How to Update Applications, ZENworks Application Objects, and snAppShots Residing on Multiple Servers: Part 2
Articles and Tips: article
Directory Engineer
Phoenix Home Life
Michael_LeeE@phl.com
01 Aug 2000
This series demonstrates the ability to transfer new or updated ZENworks Application objects to other servers. Part 1 discussed snAppShots, copying an application, software repoication system design and goals, and development tools. Part 2 discusses the software replication system process, Sendoff, Replicat, Syncup, Resetsnd, and logic pieces.
Software Replication System Process
The Software Distribution System consists of several processes:
The Step 1 process consists of the comparison process and AOT creation process and is manually run from a PC.
The Step 2 process consists of selecting the package, selecting the servers to receive the package, creating the control and zip files and creating the ZEN application objects. It is also run manually from a PC.
The Sendoff process consists of sending the package files to the field servers and runs automatically on the staging server.
The Replicat process consists of unzipping and moving the files and application objects to their correct locations and runs automatically on each field server.
The Rollback process consists of removing the effects of a package and can be run manually on a field server. It is an optional process that is run manually.
Step 1 Process
Once it is determined that a software update is to be sent to the field offices, the Field Software Distribution (FSD) person:
Runs the DOS batch file Step 1, located in the DATA:\REPLICAT\ PROGRAMS directory. This batch file appends to the PATH environment variable to allow the Perl executables to be found and runs the step1.pl Perl script.
Selects the application and clicks on the Continue button (see Figure 1).
Figure 1: The application selection screen.

The Step 1 process compares the changed files and directories with the original files and directories stored on the reference volumes. The differences detected are written to an ASCII log file stored in the DATA:\REPLICAT\LOGS diretory.
The process uses the APPXPORT program to export the ZENworks Application object to an AOT file. This AOT file is used in the Step 2 process to create new ZENworks Application objects that will be moved to the office's NDS containers. Step 1 creates a DOS batch (BAT) file containg the commands to execute, and uses the Perl system command to execute the batch file's commands.
The Step 1 process compares the file size and time stamp to determine if there has been a change (running a checksum on every file would take a much greater amount of time). When the program completes its check, it displays the Sequence Number or Package Number. This number is noted by the FSD person. Every time Step 1 is run, the Package Number is incremented by one from the previous time Step 1 was run. This number is crucial since an application may have multiple package numbers if Step 1 has been run multiple times for an application. The FSD person needs to select the correct package to apply to the field offices.
How does just selecting an application and clicking the Continue button tell the Step 1 process what volumes, directories, and files to compare? Each application has an Application File, as shown in Figure 2.
Figure 2: An example of an Application File.
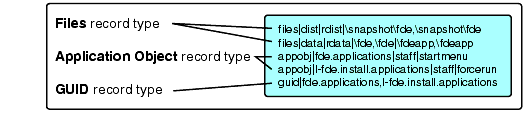
When this sample FDE application is selected, the Step 1 process reads this ASCII file to determine which volumes, directories and files to use for comparison. Step 1 also uses this file to determine what AOT files to create from which existing ZENworks Application objects.
The fields within each record in this file are delimited with the "|" character. Within a field, the "," character may be used.
Files Record Type. The Files record type deals with volumes, directories, and files. Each volume has a separate Files record. The fields of this record type are as follows:
Change volume. This is the name of the volume where changes or updates were made.
Reference volume. This is the name of the volume where the directories and files are the same as those on the field servers. (Note that I did not have to use a separate reference volume. I could have used the same volume as the change volume.)
Directories. This specifies the directories on the change volume and the reference volume separated by the "," character. (Note the second line of the example. There may be a multiple number of directories on a volume for comparison. The directory pair must be delimited with a "|" character.)
In the first line of the example, dist is the change volume, rdist is the reference volume, and \snapshot\fde, \snapshot\fde are the directories.
Application Object Record Type. The Application Object record type deals with the ZENworks Application objects. Each object has a separate appobj record. The fields of this record type are as follows:
Application object. This is the name of the Application object in reference to the office container. Install Application objects begin with the letter I. (Note in the fourth line of the example that the Application object is named I-fde.install.applications.)
Association. This is in reference to the office container, the container, group, or user to which the ZEN application object is associated with (if applicable). The "." character indicates an association with the office container.
Association type. This indicates how the application will be applied. Multiple association types can be separated with a space character.
In the third line of the example,fde.applications is the Application object; staff is the container; and startmenu is how the application will be applied.
GUID Record Type. The GUID record type deals with creating one guid number for multiple ZENworks Application objects. Only one guid record is needed to synchronize multiple objects:
Application objects. This is a list of ZENworks Application objects given the same guid number. The list must be delimited with a "," character.
In the last line of the example,fde.applications, I-fde.applications are the ZENworks Application objects that will be guid synchronized.
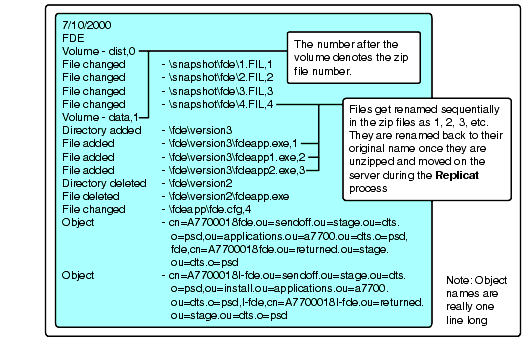
Change File. The Change File that is a result of running Step 1 is an ASCII file that shows the changes detected during the running of Step 1. Once again, this file is stored in the DATA:\REPLICAT\LOGS directory. The naming convention is CHG###.TXT, substituting the ### with the sequence number that was automatically generated during Step 1 (see Figure 3).
Figure 3: An example of a Change File.
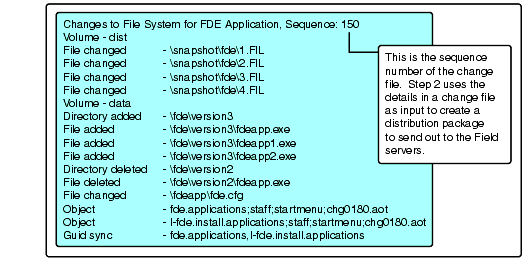
The TXT extension is used for easy retrieval into Notepad. Because this is an ASCII file, it is easily modified. For example, if a file is a data file and should not be sent out, the line can simply be deleted.
The last three lines in this example deal with the ZENworks Application objects. As you can see, both Object lines end with the actual AOT file that was created during Step 1. The "018" within the name is the Package or Sequence Number; the following digit is the object number, starting sequentially with the number 0.
This Change File is used in Step 2 to create the zip file(s), the control file, and the ZENworks Application objects.
Step 2 Process
The Step 2 process is run when a package is to be distributed to a field server. Initially, we apply a package to a "Model Office" server where extensive testing of the package is made before it is sent out to the field offices. To send a software update to a field offices, the Field Software Distribution (FSD) person does the following:
Runs the DOS batch file named Step 2, located in the DATA:\REPLICAT\ PROGRAMS directory. This batch file appends to the PATH environment variable to allow the Perl executables to be found and runs the step2.pl Perl script.
Selects the application and clicks on the Continue button.
Enters the sequence number and clicks Continue.
Selects the offices to receive the package and clicks Continue.
Enters the date to apply the package and clicks Continue.
The Step 2 process reads in the Change File output from Step 1 and:
Copies all the added or changed files.
Creates a zip of the added or changed files (one for each volume).
Creates a Control File for each office.
Creates ZENworks Application objects from the AOT files.
Modifies the Sendoff.fil with entries to schedule the files to be sent to a field server. This Sendoff.fil is created in the DATA:\REPLICAT\SENDOFF directory.
Updates the log files in the DATA:\REPLICAT\LOGS directory with the office names receiving packages.
The screen shown in Figure 4 is displayed when Step 2 starts.
Figure 4: Step 2 opening screen.
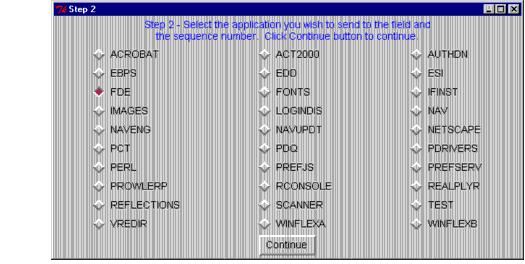
When the application is selected and the Continue button is clicked, the screen shown in Figure 5 appears.
Figure 5: Sequence Number prompt.

The application and Sequence Number are then validated. If a zip file already exists (probably this package has been sent out to the Model Office so the zip file has been created already and testing has been completed on this package), the screen shown in Figure 6 appears.
Figure 6: Prompt to use existing zip file.

The next screen (see Figure 7) displays the offices available to receive the package. These offices are taken from an ASCII file, so it is easy to add or remove offices.
Figure 7: Selecting offices to receive the FDE package.
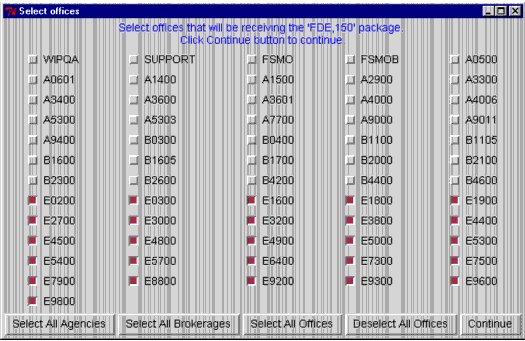
Once the offices are selected and the Continue button is clicked, a prompt appears for the package roll-out date. If the package is to take effect as soon as possible, the default date is used. If not, a date in the format MM/DD/YYYY is entered.
At this point, all the files and ZENworks Application objects are created or updated. The Step 2 process uses the APPCREAT program described earlier to create the Application object from an AOT file, created in Step 1. The APPASSOC program is used to associate the objects and the GUIDSYNC program may be used to GUID sync the objects. Step 2 creates a batch (BAT) file with the commands to execute and uses the Perl system command to run the batch file (see Figure 8).
Figure 8: A sample control file.
The date on the first line tells the Replicat process when to roll out the package.
The Object lines at the end of this file tell the Perl script that runs on the server what ZENworks Application object (that is currently in the .ou=sendoff.ou=stage .ou=dts.o=psd container) to move. These lines' fields are delimited with the "," character. In the last line, the object A770008I-fde will be moved to the .ou=install.ou=applications.ou=a7700.ou=dts.o=psd container and given the I-fde object name. For the Rollback process, the original object will be moved to the .ou=returned.ou=stage.ou=dts.o=psd container.
Sendoff Process
At 5:00 p.m., the Sendoff process on the staging server runs, using the Sendoff.fil as input. The Sendoff.fil was created during Step 2, to store what should be sent via FTP to a field server. An example of this file is shown in Figure 9.
Figure 9: A sample Sendoff.fil.
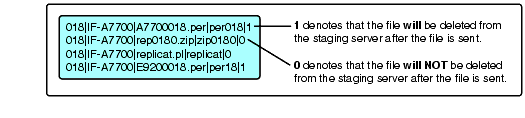
In line 1 of the above example:
018 identifies the package number.
IF-A7700 is the file server to which the package is being sent.
A770018.per is the control file name. There is one control file for each office selected to receive the update.
per018 is the name given to the control file when it is copied to the server.
1 denotes that the control file will be deleted from the staging server after the file is sent.
In line 2 of the above example:
rep0180.zip is the name of the zip file that contains the update files. The first three numbers in this file name represent the package number. The fourth number in the file name represents the volume number. There will be one zip file for each volume. If there is more than one volume, the zip files will be numbered consecutively (for example, rep0180.zip, rep0181.zip, and so on).
The 0 in the last position denotes that the zip file will not be deleted from the staging server after the file is sent.
The Sendoff process creates Perl scripts and executes them automatically. This allows the process to send to the field servers up to 20 files at a time. Every 20 seconds, the Sendoff process checks whether any sending process has completed and starts sending the next file.
If the recipient field server is not responding or there is an error in transmitting the file, the send request is put into a resend queue. Attempts will be made to resend these entries in this queue after all other sends have been made. Before sending a file, the Sendoff process checks the time to be sure it is within the transfer time described earlier (5:00 p.m. to 6:00 a.m.). After the file is sent, it is compared in size to the original. If the sizes do not match, the send request is put into the resend queue.
Replicat Process
At 4:00 a.m., each field server runs the Replicat process to check for updates to be applied to the server. In the case of an update, a check is made to be sure this package update has not already been applied to this server. The Replicat process runs the UNZIP.NLM to unzip the files and waits for the unzip to complete before continuing.
If any files are missing from the zipped file, the Replicat process rolls back any changes made due to this package. An additional script is also run to deal with any unusual updates (such as modifying ASCII files or moving data files). All logging is sent back to the staging server. The control file created in Step 2 is used as the input to this process.
Syncup Process
Syncup is a process run by the FSD person to apply a package to the reference directories and files after a package has been sent and applied to the field servers. This Perl script is run on the Windows PC and reads in the Change File output from Step 1. It applies all the change volume changes to the reference volumes on the staging server. W
hen this process completes, the reference volumes and the change volumes on the staging server match the volumes of the field servers. This Syncup process does not make any changes to any Application objects.
Resetsnd Process
When the staging server loads NetWare, the Resetsnd process is run. This Perl script checks for any transfers that were not completed by the Sendoff process and starts the Sendoff process to allow the transfers to complete. This is valuable in case the staging server, for some reason, gets rebooted during the Sendoff process. The Resetsnd process determines the point where the Sendoff process was when the process was aborted and "fixes" the Sendoff.fil before restarting the Sendoff Perl script, if needed.
Logic Pieces
This section describes the logic pieces of the in-house application.
Alphabetizing Directory and File Listings
I wanted my output from Step 1 to show the changes grouped alphabetically by directories, then grouped alphabetically by files. (I like it when directory or file listings are done alphabetically). What would be the logic behind finding the directories and files added, modified or deleted? To compare directories, Step 1 goes through this process:
Two arrays holding the directory contents are created, one from the change volume and one from the reference volume.
Each entry of these two arrays is checked to determine whether it is a directory or a file. Depending on the result, the entry is put into two other arrays resulting in four arrays: a change-directory array, a change-file array, a reference-directory array, and a reference- file array.
The four arrays are sorted.
Note: I will describe the comparison of the file arrays, although the logic of the comparison of the directory arrays is very similar.
The two file arrays are compared to each other. If a file is in the change array but not in the reference array, it is put into an add array. If a file is not in the change array but is in the reference array, it is put into a delete array. If a file is in both the change array and the reference array, it is put into a both array.
Using pointers to cycle through comparing two arrays is not difficult, but what happens when the process hits the end of an array? I did not want special logic that would check for either of the arrays to end. I wanted the logic of the routine to be consistent.
To make this work, at the end of both arrays, I added my own entries. The entries would be a value that would always exist at the end of a sorted list and would never be a normal entry in a directory. This entry consists of a string of 25 ASCII-255 characters. This entry would be checked so it would not be added to the both array.
The routine is programmed like this:
$ascii255 = " " x 25; # within quotes is an ascii 255 character (1)"push
(@referenceArray, $ascii255); # (2)"push (@changeArray, $ascii255); #
(2)"$cntChange = 0; # set pointer to change array to 0 # (3)"for ($cntReference
= 0; $cntReference " @referenceArray; $cntReference++) { # (4)"
while ($referenceArray[$cntReference] gt $changeArray[$cntChange] { # (5)"
push (@addEntry, $changeArray[$cntChange]); # (6)"
$cntChange++; # (7)"
}"
if ($referenceArray[$cntReference] eq $changeArray[$cntChange]) { # (8)"
push (@bothEntry, $changeArray[$cntChange]) if ($changeArray"
[$cntChange] ne $ascii255); # (9)"
$cntChange++; # (10)"
'next; # (11)"
}"
push (@deleteEntry, $referenceArray[$cntReference]); # (12)"}"
The key steps referenced by number in this routine are described below.
(1) Create a variable holding the 25 ASCII-255 characters.
(2) Add the ASCII-255 character entry to the end of each array.
(3) Initialize to zero the change array's counter (the first entry of an array is the zero entry).
(4) For loop: initialize to zero the reference array's counter; continue through the loop until the counter increments to the reference array's last entry; increment the counter by one.
(5) While loop: continue in loop as long as the reference array's entry is considered greater than the change array's entry (there would be a change array entry that does not exist in the reference array).
(6) Add the change array's entry to the add-entry array.
(7) Increment the change array's counter by one.
(8) If the reference array's entry is considered equal to the change array's entry, execute the next couple of lines.
(9) Add the change array's entry to the both-entry array as long as the entry is not equal to the ASCII-255 character entry.
(10) Increment the change array's counter by one.
(11) Go to the next value within the for loop
(12) Add the reference array's entry to the delete-entry array (if the logic hit here, there would be a reference array entry that does not exist in the change array)
The end result is three arrays: one holding files added, one holding files deleted, and one holding files stored in both directories.
Using Perl
Using Perl to manipulate NDS objects becomes very easy using the NDSm Perl modules written by Steinar Kleven. You can find more information about these modules at http://www.ahs.hist.no/distr/NDSm.
To move an object within the Replicat process that occurs on a NetWare server, the following procedure occurs:
Create a new instance of NDSm.
Log in to NDS.
Check for authentication.
Move the NDS object.
The routine is like the following:
$context = new NDSmNDSContext; # (1)
$buffer = new NDSmBuf_t; # (1)
if (($returnValue = $context-
Login (0,
cn=replicatId.ou=dts.o=psd
,
password
, 0)) != 0) { # (2)
error logic goes here (3)
}
$NDSAuthenticated = $context-
IsDSAuthenticated (); # (4)
if (! $NDSAuthenticated) {
error logic goes here # (5)
}
$returnValue = $context-
MoveObject
(
cn=a7700018fde.ou=sendoff.ou=stage.ou=dts.o=psd
,

ou=applications.ou=a7700.ou=dts.o=psd
,
fde
); # (6)
if ($returnValue != 0) {
error logic goes here # (7)
}
The key steps referenced in the code are explained below.
(1) Create the new instances.
(2) Log in to NDS with id "cn=replicatId.ou=dts.o=psd" (Id is trustee given Supervisor rights that flow down).
(3) Error logic gets filled in here.
(4) Check whether routine has authenticated to NDS.
(5) Error logic gets filled in here.
(6) Move the actual object from "cn=a7700018fde.ou=sendoff.ou=stage.ou=dts .o=psd" to "ou=applications.ou=a7700.ou=dts.o=psd" with the final name "fde".
(7) Error logic gets filled in here.
The end result is that the object is moved to the correct container.
Conclusion
This in-house process allows us to use ZENworks Application objects in all field offices and provides an easy method of updating these applications. It is a complex process, but the solution works very well and meets all of our goals.
* Originally published in Novell AppNotes
Disclaimer
The origin of this information may be internal or external to Novell. While Novell makes all reasonable efforts to verify this information, Novell does not make explicit or implied claims to its validity.