How to Use Metrowerks CodeWarrior Professional Development Kit for NetWare
Articles and Tips: article
Technical Writer
Novell Development Kit Team
tturner@novell.com
01 Jul 2000
Novell and Metrowerks have joined forces to provide CodeWarrior for NetWare, an integrated development environment (IDE) for creating NetWare Loadable Modules, drivers for NetWare, and NDS-enabled applications. This AppNote takes you through the steps involved in creating a CodeWarrior project, then compiling and linking that project into a working application.
- Introduction
- Updating the PDK 2. 1 Default Libraries
- Creating a New Project
- Selecting the Project Settings
- Modifying the Project Contents
- Modifying a File's Contents
- Building and Debugging a Project
- Locating the Command-Line Tools
- For More Information
Introduction
CodeWarrior Professional Development Kit (PDK) for NetWare, an add-on to CodeWarrior for Windows, provides the capability to edit, compile, and debug NetWare Loadable Module (NLM) applications for NetWare using C, C++, and Java (future debugging support). With the CodeWarrior PDK for NetWare, you can take advantage of Novell Directory Services (NDS) and other network services available on Novell's intelligent network server platform to add intelligence, manageability, and security to cross-platform network solutions that can be distributed across the enterprise and the World Wide Web.
CodeWarrior benefits include the following:
It comes with C/C++ and Java language support, NetWare Software Development Kit (SDK) and Groupwise SDKs, Device Driver Development Kit (DDK), and a number of other libraries necessary for NetWare application development.
It supports the development of both server-based applications (such as NetWare Loadable Modules and Java applications) and client applications for Windows 95/98/NT and Java, allowing you to develop both client- and server-based applications using the same tools.
As with the previous release (the first ever Novell certified development tools for developing client applications on NetWare), this new set of tools assures you that when you develop with CodeWarrior, your applications will run smoothly on NetWare.
This AppNote guides you through the steps of updating the PDK 2.1 default libraries, creating a new project, selecting the project settings, modifying the project contents, modifying a file's contents, building and debugging a project, and locating the command-line tools.
To access this material online, go to /ndk/cwpdk.htmand select the documentation icon.
Updating the PDK 2. 1 Default Libraries
After installing CodeWarrior PDK for NetWare 2. 1, you need to rebuild the default project libraries.
Note: Previous CodeWarrior PDK versions included older libraries than the libraries that were shipping on the NDK at that time. To ensure your libraries are current, install them from the following site: /ndk/cwpdk.htm
Start CodeWarrior.
Open the following project file:
c:/program files/metrowerks/codewarrior/novell support/metrowerks support/libraries/runtime/msl c++. novell(. mcp)
Select NLM All as the target, as shown in Figure 1.
Figure 1: Selecting the target.

Select Project | Remove Object Code.
In the resulting dialog window, select All Targets.
To rebuild the project, select Project | Make (or press <F7<).
Exit this project.
Open the following project file:
c:/program files/metrowerks/codewarrior/novell support/metrowerks support/libraries/runtime/novell runtime(. mcp)
Select All Libraries as the target.
Select Project | Remove Object Code.
In the resulting dialog window, select All Targets.
To rebuild the project, select Project | Make (or press <F7<).
Exit this project.
Creating a New Project
You're now ready to begin creating your first CodeWarrior project and to select the stationery for that project.
Start CodeWarrior.
Select File | New.
Select NetWare Stationery from the list of project types.
Note: You can select Empty Project, which will allow you to create a project from scratch. However, because of the difficulties involved in ensuring that the correct libraries and files are included and specifying the correct compile and linker settings, we do not recommend this option.
Specify a location for your project in the Location field.
Specify your project's name in the Project Name field, as shown in Figure 2.
Figure 2: Specifying a project name.
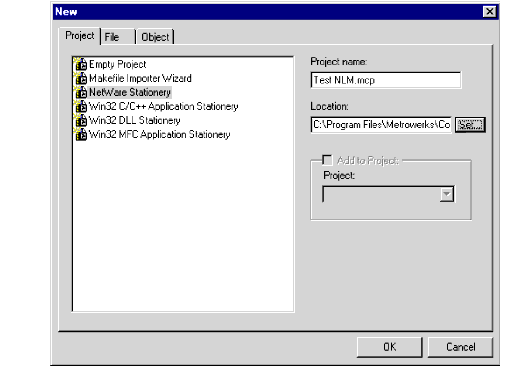
Click OK to save your project.
Selecting the Project Stationery
In CodeWarrior, the template for your project is called the project's stationery. You'll now select that stationery.
Select the stationery for your project.
Click OK.
CodeWarrior now opens a Project window for your project.
Selecting the Project Settings
CodeWarrior uses a target--a mechanism that tracks all information necessary to compile and link your project. You can optimize your files and control the build output by changing the default settings for your target.
You'll now select the appropriate target settings that apply to NLM development. (For a description of other settings, see Metrowerks' IDE User Guide.)
Ensure the correct target is selected.
The target for which you will be selecting various options appears in a drop-down list at the top of your project window, as shown in Figure 3.
Figure 3: Selecting the target in the project window.

Select Edit | [Your Target's Name] Settings.
Select the settings recommended for NetWare, as outlined in the following sections:
Selecting the Target Settings
Specifying the Current Libraries
Selecting the NLM Target
Selecting the x86 Processor
Selecting the NLM Linker
After selecting the appropriate settings, click Save.
Exit the Settings window.
Selecting the Target Settings
When you select a linker, you also imply a target OS. For that reason, the settings in this panel affect the settings for other panels and must be set first.
Expand the Target options.
Selecting Target Settings, as shown in Figure 4.
Figure 4: Selecting Target Settings.
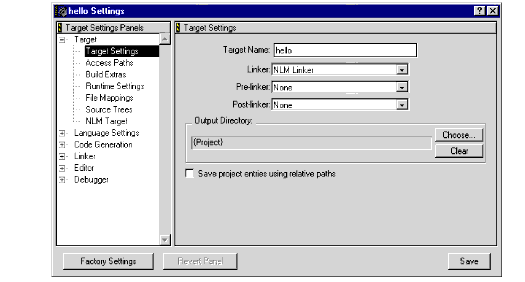
Specify the Target Name.
This name is not the name of your output file but is for your personal use. See "Selecting the NLM Target," below, for instructions on selecting the name of your output file.
In the Linker field, select the NLM Linker.
For Windows 32-bit binaries, you should select the Win32 x86 linker.
Ensure the Pre- and Post-linker fields are set to None.
These linkers are not used in NetWare.
To specify the directory in which your linked output file will be placed, select Choose.
By default, your file will be placed in the directory that contains your project file.
To add files with the same name to the project, select the box next to this option.
Otherwise, each file in the project must have its own unique name.
Specifying the Current Libraries
You'll now tell CodeWarrior where to find the current NDK libraries that you previously installed.
Select Access Paths in the list of Target options.
Select System Paths.
Select Add.
Expand the resulting directory structure down to where you installed the current NDK libraries.
The default location is c:/novell/ndk/.
Select the replacement path to use for the current libraries.
Click OK.
To highlight the old path to remove, select the old path.
Click Remove.
Continue following Steps 3-8 until you've replaced all the default library paths with the current library paths.
Selecting the NLM Target
Now you'll indicate the type of file that you want to create.
Select NLM Target in the list of Target options, as shown in Figure 5.
Figure 5: Selecting NLM Target in the list of Target options.
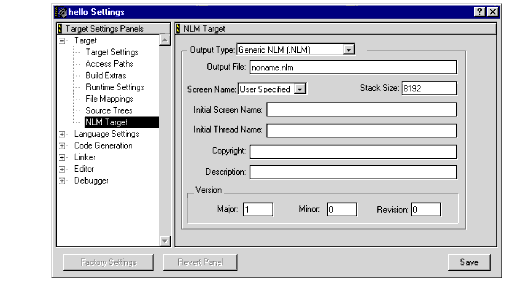
Select the Output Type for your file from the following types:
Generic NLM (. NLM) creates an NLM.
LAN Driver (. NLM) creates a LAN driver module.
Disk Driver (. DSK) creates a disk driver module.
Name Space Support (. NAM) creates a name space NLM.
Utility (. NLM) creates a utility module.
Mirrored Server Link (. MSL) creates a mirrored server link module.
OS NLM (. NLM) creates an operating system module.
Paged High OS NLM (. NLM) creates an operating system module that can be "paged" to high memory.
Host Adapter (. HAM) creates a host adapter module.
Custom Device (. CDM) creates a custom device module.
This is equivalent to the TYPE command.
Specify the name of the Output File.
Select the Screen Name option:
User Specified indicates that you will specify the name of the output screen in the Initial Screen Name field.
Console indicates that the default console screen will be used for output.
No Default indicates that no output screen will display.
You need to create an output screen; otherwise, functions such as printf() will fail since there isn't a screen to write to.
If you selected User Specified as the screen name, specify the name of the output screen in the Initial Screen Name field.
In the Initial Thread Name field, specify the name of the thread that CodeWarrior will use within the debugger.
In the Stack Size field, specify the size (in bytes) of the module's runtime stack (minimum size is 2048).
This is equivalent to the STACK and STACKSIZE commands.
Specify the Copyright text to be displayed on the screen when the module is loaded.
This is equivalent to the COPYRIGHT command.
Specify the Description text to be displayed on the screen when the module is loaded.
If this field is blank or there is no DESCRIPTION command in the project's linker command file, an error will result.
In the Major, Minor, and Revision fields, specify the version information.
The module's minor version number is limited to 0 through 99.
The module's revision number is limited to 0 through 26, where 1-26 specify the corresponding letter of the alphabet. Zero indicates that there won't be a revision digit in the module's version information.
These fields are equivalent to the VERSION command.
Selecting the x86 Processor
You're about half-way finished. It's time to select the processor that you want your NLM to run on.
Expand the Code Generation options.
Select x86 Processor, as shown in Figure 6.
Figure 6: Selecting x86 Processor.
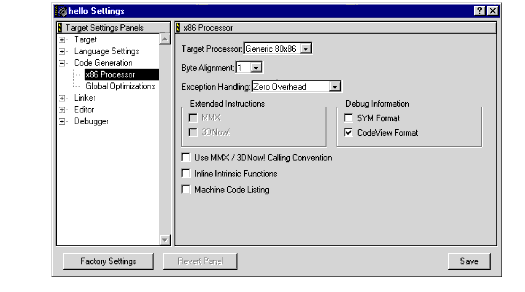
Select the Target Processor from the following:
Generic 80x86 creates modules for Intel 80386, Intel 80486, all Intel Pentium, and compatible processors.
Pentium creates modules for all Intel Pentium and compatible processors.
Pentium Pro creates modules for Intel Pentium Pro and compatible processors.
Pentium II creates modules for Intel Pentium II and compatible processors.
AMD K6 creates modules for AMD's K6 processor.
Select 1 in the Byte Alignment field.
You must choose single-byte alignment or your structures will not match the NLM libraries.
Ignore the Exception Handling field unless you are developing C++ applications.
Select the Extended Instructions options that you want to take advantage of in your processor's extended instruction set:
MMX improves multimedia performance for Pentium II processors.
3DNow! generates MMX and 3DNow! extensions for AMD K6 processors.
Select the format in which you want the symbolic debugging information to be created:
SYM Format
CodeView Format
If you want to generate 3DNow! extensions with speed optimizations, select the Use MMX/3DNow! Calling Convention box.
If you want intrinsic functions to be inserted (rather than called with a subroutine), select the Inline Intrinsic Functions box.
If you want to generate a list of source files that includes your original source code and the machine code generated by CodeWarrior, select the Machine Code Listing box.
Note: This is useful for debugging.
Selecting the NLM Linker
This last group of settings controls your linker.
Expand the Linker options.
Select the NLM Linker option, as shown in Figure 7.
Figure 7: Selecting the NLM Linker option.
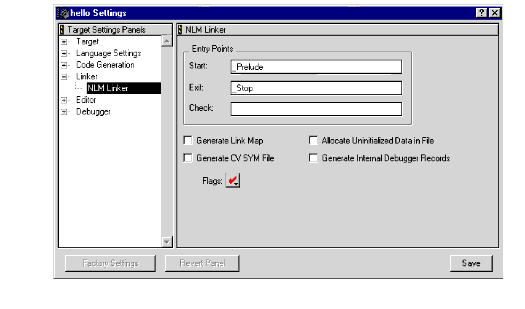
In the Start fields, specify the name of the routine to call when launching the program.
This is equivalent to the START command.
In the Exit field, specify the name of the routine to call before exiting the program.
This is equivalent to the EXIT command.
_Prelude and _Stop are the default routines for CLIB and are found in mwcrtl. lib, which CodeWarrior automatically links in.
If you're developing to LibC, specify the _LibCPrelude and _LibCPostlude routines found in libcpre.o and ensure this file is linked in.
In the Check field, specify the name of an NLM function to call when the operator uses the UNLOAD command.
If you want a text file to be generated that contains what was linked while the program was created, select the Generate Link Map box.
If you want a CodeView-compatible symbol file to be generated that can be used with the debugger, select the Generate CV SYM File box.
If you want the linker to allocate space for the NLM file's uninitialized space and to fill that space with zero values, select the Allocate Uninitialized Data in File box.
If you do not select this option, the linker will assume that memory is allocated at run time. In that case, you should specify "_mw_Prelude" in the Start field. This routine will allocate and zero out memory for any uninitialized static variables.
If you want debugger information to be generated in the output file that can be used with the debugger, select the Generate Internal Debugger Records box.
This is equivalent to the DEBUG command.
Select the Flags you want to use:
Reentrant reexecutes the NLM and overwrites any global data every time you try to load the NLM.
Do not use this flag with CLIB or LibC development.
Multiple indicates that the NLM can be loaded more than once.
Synchronize prevents other console commands from processing while the NLM is loading.
PseudoPreemption indicates that the NetWare OS will force the NLM to relinquish control the next time a file read or write system function is called if the NLM exceeds the Set Pseudo Preemption Time limit.
OS Domain indicates that the NLM must be loaded in the OS address space.
AutoUnload indicates that the NLM is unloaded when none of its entry points are being used.
Each flag you choose will be indicated by a check mark.
If you want to use flags other than those listed in this Linker section, you must use the command-line linker.
To save your selections, click Save.
Close the Settings window.
Modifying the Project Contents
You'll probably want to replace the source files that CodeWarrior automatically included as part of the default stationery.
To add files, select Project|Add Files.
You can also drag and drop files from the desktop into your project.
To add the active window, select Project | Add Window.
To remove files, select the files and press <Delete<.
Modifying a File's Contents
You're ready to begin writing code.
To open a file for editing, double-click the file's name in the project window.
You can also select the file and press <Enter<.
Edit the file.
You can use any editor to create and edit your file as long as the file is saved in plain text. However, Metrowerks' IDE might not know which files have been updated since the most recent build.
Save the file.
Building and Debugging a Project
Once you've written and edited all your code files, you're ready to compile and link those files.
Select Project | Make (or press <F7<).
Any warnings or errors will be displayed in the message window.
To generate debugging information, select Project>Enable Debugger.
If the code was previously compiled without generating any debugging information, you'll have to press <F7< again to recompile your code.
To use the debugger, select Project | Debug.
Locating the Command-Line Tools
The default location for the command-line tools is c:/program files/metrowerks/codewarrior/tools/command line tools/, where:
mwccnlm.exe is the command-line compiler
mwldnlm.exe is the command-line linker
mwasmnlm.exe is the command-line assembler
However, you can move these tools to any location that's convenient to your development environment.
To use the command-line tools, you'll need two additional files:
|
Default Location
|
Your Location
|
|
c:/programfiles/metrowerks/codewarrior/bin/lmgr326b. dll |
This DLL must reside in the same directory as your command-line tools or it must be assessible in a search path. |
|
c:/programfiles/metrowerks/license. dat |
Ensure that the environment variable,LM_LICENSE_FILE, is set to the paththat contains your license file. |
For help with any of these tools, enter
[file name] -help
at the command line after installing that tool.
For More Information
For more information about CodeWarrior, refer to the following sources:
Metrowerks Web site at http://www.metrowerks.com.
Metrowerks' book, Targeting NetWare, in both HTML and PDF formats, at the default installation location of c:/program files/metrowerks/ codewarrior/codewarrior documentation.
Metrowerks' online CodeWarrior documentation at http://www.metrowerks.com/tools/documentation/overview.stm.
From this documentation site, you can access a variety of documents including the following:
IDE User Guide (Mac OS, Windows 95/NT 4. 0)
CodeWarrior Error Reference
CodeWarrior IDE Guide
CodeWarrior IDE Tutorials
CodeWarrior Quick Tips Guide
Metrowerks' recorded NetWare incidents at http://www.metrowerks.com/support/faq.
From the Target field's drop-down menu, select NetWare.
Free training on a variety of programming subjects is provided by CodeWarriorU at http://www.codewarrioru.com/CodeWarriorU/.
* Originally published in Novell AppNotes
Disclaimer
The origin of this information may be internal or external to Novell. While Novell makes all reasonable efforts to verify this information, Novell does not make explicit or implied claims to its validity.