Implementing Software Metering with ZENworks
Articles and Tips: article
Consultant, MCNE, MCNI
Novell Consulting
01 Apr 2000
ZENworks is an acronym that stands for Zero Effort Networking. The name was chosen to indicate that, with this product, very little effort is needed to manage users and resources. It's a good choice of names, as ZENworks automates desktop management using the power of Novell Directory Services (NDS) to remotely provide application management, software distribution, software metering, desktop management, and workstation maintenance.
This AppNote describes the features, system requirements, installation, and implementation steps involved in setting up the software metering feature of ZENworks. It is assumed the reader is familiar with ZENworks, NAL (Novell Application Launcher), NALEXPLD (NAL Explorer), and, in particular, knowledge of how to create Application objects. For more information on Application objects, see the AppNote entitled "Using ZENworks to Distribute and Manage Applications on a Network" in the October 1998 issue of Novell AppNotes see www.novell.com/research/appnotes/1998/02/index.htm.
Additional information about ZENworks is available on Novell's Web site at:
http://www.novell.com/products/nds/zenworks
and on the ZENworks Cool Solutions site at:
http://www.novell.com/coolsolutions/zenworks
Copyright © 2000 by Novell, Inc. All rights reserved. No part of this document may be reproduced or transmitted in any form or by any means, electronic or mechanical, including photocopying and recording, for any purpose without the express written permission of Novell.
All product names mentioned are trademarks of their respective companies or distributors.
- Overview of Software Metering
- Setting Up Software Metering
- Creating a License Certificate
- What Will the Users See?
- Getting Reports on Software Usage
- Conclusion
Overview of Software Metering
Software metering is the means by which you can track software usage and comply with the particular software licensing agreements you may have. Novell Licensing Services (NLS) enables you to make use of and manage license units and to comply with the particular licensing requirements you have.
Any application that you have running on your network or workstation can be set up to become a metered application. As long as the application is delivered to workstations' desktops via NAL (Novell Application Launcher) or NALEXPLD (Novell Application Launcher Explorer), software metering can control the license.
Key Components of NLS
NLS consists of the following pieces:
License Service Provider (LSP)
NLS Clients
NDS objects (LSP objects, License Certificate objects, and License Container objects)
License Service Provider (LSP). The License Service Provider is the main software that controls licensing. The LSP is contained within the NLSLSP.NLM module that is installed on and run on a NetWare 4.11 or higher server. The LSP handles requests from NLS clients and maintains the licensing certificates. These certificates are stored in the NDS Directory tree, which means they will follow a user from machine to machine, as long as the machines are running an NLS client.
NLS Client. The NLS client is software the requests licensing services from LSPs. This functionality is included with the standard Novell Client 32. If an existing client has a connection to a NetWare server running an LSP, the client will communicate directly with that LSP. If the client doesn't have a connection to a server running an LSP, it will search up the tree from the user's context for an LSP.
NDS Objects. Besides the LSP, installing software metering creates other NDS objects. A License Certificate object is an NDS object that represents a license certificate. License Container objects contain the individual Certificate objects for each application. A new License Container object is created for each new application. The LSP specifies how the NDS tree is searched for the license: to the root of the tree, or to the root of the local partition.
Setting Up Software Metering
This section outlines the steps required to set up and install software metering on your network.
Checking the System Requirements
One of the most important steps in setting up software metering is to make sure your network meets the minimum system requirements. The following is a list of those requirements for setting up software metering:
ZENworks 1.1 or higher installed
NetWare 4.11 with Support Pack 6 or later (for supporting Novell Licensing Services), NetWare 4.2 or higher, or NetWare 5.x (including NetWare for Small Business)
NLS (Novell Licensing Services) installed and running on at least one server
You should have Supervisor rights to the [Root] of the NDS tree where you are going to install the Application Management piece of ZENworks.
Users must have Read and File Scan rights to the directory in which you will install NAL (Novell Application Launcher). The default is to install it to SYS:PUBLIC, where users already have these rights.
Users must have ample rights to the directories where you will install the applications they will access.
It is essential that users be attached to a NetWare server that provides Novell licensing services.
Installation Steps
To install software metering, complete the following steps:
From a network workstation, log in to the NDS tree as the Admin user (or any User object that has supervisor rights to the [Root]).
Insert the ZENworks CD at the workstation. If the CD does not auto-start, execute the following command:
<CD-ROM drive letter<:\WINSETUP.EXE
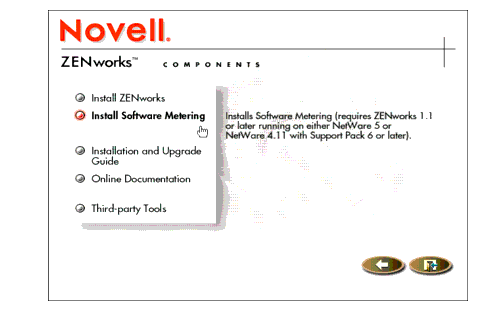
When the initial screen appears, select the following options: English | ZENworks | Install Software Metering (see Figure 1).
Figure 1: Selecting the option to Install Software Metering.
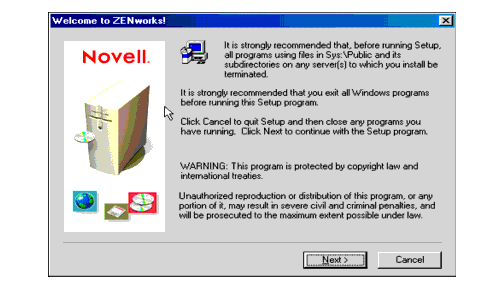
The Welcome to ZENworks screen is displayed, as shown in Figure 2. Click Next to continue.
Figure 2: The Welcome to ZENworks screen.
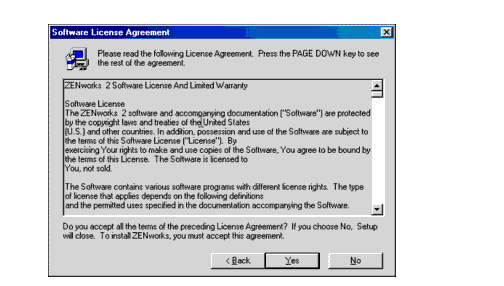
Read the information on the Software Licensing Agreement screen (see Figure 3) and then click Yes, indicating that you accept all terms of the agreement.
Figure 3: Accepting the terms of the Software Licence Agreement.
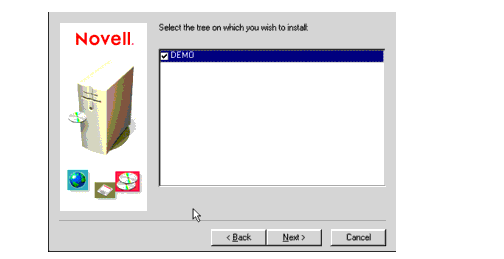
If you are attached to multiple trees, the next screen asks you to select the tree(s) that you want to enable for software metering (see Figure 4). Check the appropriate tree(s) and click Next to continue.
Figure 4: Selecting the NDS tree(s) in which you want to enable software metering.
On the next screen (see Figure 5), select the server(s) on which you want to install the software metering file. This will allow the NetWare Administrator utility (NWADMIN32.EXE) to recognize the appropriate snap-in to manage software metering licenses. Click Next to continue.
Figure 5: Selecting the server(s) on which to install the software metering file.
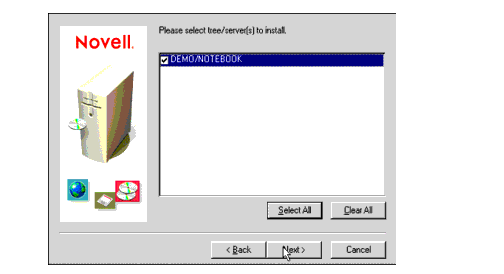
Next will appear the screen to select the appropriate language. English is the default, but you can select another language if you want. Click Next.
The Current Settings summary screen appears, as shown in Figure 6. Verify that the options are correct, and then click Next to start copying the files.
Figure 6: Reviewing the current installation settings before copying the files.
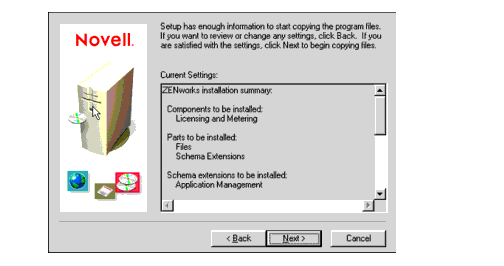
Once the files are copied, the Setup Complete screen appears, as shown in Figure 7. At this point you can choose to view the Read Me file and the Setup Log file if you want. Click Finish to complete the setup.
Figure 7: Completing the ZENworks software metering setup process.
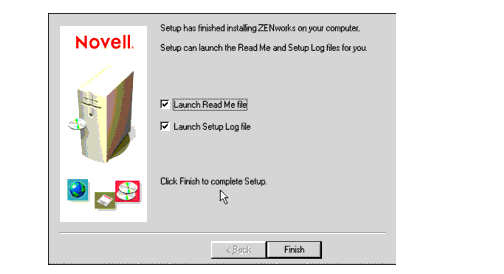
Software metering is now installed and enabled on the selected server(s).
Creating a License Certificate
This section assumes that an Application object has already been created for the software you want to meter (see the October 1998 AppNote for details on creating an Application object). It doesn't matter if this application is installed on the server or on a local hard drive. What does matter is that it is delivered and accessed through NAL (Novell Application Launcher) or NALEXPLD (NAL Explorer).
Another important point to understand is that when you create the first License Certificate under a particular name, a container is created and inside that container will be the certificate. If you create another License Certificate under the same name, a new container is not created, just an additional License Certificate object within that container.
Start the NetWare Administrator utility (NWADMIN32.EXE, located in SYS:PUBLIC\WIN32).
Highlight the container where you would like to create the License Certificate.
Select the Tools | Novell Licensing Services | Add Licenses menu options.
The "Add a License Certificate" screen appears (see Figure 8). This is where you will actually create a License Container, and inside of that container will appear a License Certificate for each set of License Units.
Figure 8: Check the "License Metering" option to create a new License Certificate.

Click on the "License Metering" button, and then click OK. The "Create a Metered Certificate" screen appears, as shown in Figure 9.
Figure 9: Specifying the options for your License Certificate.
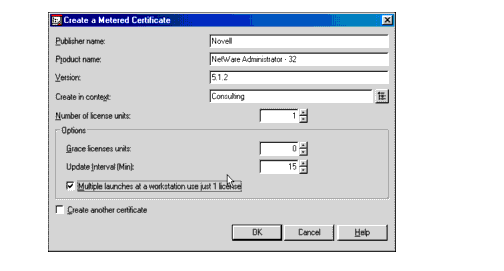
Enter the requested information as follows:
Publisher name. This is a user-defined field and can be any alphanumeric string.
Product name. This is a user-defined field and can be any alphanumeric string.
Version. This is a user-defined field and can be any alphanumeric string.
Create in Context. This should be the container that you highlighted in Step 2. If it is not, use the browse button to change to the appropriate container.
Number of license units. This should be the actual number of legal copies of this software that you own.
Grace licenses units. If you have reached the maximum number of users for this application, this option allows additional users to run the application on an overdraft basis until you have time to purchase additional licenses. You can thus comply with your software license agreement without interrupting user productivity.
Enter the number of these "grace" licenses you will allow. If you do not enter a number, users will not be allowed to open additional copies of this application beyond the number specified in Number of License Units. To ensure that no one is denied access to this application, enter a number that protects the users as well as the software vendor.
Update interval (min). This option determines how often, in minutes, an LSP polls the certificate to see if anything has changed. Setting the value to 0 tells an LSP not to poll the certificate at all.
Multiple launches at a workstation use just 1 license. Click this checkbox if you want multiple launches of the application at a single workstation to use only one license. However, if you do, check your software licensing agreement to make sure you are in compliance.
Click OK when you are finished.
If you want to create additional licenses for the same applications, follow these same steps. It is very important that you use the exact same name. If you choose a different name, a new License Container and Certificate will be created.
Assigning a License Certificate to an Application
At this point, you have created a License Certificate. You now need to assign that certificate to an application. To do this, follow these steps:
In NWAdmin, browse to the Application object and go into the Details tab for that object.
Select the Software Metering tab (see Figure 10).
Check the box to "Use Novell Licensing and Metering for this Application".
Click on browse button and walk the NDS tree until you find the container for the License Certificate you created in the previous section.
Figure 10: Checking the Software Metering options for the Application object.
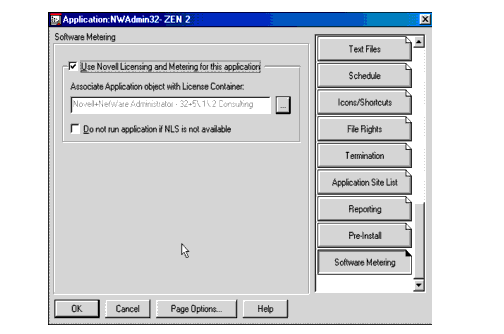
Make a selection for the option "Do not run application if NLS is not available". If you check this option, this application will not run if Novell Licensing Services is not running. (This could be the case if NLSLSP.NLM is not running on one of the servers.)
Click OK to save your changes.
Looking at the Detailed Information for a License Container
As you work with software metering, you might need to view information about the License Certificate for a certain application. For example, you may want to validate that you have the correct number of licenses, thus saving money by not purchasing too many licenses. This information can also show which users are using an application. This may be helpful if you need to fix a database program and you want to notify each user to quit the program so the repair can be made.
In NWAdmin, highlight the License Certificate you just created.
Click on the Details tab for this Certificate. This is really known as a License Container. The certificate represents each individual License Certificate that you create in the steps for "Creating a License Certificate" above.
The "General" page (see Figure 11) allows you to see information about all License Certificates created in this License Container.
Figure 11: Viewing general information about the License Certificates.
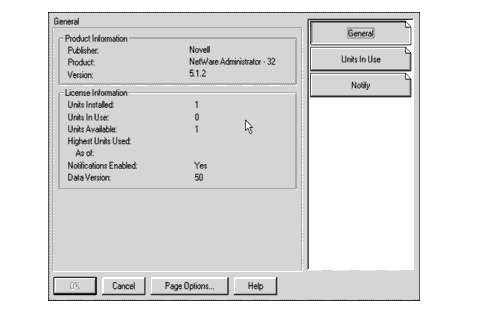
The "Units In Use" page (not shown) will allow you to see how many Units are in use, by whom, and how many each person has in use. It will also allow you to see a "Usage For" set of information.
The "Notify" page allows you to specify who should be notified if there is a problem with this License Container. There are several situations that might cause NLS to send a notification about a license for a product. For example, a policy manager might be unable to convey a license to a User object. These notifications are sent to one or more designated persons. The Notify property page lists User or Group objects that have been designated to receive these notifications. NLS uses two methods to send these notifications:
The NetWare Broadcast utility
E-mail
Looking at the Detailed Information for a License Certificate
You can also view the details on just a particular license of this software. This is useful in situations where, for example, your organization purchases a company-wide software package, but each department must pay for their share of the licenses. This information allows you to see details on licenses purchased by a department, and let you assign those licenses to only users from that department. Thus, another department could not use any of these licenses because they did not pay for them.
The "General" page for a License Certificate is shown in Figure 12.
Figure 12: Viewing general information about a License Certificate.
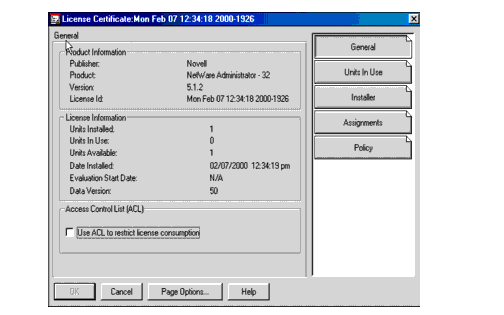
From this page you can view the following information about a particular License Certificate:
Production Information such as Publisher, Product, Version, and License ID.
License Information such as Units Installed, Units In Use, Units Available, and so on.
In the Access Control List (ACL) section, the option "Use ACL to restrict license concumption" enables you to limit access to specific objects. If this ACL feature is enabled, NLS checks the effective rights of the object that units are being requested for. This action ensures that the object has the Read right to the NLS:List of Handles attribute at the license container. If the object does not have the Read right, access is denied.
Note that when the ACL feature is enabled, logins might require more time.
The "Units In Use" page (not shown) contains the same information as seen above on the License Container.
The "Installer" page (not shown) will show you the Relative Distinguished name of the user that created this License Certificate.
The "Server Assignment" page (not shown) will allow you to add a particular server that this license is assigned to. In most cases, application software will not need any information here.
The "Policy" page (not shown) is really a summary page of some of the information on the other pages. It explains how license units on a license certificate can be used.
What Will the Users See?
If everything is set up properly, the end-users will not even notice that software metering is running. However, there are cases where users might receive a message on their workstation via the NetWare Broadcast message pop-up window.
For example, the message in Figure 13 appears if an Application object is set up with the option to use Novell Licensing and Metering for an application, but no License Certificate was associated with this application.
Figure 13: Error message displayed when no License Certificate is associated with an application.

The message in Figure 14 appears because NLSLSP.NLM is not running on the server and the Application object is set up with the option "Do not run application if NLS is not available" checked.
Figure 14: Error message displayed when NLS is not running on the server.

The message in Figure 15 appears because the Application object is out of License Units. The Application object was set up for one License Unit and someone else was already using that license.
Figure 15: Error message displayed when all License Units are used up for an application.

The message in Figure 16 shows what the Users or Groups would see if they were on the Notify list (as described in the section "Looking at the Detailed Information for a License Certificate" above).
Figure 16: Broadcast message displayed to users on the Notify list.

Getting Reports on Software Usage
You can generate software usage reports on each individual License Container. To do this, complete the following steps:
In NWAdmin, choose the Tools | Novell Licensing Services | Generate License Reports options. The screen will look similar to the one shown in Figure 17.
Figure 17: ZFS objects in eDirectory are managed through ConsoleOne.
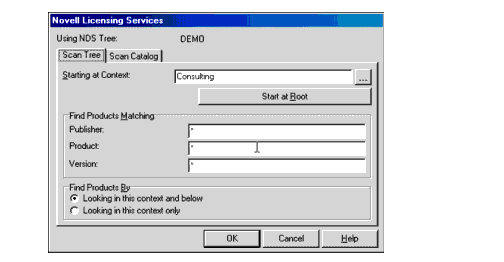
Select which Container to start searching from, or click on "Start at Root".
Fill in the "Find Products Matching" fields, or leave them at the default of asterisks to search for all.
Click the appropriate button for "Find Products By" to look in this context and below, or in this context only.
Click OK. The report will appear on the screen, looking similar to the sample shown in Figure 18.
Figure 18: Viewing a software usage report.
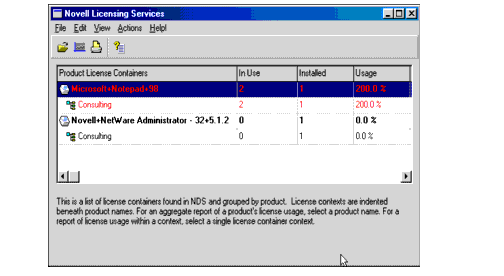
Notice that the Microsoft+Notepad+98 License Container appears in red, indicating that there was an overage for this Application object. In this example, this occurred because the License Certificate was set up to allow Grace Licenses Units.
You can double-click on one of the lines to get more detailed information. You can also save this information in one of five different ways (and in some cases select a start date and end date):
Save Graph as Bitmap. This creates a bitmap which could be inserted as a graphic in a word processor, a spreadsheet, or an HTML file viewable from a browser.
Save Summary as Text. This saves summary information in plain text format, which you could convert for use in a program such as Microsoft Word, Corel QuattroPro, Microsoft Access, and so on, to manipulate the data as needed.
Save Reloadable Data. This option saves all of the data regardless of the period selected. The data is a 15-month history of the product's usage on the network.
Save Tab-delimited Data. This option saves all of the data, regardless of the period selected, in a two-column tabbed format. This information can then be imported into a database or spreadsheet program.
Save All. This options saves the information in all of the above formats: bitmap, text, reloadable data, and tab-delimited.
Conclusion
Hopefully this AppNote has given you a good feel for what software metering is and what it is capable of doing for your organization. Always remember one very important point. It doesn't matter if the application is stored on a local machine, on a NetWare server, or on a Windows NT server. It just matters that the Application object is accessed through NAL or the NAL Explorer.
* Originally published in Novell AppNotes
Disclaimer
The origin of this information may be internal or external to Novell. While Novell makes all reasonable efforts to verify this information, Novell does not make explicit or implied claims to its validity.