A Strategy for Migrating from IPX to IP Print Services Using NDPS
Articles and Tips: article
Consultant, MCNE
Novell Consulting Services
01 Feb 2000
NDPS is the preferred printing system for NetWare 5, but many are confused how to make the switch from the queue-based IPX printing of previous versions. Here's a simple migration strategy that will remove the guesswork and have you up and printing in record time.
- Introduction
- Brief Review of NDPS
- Important Design Guidelines
- Migrating to NDPS and IP
- Clean-Up Steps
- Conclusion
Introduction
The purpose of this document is to assist the network administrator, as well as resellers and consultants, in the process of migrating from either an IPX or mixed IP/IPX print environment to Pure IP. It is strongly advised that the reader thoroughly read and understand this material before attempting this process.
At the least, the process of implementing a Pure IP print environment requires the installation and implementation of the Novell Distributed Print Services (NDPS) engine. Although it's a bit lengthy for virgin NDPS networks, this procedure more than pays for itself in both print job administration and job delivery access time.
Although Novell has gone to great lengths to lessen the amount of effort required by the administrator in implementing NDPS, there are still several design guidelines and system requirements that must be addressed before envoking the proposed strategy.
This AppNote covers the following topics:
A brief review of NDPS
Important design guidelines
Migration to NDPS and pure IP
Necessary clean-up steps
For more information about NDPS and the future NetWare Enterprise Print Services (NEPS), see the online product information at:
http://www.novell.com/products/printing
Brief Review of NDPS
Novell Distributed Print Services is the default and preferred print system in NetWare 5. It is designed to handle the increased complexity of managing print devices in any type of network environment, ranging in size from small workgroups to enterprise-wide systems. NDPS allows you to use the NetWare Administrator (NWAdmin) utility to create, configure, and manage printers without having to go to the server console. You can also designate those printers for automatic installation on user workstations, without any action by your users.
NDPS replaces the previous queue-based technology so you no longer have to set up print queues, printer objects, or print servers and link them all together. Instead, all of your managerial tasks are now focused on the printer itself, which is configured as an NDS object and still made fully accessible via NWAdmin.
Queue-based print services are challenging to manage and use. To install a printer on the network using queue-based technology, the system administrator must create Print Queue, Print Server, and Printer objects, link them together, and hope it all works. This system is complicated and time-consuming, and therefore troubleshooting printing problems can become quite tedious.
NDPS eliminates most of these obstacles, while enhancing the overall versatility of your printing environment. Moreover, NDPS is fully compatible with existing queue-based printing resources, which means the transition from your legacy print environment will be nearly painless. The other advantages of using NDPS will become increasingly apparent as you begin the transition process.
NetWare Enterprise Print Services (NEPS) delivers NDPS version 2 to NetWare 4 and NetWare 5 systems and allows access to printers from UNIX and MacIntosh clients using LPR/LPD and Internet clients using IPP. For more information about NEPS, see the online product documentation at:
http://www.novell.com/documentation/lg/endps/docui/index.html
Important Design Guidelines
This section discusses some design issues to consider when implementing NDPS.
Placement of Broker(s)
While the distribution of your brokers is not really a critical issue, you will want them sufficiently well distributed so that your brokered services will be readily available on the system when needed. Given Novell's minimum design requirements, one Broker object should be created at each physical WAN location.
To clarify this statement, let's take a quick look at the three services offered by the Broker object: Service Registry Service (SRS), Event Notification Service (ENS), and Resource Management Service (RMS). While these services are transparent to end users, administrators must be aware of them and understand how they affect printing, LAN traffic, and the minimum implementation requirements needed.
Service Registry Service
The Service Registry Service allows public access printers to advertise themselves so that end users can find them. This service maintains information about device type, device name, device address, and device-specific information such as the printer manufacturer and model number.
Before NDPS, each printer had to periodically advertise its availability through the Service Advertising Protocol (SAP), which was effective but created a lot of traffic on the wire. The Service Registry Service helps minimize the network traffic problem created by many printers advertising through the SAP. (For additional information on turning off SAP, see your printer's documentation.)
When you attach a public access printer to the network, it registers with SRS. When an application or user wants to use the printer, it then contacts an SRS and retrieves a list of all registered printers on the network. (For IPX, the SRS uses SAP type 8202; for IP environments, multicast is used.)
Through SRS, plug-and-print public access printers, as well as those created manually, are immediately made available to users. If there are multiple SRs running on the network, they synchronise automatically. This synchronisation allows users to choose public access printers anywhere on the network.
The table below summarizes the issues and recommendations regarding SRS.
|
Issue
|
Recommendations
|
|
Reliability of server / fault tolerance |
On multi-server networks, enable at least two SRs per network. |
|
Network traffic (network layout) |
Enable at least one SR per site (WAN link). |
|
Memory |
1MB base for SR, an additional 10KB per resource added (such as NDPS Manager) |
Event Notification Service
NDPS printers can be configured to provide event notification of print jobs and printer status. In NetWare Administrator, administrators can configure event notification for all interested parties. That is, non-job owners as well can be notified of a defined printer or server event which occurs during the processing and printing of a job. At the workstation, individual users can use the Novell Printer Manager to configure an event notification pertaining to their jobs only.
The Event Notification Service supports both consumers of events (users) and suppliers of events (printers). Users can register with ENS by identifying the types of events they want to be notified about, while the printer can register the kinds of events it is capable of reporting. For example, the administrator for a specific printer (by default a Manager of that printer) can designate an Operator to be notified if the printer runs out of paper or if the toner is low. Similarly, users can be notified when their jobs have finished printing.
Here are the issues and recommendations relating to ENS.
|
Issue
|
Recommendations
|
|
Number of trees |
Enable at least one ENS per tree. |
|
Reliability of server / fault tolerance |
On multi-server networks, enable at least two ENs per tree. |
|
Performance |
Enable additional ENs as needed. |
|
Licensed Connection |
One licensed connection only is required when enabled on the server. |
|
Methods availability |
Make sure that the methods you need are enabled for each ENS you have installed. Novell provides NetWare pop-up, log file, e-mail (GroupWise, MHS and SMTP), and programmatic methods. Third parties can develop other types of notification methods as well. |
Resource Management Service
This service allows resources to be installed in a central location and then downloaded to clients, printers, or any other entity on the network that needs that resource. It provides a single place where a variety of file types are stored for immediate access by NDPS. The Resource Management Service supports adding, listing, and replacing resources including printer drivers, printer definition files, banners and fonts.
|
Issue
|
Recommendations
|
|
Number of trees |
Enable at least one RMS per tree. |
|
Reliability of server / fault tolerance |
On multi-server networks, enable at least two RMs per tree. Be sure to keep the databases synchronized after you have created them. |
|
Disk Space |
Allow 50MB for each RMS to ensure adequate space for resources added in the future. Size may vary considerably depending on the number of languages, platforms, and drivers your system supports. |
|
Licensed Connection |
One licensed connection is taken when enabled on the server. |
Placement of Managers
There are no strict regulations in place as of yet regarding placement of the NDPS Managers, so instead I will set forth a few basic guidelines:
Only one NDPS Manager can be loaded per server. Load this resource only on servers configured to service print jobs. The only exception to this rule is any server which has a printer connected directly to it. In that case, the NDPS Manager must be loaded on that server as well.
Always place the NDPS Manager and the printers it controls on the same LAN segment for optimal performance.
Whenever possible, consider assigning your Printer Agents to more than one NDPS Manager so that the print load will be spread over multiple servers. This will facilitate load balancing and reduce the possibility of a "single point of failure" which would disable all printing on your network.
Fault Tolerance
The NDPS Manager uses a database to store information about the printers it controls. This database can be backed up on the server on which it is running, or it can be backed up and replicated inside of NDS.
Backing up the database on the server on which it is running will provide some protection in cases where the original database is corrupted or is accidentally deleted for some reason. However, if the server containing the database abends or becomes otherwise unavailable, end users will not be able to print until the server is either restarted or reconnected. Depending on the circumstances, this can result in a relatively minor inconvenience or a major disruption for your users.
You can greatly enhance the fault tolerance of the NDPS Manager database by backing it up to NDS via the automatic backup configuration options available at the server console. This procedure ensures that the database image will in fact be backed up to NDS whenever the NDPS Manager is unloaded (the default is once a day). This way, if for some reason a restoration of the database via normal means fails, NDS will permit you to restore the complete database and place it on any server within your NDS tree housing the NDPS Manager.
Note: You cannot restore a database from NDS to the same server from which it was backed up. In order to restore a database from NDS to its original source server, you must first restore it to a different server, then back the database up to NDS from that server. You can then restore it to its original server.
Migrating to NDPS and IP
While there is no single ideal NDPS transition strategy, the following general guidelines from the NDPS documentation can be applied to any transition scenario.
Third-party gateways are currently the best option for printers they support. Until NDPS-embedded printers become widely available, third-party gateways enable the richest access to networked print devices. Thus, when migrating a printer to NDPS or when installing a new printer in an NDPS environment, you should first determine the availability of a third-party gateway for that printer. If a gateway is available and it supports the system's environment, it should be your first choice. (Make sure the third-party gateway supports the communication protocols you plan to use in your network.)
Migrate the server side first, then migrate your end-users gradually. A sensible approach to deploying NDPS into a system is to first replace the server components of your legacy printing system with the NDPS server components. Since the NDPS Manager (NDPSM.NLM) and the Print Server (PSERVER.NLM) can run simultaneously on a server, this transition can be accomplished one queue/printer at a time. Users can then be gradually switched to print directly to NDPS printers instead of queues.
This section outlines a suggested NDPS and IP migration strategy that you can adapt to the needs of your particular network.
Maintaining Queue-Based Printing During the Transition
During a migration to NDPS, it is recommended that you maintain your print queues. This allows you to gradually migrate users to NDPS because users' workstations can continue to print to existing queues and be moved to NDPS as time permits. Workstations can even be configured to print to both queues and NDPS printers.
NDPS Printer Agents, either embedded into printers or running as part of an NDPS Manager, can be configured to retrieve jobs from queues in addition to accepting jobs from NDPS users (see Figure 1).
Figure 1: The NDPS Printer Agent plays a key role in transitioning to NDPS.

After you have created NDPS Printer objects to represent the printers that are still servicing queues, you can delete your legacy Print Server and Printer objects (but not your Queue objects) if you want, reducing the number of objects in your NDS tree you need to manage. Eventually, only a few queues serviced by NDPS Printer Agents will remain to support your DOS and Windows DOS-box printing needs. Most printing will be through the basic NDPS configuration (shown in Figure 2) and its variations.
Figure 2: This is the basic NDPS printing configuration.

Implementing the NDPS Service
In order to achieve Pure IP print capabilities, NDPS must be installed and properly configured in your environment. It is also assumed that prior to performing the following procedures, NDPS was installed during the initial OS installation. If not, refer to the NDPS documentation for instructions.
Installing the NDPS Broker
During the initial install, NetWare automatically creates the broker on the first server in the tree. Subsequently, only servers not within three hops will get the broker installed. We will not follow that format, but rather take it to a more appropriate level. The broker will be loaded on additional servers only if they are located across a WAN link.
Here are the steps to install an NDPS Broker:
From NWAdmin (NWADMN32.EXE), highlight the container within which you would like the object, right-click, and select Create.
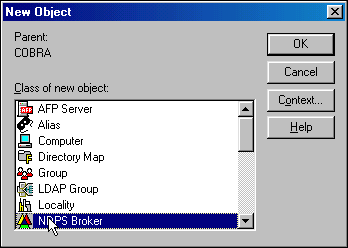
Select NDPS Broker and click OK (see Figure 3).
Figure 3: Creating a new NDPS Broker object in NWAdmin.
Assign the appropriate broker name when requested and make sure all boxes for SMS, EMS and RMS are checked (see Figure 4). Click Create.
Figure 4: Naming the new NDPS Broker.
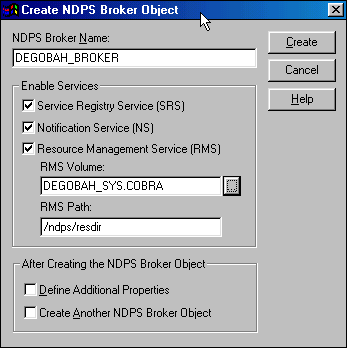
When asked for the database location, enter the server on which NDPS was installed.
Note: If this was not the first server with a broker, make sure you add the LOAD BROKER command to the server's AUTOEXEC.NCF file.
Installing the NDPS Manager
NDPS Manager provides a platform for Printer Agents that reside on the server. An NDPS Manager must be created as an object in the NDS tree before you can create server-based Printer Agents.
The NDPS Manager object stores information used by the NetWare Loadable Module (NLM) named NDPS.NLM. You can manually load this NLM at the server console, or it will be automatically loaded when you create a Printer Agent with NWAdmin.
A single NDPS Manager can control multiple Printer Agents; there is no hard limit. However, a particular NDPS Manager can be loaded on only one server. If it controls a local printer, it must be loaded on the server on which the local printer is attached to.
A user creating an NDPS Manager must have at least Read, Write, Modify and Create rights for the container in which the object will be created. While you can perform some configuration and management tasks directly through the NDPS Manager console interface, NetWare Administrator is the main tool for performing these tasks.
From NWAdmin (NWADMN32.EXE), highlight the container within which you want the manager to reside, right-click, and select Create.
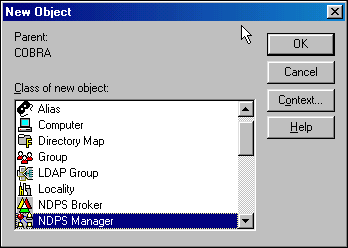
Select NDPS Manager and click OK (see Figure 5).
Figure 5: Creating an NDPS Manager object in NWAdmin.
When prompted for the name, enter an appropriate title (see Figure 6).
Figure 6: Naming the new NDPS Manager.
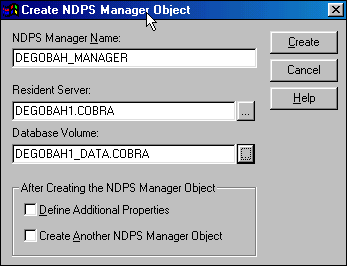
Next, browse for the server on which you would like to store the print queues and other databases. Keep in mind that only servers that have had the NDPS components installed will be made available from the pull-down menu.
Click Create.
Creating the NDPS Printer
Prior to beginning this process, you need to have completed all necessary steps in the previous sections.
From NWAdmin (NWADMIN32.EXE), right-click on the container within which you want to create the printer and select Create.
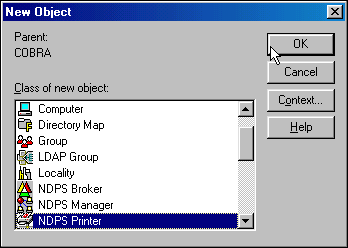
From the list, select NDPS Printer and click OK (see Figure 7).
Figure 7: Creating an NDPS Printer object in NWAdmin.
When prompted, enter the name you want to assign the printer (see Figure 8).
Figure 8: Naming the new NDPS Printer and selecting the Printer Agent source.
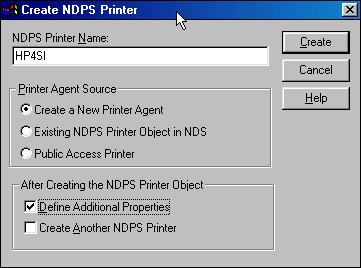
At the Printer Agent Source field, make sure you only select "Create a New Printer Agent". Once this has been confirmed, leave the assigned agent name alone (defaults to the printer name given in Step 3) and associate the object with the appropriate NDPS Manager. Click Create.
You must now choose the gateway type for the printer. In most cases you will want to select HP IP/IPX Gateway, as shown in Figure 9. Click OK.
Figure 9: Selecting the Printer Agent Gateway type.
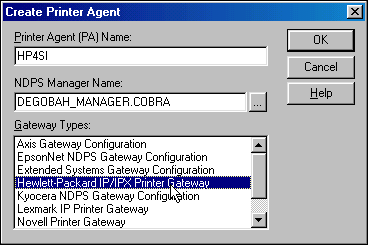
Lastly, select the appropriate drivers from the pull-down lists for each OS desired. If you don't see the driver listed and you haven't installed one on the server, NDPS defaults to using the Windows 3.x drivers for all Windows 95/98 machines. This will not cause any major issues.
Building the Transition Queue
Implementation of this phase will in no way disable your current NDS queue-based printing environment.
From NWAdmin (NWADMIN32.EXE), right-click on the NDPS Printer object you want users to print to and select Details.
If the previous procedures were performed properly, you should now see all the buttons activated within the printer's opening bitmap. Click on Jobs-V.
From the pull-down menu, select Spooling Configuration.
At the bottom of the form, you will see a field labeled "Service Jobs from NetWare Queues". Click Add and select the existing NDS queues you want to assign for the printer.
Click OK and close the bitmap.
Remaining inside NWAdmin, find the existing NDS Print Server object which represents the NDS Print Queue object you just transitioned, right-click on it, and select Details.
Click on Assignments.
From the bottom screen, verify that the Default Print Queue is unchanged. The Print Server field should now be empty. Do not delete the queue field.
Implementing the NDPS Print Manager
In order to convert to a pure NDPS environment and provide the least amount of administrative overhead for the support department, it is strongly suggested that the NDPS Print Manager be installed and distributed to every applicable desktop using one of the following procedures:
From NWAdmin32, make the following modifications to the container (or group) login script:
@\\%server_name%\sys\public\win32\nwpmw32.exe
From a Windows 95/98 desktop, right-click, select New, and then Shortcut. In the executable name field, insert "Z:\PUBLIC\WIN32\NWPMW32.EXE". In the name field, enter "NDPS Print Manager". Click OK.
Use ZENworks to distribute the object to users.
Clean-Up Steps
Prior to performing this final phase, you must make absolutely sure all existing NDS queues have been transitioned using the steps in the previous phases, and that you have implemented a complete NDPS client rollout.
From NWAdmn32, right-click on the existing NDS Print Server object and select Delete. When asked to confirm, answer "Yes".
Highlight and right-click on the existing NDS Printer object and select Delete. When asked to confirm, answer "Yes".
Highlight and right-click on the existing NDS Print Queue object and select Delete. When asked to confirm, answer "Yes".
Conclusion
This AppNote has shown how to migrate to NDPS in a Pure IP environments. As the preferred print system for NetWare 5, NDPS offers important improvements over Novell's legacy queue-based print service architecture. It was designed to handle the increased complexity of managing modern printers in a network environment and to exploit the new functionality offered by these printers. The power and versatility of NDPS will help you get the most out of your printing resources, whether you're in a small workgroup or an enterprise-wide system.
* Originally published in Novell AppNotes
Disclaimer
The origin of this information may be internal or external to Novell. While Novell makes all reasonable efforts to verify this information, Novell does not make explicit or implied claims to its validity.