How to Set Up and Use Remote Control with ZENworks 1.1 and 2.0
Articles and Tips: article
Consultant
Novell Consulting
01 Feb 2000
Did you know that, besides being the king of application distribution and desktop management, ZENworks has the ability to do remote control? This AppNote explores the ins and outs of this little-understood feature.
- Introduction
- ZENworks Setup Tasks
- Un-Registering Workstations and Starting Over
- Moving and Renaming Workstation Objects in the Tree
- Granting NDS Remote Control Rights
- Workstation Registration Agent Function
- Troubleshooting Tips
- Summary
Introduction
ZENworks is an extremely powerful tool used to assist network administrators in building and maintaining a robust and reliable network. It leverages the power of Novell Directory Services (NDS) to simplify user and workstation management.
However, one aspect of ZENworks that is generally misunderstood is the ability to "take over" a remote workstation through the Remote Control function. The purpose of this AppNote is to help clarify the process of setting up and successfully using ZENworks to control workstations remotely.
This AppNote covers the following concepts and procedures:
Setting up ZENworks on the workstations you want to remote control
Granting the NDS rights needed for remote control to work
Maintenance tasks such as unregistering a workstation and moving or renaming Workstation objects in the tree
The function of the Workstation Registration Agent
Troubleshooting tips
The intended audience for this AppNote should have a basic understanding of NDS and ZENworks. For more information, visit the product Web sites at:
http://www.novell.com/products/zenworks
ZENworks Setup Tasks
Before you can use ZENworks to remote control a workstation, you need to perform the following setup tasks, explained in the sections that follow:
Grant users NDS rights to register workstations
Register workstations for importation
Create and associate a workstation import policy to users
Import the registered workstations
Re-register the workstations
Granting Users NDS Rights to Register Workstations
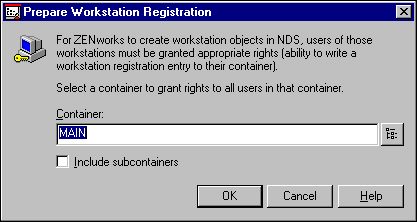
Before the workstation registers to the user's container, you need to prepare the NDS container. You can do this in one of two ways:
Run WSRIGHTS.EXE during the ZENworks installation.
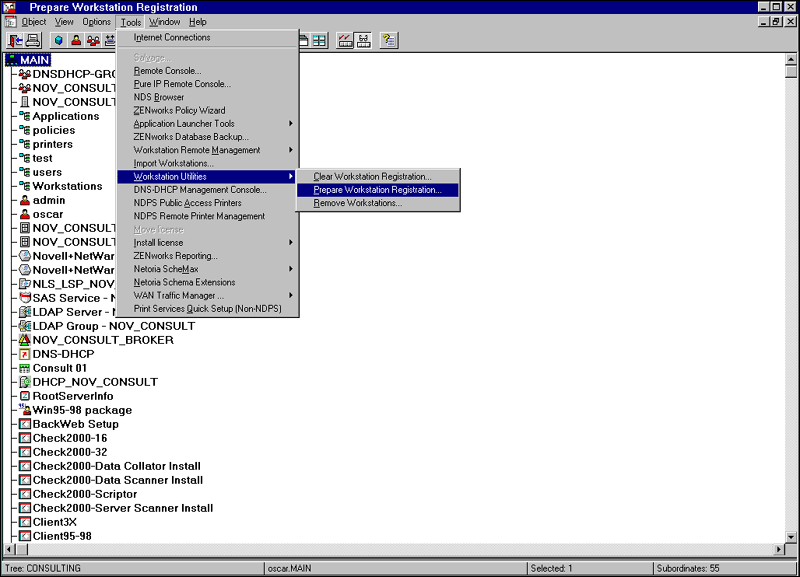
Using NWAdmin (NWADMN32.EXE), highlight a container and choose Tools | Workstation Utilities | Prepare Workstation Registration (see Figure 1).
Figure 1: Selecting the option to prepare for workstation registration.
Once you have selected this option, specify the container in which you want users to be granted rights and click OK(see Figure 2). The container is now ready for workstations to begin registering.
Figure 2: Preparing a container for workstation registration in NWAdmin.
Registering Workstations for Importation
You can register a workstation for importation in one of three ways:
Install the ZENworks client (version 3.x or higher). This is the automated way of registering a workstation.
If you don't have the ZENworks client, you can run WSREG.EXE from a login script.
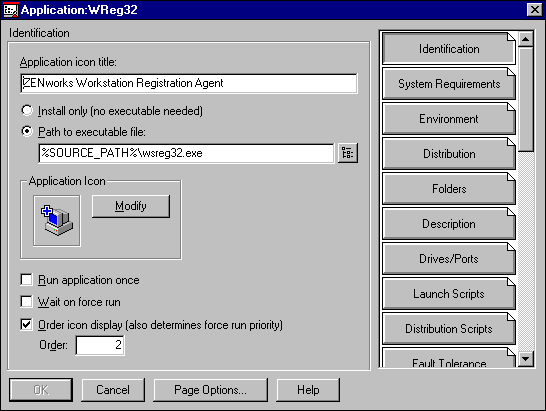
Run the WSREG Application object (see Figure 3) using the Novell Application Launcher (NAL).
Figure 3: WSREG is one of the default applications created by the ZENworks installation.
Creating a Workstation Import Policy and Associating It to a User
Before you can import a workstation into the tree, you first need to create a Workstation Import Policy and associate it with the user. To do this, follow these steps:
Launch NWAdmin (NWADMN32.EXE) and select the Organization (O) or Organizational Unit (OU) where you want to store ZENworks Policy Packages.
Right-click the O or OU, choose Create | Policy Packages, and then click OK.
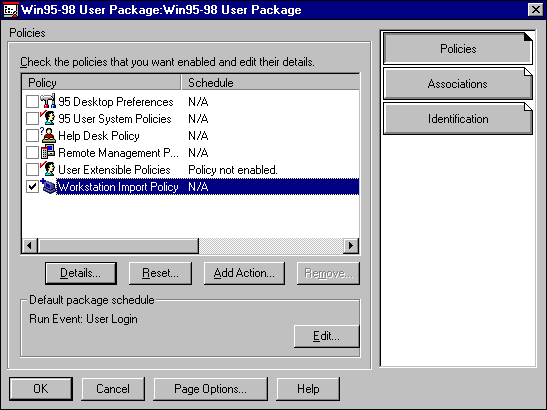
Choose to create the User Policy Package that corresponds to your users' operating systems (Windows 3.1, Windows 95, or Windows NT). For example, if you need to support one or more users who are using Windows 95 workstations, choose 95 User Package. If you support multiple platforms, create a User Policy Package for each platform (see Figure 4).
Figure 4: Creating a User Policy Package to enable an Import Policy.
Give the User Policy Package a name that is meaningful to you.
Choose the location where you want to save the policy package.
From the Policies list, check the Workstation Import Policy and click Details.
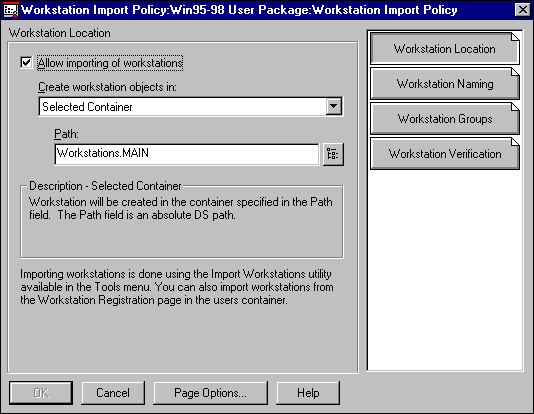
Choose the Workstation Location page, and then choose the container where you want the Workstation object to be created. If you want Workstation objects in the same location as the User objects, accept the default User Container. If you want to change the location, choose Selected Container and browse for a new location (see Figure 5).
Figure 5: Configuring the location where new Workstation objects will be created.
On the Workstation Naming page, choose how you want the workstations named and click OK (see Figure 6).
Figure 6: New Workstation objects will be named and managed according to these settings.
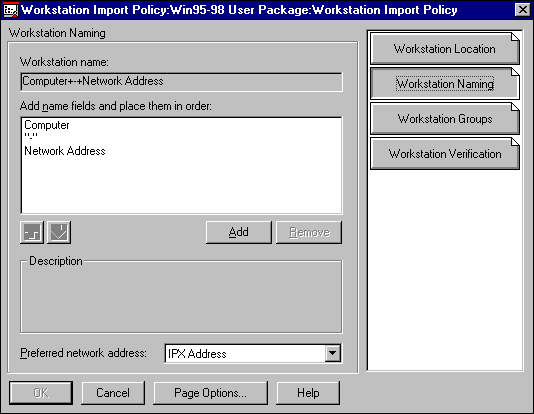
The Workstations will be named according to the items in the list. If you accept the default, your workstations will be named as follows:
*Computer name for Windows 95 or NT
Associate the User Policy Package you created in the previous steps with a User, Group, or container whose workstation you want to manage with this Policy Package:
In the User Policy Package, choose the Associations page (see Figure 7).
Figure 7: The Associations page can be used to view and configure all objects associated with this policy package.
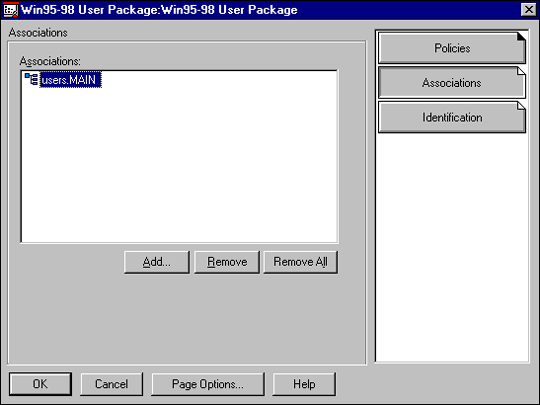
Click Add, and then browse for the object you want to associate with.
Click OK twice to save changes and return to the tree view.
Importing the Registered Workstations
You can schedule imports to occur automatically using the Application Launcher or the Scheduler, or you can import workstations manually from the Tools menu or the command line. You can also import workstations on a container-by-container basis (with or without sub-containers), or you can choose to import only selected workstations.
Note: After completing any of these options, you must run the Workstation Registration program again to complete the registration process and synchronize the workstation with NDS. This is explained later in this AppNote.
Importing Selected Workstations Manually. You can selectively import workstations by selecting workstation entries on the Workstation Registration page of a container. Here are the steps:
Launch NetWare Administrator (NWADMN32.EXE).
Highlight the container where the User objects reside whose workstations you want to import.
The container must be associated (either directly or indirectly) with the User Policy Package (Windows 3.1, Windows 95/98, or Windows NT) you created previously.
Choose Details | Workstation Registration.
Select the registered workstations you want to import (see Figure 8).
Figure 8: You can manually specify which registered workstations are to be imported.
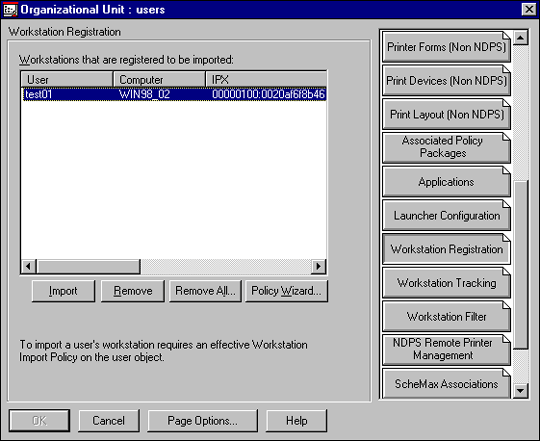
Click Import to import the workstations. The import is complete at this point, and the Workstation objects are displayed in the tree (after you refresh the view of the container).
Click Cancel to close the container's Details.
View the new Workstation objects in the tree.
Collapse the container, and then open it again to refresh the list.
View the workstations you imported in Steps 4 and 5 (see Figure 9).
Figure 9: New workstation created in the container assigned on the Import Policy workstation location page.
Note: The Workstation objects are created in the context specified in the Workstation Import Policy found in the associated User Policy Package.
Importing Groups of Workstations Manually. To import a group of workstations manually, do the following:
Launch NetWare Administrator (NWADMN32.EXE).
Highlight the container where the imported workstations will reside (the container the registered workstation is associated with).
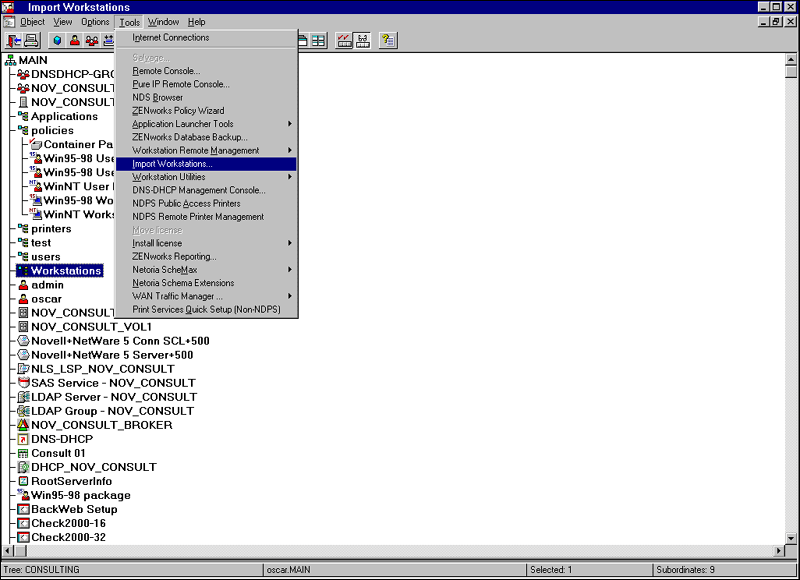
Choose Tools | Import Workstations (see Figure 10).
Figure 10: The option for importing groups of workstations in NWAdmin.
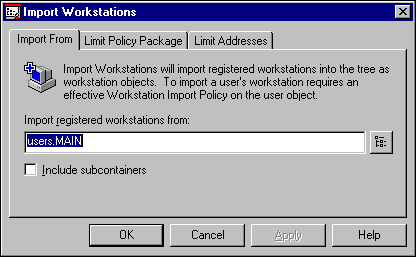
Click on [...] to browse and choose the container from which you want to import registered workstations (see Figure 11).
Figure 11: Importing groups of workstations manually in NWAdmin.
Click OK to complete the import process.
Close and reopen the browser to view the latest imported workstations.
Note: The Workstation Registration program must run again following the import to complete the registration process and synchronize the workstation with NDS. (This is done automatically by the ZENworks 3.x client.)
Scheduling Automatic Imports Using the Scheduler. You can use Desktop Management features to schedule the import process by creating a scheduled action for WSIMPORT.EXE. The scheduled action should include the .EXE file name, the context of the container you want to import to, and any command line parameters you might want to use.
For example, if your context were FLL.NOVELL and you didn't want to include subcontainers in the import session you were creating the scheduled action for, you might enter the following as your scheduled action target:
\\Zenserver\sys\\public\wsimport.exe "FLL.NOVELL" /s-
Note: Type WSIMPORT.EXE /? at the command line to view the available parameters.
Re-Registering Workstations
This last task serves two purposes: associating the physical workstation with the newly created Workstation object in the tree, and keeping the Workstation object attributes updated with changes to the workstation. For a workstation to be associated with a Workstation object in the tree, the distinguished name needs to be written to the Registry (WIN32 client).
To complete the last step and associate the physical workstation with a Workstation object in the tree, the WSREG.DLL (WIN32) must run a second time after an importation has been completed. How you register determines how you will finish this last step.
For example, suppose you have installed the new ZENworks client (3.x or higher). Under Windows 95/98, the WSREG.DLL is run at the beginning of every "cold" login. (A cold login is logging in after you start up the workstation; a warm login is when you are already logged in and you use the NetWare login utilities to log in again.)
As mentioned above, the Workstation Registration Agent actually serves two purposes. It gets the workstation created in the tree and associated, and it updates certain Workstation object attributes in order for other applications to work. Other attributes that are updated by the Workstation Registration Agent include:
User History. The User History is a list of users who have modified the Workstation object by running the workstation registration agent.
Last User. For example, the Last User is the user who modified the Workstation object last by running the workstation registration agent.
Last Registered Time. The Last Registered Time is set every time the workstation registration agent runs and shows the last time the workstation registration agent ran on the workstation.
Un-Registering Workstations and Starting Over
You can un-register workstations and start over in one of three ways:
Run UNREG32 (Windows 95/98 or NT) or UNREG16 (Windows 3.1) at the workstation.
Delete the Workstation object from the tree.
Remove the registration cookie from the workstation registration page.
Each method is described in more detail below.
Using the UNREGxx Utility
If the workstation you are going to un-register is running Windows 95/98 or NT, run UNREG32.EXE at the workstation.
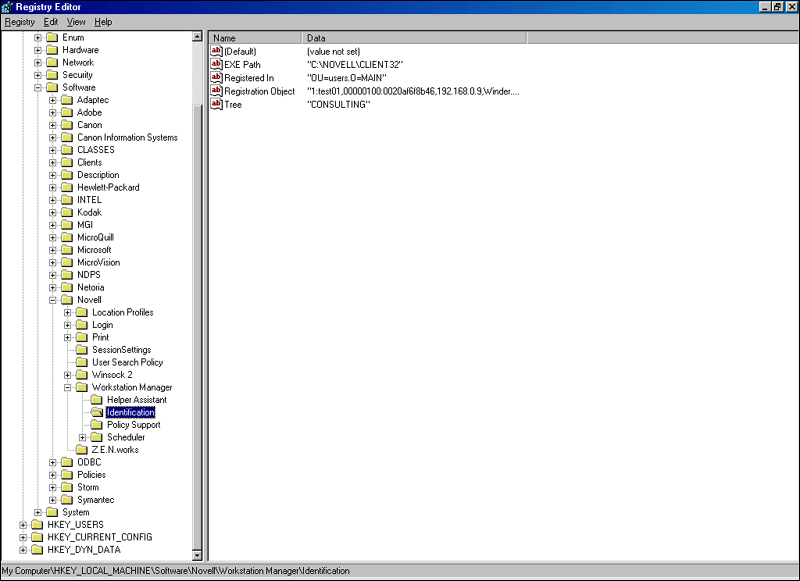
When this program is run on an NT workstation, the WSREG32.LOG file is deleted and the Registry settings found at HKEY_LOCAL_MACHINE \Software \Novell \Workstation Manager \Identification are deleted. The one exception is the Tree, which is the trusted tree that is set in Workstation Manager. If you want to change the tree name, set it through Workstation Manager by going into the Properties page for the Network Neighborhood. Select Novell Workstation Manager and click Properties. You can change it there.
Under Windows 95/98, UNREG32.EXE will delete the WSREG32.LOG file and the WORKSTAT.ID file along with all the settings, including the Tree value, in the Registry located at HKEY_LOCAL_MACHINE\Software\Novell\ Workstation Manager\Identification (see Figure 12).
Figure 12: Windows 95/98 registration values stored in the Registry.
After the workstation has been un-registered, it is ready to be registered and imported again.
Deleting the Workstation Object
You can also un-register a workstation by removing its Workstation object from the tree. If the Workstation object is removed from the tree, the Workstation Registration Agent will create a new registration cookie and will re-register for importation.
It is important to note here that the Workstation Registration Agent will only re-register for importation if the workstation has a DS Authenticated connection to the Trusted Tree or the tree where the workstation should be. If the workstation ever logs in to a different tree and does not have a DS Authenticated connection to that Trusted Tree, the Workstation Registration Agent will not un-register but will maintain its identity.
Removing the Registration Cookie
The third way to un-register a workstation is to remove the registration cookie from the workstation registration list found on the Workstation Registration page in a container (see Figure 13). By removing the registration cookie, the Workstation Registration Agent will create a new registration cookie and will register it to the user's location in the tree.
Figure 13: Removing the registration cookie on the Workstation Registration page.

Moving and Renaming Workstation Objects in the Tree
As long as a workstation is moved or renamed using NWAdmin32 with the ZENworks snap-ins, the snap-ins will capture the rename and move commands for a Workstation object and write the changes to the container's workstation tracking attribute. You can view this list by going to the container details and selecting the Workstation Tracking page.
Basically, as a workstation is moved and renamed, a trail is left behind to show where the workstation resides. This trail is found in the container's Workstation Tracking attribute. After the Workstation object has been renamed and moved, the next time the workstation registration agent runs on the workstation, the Workstation Registration Agent will first determine if the workstation is still in the tree. If the Workstation object is not found in the tree, it will read the Workstation Tracking attribute and follow the trail to the new workstation name or place. As it follows the trail, the Workstation Registration Agent also removes the trail from the attribute, thereby cleaning up the workstation tracking. Once it finds the new name or place, the Workstation Registration Agent will write the new distinguished name down to the workstation Registry, and the workstation is then associated with the Workstation object in the tree.
If the workstation registration agent doesn't find the workstation, it will re-register the workstation for importation.
Granting NDS Remote Control Rights
To remote control a workstation, the user needs the following rights to the Workstation object:
|
Selected Property
|
Property Right Needed
|
|
DM:Remote Control |
Write |
|
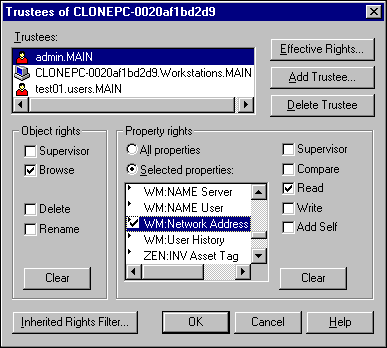
WM:Network Address |
Read |
Figure 14 shows how to grant the Write property right using selected properties of a trustee of the Workstation object.
Figure 14: Granting the Write property right.
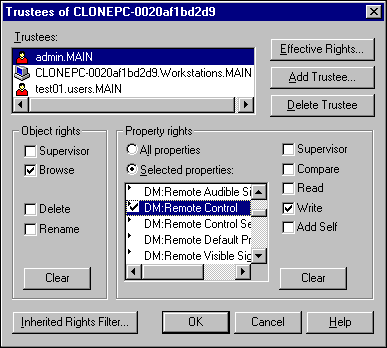
Figure 15 shows how to grant the Read property right.
Figure 15: Granting the Read property right.
Note that because selected property rights do not flow down, you cannot grant the above selected property rights to the Root, Organization, or Organizational Unit. The following error is received when trying to do so: "ZENworks Remote Control, Unable to establish Security Context with agent, WViewNT, Console user does not have remote control permissions."
You can add Read and Write Property rights to the container and it will work. All properties rights will flow down, whereas selected properties rights will not.
Note: This applies only in NetWare 4.x trees. In a NetWare 5 tree, selected properties rights are inheritable.
Workstation Registration Agent Function
The Workstation Registration Agent's priority is to get the workstation registered for importation (creating a Workstation object in an NDS tree) and then associate the physical workstation with the Workstation object in the tree after the workstation has been imported. It will then update the following Workstation object information:
Network Address
User History
Last User
Last Server
Last Registered Time
If the Workstation Registration Agent can't find the workstation in the tree, it determines whether the workstation has been moved or renamed. To find which Workstation object belongs to the workstation, here are some points to keep in mind.
Under Windows NT and Windows 95/98, the Distinguished Name of the Workstation object is written to the Registry located at HKEY_LOCAL_ MACHINE \Software\Novell \Workstation Manager\Identification. In this area you will find five values that the workstation registration agent uses:
The first value is the EXE Path.
The second value is Registered In, which is used as a reference point for the Workstation Registration Agent.
The third value is the Registration object, which is the workstation registration cookie that is written to the container's Register Workstation attribute. The registration cookie looks something like this:
1:TestUser , 01010480:00c04fd8eee2, 137.65.61.85,
TestUser.Novell, PC Clone
Hsfmsg01,WINNT,PENTIUM
The first field is the name of the user who is logged in and is registering. The next field is the IPX address, followed by the IP address. The fourth field is the DNS Name, followed by the computer name, primary server, OS type, and finally the type of CPU the workstation has. If the Workstation Registration Agent cannot find a piece of information for one of these fields, the field is left blank. The information in the registration cookie is then used as NAMING VALUES for the actual importation and naming of the workstation.
The fourth value is the Tree. Under NT, the Trusted Tree can be set while installing the ZENworks client, or you can right-click the Network Neighborhood and select Properties | Novell Workstation Manager | Properties.
You will see a place to enter a Trusted Tree. Under Windows 95/98 and 3.1 platforms, the Tree value is set when the Workstation Registration Agent runs for the first time. The Workstation Registration Agent will use the primary tree as the Tree value. This value then becomes the Trusted Tree for the workstation to use.
The fifth value is Workstation object. This value is the fully Distinguished Name of the Workstation object. When a Workstation object can be located by the Distinguished Name and the Tree name in the workstation Registry, the workstation is associated.
Note: Under DOS and Windows 3.1, a hidden system file called WORKSTAT.ID is created. This file maintains all the same information that the Workstation Registration Agent writes to the Registry.
Troubleshooting Tips
Here are some basic troubleshooting steps to take if you are unable to remote control a workstation.
Check the Tree Entry in the Registry
In RegEdit, go to HKEY_LOCAL_MACHINE \Software \Novell \Workstation Manager \Identification. Look at the "Tree" entry. If it does not show the correct tree, you will need to do one of two things:
Run the UNREG32 located in \\xxxx\sys\public\Unreg32
Delete the "Identification: key and reboot the PC
Note: You can move a Workstation object to a different context within the same tree, but you can not move it into a different tree without unregistering it.
Register the Workstation Again
Once you have made sure your workstation was not registered into a different tree, you can now register it again as follows:
Automatic with the ZENworks 3.x client (log out and in again or reboot your PC).
Run WSREG32 located in \\xxx\sys\public\Wsreg32.
The workstation registration "cookie" will be in the container where the user object is located.
Reimport the Workstation
Now that you have registered your workstation, you can go to the container where your User object resides and import your workstation. Simply right-click the user's container, select the Workstation Registration tab, highlight your workstation, and click Import.
You must have an Import Policy associated with the user. The Import Policy determines what context the Workstation object should be placed in. It also determines the naming of the Workstation object.
Reboot the Workstation
After you have successfully imported the workstation, you must either reboot or log out and back in so the Workstation Registration Agent can link up to the Workstation object. (Refer to "Workstation Registration Agent Function" above for more details on how the agent works.)
Check Synchronization
A key way to determine if the Workstation object and the agent are in synch is to check the Inventory tab on the workstation's Properties page. If there is no information, the agent has not yet synched up with the object. Either reboot or log off and on again.
Another common error you will see is "The user agent was unable to locate the workstation in NDS." You can fix this by rebooting to synchronize the agent with the Workstation object.
Once the workstation is imported and synched, you can remote control it by clicking on the Remote Management tab on the Properties page of the Workstation object.
Summary
ZENworks is a powerful tool with many capabilities. This AppNote focused on Remote Control, a small portion of what ZENworks can do. There are many good articles and Web sites that can assist you in building a reliable network with ZENworks. Here are some recommended reference sites:
* Originally published in Novell AppNotes
Disclaimer
The origin of this information may be internal or external to Novell. While Novell makes all reasonable efforts to verify this information, Novell does not make explicit or implied claims to its validity.