Understanding Novell's Single Sign-On
Articles and Tips: article
Consultant
Novell Consulting Services
01 Feb 2000
As more and more applications are requiring password access, users are demanding relief from password overload. But don't worry: help is on the way with the new Single Sign-on from Novell.
- Introduction
- Overview of Single Sign-On
- NDS Design Considerations
- Upgrading NICI
- Installing Single Sign-on
- Management Through ConsoleOne
- Conclusion
Introduction
Password administration has always been a burden for network administrators. As more applications authenticate users as a prerequisite for access, users are plagued not only with trying to create new and different passwords, but also with the difficulty of remembering them. As a result, administrators are spending more time assisting users with forgotten passwords.
Novell's Single Sign-on (SSO) allows users to gain access to various applications based on the user's authenticated Novell Directory Services (NDS) connection. Users can thereby log in to the NDS tree and access SSO-enabled applications without having to enter any additional passwords or other credentials.
Single Sign-on leverages the Novell International Cryptographic Infrastructure (NICI) to securely store and retrieve user authentication secrets (passwords and other credentials). SSO-enabled applications make read and write calls to the SecretStore Service on the server, which processes and executes all SSO requests.
This AppNote introduces the basic concepts behind Single Sign-On and discusses a number of related issues and procedures, including:
NDS design considerations
Upgrading NICI to version 1.3.1
Installing Single Sign-On
Management with ConsoleOne
Readers should have good understanding of NDS and NICI. For additional information about Novell's security solutions, see our security Web site at:
http://www.novell.com/security
Overview of Single Sign-On
Before launching into a discussion of Single Sign-on design considerations and installation procedures, it will be helpful to review some basic concepts. (Portions of this overview come from the Technical Overview document available on the Single Sign-on Web site.)
Major Security Components
Through the Novell Single Sign-on technology, "secrets" (passwords and other authentication credentials) are securely encrypted at all times, whether in transmission or in storage, and accessible only by the owner of the data. Since the data type is irrelevant, passwords and tokens can be safely stored and retrieved to enable a true single login experience for all applications.
Novell International Cryptographic Infrastructure (NICI) provides the underlying infrastructure for network cryptographic services on a worldwide basis. It supports strong cryptography and multiple cryptographic technologies. All network security services are built on NICI.
SecretStore (SSS.NLM) is a security subsystem built around the NICI version 1.3.1 crypto-system and NDS 7.x and higher. SecretStore version 1.x is NetWare 5.x-based and only supports Client 32-authenticated users on Windows NT 4.x or Windows 95/98 workstations. Its function is to process and execute all SSO requests.
The SecretStore service in Single Sign-on uses NICI to encrypt data that is stored in and retrieved from NDS. When the data is first created, a symmetric key is generated and stored for the user. This key is wrapped (encrypted) using the partition key. Subsequent read and write requests to the SecretStore data cause the key to be unwrapped and used to encrypt and decrypt the stored data. The SSO client negotiates a supported algorithm for decrypting and encrypting the data. SecretStore always selects the strongest algorithm available through NICI policies for encrypting the data.
Other Key Concepts
With Novell Single Sign-on, passwords and credentials are never stored or transmitted in the clear; they are encrypted using NICI, as explained above. When a client application retrieves a secret from NDS, the secret is decrypted at the client side. Upon successful completion of the application's authentication process, the secret is promptly destroyed and removed from memory (similar to how the NDS private key is handled in the NDS authentication process). To give users access to network services, NDS uses an authentication service based on the RSA public-key/private-key encryption and decryption algorithms. This authentication mechanism uses a private key attribute and a digital signature to verify a user's identity.
NDS authentication is session-oriented, and the client's signature is valid only for the duration of the current session. With Novell Single Sign-on, however, the client doesn't have to be reauthenticated every time the user asks for additional services or applications, since reauthentication takes place automatically in the background. Thus, the integrity of SSO-enabled applications is protected and secure, and the user can access resources globally without being hampered by having to authenticate over and over again.
Novell Single Sign-on uses session-oriented security, and each internal call from the enabled applications is considered a session from beginning to end. An encrypted "tunnel" is established for the session between client requests and server responses. After one such session is completed, the tunnel is "torn down" and a new tunnel will be established for the next client request. This mechanism guarantees the uniqueness of the session keys.
SD Key Server. The "Security Domain" is the trustee of security objects which are stored in the Key Access Partition (KAP) container, part of the security container. The first server on which Single Sign-on is installed becomes the SD Key Server. Its function is to generate and manage the NICI "tree key" which is required for the installation of Single Sign-on.
Enhanced Protection. Novell Single Sign-on includes an optional "Enhanced Protection" setting that a user can apply to each secret to provide non-repudiation capability. Enhanced Protection means that a user's secret is not only protected from the view of others, but becomes locked when an administrator changes the user's NDS password.
For example, suppose a network administrator attempted to view another user's secrets by changing the user's NDS password and then logging in as that user using the new password. The administrator would be unable to view the secrets, which are blocked from view because the secret has enhanced protection enabled. If the administrator attempted to unlock the secret, he or she would be prompted to enter the user's previous NDS password, rather than the new one that the administrator created.
Secrets can only be unlocked with the last valid password that the user entered via a user-initiated Change Password request. Even if the user or administrator changes the NDS password multiple times after the secrets have been locked, the status of the locked secrets is not affected.
How It All Works
Users first log in to NDS and, once authenticated, have single sign-on access to enabled applications. As a user launches these applications, he or she is granted access without seeing any password dialog or other screens. It appears to the user as if access was granted automatically.
Applications are enabled by making the API calls provided by Novell through the Novell Developer Kit (NDK). Only the application's client is modified, resulting usually in a .DLL file so that deployment by the network administrator is easy. The updated client can be distributed easily and automatically to the user via ZENworks
When the administrator installs SSS.NLM, a schema extension to NDS is created. As previously noted, only the user has access to his or her set of secrets, because these secrets are stored in hidden attributes that prevent unauthorized access.
When the user first launches an enabled application, the application's client queries NDS as to whether or not the user is authenticated to NDS. If the user is not authenticated, the application's client displays the password entry dialog. After the user enters his or her password, the application authenticates the user and grants access. If the user is authenticated to NDS, the client asks for the secret from NDS. The first time the user logs in to that application, no secret is available, and the user is prompted to enter the password. This time, the user is granted access into the application, but the secret is also accessed and encrypted and stored in NDS for subsequent use.
In the case of password administration where users are required to change their passwords after a certain number of days, a user doesn't have to remember a password that he or she hasn't been using; the current password is automatically inserted into the password change dialog box, requiring that the user only enter the new password. When the user presses <Enter< to invoke the password change, the new secret is accessed and encrypted. The NDS attribute that implements Novell Single Sign-on is updated with the new password, ensuring single login the next time the user launches that application.
NDS Design Considerations
Single Sign-on and SecretStore are NDS-aware services. SecretStore (SSS.NLM) can only be installed on a NetWare 5.x server, but it can be accessed by NetWare 4.x users in a mixed NetWare 4.x/5.x environment.
As explained previously, the first server on which SecretStore is installed becomes the SD Key Server. Subsequent installations of SSS.NLM within the same tree must connect to this server to retrieve the SD tree key.
When a user authenticates to the NDS tree, there are two requirements for SSO-enabled applications to be able to retrieve the secrets for that user:
The user must have an authenticated, primary connection to a server which holds the Master or a Read/Write replica of the partition in which the User object exists.
SecretStore (SSS.NLM) must be loaded on that server.
If the user is not authenticated to such a server, the SSO client "pings" NDS (DS.NLM) to get the replica ring of the partition containing the User object. (This is done using an NCP 92 ping, not an IP ping.) DS.NLM returns a list containing the server holding the Master replica first, followed by those holding Read/Write copies. The SSO client checks each of the servers in turn until it finds the server with SSS.NLM loaded. The client then retrieves the secrets from that server.
This discovery process may result in unwanted traffic, especially if the servers holding the replicas are located across a WAN link. Therefore, it is good design to have SecretStore loaded on the default server that the users log in to. Alternatively, you can have the server holding the Master replica run SSS.NLM (provided it's not located across a WAN link, since it will be first server in the list that DS.NLM returns to the client).
If you have a "DS-Master" type of architecture in which a central server holds most of the replicas, you may want to move the Master replica somewhere local to the users for better performance.
Thanks to NDS, secrets are replicated and synchronized to all the servers in the replica ring. Since Single Sign-on is NetWare 5-based, you must have at least one NetWare 5.x server in the tree running SSS.NLM and holding the Master or a Read/Write replica for the partition in which the User object exists. For redundancy and load balancing, you should have at least two servers per replica ring running SecretStore. That way, if one server fails, the SSO client can continue to retrieve the secrets from the other.
An example of this recommended setup is shown in Figure 1. In this sample NDS tree, SecretStore (SSS.NLM)was loaded first on server FS1, which also holds the Master replica of the "NORAD" partition. For redundancy, SecretStore was also loaded on FS2, which holds a Read/Write replica of the partition.
Users in this partition (such as "Einstein") can authenticate to either of these servers. The Single Sign-on client performs the background authentication and retrieves the users' secrets.
Figure 1: A sample NDS tree in which Single Sign-on has been implemented.
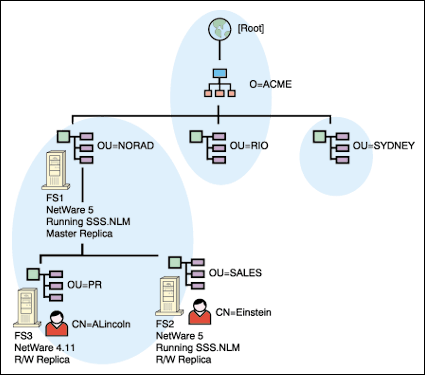
User "ALincoln" in OU=PR logs in to FS3, a NetWare 4.11 server. In this case, the user's secrets cannot be retrieved from server FS3. The SSO client performs a ping (NCP 92) and DS.NLM returns a list containing all the servers in the replica ring. FS1 will be the first server in the list, so that is the one from which ALincoln will retrieve his secrets.
Upgrading NICI
Before installing Single Sign-On, you need to ensure the following prerequisites are met:
The server should be patched with the latest NetWare 5 Service Pack (at least Service Pack 1).
Licensing should be properly installed on the server.
The server should be running NICI version 1.3.1 or higher.
NICI version 1.3.1 is available in one of two editions:
U.S./Canada (128-bit) edition. This edition upgrades a NetWare server's 128-bit Cryptographic Engine (XENG) modules. This edition is available for use only on servers within the U.S. or Canada, unless prior authorization has been obtained from the U.S. Department of Commerce.
Worldwide (56-bit) edition. This edition will upgrade key strength from 40 to 56 bits in the Cryptographic Engine (XENG) for data encryption with DES; from 256 to 512 bits for data encryption with RSA; and from 512 to 1024 bits for key management with RSA. It may be installed on any worldwide edition of NetWare 5.
The URL from which to download NICI 1.3.1 is:
http://www.novell.com/products/cryptography
Download NICI-U0.EXE for the U.S./Canada edition, or NICI-W1.EXE for the Worldwide edition. You will need to extract the contents of the file to a floppy diskette in order to install this product on your NetWare 5 server.
Loading the Upgraded Version
To upgrade NICI to version 1.3.1, complete the following steps:
Load NWCONFIG.
Select Product Options.
Select "Install a Product Not Listed".
Indicate where the self-extracted files will be installed from by pressing <Enter< for a floppy diskette or <F3< for a network directory.
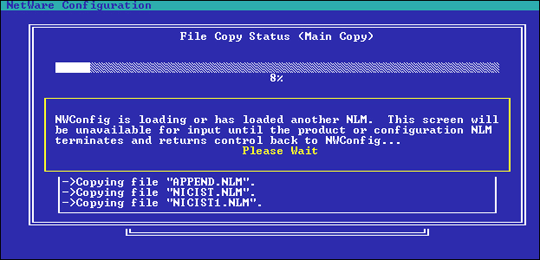
When the product description and software license are displayed, you will be prompted to accept the License Agreement. If you accept the agreement, the files are copied to appropriate destination directories on the server (see Figure 2).
Figure 2: This message is displayed while the NICI files are copied to the server.
When prompted that the installation was successful (see Figure 3), press <Enter<.
Figure 3: This prompt is displayed when NICI installation is complete.
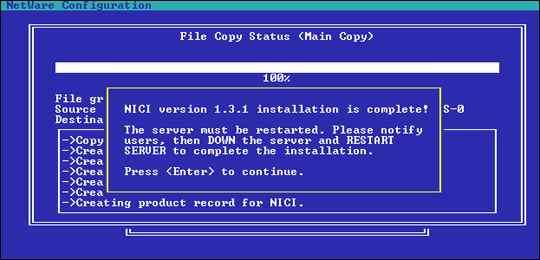
When prompted that the installation is complete, notify all logged-in users to log out, and then reboot the server.
Resolving NICI Upgrade Problems
If you experience problems with any of the security services after you have upgraded either the U.S./Canada or Worldwide editions of NICI, review the SYS$LOG.ERR file in the SYS:\SYSTEM directory for any NICI errors. Some example errors are shown below:
8-20-1999   4:40:16 pm:    CCS-3.13-1
Severity = 5 Locus = 17 Class = 19
NICI CCS: WARNING - Could not load server private key
NCP Packet Signature Option may not be available.
8-21-1999   4:40:13 pm:    XMGR-3.6-13
Severity = 5 Locus = 17 Class = 19
Required Foundation Key Set not present.
NICI cannot initialize.
These problems may be resolved by installing the foundation key as follows:
Copy the xxxxxxxx.NFK file from the MLA license disks or the xxxxxxxx.NLF file on non-MLA license disks to SYS:SYSTEM.
Rename the file to NICIFK.
Reboot the server.
If the errors persist, delete the following files on the SYS volume:
SYS:_NETWARE\XMGRCFG.DA0*
SYS:_NETWARE\XMGRCFG.KS0*
SYS:SYSTEM\NICI\XMGRCFG.DA1
SYS:SYSTEM\NICI\XMGRCFG.KS1
SYS:SYSTEM\NICI\XARCHIVE.000
SYS:SYSTEM\NICI\NICICFG.CFG
* You will require special tools to access this directory.
After you have done this, reinstall NICI 1.3.1 with the new foundation key as explained in Steps 1-3 above.
Installing Single Sign-on
To install Novell Single Sign-On in an NDS tree, you must have NDS Supervisor object rights to the [Root] of the tree. Keep in mind that the first server on which Single Sign-On is installed will become the SD Key Server. Subsequent installations of Single Sign-On within the same tree will connect to this server to retrieve the SD tree key.
At the NetWare 5 server console, type:
NWCONFIG<Enter<
Select Configuration Options | Product Options.
Select Other Installation Actions | Install a Product Not Listed.
Indicate where the self-extracted files will be installed from by pressing <Enter< for a floppy diskette or <F3< for a network directory.
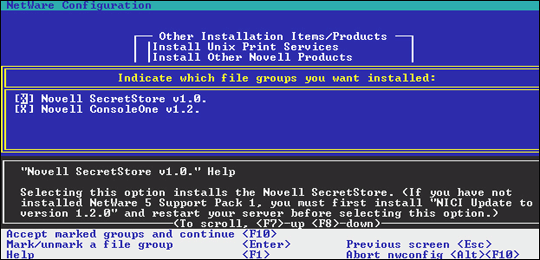
When prompted for which file groups to install, select Novell SecretStore v1.0 and ConsoleOne v1.2, if needed (see Figure 4).
Figure 4: This message is displayed while the NICI files are copied to the server.
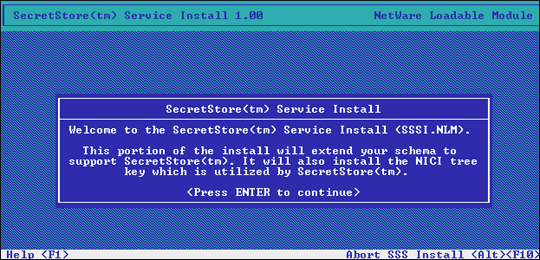
You will see a welcome screen similar to the one shown in Figure 5. Press <Enter< to continue.
Figure 5: This screen prompts you for which file groups to install.
When the product description and software license are displayed, you will be prompted to accept the License Agreement. If you accept the agreement, the files are copied to appropriate destination directories on the server.
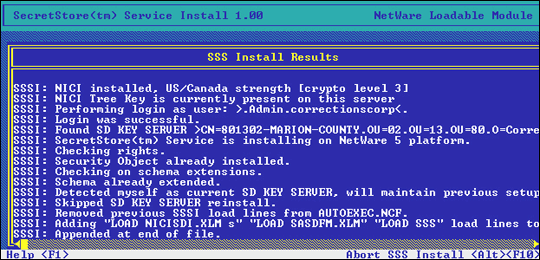
Enter the administrator password when prompted. (If this is not the first server, you will be given an option to change the SD Key Server. Answer "No".) SSSI.NLM will display its progress, as shown in Figure 6.
Figure 6: This screen is the welcome screen for the SecretStore Service Installation program (SSSI.NLM)
When prompted that the installation was successful, press <Enter<.
After the installation is complete, review the AUTOEXEC.NCF file to verify that the Novell Single Sign-On entries are in place, as shown in the example below:
# BEGIN SECRETSTORELOAD NICISDI.XLMLOAD SASDFM.XLMLOAD SSS# END SECRETSTORE
These entries should precede the PKI/SAS entries in the AUTOEXEC.NCF file.
Reboot the server.
For subsequent installations of Single Sign-On, ensure that the new SSO server is able to communicate with the SD Key Server.
Note: Never use "DSTRACE = *.* " to update DS.NLM on a server running SSS.NLM. If you want to upgrade or reload NDS on the server which is running SSO, load the new DS.NLM and then reboot the server.
Novell Single Sign-On Client Installation
When you install the Novell Single Sign-On workstation software, DLL files are installed for the following third-party applications:
NWSSENTRUST.DLL for Entrust Entelligence 4.0
NWSSNOTES.DLL for Lotus Notes 4.5 or higher
PSUSER.DLL for PeopleSoft 7.0
Novell Single Sign-on will use these files only if the workstation is running these specific applications.
You must either map a search drive to SYS:PUBLIC\WIN32 or copy the NWSSO.DLL file to each user's local drive in the C:\WINNT\SYSTEM32 or C:\WINDOWS\SYSTEM directory.
SD Key Server Disaster Recovery
In the event the SD Key Server crashes, any existing NetWare 5 server running SSS.NLM can be promoted to act as the SD Key Server. To do this, simply load SSSI.NLM on the server, authenticate as Admin, and then answer "Yes" to the option to make this the SD Key Server.
Management Through ConsoleOne
Novell Single Sign-on can be managed using ConsoleOne 1.2x or higher. You will need to install the ConsoleOne snap-ins that come with Novell Single Sign On. ConsoleOne is installed in the SYS:PUBLIC\MGMT\CONSOLEONE\ 1.2\BIN directory. It will update the appropriate DLL on your workstation when run for the first time.
The administrator can add, modify, or delete secrets using ConsoleOne.
The optional Enhanced Protection can be selectively enabled for different secrets. This feature can be turned on only at the time the secret is created.
With Enhanced Protection enabled, secrets can be unlocked only with the last valid password that the user entered using a user-initiated Change Password request. As a result, even if the user or administrator changes the NDS password after the secrets have been locked, the status of the locked secrets is not affected. The user must provide his or her old NDS password to unlock the secrets.
Neither Admin nor the user can recover the secret if a user forgets the old NDS password. In this case, you have to delete and then re-create the secrets.
The administrator can only create secrets, not view any user's secret. You have to log in with the same user ID to view the secrets for that user.
Note: To manage and coordinate SecretStore name changes worldwide, it is important to register your names with Novell Developer Support. For further information, contact:
http://developer.novell.com/ndk/support.htm
Conclusion
With the release of Novell Single Sign-on, Novell provides a secure, easy-to-use single login product that minimizes password administration headaches. With NDS as the key to managing users, their access rights and authentication, the administrator has a true single-point-of-administration solution that is backed by the strong security of NICI.
By developing APIs and providing them to third-party developers, and through its continued concentration of enabling top enterprise applications, Novell is committed to making Novell Single Sign-on the logical single sign-on solution of choice.
Novell Single Sign-on is available to NetWare 5 customers for US $49 per user. The product can be purchased from an authorized Novell reseller or by calling (888) 321-4272. In addition, you can download Novell Single Sign-on for all PeopleSoft applications from http://www.novell.com/products/sso.
For Additional Information
This AppNote has covered various aspects of Novell Single Sign-on, including NDS design considerations, installation, and management. Those desiring further information are referred to the following resources:
For additional deployment information, see the SETUP.PDF and README files supplied on the Novell Single Sign-on installation CD.
Developers can download the Novell Single Sign-on Software Development Kit (SDK) for free from http://developer.novell.com/ndk/sdk/index.htm.
For information on SSO-enabling an application and the APIs, see "SecretStore Single Sign-on" in the November 1999 issue of Novell Developer Notes.
* Originally published in Novell AppNotes
Disclaimer
The origin of this information may be internal or external to Novell. While Novell makes all reasonable efforts to verify this information, Novell does not make explicit or implied claims to its validity.