BorderManager Enterprise Edition 3.5 Implementation Tips
Articles and Tips: article
Consultant
Novell Consulting
01 Dec 1999
BorderManager Enterprise Edition 3.5 has a new concurrent licensing scheme that can be a bit tricky to figure out. This AppNote helps unravel the mysteries of installing, monitoring, and upgrading licenses.
- Introduction
- Server Placement and Configuation
- BorderManager Installation
- BMEE Configuration: Server Console
- BMEE Configuration: NetWare Administrator
- Summary
Introduction
BorderManager Enterprise Edition (BMEE) is a suite of software designed to enhance security and connectivity services in both NDS and NetWare. Some of its components will seem familiar to long-time Novell customers, since they evolved from products such as the MultiProtocol Router (MPR), NetWare Connect, and Novell Internet Access Server (NIAS). In fact, the term NIAS (now at version 4.2) is still used, as are utilities like INETCFG and NWCCON.
BMEE adds the following services to NetWare:
WAN media support
Enhanced packet filtering
Network Address Translation (NAT), which is now native to the NOS with patched NetWare 5
Virtual Private Networking (VPN), site-to-site and client-to-site
Remote access (including RADIUS) and modem sharing
IP Gateway (both IPX/IP and IP/IP circuit gateways)
Multiple proxy services, including transparent HTTP proxy
Multiple caching services, forward and reverse
Access control
Content filtering
This AppNote is based on version 3.5 of BMEE. It discusses server placement and configuration, installation of BorderManager, and configuration tips for a few common services. Although IPX/SPX is supported by certain BMEE components (RADIUS, VPN, and others), only TCP/IP is discussed.
This document assumes a professional knowledge of TCP/IP, NetWare, and Novell Directory Services (NDS). It also assumes a general familiarity with the purpose and features of BorderManager.
Server Placement and Configuation
Before you install BMEE, there are some important placement and configuration issues you need to consider. The following sections discuss design considerations about the physical location of the BMEE server, its placement in the NDS tree, and other server settings.
Physical/Logical Placement
The placement of BorderManager servers on the physical network, and on the logical network, is the single most important design issue. This determines how (and if) your goals are accomplished. A complete understanding of your network infrastructure is necessary to ensure proper placement.
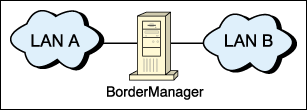
To serve as a firewall, the BMEE server must have at least two network interfaces and be functioning as a gateway between networks (see Figure 1). However, a BMEE server may have a single physical interface. End node placement may be appropriate for RADIUS or VPN servers if no firewall services are in use. Even proxy/cache will work with the server as an end node, but users can potentially bypass the proxy.
Figure 1: A BMEE server acting as a gateway in a firewall scenario.
When designing firewall or hierarchical caching services, begin at the most upstream point. Typically, this is the primary connection to the public Internet. The connecting device can be a BMEE server or an external router. Regardless, the first BMEE server must have an interface with at least one registered public IP address (name this board PUBLIC). Multiple public addresses may be needed if the server will be doing static NAT.
Ensure a large enough subnet to accommodate the network's foreseeable needs. If the ISP uses an unnumbered or unrouted connection, it will be necessary to have an external router as the connecting device in series with the first BMEE server. Figure 2 shows an example configuration.
Figure 2: A BMEE server in a scenario with an unrouted ISP connection.
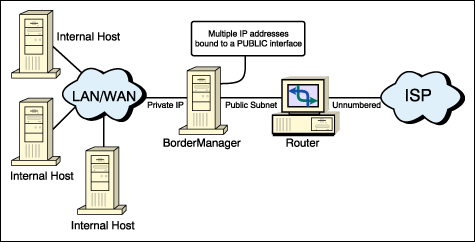
You might be able to save money at remote sites by having a BMEE server act as the connecting device. BorderManager supports most WAN media, including leased line, frame relay, ISDN, and ATM. However, circuit providers often supply a router, whether it is needed or not, so you may find yourself with an extra device in series with the server. As long as the ISP will put the public subnet on the serial link between the ISP and the customer, this extra router can be configured as a transparent bridge.
Note: On-demand connections are supported but not recommended. A permanent 56/64 or T1/E1 connection will be the most stable and easiest to configure.
Larger organizations may have more complex needs that dictate spreading BMEE services across multiple servers and establishing a "demilitarized zone" or DMZ. For example, you may wish to deploy NAT and VPN services for several hundred users. Since both are processor-intensive functions, separate servers would be appropriate. However, VPN servers cannot be placed behind NAT devices. Since NAT puts a new header on packets, a SKIP dialogue cannot occur between VPN nodes and encryption cannot be negotiated, so the VPN server would need to be upstream of the NAT server.
Other firewall designs are discussed in detail in the BMEE product documentation (under Overview | Firewall Technologies), available online at http://www.novell.com/documentation/.
Within the private internetwork, the normal infrastructure design principles apply. For example, minimize the number of hops between servers in a hierarchical cache structure. This may require removing some external routers or reconfiguring them as bridges. Leaving the router hardware in place can provide a backup connectivity method should a BMEE gateway server go down for an extended period; the old router can be reconfigured temporarily.
Placement in the NDS Tree
Although BorderManager is a server-centric product, it uses NDS for configuration details and authentication. Almost all application-layer configuration is done on the Server object. Therefore, intelligent placement of the BMEE Server objects in the tree is critical, as is deciding which replicas the servers will hold.
A BorderManager server should be placed near its users in the NDS tree. In a branch office, for example, the BMEE gateway server should be in the OU for that geographical location. The key is to minimize tree walking and the number of replicas the server needs. If practical, it should hold all of its users and rules in a local replica. (Rule placement is discussed in a later section.) As with any NDS design, administrative roles must also be accommodated.
Server Configuration Notes
The following minimum environment settings are recommended as a starting point when tuning proxy/cache servers:
set maximum packet receive buffers = 2500

set minimum packet receive buffers = 1000

set new packet receive buffer wait time = .1 sec


set maximum interrupt events = 50

set maximum service processes = 1000

set minimum service processes = 500

set new service process wait time = .3 sec

set worker threads execute in a row count = 15

set pseudo preemption count = 200


set immediate purge of deleted files = on

set enabled file compression = off

set enable disk read after write verify = off

set maximum file locks = 100000


set garbage collection interval = 5

set directory cache allocation wait time = 0.1 sec

set directory cache buffer nonreferenced delay = 60 min

set maximum number of internal directory handles = 500

set maximum directory cache buffers = 10000

set minimum directory cache buffers = 2500

set maximum concurrent directory cache writes = 125

set maximum concurrent disk cache writes = 750

set dirty disk cache delay time = .1 sec
The purpose of these settings is discussed in TID #2949807 and TID #10012765 at http://support.novell.com. The descriptions in these TIDs will help you determine what settings might need to be adjusted if you observe the need for further tuning.
Maximum Physical Receive Packet Size. The BMEE online documentation provides suggested settings for the "Maximum Physical Receive Packet Size" variable. The suggested settings almost always work. However, if you have a WAN card in the server connected to frame relay, the telco switch may necessitate a setting lower than 1514. If no data is flowing through the WAN link with the conventional settings, use PING.NLM and change the ping packet size, starting at 1514 and going down until the replies come. Then use that as the maximum physical receive packet size. "Set Use Specified MTU = On" is a quick fix for this, but can result in less efficient throughput.
If Point-to-Point Protocol (PPP) is in use on the WAN link (such as an async dial-up line or a "clear channel" DDS circuit), the maximum physical receive packet size may need to be increased by ten from the recommended values, to accommodate the PPP header.
Minimum Hardware Requirements. All of the BorderManager services can run simultaneously on surprisingly minimal hardware. As long as the server has at least 64MB of RAM, you can use it to service a small work center. However, caching functions are vastly improved with more RAM; 256MB is recommended, or more if possible.
Since encryption and translation are processor-intensive functions, VPN, NAT, and IP Gateways should be on dedicated boxes in large environments (more than a few hundred users).
Server Volumes. Separate volumes should be set up for cache and logging so that the SYS volume does not get filled. To improve cache efficiency, use a block size of 8KB or 16KB, with compression and block suballocation disabled. NSS volumes work well for caching but have additional tuning requirements (see TID #2949807 at http://support.novell.com).
Static Routing. Whenever possible, use static routing on BMEE servers. It places almost no load on the server, and does not add to the router discovery traffic that may already exist on the network. Since BMEE servers are usually upstream gateways, one static default route and the minimal network routes can be very simple to enter.
Licensing Issues. BorderManager licensing is different from most Novell products. Network layer services (filtering, NAT, site-to-site VPN, and so on) require only a server license. Services that require user authentication (remote access, content filtering, and so on) require a user license. Users authenticate to the BorderManager applications running on the server, not to NetWare itself, so a server running BorderManager will usually be fine with the included NetWare base license. It is possible to buy components separately in three different packages (Firewall Services, VPN Services, and Authentication Services), which saves money on dedicated function servers.
For more information on BorderManager licensing, see the AppNote entitled "Understanding BorderManager Licensing" in this issue.
BorderManager Installation
Once you have the server placement planned, BorderManager installation is easy. The install routine puts all components in place for you to configure and implement at your convenience. There are three steps:
Install BorderManager on the server
Install the NWAdmin snap-ins
Install CyberPatrol (if desired)
Installing BorderManager on the Server
BMEE 3.5 can be installed on NetWare 4.11, 4.2, 5.0, or NetWare for Small Business 4.2 or 5.0. Current OS support packs must be in place. Separate installation instructions are provided in the online documentation for each OS. BorderManager does extend the NDS schema, so the installer must be a user with the Supervisor right to the root of the tree. As with any major NDS operation, you should ensure the health of the tree before starting.
By default, BRDCFG.NLM will load when you first boot the server after installation. You can "Secure the Public Interface" by enabling packet filters with the default exceptions. (Packet filters will be discussed in detail in the next section.) On NetWare 4.x, all BMEE services are disabled by default. On NetWare 5, access control and HTTP proxy are enabled by default, with all other BMEE services disabled.
Installing the NWAdmin Snap-Ins
After installing the support pack and restarting the server, run the SETUP.EXE program found in SYS:PUBLIC\BRDRMGR\SNAPINS\ to install the NetWare Administrator snap-ins. If the PKI snap-in does not already exist, it is also installed, but to SYS:PUBLIC\. You may also need to copy PKISNAP.DLL to the WIN32\SNAPINS\ subdirectory.
Installing CyberPatrol (Optional)
CyberPatrol is a canned set of deny-by-URL rules. It may be installed by running SYS:ETC\CPFILTER\CP_SETUP.EXE. BorderManager includes a 45-day trial version of CyberPatrol.
BMEE Configuration: Server Console
Most of BorderManager's configuration is done in NWAdmin. However, much of the lower layer configuration is done at the server console with INETCFG, FILTCFG, and NWCCON. There are two additional utilities, VPNCFG and BRDCFG, plus a gateway NLM to all the utilities called NIASCFG.
Packet filtering and NAT are two common services that are configured at the server console.
Packet filtering is the simplest border control mechanism. Filters work at the network and transport layers and take precedence over all other BorderManager components. They are configured in FILTCFG.NLM.
Use of dynamic NAT (or of the IP Gateway with routing disabled) provides a natural firewall in the sense that no one on the public Internet can initiate a dialogue with an internal node. However, that does not protect the BMEE server itself, or hosts set up with static NAT. In the absence of access rules, these features also do not control what dialogs can be initiated by users. Packet filters fill those security needs.
There are two approaches to packet filtering (and border security in general): "allow all and deny by exception," or "deny all and allow by exception." BorderManager defaults to the latter. If you did not do so during installation, you may implement the default filters and exceptions by loading BRDCFG. It will create the following denied TCP/IP packet filters:
|
Source Interface
|
Destination Interface
|
Protocol ID
|
Source Port
|
Destination Port
|
Source Address
|
Destination Address
|
|
Public |
Any |
IP |
All |
All |
Any |
Any |
|
Any |
Public |
IP |
All |
All |
Any |
Any |
BRDCFG will also create the following filter exceptions:
|
Source Interface
|
Destination Interface
|
Protocol ID
|
Source Port
|
Destination Port
|
Source Address
|
Destination Address
|
|
Public |
Any |
TCP |
All |
443 |
Any |
Public* |
|
Public |
Any |
TCP |
All |
1024-65535 |
Any |
Public |
|
Public |
Any |
UDP |
All |
1024-65535 |
Any |
Public |
|
Public |
Any |
TCP |
All |
213 |
Any |
Public |
|
Public |
Any |
TCP |
All |
353 |
Any |
Public |
|
Public |
Any |
UDP |
All |
353 |
Any |
Public |
|
Public |
Any |
SKIP (57) |
All |
All |
Any |
Public |
|
Public |
Any |
TCP |
All |
80 |
Any |
Public |
|
Any |
Public |
IP |
All |
All |
Public |
Any |
* This is the actual IP address of the public interface. Note that BorderManager 3.x supports stateful filtering. If desired, the exceptions for dynamic ports 1024-65536 may be removed. Stateful filter exceptions can then be entered for services running on the BorderManager server and for services running on hosts being accessed via static NAT. This is a more secure configuration because dynamic ports are blocked except when actually in use by a dialog.
Excellent step-by-step instructions for creating filter exceptions are contained in the following TIDs:
|
Service
|
TID #
|
|
Ping |
2941091 |
|
DNS server |
2932684 |
|
DNS client (TCP) |
2942501 |
|
NetWare 5 (NCP, NTP, SLP, and CMD) |
10013531 |
|
SMTP server behind BMEE |
2933206 |
|
HTTP server on BMEE server |
2936875 |
|
HTTP server behind BMEE |
2933282 |
|
HTTP client behind BMEE |
2943229 |
|
POP3 client behind BMEE |
2933125 |
|
Real Audio client behind BMEE |
2932188 |
|
ICQ client behind BMEE |
2945221 |
|
NNTP client behind BMEE |
2933126 |
|
Passive FTP client behind BMEE |
2938697 |
|
Active FTP client behind BMEE |
2935141 |
|
Telnet client behind BMEE |
2939550 |
Network Address Translation (NAT)
NAT allows the use of "private" or unregistered IP addresses behind a BorderManager server, and throughout an organization's internetwork. The primary advantage of dynamic NAT is the conservation of rapidly-disappearing public IP v4 addresses. With dynamic NAT, a single registered address can service thousands of private nodes. A nice side effect, as mentioned in the previous section, is that dynamic NAT creates a natural firewall that prevents anyone on the public Internet from initiating a dialogue with a private node.
When an internal host needs to be accessed from the Internet, a public address is selected for the host, bound to the public interface of the NAT server, and mapped to the corresponding private address. This is "static NAT." Filters can then be created on this public address to protect the internal host.
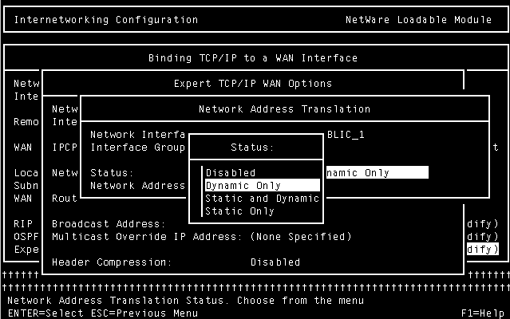
Dynamic and static NAT are enabled on the public interface in INETCFG (see Figure 3). Go to Bindings | <Public Interface Name<| Expert TCP/IP Bind Options | Network Address Translation. Select dynamic, static, or both. If you select static only or both but make no entries in the NAT table, the setting will revert back to dynamic only. Once you reinitialize the system, you have a NAT server!
Figure 3: Enabling dynamic and static NAT using INETCFG.NLM.
To configure static NAT, select public addresses for those hosts that need them. Add them to the NAT table for the public binding with the corresponding private addresses. Then, add the public addresses to the BMEE server's public interface binding by typing "add secondary ipaddress xx.xx.xx.xx" at the console prompt for each address in turn. The address will be automatically assigned to the correct interface. Add those statements to the AUTOEXEC.NCF after the INITSYS.NCF line (put it towards the end). To verify secondary IP address configuration, type "display secondary ipaddress" at the console prompt.
Once NAT is enabled, you may need to type at the console prompt: "set nat dynamic mode to pass thru = on". This is required when applications that need to be accessed from the public Internet (GWIA, HTTP, and others) are running on the NAT box.
Any addresses will work on the private network; however, if you are using a range that is in use on the Internet, internal nodes will be unable to communicate with the real owners of those addresses. The following address ranges are reserved for private use:
|
Class
|
From IP Address
|
To IP Address
|
Total Node Addresses
|
|
A |
10.0.0.0 |
10.255.255.255 |
16,777,214 |
|
B |
172.16.0.0 |
172.31.255.255 |
1,048,544 |
|
C |
192.168.0.0 |
192.168.255.255 |
64,770 |
BMEE Configuration: NetWare Administrator
Once you've locked down the border with packet filters and NAT, you can begin configuring application layer services in NWAdmin. This is where you configure VPN, access control, proxies, and caching. Before you begin to configure services on the BorderManager Setup page of the Server object, be sure to add the server's IP addresses where indicated and to specify whether they are public or private. Most changes to BMEE settings in NDS are automatically synchronized out to the NLMs and go into effect immediately.
Site-to-Site Virtual Private Networking
VPN configuration starts at the server console in VPNCFG. Follow the prompts to specify whether the server is a master or slave, assign network addresses to the VPN channel, and generate encryption keys.
A site-to-site VPN is a new logical segment in the internetwork. Effectively, it is an additional interface on the server. It therefore needs its own network addressing. The master and slave servers all have node addresses on this subnet. You need two IP addresses to complete setup in VPNCFG. "Public IP Address" is the address of the physical public interface. "VPN Tunnel IP Address" is the address you are assigning to the new logical segment.
Note: If NAT is enabled on the public interface, on the same box as VPN, the VPN logical segment itself is on the private side of the NAT firewall.
Once the addresses are assigned and the encryption keys created and exchanged, the remainder of the VPN configuration is done via NWAdmin. Here the Master and Slave servers can be added. Under the Master server, the protected networks and security parameters can be set. By default, the VPN nodes regenerate the data encryption key every 1000 packets (by employing jitter, VPN servers vary when they change data encryption keys so that it is not exactly 1000 packets every time). While this can be changed, it should be sufficient for most users. Likewise, the default encryption technique, RC5, should be sufficient as well. TripleDES is technically more secure; however, the additional processing overhead required causes a significant performance hit.
For the VPN network topology, the default of mesh is usually most appropriate. Mesh allows all the VPN servers to communicate directly with one another. This generates more routing traffic when RIP or OSPF are used, but static routing keeps the mesh topology efficient. Also with mesh, if one node goes down the rest of the VPN stays up.
While not mandatory, Novell does recommend regenerating the Diffie-Hellman shared secret every 6 to 12 months. Since the keys are exchanged "out-of-band" (such as via floppies, e-mail, and others), the chances of someone stealing a key are rare. However, the only way to ensure that security is never compromised is to re-exchange the keys periodically. The keys can be regenerated using the VPNCFG.NLM on both the Master and Slave servers. After they are generated, they need to be exchanged and installed at each site.
Master and slave servers do not need to be in the same NDS tree. However, the goal is often to merge a tree at a remote site into the main organizational tree. The VPN should be observed for some time for stability and performance before proceeding with a tree merge.
Access Rules
To enable access rules, check the "Enforce Access Rules" box on the BorderManager Setup page on the server object. Access rules apply to all users who attempt to go through the BMEE server. A default rule of Deny All is placed on the server object, and gets pushed down (stays at the end of the list) as new rules are created.
Unlike ZENworks policies, BorderManager rules are not user- or container-centric, they are server-centric. Each time a BMEE server comes online, the server searches the tree for rules, from the server object up to the root. It will only search upward, not across Os or OUs. Each rule found is placed in the ACL of the server. They are ordered as follows:
Rules created at the Server object
Rules created at the parent container of the Server object
Rules created at other up-line containers
Rules created at the O container
Note: ACLCheck looks for changes every fifteen minutes, with a full refresh every twenty-four hours.
Each user request is checked against the ACL to determine if a rule exists that applies to that request. If an applicable rule is found, the search stops. Therefore, server-based rules take precedence.
An example will help illustrate how this works:
O=EMEA (rule=DENY ALL)

    |
OU=Corp (rule=DENY ALL);

                  |
OU=Legal (rule=ALLOW ALL);

                                |______CN=BMEE_Server
If users exist in all three containers, you might think that only users in the Legal container would have access through BMEE_Server. But since the server looks at rules from the Server object up, it would find an applicable rule for all requests at OU=Legal(rule=Allow All). So, users in all three containers have full access.
The needs of each network drive rule-placement decisions. In small environments, putting all rules on the Server objects can help keep things simple. However, rules implemented at a container can eliminate duplication because they can apply to multiple subordinate servers. They can also facilitate administrative roles, but be mindful of replica placement. Follow the standard NDS design principles by avoiding excess tree walking, too many replicas, and replication across WAN links. Note that CyberPatrol rules can only be set on Server objects. This is by design, to ensure license compliance.
Summary
This AppNote has provided guidance for the effective design and implementation of a basic BorderManager Enterprise Edition 3.5 system. It discussed packet filtering, NAT, site-to-site VPN, and access control, services which enhance the security and manageability of an internetwork. Additional services, such as forward and reverse proxy, enhance performance, while client-to-site VPN and RADIUS enhance connectivity. The broad range of services in the BMEE suite make BorderManager a powerful, flexible solution for any network.
* Originally published in Novell AppNotes
Disclaimer
The origin of this information may be internal or external to Novell. While Novell makes all reasonable efforts to verify this information, Novell does not make explicit or implied claims to its validity.