A Disaster Recovery Strategy for Mixed NetWare 4/5 Environments
Articles and Tips: article
MCNE, MCSE, CCNA
California Energy Commission
01 Sep 1999
This AppNote provides some sage advice on how to prepare for the unthinkable--a large-scale disaster that wipes out your entire network.
- Introduction
- NDS and the Extensible Schema
- Tools for NDS Recovery
- Actual Disaster Recovery Example
- NDS Restoration Issues
- Conclusion
Introduction
Many of the disaster recovery solutions available on the market work on the assumption that you will be restoring data onto the same hardware from which it was lost. However, in full disaster scenarios, it is rarely the case that the network administrator ends up with the same equipment. For the purpose of this article, it is assumed that you have lost all your original hardware but you have a tape stored off-site. It is faster to go through the traditional approach of restoring from a straight backup.
The disaster recovery strategy presented in this article assumes that you have one person dedicated to maintaining such a system. This may not be practical in all network environments. You will have to weigh the benefits of the proposed disaster recovery solutions against the time and cost involved in maintaining them.
Our network is based on HP servers and the software solutions provided by Novell and Veritas.
This AppNote outlines the procedures to restore a group of NetWare 4.x and 5.x servers for disaster recovery scenario. There are four sections to this AppNote:
An overview of the NDS database and its extensible schema
A discussion of tools and procedures used for disaster recovery
A practical example supporting the disaster recovery plan and methodology
A discussion of various issues encountered in recovery testing
For more information, refer to the sources listed at the end of this AppNote.
NDS and the Extensible Schema
Novell Directory Services (NDS) is composed of two main elements:
NDS objects, which include the [Root] object and its children objects such as container objects and leaf objects
The NDS schema, which is a set of rules for how NDS objects are defined and how they interact
Much of the popularity of NDS is due to the extensibility of the base schema. Any third-party manufacturer can create software that integrates with NDS by modifying the existing schema classes. In fact, many Novell products (such as GroupWise and ZENworks) modify the schema.
The "golden rule" when extending the schema is this: If you have to restore NDS, restore the schema before restoring the NDS objects.
The logic behind this rule is that when NDS is reinstalled after a disaster, the schema reverts to its original unmodified state. If you try to restore NDS objects that are dependent on an updated or modified version of the schema, these objects will not restore properly.
With Backup Exec 8.0 for NetWare, for example, a series of "Unknown" objects will appear, denoting the failure of the base schema to recognize the added functionality of a newer schema. With the NetWare 5.0 Backup utility (SBCON), the symptoms are that objects, including their subordinate containers, simply do not restore. No Unknown objects appear as with Backup Exec 8.0.
In our testing, we have found similar results with Backup Exec 8.0 and SBCON. If you have multiple containers and you forget to re-extend the schema before restoring NDS, either the containers and users inside them are not restored (SBCON) or they appear as Unknown objects (Backup Exec). Only the top (O=Organization) container is restored correctly, along with any users belonging to that container, because it is the mandatory container created when you first install NDS. With either product, objects based on an updated schema will be missing.
Tools for NDS Recovery
Two tools are invaluable for any disaster recovery scenario:
Documentation (hard copy of the NDS tree)
Backup hardware and software
Document Your NDS Tree
For recovery purposes, it is essential that you have a hard copy printout of your NDS tree structure. This documentation should include:
A complete list of Server objects with their internal IPX numbers and the number and sizes of volumes with the different name spaces loaded.
The placement of the NDS replicas and partitions.
Ideally, a graphical representation of the structure of the NDS tree.
Some third-party tools are available to help you document your NDS tree. One is DS Standard from Computer Associates. (For more information about this product, visithttp://www.cai.com/products/ds_standard_nds.htm.)
Backup Hardware and Software
You will also need the appropriate backup hardware and software to back up and restore your network. Having a dedicated backup server with a Master replica is a plus. You could use another server that contains a Read/Write replica, but you will have to promote it to a Master replica. Of course, in the event that all servers are lost, this option will not be available.
Basic Recovery Procedure
In the event of a disaster, follow this basic procedure to restore your network.
Recreate the NDS tree with the same Organization object and the same account and password used to back up the original tree. Do not restore the user to be used for the restore operation.
To facilitate the restore, install as many servers as you can into their appropriate containers before restoring NDS. Once again, this may be unrealistic in the case of a large-scale disaster. Most companies will opt to recover the servers most vital to their core business and leave the rest for later. More detail on how to do this is given in the "Partial Restore" section later in the AppNote.
Restore the NDS information first.
Restore the file system last.
You do not need to restore the file system on your backup server.
Our experience shows that you will most likely need to recreate your print queues. In fact, any NDS object that relies on a queue structure will have to be recreated. A queue references a directory on the file/print server. For example, the HP ScanJet scanner creates NDS queues which are placed on a volume on the server.
Also, if your backup software does not include any open file agent, it is most likely that your queues will not be restored.
Partial Restore
Partial restore is basically restoring the full NDS database and selectively restoring certain servers. For the servers you do not want to restore immediately, use the NDS Manager utility to delete them one by one after restoring NDS. This will take care of all time synchronization issues and replication issues due to a replica ring (list of servers containing a copy of the NDS database) not being able to synchronize because some of the servers are not physically present. Allow some time for the servers to synchronize their NDS databases. It is normal to experience -698 errors for a while until the synchronization is complete.
Reinstall the servers you want in the existing tree the same as you did during the original installation, preferably keeping the same internal IPX numbers. The first three servers installed will automatically receive a Read/Write replica. For the remaining servers, you will have to manually add a replica if there was a replica before. This is one reason why you need to document your replicas.
Time Synchronization
Time synchronization is another factor to consider in restoring NDS. For example, in our production network, we have one NetWare 4.11 server acting as the Single Reference timekeeper for the network. All other servers are Secondary time servers. In a disaster recovery scenario, the first server installed in the NDS tree becomes (by default) the Single Reference server. If this is not the server that acted as the timekeeper before, you will need to change the time configuration as part of the restore procedure (see Novell TID #2930686 "Time Synchronization Setup" for more information on this subject).
We encountered some other issues with time synchronization in our disaster recovery testing. For example, when running the "Servers known to this database" option in DSRepair, our servers showed that one of the servers was still known to the NDS database even though it was previously removed via NDS Manager and does not show up in the replica ring. We had to find the server containing the bad replica and remove NDS from it. Since we had other copies of DS, we reinstalled it from a good copy. (For further information, see TID #2908056 "Removing a Crashed Server from the NDS Tree".)
Actual Disaster Recovery Example
To better illustrate the disaster recovery process in action, we'll run through an example of an actual recovery.
Advance Preparation
In preparation, we designated server BS_CEC03 as the backup and disaster recovery server. It contains a Master replica of the single [root] partition. (In large networks with multiple partitions, it is advisable to have a server containing a copy of all the partitions. This assures maximum recoverability, but can cause extra traffic on the LAN/WAN.)
We next gathered the following necessary information:
NDS tree name (CEC_TREE)
NDS tree structure
Location in the NDS tree of the server containing the master replica
IPX internal network number of BS_CEC03 (78BC105)
IPX internal network numbers of all the other servers
MS_CEC01 (3600103D)
FS_CEC01 (3576CA5F)
WEB_CEC01 (D0E84F2)
LIB_CEC01 (01F695CE)
MW_CEC01 (35DB214D)
TS_CEC01 (0B0E507D)
Version of NDS on NetWare 4.11 and 5.0 servers
Admin account and password
Backup account, password, and location (BACKUP.HQ.CEC)
Volumes names, sizes, and name spaces loaded (LONG, MAC, and so on)
Licenses (diskettes)
Restoring the First Server (BS_CE303)
Our first step after the disaster was to purchase a new server and tape backup unit. We installed this server and loaded NetWare 5.0 on it. We took care to have the same NDS version that was previously backed up. In our case, this was DS.NLM version 7.09 for the NetWare 5 servers. The NetWare 4.11 servers were at DS.NLM version 6.00 for interoperability between NetWare 4.11 and 5.0. Since NetWare 5 service packs update the NDS version, we did not load any service packs at this time.
We could now use this newly installed server to rebuild our backup server (BS_CEC03). Before restoring NDS on this server, we determined that we'd need to install two other important servers: MS_CEC01 (GroupWise 5.2) and FS_CEC01 (print queues on VOL1), using the same names for the servers and the same IPX internal network numbers. This process is outlined below:
Install NDS on the first server.
Load DSREPAIR.NLM and run the unattended repair twice. There is always one error:
"Modification Time was incorrect. It has been updated."
Ignore this error. It is simply cosmetic.
Reinstall the other two servers with NetWare 4.11 in their own temporary tree, making sure to apply NetWare 4.11 SP6 for interoperability between NetWare 4.11 and 5.0.
Remove NDS from these servers and install them in the CEC_TREE below .HQ.CEC. Install the servers one at a time and allow some time for replication.
Run DSREPAIR.NLM twice after each new server installation.
Creating a New Backup Account
This Backup user account under .HQ.CEC would allow us to restore the NDS tree. We needed to make sure we did not restore over this account when restoring NDS. Our network documentation provided pertitent information as shown here:
|
Company/Organization |
CEC |
|
Level 1 Sub-organizational Unit |
HQ |
|
Level 1 Sub-organizational Unit |
|
|
Level 1 Sub-organizational Unit |
|
|
Administrator Name: |
.Admin.CEC |
|
Password: |
|
|
Context |
.OU=HQ.O=CEC |
To create the new Backup account, we created an Admin-equivalent user named Backup in the .HQ.CEC context.
Reinstalling Licenses the Fast Way
To do a license installation, we followed the steps listed below on each reinstalled server:
Type NWCONFIG at the server console.
Select License Options.
Select Setup Licensing Service.
Select Install Licenses.
Insert the license diskette in drive A:.
The Restored Network So Far
Figure 1 shows the new NDS tree with the three most important servers in place: the backup server BS_CEC03, the GroupWise server MS_CEC01, and the file and print server FS_CEC01, along with their volumes. Notice the Backup user in .HQ.CEC and the objects created by the license installation.
Figure 1: The new NDS tree shows the three most important servers and the license objects.
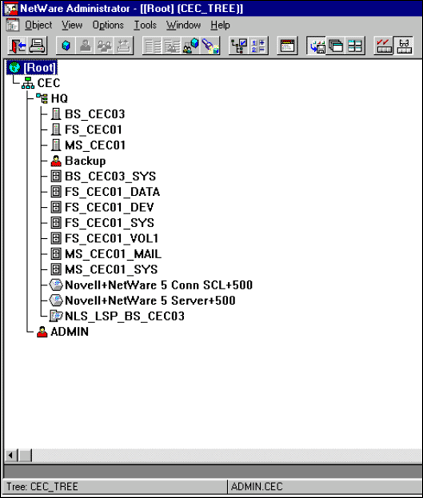
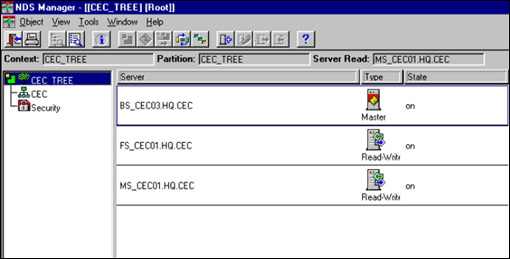
Figure 2 illustrates the replica and partitioning view of the restored network, as seen from NDS Manager. In this tree there is only one partition ([Root]). The backup server has the Master replica and the other two servers have Read/Write replicas.
Figure 2: The "Tree" view of the network shows the replicas and partitioning.
At this point, we did a full restore of the NDS tree using Backup Exec. The results of this operation are shown in Figure 3.
Figure 3: A restore of the full NDS tree done by Backup Exec 8.0 as seen using the "Partitions and Servers" view in NDS Manager.
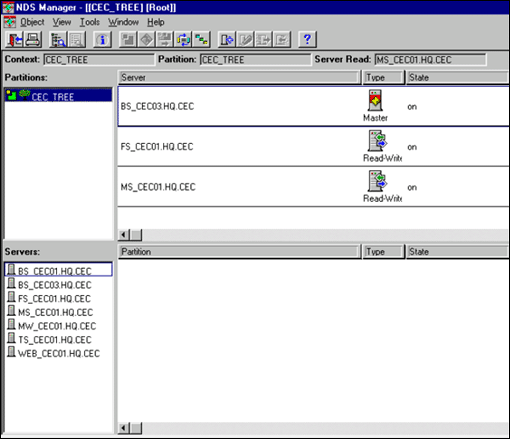
The restore operation added other servers that existed in the original tree before the disaster. In other words, Backup Exec restored not only the first three servers (BS_CEC01, MS_CEC01, and FS_CEC01), but also four other servers that are not physically present on the network.
Deleting Unrestored Servers
Because some of the servers whose objects were restored were not physically present at the time of this restore, we got the following error message when double-clicking on the server name in the Servers list:
Error # -321: unable to attach An attempt to connect to a server failed.
For example, the ManageWise server (MW_CEC01) was not yet reinstalled on the tree but we could still see information about the Server object by right-clicking on the server name and selecting the Information option (see Figure 4).
Figure 4: Server information was still available for the uninstalled ManageWise server MW_CEC01.
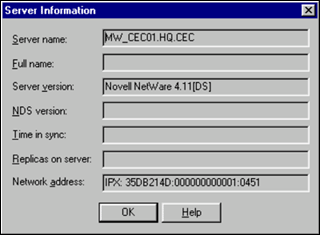
Note: The old IPX network number assigned to the server is displayed in the Network address field. You could use this to later reinstall the server with the same IPX internal network number even if you had lost your documentation.
We had to delete this Server object and others to clean up the NDS database so synchronization could be achieved.
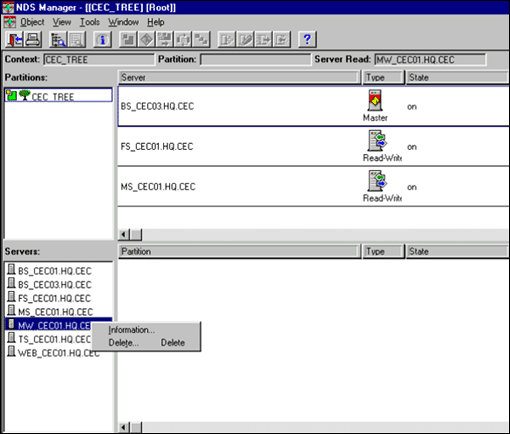
To delete a server from within NDS Manager, right-click on the server name in the Servers list (see Figure 5). Select Delete and answer Yes to the confirmation prompt.
Figure 5: To delete a server, right-click on its name and select the Delete option.
Checking NDS Synchronization
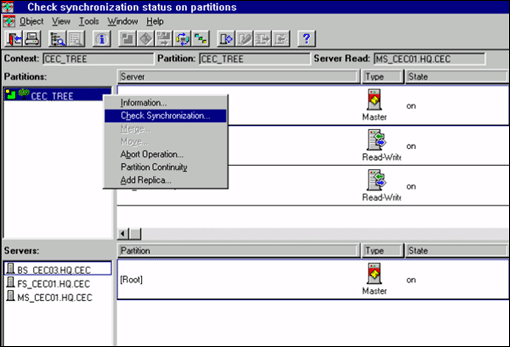
After deleting servers, check the synchronization status by right-clicking on the partition in the Partitions list and selecting the Check Synchronization option, as shown in Figure 6.
Figure 6: Partition synchronization check screen.
In the Check Synchronization window, choose "Selected partition only" and click OK(see Figure 7).
Figure 7: Choosing which partition to check synchronization on.
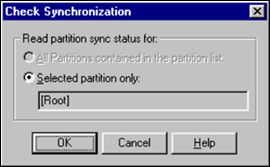
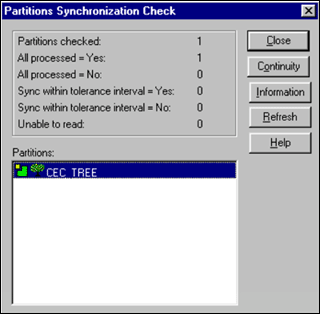
Figure 8 shows the resulting Partitions Synchronization Check window. Verify that "All processed=Yes" shows a value of 1 for the single partition that was checked. Click Close to continue.
Figure 8: The Partitions Synchronization Check window displays the results of the check.
You can also check synchronization via the Replica Information option. To do this, select a server that has a replica in the list to the right of the Partitions list. Right-click and select the Information option to see the Replica Information window shown in Figure 9.
Figure 9: The Replica Information window shows the status of the selected replica.
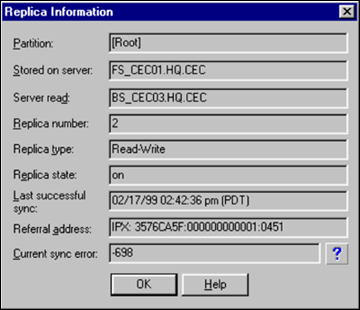
If a sync error is reported, click on the ? button to the right of the Current sync error field to see an explanation of the possible causes and remedial actions to take (see Figure 10).
Figure 10: Checking the online help for Novell Error Codes.
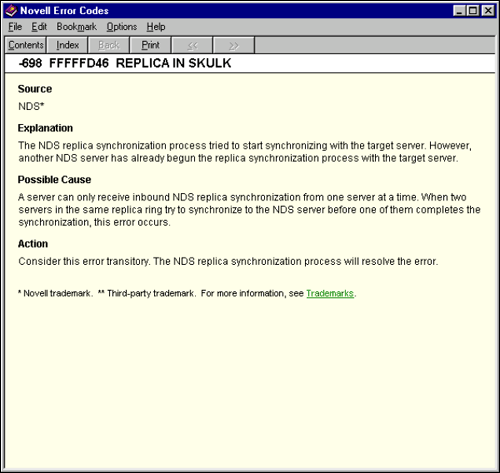
Figure 11 shows a sample "Partitions and Servers" view of the synchronized tree in NDS Manager.
Figure 11: Final view of the synchronized NDS tree in NDS Manager.
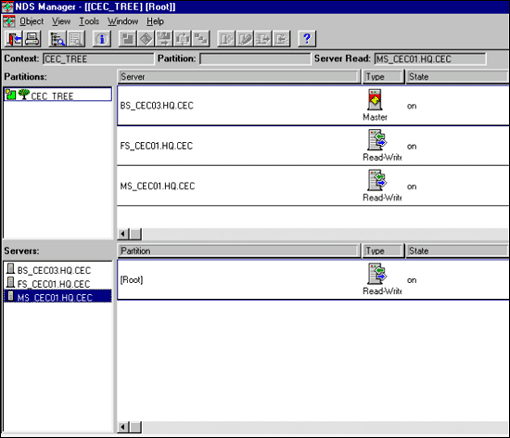
Figure 12 shows a final "Tree" view of the restored NDS tree in NDS Manager.
Figure 12: Final view of the NDS tree from NDS Manager.
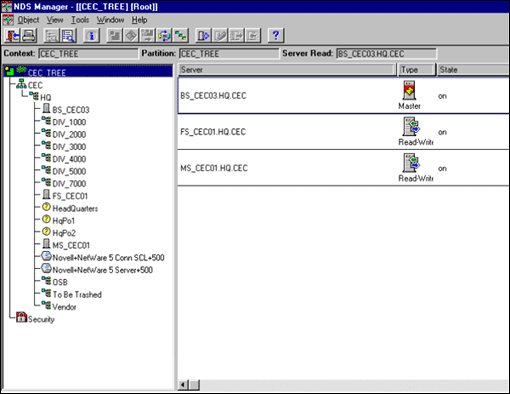
Figure 13 shows a view of the restored tree from the NetWare Administrator utility. Note that the sub-container objects and print queues are all in place.
Figure 13: Final view of the NDS tree from NWAdmin.
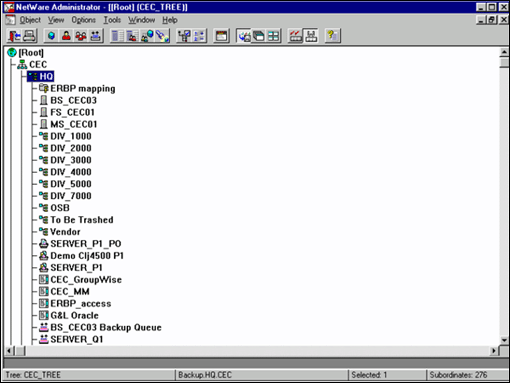
The final step is to delete the Unknown objects that identify the volume objects and the licensing information for servers that have not been removed previously.
NDS Restoration Issues
This section describes some of the other issues we encountered when trying to restore NDS in our disaster recovery procedures.
Backup Exec v8.0 Issues
When doing a restore of NDS, make sure that you do not restore the Backup Exec queue objects and the backup user account. If you do, you will get the following error message:
Session 1 was unable to finish servicing the job. NetWare Code 0xFC. Session 1 has had a queue failure.
You might also get the following message:
Queue Fail - This session has been shutdown. Do you wish to attempt to restart the session (Y/N)?
The solution is to exclude the Backup Exec objects in the restore process. (For more information, see Seagate's TechNote Number 020-100116.)
Do not access NetWare Administrator while the restore is in process. Doing so will create a lot of Unknown objects.
A small number of objects (less than 10 in a 1,500 objects tree) were not restored due to Insufficient Privilege when the restore included overwriting the backup account. If the backup account was not overwritten, all the print queues were restored.
We successfully restored 61 directories and 1,668 files. The database size was 7,319,428 bytes.
NetWare 5 Backup Utility Issues
Our testing shows that NWBACK32.EXE was not able to restore a large tree. We tested with a small tree (fewer than 100 objects) with no problem. However, our large tree (more than 1,500 objects) did not restore well. A minimum of objects were restored, with most sub-containers and their child objects not being restored.
NetWare 5 Tape Driver Issues
During our lab testing, we compared Backup Exec and the NetWare 5 backup utility, which requires NWTAPE.CDM to be loaded. This driver is loaded automatically by NetWare 5. But even though NetWare 5 detects the correct driver, it does not automatically copy the NWTAPE.CDM driver to the C:\NWSERVER directory. We found that to get this driver to load permanently, we had to manually install it from the original CD-ROM mounted as a NetWare volume, using NWCONFIG.NLM and the Drivers Options.
This driver is not required with Backup Exec 8.0 and it will actually cause errors if the driver is still in the server's memory. When loading Backup Exec via the BESTART.NCF file, we saw the following 1004 Error:
Module NWTAPE.CDM is currently loaded in memory. You must unload the NWTAPE.CDM module.
Removing the load command from the STARTUP.NCF file does not prevent NetWare 5 from loading it automatically. Neither does temporarily deselecting this driver, using NWCONFIG | Drivers Options. When we tried this, Backup Exec generated a 1006 Error asking us to load the NWASPI.CDM driver.
The permanent solution is to down the servers, delete NWTAPE.CDM from the C:\NWSERVER directory and reboot the server.
NetWare 5 Transaction Tracking System (TTS)
NDS synchronization depends on TTS being enabled. In some cases, especially on WAN links, you will have to adjust the value of the "SET Maximum Transactions=" parameter which specifies how many transactions can occur at the same time. We found that with the NetWare 5 Backup Utility we had to decrease this value from its default of 10,000 to a lower number to restore all the NDS objects. It was not necessary to lower the value with Backup Exec.
Restricting the Admin Workstation
Another situation to be aware of is restricting Admin to only be able to log in from a specific workstation. This is done in NWAdmin by specifying the MAC address of the workstation's network adapter. If this workstation is destroyed in a disaster and you restore the address-rectricted Admin account from a backup, you will not be able to log in as Admin from a new workstation. In this case you would have to create a new Admin account after restoring NDS.
GroupWise Databases and Open Files
At present, neither the NetWare 5 Backup utility nor Backup Exec 8.0 is able to back up the GroupWise databases or open files. An "Open File Option" is available for use with Backup Exec for NetWare v8.0.251 or newer. This option allows Backup Exec to capture live data at any time, including open files for live databases, and create virtual volumes that can be backed up while the live volume's data is being changed. However, this option does not currently back up GroupWise databases.
Novell currently provides two utilities to back up GroupWise 5.x files: GWBACKUP.EXE and DBCOPY.EXE (available for download from Novell's support Web site at http://support.novell.com). These utilities can be used to back up GroupWise Post Offices and restore them in the event of catastrophic damage. Novell anticipates that the next release of GroupWise will include the necessary Target Service Agents (TSAs) to allow an automatic shutdown of the database files during the backup process.
Conclusion
Restoring NetWare servers after a major disaster is a challenge. You should be prepared by gathering appropriate documentation and performing recovery testing before a disaster strikes. The recovery procedures outlined in this AppNote should help you prepare for such an event.
Additional information is available from the Novell and Veritas support Web sites. The items listed below are of particular interest for disaster recovery.
From Novell (http://support.novell.com):
DSDOC2.EXE (documentation on NDS terms, definitions, and error codes)
TID #2929217 "GW 5.x Backup Utilities"
TID #2936891 "0x8e error while backing up GW 5.2 w/ Seagate"
From Veritas (http://support.veritas.com):
TechNote #020-100116 "During a restore of the NetWare Directory Services (NDS) tree the error 0xfc Queue failure is seen on the Job manager screen"
TechNote #020-101299 "When backing up using Backup Exec for NetWare, some GroupWise files cannot be backed up because they are held open by the GroupWise application"
* Originally published in Novell AppNotes
Disclaimer
The origin of this information may be internal or external to Novell. While Novell makes all reasonable efforts to verify this information, Novell does not make explicit or implied claims to its validity.