Using NDS for Secured LDAP Directory Lookups from Lotus Notes and Domino R5
Articles and Tips: article
Senior Software Engineer
Novell Strategic Partner Engineering Group
01 Aug 1999
If you're using Lightweight Directory Access Protocol (LDAP) to store additional address books for Lotus Notes, you can now leverage Novell Directory Services to access the LDAP information quickly and seamlessly.
- Introduction
- Lotus Notes and NDS
- Setting Up NDS for Use with Notes
- Configuring the Notes Client to Access NDS via SSL and LDAP
- Configuring the Domino R5 Server's Directory Assistance to Access NDS via SSL and LDAP
- Making Sure It All Works
Introduction
Lotus Notes can be configured to use Lightweight Directory Access Protocol (LDAP) directories as an additional address book store. This provides an excellent way to leverage NDS directories in environments where Lotus Notes is installed. Lotus recommends that LDAP lookups be secured using the Secure Sockets Layer (SSL), which will be a focus of this AppNote.
This AppNote covers:
The Lotus features that can use the NDS directory
The changes which must be made to NDS to prepare it for use with Notes and Domino server
Step-by-step instructions on configuring the Notes Client and Domino Server to use NDS via SSL and LDAP
Lotus Notes and NDS
This section talks about two Notes features that integrate with the directory: Notes Client LDAP account lookups and Domino Server Directory Assistance LDAP lookups.
Notes R5 Client LDAP Account Lookups. A user can configure the Notes client to search for names in an LDAP directory. Once an LDAP directory has been configured, the user can search the Directory from within Notes. Search results can be used in addressing messages in Lotus Notes.
Domino R5 Server Directory Assistance. Directory Assistance is a feature which allows a Domino server to use an external LDAP directory to look up and resolve names. Whereas the Client LDAP feature is configurable on a per-user basis, Directory Assistance applies to all users of a Domino Server. This allows an enterprise to designate an outboard LDAP directory for everyone to access.
A name lookup against the Notes client and Domino server's directory is accomplished when a user presses the <F9< key. When the user presses this key, the Domino server sends a query to the external LDAP server configured in Directory Assistance, requesting anything that matches the name entered by the user.
Setting Up NDS for Use with Notes
To prepare NDS for use with Notes, security must be configured for LDAP, and some LDAP attribute mappings are required.
Setting Up Security for LDAP
The first step is to create a Certificate Authority in the Security container in NDS. On the first wizard screen, select the Custom option and answer the questions. Note the following:
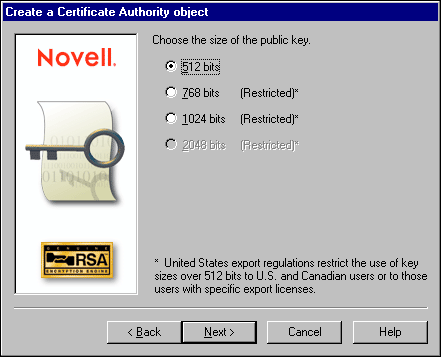
When creating the Certificate Authority for this AppNote, I used a 512 bit public key length (see Figure 1).
Figure 1: Selecting the size of the public key.
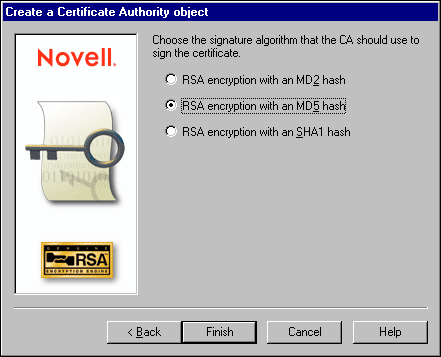
Set the signature algorithm to MD-5 (see Figure 2). MD-2 security isn't as strong as MD-5. Lotus is adding support for SHA1 in Notes R5.01.
Figure 2: Choosing the signature algorithm.
After creating the Certificate Authority, LDAP needs a Key Material Object to work with SSL. To create this object, proceed as follows.
Right-click on the container holding the LDAP server object, select Create, then select Key Material Object.
On the first wizard screen, select Custom and answer the wizard's questions. Note the following:
I used a 512 bit public key length for the Key Material Object.
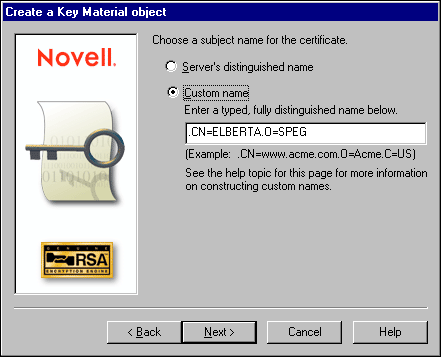
Select the Custom Name for the subject name of the certificate (see Figure 3).
Figure 3: Choosing a subject name for the certificate.
Use the Tree CA to sign the certificate for the Key Material Object.
Choose MD5 as the signature algorithm.
Use the organization's trusted root certificate.
Now associate the new Key Material Object with the LDAP server by displaying the Details screen for the LDAP server object.
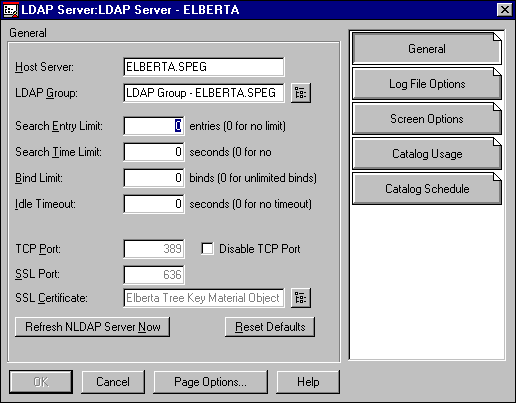
Click on the Directory Browse button next to the SSL Certificate field and select the newly created Key Material Object (see Figure 4).
Figure 4: LDAP server object configuration.
Click Refresh NLDAP Server Now to reconfigure NLDAP.NLM.
Creating LDAP Mappings Required by Notes
Next, you need to create the LDAP attribute mappings needed by Notes. The following attributes are used by Notes in LDAP searches (what is shown below are the LDAP attribute name and the NDS attribute I mapped it to):
"mail" mapped to Internet Email Address
"rfc822mailbox" mapped to Internet Email Address
"shortname" mapped to cn
Notes expects cn to contain a <Firstname< <Lastname< combination. It also expects shortname to contain something like User ID <Firstinitial<<Lastname<.
I found Notes validates attributes such as the mail attribute when processing the results of the lookup. If the mail attribute is empty, the entry is ignored. This can be annoying, so pay careful attention to attribute values.
The LDAP query string passed by the Notes client when searching for * is:
(|(|(|(cn=*)(|(mail=*)(rfc822mailbox=*)))(givenname=*))(sn=*))
The LDAP query string passed by the Domino R5 server using Directory Assistance is:
(|(cn=*)(uid=*)(shortname=*)(sn=*)(givenname=*))
Also, the Domino R5 server requests the following LDAP attributes:
FullName
MailDomain
MailAddress
Location
ListName
Member
Mail
AltFullName
MessageStorage
AltFullNameLanguage
CN
While attribute mappings should also be created for these LDAP attributes for Notes R5 to be fully functional, I was able to get this working after creating just the previously mentioned attribute mappings.
Setting Up Mappings in NWAdmin. There are several ways to set up these mappings. First, using NWAdmin32.EXE, open the LDAP Group object and click on the Attribute Map snap-in button. This will display the attribute mappings for this LDAP server, as shown in Figure 5.
Figure 5: Attribute mapping screen.
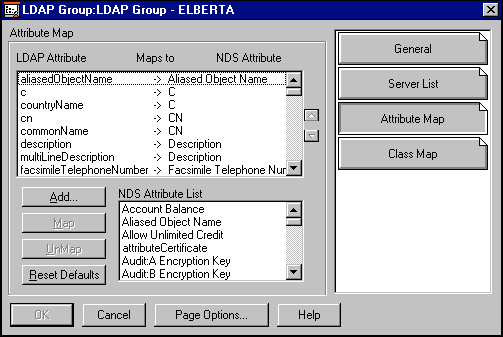
To add the mapping for the mail attribute, for example:
Click Add and type "mail" in the edit field displayed. Click OK.
Scroll through the NDS Attribute List to locate the NDS attribute you want to map. Again, for this AppNote we need to map mail to Internet Email Address, so locate and select that attribute.
Click the Map button. As a result, the following line will show up in the Attribute Map:
mail -> Internet Email Address
Setting Up Mappings with SCHMAP. Alternatively, the Novell NDK will soon contain a utility called SCHMAP, a schema creation and mapping utility created by the Strategic Partner Engineering Group. SCHMAP is provided as both an NLM or a Win32 .EXE program. It accepts an LDIF file as input. This is what the LDIF file to add the basic mappings for Notes looks like:
#Attributes

dn:cn=schema

changetype: modify

add: newattribute

name: Internet Email Address

syntax: SYN_CI_STRING

flag: DS_SINGLE_VALUE

map: mail

-


#Attributes

dn:cn=schema

changetype: modify

add: newattribute

name: Internet Email Address

syntax: SYN_CI_STRING

flag: DS_SINGLE_VALUE

map: rfc822mailbox

-


#Attributes

dn:cn=schema

changetype: modify

add: newattribute

name: CN

syntax: SYN_CI_STRING

flag: DS_SINGLE_VALUE

map: shortname

-
The command line to apply these changes is:
SCHMAP <input ldif file< <ldap group object< <option<
To apply the mappings for this example, I ran SCHMAP as follows:
SCHMAP "sys:"lotus"notes.ldf" "LDAP GROUP - ELBERTA.SPEG" /M
The /M option tells SCHMAP to add only the LDAP attribute mappings specified, rather than creating NDS attributes and mapping LDAP to them.
Note: For a complete explanation of how to use SCHMAP, the command line options, or the LDIF file format for SCHMAP, look on the Novell NDK. Also check the September 1999 issue of Novell Developer Notes for an article on SCHMAP as well as SCHMIG, another utility from the Strategic Partners Engineering Group. It migrates .conf schema files into the LDIF format accepted by SCHMAP.
At this point, NDS is ready for use with Notes.
Configuring the Notes Client to Access NDS via SSL and LDAP
First, we'll configure the Notes Client to use NDS via LDAP. Let's go straight into the steps to do this.
Running the Notes Client
The first thing to do is run the Notes Client.
Configuring Security
Since we want the LDAP requests to take place over an SSL connection, we need to configure Notes to trust our server. To do that, we'll need to generate a Notes Internet Cross Certificate. This will result in the Domino server having a certificate it can trust when using SSL to communicate with NDS.
Generate the Internet Cross Certificate by selecting File | Tools | Add Internet Cross Certificate. This results in the Add Internet Cross Certificate dialog being displayed (see Figure 6).
Figure 6: Add Internet Cross Certificate dialog box.
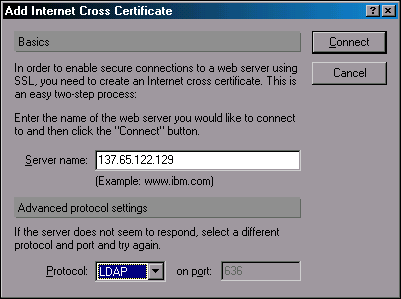
Set the Server Name field to the name or address of the NDS LDAP server and select LDAP as the protocol. (Note that the secured LDAP port is selected for you.)
Click Connect. Now the Issue Cross Certificate dialog is displayed, as shown in Figure 7.
Figure 7: Issue Cross Certificate screen.
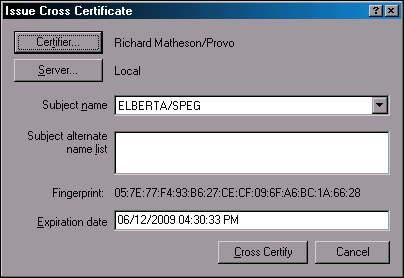
Accept the defaults by clicking Cross Certify.
Now your Notes Client is ready to talk to the LDAP server using SSL.
Setting Up the LDAP Account
Next, create an LDAP account to use in the Notes Personal Address Book.
Select File | Database | Open and open your personal (local) Name and Address Book on the client (names.nsf), as shown in Figure 8.
Figure 8: Open Database window.
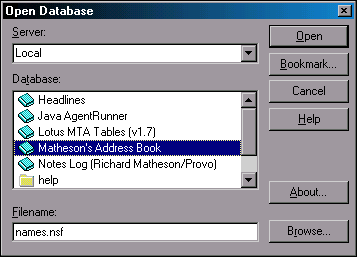
Once the Address Book is opened, select Create | Account from the menu. You create an LDAP account by filling out the appropriate fields in the Account screen (see Figure 9). This screen has three tabs: Basics, Protocol Configuration, and Advanced.
Figure 9: The Account screen with the Basics tab selected.
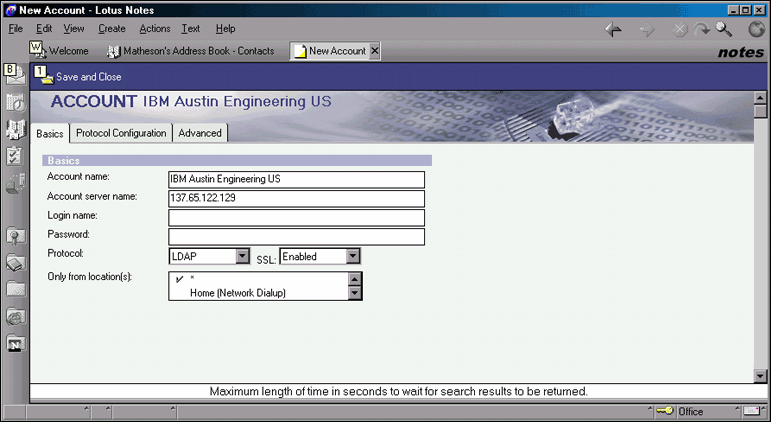
In the Basics tab, specify the account name. This can be whatever you want. Then provide the name or address for the LDAP server.
The next two fields allow you to specify a user ID and password to be used if it is necessary to do an authenticated bind to the LDAP directory. NLDAP.NLM comes with a default configuration option which rejects a clear text Username-Password combination. Novell discourages passing NDS passwords across the Internet in clear text. For that reason, this example uses an LDAP anonymous bind and doesn't require a username and password for using the directory.
Finally, set the Protocol to LDAP and change SSL to Enabled if you are going to use SSL to connect to LDAP.
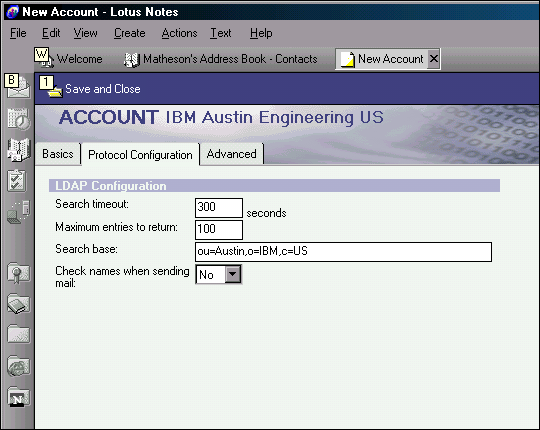
On the Protocol Configuration tab (see Figure 10), you need to specify the timeout value, the number of search results to return, and the search base distinguished name to be used when accessing the directory.
Figure 10: The Protocol Configuration tab.
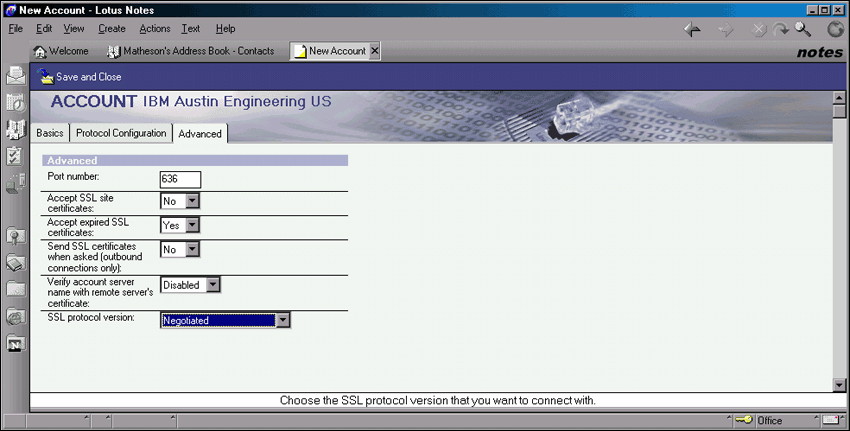
Set the values on the Advanced tab as shown in Figure 11.
Figure 11: The Advanced tab.
Click Save and Close.
Now the Notes Client is ready to search NDS via LDAP.
Configuring the Domino R5 Server's Directory Assistance to Access NDS via SSL and LDAP
In the last section we made changes that only affected a client's configuration, so the server didn't have to be running. In this section we will be configuring the Domino server to refer address lookups to an LDAP directory.
Starting the Domino Server
If the Domino server isn't running, start it now. Restart your Notes client and connect to the server.
Configuring Security
The first changes need to be made using the Administrator's ID. To switch to the Administrator's ID file:
Select File | Tools | Switch ID from the menu.
Locate and select the Administrator's ID file.
Once you've switched to the Administrator's ID, follow the same steps described above to add an Internet Cross Certificate for the NDS server. Select File | Tools | Add Internet Cross Certificate (see Figure 12).
Figure 12: The Add Internet Cross Certificate window.
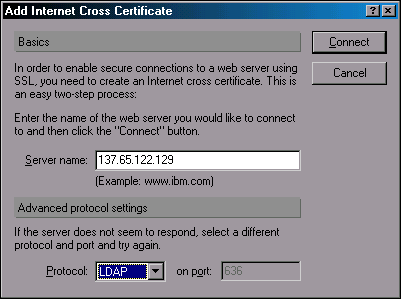
In the dialog box, specify the name or IP address of the LDAP server and set LDAP as the protocol. Then click Connect.
In the Issue Cross Certificate dialog (see Figure 13), make sure the Certifier field is set to the name of the Domino server by clicking the Certifier button and choosing the server's ID file. Set the Server field to the name of the Domino server where you want this cross certificate to be created.
Figure 13: The Issue Cross Certificate window.
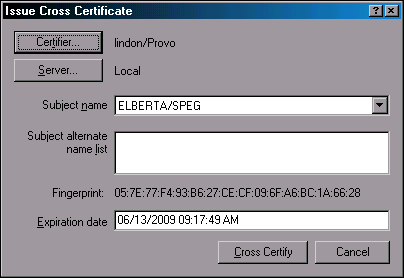
Click the Cross Certify button to add the certificate to the Domino server's directory (names.nsf).
If you want to verify that the Internet Cross Certificate was added to the Domino directory, open the names.nsf file on the Domino server and go to the Server/Certificates folder. Scroll down to Internet Cross Certificates; you should see the certificate you just added.
Configuring Directory Assistance for the Domino R5 Server
Now the Domino R5 server trusts our LDAP server. We need to set up Directory Assistance to use LDAP to look up names.
The first task is to create a Directory Assistance database.
Select File | Database | New.
Set the Server field to the name of the Domino server.
Set the Template Server field to the name of the Domino server.
Select the Directory Assistance template from the Template List, as shown in Figure 14.
Figure 14: Selecting the Directory Assistance database.
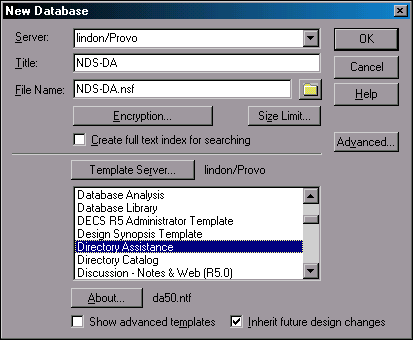
In the Title field, type the name you want to use for this database. Note that the filename field is automatically filled in by Notes.
Click OK to create the new Directory Assistance Database.
Once the Directory Assistance database is created, open it and click Add Directory Assistance. You will see a Directory Assistance screen with three tabs (see Figure 15).
Figure 15: The Directory Assistance screen with the Basics tab selected.
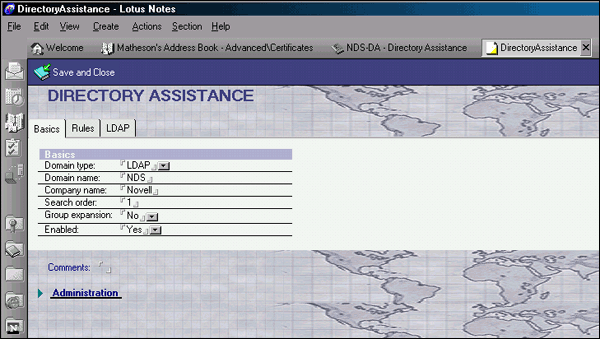
To fill in the Basics screen:
Select LDAP as the Domain Type.
The Domain Name and Company Name can be whatever you want.
Set the Search Order to 1.
Leave the other fields as shown in Figure 15.
To fill in the Rules screen:
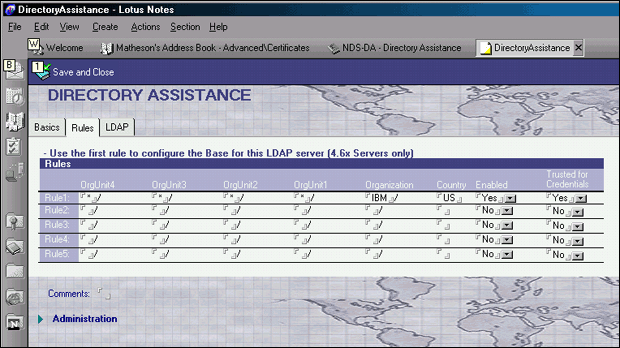
On my server I bulkloaded a sample IBM dataset, so I needed to set the Organization field to IBM and the Country field to US.
Set Enabled and Trusted for Credentials to Yes (see Figure 16).
Figure 16: The Rules screen.
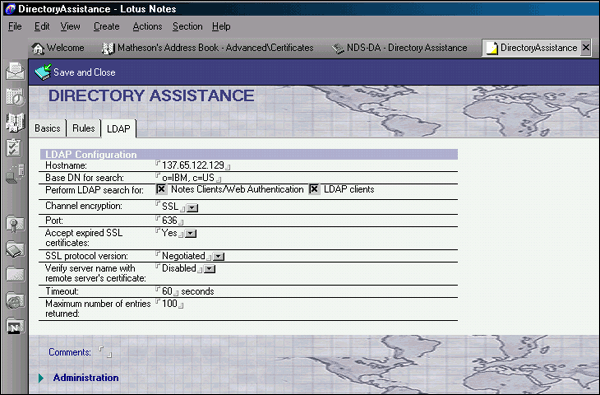
To fill in the LDAP screen:
Set the server name or address.
Set the search base dn.
Check the LDAP Search check box.
Be sure to change Verify Server Name with Remote Server's Certificate to Disabled.
Accept the other defaults as shown in Figure 17.
Figure 17: The LDAP screen.
Click Save and Close.
All that remains now is to configure the Domino server record to use our new Directory Assistance database.
Open the Domino server's Name and Address Book (File | Database | Open).
Change the Server field to the name of the Domino server.
Locate and open the server's Name and Address Book (names.nsf).
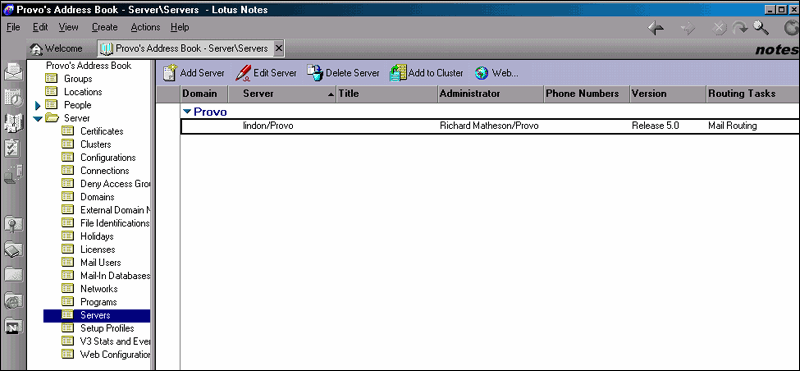
On the left side of the screen, find and expand the Server folder.
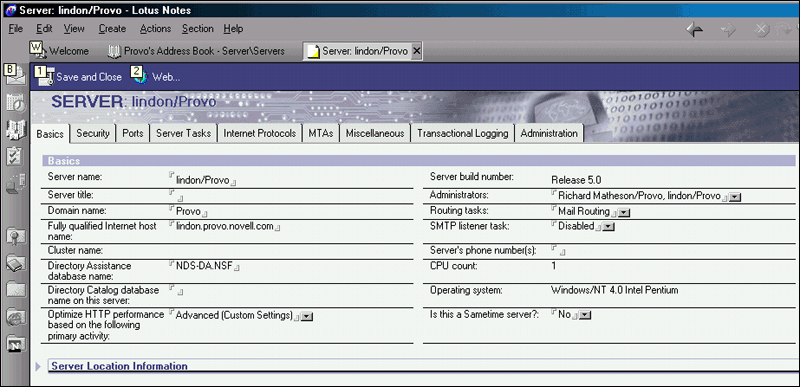
Go to the Servers view in the newly expanded list, and double-click on it. You will see a Server screen similar to the one in Figure 18.
Figure 18: The Server screen with the Basics tab selected.
On the right side of the screen, locate and select the Domino server's name.
Click on the Edit Server icon at the top of the screen. This will display the Server Record for the Domino server (see Figure 19).
Figure 19: The Server Record screen.
Click on the Edit Server button at the top of the Server Record screen.
Change the Directory Assistance database name field to be the name of the Directory Assistance database you just created.
Click Save and Close.
The Domino server needs to be shut down and restarted so it can pick up this new configuration.
Making Sure It All Works
Both of these features can be tested when addressing a new memo in Notes. To test, start the Domino server and the Notes client. In the client, open a mail database and click on New Memo. Here is where all this work becomes useful.
First, check out the Notes client integration with LDAP by clicking the Directories button at the top of the screen. The Select Addresses dialog is displayed (see Figure 20).
Figure 20: The Select Addresses dialog box.
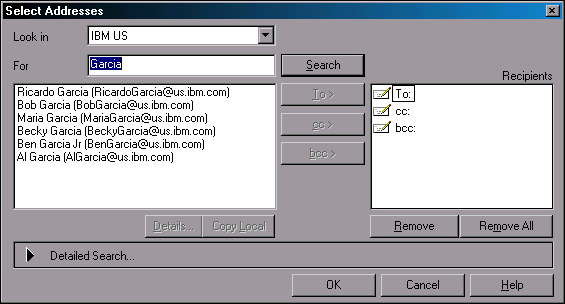
Select the name of the LDAP Account you created earlier. Type a name to search for and click Search. Notes sends your query to NDS via LDAP, and the results are returned and displayed in the results window.
To test Directory Assistance, begin typing a name in the To: field on the memo. (Notes may invoke type-ahead to search the server's Name and Address book for the name you are typing.) For the purpose of our test, type in a name that isn't in the Name and Address Book. When Notes indicates in the status line that the name wasn't found, press <F9< to cause Notes to look up the name in the LDAP directory pointed to by our Directory Assistance database. If the name you entered is in NDS, it will be returned via LDAP and Notes will display it in the To: field.
That's it! Now you can access information on all the users in your NDS directory from Notes.
* Originally published in Novell AppNotes
Disclaimer
The origin of this information may be internal or external to Novell. While Novell makes all reasonable efforts to verify this information, Novell does not make explicit or implied claims to its validity.