Using Novell Upgrade Wizard 3.0
Articles and Tips: article
Software Engineer
Novell Engineering
01 Aug 1999
Upgrading from NetWare 4 to NetWare 5 has never been easier than with the latest release of the Novell Upgrade Wizard. With the Wizard's help, you'll be performing an across-the-wire server upgrade faster than you can say, "To Oz!"
- Introduction
- Novell Upgrade Wizard Overview
- Preparing for the Migration
- Running the Upgrade Wizard
- Conclusion
Novell Upgrade Wizard Overview
The Novell Upgrade Wizard 3.0 has recently been released. This new version includes all the features of version 2.3 which upgrades NetWare 3.1x servers to NetWare 4 or NetWare 5. The Novell Upgrade Wizard 3.0 adds the capability to upgrade an existing NetWare 4.1x server to another computer with NetWare 5.x installed on it.
The NetNote entitled "Quick at Novell Upgrade Wizard 3.0" in the July 1999 issue of Novell AppNotes provides a brief overview of the new features in the Upgrade Wizard. This AppNote will give you insight to the inner workings of the Upgrade Wizard as it upgrades a NetWare 4.x server to a NetWare 5 server.
See "Using the Novell Upgrade Wizard" in the March 1998 issue of Novell AppNotes for information on the features of the Upgrade Wizard 2.3, as well as step-by-step information on upgrading from NetWare 3.1x to NetWare 4.
The latest revision of Novell Upgrade Wizard 3.0 is available for download at:
www.novell.com/download/#NetWare/intraNetWare
Novell Upgrade Wizard Overview
Novell Upgrade Wizard helps you copy the files and objects from an existing server running NetWare to another server running a later version of NetWare. Whereas earlier versions of Novell Upgrade Wizard only allowed you to migrate bindery data from a NetWare 3 server, version 3.0 allows you to move file system volumes and NDS data from a NetWare 4 server to a NetWare 5 server.
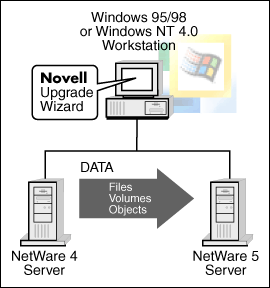
The Upgrade Wizard is run from a Windows 95/98 or Windows NT workstation and performs an "across-the-wire" upgrade from a source server to a destination server (see Figure 1). This is especially useful when you want to upgrade an existing NetWare 4 server to NetWare 5, but the existing computer hardware is inadequate.
Figure 1: Novell Upgrade Wizard performs an across-the-wire migration from one server to another.
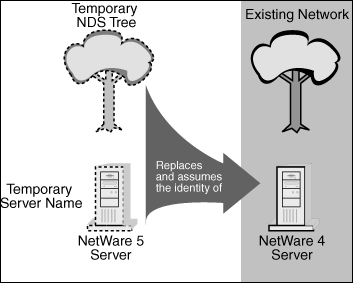
Novell Upgrade Wizard 3.0 retains the project approach to upgrading servers introduced in version 2.3. In essence, you create a model of your upgrade project which is completed before the actual migration takes place. You set up a temporary NDS tree and give the destination NetWare 5 server a temporary server name. When it comes time to finalize the upgrade project, the temporary server replaces and assumes the identity of the existing NetWare 4 server (see Figure 2).
Figure 2: The destination server is set up in a temporary NDS tree and given a temporary server name.
Here are the basic steps involved in upgrading a NetWare 4.x server to a NetWare 5.0 server using Novell Upgrade Wizard 3.0:
Prepare the client on which the Upgrade Wizard will be run.
Prepare the source server.
Prepare the destination server.
Run the Upgrade Wizard.
Copy the file system (volumes).
Modify the destination server configuration files.
Migrate Directory Services to the new server.
Select the Restart Option (optional).
Verify the migration by logging in to the new server.
These steps are outlined in more detail throughout this AppNote.
Preparing for the Migration
This section covers the tasks you must complete before you can use the Novell Upgrade Wizard.
Prepare the Client for Running the Upgrade Wizard
In order to install and run the Upgrade Wizard, you need a workstation with the following configuration:
Windows 95/98 or Windows NT 4.0 or later
Novell Client software: Novell Client for Windows 95/98 version 3.1.0.0 or later for a Windows 95/98 workstation, or Novell Client for Windows NT version 4.50.819 or later for a Windows NT workstation
25 MB of available disk space
A client connection to the source and destination servers using the IPX protocol.
Even though NetWare 5 does not require IPX, you will need to load the IPX protocol in order to run the Upgrade Wizard. After you've completed the upgrade, you can unbind the IPX protocol from the destination server.
Note: Windows 95/98/NT Registry entries for the Upgrade Wizard (MRU List, Options, and User Information) are stored in HKEY_CURRENT_USER/Software/Novell/Novell Upgrade Wizard.
Prepare the Source Server
Your NetWare 4 source server must be running the NetWare 4.10, 4.11, or 4.2 operating system, with the updates listed below (all server updates are available from http://support.novell.com).
NetWare 4.10 servers must have the following update files installed:
410PT8B.EXE
DS410N.EXE
LIBUPI.EXE
SMSUP6.EXE
NetWare 4.11 servers should have Support Pack 6 (IWSP6A.EXE) installed. However, you can perform the upgrade with at least the following update files:
LIBUPI.EXE
DS411P.EXE
TSA410.NLM
NetWare 4.2 servers require Support Pack 6 (IWSP6.EXE) or later. Support Pack 6 is installed by default during the NetWare 4.2 server installation program.
Your source server must have the LONG (or OS2) namespace support loaded on all the volumes you will be copying.
If the destination server will be the first NetWare 5 server in the NDS partition, the NetWare 4 source server must have a Read/Write or Master NDS replica of the partition prior to migrating.
If the source server holds a Master replica of a partition, ensure that at least one Read/Write replica exists on another server and that it is synchronized.
You must have supervisor or supervisor-equivalent rights, including Console Operator rights, to the source server. (You need Console Operator rights in order for the Upgrade Wizard to automatically load the required NLMs.) You obtain Console Operator rights by being assigned to the Operators list of the server and by having all rights to the ACL of the server object.
Prior to performing the upgrade, be sure to back up all file system and NDS data on the source server.
Note: Be aware that some applications may not work properly after the migration. You may need to re-install some server applications.
Prepare the Destination Server
You will need to install NetWare 5 on the new server hardware. Follow the online prompts and procedures for setting up the destination server. Be sure that you update the NetWare 5 destination server with Support Pack 1a or later.
You don't need to do a backup of the destination server since you are only installing the base NetWare 5 operating system. If the migration doesn't complete successfully, you can simply do a fresh installation of NetWare 5 on the destination server.
You will need to install and configure the IPX protocol on the destination server for the purposes of the migration. You can remove IPX from the destination server after the migration is completed.
If you are using Service Advertising Protocol (SAP) filtering on your network, the source and destination servers should be running on a common IPX LAN segment (same IPX external network number). Since the Upgrade Wizard uses SAP to discover the servers, having the servers on the same LAN segment avoids the possibility of having a SAP filter interfere between the two servers. Optionally, you can disable SAP filtering to achieve the same objective.
When running the Upgrade Wizard, the user logged in to the client workstation must have supervisor or supervisor-equivalent rights, including Console Operator rights, to the destination server.
You must also have supervisor rights to the Root of the tree. This is necessary to make the required modifications to the NDS schema for NetWare 5.
Running the Upgrade Wizard
Once you have completed the preparatory tasks listed above, you are ready to run the Upgrade Wizard. Start the program by logging in on the client workstation you have prepared. Then select Start | Programs | Novell | Novell Upgrade Wizard | Novell Upgrade Wizard.
Notice that in addition to the Novell Upgrade Wizard, there are two other selections on the Novell Upgrade Wizard menu selection (see Figure 3).
Figure 3: Additional menu options for the Novell Upgrade Wizard.

Novell Upgrade Wizard Readme. You will want to review the readme file for any known issues regarding the Upgrade Wizard.
Novell Error Resolution Help. If you encounter an error either in the Novell Upgrade Wizard or any other Novell utility, such as NWAdmin or a command-line utility like NLIST, you can use this help file to determine the cause and possible solutions to the error. To find the meaning of an error such as -601, for example, click the Index tab and type" -601" in the first entry box. The entry "-601 error code" should be highlighted in the list below. Click Display to see information regarding this error. To find the meaning of an error such as fffffd7f, click Index, type the last four characters of the error (fd7f), and click Display.
The Upgrade Wizard also features extensive online help. If you run into problems with the Upgrade Wizard, please check the help and the Readme file before calling Novell for assistance.
Once you start the Novell Upgrade Wizard, you are asked whether you want to create a new project or open an existing project (see Figure 4).
Figure 4: Novell Upgrade Wizard welcome screen.
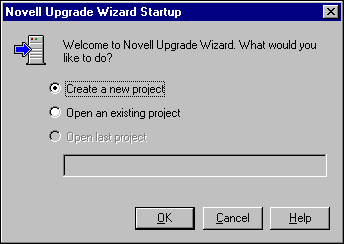
Select "Create a new project" and click OK to begin a new upgrade.
You are next asked what type of upgrade you will be performing (see Figure 5).
Figure 5: Selecting the type of upgrade.
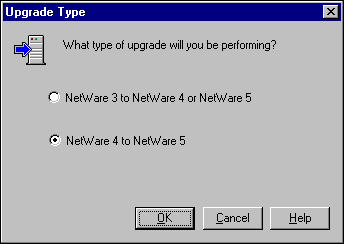
To perform a NetWare 4 to NetWare 5 upgrade, select "NetWare 4 to NetWare 5" and click OK.
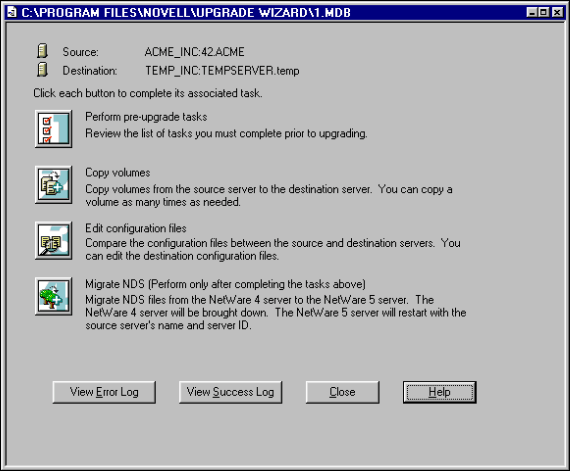
The next few screens summarize the tasks you should have completed before continuing, prompt you to name the project file, select the source NDS tree and server, and select the destination NDS tree and server. You will then see the Upgrade Wizard's main window, shown in Figure 6.
Figure 6: Novell Upgrade Wizard main window.
Copy the File System (Volumes)
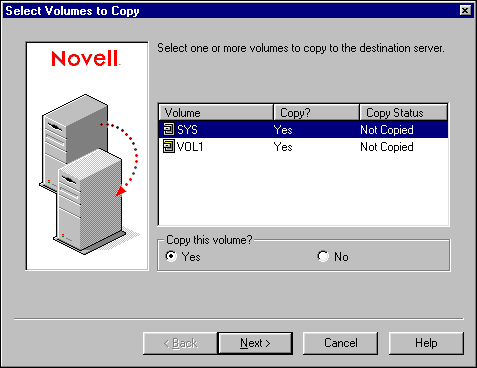
To copy file system data from the source server to the destination server, click the "Copy volumes" icon. You can select which volumes you want to copy, as shown in Figure 7.
Figure 7: Selecting which volumes to copy.
Note: As an alternative, you can use your backup software to copy the file system. Back up the volumes through your backup software, migrate the DS information with the Upgrade Wizard, and then restore the file system from your backups. Since the object IDs will be the same, all file and directory trustees and ownerships will be restored. This may be faster than copying the files across the network. It is the best way to copy the file system if you want to do a partial upgrade of a volume or you want to consolidate multiple volumes into one.
To avoid overwriting newer files on the destination SYS volume, the Upgrade Wizard does not copy these directories to their corresponding directories on the destination server. The SYSTEM, PUBLIC, MAIL, ETC, NETBASIC and LOGIN directories are copied to the SYS:SYS.MIG\ directory on the destination (SYS:SYS.MIG\SYSTEM, SYS:SYS.MIG\PUBLIC, and so on.) With these directories in place, you can selectively copy the data back to the SYSTEM, PUBLIC, MAIL, ETC, NETBASIC and LOGIN directories. This gives you control over what is overwritten in these directories.
Volume Copy Validation Phase. Here is what the Upgrade Wizard does during the validation phase prior to copying the volume files:
Verifies that you are authenticated to both servers.
Verifies that you have a licensed connection to both servers.
Checks to see if the schema has been updated for NetWare 5 licensing.
Loads TSA500.NLM on the destination server and TSA410.NLM on the source server.
Initializes the connections to the source and destination SMDRs.
Copies required NLMs to both servers, if needed. The Upgrade Wizard ships with a number of required NLMs. If the servers don't have the required versions, they are automatically copied.
Checks to see if the correct versions of NLMs are loaded. If an error occurs here, you may get two different types of messages:
You may see a message that you have the incorrect file version. This means the file in the SYS:SYSTEM directory is the incorrect version and you may have to update the server with the service packs listed previously.
You may see another message that says that the loaded version of the NLM is incorrect. In this case, you need to unload and reload the NLM to get the later version.
Checks to see that you have all rights to the file system.
Checks to see if users are logged in to the source server, if you have selected to have users log off before copying the volumes.
Checks the version number of the destination server. The destination server must be NetWare version 5.0 or above.
Checks that each volume you are going to copy has a corresponding volume on the destination server with the same name. (With this release of the Upgrade Wizard, the number and names of the volumes must be the same.)
Checks to see if the source volume has compression turned on and the destination volume doesn't. The problem here is that the space required on the destination volume may be much greater than that on the source since the data will have to be uncompressed.
Verifies that the name spaces on the source volume are also loaded on the destination volume.
Verifies that you have an IPX connection to the destination server. You need to have an IPX connection to both servers. You can verify this by right-clicking on the red "N" in the Windows 95/NT system tray. Select NetWare Connections and review the Trans Type column for both servers. If the Trans Type connection is not IPX, you may have to change the ordering of the protocols as follows:
Open Control Panel on the workstation.
Select Network.
Select Novell NetWare Client and click the Properties button.
On the Protocol Preferences tab, select IPX as the first protocol in the Protocol Order list.
Creates the SYS:SYSTEM\NUW30 directory on the destination server. This is where files used by the Upgrade Wizard are stored.
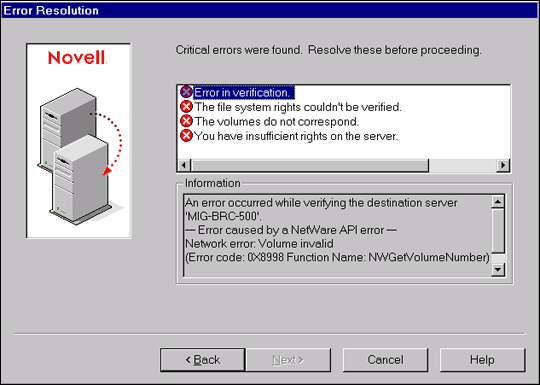
If a problem is encountered during any of these verification procedures, warning or error information will be displayed on the Error Resolution screen (see Figure 8).
Figure 8: Resolving errors and warnings screen.
Volume Copy Phase. The first step of the actual volume copy backs up the trustees into files. Since the destination server is in a different NDS tree than the source, the trustees and ownerships do not transfer at this point of the upgrade. The Upgrade Wizard backs them up to files in the same path as the project file. These trustee backup files are used after the NDS database has been migrated to restore this information to the destination server.
The trustee backup files use the following naming convention:
SERVERNAME_VOLUMENAME.TTI SERVERNAME_VOLUMENAME.TTD
where SERVERNAME is the name of the source server and VOLUMENAME is the name of the volume. For example, if the server being migrated is called MYSERVER, the trustee information for the SYS volume is stored in the files MYSERVER_SYS.TTI and MYSERVER_SYS.TTD.
The volume copy phase also modifies the NDS schema of the source tree for NetWare 5 licensing, if necessary. This needs to be done at this point of the migration so that by the time NDS is migrated, the schema changes have replicated throughout the tree.
When the file migration completes, review both the Success Log and the Error Log to verify that the volume copy was successful.
Modify the Destination Server Configuration Files
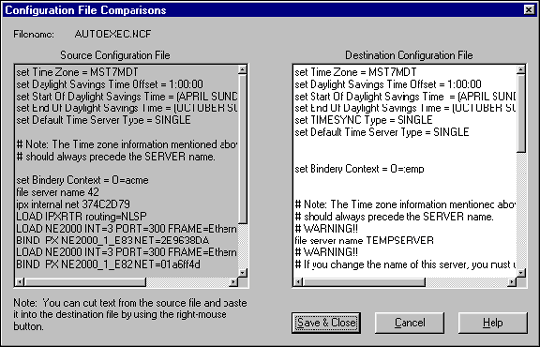
Since you may have many server configuration files, Upgrade Wizard gives you the ability to modify these files using a simple cut-and-paste operation.
When you click the "Edit the Configuration Files" icon from the main window, the Upgrade Wizard scans the SYS:SYSTEM directories of both servers looking for all *.NCF and *.CFG files. If it finds a file on either server, the file will appear in the list (see Figure 9).
The Upgrade Wizard also allows you to edit the STARTUP.NCF file located in the server's boot partition. If the file only exists on one server, it will display in the list for that server, leaving the other side of the screen blank.
Figure 9: Editing the server configuration files.
You don't need to change the following items because the Upgrade Wizard will automatically modify them during the migration phase:
AUTOEXEC.NCF File
FILE SERVER NAME will be changed to the name of the source server.
TIME ZONE will be changed to the time zone stored in the source server's AUTOEXEC.NCF file.
SERVERID will be changed to the IPX INTERNAL NET value stored in the source server's AUTOEXEC.NCF file.
DEFAULT TIME SERVER TYPE will be changed to the value stored in the source server's AUTOEXEC.NCF file.
BINDERY CONTEXT will be changed to the bindery context stored in the AUTOEXEC.NCF file of the source server.
DEFAULT TIMESYNC TYPE will be changed to the value from the source server's AUTOEXEC.NCF file.
TIMESYNC TYPE will be changed the value retrieved from the SET parameter on the source server, not from the AUTOEXEC.NCF file of the source server.
TIMESYNC.CFG File
TYPE is set to the source server's time sync type, as retrieved from the SET parameter on the source server.
Migrate NDS Data to the New Server
This is the most sensitive step of the upgrade process. Since Directory Services must be functioning correctly at this point, it is critical that you complete the following manual steps before proceeding with the NDS migration step.
Load DSRepair on the server that holds the Master of the source NDS tree's [Root] partition.
Run the Time Synchronization option. Make sure that all servers are synchronized and that there are no time-related errors (see TID #2930686 for help in resolving time synchronization issues).
Run the Report Synchronization Status option. Review the log file and resolve any synchronization errors before proceeding.
Load DSRepair on the source server.
Select the Local Repair option. Review the error log and correct any errors before proceeding.
Select Advanced Options/Repair Local DS Database. Set all the options to "no" except for the Check Local References option. Run the repair. If there are any errors, run the repair again.
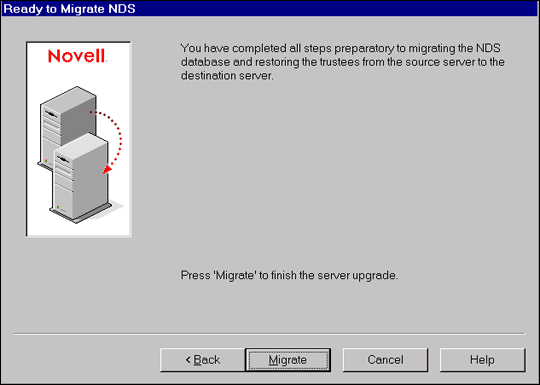
Once these steps have been completed, proceed with the upgrade by clicking the Migrate button (see Figure 10).
Figure 10: Click the Migrate button to finish the server upgrade.
Verification Performed Prior to Migrating NDS. Here is a list of the things that the pre-NDS-Migration verification does:
Ensures that you have a licensed connection to the source server.
Verifies that you have supervisor rights to the root of the source and destination tree. This is needed in order to modify the schema.
Verifies that you have console operator rights on the both servers so necessary NLMs can be loaded automatically.
Ensures that the schema on the source tree has been modified for licensing. This occurs during the Volume Copy step. If you did not select to copy the volumes via the Upgrade Wizard, you will need to do so to modify the schema before you can proceed.
Checks to be sure the NDS revision on the source server is at least version 5.13. If not, you will need to upgrade to this revision of NDS.
Checks to see if a master partition is stored on the source server. It it is, you should have a Read/Write replica on another server before migrating this server. This way references to this replica can continue to function while the server is being migrated.
Runs DSRepair with the /U (unattended) option. The log file from this utility is stored in the SYS:SYSTEM/NUW30/DSREPAIR.LOG file. Upon completion, the Upgrade Wizard reads the log file looking for the word "Error". If found, a warning message will be displayed. (This is not a foolproof method of identifying errors, but it will catch some of the more egregious ones.)
If this is the first NetWare 5 server being inserted into a NetWare 4.x tree, verifies that the server has at least a Read/Write replica of a NDS partition. This is necessary for the licensing to install correctly.
Checks that the destination server's NetWare version is at least 5.0.
Checks if other objects were installed into the destination tree. You shouldn't install any other products or modify NDS on the destination server. The NDS Migration process removes the Directory Services database residing on the destination server and replaces it with the Directory Services database from the source server. Therefore, any objects you have created will be gone after NDS is migrated.
Ensures that the backup trustee files (*.TTI and *.TTD) can be found for the volumes you selected to copy. When the volume information is copied, the backup trustee files are created in the same location as the project file. If you have selected to copy the volumes and these files are not found, something is wrong. You must copy the volumes again or you may lose all trustee and ownership information.
Ensures that the destination server is the only server in the destination tree. The destination tree is supposed to be a dummy tree with no other objects or servers in it.
Ensures that IPX is loaded on the destination server.
Checks that the NDS revision on the destination NetWare 5 server is at least 7.18 and not more than 7.99. (This release of the Upgrade Wizard doesn't yet support migrating to NDS version 8.)
Copies and verifies required NLMs. If any NLMs are copied, they will be listed on the Error Resolution screen.
When the verification completes, you will have a chance to review the warnings and errors.
NDS Migration. If there are no errors, you may proceed with the NDS Migration, which does the following:
Backs up and closes the NDS database on the source server
Copies the backed up NDS database files from the source server to the destination server
Shuts down the source server
Removes the connection to the source server and tree
Renames the destination server to the name of the source server
Modifies the destination server's AUTOEXEC.NCF file
Modifies the destination server's TIMESYNC.CFG file
Upgrades and restores NDS on the destination server
Reboots the destination server
Licensing Issues. When the destination server comes back up, NWCONFIG.NLM is automatically loaded. It installs licensing and installs a license, if you entered a path to a license file.
In regards to the license file location, you don't need to install a license if either of the following conditions are true:
This is not the first NetWare 5 server in your tree.
You have already installed a Major License Account (MLA) in a parent container of the server you are upgrading.
Remember, if your license diskette is in drive A, leave it there throughout the NDS Migration process.
Verifying a Successful NDS Migration. After the destination server has restarted and is ready, it is recommended that you verify the success of the NDS Migration before you proceed to the final migration steps. If problems are encountered after the server reboots, review the information in the "Restart Options" section of this AppNote.
Make sure the NetWare 5 destination server has restarted successfully.
Make sure that time is synchronized on the NetWare 5 server. To check the time synchronization status, load DSREPAIR at the server console and select the Time Synchronization option.
If time is not synchronized, enter the following command at the NetWare 5 server console:
SET TIMESYNC RESTART FLAG=ON
Make sure that NDS is synchronized on the NetWare 5 server. To check NDS synchronization status, load DSREPAIR at the server console and select the Report Synchronization Status option.
If the destination NetWare 5 server does not contain a Read/Write or Master replica, you must check NDS synchronization by running DSREPAIR on a server in the NDS tree that has a Read/Write or Master replica.
If NDS is not synchronized, enter the following commands at the server console:
SET DSTRACE=* SET DSTRACE=*H SET DSTRACE=+SYNC
Resolve any Novell Licensing Service errors recorded in the NUW.ERR error log file. To view the error log file, enter the following command at the server console:
EDIT SYS:SYSTEM/NUW30/NUW.ERR
If the license you specified was not installed, install it using NWCONFIG.NLM.
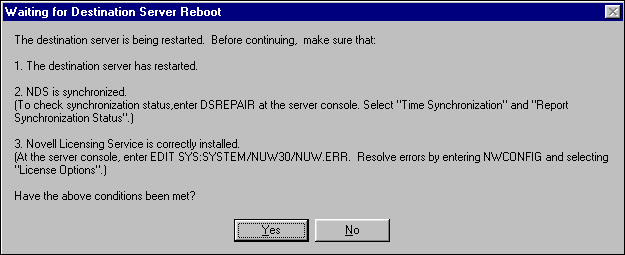
After performing the verifications listed above, answer "Yes" on the screen that asks if the conditions have been met (see Figure 11).
Figure 11: The Proceed screen.
Post-Server Reboot. The Upgrade Wizard performs the following tasks after the destination server has rebooted successfully:
Upgrades the NDS schema with the NetWare 5 schema changes, if necessary.
Restores the file system trustees and ownerships using the *.TTI and *.TTD files created during the Volume Copy phase.
The source server is brought down and the destination server now assumes the identity of the source server. To ensure that you have a valid connection to the server, you should log out and log back into the tree.
Restart Options
You may encounter problems as the destination server reboots. For example:
The destination server may have problems rebooting.
NDS may not synchronize.
Time may not synchronize.
The client can't reconnect automatically.
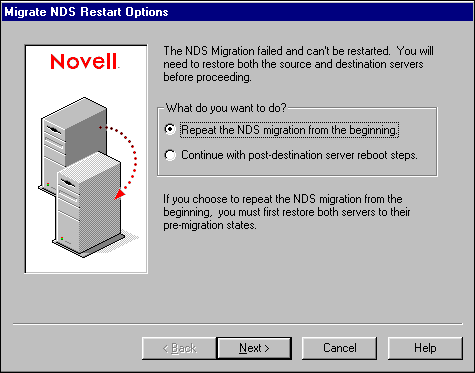
If any of these problems occurs, you should attempt to complete the migration anyway. If it doesn't complete or completes with errors, restart the NDS Migration by clicking the Migrate NDS icon again. You will be given several restart options (see Figure 12).
Figure 12: Restart options.
Note: This is one of the features of the Upgrade Wizard that is not obvious (this is being corrected for a future release). When you click Migrate NDS after the server has already rebooted, you will be given the option to restart the migration from the point of failure, which is usually after the server has rebooted.
Before you attempt to restart the migration, be sure you log in to the server again to clear your previous connections.
Select "Continue with post-destination server reboot steps" to have the Upgrade Wizard attempt to complete the post-server reboot steps. You can run this as many times as you need until it completes successfully.
You can also use this option if you have restored both servers back to their pre-NDS-migration state and want to restart the whole process. If so, select "Repeat the NDS migration from the beginning."
Conclusion
Using the Novell Upgrade Wizard 3.0 to upgrade to NetWare 5 is easy and powerful. The use of wizards and the project model make the user interface practically foolproof. The verification capabilities make error identification and correction extremely simple.
* Originally published in Novell AppNotes
Disclaimer
The origin of this information may be internal or external to Novell. While Novell makes all reasonable efforts to verify this information, Novell does not make explicit or implied claims to its validity.