Integrating Thin-Client Servers with ZENworks and NDS
Articles and Tips: article
Team Lead, Common Technologies
Novell Product Management
ROY LOPEZ
Senior System Engineer
Novell New York Office
BILL CALERO
Systems Engineer
Novell New York Office
EDMUND LEE
Systems Engineer
Novell New York Office
01 Jul 1999
Thin-client solutions such as WinFrame, MetaFrame, and Windows Terminal Server are gaining in popularity. Find out how easy they are to integrate with your Novell networking environment.
- Introduction
- Integration with WinFrame
- Integration with Windows Terminal Server and MetaFrame
- Integration of the Thin-Client Server with ZENworks
- Installing the Novell Client on a Thin-Client Server
- Integration with NDS for NT
- Deploying Thin-Client Server Farms without Domains
- Granting Access to Thin-Client Server Services
- Embedding ZENworks into a Web Browser
- Integrating Thin-Client Servers with the NetWare 5 JVM
- Conclusion
Introduction
IT professionals are continually being asked to do more with the same limited resources. At the same time, the workforce they support is becoming more mobile. Users expect their IT department to deliver fast, simple access to network resources no matter where they are working. These users demand the same level of performance when they are on the corporate network as they do dialing in with a modem from a hotel room.
To meet these expectations, many IT organizations are turning to the thin client solutions delivered by Citrix and Microsoft in the WinFrame, MetaFrame, and Windows Terminal Server products. Using these products, users are able to connect to the thin-client servers with virtually any computing device and run applications with blazing speed, even across the thinnest of connections. The applications are actually running on the thin-client server, which is simply sending screen updates to the workstation the user is using. Because only screen updates, keystrokes, and mouse clicks are transferred between the workstation and thin-client server, this solution offers virtually the same performance to a user dialing in remotely as a user on the corporate network.
The integration of Novell products such as Novell Directory Services (NDS) and ZENworks with thin-client servers satisfies the needs of both network administrators and users. Wherever they are, users have a consistent desktop and the level of performance they demand, while administrators have a single tool to administer both standard desktops and thin clients.
This AppNote discusses various integration issues involved with using thin- client servers in a NetWare environment. This material is adapted from the Implementation Guide found on the World Wide Web at:
http://www.novell.com/products/nds/zenworks/thinclient.html
Integration with WinFrame
WinFrame is the thin client server that runs on Windows NT v3.51. At the time this document was written, the latest version of WinFrame available on the market was version 1.7 (version 1.8 was available in beta testing). Although this document discusses the integration of various Novell products with WinFrame and MetaFrame v1.7, the concepts and integration with v1.8 are the same. Some of the management utilities and interfaces in v1.8 may be different, but the points of integration are the same.
WinFrame users can benefits from access to Novell solutions by loading the Novell Client v4.11b for Windows NT on WinFrame servers. This version of the Client includes support for WinFrame. Novell recommends using this client only on WinFrame servers or on devices running Windows NT v3.51.This client can be downloaded from http://www.novell.com/download. There is no need to load any software on the thin clients or on the devices from which users are viewing the WinFrame session.
Using the 4.11b client, users have full access to NetWare and NDS. The following table lists the ZENworks components that function with the 4.11b client (and therefore with WinFrame.)
|
Customized Application Management (Novell Application Launcher) |
Self-healing of applications if problems occurScheduled software updatesApplication fault tolerance and load balancingCustomized user application installationSoftware metering |
|
Desktop Management |
Dynamic Local UserAutomatic Client UpgradeManagement of path to roaming profile and system policies |
|
Desktop Maintenance |
Remote controlHelp desk applications |
Some client-specific functionality in the Desktop Management component of ZENworks (such as printer driver management and hardware inventory) will only function if the Novell Client v4.5 for Windows NT or higher is loaded on the thin-client server. Since the later Novell Clients do not support Windows NT v3.51, this functionality is not supported on a WinFrame server.
When ZENworks is installed on a WinFrame server, administrators should install the application management and desktop maintenance components but not the desktop management components. The desktop management components that are supported on Windows NT v3.51 will be installed by installing the Novell Workstation Manager that is included with the 4.11b client.
With the Novell Client v4.11b on the WinFrame server, organizations will be able to take advantage of the significant benefits delivered through Novell products such as ZENworks and NDS for NT. Using these products, WinFrame administrators have a single point of administration for NetWare, Windows NT, and WinFrame user accounts. These administrators will also be able to use a single tool (NDS) to manage application deployment and management, roaming profiles, system policies, and help desk access for both standard desktop and thin client devices.
Integration with Windows Terminal Server and MetaFrame
Windows Terminal Server is the thin client server that is provided by Microsoft and is based on NT 4.0. Windows Terminal Server uses the remote display protocol (RDP) which is a point-to-point protocol. Most organizations add the Citrix MetaFrame product to their implementation of Windows Terminal Server to take advantage of the Independent Computing Architecture (ICA) protocol. The ICA protocol is the technology that enables load balancing and "server farm" solutions supplied by Citrix. (A server farm is a group of WinFrame or MetaFrame servers that are logically pooled together to service a user workload.)
Users of Windows Terminal Server and MetaFrame have full access to all Novell services and products. The Novell Client v 4.5 for Windows NT was the first client released by Novell that contained the necessary components to fully integrate with Windows Terminal Server and MetaFrame. At the writing of this AppNote, the Novell Client v4.6 for Windows NT is the most recent release of Novell's Client for Windows NT and is the preferred client to integrate with Windows Terminal Server and MetaFrame. To ensure optimal performance, check Novell's Web site at http://www.novell.comfor the most recent update to this client software.
Installing the Novell Client v4.50 for Windows NT (or later) on the Windows Terminal Server or MetaFrame server enables full access to all Novell products. In this configuration, end users of the thin-client servers have access to NetWare, NDS, BorderManager, and ZENworks. Integration with NDS for NT does not require the Novell Client for Windows NT to be installed on the thin- client server.
Integration of the Thin-Client Server with ZENworks
Perhaps the Novell product that provides the most immediate benefit to thin- client server users is ZENworks. Short for Zero Effort Networks for users, ZENworks automates desktop management using the power of NDS to remotely provide application management, software distribution, desktop management, and workstation maintenance. (For more detailed information on ZENworks, visit http://www.novell.com/products/nds/zenworks/.)
For thin client users, ZENworks resolves network access problems by providing fast and efficient access to resources from virtually any location. Novell resolves network management problems inherent in administering resources to thin client users with a familiar tool that many administrators have already deployed: NDS. Organizations using thin-client servers can use ZENworks to administer standard desktops together with thin clients. The same policies that are created in ZENworks can be applied to both standard desktops and thin clients without modification.
ZENworks benefits administrators and users. Administrators need only learn and deploy a single desktop management solution for both worlds, which provides significant costs savings. Users also benefit because they are presented with an identical working environment whether they are working on a desktop or through a thin-client server. Since NDS manages both environments, the users' desktop and view of the network is independent of the manner in which the resources are being accessed.
ZENworks separates the administration of the users' working environment into two components: the workstation configuration and the user configuration. Some configuration options are workstation-specific and need to be set independent of the user that is using the workstation; other settings are user-specific and should follow users as they roam throughout the organization. This is especially applicable in the thin-client server world where a user may be directed to use resources on any server in a server farm through the ICA protocol.
Most organizations create ZENworks policy packages to coincide with tasks or roles that are associated with groups of users as well as the physical location of the workstation. For example, an organization may create user policy packages that contain the desktop configuration that is required by administrative assistants or engineers and then associate the policy package with appropriate users, groups, or organizational units in NDS. These administrators may also create a workstation policy package that contains the configuration needed on a group of workstation in a physical location. A single policy package could be created and then associated with thousands of users or workstations.
Windows NT Workstation Policy
ZENworks allows administrators to create objects in NDS that correspond to the workstation policies and user policies they want applied. Figure 1 shows the Windows NT Workstation Package screen in which you can enable various workstation-specific policies.
Figure 1: The Windows NT Workstation Policy Package allows you to enable workstation-specific policies.
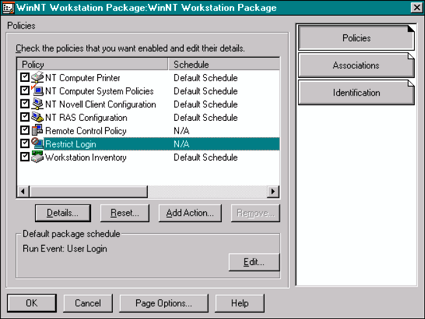
Workstation policy packages contain policies that are created and configured by administrators to be applied to the workstation, independent of the user that uses the workstation. These policies contain the configuration administrators want every user to have when working on a set of workstations. The various types of workstation policies are described below.
Computer Printer Policy. This policy allows administrators to associate printers and the associated printer drivers with groups of workstations. As users log in to the workstations that are associated with this policy, printers are created and the appropriate drivers are downloaded and installed (without having to give users administrative rights on NT workstation/server).
An example of the use of the computer printer policy is to allow roaming users to always have access to the printer closest to the workstation they are using. If an organization has multiple server farms in different locations, this policy could be used to provide users access to the printers in each physical location.
Computer System Policy. This policy allows administrators to centrally manage the Windows system policies that configure the workstation-specific settings. By configuring the policy through NDS, administrators do not have to hassle with creating and distributing *.POL files across the network. Rather, they can create a policy in NDS and NDS will distribute the policy throughout the network.
Administrators of thin-client servers can use such a computer system policy to configure the server to not display the name of the user that last logged in.
Novell Client Configuration Policy. This policy allows administrators to centrally manage the Novell Client configuration centrally through NDS. Settings such as the preferred tree, name context, and advanced Client settings can be configured once in NDS and then be automatically deployed to thousands of workstations.
In the case of thin-client servers, administrators could create a single workstation policy package with the desired Novell Client configuration and then associate the policy with all the servers in a server farm. When modifications to the client configuration are necessary, a single change in NDS would be automatically deployed to all servers in the farm.
NT RAS Configuration Policy. This policy allows administrators to centrally configure the list of dial-up Remote Access Server (RAS) numbers available to users. For example, the network administrator could create a single list of dial-up numbers in NDS and have that list automatically distributed to every workstation that is associated with the policy. As updates to the dial-up list are needed, administrators make a single change in NDS and the change is automatically distributed to the appropriate workstations.
Remote Control Policy. This policy allows administrators to centrally configure the remote control settings through NDS. Settings such as the protocol and the visual and audio alerts used during a remote control session are configured in this policy. The workstation remote control policy is compared to the user remote control policy and the most restrictive policy is implemented. For example, organizations may have workstations that they do not want to be remotely controlled no matter what user is using it.
Restrict Login Policy. This policy allows administrators to identify the users that are not allowed to use the workstation.
Workstation Inventory Policy. This policy enables or disables the hardware inventory capability. When hardware inventory is enabled, an inventory of the hardware and configuration is stored in NDS. This information can be easily extracted from NDS when needed. As changes in the hardware and configuration are made, the inventory in NDS is automatically updated.
User Policy Package
Figure 2 shows the Windows NT User Package screen, in which you can enable the various user-specific policies that follow users as they move around the network.
Figure 2: The User Policy Package allows you to enable various user-specific policies.
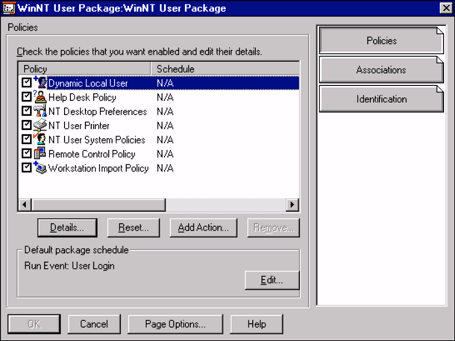
The settings defined in the user policy package will be implemented on any workstation the associated users authenticate from. These policies provide a solution for administrators to manage mobile users since the configuration is maintained in a single (NDS) location. The various user policies are described below.
Dynamic Local User Policy. This policy allows administrators to centrally manage access to NT workstation and server resources. Administrators of thin-client servers can use this policy to manage the user accounts on the thin-client servers. This policy is used in the domain-less server farm solution which is discussed later in this AppNote.
Help Desk Policy. This policy allows administrators to configure the held desk application that ships with ZENworks. Administrators can centrally configure the information users need to get help when needed, such as telephone numbers and e-mail addresses.
Desktop Preferences Policy. This policy allows administrators to centrally configure users' desktop preferences. Settings such as corporate wallpaper and screen saver can be configured once in NDS and then automatically distributed to any workstation a user uses that has been associated with the policy package. Administrators can also centrally configure the path to the roaming profile in this policy. Many customers using ZENworks in conjunction with the thin-client servers use this policy to manage the roaming profiles rather than the setting in User Manager.
User Printer Policy. This policy allows administrators to associate printers and the associated printer drivers with groups of users. As users roam, the printers and associated printer drivers created and automatically installed (without having to give users administrative rights on NT workstation/server). Administrators of thin-client servers can use this policy to associate users with the print resources they need access to. As users use different servers in a server farm, the appropriate printer drivers are automatically downloaded and installed as needed.
User Printer System Policy. This policy allows administrators to manage the Windows system policies that configure the workstation-specific settings. By configuring the policy through NDS, administrators do not have to hassle with creating and distributing *.POL files across the network. Administrators can create a policy in NDS and NDS will distribute the policy throughout the network. Administrators of thin-client servers can use this policy to configure thin-client servers so applications such as the Run command or Network Neighborhood are not displayed.
User Remote Control Policy. This policy allows administrators to centrally configure the remote control settings through NDS. Settings such as the protocol and the visual and audio alerts used during a remote control session are configured in this policy. The user remote control policy is compared to the workstation remote control policy and the most restrictive policy is implemented. For example, organizations may have users (such as the CEO) that they do not want to be remotely controlled.
Workstation Import Policy. This policy allows administrators to configure the location and naming of the workstation objects that are created for each workstation in NDS.
Installing the Novell Client on a Thin-Client Server
Integrating Novell solutions with thin client servers is simple. The only requirement to full integration is to install the Novell Client for Windows NT on the thin-client server. All necessary integration is contained within the Novell Client for Windows NT. Once the Novell Client is installed, administrators and users reap the full benefits of NetWare, NDS, ZENworks, and BorderManager.
WinFrame v1.7 with Service Pack 5B and Hotfix SE17B058 are required. You can find the WinFrame Service Pack and Hotfix at http://www.citrix.com/support/ftp_winfrm17.asp or at the FTP site ftp://ftp.citrix.com.
To avoid problems installing and configuring the 4.11b Client with WinFrame, the following order should be followed:
Install WinFrame v1.7.
Install Service Pack 5b.
Install Hotfix SE17B058.
Install Novell Client v4.11b for Windows NT.
To install the Novell Client for Windows NT, complete the following steps:
At the command prompt, type the following:
Change user/install
Install the Novell Client for Windows NT.
Before rebooting the server, type the following at the command prompt:
Change user/execute
Reboot the server.
Integration with NDS for NT
A large cost facing many organizations is time spent entering data into and maintaining all the databases and directories where user account information is stored. Many organizations have hundreds of databases into which duplicate employee information is entered.
NDS for NT was developed with the goal of reducing the costs of administering the large numbers of databases commonly found in NT networks, especially when the NT networks are deployed alongside NetWare. With NDS for NT, organizations can deploy WinFrame, Windows Terminal Server, MetaFrame, or any other domain-aware application without incurring the high costs of deploying and administering domains.
Most customers that deploy thin-client servers have multiple servers grouped into what Citrix has termed a server farm. A group of WinFrame or MetaFrame servers can be logically pooled in a server farm. When a user launches a published application that is configured for load balancing, the MetaFrame load balancing support routes the application to the most lightly-loaded server in the farm for execution. Today, thin-client servers use NT domains to centrally manage the user account information for users that access applications in the server farm. Customers can deploy a server farm without having to deploy domains by using a solution in ZENworks named Dynamic Local User, which will be explained in more detail later in this AppNote.
NDS for NT allows thin-client administrators to use NDS to manage both NDS and domain user account information. NDS for NT-enabled networks allow administrators to deploy NT servers and domains in the manner that best suits their organization, without having to worry about the domain limitations and hardships. NDS for NT eliminates the need to establish trust relationships. It also allows granular delegation of rights within the domain, eliminating the need to grant administrative rights to all objects in the domain. NDS for NT does this by representing the domain within NDS (see Figure 3).
Figure 3: With NDS for NT, the NT domain "NEW-YORK" is represented as an object in NDS.
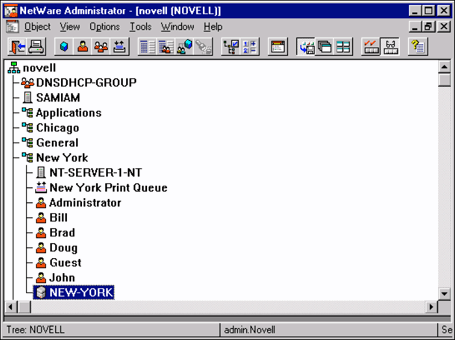
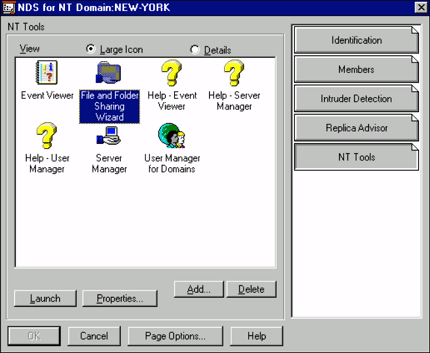
As you can see, the New York domain can be administered through NDS. Through this NDS object, administrators can manage all aspects of the NT domain, including the ability to manage NT File Shares (see Figure 4).
Figure 4: The File and Folder Sharing Wizard helps administrators manage NT File Shares.
One of the greatest benefits of NDS for NT is that a single User object in NDS represents both the NDS and domain users. When an administrators wants to modify a setting such as the time when the user is authorized to use the network, the setting only has to be entered once. Currently, NDS is available on the NetWare, Windows NT, Sun Solaris, and IBM UNIX platforms. This means that administrators can create a single user account in NDS and have that single-user account control access to servers in each of these platforms.
In most organizations, there would be different teams to manage access to these network resources. For example, when a new employee is hired in an organization using the NetWare, NT, and Solaris platforms, the first team of administrators would create the user account in NDS and enter the appropriate rights and restrictions. The second team would then create an account (with the same name) in the NT domain and enter the same rights and restrictions. Finally, the third team would create an account (with the same name) to access the Solaris server and enter yet again the same rights and restrictions. Once the accounts have been created, everyone prays that all the passwords stay synchronized.
NDS for NT reduces this complex workflow to a single user account creation in NDS. The restrictions need be entered only once and they can then be applied to all of the other server platforms.
Because thin-client servers depend on NT servers and domains for user account administration, organizations deploying these products will significantly benefit from NDS for NT. NDS for NT offers a single point of administration for NDS NT domain user account information while enabling organizations to architect and deploy their domain according to their needs.
With NDS for NT v2.0, Novell does not support installing NDS for NT and thin- client servers on the same server. Like Microsoft and Citrix, Novell recommends that the thin-client server not be configured as a Primary Domain Controller nor as a Backup Domain Controller. With the release of NDS for NT v2.01, Novell supports installing NDS for NT and Windows Terminal Server or MetaFrame on the same server; however, Novell does not support installing NDS for NT and WinFrame on the same server.
Deploying Thin-Client Server Farms without Domains
Knowing the costs and complexities of managing NT server and domains, many customers have asked Novell for a solution that would facilitate the deployment of thin-client servers without domains. This is possible through the use of ZENworks in conjunction with WinFrame or MetaFrame. (Windows Terminal Server does not offer load balancing in a server farm.)
Dynamic Local User
A ZENworks solution called Dynamic Local User was created to fulfill the requests from customers to provide a solution that enabled them to deploy NT Workstation without having to deploy domains. Since NT Workstation is a secure operating system, users must have an account on the NT workstation in the Security Accounts Manager (SAM) database and must authenticate through that account before they are given access to resources. Administrators who do not want to individually manage user accounts on hundreds of NT workstations have asked for a centralized solution, which ZENworks provides.
Using the Dynamic Local User solution in ZENworks, NDS manages user accounts on both NT Server and Workstation. Through this policy, administrators can define the access rights granted to users of NT Workstation and Server through NDS. When using Dynamic Local User, users are given access to NT resources as follows:
The user types <Ctrl<-<Alt<-<Del< on the NT device to authenticate. The user inputs his/her NDS username and password. These credentials are verified with NDS and the user is authenticated to NDS. At this point, the user has not yet been authenticated to the NT workstation or server.
NDS next identifies any ZENworks policy packages that should be applied to the user. If the user has been associated with a User Policy Package that has Dynamic Local User enabled, ZENworks identifies the access rights the user has been granted.
ZENworks then queries the SAM database on the workstation or server from which the user is authenticating to see if the user has an account. If a valid account does not exist, ZENworks dynamically creates an account for the user in the local SAM database according to the configuration created by the administrator in the ZENworks Policy Package.
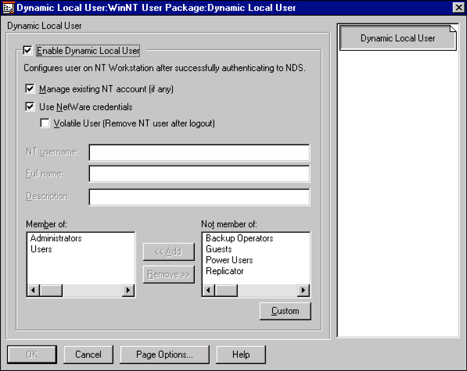
By default, the account is created with the same credentials (username and password) as defined in NDS. ZENworks allows the user to roam throughout the organization and guarantees access to any NT workstation or server to which the user needs to authenticate. As shown in Figure 5, the user accounts that are created by ZENworks can be configured as volatile or non-volatile. Volatile user accounts are deleted from the local SAM database when the user logs out.
Figure 5: Configuring Dynamic Local User authentication and access rights.
Combining the Dynamic Local User solution with a few registry settings on each WinFrame or MetaFrame server enables the load balancing functionality in server farms to be deployed without domains. When publishing an application to load balance across multiple Citrix servers, the Citrix Application Configuration utility presents the dialog shown in Figure 6.
Figure 6: The Citrix Application Configuration utility screen.
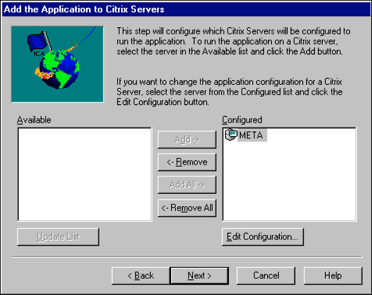
The Application Configuration utility for an NT domain displays the Citrix servers that are members of the domain in the "Available" window. In the domain-less scenario, no servers would be displayed in the "Available" window since there would be no domain. Click Next to finish publishing the application.
Once the application publishing on the first server finishes, launch REGEDT32 and open the registry key that corresponds to the application just published (in this example, the published application is ZENworks). Notice that below the published application is the name of the MetaFrame server selected in the Application Configuration utility.
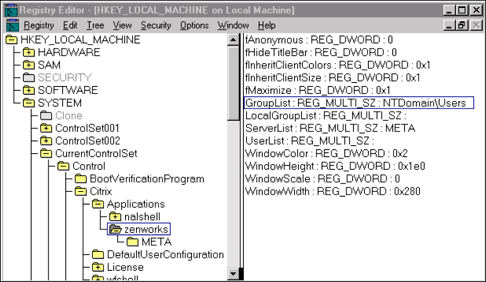
If the MetaFrame server is a member of a domain, you will see the domain name and the group selected in the GroupList registry key (see Figure 7).
Figure 7: Registry key indicating that ZENworks has been published across servers.
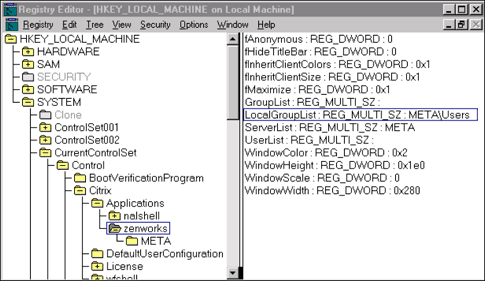
If the MetaFrame server is not a member of a domain on the NT server, you will see the name of the MetaFrame server and the appropriate group on the LocalGroupList registry key (see Figure 8).
Figure 8: LocalGroupList indication where the MetaFrame server isn't part of a domain.
To configure the domain-less solution, the following modifications need to be made on each MetaFrame server that publishes the application and participates in the load balancing:
Using the Multi-String Editor, nullify the GroupList registry setting (delete the value) if necessary.
Input the name of the MetaFrame server on which you are making the modifications and the appropriate group name.
Double-click on the ServerList key and input the name of each of the MetaFrame servers that will participate in the server farm, followed by a Return.
Create new registry keys under the published application for each server that will participate in the server farm. Initially, the server you are working on appears under the application.
After creating a key for each server that will participate in the server farm, add two values under each key: InitialProgram and WorkDirectory. The string associated with each value is blank.
Export the registry hive for the published application (ZENworks in this example) to a file and then import it on each server in the server farm. When the hive is imported to the other servers in the farm, one registry string must be modified on each server. The value of the LocalGroupList under the published application must be modified to contain the name of the server on which the hive is imported.
Making these changes directs the thin-client servers to look at the Local Users group on each server rather than looking at the Users group in the domain. These registry changes need to be made on all WinFrame and MetaFrame servers in the server farm. This does not modify the ICA functionality in any way, so the server farm continues to function as it always has. The server farm will authenticate against the local SAM database on each NT server, which is now managed through NDS and ZENworks rather than requiring an NT domain.
The domain-less solution is ideal for those customers who want to deploy the thin-client server but don't want to incur the costs associated with creating and maintaining NT domains. However, customers deploying this domain-less solution will not be able to use some of the new functionality that is included in WinFrame and MetaFrame v1.8. For example, one new solution included in the 1.8 product called Program Neighborhood distributes and manages solutions for thin-client servers. Customers wanting to deploy Program Neighborhood should not use the domain-less solution because Program Neighborhood requires a domain.
Granting Access to Thin-Client Server Services
There are multiple ways that users can be given access to thin-client server resources. The quickest and easiest method is to use the Remote Application Manager utility that is installed on each workstation where the ICA Client is installed. To grant access, complete the following steps:
Launch the Remote Application Manager from the Start menu.
From the "Entry" menu, select New.
Select the connection type (Network, Dial-In, or Serial) that will be used for the remote application entry. (In this example we will select Network.) Click Next.
In the next window, give the entry a name (in this example it's "On the Road") and specify which network protocol will be used to communicate with the application server (TCP/IP in this example). Also specify whether you will be connecting to a server or a published application (in this example, it's the server META). Click Next to continue.
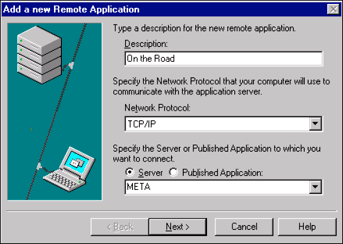
Select the option that best describes the network connection (fast LAN or low-bandwidth WAN/dial-up) that will be used. Click Next to continue.
You can configure the ICA session so that users are not prompted for a username and password by entering the username and password in the next window. To require users to enter the appropriate username and password, leave these fields blank. Click Next.
Input the sound and display configuration that you want to be used for the ICA session. Click Next.
To allow users to access the entire NT desktop during the ICA session, leave the Application and Working Directory fields blank in the next window. To allow users to see a specific application, enter the appropriate information. Click Next to continue.
Define the icon and program group that are associated with the remote application session. Click Next to continue.
Click Finish to complete the creation of the remote application.
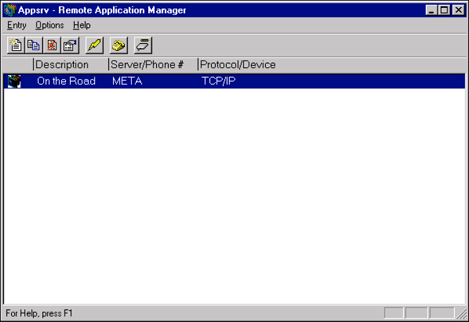
Once you return to the Remote Application Manager screen (see Figure 9), you can initiate the remote application you just created by double-clicking on the entry. In this example, you would click on "On the Road" to initiate the thin-client session.
Figure 9: Initiating a remote application in the Remote Application Manager window.
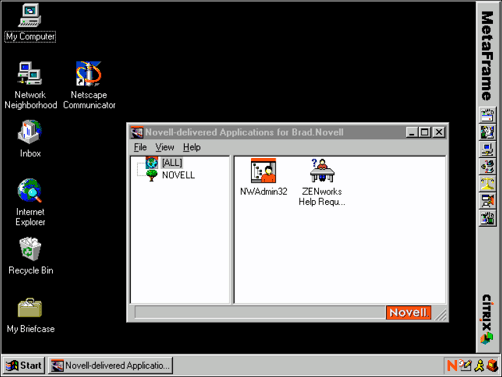
You will next be prompted to authenticate to NDS (which could be running on NetWare, Windows NT, or Solaris servers). Once you enter your username and password, you will be presented the Windows NT desktop, which is now being managed through NDS and ZENworks (see Figure 10).
Figure 10: The Windows NT desktop under NDS and ZENworks management.
Embedding ZENworks into a Web Browser
Application definitions can also be used to create ICA files. These text files with an .ICA extension contain a series of command tags. They are used by the Citrix ICA Clients to launch applications on a Citrix server. The command tags define the attributes of the session to be launched on the Citrix server, including:
The address of the Citrix server or the name of a published application
The user name, password, and domain name to use when connecting to the Citrix server
The height and width of the application ICA Client window
The number of colors (16 or 256) to use when connecting to the Citrix server
The encryption level to use when connecting to the Citrix server
The name of the application definition
An ICA file can be downloaded by a Citrix ICA Client and used to connect to a published application or server. Links to ICA files can be placed in Web pages, and ICA files can be used to embed applications inside Web pages using the Citrix ICA ActiveX, Netscape plug-in, or Java client.
ICA files can be generated on the Citrix server using the Write ICA File Wizard in the Application Configuration utility, or with the ICA File Editor on Windows Terminal Server, Windows 95, or Windows NT 4.0 or higher.
Generating an ICA File
To generate an ICA file with the Application Configuration utility, follow these steps.
Launch the Application Configuration utility by selecting Start | Programs | MetaFrame Tools | Application Configuration.
To create a new application, select New from the Application menu.
In the "Enter Application Name" window, enter the name of the application you want to publish. In this example, we are going to publish the software management component of ZENworks, so we will name the application ZENworks. The application name cannot be the same as the thin-client server's name on the network, nor can it be the same as an existing published application.
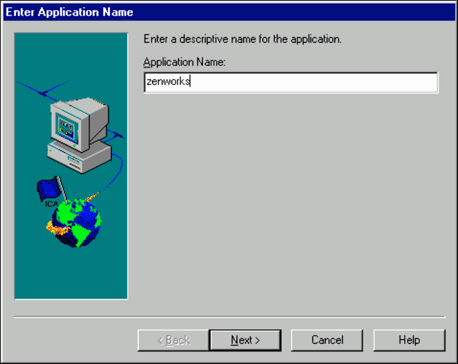
Click Next to continue.
Select whether the application will be configured as Explicit or Anonymous.
An explicit user is a conventional user who usually must supply an explicit user name and password.
An anonymous user is a type of user unique to Citrix application publishing. By default, anonymous users have guest privileges and belong to the Anonymous group. If an application published on the Citrix server can be accessed by guest-level users, the application can be configured to allow access by anonymous users. When a user launches an anonymous application, the Citrix server does not require an explicit user name and password but selects an anonymous user from a pool of anonymous users who are not currently logged in. During setup, an Anonymous user group is created and a number of anonymous users are created equal to the MetaFrame user license count. Additional anonymous users must be created manually if additional user licenses are added. Anonymous users are given minimal permissions. They have the following user configuration restrictions:
Ten minute idle (no user activity) timeout
Logged out on broken connection or timeout
No password is required
(These values can be changed manually using User Manager for Domains.)
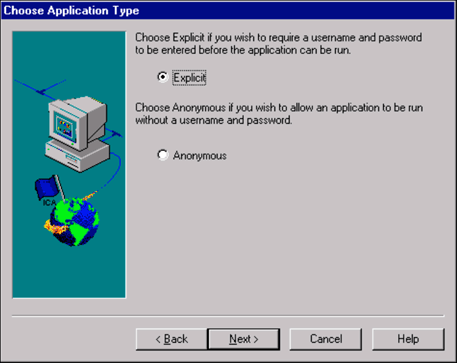
In this example, we want to require users to authenticate and enforce security, so we select "Explicit". Click Next to continue.
You are next asked to specify the Command Line and Working Directory for the application.
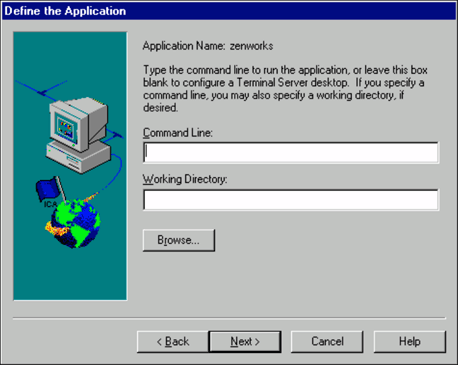
For this example, we want to launch an ICA session from the browser that will display the entire desktop to users, so we leave these parameters blank and click Next to continue.
Choose whether you want the application title bar to be displayed when it is published and whether you want the application maximized at startup.
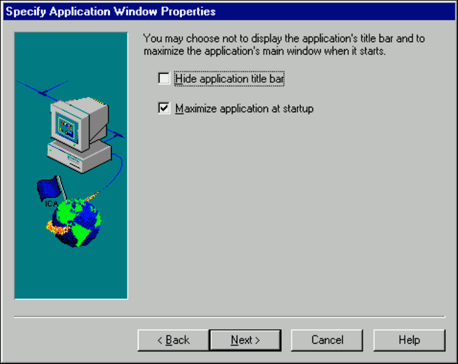
In this example, we'll leave the options set at the default (hide title bar and maximize at startup) and click Next to continue.
The Configure Groups and Users screen displays the domain name or server name and a list of which users or groups are allowed to run the published application. The "Available" window lists the groups and users you can add to the "Configured" list.
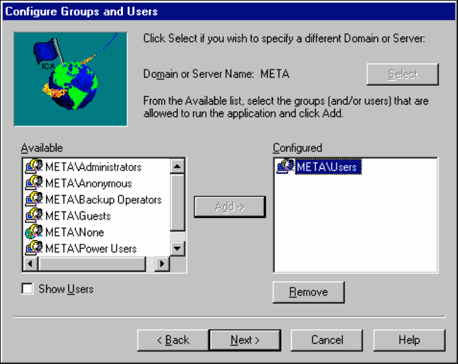
To add a user or group, select it in the "Available" window and click Add-". When you are finished, click Next.
The "Add the Application to Citrix Servers" windows is displayed so you can specify which servers will be configured to run the application.
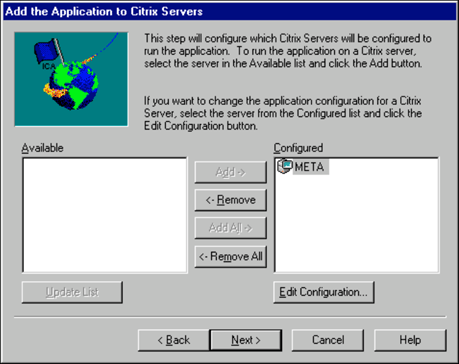
If you have installed Load Balancing Services, you can specify multiple servers. ICA client connections are balanced among the configured servers. If Load Balancing Services are not installed, only the current server is displayed in the "Configured" window and the Add-" button is unavailable. (To use Load Balancing Services without a domain, refer to the previous section entitled "Deploying Thin-Client Server Farms without Domains".)
If you are working with a server farm, the command line and working directory will need to be set correctly for each server. To do this, highlight the server and click on Edit Configuration.
When you are finished specifying servers, click Next.
A screen displays indicating that you have successfully configured the application. Click Finish to save the application configuration.
Creating HTML Page Templates
To automatically create HTML page templates with launched or embedded applications, use the Write HTML File wizard. The HTML page needs a link to an ICA file that the Web browser passes to the Citrix ICA Web Client. We will now use the Write ICA File wizard and the Write HTML File wizard to create the necessary ICA and HTML files.
From the Application menu in the Application Configuration utility, select Write ICA File.
In the "Choose Your Path" window, select the desired assistance level: a lot or not much. If you are a newcomer to the Citrix utilities, select the option "A lot! Please explain everything". Click Next.
Specify the window size and color attributes.
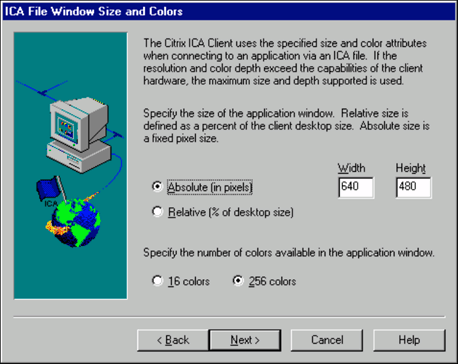
The Citrix ICA Client uses the specified size and color attributes when connecting to the application specified in the ICA file. If the application is embedded in a Web page, the maximum size of the application is specified in the HTML page. If the resolution and color depth exceed the capabilities of the client hardware, the maximum size and color depth supported by the client is used instead.
Make your selections and click Next to continue.
Select the level of encryption for the ICA connection.
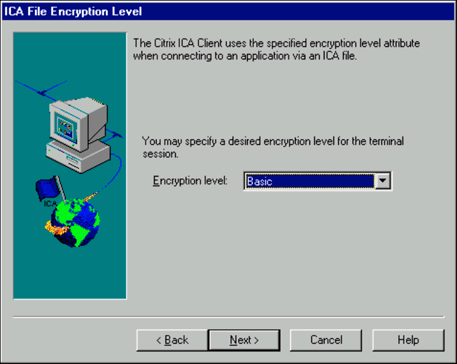
The default level is Basic, which should be fine for this example. Strong encryption using the RC5 algorithm is available with Citrix SecureICA Services, which enable RSA RC5 encryption with 40-, 56-, or 128-bit session keys. The Citrix server must be configured to allow the selected encryption level or greater. For example, if the Citrix server is configured to allow RC5 56-bit connections, the Citrix ICA client can connect with RC5 56- or 128-bit encryption. Click Next to continue.
Specify the path and filename for the ICA file, including the .ICA extension.
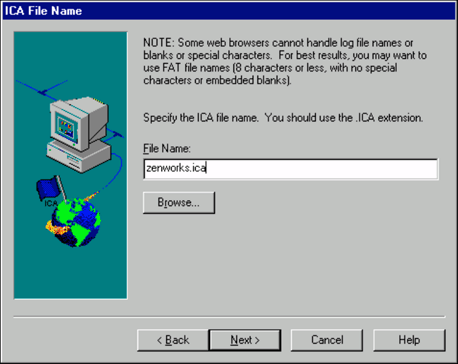
By default, the file is saved in %systemroot%\System32. In this example, we are going to call the file ZENWORKS.ICA. Click Next to continue.
The "Write an HTML file?" window asks whether you want to create an HTML template for this application.
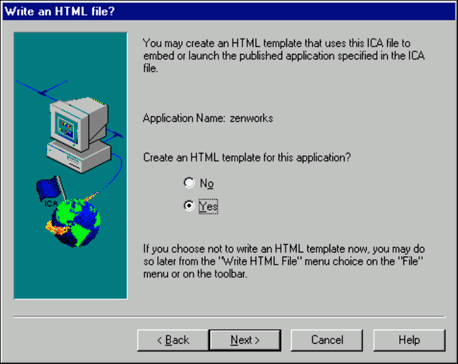
(If you choose not to do this now, you can do it later from the Write HTML File option on the File menu.) Answer Yes and click Next.
Specify the appearance you want for the HTML application. If you want to have the desktop appear within the browser window, select "Embedded". Otherwise, select "Launched".
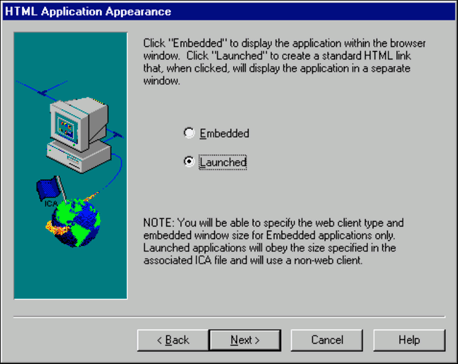
In this example, we want the ICA session to be displayed as a separate application, so we will select "Launched". Click Next to continue.
Specify the Web client type for the embedded application: Netscape Plug-In/ActiveX control or Java Client. The HTML page uses the specified Web client type to display the application.
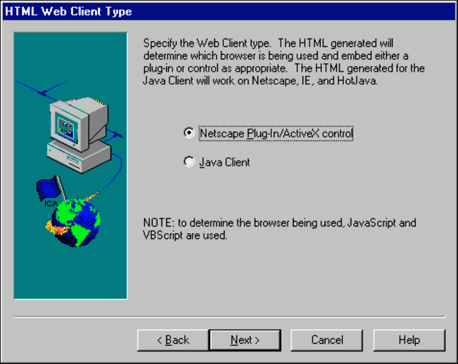
Click Next to continue.
Specify the width and height of the application window in the HTML page.
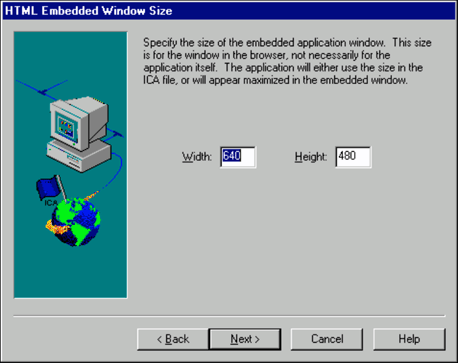
Click Next to continue.
To include additional comments in the HTML file that describe each HTML file option, check the Verbose page option.
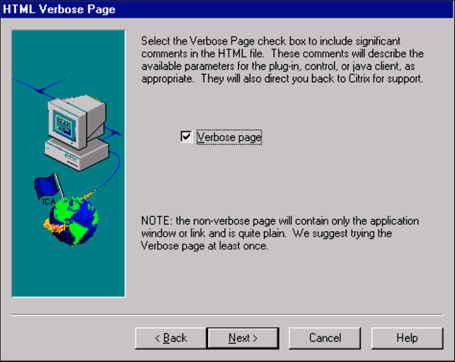
Click Next to continue.
Specify the file name for the HTML page by using the .htm or .html extension depending on your Web server. By default, the file is saved in %systemroot%\System32.
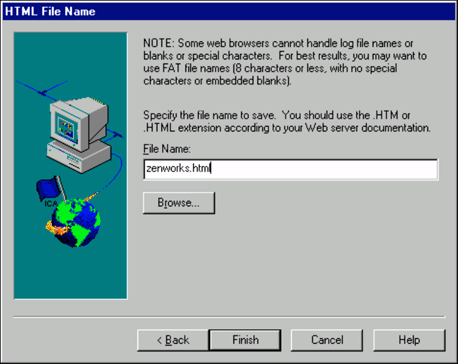
For this example, we'll use the name ZENWORKS.HTML. Click Finish.
The HTML and ICA files will have to be copied to the appropriate location depending upon the Web server you are using. For use with Microsoft's Internet Information Server, copy the HTML file to the inetpub\wwwroot directory and copy to the ICA file to inetpub\wwwroot\samples\ICA (a directory you will create).
With a little HTML work, the ICA and HTML files that were just created will be displayed to users as seen in Figure 11.
Figure 11: Example HTML file, as displayed to users.
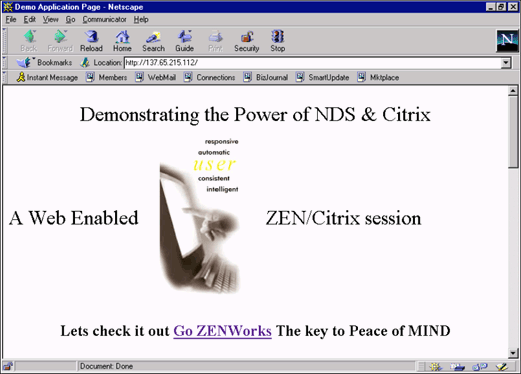
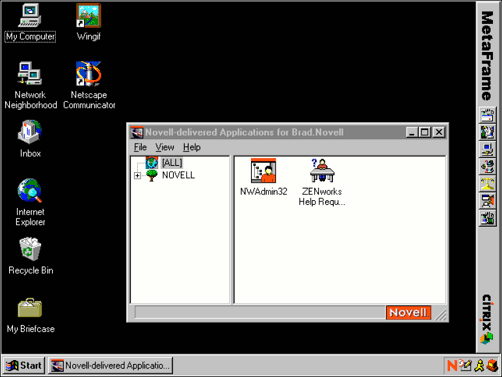
When the user clicks on the "Go ZENworks" link, an ICA session launches. The user sees the same interface in the ICA session that is seen in the office. Since the application was configured as "Explicit", the user is asked to authenticate to NDS. Once the user has entered the appropriate username and password, the configured desktop will display as shown in Figure 12.
There is tremendous value here for both administrators and users. Users are presented with identical working environments when using a standard desktop or when working through a thin-client session. Because users are presented with identical working environments in both scenarios, they do not have to be retrained or educated on a new working environment.
Administrators benefit because they are able to use a single tool to configure and manage the desktop and working environment for their users, independent of the manner in which the user is accessing the resources. Since administrators do not have the dual task of creating separate working configurations for desktop users and thin client server users, they have more time to work on other issues.
Figure 12: The configured desktop as displayed to users.
Publishing the Application Management Component
This section describes how to create the necessary ICA and HTML files to publish only the application management component of ZENworks. For this example, we'll publish a Novell Application Launcher (NAL) window. Users launching this embedded application will not have access to the entire desktop. They will only be given the interface through which they can launch and install applications through NAL.
To publish a new application, select New from the Application menu of the Application Configuration utility.
When prompted to enter the application name, enter a descriptive name for the application. In this example, we'll name the application "nalshell". Click Next to continue.
As in the previous example, the application type can be Explicit or Anonymous. We will configure this application as Explicit so that users are required to enter their NDS username and password before they are given access to the applications.
In the "Define the Application" window, enter the Command Line as Z:\NAL.EXE and the Working Directory as Z:\. When ZENworks is installed, the application management components are automatically copied to the public directory of the NetWare server. This example assumes that drive letter Z is mapped during login to the SYS:PUBLIC directory of a server on which ZENworks has been installed. Click Next to continue.
The next window asks you to specify the application window properties. You can choose whether to display the application's title bar and whether you want the application maximized at startup. For this example, leave the options set at the default (do not hide title bar and maximize at startup). Click Next to continue.
The Application Configuration utility will lead you through the same configuration options as in the previous example.
When asked for the name of the ICA file, name it "nalshell.ica" and click Next to continue.
When prompted to define the HTML appearance of the application, configure it as Embedded. This will display the application (in this case, the NAL window) within the browser. Click Next to continue.
You will now be guided through completing the creation of the HTML file. Configure the options as detailed in the previous example. When prompted for the name of the HTML file, name it "nalshell.html".
The HTML and ICA files will have to be copied to the approprate location depending on which Web server you are using. For Microsoft's Internet Information Server, copy the HTML file to the inetpub/wwwroot directory, and copy the ICA file to inetpub/wwroot/samples/ICA (a directory you will create).
With a little HTML work, the ICA and HTML files that were just created will be displayed to users as follows. After users enter their username and password in the Novell GUI Login window within the browser (since they first have to authenticate to NDS), the embedded NAL application will be displayed within the browser.
From the NAL window, users can launch and, if necessary, install any application that has been associated with their user account in NDS. The beauty of this solution is that, based on their digital persona within NDS, users can access all the applications they need from any desktop in the enterprise without being given access to the entire desktop.
Integrating Thin-Client Servers with the NetWare 5 JVM
Integrating thin-client servers with the Novell Java Virtual Machine (JVM) has significant value for NetWare administrators. Until now, administrators could not execute Windows programs from a NetWare server. When there was a need to use a Windows application, such as NWAdmin, administrators had to have a separate Windows workstation. Now, using the Citrix Java ICA Client, administrators can use the NetWare console as if it were a Windows workstation.
The Citrix Java ICA Client in the NetWare 5 JVM demonstrates the power of the NetWare JVM. You will be pleasantly surprised by the performance when working through an ICA session in the NetWare 5 JVM. To use the Citrix Java ICA Client, you need the SETUP.CLASS file that can be downloaded from http://download.citrix.com/download.asp?client=java_11. Once you have dowloaded the file, complete the following steps:
Create a directory on the server named sys:\java\citrix and copy the SETUP.CLASS file to that location.
Confirm that JAVA.NLM is loaded. This can be done either by typing "MODULES" at the server prompt and looking for the JAVA.NLM to be listed, or by typing "JAVA" at the server prompt.
At the server console, type the following command:
envset CWD=SYS:\java\citrix.
At the server console, load the Java setup by typing:
java setup
After reading the Citrix ICA Client for Java welcome screen, click Next to continue the installation.
After reading the license agreement, check "Accept all terms of the license" and click Next.
Enter the directory where you want the Citrix Java Client files will be installed (the default is \java\citrix). Click Finish and the Citrix Java Client setup will copy files to a directory structure under the specified directory.
While the files are being extracted, you may receive some messages that batch files could not be created. Do not worry about these messages.
At this point you can expand the Jar files, though you're not required to. If you do not expand the Jar files, you will need to add the following line to your sys:etc\java.cfg file:
CLASSPATH=$CLASSPATH;$OSA_HOME\citrix\location of JICAEngJ.jar\JICAEngJ.jar
To expand the Jar files, type the following at the server console:
jar -xvf jicaengj.jar
This will start unzipping the files into the sys:\java\citrix\ directory.
Note: You will only need to expand the JICAEngJ.jar (this is the Java version of the client versus JICAEngN.jar, which is the Netscape applet version). So if you do expand both, you will just be overwriting what was expanded first.
Now that the installation is complete, you are ready to initiate a thin-client session from the NetWare 5 JVM. To do this, enter the following command at the server console (all on one line):
java com.citrix.JICA -address:xx.xx.xx.xx -width:1024 -height:760
For address, specify the address of your MetaFrame server. The width and height settings indicate the desired size of the client window on the Java GUI screen. A size of 1024 x 760 will fill most displays completely.
Once you have entered this command, the Citrix Java Client will connect to the specified MetaFrame server.
Automating the Citrix Java Client Initiation
Most customers will not want to manually enter the command listed above every time they want to initiate a Java session. The following instructions will add an entry on the Novell JVM Start menu for simplified access:
Create a CITRIX.NCF file in the SYS:SYSTEM directory.
In the CITRIX.NCF file, add the following two lines:
envset CWD=SYS:\java\citrix java com.citrix.JICA -address:xx.xx.xx.xx -width:1024 -height:760
Edit a text file located in the SYS:JAVA\NWGFX\FVWM2 directory. For NetWare 4 servers, use fvwm2rc4xx; for NetWare 5 servers, use fvwm2rc5xx.
Under TaskBar Start Menu, add:
+ "MetaFrame"  Exec sys:\system\citrixm

+              Nop
Under Utilities Menu add:
+ "MetaFrame"  Exec sys:\system\citrixm

+              Nop
This NCF file will work for either WinFrame v1.7 or the Windows Terminal Server/MetaFrame combination. In this example, we created two NCF files: one for MetaFrame and one for WinFrame.
Once you have created the NCF files, you will need to stop and start the java.nlm. This is done by typing the following two commands:
java -exit
java
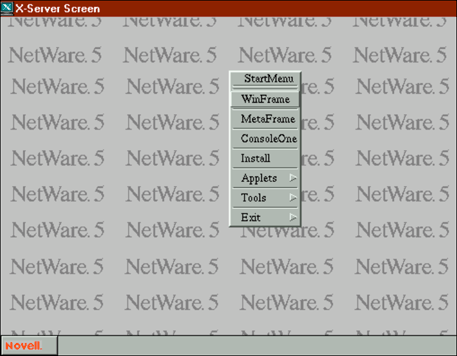
Once the JVM has been restarted, the Start Menu will appear as shown in Figure 13.
Figure 13: The JVM Start Menu with the WinFrame and MetaFrame options.
Conclusion
The integration of Novell's ZENworks and NDS products with thin-client servers addresses the needs of both network administrators and users. Users obtain a consistent desktop look and feel wherever they are, as well as the performance they demand. Administrators have a single tool that can be used to administer standard desktops and thin-clients from a central location anywhere on the network. Thanks to NDS, users can log in any time, anywhere, and authenticate to the network with a single user ID and password. With ZENworks, administrators can push software out to users and provide remote troubleshooting support from a central location.
* Originally published in Novell AppNotes
Disclaimer
The origin of this information may be internal or external to Novell. While Novell makes all reasonable efforts to verify this information, Novell does not make explicit or implied claims to its validity.