Managing Mixed NetWare and Solaris Networks with NDS for Solaris 2.0
Articles and Tips: article
Technical Writer
Novell India
01 Jun 1999
Got a mixture of NetWare and Sun Solaris networks? See how easy it can be to create and manage users in both environments with Novell's NDS for Solaris 2.0.
- Introduction
- Typical NDS for Solaris Functions
- Deploying NDS for Solaris
- Migrating Solaris User and Group Accounts to NDS
- Reverting Migrated Accounts from NDS
- Managing Solaris Accounts
- Managing Unix-Related Groups
- Managing a UNIX User Object
- Summary
Introduction
The AppNote titled "An Introduction to NDS for Solaris 2.0" in the April 1999 issue introduced NDS for Solaris, Novell's implementation of Novell Directory Services (NDS) on the SPARC Solaris platform. With this product, Solaris servers and workstations can act as directory servers. Along with NDS for NT and NetWare 5, NDS for Solaris allows administrators to create and manage a single user account across NetWare 5, Windows NT, and Solaris systems.
This AppNote describes some of the typical functions performed with NDS for Solaris 2.0, paying particular attention to procedures for managing Solaris user accounts using the NetWare Administrator utility. It outlines how to install and configure the product, and then explains how to do the following tasks:
Migrate Solaris user and group accounts to NDS
Revert migrated accounts from NDS back to Solaris
Manage migrated Solaris accounts with NWAdmin
Manage Unix-related groups
Manage Unix user objects
For more information about NDS for Solaris, visit the product Web site at:
http://www.novell.com/products/nds/nds4solaris/
Typical NDS for Solaris Functions
Some of the typical functions that NDS for Solaris performs include the following:
Installing a User Account Redirector
The installation of NDS for Solaris installs a user account redirector on the local system. This redirector consists of NDS-enabled providers for PAM and NSS.
The installation reconfigures the Solaris system to use the pam_nds module to redirect authentication requests to NDS. It also installs the nss_nds provider to resolve user names and group names into their corresponding entry records. Before the redirector is installed, the corporate directory's schema needs to be extended to add object classes and attributes specific to the NDS for Solaris product.
Migrating UNIX Users and Groups
NDS for Solaris includes a migration tool called MIGRATE2NDS that migrates Solaris user and group objects to NDS. The migration tool helps administrators move existing user accounts on Solaris systems (from NIS and NIS+ databases) to NDS. The administrator can control the NetWare semantics to be adopted for the Solaris user accounts that are migrated to NDS. The password of the user account is also migrated.
The administrator needs to ensure that there are no duplicate user names across the entire NDS tree, as the migration tool will not check for the uniqueness of the Solaris user being migrated.
Creating an NDS Replica
An NDS replica needs to be installed on the Solaris system. The Solaris installation process allows you to install Read/Write or Read-Only replicas of the NDS database on the Solaris server. These replicas are identical to those provided on NetWare servers. The ability to add replicas provides local access to NDS on Solaris servers, enabling greater speed and accessibility on remote networks. Solaris workstations or small servers are normally not expected to hold a replica.
Note: Novell recommends that the master replica reside on a NetWare 5 server for greatest reliability and access to NDS management and repair utilities. This restriction may be alleviated in a future release of NDS for Solaris.
Deploying NDS for Solaris
NDS for Solaris consists of two components: the NDS User Account Management (UAM) component and the NDS Server component. Before you begin the actual installation of the product, you need to decide whether you want to install the NDS UAM component, the NDS Server component, or both.
NDS UAM allows you to move Solaris user and group accounts to NDS, thereby making them manageable NDS objects. This will allow you to manage Solaris and NetWare user accounts with a single utilityNetWare Administrator (NWAdmin). NDS UAM needs to be installed on all Solaris systems whose users need to be in NDS.
NDS Server allows you to place an NDS replica on a Solaris server. NDS Server needs to be installed on all Solaris systems on which you want to place an NDS replica.
Installing NDS for Solaris
The NDS for Solaris 2.0 installation process includes running the Windows Setup program, running the Solaris Install program, and configuring the product components.
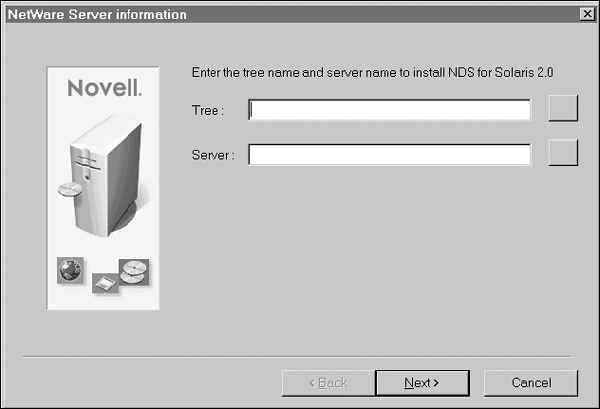
Windows Setup. The Windows setup program extends the NDS schema of the NDS tree to support Solaris accounts and installs the NDS for Solaris snap-in for NWAdmin. The Windows setup program requires the name of the tree into which the product should be installed, and the name of the NetWare 5 server into which the NDS for Solaris snap-in for NWAdmin should be installed, as shown in Figure 1.
Figure 1: NetWare Server Information screen.
If you have not logged in to the NDS tree, or if the account you are logged in to does not have administration rights to the root of the NDS tree, you will be prompted to provide the name and password of such a user. This information is required for the first Windows install only; any subsequent Windows installs will not require administration rights to the root of the NDS tree.
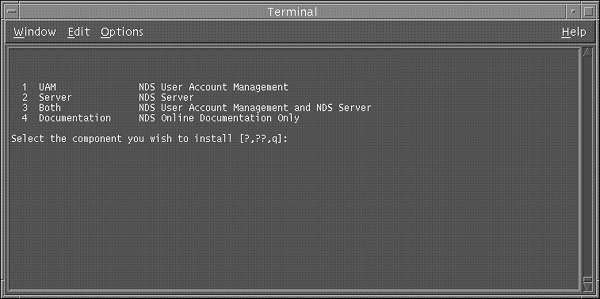
Solaris Installation. After completing the Windows setup, you can execute the Solaris installation program. This program installs the Solaris product binaries. It provides the option of installing individual components of the product. You are given the following four options (see Figure 2):
Install User Account Management (UAM)
Install NDS Server
Install Both the Product Components
Install the NDS for Solaris Online Documentation
Figure 2: Solaris installation components.
Depending on the option you select, the installation program proceeds to add packages associated with the product components. After the packages are added, the program asks for configuration information. Though the product can be configured later using the NDSCFG utility, it is recommended that you complete this step during product installation to ensure proper functioning of the product.
The following configuration parameters are needed to configure the UAM component:
Name with full context of the user with administration rights
Tree name
NDS context for the Solaris Workstation object
Context of the root of the partition
This information is required to create a Workstation object that represents the Solaris system on which UAM is installed in NDS.
The following configuration parameters are required to configure the NDS Server component:
Context of the user with administration rights
Tree Name
Server context
DB files directory
This information is required to create a Server object that represents the NDS server in NDS. The DB files directory parameter is optional; it specifies the path within the UNIX file system where the NDS database files are stored.
This completes the installation and configuration of NDS for Solaris. If you have installed the UAM component, you can proceed to migrate Solaris user/group accounts to NDS, using the MIGRATE2NDS utility.
Configuring the Product. You can configure the product using NDSCFG with command-line options. You will need to do this if you chose to exit the configuration during installation or if the configuration failed for some reason.
If you have installed only the UAM component, execute the following command (all on one line):
ndscfg -a <admin-with-context< -A uam -t <tree-name< -w <workstation-context< -r <partition-root<
If you have installed only the NDS Server component, execute the following command (all on one line):
ndscfg -a <admin-with-context< -A nds -t <tree-name< -n <server-context< -d <dbfiles-dir<
Note: The - t parameter is needed only if the tree name does not exist in /etc/nds.conf. The - d parameter is optional.
If you have installed the binaries of both the components, execute both of these commands in any order.
Migrating Solaris User and Group Accounts to NDS
Once NDS for Solaris is installed and configured, all existing Solaris users and groups can be migrated to NDS. The MIGRATE2NDS tool can be used to move the Solaris accounts to NDS. The tool supports the movement of accounts from files NIS and NIS+. Before proceeding with the migration, ensure that the product has been configured during installation, as described in the previous section.
The migration procedure of Solaris user and group accounts to NDS consists of three phases:
Preparing for migration
Migrating the accounts
Activating and verifying the migrated accounts
Preparing for Migration
The migration tool moves accounts from files NIS and NIS+. In these files, the same accounts can exist on various Solaris systems. The objective of this phase is to:
Consolidate the Solaris accounts across files and ensure that there are no duplicate uids and gids
Create the migrate2nds.inp file which contains inputs required by the migration tool
Define the rules for unattended migratation if the administrator specifies the Unattended Migrate parameter in the migrate2nds.inp file
Depending on where the user accounts are being migrated from, the passwd and groups entry in the /etc/nsswitch.conf file should be set to:
files files nis files nisplus
NDS must not be specified in these entries when you execute the migrate tool.
If accounts are being migrated from files, run the PWCONV command to update the entries in the /etc/shadow file with those in the /etc/passwd file. This will ensure that the entries in both files are consistent. Refer to PWCONV (1M) for more information.
Ensure that there are no invalid entries in the files, NIS, and NIS+ databases. When migrating accounts from NIS or NIS+, the administrator should ensure that the service is available before attempting the migration.
Migrating the Accounts
When you are migrating accounts from NIS, it is recommended that you run the migration tool on the NIS master. This enables the administrator to delete the migrated accounts from NIS. If you do not want to delete the migrated accounts, the migration tool can be run on any client.
Note: The root user account must never be deleted from files on the Solaris systems. This is required to allow the administrator to diagnose and restore NDS if NDS is not available for some reason.
To migrate accounts from the root domain in NIS+, run the migration tool on the root master server. If accounts are to be migrated from a non-root domain, run the migration tool on the client of the domain. The client should be in the admin group of the domain and should have modify rights to the table.
If accounts are being migrated from two databases (files nis or files nisplus), ensure that there are no duplicate accounts in the two databases. If there are, you should specify that you want the duplicate accounts mapped. If you choose not to migrate either of these accounts, the account will be considered as non-migrated from both the databases.
To migrate accounts, log in as root. In the /usr/sbin directory, type "migrate2nds". Follow the instructions given by the migration tool. The tool migrates the groups first, then the user accounts, and finally the group member list. NDS does not allow two or more users with the same name to be moved into the same context in NDS. Similarly, it does not allow multiple groups of the same name to be migrated to the same context.
A migrated user can log in through the Novell Client only after first logging in from a Solaris system. If the administrator changes the password after migratation (using NWAdmin), this restriction does not apply.
Activating and Verifying the Migrated Accounts
On completion of the migration procedure, you must add the NDS source to the passwd and group database entries in the /etc/nsswitch.conf file to activate the migrated Solaris accounts. However, the NDS source should always follow (not precede) the file's source in the passwd and group database entries in the nsswitch.conf file. That way, if the NDS server is down, the Solaris system is allowed to come up since the root account will still be available in files.
An example entry in the nsswitch.conf file is shown below:
# passwd and group entries for NDS for Solaris 2.0 passwd: files nds group: files nds
Since the "files" source precedes the "nds" source in the nsswtich.conf file, it is advisable to delete the migrated accounts from the local database. Refer to the NDS for Solaris online documentation for more information.
After installing NDS for Solaris and migrating accounts to NDS, NDS-based authentication, account management, and password management can be provided for UNIX accounts. The pam_nds module can be dynamically loaded to provide the necessary functionality upon demand. The path to this module is provided in the /etc/pam.conf file. To provide NDS-based authentication, account management, and password management features, the pam.conf file has to be modified to dynamically load the pam_nds.so.0 module. A sample file named pam.conf.nds is installed in the /etc directory when NDS for Solaris is installed. For the Solaris system to use NDS authentication, copy the /etc/pam.conf.nds file to /etc/pam.conf.
The migration tool creates the migrate2nds.log file in the /var/ndsuam/log directory. This log file will mention:
Whether an account has been migrated or not
The new name of the migrated account, if it has been migrated with a different name
The Solaris system to which the group has been granted access
You can view this log file to verify status of all the migrated accounts.
Reverting Migrated Accounts from NDS
NDS for Solaris provides a process in which the administrator has the option of reverting accounts to files NIS and NIS+ from NDS. Accounts that have been migrated to NDS can be reverted to the local databases on the Solaris system; however, this process does not do the following:
Delete the accounts in NDS after they have been reverted to the local database
Revert migrated accounts that have been added to NDS using the NDS for Solaris snap-in for NWAdmin
Revert migrated accounts that have been modified in NDS using the NDS for Solaris snap-in for NWAdmin
In order to be able to revert migrated accounts, the administrator has to specify the value "yes" (yes is the default value) for the CreateBackups parameter in the migrate2nds.inp file before running the migration tool. Refer to the "Migrating Accounts" section for more information.
Managing Solaris Accounts
Once all UNIX users and groups are migrated to NDS, they can be administered like any other NDS object. In this example, we will see how NWAdmin can be used to create, modify, and delete UNIX users in the directory.
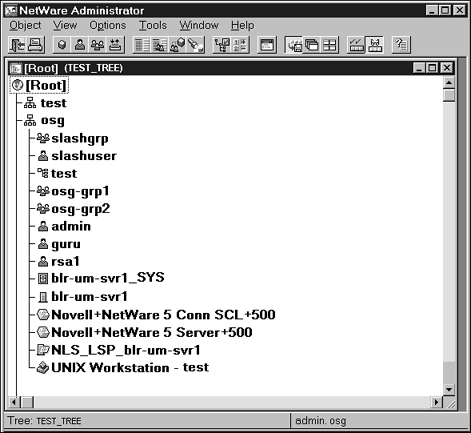
To administer the objects, log in as administrator from a Windows desktop and run NWADMN32.EXE from the SYS:\PUBLIC\WIN32 directory.
Figure 3 shows the UNIX Workstation object, representing a Solaris system test that has been created in NDS. BLR-UM-SVR1 is the NDS Server object that has been created in NDS, representing the NDS replica installed on the Solaris system.
Figure 3: NWAdmin view of the UNIX Workstation object and NDS Server object in NDS.
Managing Unix-Related Groups
Figure 4 shows a regular NDS group whose properties have been extended by NDS for Solaris to include the Unix group ID and the list of workstations that are associated with this group. Each UNIX system that needs to be accessed by users must have a corresponding Workstation object in the NDS tree.
Figure 4: NWAdmin view of the UNIX group ID and Workstation memberships.
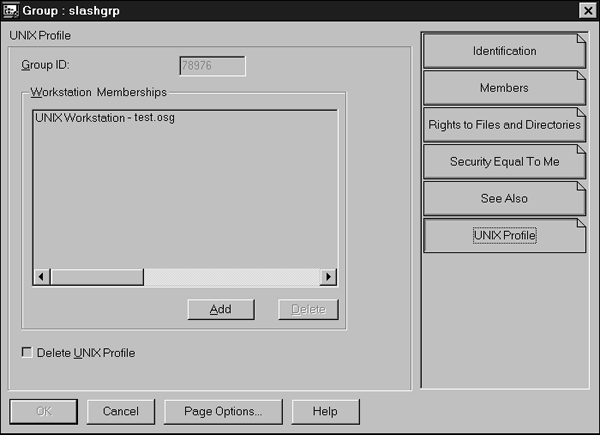
A UNIX group can be granted membership to the Workstation object. This allows all users in the UNIX group to be granted access to the UNIX system represented by that Workstation object. The Add button can be used to add more workstations into the group, and the Delete button can remove them from this group. If the "Delete Unix Profile" check-box is checked, the group will not be visible to UNIX workstations or servers. Click the Members tab to add users to the group.
Managing a UNIX User Object
Figure 5 shows a regular NDS User whose properties have been extended by NDS for Solaris to include the UNIX-related attributes like User id, home directory, login shell, and so on.
Figure 5: NWAdmin view of an NDS user with extended UNIX-related attributes.
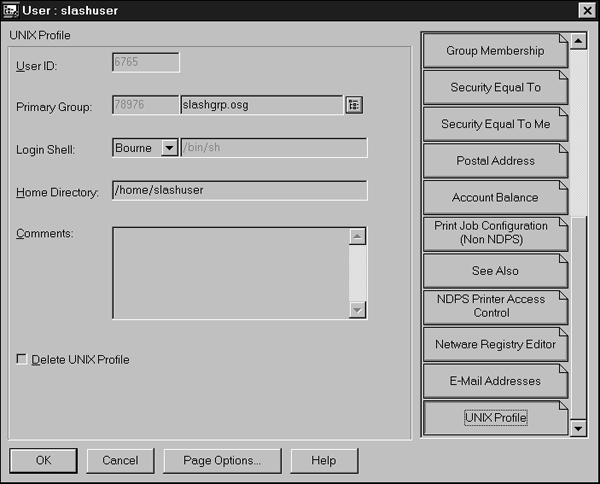
To select the Primary Group to which the user should belong, click the browser button to the right of the Primary Group entry box. A browser window opens, listing the available groups. Select the required group and click OK. It is mandatory that you select a UNIX group.
You can assign secondary group memberships for the User object through the Group Membership tab. If the "Delete Unix Profile" check-box is checked, the displayed UNIX User profile will be deleted from the NetWare account.
Summary
NDS for Solaris provides the tools necessary to migrate Solaris user accounts to NDS, thereby eliminating the need to have two databases. This product, along with NDS for NT and NetWare 5, allows administrators to create and administer a single-user account across NetWare 5, Windows NT, and Solaris systems. An NDS for Solaris snap-in to NWAdmin is provided so that these accounts can be administered from a single point. NDS for Solaris is a safe way to unify your entire network and make all your resources easier to access, develop, and manage.
* Originally published in Novell AppNotes
Disclaimer
The origin of this information may be internal or external to Novell. While Novell makes all reasonable efforts to verify this information, Novell does not make explicit or implied claims to its validity.