NDS v8: The Future of Novell Directory Services
Articles and Tips: article
NDS Product Manager
Novell, Inc.
01 Mar 1999
As the premier directory service in the industry, NDS continues to find acceptance in the enterprise networking space. Find out what the future has in store for NDS v8, the next generation of this powerful directory technology.
- Introduction
- NDS v8 Enhancements
- Support for LDAP v3
- Administrative Utilities
- Upgrading the NDS Database to NDS v8
- Conclusion
- Appendix: The LDIF Format
Introduction
NDS v8 is the next generation of Novell Directory Services and is an enhancement to the current NDS. It extends NDS into the Internet and enterprise directory niches with no loss in functionality. The main focuses of NDS v8 are scalability, performance, LDAP v3 (Lightweight Directory Access Protocol) and management.
NDS v8 offers the following features:
Increased NDS capacity for millions of users in a single tree
Increased performance for directory reads, writes, and searches
Documented, predictable performance for given hardware
ConsoleOne management
Increased Lightweight Directory Access Protocol (LDAP) v3 performance
Improved DSRepair utility
Batch utility for adding, modifying, and deleting NDS objects
Extended naming support, including "dc=" naming and uniqueID
In-place upgrade of an existing NDS database
This AppNote discusses the new features and enhancements in NDS v8. Also discussed is preparing your current NDS for an upgrade to NDS v8, the installation process, and suggestions for upgrading hardware to enhance performance.
At this time, NDS v8 is available free from Novell's product download site at http://www.novell.com/download, along with the NetWare 5 Support Pack 1 and the new DSREPAIR and BULKLOAD utilities.
Additional information about NDS v8 can be found on the Web at:
http://www.novell.com/products/nds/
NDS v8 Enhancements
NDS v8 is based on NetWare 5 code and will be available only for NetWare 5 servers with Support Pack 1 already installed.
NDS v8 supports true underlying database technology with indexed values. The advantage of indexing is improved performance and speed in directory access. The values that have been indexed will affect the speed of look ups and NDS background processes. The goal is to achieve 200 LDAP v3 reads per second.
NDS v8 uses a persistent change cache. With this type of cache all of the changes that are being made to a server are held in a vector. If a server crashes during the middle of the changes, when the server is brought back up NDS will load faster and synchronize the changes in a matter of seconds.
NDS v8 no longer uses Novell's Transaction Tracking System (TTS) to ensure that database transactions are either completed or backed out of in the event of a system failure. Instead, it uses a more scalable model called the roll back model. This model uses a log file to roll forward transactions in the event of a system failure.
NDS v8 is being designed to scale to support billions of objects per tree, millions of objects per server, hundreds of thousands of objects per container, and large object sizes of up to 50KB.
Changes to the NDS Data Structure
Earlier versions of NDS keep four data files and multiple streams files in the SYS:NETWARE directory, as shown in Figure 1.
Figure 1: NDS data structure prior to NDS v8.
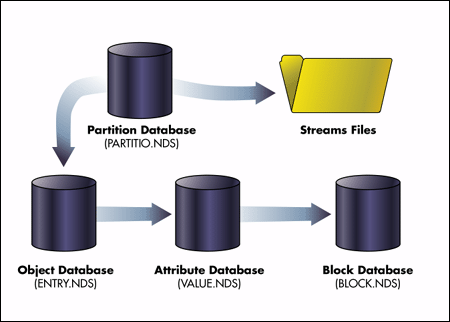
These files hold NDS data as follows:
PARTITIO.NDS contains a list of the database partitions, including system, schema, external reference, and bindery.
ENTRY.NDS contains records for each object contained on the server's replicas.
VALUE.NDS contains property values for each object.
BLOCK.NDS contains overflow value data from the VALUE.NDS file.
Stream files are named with hexadecimal characters (0 - 9, A - F) and hold information such as print job configurations and login scripts.
The new NDS v8 data structure is shown in Figure 2.
Figure 2: NDS v8 data structure.
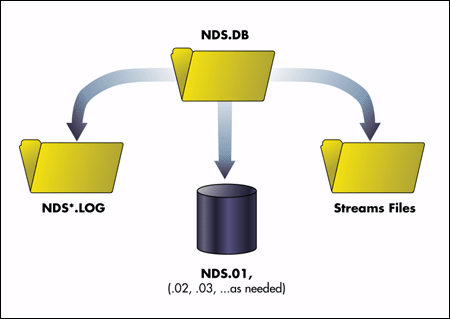
These files hold NDS data as follows:
NDS.DB is the control file for the database.
NDS*.LOG tracks transactions that have not completed. In the event of a system failure, this file is used to complete the pending transactions when the system is restored.
NDS.01 contains all records and indexes found on the server. When this file reaches 2 GB, then NDS.02 is created for the remaining data. Additional files are created as necessary to keep individual database files from growing beyond 2 GB in size.
Stream files are named with hexadecimal characters (0-9, A-F) and hold information such as print job configurations and login scripts. Streams files have a .NDS extension. A number of indexes are maintained in the NDS.01 file to enhance performance. These indexes include:
Attribute substring indexes for the CN and uniqueID fields
Attribute indexes for the Object Class and dc (LDAP domain container) fields
Attribute indexes for positioning that include strings beginning with CN, uniqueID, Given Name, and Surname
NDS v8 has the same compatibility requirements as NetWare 5. However, the limits in a mixed environment (4.1x, 4.2 and 5.x) will be determined by the lowest common denominator in a replica ring. In other words, although a server running NDS v8 can handle over 100,000 objects in a partition, that type of scalability is not available on servers not running NDS v8.
Additional Utilities
NDS v8 comes with a new utility called the bulkloader. This utility provides the capability of adding millions of objects to NDS using the LDIF (LDAP Data Interchange Format) version 1 file format that is in draft form in the Internet Engineering Task Force. LDIF is the standard format for exporting and importing information into directories that support LDAP v3. Bulkloader is an BULKLOAD.NLM that runs on the server.
NDS v8 also includes a new DSRepair utility that allows a repair to be run on a single partition instead of the entire database. With large database sizes of 4GB or more, it is not feasible to lock a database and run a repair. The new DSrepair allows for specific high level repairs to be run without locking the database. The DSREPAIR package is necessary if you install NDS v8 to a server that does not contain a replica of [Root].
Support for LDAP v3
NDS v8 contains full support for all LDAP v3 requirements. It contains auxiliary class support, DNS naming support and dc= naming capabilities. NDS v8 has also been optimized for LDAP queries and searches.
Auxiliary Class Definition
The NDS schema uses containment, which means that objects inherit attributes from the classes that make up a containment list. For example, when a User object is created, that object inherits the attributes and functionality of the schema classes Organizational Person, Person, and Top. Auxiliary classes, as defined in the RFC, allow objects to create attributes and functionality by simply adding a class to the object definition without affecting the containment list. This allows the changes to occur dynamically.
As part of the LDAP support, NDS v8 has two specific LDAP controls: Server Side Sorting and Paged Results.
Server Side Sorting. Server side sorting allows NDS objects to be sorted on the server and then distributed to various client applications that need access to objects. Server side sorting takes less time to display large numbers of objects and uses less RAM on the workstation.
Paged Results. As NDS scales to millions of objects, it does not make sense to return all 100,000 objects to a view. With server side sorting and paged results/virtual list view controls, NDS v8 can return pages of objects to a view; for example, the first 100, the last 100, and so on.
Support for UID and DNS Naming
A new addition for LDAP is the support of UID as a naming attribute in NDS. UID provides a way to look up unique identifiers for objects. Also included with the LDAP v3 feature is the support of the DNS naming structure. This allows for the dc= attribute to be included as a attribute of an object.
Circular Containment
With the changes in NDS v8, Novell has also introduced circular containment. This allows Organizational Units and Organizations to contain domains and not just other Organizational Units.
To have full LDAP functionality, a few things must happen. To support the auxiliary classes changes in the NDS schema, NDS v8 must be installed on a server that has a copy of the [Root] partition. To have the use of the circular containment, all servers must be at a minimum NDS level of 6.01 and 7.21. The option of global optional schema updates must be run on all servers.
Administrative Utilities
NDS v8 includes several administrative utilities. ConsoleOne is provided with NDS v8 to manage NDS, the NetWare file system, and the schema. You can also use your existing NWAdmin utility for management. Two new utilities are being introduced with NDS v8: Bulkload and an updated DSRepair.
ConsoleOne
ConsoleOne is the primary NDS administrative utility for NDS v8. It has been engineered into a simple, easy, and lightweight framework that will be advantageous to all snap-ins, performance, and future adaptations of management that include Web-based management.
Note: ConsoleOne includes the LDAP snap-in for managing your LDAP configuration. It also contains snap-ins for file management, object management, and schema management. For managing other features, such as PKI, use NWAdmin.
The new ConsoleOne that ships with NDS v8 is at least 10 times as fast as the previous ConsoleOne that shipped with NetWare 5, and includes the base NWAdmin functionality. It's a better solution for large scale environments.
When containers of 100KB or larger are opened, limitations are set by the speed and RAM of the workstation. ConsoleOne runs on the client and provides a replacement for NWAdmin in the scalable environment. It takes advantage of server side sorting and paged results, so that indexing is on the server rather than at the workstation.
ConsoleOne has the following new features:
Browse Huge NDS containers. You can browse NDS containers containing millions of objects. ConsoleOne retrieves and displays the contents one page at a time.
Search or Customize Views. You can search or filter the contents of the right pane based on object name and type. If the right pane contains NDS objects, you can also search based on specific property values. You can set any container at the top of the left pane.
Configure LDAP Services. You can configure LDAP v3 services on individual NetWare servers and control how LDAP-based access to NDS works for different groups of users.
Manage All NDS Objects. You can create, move, rename, delete, and modify any type of NDS object defined in the schema of your NDS tree. Custom property pages are available on most object types, and a generic Other page lists any remaining properties. You can modify multiple objects of the same type simultaneously.
Extend the NDS Schema. You can extend the NDS schema to allow the addition of new types of objects and properties to your NDS tree. This includes the ability to create auxiliary classes.
Set Up User Accounts by Template. You can create a template for setting up new user accounts. The template can supply initial values for most properties of the User object, including a home directory.
Control NDS Rights Inheritance. You can control whether NDS rights assignments are inheritable to lower levels in the tree, even for specific properties such as login passwords.
Manage NetWare file Services. You can manage the file system on individual NetWare volumes. You can create, move, copy, delete, and modify attributes of individual files and folders, including rights assignments and owners. You can view and change volume statistics and control disk space allocations by user or by folder.
With ConsoleOne an administrator can select any type of object and perform a multi-object attribute change. This is extremely useful when administrators want to change group memberships or workstation manager objects. In previous versions of NWAdmin, an administrator could only select multiple users and modify those attributes.
ConsoleOne has changed the display and ease of managing rights. Administrators no longer have to calculate each individual right. You simply click on rights and all effective rights will be shown immediately.
ConsoleOne features the ability to easily extend the NDS schema with schema manager and to administrate those extensions without having to write a snap-in. Also new is a generic Other tab that allows the administration of all schema extensions on any type of object class.
The following is a summary of ConsoleOne improvements:
Enhanced Search. You can visually construct a complex search query.
Multiple Object Details. You can select any set of objects and can modify those objects at the same time.
Simplified Rights Management. New interface to rights management simplifies user experience in setting and modifying rights.
Complete Attribute Editing. You can modify all attributes of any NDS object without any new snap-ins.
Universal Object Creation. You can create any NDS object without any new snap-in.
You can set up ConsoleOne on a workstation by running the setup utility located at
sys\public\mgmt\ConsoleOne\1.2\Install\setup.exe
Schema Management
NDS v8 offers the following enhancements to schema management:
ConsoleOne management of the schema
ASN1 IDs to uniquely identify each attribute and class in the schema Domain class (a container class)
Auxiliary classes which you can associate with specific objects rather than an entire class
NWAdmin
You can also use NWAdmin (NWADMN32.EXE) to manage NDS objects. However, NWAdmin has the following limitations relative to scalability and performance:
All objects are sorted on the client workstation
Search Results list is limited to 38,000 objects or less
Object Selector dialog is limited to 38,000 objects or less
Group Membership is limited to 38,000 objects or less
Trustees of an object is limited to 38,000 objects or less
Viewing of large data sets (50,000 or more) will be slow because NWAdmin does not take advantage of the NDS v8 scalability
Schema Manager in NDS Manager does not support the creation of auxiliary classes
Bulkload Utility
You can use the Bulkload utility to create, modify, and/or delete NDS objects in a batch process. BULKLOAD.NLM uses LDAP Data Interchange Format (LDIF) files for batch processing, which can be generated from most e-mail programs.
DSRepair Utility
The DSRepair utility has been enhanced with the following new features since the version released with NetWare 5:
Checks the database structure automatically without closing the database and without user intervention
Checks indexes
Repairs the database without closing the database or locking out users
Reclaims free space by discarding empty records
This new version of DSRepair will also work with the underlying NDS data structure used prior to NDS v8.
Upgrading the NDS Database to NDS v8
The minimum software requirements for upgrading to NDS v8 are as follows:
NetWare 5
NetWare 5 Service Pack 1
The general upgrade process is as follows:
Download the product image.
Prepare your network hardware (optional).
Prepare the NDS tree for the upgrade.
Upgrade servers.
Load user objects from LDIF files (optional).
Download the Product Image
To install NDS v8, you will need to download the following from Novell's product download page at http://www.novell.com/download/:
NDS v8
Support Pack 1 for NetWare 5
DSRepair
The installation for NDS v8 is a remote focused install. After downloading NDS v8, you can extract the file into a directory that is accessible from the server and install the product using the NWCONFIG utility. More detailed installation steps are given later in this AppNote.
Prepare Your Network Hardware (Optional)
If you are upgrading your hardware in conjunction with the NDS v8 upgrade, it is advisable to install the new hardware and test it with the existing network operating system and NDS version before upgrading to NDS v8.
To take advantage of the performance and scalability of NDS v8, consider upgrading all servers in a replica ring with more RAM, increased disk space for the SYS volume, a faster processor, and speedier network connections such as 100 Mbps Ethernet.
Prepare the NDS Tree for the Upgrade
Use the following guidelines to determine if you need to prepare the NDS tree before installing NDS v8.
If your first installation of NDS v8 is on a server holding a replica (master or read/write) of the [Root] partition, proceed with the "Upgrade Servers" section that follows. It does not matter which [Root] server you upgrade first.
If your first installation of NDS v8 is to a server that does not hold a replica of [Root], follow the steps below before performing your first NDS v8 upgrade.
From the product download page, download DSRepair.
Expand the DSRepair files from a workstation.
Copy the appropriate version of DSRepair to the SYS:SYSTEM directory of a server holding a replica of the [Root] partition.
For NetWare 4.10 or 4.11, copy DSREPAIR.NLM from \dsrepair\4x. For NetWare 5, copy the DSREPAIR.NLM from \dsrepair\5x.
Run DSRepair from the server console and select Advanced Options Menu | Global Schema Operations | Post NetWare 5 Schema Update. You will be prompted for the Admin name (for example, .Admin.Company) and password.
Upgrade Servers
You can perform the upgrade at the server's console or remotely using RConsole or RConsoleJ. Be aware that the installation scripts automatically restart the server during the upgrade process. Make sure all users are logged out during the upgrade. If you install the product using remote console, make sure you include the following commands in the server's AUTOEXEC.NCF file:
remote [password] rspx
To use the Java-Based Remote Console, make sure the following commands are included in the AUTOEXEC.NCF file:
spxs rconag6 [password] [TCP port] [SPX port]
The upgrade steps below are divided into several substeps.
Installing Support Pack 1. If you have already installed SP1, skip to the next section.
Download and expand the Support Pack 1 software to a directory on the NetWare 5 server.
Start the NWConfig utility (NWCONFIG.NLM) at the server's console.
Select Product Options | Install a Product Not Listed.
Press F3 and specify the path to the expanded Support Pack 1 files.
Follow the instructions to install Support Pack 1. The server will reboot during this process.
Answer yes to the prompt to reboot the server again at the end of the Support Pack 1 installation process.
Installing NDS v8. To install the NDS v8 files, do the following:
If you have not already done so, download the NDS v8 files from the Novell downloads site and expand the files into a single directory on the NetWare 5 server.
Start NWConfig at the server's console. The Configuration Options list appears, as shown below.
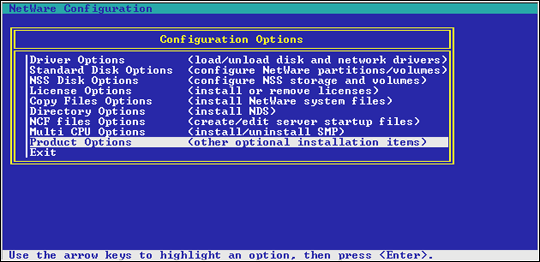
Select Product Options. The Other Installation Actions screen appears as shown below.
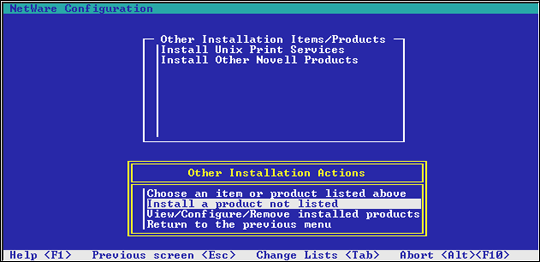
Select Install a Product Not Listed.
To specify a directory path, press F3 (F4 if you're using the SPX-based RConsole). An entry box will appear, as shown below.
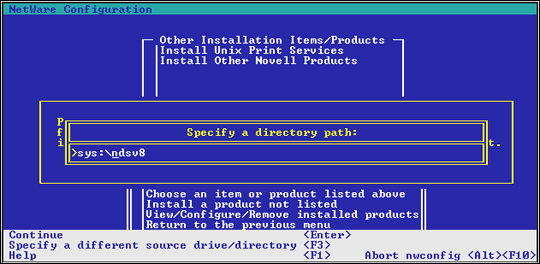
Type the path to the expanded NDS v8 files in the dialog box and press Enter. The file copy process will then begin.
A status screen similar to the one below shows the progress of the copy process.
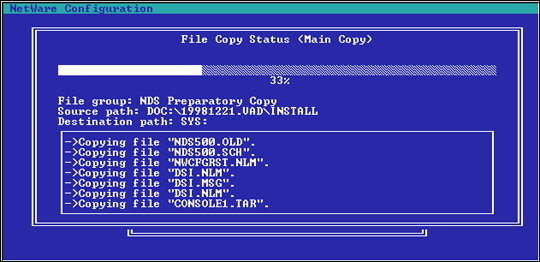
Once the files are copied, the server will automatically reboot.
Running the Installation Scripts. To Install LDAP and SAS, continue with the following steps.
After the server has rebooted, start the NWConfig utility again. If it is already loaded, access its screen by pressing Ctrl+Esc and then selecting the number corresponding to the screen. In the sample screen below, the number is 5.

When prompted, enter the Administrator's Login name (with context) and password, as shown below.
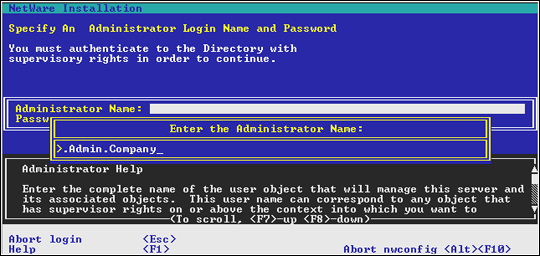
The installation scripts will install LDAP and SAS (required components). The upgrade status log will then appear. Press Esc to close the upgrade status log. You will be prompted to reboot the server, as shown below.
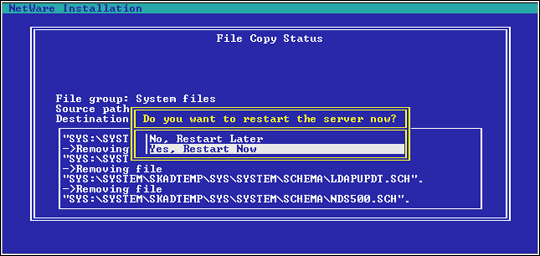
Select Yes, Restart Now. The server will reboot.
Configuring LDAP with a Valid SSL Certificate. If LDAP has not been configured with a valid SSL certificate, the server's console will show an error similar to the following:

To configure LDAP with a valid SSL certificate, do the following:
Start NWAdmin (NWADMN32.EXE from the server's SYS:PUBLIC\WIN32 directory) on a workstation.
Right-click the container object that holds the server's LDAP Server object.
Choose Create|Key Material. The Key Material object Wizard starts. (You may click on Help at any time for more information.)
Click Next and provide a name for the key pair.
Choose the server from the drop down box.
Click Finish. A message will appear indicating the Key Material object has been created.
Right-click on the LDAP Server object and select Details.
Click on the Browse button next to the SSL Certificate field.
Select the new Key Material object you created.
Click OK.
Repeat this procedure for each NetWare 5 server you want upgraded to NDS v8.
Load User Objects from LDIF Files (Optional)
You can use BULKLOAD.NLM to create, modify, and/or delete NDS objects in a batch process. BULKLOAD.NLM uses LDIF Format. To run BULKLOAD.NLM, you must have already created your LDIF file. After you have created the file, follow the steps below:
Start BULKLOAD.NLM at the console of a server running NDS v8.
Select Set Map File and specify the schema map file name (optional). This will create a text file that maps LDAP object classes to NDS object classes. The file must exist in the server's SYS:SYSTEM directory. The default file for schema mapping is DEFAULT.MAP. You can edit DEFAULT.MAP to add mappings or you can create a new file and specify it with the Set Map File option.
Select Apply LDIF File to run the batch process.
See the Appendix for more information about LDIF format.
Enable Domain Containment
Installing NDS v8 does not automatically provide LDAP support for a Domain object to contain other types of containers (for example, O, OU, L, and C). To enable this functionality, perform the following steps before or after installing NDS v8:
Ensure that replica-holding NetWare 4.x servers have the latest version of NDS. NetWare 4.11 must have NDS version 6.01 or later. NetWare 4.10 must have NDS version 5.17 or later. NetWare 5 servers do not require an NDS update. The earlier versions of NDS will receive schema changes properly but will not propagate them to child replicas.
From the expanded DSREPAIR download, copy the appropriate version of DSREPAIR to the SYS:SYSTEM directory of a server holding a replica of the [Root] partition. For a NetWare 4.10 or 4.11 server, copy the DSREPAIR.NLM from \DSREPAIR\4X. For a NetWare 5 server, copy the DSREPAIR.NLM from \DSREPAIR\5X.
From the server console, run DSREPAIR and select Advanced Options Menu | Global Schema Operations | Optional Schema Enhancements. Run this option after any extensions to the schema to ensure propagation throughout the NDS tree.
Conclusion
This AppNote has introduced NDS v8, the next generation of Novell Directory Services. It has outlined the new features and enhancements and provided an overview of how to install NDS v8 on a NetWare 5 network. Future AppNotes will delve into NDS v8 in more detail.
Appendix: The LDIF Format
You can export data in LDIF format from most e-mail and directory systems. Bulkloader only supports version 1 of the LDIF draft. It can produce keypairs for each user when the user Password field is included. The process runs considerably slower when you include the user Password field.
Version 0. You can export data in LDIF version 0 format from most e-mail directory systems. BULKLOAD supports only additions from LDIF version 0 files. The following is a sample version 0 file:
dn: cn=Patrick Milliken, o=Someorg

cn: Patrick Milliken

sn: Milliken

objectclass: inetorgperson

givenname: Patrick

telephonenumber: +1 802 555 1212

title: Developer

dn: cn=Susan Moller, o=Someorg

cn: Susan Moller

sn: Moller

givenname: Susan

objectclass: inetorgperson

telephonenumber: +1 802 555 1212
Version 1. Version 1 LDIF files must begin with the line "version 1." If this line is omitted, BULKLOAD assumes that the file is version 0, and that all objects in the file are to be added. LDIF version 1 files may contain additions, modifications, and deletions in the same file.
The following is a sample version 1 file for adding entries:
dn: cn=Patrick Milliken, o=Someorg

changetype:add

cn: Patrick Milliken, o=Someorg

sn: Milliken

givename: Patrick

objectclass: inetorgperson

telephonenumber: +1 999 222 2222

title: Developer

dn: cn=Susan Moller, o=Someorg

changetype:add

cn: Susan Moller

sn: Moller>

givename: Susan

objectclass: inetorgperson

telephonenumber: +1 999 222 2222

title: Director
The following is a sample version 1 file for modifying entries. The lines beginning with dashes are required:
dn: cn=Patrick Milliken, o=Someorg

changetype:modify

add:postaladdress

postaladdress: 999 W 555 E $ Sometown, UT $ USA

-

delete:description

-

delete:telephonenumber

telephonenumber: 1-999-999-9999

-
The following is a sample version 1 file for deleting entries. This is done by specifying the distinguished names to be deleted with no leading qualifier:
dn: cn=Patrick Milliken, o=Someorg

changetype:delete

dn: cn=Susan Moller, o=Someorg

changetype:delete
Further information on LDIF file formats is available at
http://search.ietf.org/internet-drafts/draft-good-ldap-ldif-03.txt
* Originally published in Novell AppNotes
Disclaimer
The origin of this information may be internal or external to Novell. While Novell makes all reasonable efforts to verify this information, Novell does not make explicit or implied claims to its validity.