An Introduction to NDS for NT v2.0
Articles and Tips: article
Product Manager
Novell, Inc.
ADAM SMITH
Product Marketing Manager
Novell, Inc.
01 Jan 1999
NDS for NT is a bit hit in mixed NetWare-Windows NT shops. Read about all the exciting new features in the latest version, along with installation and usage examples, to make administering NetWare and NT Server easier than ever.
- Introduction
- About NDS for NT
- Installing NDS for NT v2.0
- Single Point of Administration
- NT File Share Management
- Single Sign-On
- Using Other NDS for NT Utilities
- Uninstalling NDS for NT
- Conclusion
Introduction
It is becoming increasingly common for networks to contain both Windows NT and NetWare servers. Novell Directory Services (NDS) is a simple yet powerful tool that provides a single point of administration for your entire network and dramatically cuts your total cost of owning a network. It also gives users a single login capability and makes your network more reliable, scalable, and secure.
In addition to these NDS benefits, Novell's NDS for NT product enhances mixed NetWare-Windows NT environments by:
Making deployment of NT applications easier. NDS for NT helps you deploy NT applications without the cost and weaknesses of NT server management.
Increasing reliability and productivity. Using the industry leading directory service, you will increase the total value of your network by eliminating redundant administration and easing user access through a single login. NDS for NT is the first solution to offer single sign-on for users of both NetWare and NT server.
Managing the NT Branch Office. NDS for NT is the foundation for centralized management tools for your desktops, applications and user profiles (ZENworks), managing NT server (ManageWise), providing secure remote network and Internet access (BorderManager Authentication Services), and managing groupware (GroupWise).
This AppNote introduces NDS for NT v2.0, the cost-saving directory solution for managing Microsoft NT servers and applications in mixed environments. It takes you through the basics of installing and using the product, focusing mainly on the new features in version 2.0.
For more information, visit Novell's NDS for NT Web page at:
http://www.novell.com/products/nds/nds4nt/
About NDS for NT
Novell created NDS for NT to help organizations efficiently manage their NT servers and NT applications. In designing this product, Novell visited many customers who were asking for help in managing NT in their branch offices. NDS for NT integrates the domain namebase into NDS. This allows network administrators to administer all aspects of the NT domain through NDS. In addition, NDS for NT has been designed so that any application requiring domain information will receive that information from NDS without requiring any modification to the application.
For example, assume that a person needs access to both an NT domain and a NetWare server. If NDS for NT is not installed, the network supervisor must create and maintain two accounts for that user, one on each platform. If several hundred users need accounts in a domain and on NDS, the amount of work required to maintain those accounts can be prohibitive. However, if NDS for NT is installed on the NT server, all requests to the domain user object are redirected to a single User object in NDS. This object controls access to Microsoft network resources and NDS, thereby cutting the network supervisor's work in half.
NDS for NT is installed on NT servers that are designated as Primary Domain Controllers (PDC) or Backup Domain Controllers (BDC). No workstation components or workstation configuration is required. From the perspective of the Microsoft clients or applications using that domain, nothing has changed. All workstations and applications will continue to function as they always did.
As an example, if an administrator needs to add a new user with access to an NT Server, the administrator can use NWAdmin to add the user in NDS and grant user rights to the NT server and domain. Alternatively, the administrator can use Microsoft User Manager to create the user. User Manager sends requests to the NT server to create the user in the domain and NDS for NT directs those requests to the NDS database. The user is created in NDS with the same properties and access restrictions that are available from the domain itself. Any subsequent modifications made to that user with User Manager or any other domain administration utility is serviced in the same way. While Microsoft's User Manager can be used to create and modify users in NDS for a specific domain, NWAdmin offers more with a global view and administration of the entire network.
The key advantage is that NDS for NT does not require existing NT administrators to be retrained to use the Novell administration utilities. NDS for NT is so transparent, NT administrators can continue to use NT administrative tools, such as User Manager, to do their administration. You could say that Novell has NDS-enabled these NT tools.
New Features in NDS for NT v2.0
NDS for NT 2.0 is the second major release of the NDS for NT product. Significant enhancements have been made since the 1.0 product that include:
The ability to store an NDS replica on an NT server
The ability to manage NT file shares through NDS
Single-sign-on for users accessing NetWare and NT servers
Enhanced scalability
The ability to store NDS replicas on NT servers enables NDS for NT to be used in branch offices where only NT server has been deployed without having to cross a WAN link to access the NDS data on a NetWare server. NDS for NT 2.0 brings the NDS benefits such as ease of management and scalability to the NT branch office, allowing users in the branch office to benefit from the most widely deployed directory service in the world.
The ability to manage NT file shares through NWAdmin provides the solution whereby network administrators can set up and manage user access privileges to the file systems on both NetWare and NT from NDS using a single utility. This single point of administration provides significant savings for organizations that have heterogeneous networks.
The single-sign-on solution in NDS for NT significantly reduces the costs of perhaps the most common help-desk call, "I forgot my password." Because NDS for NT can ensure that the NetWare and NT passwords are always identical, end-users do not have to concern themselves with managing passwords. If a user's password does need to be changed, the network administrator only has to change the password once in a single utility. Without NDS for NT, the network administrator would have to change the NetWare password, then launch a separate utility and reenter the password to change the NT password.
NDS for NT allows domains to scale beyond Microsoft's native solution. If the only servers participating in the replica ring are NetWare 5 and NT servers running NDS for NT 2.0, the domain can scale to 65,000 objects. This is substantially larger than an NT Domain could scale without NDS for NT.
Installing NDS for NT v2.0
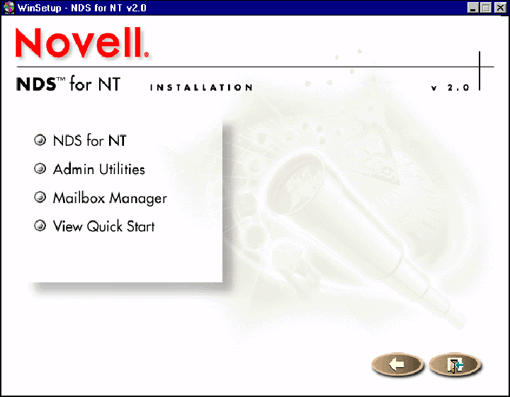
To install NDS for NT, insert the CD and the WINSETUP.EXE program will automatically run. From the introductory screen (shown below), you can install the various components of NDS for NT, as well as view the quick start instructions.
Installing the Novell Client for Windows NT
The Novell Client for Windows NT must be installed before NDS for NT will function. The installation of the Novell Client for Windows NT allows the Primary Domain Controller (PDC) or Backup Domain Controller (BDC) to communicate with other NDS servers on the network.
From the introductory screen, click on NDS for NT. You will see a welcome screen for the NDS for NT Installation. Click Continue .
After accepting the licensing agreement, click Next and the Novell Client for Windows NT will be installed.
After the client is installed, you will need to reboot the server. Click Reboot.
Installing NDS for NT
After the server has reinitialized, you will be prompted to authenticate to the NDS tree. Since you will be extending the NDS schema, you must authenticate as a user with administrative privileges at the root of the NDS tree.
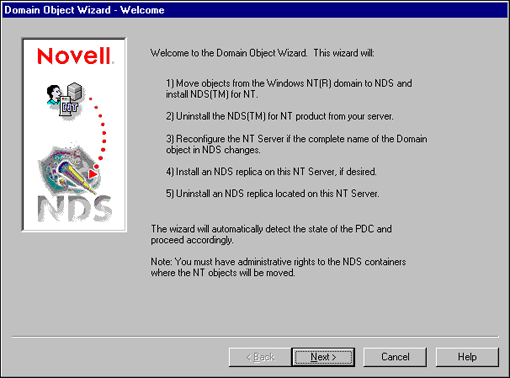
At this point, the Domain Object Wizard will automatically launch. The Domain Object Wizard is the utility that moves users from the SAM database into NDS and installs the NDS replica on the NT server. Click Next to start the Wizard.
You'll first be asked to identify the NDS tree where you want the Domain object to be created. Once you have done so, click Next.
You will be informed that to move your NT Domain to NDS, you must extend the schema on the NDS tree you just selected. Click Next to proceed.
Now you need to specify the NDS context (container or organizational units) where you want the Domain object to be created. You must also specify the context where you want users that are created through NT utilities, such as User Manager, to be placed in the tree.
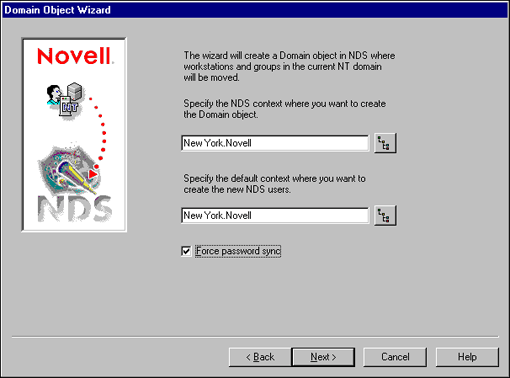
If you want to use the single sign-on solution in NDS for NT which will keep the domain and NDS passwords synchronized, the "Force password sync" box should be checked. Click Next to continue.
The next screen allows you to search the NDS tree for existing User objects matching the User objects in the NT domain. This search will identify all duplicate users to merge during the domain migration process. Choose whether you want to perform this search or skip it, and click Next.
If you chose to perform the search, you will be asked to select the default action to take if the preexisting NT users are not found in the NDS tree. Select to either create the users or not to move them and click Next.
You will now be prompted to select the NDS container(s) where you want to search for duplicate users. Select one or more containers by checking the box next to the container object. Click Next, then click Search to perform the search
Once the search has completed, click Next to view the results. You will see a summary similar to the one shown below displaying the results of the duplicate user search.
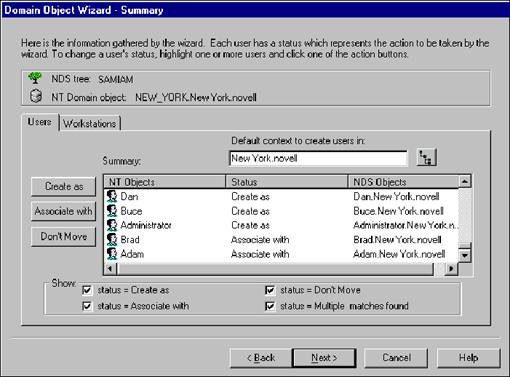
In this example, users Brad and Adam already existed in NDS. The Domain Object Wizard identified these users and will merge the existing NT users into the associated NDS User objects. You also have the option to make manual associations between users.
Click Next to proceed with creating the Domain object in NDS and moving or merging the Domain's users, groups, and workstations into the NDS tree. As the objects are moved, the actions (along with any errors) are reported and logged.
Once this process is completed, click Next. The Domain Object Wizard displays the screen shown below.
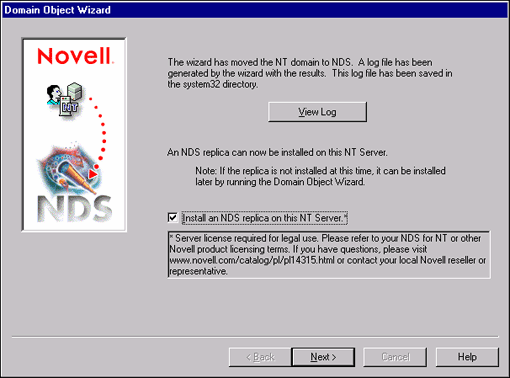
The log file provides a detailed report of all the objects that are moved from the NT domain into NDS. If you want to view the log file, click View Log.
If you do not want to place an NDS replica on your domain controller, make sure the "Install an NDS replica on the NT Server" box is unchecked and click Next. Skip to the section titled, "Installing the NDS for NT Administrative Utilities." Otherwise, check the box, click Next, and proceed with the steps listed in the next section.
Placing an NDS Replica on an NT Server
If you have elected to place an NDS replica on the NT server, you will be prompted to enter the NDS username and password of a user that has the rights necessary to add NDS replicas. Click Next.
You will be asked to enter a name that will represent the NT Server within NDS. This domain controller name will automatically be populated into the appropriate field with " - NT " appended to the end of the name. The NDS object that represents the NT Server will be created in the same context as the NDS Domain object wherein the NT Server participates. Click Next.
You will be prompted to identify the directory path where the NDS data files will be stored. This must be on an NTFS volume. Enter a path such as "D:\Novell NDS" and click Next.
Once the NDS replica is installed on the NT Server, you will see a message stating that the NT server must be restarted to complete the replica installation. Click Finish to restart the server.
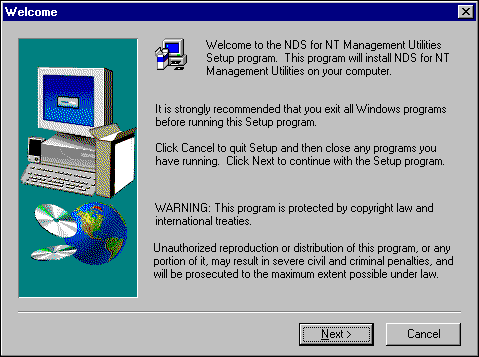
Installing the NDS for NT Administrative Utilities
The next step in installing NDS for NT is to install the Administrative Utilities.
Reinsert the NDS for NT CD to auto-run the Installation, or use Windows Explorer and click on the WINSETUP.EXE icon on the CD.
From the introductory screen, click on Admin Utilities. You will see the screen shown below.
Click Next. After accepting the license agreement, you can read the NDS for NT 2.0 Release Notes. Click Next to continue.
You can choose to install the utilities on the local drive of an NT server or on a NetWare server. Your choice should be based upon the location from which the network administrators prefer to run the utilities.
By default, the utilities will be installed in the C:\Novell\Public\Win32 directory on the NT server. On NetWare servers the utilities are installed to the SYS:PUBLIC\WIN32 directory. After you have made your choice, you are shown a summary of the components that will be placed on the server.
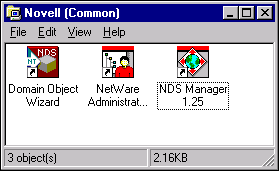
If the utilities are installed to an NT server, shortcuts for the three administrative utilities listed below will be created in the Program Folder you select. If the utilities are installed to a NetWare server, only the Domain Object Wizard shortcut will be created.
NetWare Administrator. You will use this utility to manage all objects within the NDS tree
NDS Manager. You will use this utility to perform NDS partitioning and replication operations.
Domain Object Wizard. You will use this utility to add or remove NDS replicas and uninstall NDS for NT.
Click Next to proceed with the install.
Single Point of Administration
NDS for NT provides the ability to administer the entire Novell and Microsoft network environments from a single utility. A single NDS User object contains all the permissions, restrictions and configurations for both NetWare/NDS and NT/domains. NDS for NT allows administrators in a mixed NetWare and NT network to manage the user account information once, rather than having to enter information into NDS and then input the same information into the domain.
Once NDS for NT is installed, the domain object, users, and local and global groups are represented within NDS. As you can see in the example screen below, the New York domain is under the New York OU. If you want to see a list of the users who are members of the domain, simply right click on the Domain object and select Details.
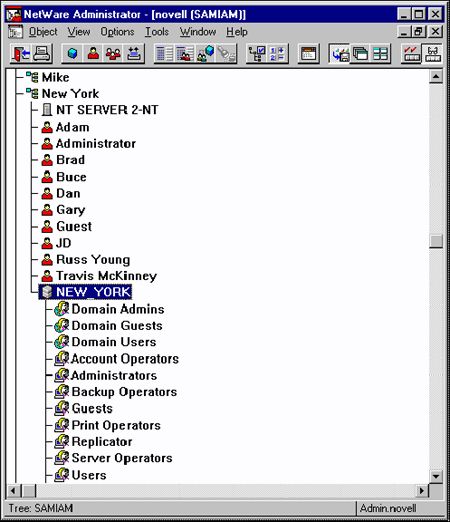
Clicking on the Members page button shows a list of users who are members of the New York domain. Adding a user to the domain is simple as clicking on the Add button and selecting an NDS user from anywhere in the NDS tree.
For example, an administrator can create a user with User Manager. Since NDS for NT redirects calls destined for the SAM database into NDS, any user created with User Manager is really created in NDS. Think of User Manager as another NDS Administrative tool, but limited in function to a single Domain object.
The following is an example of this interoperability. Using User Manager, we will create the user John Smith and make him a member of the Print Operators and Replicator groups. The screen below shows creating the new user.
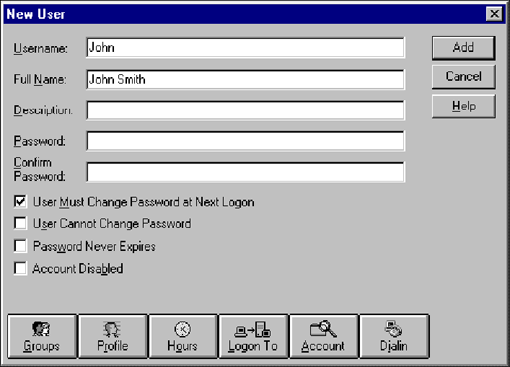
Now we make John a member of the two groups, as shown in the screen below.
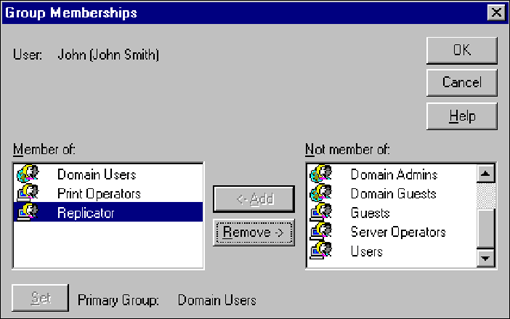
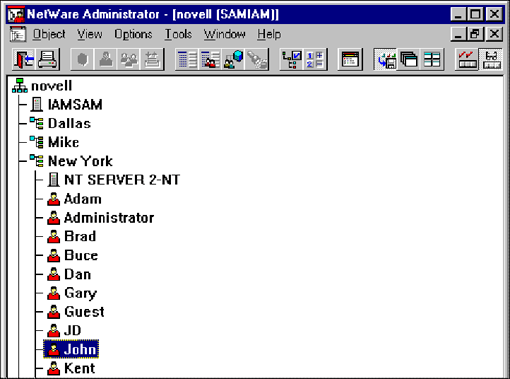
When we refresh the view in NWAdmin, we see that the user John has been created in the New York container. If we go to his Domain Access, we can see that John is a member of the New York domain and is a member of the groups we assigned in User Manager.
Granting Users Access to Multiple Domains
Giving users access to multiple domains is as easy as clicking on Add, browsing to another Domain object in the NDS tree, and selecting it. In the NT world, we would have to establish trust relationships between the two domains or create separate user accounts in each domain.
If trust relationships are used, all users in the trusted domain are granted access to the trusting domain. This provides no granularity of administration. If granularity of administration is needed, the only solution is to create user accounts in each and every domain. Each user account would also require its own set of restrictions, permissions, and password.
Consider the example of a user needing access to the services in four domains. One or more NT administrators would have to create that user account in each domain and then enter the same configuration information in each domain (four times). If the user forgets his or her password, an NT administrator would have to execute the User Manager utility and enter the new password four different times (once for each domain).
With NDS for NT, there is a single user account in NDS which provides a single sign-on regardless of the number of domains the user is authorized to access. The password is identical for NetWare and NT.
Without NDS for NT, there is no solution for an NT administrator to get a global view of a user's privileges on the network. Notice that while using NDS for NT, an administrator can select a user in NWAdmin and view access privileges to domains throughout the network. In contrast, administrators in the standard domain world would have to look with User Manager in every domain (launching a separate instance of the User Manager utility for each domain) to identify the user's access privileges across the entire network.
While researching the NDS for NT product, one administrator told Novell that when an individual left the organization, it took her two hours to delete the user's accounts from the entire network since she had to manually look in every domain in her organization. NDS for NT, on the other hand, deletes the user from every domain and from NDS when the user account is deleted. What took this administrator two hours to do can now be accomplished with a single click of the mouse in NDS.
Using the above example, if you were to delete the user account John Smith, the user would be deleted from NDS, the Seattle domain and the New York domain. Without NDS for NT, the user would have to be deleted from NDS then the administrator would have to execute User Manager for the Seattle domain, delete the account, execute User Manager again for the New York domain and delete the account.
Likewise, when a user moves to another area of the organization, NDS for NT provides a simple solution not available with NT. Without NDS for NT, the only way to move a user from one domain to another is to manually write down all the user's configuration information, restrictions, etc., delete the account in the first domain, recreate the user account in the second domain (using a different instance of User Manager) then reenter the user's configuration parameters. In this scenario, the user's password would be lost and a new default password would have to be assigned. This is often affectionately referred to as the "Paper Napkin Transfer Protocol." Using NDS for NT, the user is simply added to the second domain and then deleted from the original domain. No user settings have to be recreated and the password and other settings are preserved.
NDS for NT also allows the administrator to manage the domain-specific user settings, such as workstation restrictions, and home directory, from NWAdmin.
NT File Share Management
NDS for NT 2.0 offers the ability to manage NT file shares within NWAdmin. NT administrators will be excited by the ability to manage user accounts and file shares from the same utility. Without NDS for NT, administrators have to use two different utilities to manage NT users and NT file shares.
Following is an example of how NT file shares can be managed with NDS for NT.
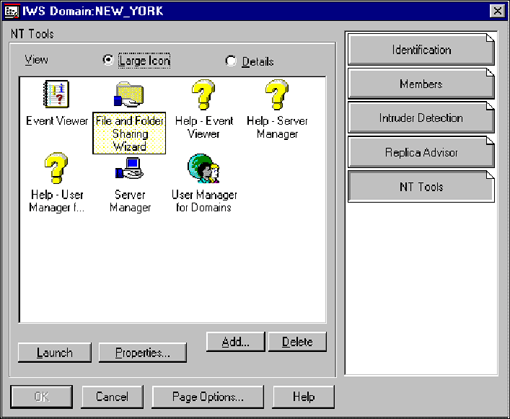
Launch NWAdmin, highlight the domain where you want to create the NT share, right click and select Details.
Click the NT Tools property page. Several NT Tools will be displayed, including User Manager, File and Folder Sharing Wizard, Event Viewer, and Server Manager.
Double-click on the File and Folder Sharing Wizard icon to create an NT share.
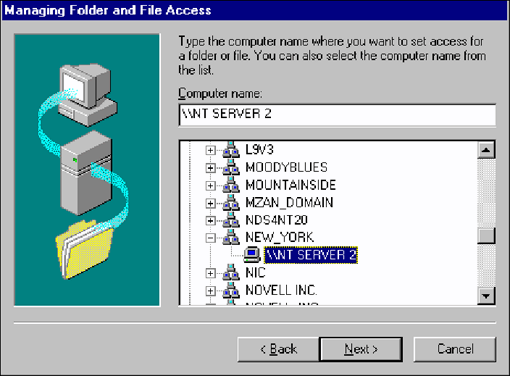
If the folder that you want to share on the network is on the computer where you are working, select "On my computer"; otherwise select "On another computer".
Browse to the domain and the server where you want to create the file share. Highlight the appropriate server and click Next.
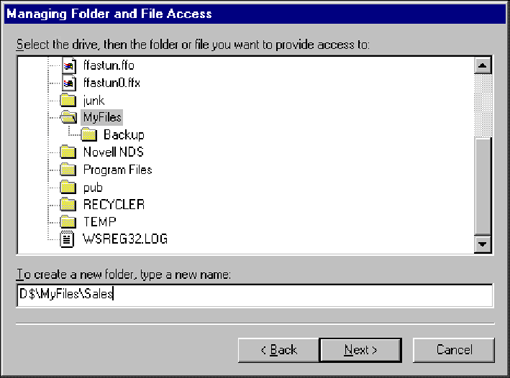
Browse to the folder you want to share or enter the name of a new folder that you wish to create and share. For this example, we will create a sales folder under My Files that we will share. Click Next to continue.
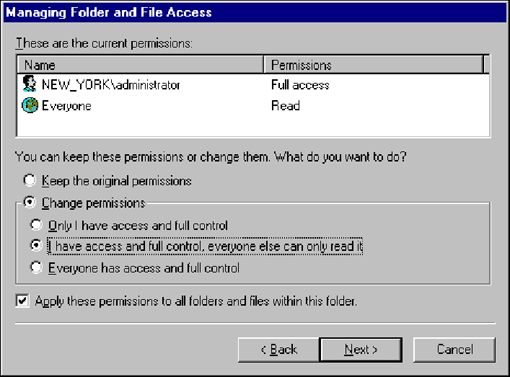
Displayed are the initial permissions that can be assigned to the file share through the File Folder Sharing Wizard. You will see later where you can configure more granular permissions, if desired. Click Next.
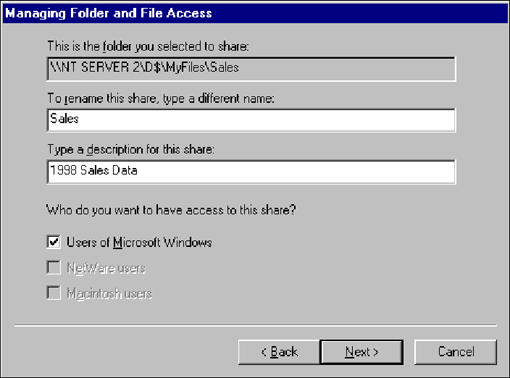
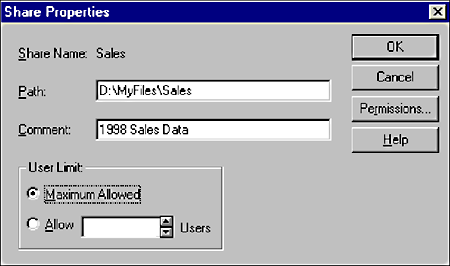
You will be able to type in the description of the share and change the name of the share that will be available to users on the network. Click Next when finished.
A summary of the share configuration you are about to create is displayed. Click Finish to create the share.
You will need to use the Server Manager utility to set additional share permissions other than the default options that were available in the File and Folder Sharing Wizard. If you need to create additional permissions, return to the NT Tools property sheet and launch the Server Manager utility. (This utility can also be launched from the NT Tools tab on the Domain object in NWAdmin.) Highlight the server, then go to the Shared directories option under the Computer menu option.
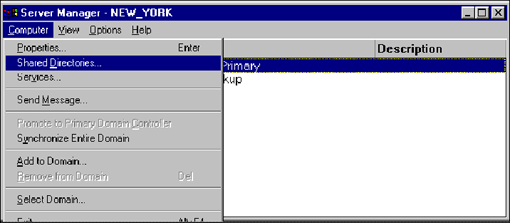
Highlight the Sales shared folder and click on Properties.
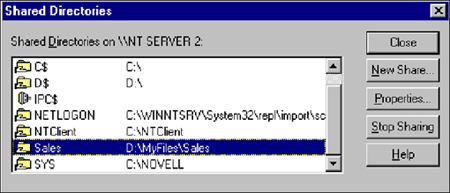
To modify the access control, click on Permissions.
Clicking on the Add button brings up a list of users and groups that can be assigned to the share.
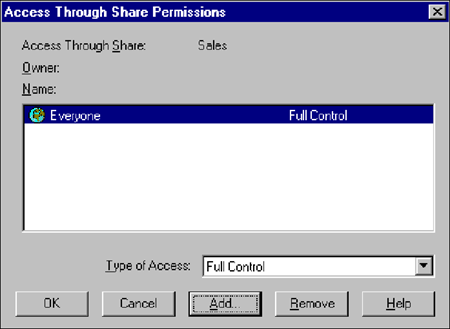
Remember that the utility you are currently using is making calls to the domain namebase which is stored in NDS. The file share rights are stored on the NT file system.
One of the major values of NDS for NT for NT administrators is the ability to manage multiple domains from a single utility, and from a single workstation. For example, from NWAdmin we could administer NT file shares on the servers in Seattle domain like we did in the New York domain.
Single Sign-On
One of the biggest challenges facing users and administrators is keeping their passwords on the network synchronized so they only have to remember a single password. NDS for NT 2.0 offers the first single sign-on solution for users requiring resources on both NetWare and NT servers.
To ensure that the NT and NetWare passwords will always be identical, the Force Password Sync box must be checked on each user. This option can be set globally when moving users into NDS during the installation of NDS for NT. It can also be set in the template used to create new users, or from the Details tab on the Domain object in NDS.
Once the Force Password Sync option has been enabled and saved, the Set NT Password button is modified to Change Both Passwords referring to the NDS and domain passwords. Once Force Password Sync option is enabled, NDS for NT will ensure that the NDS and domain passwords stored in NDS are identical. The passwords will be identical no matter what Windows-based utility is used to modify or change the passwords.
Using Other NDS for NT Utilities
An undocumented utility that can be very useful in managing NDS for NT is the NDS Console (NDSCONS.EXE) utility that is copied into the directory you specified to store the NDS information. In our example, we selected C:\Novell\NDS. This utility can be used to shut down NDS or load additional modules, as shown in the screen below.
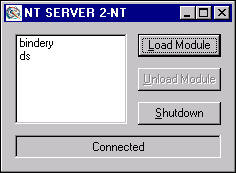
You can see that, by default, the NDS and Bindery modules are loaded on the NT Server when an NDS replica is installed.
Use the Load Module button to load another module. For example, you could load the NDS Server Trace (DSTrace) utility to check the health and status of NDS. This would be accomplished by clicking on Load Module, highlighting "dstrace" in the resulting list, then clicking on Load. The NDS Server Trace Utility screen will be activated, from which you can view the status of NDS. It will appear similar to the sample screen shown below.
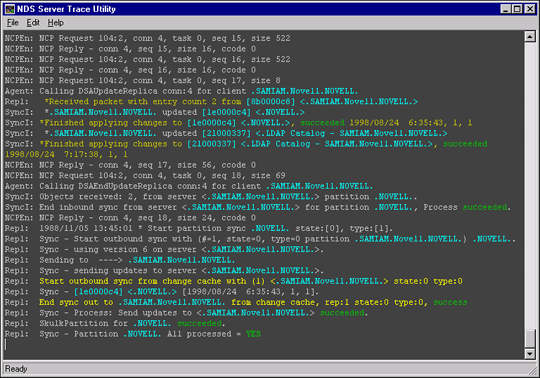
Note: Since running this utility takes resources from the NT Server processes, it is not recommended that you leave the DSTrace utility running at all times.
Information about the NDS connection the NT Server is servicing can also be displayed from the NDSCONS utility by loading the "monitor" module. From the NDS Server Connection Monitor, you can see information such as the identity and network address of connected devices, as shown in the screen below.
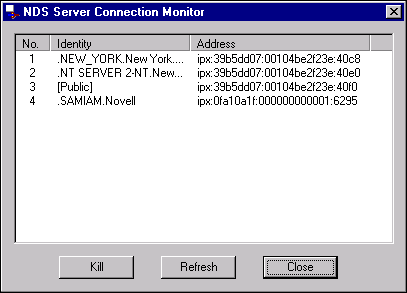
From this utility, network administrators can also delete NDS connections to the NT Server by highlighting the connection and clicking Kill.
The NDS Manager utility allows administrators to view and manage NDS replicas and partitions. The view that you initially see is a representation of the NDS tree, as shown below.
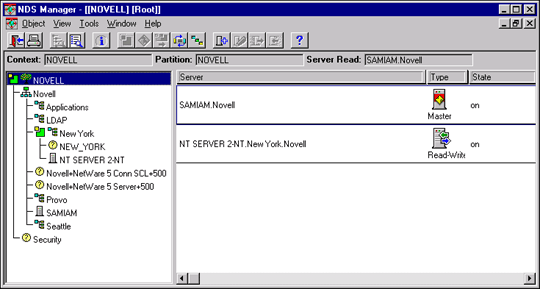
If you choose to partition off an OU representing a location, highlight the OU object, right click, and choose Create Partition. A similar operation would be needed to set up a branch office where NT is the only server.
Once you have partitioned off the OU that contains the NT domain, select the Partitions and Servers view from the View menu. Notice which replicas are stored on the NT Server. In version 2.0 of NDS for NT, it is highly recommended that you maintain only Read/Write replicas of any NDS partition on the NT server. The Master replica should be stored on NetWare servers since some of the utilities (such as DSREPAIR) currently only run on NetWare. The NDS utilities for use on NT servers will be included in a future release of NDS for NT. In the case of a branch office, the Master replica should be managed from a central, corporate site and a Read/Write replica should be maintained at the branch office for local login and for network services such as ZENworks and GroupWise.
Uninstalling NDS for NT
To uninstall NDS for NT, you use the Domain Object Wizard to reverse migrate and remove NDS for NT from the NT Server. When you launch the Domain Object Wizard, it will detect the NDS replica on the NT Server, ask you to authenticate as a user with necessary rights to perform replica operations, and then proceed to remove the replica. You can then uninstall NDS for NT.
You have three options when uninstalling NDS for NT. The default is to move all the domain information (including all changes made while the domain information was kept in NDS) back into the domain. The other options are to have objects revert back to the state they were in prior to the installation of NDS for NT, with the exception of passwords, or to simply remove NDS for NT and restore no information from NDS to the domain.
Conclusion
NDS for NT upgrades the Windows NT domain system to a true directory service and gives organizations single sign-on, single point of administration, and full NT application support for mixed NetWare and NT networks, thereby eliminating the high costs associated with cumbersome NT domains. NDS for NT greatly reduces the amount of time network administrators spend managing today's multi-platform networks.
NDS for NT allows administrators flexibility for managing all Windows NT domains and their resources through NDS using either NWAdmin or Windows NT utilities like User Manager. NDS for NT also allows a single NDS user object to become a member of multiple domains, thus doing away with the complexity of trust relationships inherent with multi-domain installations. This latest step in Novell's integration strategy demonstrates Novell's commitment to support the heterogeneous networks that customers need by providing robust NDS support across platforms, while making networks easier to manage.
* Originally published in Novell AppNotes
Disclaimer
The origin of this information may be internal or external to Novell. While Novell makes all reasonable efforts to verify this information, Novell does not make explicit or implied claims to its validity.