Troubleshooting NDS in NetWare 5 with DSREPAIR and DSTRACE
Articles and Tips: article
Senior Consultant
Novell Consultanting Services
BLAIR W. THOMAS
NDS Marketing
Novell, Inc.
01 Jan 1999
Excerpted from Chapter 9, "Troubleshooting NDS" in Novell's Guide to NetWare 5 Networks by Jeffrey F. Hughes and Blair W. Thomas (Novell Press, 1998). To order this book, call 800-762-2974 or 317-596-5200.
Discover the new features that await in the new NetWare 5 versions of these trusty NDS utilities, and get some insight on how to use them to troubleshoot NDS.
- Introduction
- Basic NDS Troubleshooting Steps
- The DSREPAIR Utility
- The DSTRACE Utility
- NDS Troubleshooting Dos and Don't
- Conclusion
Introduction
Troubleshooting has been described as a combination of art, science, and luck. One reason troubleshooting tends not to be much fun is that administrators often do not know enough about the underlying technology to properly define network problems when they occur. Unfortunately, as networks grow larger and larger, they also become more complex. In the server-centric world of NetWare 3.x, troubleshooting was usually confined to tracking down a server or two that was experiencing a problem. Typically, you could focus on a single server and identify problems quickly. In NetWare 5, you are dealing with a more complex multiserver environment in which servers must communicate with one another. In addition, the technology may be new to many companies and may be unfamiliar to users and administrators.
To make troubleshooting NetWare 5 easier, Novell has introduced improved repair utilities and procedures for maintaining your NetWare networks. This AppNote describes two improved utilities in NetWare 5: DSREPAIR and DSTRACE. It is based, in part, on information gathered by the staff on Novell's technical support teams regarding how to maintain and troubleshoot Novell Directory Services (NDS). Experience has shown that if the status of NDS is properly verified before and after operations are initiated, NDS management can be virtually error free.
This AppNote covers three key topics:
Understanding and using the NetWare 5 DSREPAIR utility
Understanding and using DSTRACE in NetWare 5
NDS troubleshooting dos and don'ts
For more information, refer to Novell's NetWare 5 Web site at:
http://www.novell.com/products/nw5/
Basic NDS Troubleshooting Steps
The following sections describe the DSREPAIR and DSTRACE utilities in NetWare 5. These utilities are very important tools you will use during normal NDS maintenance and troubleshooting. By using a combination of DSREPAIR and DSTRACE, you will be able to perform three basic NDS troubleshooting steps. These steps are:
Identify the partition that is experiencing errors by using and understanding the DSTRACE set parameters and using the DSREPAIR utility.
Identify the replica(s) in the partition that have errors. Identify these errors by using the DSTRACE SET commands and the DSREPAIR utility.
Identify the error and take the appropriate action.
Also, be sure to keep informed about patches and update announcements by checking Novell's Web site regularly. The URL is http://www.novell.com.
The DSREPAIR Utility
The DSREPAIR utility enables you to monitor NDS, check for errors, and correct problems in the name service on an individual server basis. The utility runs as a NetWare Loadable Module (NLM) at the server console. The utility is menu driven and is written with the well-known C-worthy user interface. The following are the main functions of DSREPAIR:
Correct or repair inconsistencies in the NDS database
Check NDS partition and replica information and make changes where necessary
Initiate replica synchronization
You can run the DSREPAIR utility on any NetWare 5 server in the NDS tree. Additionally, the utility can either be loaded at the server console or through access a server via the RCONSOLE utility.
Figure 1 illustrates the DSREPAIR utility's main menu.
Figure 1: The DSREPAIR utility main menu.
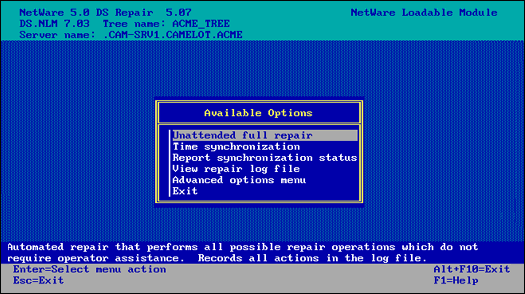
The DSREPAIR utility provides the following options:
Unattended Full Repair. This feature automatically performs repair operations on the local NDS name service without operator assistance.
Time Synchronization. This option checks the time synchronization for all servers that are known to the local server. You must monitor and correct time synchronization problems before performing any repair operation. A replica of the [ROOT] partition must be on the local server running DSREPAIR for this feature to contact all servers in the tree.
Report Synchronization Status. This option lets you check the status of any partition on the server.
View Repair Log File. This option lets you view all the operations of the DSREPAIR utility by consulting a log file stored on your server. The default log file is SYS:SYSTEM\DSREPAIR.LOG. You should always view the log file after running the utility.
Advanced Options Menu. The advanced options on this menu give you greater flexibility to manually control the repair of your NDS tree.
These options are discussed below.
Unattended Full Repair
The Unattended Full Repair option automatically performs all possible repair operations that do not require operator assistance. This option goes through five major repair procedures:
It repairs the local NDS database, which locks the database during the repair operation so that no new database updates can occur until completed.
It repairs any NCP server object's network address; the database is not locked during this operation.
It verifies all remote NCP server object IDs; the database is not locked during this operation.
It checks replica rings; the database is not locked during this operation.
It authenticates every server in the ring and verifies information on the ring.
You can control which of the preceding items are checked or repaired by using the Repair Local DS Database option, which is described later in this AppNote under the "Advanced Options Menu" section. Refer to the Repair Local DS Database selection screen for more information.
The log file records all the actions during the Unattended Full Repair operation. When the repair operations are completed, the log file is opened so you can see what repairs were made and check the current state of the database.
Time Synchronization
The Time Synchronization option contacts every server known to the local server and requests information about time synchronization, Directory Services, and server status. The information is written to the log file. When the operation has completed, the log file is opened so you can check the status of time synchronization plus other Directory Services information. Figure 2 shows the log file after the time synchronization operation has been run on the ACME tree.
Figure 2: The log file after the time synchronization operation has been run on the ACME tree.
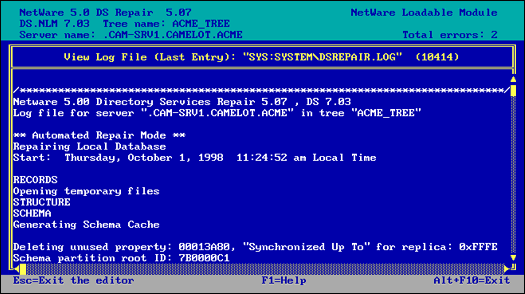
An explanation of each field in this log file is provided in Figure 3.
Figure 3: Fields in the DSREPAIR log file.
|
Field
|
Content
|
|
Server Name |
The distinguished name of the server responding to the request. |
|
DS.NLM Version |
The version of Directory Services (DS.NLM) running on the responding server. This information is valuable as a quick reference to see the versions of NDS running on the servers of your network. |
|
Replica Depth |
The replica depth indicates how deep in the NDS tree moving away from [ROOT] the first replica is on the responding server. Each server knows which replica is highest in the NDS tree. This value is the number being reported. A positive number indicates how many objects there are from the [ROOT] to the highest replica. A value of -1 indicates that no replicas are stored on the server. |
|
Time Source |
The time source is the type of time server the responding server is configured to be. |
|
Time is in Sync |
This field indicates the time synchronization status of the responding time server. The possible values are Yes and No. The value displayed is the status of the synchronization flag for each server. This means that the server's time is within the time synchronization radius. |
|
Time Delta |
This field reports the time difference, if any, from the time synchronization radius for each server. The time synchronization radius is 2 seconds by default, so you will probably not see a server with more than a 2-second difference. If the value is larger, the Time is in Sync field is probably set to No. The maximum the field can report is up to 999 minutes and 59 seconds. |
Report Synchronization Status
The Report Synchronization Status option starts a replica synchronization process for all the partitions that have replicas on this server. This operation starts the synchronization process for all partitions and replicas. If you want to perform the same operation for individual partitions, you need to select the Replica and Partition Operations option from the Advanced Options menu.
The Replica Synchronization operation contacts each server in each of the replica lists stored on the server. A server does not attempt to synchronize to itself, so the status returned for a server's own replica is the value of "host."
The operation uses the log file to track the actions of the requests and displays any errors that occur. This operation is a quick and easy way to determine that the partitions and servers are communicating and synchronizing properly.
View Repair Log File
The View Repair Log File option lets you view the DSREPAIR log file, which contains the results of the previously performed operations. The default log file is stored in SYS:SYSTEM\DSREPAIR.LOG. When DSREPAIR performs an operation, the results are written to this log file. A record of each succeeding operation is appended to the log file, which increases in size with each repair operation. The size of the log file is displayed on the title line in parentheses after the name of the file.
Using the advanced options menu in DSREPAIR (discussed next), you can set the current log file size, reset the log file, log output to a new file name, or append to an existing file.
Advanced Options Menu
The Advanced Options menu enables you to control the individual repair operations manually. You can also use it to monitor status and access diagnostic information about your NDS tree. These options provide advanced repair operations that you should execute only if you understand the procedures and how they function. The Advanced Options menu provides the options shown in Figure 4, several of which are identical to the main menu options.
Figure 4: The Advanced Options menu in DSREPAIR.
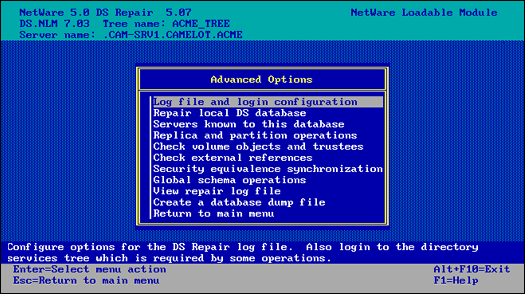
Log File and Login Configuration. This option lets you configure the log file and log in to the Directory tree. Configuring the log file enables you to manage where DSREPAIR writes the information it gathers. You can turn the log file off, delete it, and change the name of the file itself. The file can be stored on any volume or DOS drive.
The login function presents a login screen that lets you enter an administrator user name and password. Once you have logged in, the authentication information is maintained in server memory for all other repair operations that require an administrator to log in.
Repair Local DS Database. This option repairs the local NDS name service and performs the same function as the Unattended Full Repair option in the main menu. Figure 5 shows the Repair Local Database Options screen. You can select or deselect each item to turn it on or off for the unattended full repair.
Figure 5: The Repair Local Database Options screen.
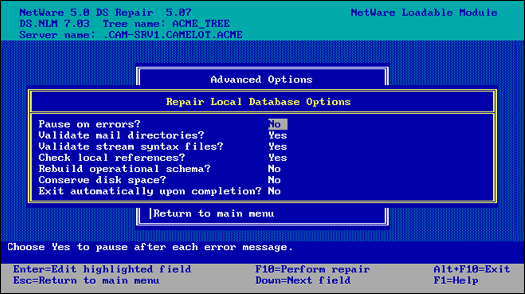
During the repair operations, NDS is temporarily locked, preventing clients from logging in. Several items are checked during the repair operation. For example, the NDS tree structure is checked to ensure that all records are linked to the [ROOT] object and that the object and property records are linked. The partition records are checked for validity and any errors are fixed. A check is made for invalid checksums and links between records and any errors are fixed.
The repair operation creates a set of temporary NDS files that are used to perform all the changes. The temporary files have the .TMP extension. At the end of the repair operation these temporary files become the permanent NDS files, unless you choose not to accept the repairs that were made.
Descriptions of the Repair Local DS Database options are listed in Figure 6.
Figure 6: The Repair Local DS Database options.
|
Option Name
|
Default
|
Description
|
|
Pause on errors? |
No |
Turn on this option if you want DSREPAIR to stop on errors. After the repair is complete, you can view all actions it performed in the log file. |
|
Validate maildirectories? |
Yes |
This option checks the mail directories on volume SYS for users who no longer exist after the repairs have been made. NDS does not require the user to have a mail directory. The mail directories are migrated from NetWare 3 to support bindery users in NetWare 5. |
|
syntax files? |
Yes |
This option checks for valid stream files after the syntax repair operation. Stream files contain data for a property whose data type syntax is stream, such as a login script. The files are associated with a specific user object or other object. If the user (or other object) no longer exists in NDS, the stream files associated with the user (or other object) are removed. |
|
Rebuild operational schema? |
No |
The operational schema is the set of rules that NDS uses to objects and properties. The schema is required for base operations. If the schema becomes damaged or corrupted, you should rebuild it using this option. However, it is extremely unlikely that this situation will arise. |
|
Conserve disk space? |
No |
DSREPAIR creates temporary copies of the NDS files and operates on these files. You can choose to save or discard the changes after a repair has completed. If you save the changes by leaving this option set to No, the temporary files become the real NDS files and the current NDS files are assigned the .OLD extension. This ensures that DSREPAIR has an old set of files that Novell technical support can review in case of emergency. The drawback to saving at least one old copy of the NDS files is that it takes up a little more disk space. In most cases this will not be an issue because the NDS files don't take up a large amount of disk space. |
|
Exit automatically upon completion? |
No |
This option lets you look at the log file before saving the changes to the repaired NDS files. If you choose Yes, the utility automatically saves the changes and exits DSREPAIR. |
Servers Known to This Database. This option displays all the servers that the local NDS knows about. Each server must contact all servers in the replica list during replica synchronization. The local server will only know about the servers it needs to contact. If the local server has a copy of the [ROOT] partition, the list of known servers most likely contains all the servers in the tree.
Figure 7 shows the Servers found in this Directory Services Database screen. This information shows servers from replica lists, servers from remote/local IDs, and NCP server objects in any partition.
Figure 7: The Servers found in this Directory Services Database screen in DSREPAIR.
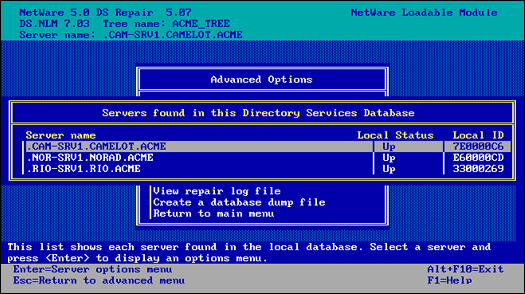
The Local Status field displays the state of the server as seen from the local server. If the value for a server is Up, the remote server is active. However, if the value is Down, the local server cannot communicate with the other server.
If you can select a server from the list, the Server Options menu shown in Figure 8 becomes available. This menu applies to the selected server.
Figure 8: The DSREPAIR Server Options menu.
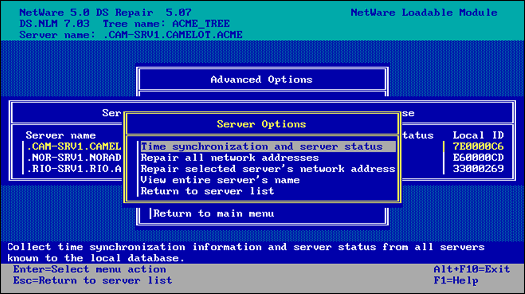
The Server Options menu provides the following options:
Time Synchronization and Server Status. This option contacts every server known to the local server and requests information about time synchronization, Directory Services, and server status. This option is the same as the Time Synchronization option on the main menu.
Repair All Network Addresses. This option checks every server object known to this server and searches for the server's name in the local SAP table. If the address is found in the SAP table, this address is compared with the value stored by the local server. If the two addresses do not match, the address in the SAP table is assumed to be correct and the other addresses are changed to match it. This operation is performed if you select the Unattended Full Repair option from the DSREPAIR main menu.
Repair Selected Server's Network Address. This option repairs the highlighted server's network address in replica rings and server objects in the local database. As shown in Figure 9, you will see a log file displaying the results of this activity and any errors that may have been generated.
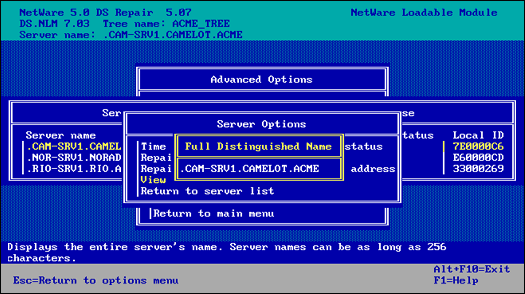
View Entire Server's Name. This option allows you to view the server's distinguished name. Figure 10 shows a view of the server's full name from DSREPAIR.
Figure 9: The screen displayed when you select the "Repair selected server's network address" options in DSREPAIR.
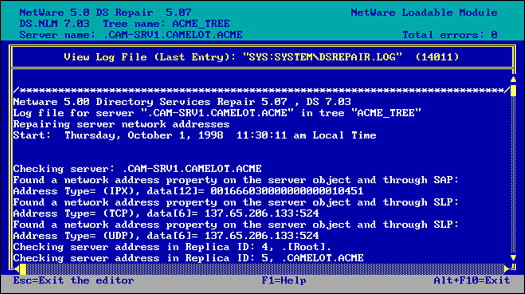
Figure 10: DSREPAIR can display the NDS Full Distinguidhes Name of the selected server.
Replica and Partition Operations. You should become very familiar with the Replica and Partition Operations option on the Advanced Options menu. You will use this menu more than any other menu during the maintenance of NDS. When this option is selected, DSREPAIR displays a list of all the replicas stored on the server. This list applies only to the server on which you are running DSREPAIR.
The menu option to view replicas is called Replicas Stored on this Server. Figure 11 shows the results from choosing this option. Each replica is shown in list format, with the replica type (master, read/write, read only, and subordinate reference) and replica state (On, Off, and so on).
Figure 11: The "Replicas Stored on this Server" list in DSREPAIR.
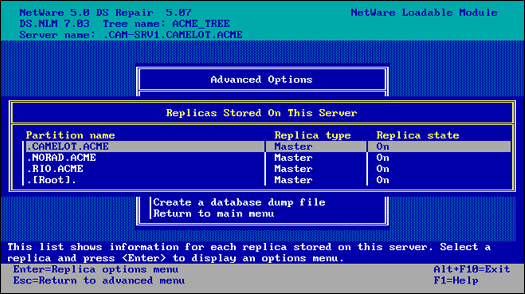
From the Replicas Stored on this Server list, you can select an individual replica or partition, which enables you to obtain more specific information and perform maintenance functions. After you select an individual replica or partition from the list, you'll see a larger Replica Options menu called Replica Options, Partition: <partition name<. Figure 12 shows this Replica Options menu. In the figure, the name of the partition is CAMELOT.ACME. This menu includes an extensive list of specific options and operations that enable you to perform specific diagnostic and repair functions. These operations apply only to the partition selected.
Figure 12: The Replicas Options menu in DSREPAIR for the CAMELOT.ACME Partition.
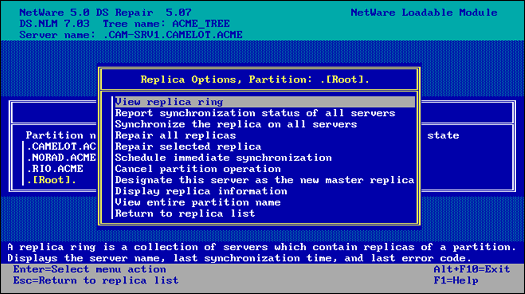
The Replica Options menu is the most heavily used menu in DSREPAIR because it enables you to monitor, diagnose, and repair specific problems with the replicas stored on a particular server. Several repair options in this menu require you to log in as a user who has rights to perform the operation. The utility requires you to log in before running all of the important repair options as a final check that you are authorized to perform the operation.
The operations in this menu affect the entire partition and all of its replicas. This is one place that the DSREPAIR utility can start operations on the other servers through the use of a replica list.
If you want to affect only the replica that is stored on a specific server, select the View Replica Ring option, select a specific replica on any server, and then perform partition and replica operations on only that server.
The Replica Options
The Replica Options menu supplies several additional options that you can execute for the partition and all of its replicas, as described below.
View Replica Ring. This option provides another menu or list of all the servers that contain replicas for the selected partition. The list that appears is called Replicas of Partition: <partition name<. A replica ring is equivalent to a replica list, which is a list of all the servers that hold replicas for a specific partition. The replica ring shows the replica type and replica state information for each server. You can choose a server or replica in this list and display the Replica of Partition: <partition name< list, which provides more functionality on the selected server. Figure 13 illustrates information for the CAMLEOT.ACME partition.
Figure 13: Viewing the replicas of a partition in DSREPAIR.
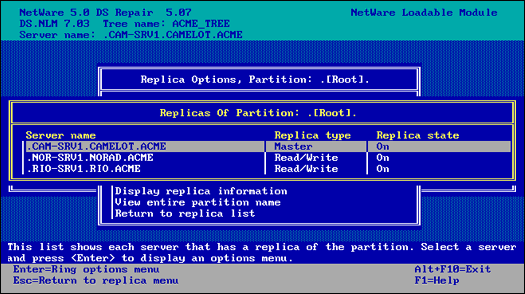
Selecting the View Replica Ring option will display the Replicas for Partition: <partition name< menu, which supplies the following options, which affect only the selected partition:
Report Synchronization Status of All Servers. This option checks the synchronization status of every server that has a replica of the selected partition. If all the servers with a replica response are synchronizing, the partition is functioning properly.
Synchronize the Replica on All Servers. This option performs a synchronization of the selected partition on all severs that contain a replica and reports the status.
Repair all replicas. This option performs a repair of all replicas on this server. This option also checks and validates the information on each server that contains a replica, as well as the IDs of both the remote and local servers. This is the same information that is checked when you select the Unattended Full Repair option from the main menu. In other words, you can run an Unattended Full Repair or a Repair Local Database instead of choosing the Repair All Replicas option.
Repair selected replica. This option performs a repair on only the highlighted replica. This option is the same as the Repair All Replicas option, except that it repairs only the selected replica. Before choosing this option, you can run an Unattended Full Repair or Repair Local Database, both of which are equivalent to this operation.
Schedule immediate synchronization. This option starts an immediate synchronization of all the replicas stored on this server. You can use this option to initiate synchronization activity if you want to view the Directory Services trace screen started by DSTRACE.
Cancel partition operation. This option attempts to cancel a partition operation that was started for the selected partition. This operation talks to the master replica, which is responsible for the partition operations. Some partition operations may not be canceled if they have progressed too far. Other partition operations, such as the Add Replica Partition operation, cannot be canceled.
Designate this server as the new master replica. This option designates the local replica of the selected partition as the new master. Each partition can have only one master replica, so the previous master replica is changed to a read/write replica.
This option is useful for designating a new master replica if the original one is lost. This situation may arise, for example, if the server holding the master replica has a hardware failure and will be down for a while or indefinitely.
Display Replica Information. This option displays the distinguished name for the selected replica.
View entire partition name. This option will display the full distinguished name of the selected partition.
The Rest of the Advanced Options
Now let's return to our discussion of the items listed in the Advanced Options menu (shown previously in Figure 4).
Check volume objects and trustees. This option will check all mounted volumes on this server for valid volume and trustees on the volumes. This option requires you to log in as the Admin user before performing this operation.
Check external references. This option will check each external reference object to determine if a replica containing the object can be located. If all servers that contain a replica of the partition where the object resides are inaccessible, the object will not be found during the check and a warning message will be issued.
Security Equivalence Synchronization. This option allows synchronization of security equivalence properties throughout the global tree. This operation walks the Directory tree, checks each object for the Equivalent To Me property, and checks it with the corresponding Security Equals property on the referenced object.
You should never have to run this option if you are using the standard NetWare security and rights administration. The Equivalent To Me property is not used by default. Enabling this option can cause performance degradation on your server.
Global Schema Operations. This option checks that all servers in the NDS tree contain the correct schema up to the NetWare 5 base schema. If a NetWare 5 server does not contain the correct schema, it will be updated.
After you select the Global Schema Operations option, you are provided with the following methods for updating the schema:
Update All Servers' Schema. This option updates the schema on all servers in the tree and is useful for updating previous versions of NetWare 5 or NetWare 4 (4.0, 4.01, 4.02, 4.1, 4.11) to the current NetWare 5 schema.
Update the [ROOT] Server Only. This option updates the schema on the server that contains the master replica of the [ROOT] partition.
Import Remote Schema. This option is used for equalizing the schema before merging two trees.
View Repair Log File. This option allows you to manage the log file created when you run the other DSREPAIR options. The default log file is SYS:SYSTEM\DSREPAIR.LOG. When DSREPAIR is loaded, the log file is opened. When repair operations are performed, the activity is appended to the log file. The size of the file is displayed within parentheses on the far right side of the title line. You can use this option to control the log file. For example, you can turn the log file off, turn it on again, change the file name, and change its location. You can place the log file on a NetWare volume or on a DOS drive.
Create a Database Dump File. This option lets you copy the NDS files to disk in a compressed format to be used by Novell technical support. Creating a dump file can be useful for diagnostic and troubleshooting efforts. However, note that the dump file is not a backup that you can restore later.
When you select this option, you are asked to enter the path name for a dump file. The default is SYS:SYSTEM\DSREPAIR.DIB. The dump file can be written only to a NetWare volume and not to a DOS drive.
The DSTRACE Utility
In previous versions of NetWare (4.x), DSTRACE referred to a group of SET commands available at the server console. DSTRACE was often referred to as a utility; however, it was really just a group of server SET commands that were useful for monitoring how NDS was functioning.
Now, in NetWare 5, DSTRACE is a utility (a NetWare Loadable Module) that provides expanded monitoring capabilities compared to its predecessor. Once it is loaded, you can use DSTRACE (also called the NDS Trace Event Monitor) to monitor synchronization status and errors. DSTRACE is primarily used to determine and track the health of NDS as it communicates with the other NetWare 5 servers in the network.
You can use DSTRACE commands to:
Monitor the status of NDS synchronization processes
View errors that occur during NDS synchronization
Note: DSTRACE was originally developed and used by the NDS engineers to help develop NDS. Novell technical support uses it to diagnose NDS errors and determine the health of the NetWare 5 system. The DSTRACE utility is provided for the benefit of all administrators.
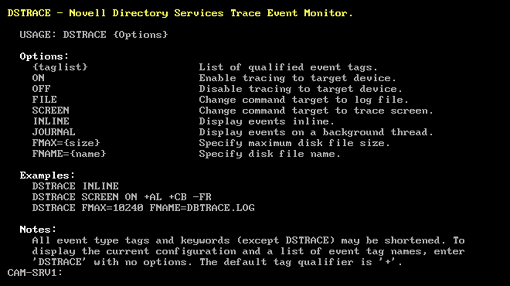
After you enable DSTRACE by typing DSTRACE, you can type HELP DST which will display a list of options as shown in Figure 14.
Figure 14: The DSTRACE help information.
In NetWare 5, the DSTRACE screen displays the important information in color. Different colors highlight key events that occur during the synchronization process for the server. The trace screen displays synchronization information for every replica stored on that server.
Note: Always check the DSTRACE screen to see that NDS is communicating before performing any partition operation. Never start a new partition operation if there is an error communicating to the other servers or replicas of the same partition. Look for the message "ALL PROCESSED = YES" for each partition on the server, especially the partition you are going to modify. This message indicates that all replicas in the partition are synchronized without error.
To enable DSTRACE for viewing and event logging, you can use the following commands:
|
DST |
ON - Enables tracing the target device |
|
DST |
OFF - Disables tracing to target device |
|
DST |
FILE - Change command target to log file |
|
DST |
SCREEN - Change command target to trace screen |
|
DST |
INLINE - Display events inline |
|
DST |
JOURNAL - Display events on a background thread |
|
DST |
FMAX={size} - Specify maximum disk file size |
|
DST |
FNAME={ name } - Specify disk file name |
Once you have enabled DSTRACE, you can specify what you would like to view. You can select a whole array of information to view by specifying the DST command followed by a taglist. The possible tags are shown in Figure 15.
Figure 15: The online list of qualified event tags for the DSTRACE taglist.
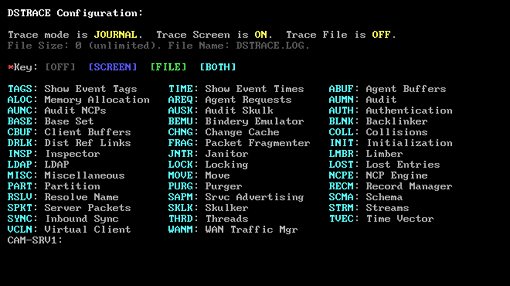
To enable a tag, you simply type DST followed by the tag or item you want to view. Keep in mind that you have options of only viewing the file on the console, logging the item to a file, or doing both. A legend at the top of the screen tells you whether you are viewing, logging to a file, or both.
For example, you can type DST TIME to show event times. To disable this view, you would type DST -TIME, or to abbreviate, you can type DST -TI. The first two letters of each tag will work; however, you must always type all three characters of DST.
Using DSTRACE
The quickest way to become familiar with the DSTRACE screen is to use it and learn what all the messages mean. Here is a standard set of DSTRACE commands that you can try:
|
DSTRACE(load DSTRACE on the server) |
|
|
DST |
+- <your preferred set of tags or flags< |
|
DST |
SCREEN ON(enables viewing on the screen) |
|
DST |
FILE ON(enables the events to be logged to a file) |
DSTRACE has three main parts:
Basic functions
Debug messages
Background process
Basic Functions. The basic functions of DSTRACE are to view the status of the Directory Services trace screen in NetWare 5 and initiate limited synchronization processes. To start the Directory Services trace screen, you enter the following command at the server prompt:
DST ON
To initiate the basic DSTRACE functions, you need to enter commands at the server prompt using the following syntax:
DST = <command option<
Figure 16 lists the commands that you can enter using the preceding syntax.
Figure 16: Basic DSTRACE commands.
|
Option
|
Description
|
|
ON |
Starts the NDS trace screen with basic trace messages |
|
OFF |
Disables the trace screen. |
|
ALL |
Starts the NDS trace screen with all the trace messages. |
|
AGENT |
Starts the NDS trace screen with the trace messages that are equivalent to the ON, BACKLINK, DSAGENT, JANITOR, RESNAME, and VCLIENT flags. |
|
DEBUG |
Turns on a predefined set of trace messages typically used for debugging. The flags set are ON, BACKLINK, ERRORS, EMU, FRAGGER, INIT, INSPECTOR, JANITOR, LIMBER, MISC, PART, RECMAN, REPAIR, SCHEMA, SKULKER, STREAMS, and VCLIENT. |
|
NODEBUG |
Leaves the trace screen enabled, but turns off all debugging messages previously set. It leaves the messages set to the ON command option. |
Debugging Messages. When the DSTRACE screen is enabled, the information displayed is based on a default set of filters. If you want to view more or less than the default, you can manipulate the filters using the debugging message flags. The debugging messages help you determine the status of NDS and verify that everything is working well.
Each NDS process has a set of debugging messages. To view the debugging messages on a particular process, use a plus sign (+) and the process name or option. To disable the display of a process, use a minus sign ( - ) and the process name or option. Here are some examples:
|
SET DSTRACE |
= +SYNC (Enables the synchronization messages) |
|
SET DSTRACE |
= -SYNC (Disables the synchronization messages) |
|
SET DSTRACE |
= +SCHEMA (Enables the schema messages) |
You can also combine the debugging message flags by using the Boolean operators (which means AND) and | (which means OR). The syntax for controlling the debugging messages at the server console is as follows:
SET DSTRACE = +< trace flag< [<trace flag<] or SET DSTRACE = -< trace flag< [<<trace flag<]
Figure 17 describes the trace flags for the debugging messages. You can enter abbreviations for each of the trace flags. These abbreviations or alternatives are listed within parentheses in the table.
Figure 17: Trace flags for the debugging messages.
|
Trace Flag
|
Description
|
|
AUDIT |
Messages and information related to auditing. In many cases, this will cause the server to pop into the debugger if auditing encounters an error. |
|
AUTHEN |
Messages that are displayed while authenticating connections to the server. |
|
BACKLINK (BLINK) |
Messages related to verification of backlinks and external references. The backlink process resolves external references to make sure there is a real object in NDS. For real NDS objects the backlink process makes sure that an external reference exists for each backlink attribute. |
|
DSAGENT (DSA) |
Messages relating to inbound client requests and what action is requested. |
|
EMU |
Messages relating to Bindery Services (emulation). |
|
ERRET |
Displays errors. Used only by the NDS engineers. |
|
ERRORS (ERR, E) |
Displays error messages to show what the error was and where it came from. |
|
FRAGGER (FRAG) |
Fragger debug messages. The fragger breaks up and rebuilds DS NCP packets (which can be up to 64K) into packets that can be transmitted on the network. |
|
IN |
Messages related to inbound synchronization traffic. |
|
INIT |
Messages that occur during the process of initializing or opening the local name service. |
|
INSPECTOR (I) |
Messages related to the inspector process, which verifies the DS name service and object integrity on the local server. The inspector is part of the janitor process. If errors are detected, it could mean that you need to run DSREPAIR. Be aware that messages reported by this process may not all be actual errors. For this reason, you need to understand what the messages mean. |
|
JANITOR (J) |
Messages related to the janitor process. The janitor controls the removal of deleted objects. It also finds the status and version of NCP servers and other miscellaneous record management. |
|
LIMBER |
Messages related to the limber process, which verifies tree connectivity by maintaining the server name, address, and replicas. This involves verifying and fixing the server name and server address if it changes. |
|
LOCKING (LOCKS) |
Messages related to name service locking information. |
|
MERGE |
Not currently used. |
|
MIN |
Not currently used. |
|
MISC |
Miscellaneous information. |
|
PART |
Messages related to partitioning operations. This trace flag may be useful for tracking partition operations as they proceed. |
|
RECMAN |
Messages related to the name base transactions, such as rebuilding and verifying the internal hash table and iteration state handling. |
|
REPAIR |
Not currently used. |
|
RESNAME (RN) |
Messages related to resolve name requests (tree walking). Resolve name resolves the name maps and object names to an ID on a particular server. |
|
SAP |
Messages related to Service Advertising Protocol when the tree name is sent via SAP. |
|
SCHEMA |
Messages related to the schema being modified or synchronized across the network to the other servers. |
|
SKULKER (SYNC, S) |
Messages related to the synchronization process, which is responsible for synchronizing replicas on the servers with the other replicas on other servers. This is one of the most useful trace flags available. |
|
STREAMS |
Messages related to the stream attributes information. |
|
TIMEVECTOR (TV) |
Messages related to the synchronization or exchange of the timestamps between replicas. These messages display local and remote Synchronized Up To vectors, which contain the timestamps for the replica. |
|
VCLIENT (VC) |
Messages related to the virtual client, which handles the outbound server connections needed to pass NDS information. |
As you use the debugging messages in DSTRACE, you will find that some of the trace flags are more useful than others. One of the favorite DSTRACE settings of Novell technical support is actually a shortcut:
SET DSTRACE = A81164B91
This setting turns on (by setting the appropriate bits) a group of debugging messages.
Background Processes. In addition to the debugging messages, which help you check the status of NDS, there is a set of commands that forces the NDS background processes to run. To force the background process to run, you precede the command with an asterisk (*). An example would be:
SET DSTRACE = *H
You can also change the status, timing, and control for a few of the background processes. To change these values, you must precede the command with an exclamation point (!) and enter a new parameter or value. An example would be:
SET DSTRACE = !H 15(parameter value in minutes)
Here is the syntax for each statement controlling the background processes of NDS:
SET DSTRACE = *< trace flag < [ parameter ] or SET DSTRACE = !< trace flag < [ parameter ]
Figure 18 lists the trace flags for the background processes, any required parameters, and the process the trace flags will display.
Figure 18: Trace flags for the background processes.
|
Trace Flag
|
Parameters
|
Description
|
|
*. |
None |
Unloads and reloads DS.NLM from the SYS:SYSTEM directory. For a short period of time, both DS.NLM and DSOLD.NLM will be loaded.This command is extremely useful when you are updating a version of DS.NLM. You can perform this operation during normal business hours without disrupting users on that server. |
|
*B |
None |
Forces the backlink process to begin running. The backlink process can be traffic intensive, and you should probably wait until a slow time on the network before setting this command. |
|
!B |
Time |
Sets the backlink process interval used by NDS (in minutes) to check the backlink consistency. This command is the same as the NDS SET parameter NDS Backlink Interval. The default is 1500 minutes (25 hours). The range for this parameter is 2 to 10080 minutes (168 hours). |
|
*D |
Replica rootEntry ID |
Aborts the Send All Updates or *I. This command is used only when a Send All Updates or *I cannot complete (and is therefore endlessly trying to send the objects to all replicas). This situation usually occurs because one of the servers is inaccessible. |
|
*F |
None |
Forces the flatcleaner process, which is part of the janitor process. The flatcleaner purges or removes the objects marked for deletion in the name service. |
|
!F |
Time |
Sets the flatcleaner process interval, changing (in minutes) when the flatcleaner process automatically begins. The flatcleaner process purges or removes the deleted objects and attributes from the name service.The default interval for this process is 240 minutes (4 hours). The value entered must be greater than 2 minutes. |
|
*G |
None |
Gives up on a server when there are too many requests being processed. The process gives up on the server and sets the server status to down. |
|
*H |
None |
Forces the heartbeat process to start. This flag starts immediate communication to exchange timestamps with all servers in replica lists.This command is useful for starting the synchronization between servers so that you can observe the status. |
|
!H |
Time |
Sets the heartbeat process interval. This (in minutes) parameter changes when the heartbeat process begins. The default interval for this process is 30 minutes. |
|
*IrootEntry ID |
ReplicarootEntry ID |
Forces the replica on the server where the command is issued to send a copy of all its objects to all other servers in the replica list. This command is the same as Send All Objects in DSREPAIR. |
|
!I |
Time(in minutes) |
Sets the heartbeat base schema interval. This parameter changes the schema heartbeat interval. The default interval for this process is 30 minutes. |
|
!J |
Time(in minutes) |
Sets the janitor process interval. This parameter changes when the janitor process executes. The default interval is 2 minutes, with the limits of 1 to 10080 minutes (168 hours). |
|
*L |
None |
Starts the Limber process. The Limber process checks the server name, server address, and tree connectivity of each replica. |
|
*M |
Bytes |
Sets the maximum size of the trace file in bytes, with a range of 10,000 to 10,000,000 bytes. |
|
*P |
None |
Displays the tunable parameters and their default settings. |
|
*R |
None |
Resets the TTF file, which is the SYS:SYSTEM\DSTRACE.DBG file by default. This command is the same as the SET parameter NDS Trace File Length Set to Zero. |
|
*S |
None |
Schedules the Skulker process, which checks whether any of the replicas on the server need to be synchronized. |
|
*SS |
None |
Forces immediate schema synchronization. |
|
!T |
Time(in minutes) |
Sets the server UP threshold. This flag changes the server state threshold, which is the interval at which the server state is checked. The default interval is 30 minutes. |
|
*U |
Optional ID of server |
Forces the server state to UP. If object no server ID is specified, all servers in replica lists are set to UP. This command performs the same function as the SET parameter NDS Server Status. |
|
!V |
A list |
Lists any restricted versions of the DS. If there are no versions listed in the return, there are no restrictions. |
|
!W |
Time (in ticks) |
Changes the IPX Request in Process (RIP) delay. This is the length of time to wait after getting an IPX time-out before resending the packet. The default value is 15 ticks. The range is 1 through 2000 ticks. |
|
!X |
Number of retries |
Changes the number of IPX retries for the DS (server-to-server) client. After the retry count has been exceeded, an NDS error -625 is displayed. The default is value 3. The range is 1 through 50. |
|
!Y |
Number |
Factors the estimated trip delay. It is used in the equation: IPX Timeout = (T *Y) + Z. This is where T is equal to the ticks required to get to the destination server. The default is value 2. The range is 0 through 530. |
|
!Z |
Number |
Adds additional delay for the IPX time-out. To increase the time-out, change this parameter first. It is used in the equation: IPX Timeout = (T * Y) + Z. This is where T is equal to the ticks required to get to the destination server. The default value is 4. The range is 0 through 500. |
NDS Troubleshooting Dos and Don'ts
This section describes some of the most common mistakes people make when installing and managing NetWare 5 and NDS. Do Not Temporarily Change the Internal IPX or File Server Name
If a server is brought up without running AUTOEXEC.NCF for any reason, the NetWare OS requires that you enter a server name and internal IPX number. In NetWare 5, the server name and internal IPX number must be the same as what is stored in the AUTOEXEC.NCF. Otherwise the NetWare 5 server treats the change as permanent and synchronizes the change to all the other servers in your tree. Even if the server is not connected to the network, the change happens on its database and as soon as the server is connected to the network it sends the change. If this happens, let the system resolve the change first, and then change the name or internal IPX back to what it should be. Do not change the server name and internal IPX number back immediately because this can cause problems with NDS. Check Replica Ring Synchronization Before Doing a Partition Operation
Always run the DSREPAIR Check Report Synchronization option before starting any partition operation. This action will ensure that there are no synchronization errors, and any change you make will be synchronized to other replicas. Do Not Change Read/Write to Master Under Partition Error Conditions
If you change the master replica of a partition under error conditions, the operation can get stuck. This means that NDS has not properly or fully completed the process and NDS is in an inactive state. In this situation, no other partition operation is possible since the master replica controls all the partition operations. If you check the View Replica Ring option in DSREPAIR, it should confirm that the replica states are Change Replica Type. If Change Replica Type doesn't resolve itself, you may have to call Novell technical support to resolve the issue. Centralize the Partition Operation Administration
Novell technical support has found that centralized management of all the partitions in the tree is critical to maintaining a healthy NDS tree. Managing NDS should be divided into:
Partition management
User and server management
Partition management is the only area that needs to be centralized. User and server management can be decentralized, as in a NetWare 3 environment. NDS is loosely connected, and it takes a while for changes to synchronize to other replicas. If the change happens to be partition information and there are multiple administrators performing multiple partition operations, the replicas may not synchronize properly. Centralizing partition operations eliminates many of the related problems. Do Not Design a Flat Tree
Flat tree design is inefficient and causes unnecessary overhead to the system. The reason is that a very wide and flat tree (meaning many peer organizational units) creates a large number of subordinate references if each container is partitioned. An inefficient tree design can compound NDS problems and actually decrease the performance of your network. Use INSTALL to Remove or Delete a Server
Always use the INSTALL.NLM option Remove Directory Services when deleting a server object. This option removes a server from the tree properly. Even if the server has a copy of any replica, INSTALL removes the copy from the server for you. Never delete a server object unless the server has been removed from the tree with the Remove Directory Services option. If You Suspect Errors, Verify the Partition Operation on the Back End from the Master Replica
After issuing the call from the front end to perform a partition operation, check the master partition on the server that is controlling the back end process before considering the operation completed. There are two ways to verify that the operation is completed: DSTRACE and the DSREPAIR Report Synchronization option. Verifying partition operations from the servers holding the master replicas will tell you whether the operation has finished or whether any errors have been generated as a result of the operation. Do Not Copy .NDS Files from One Server to Another
The .NDS files are located in the SYS:_NetWare directory and are specific to the server. Copying these files to another server will generate unexpected results and can cause serious problems for the tree. Use NDS Replication Before a Tape Restoration
Always rely on the replicas of a partition before using tape backup. This is why you should have at least three copies of any partition. Consider How the Partition Operation Will Affect the Tree
Network administrators need to adjust to the new network-centric environment of NetWare 5, instead of thinking in terms of the server-centric world of NetWare 3. When you made a change in NetWare 3 it happened only on that server. However, when you make a change to an NetWare 5 server, the change affects both the tree and the network. In the NetWare 5 environment, you have to continually ask "How will the change affect the partitions of the tree?" Avoid Duplicate Server Names, Internal IPX Numbers, or Tree Names
Duplicate server names, internal IPX numbers, and tree names can result in some irrational behaviors on the network, confusing all the clients and servers in the network. Do Not Install the Same Server in More than One Tree
Installing the same server name in multiple trees can create problems in replica synchronization. Normally, INSTALL.NLM will not let you do this, but if there are synchronization errors this situation is possible.
Conclusion
As a network administrator responsible for the maintenance and trouble- shooting of NDS, you need to know how to monitor NDS operations and check the health of the NDS tree. This AppNote helps you understand how to check the health of the tree before you start any new NDS partition operations, and then how to monitor the operations to completion with the DSREPAIR and DSTRACE utilities.
* Originally published in Novell AppNotes
Disclaimer
The origin of this information may be internal or external to Novell. While Novell makes all reasonable efforts to verify this information, Novell does not make explicit or implied claims to its validity.