Configuring Entrust v3.0c for NetWare 5
Articles and Tips: article
Directory and Network Services
Novell, Inc.
ROB RAWSON
Consulting Services
Novell, Inc.
01 Nov 1998
Entrust Technologies' Entrust/Alliance PKI (public key infrastructure) software gives customers the ability to manage digital certificates via NDS as well as provide single-sign-on capabilities to NetWare 5.0 and third-party products that also support Entrust's PKI certificate technology. Entrust/Alliance PKI integration with NetWare 5 will simplify network authentication for users, reduce redundancy in network administration, and lower the total cost of ownership for secure networking applications.
With Entrust PKI, applications have the ability to securely store and retrieve security information associated with a user's authenticated NDS connection. Customers will have access to the single sign-on solution, allowing a single login to be shared across Entrust-Ready applications to save time and increase user productivity. In addition, because NDS is distributed rather than server-centric, Entrust users gain the ability to log in from any location on the network.
Through the LDAP protocol, businesses can store end-user certificates issued by Entrust's enterprise PKI solutions on NT Server and UNIX in Novell's NDS (out of the box and without modification). This allows NetWare 5 users to store and retrieve their certificates while network administrators manage them through Entrust's administrative software. The agreement between Novell and Entrust increases this level of integration by allowing Entrust/Alliance PKI for NetWarea complete PKI based on fourth generation technologyto run natively on NetWare 5.
This AppNote describes the process of installing Entrust v3.0c and Entrust v3.0c1 on Windows NT Server 4.0 using NDSvia LDAP v3.0as Entrust's directory.
Prepare Windows NT Server
We recommend that you install Entrust 3.0c or later as we had difficulty getting Entrust 3.0b working. It will require a machine with the following:
166MHz or faster Pentium processor (Entrust's install wizard enforces this requirement)
64MB of RAM (128MB recommended)
NT Server 4.0 with Service Pack 3
64MB swap file (128MB recommended)
A blank formatted floppy disk
The updated MUP.SYS from Microsoft which improves client performance is also recommended. (See Microsoft Support Article ID: Q171386 for more information on MUP.SYS.)
Additional Windows NT Configuration for Entrust 3.0c1
If you are installing Entrust 3.0c1, (not Entrust 3.0c) you will also need configure Windows NT 4.0 to allow the Administrator user to log on as a service. To do this, do the following:
Run the User Manager Utility (Start | Programs | Administrative Tools | (Common) | User Manager for Domains).
Select the line for the Administrative user's account then select Policies | User Rights... menu item.
Check the "Show Advanced User Rights" checkbox then select "Log on as a service" in the Rights dropdown list.
Click on the Add button. In the Add Users and Groups dialog, select Administrators.
Click on the Add button to add Administrators to the list, then click on OK to close the dialog.
Click OK on the User Rights Policy dialog.
Exit the User Manager Utility.
Install LDAP v3.0 on NetWare 5
If you are installing NetWare 5 as part of the Entust setup procedure, you will need to select the LDAP Services component from the Additional Products and Services screen during the NetWare 5 installation.
If you have already installed NetWare 5 and you did not install LDAP services for NDS during the installation, you will need to do so before continuing.
Put your NetWare 5 CD-ROM into the CD-ROM drive of your NetWare 5 server.
From the NetWare 5 GUI console, click on Novell | Install.
In the Installed Products dialog which pops up, click on New Product.
Specify the MS-DOS path to the CD-ROM drive and click on OK.
Select the LDAP Services component from the Additional Products and Services screen, click on Next, and follow the prompts to complete the installation.
Configure LDAP for Entrust
You will also need to complete the following configuration steps to prepare LDAP v3.0 to respond correctly to Entrust LDAP requests:
Run NDSMGR32 and select Schema Manager. Add optional attribute LDAP:caCertificate to the class Organizational Unit.
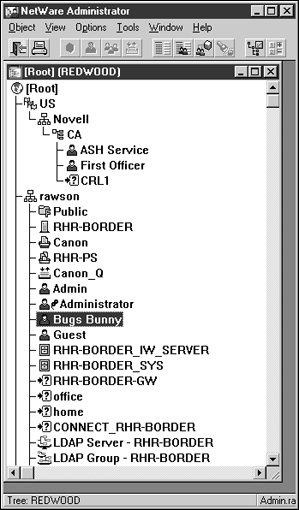
Using NWAdmin, create a CA Organizational Unit container, preferably as a peer to the NDS tree's primary Organization container so that rights for this container may be isolated. For example, you might create the CA organizational unit in a country object, where normal users are not under one, creating "ou=CA.o=Novell.c=US" where users are typically in "o=Novell".
Using NWAdmin, grant the CA container supervisory object and property rights to the NDS tree root.
Using NWAdmin, create a "guest" user, with no password, and rights to browse the tree from the root. Also give the "guest" user explicit browse rights to the CA container.
If so desired, you can further secure this account by restricting logins to the address of the server running the LDAP NLM, limiting concurrent connections, and specifying that users are not allowed to change this password.
Using NWAdmin, configure the LDAP Group object so that clear text passwords are allowed, and set the "guest" user created in Step 3 as the proxy user.
Put a password on the CA Organizational Unit container. You will need to add a snap-in to NWAdmin to enable NWAdmin to put a password on Organizational Units. The snap-in and directions for using it can be accessed by following the Third-Party Integration link on the Novell LDAP web page at http://www.novell.com/products/nds/ldap.html. (The password set here will be required in the dialog in Step 9 of the Entrust Installation below.)
The Entrust infrastructure will actually authenticate to NDS via LDAP as the CA container object, which may seem unusual to users familiar with NDS where only leaf objects usually authenticate. For this reason, a password must be applied to the container object since passwords are not stored in NDS directly as an attribute of an object.
Installing Entrust
Run the Entrust installation program from the Entrust CD-ROM. Select the Informix installation option on the Entrust Setup Master Control window and click on Proceed. Follow the installation prompts to complete installation of the Informix database components.
When the Informix installation is completed, select the option to restart the computer and click on Finish.
After rebooting, re-run the Entrust installation program. Select the Entrust/Manager installation option on the Entrust Setup Master Control window and click on Proceed.
Deselect the Entrust/Directory checkbox in the Select Components dialog, as shown below.
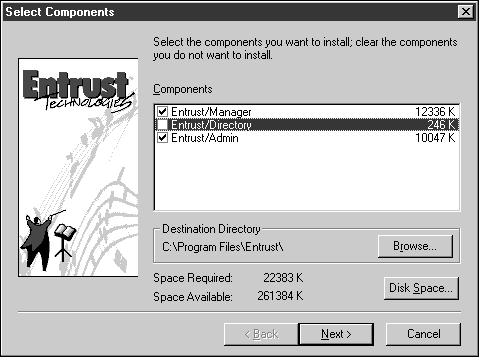
Click Next.
Click on Directory in the Entrust Component Configuration dialog.
Select the "Use existing LDAP-compliant Directory" option in the Choose Directory dialog, as shown below.
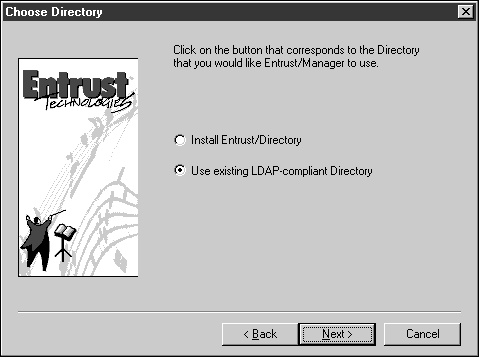
Click Next.
Select the ASN.1 encoded data to be stored as "binary format" in the Choose Existing Directory dialog. (If you do not see this selection, you are probably using an older version of the Entrust infrastructure. Version 3.0c or later is recommended.)
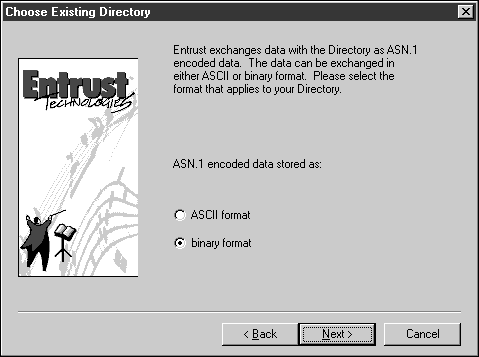
Click Next.
Enter the IP address and the port (389) for the LDAP agent in the Directory Configuration dialog.

Click Next.
Using X.500 comma-delimited notation, enter the object name of the Certificate Authority container you created in Step 1 of the Configure LDAP for Entrust section into the "CA DN" text box on the Existing Directory Configuration dialog. For that example, it would be "ou=CA, o=Novell, c=US". In the "DN of the Directory entry" text box, enter the name of an NDS administrative user object in the same notation, such as "cn=admin, o=Novell".
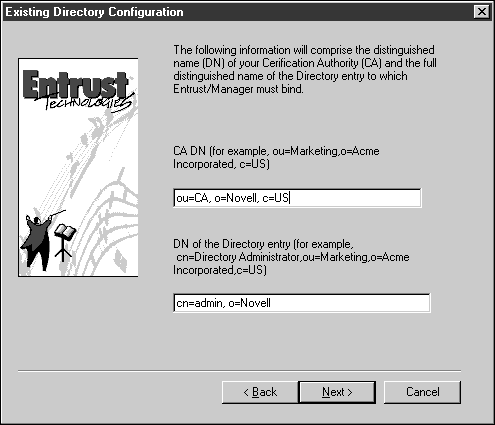
Note: Check this entry carefully before proceeding. Common errors are using dots rather than commas for delimiting the name, using hyphens instead of equal signs, or writing ou where you mean cn or visa versa. This does not get checked until much later in the setup process, so you can be easily burned by an erroneous entry on this page.
Click Next.
Enter the password you set in Step 6 of the Configure LDAP for Entrust section in the first two password fields, and the administrative user's password in the second two password fields in the Directory Passwords dialog.
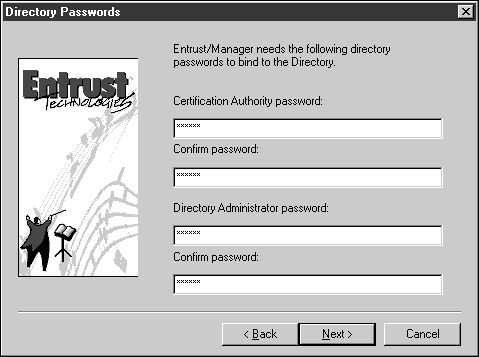
Click Next.
You will be back at the Entrust Component Configuration dialog and the Directory will be shown as CONFIGURED. Click on Entrust/Manager.
Enter the IP address of the Entrust server in the Manager Port Configuration dialog if it is not already there.
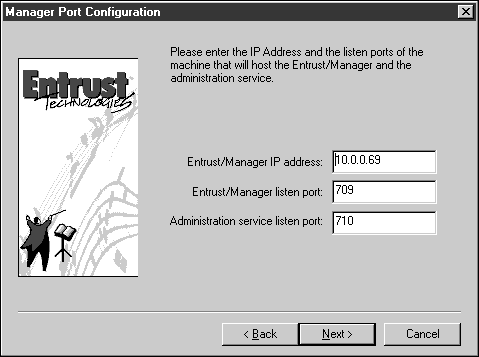
Click Next.
SHA-1 is the default and is the recommended choice on the Entrust/Manager Certificate Hashing Algorithm dialog. Click Next.
RSA is the default and the recommended choice on the Entrust/Manager Signature Algorithm dialog. Click Next.
Note: In the next two dialogs it is recommended that the files be placed in the default locations that the Entrust installation wizard chooses.
Enter the license information from the Entrust license card in the Entrust/Manager Enterprise User Limit Configuration dialog. Click Next.
Enter the password for the NT user ID you are currently logged on as.
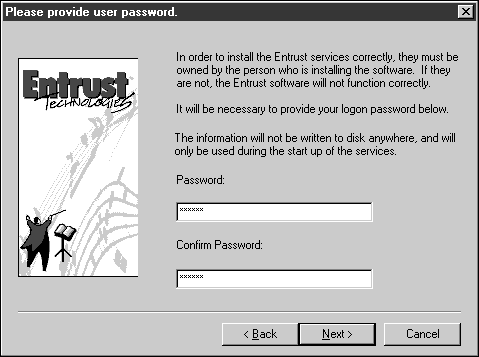
Click Next.
Confirm the configuration from the Current Entrust Configuration screen, as shown below.
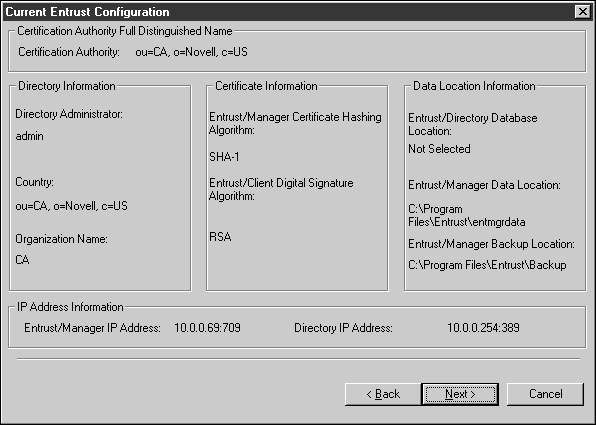
Click Next.
Select the folder within the start menu (default is recommended) in the Select Program Folder dialog and click Next.
Enter the proper registration information in the Entrust Registration dialog. (Several of these fields including Address, Country, Phone, and E-mail Address are required.) Click Next.
Files will begin copying.
Note: You will be prompted to store several INI files. These are used later in configuring clients and administrative workstations. Be prepared with a blank formatted floppy disk to store these files. Alternatively, you can store the INI file on a network drive for the client software. However, you will need a floppy for the admin software's INI file to be stored.
The Setup Complete dialog will appear when the installation is complete. Deselect the button to run Entrust/Master Control now, then click Finish.
Special Entrust Configuration (Entrust 3.0c only)
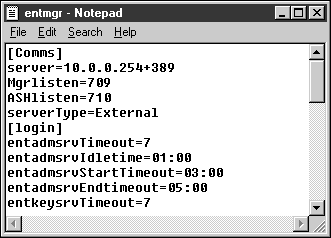
Launch Notepad. If you have selected the default directories, you should open the following file: C:\Program Files\Entrust\entmgrdata\maager\entmgr.ini
Locate the [Comms] section of the file and find the select "ServerType".
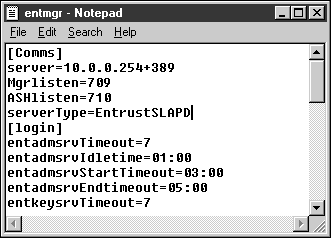
Change that selection to "EntrustSLAPD" and save the file.
Configure Entrust Key Management Service (Entrust 3.0c Only)
From the Start Menu | Settings | Control Panel, launch the Services applet.
Select the Entrust Key Management Service, as shown below.
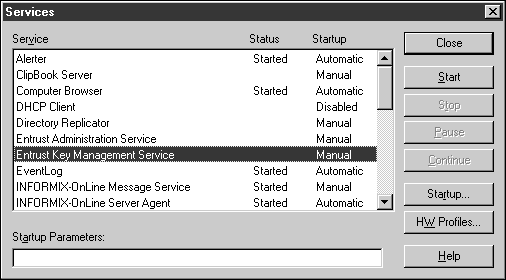
Click Startup.
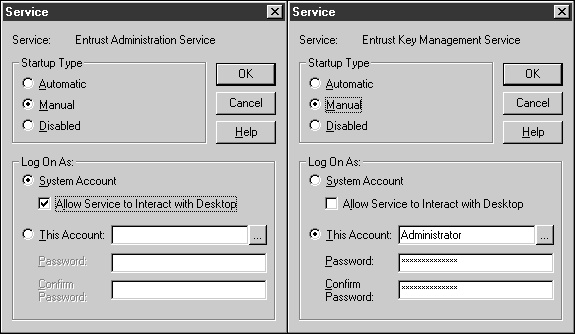
For the "Entrust Key Management Service", change the startup to log on as System Account, and check the "Allow Service to Interact with Desktop" checkbox. Repeat this procedure for the "Entrust Administration Service", then close the applet and the control panel.
Start the Entrust Service
Start Entrust by selecting Start Menu | Programs | Entrust | Entrust Master Control.
Click the Logon button on the Entrust/Master Control window. When prompted with initializing Entrust for the first time, click OK.
Select an encyrption algorigthm. CAST-128 is a good choice.
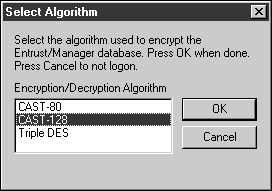
Click OK.
In the Initial Password Entry dialog you will need four unique passwords, which contain both upper- and lower-case characters and at least one number, and are at least eight characters long. Click OK.
This is the first point at which Entrust will attempt to contact the directory. If there are any configuration errors in the directory, Entrust will get very slow for a while, and it will not respond to requests. This can last a significant amount of time, especially if you are running on a minimal machine (such as a 166MHz laptop with 64Mb of RAM). Eventually, you should see this dialog appear:
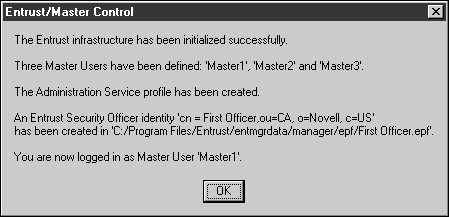
Click OK.
In the Entrust/Master Control window, click on Services | Start Administration.
Start the Entrust Administration Client
When the cursor returns from the hourglass, start the administration client by selecting Start | Programs | Entrust | Entrust Admin.
Enter the First Officer password from Step 4 of Start the Entrust Service.
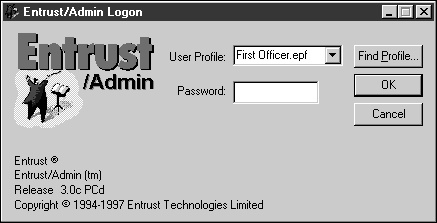
Click OK.
From the Entrust/Admin window, create a test user. To do so, first create a SearchBase by right-clicking on Searchbases | New Searchbase.... Select a name for the search base and enter the DN.
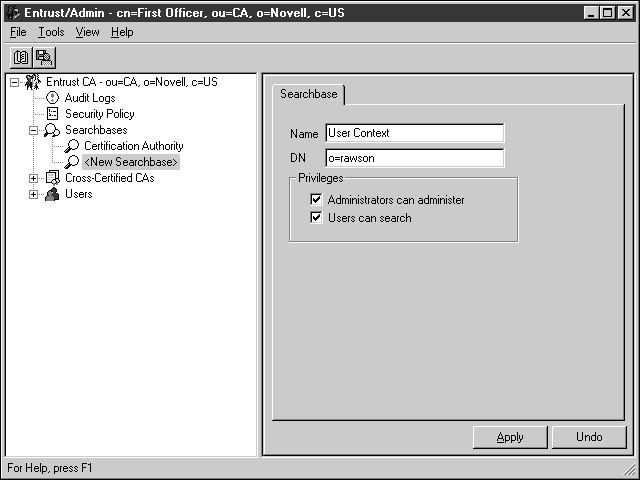
Click Apply.
Click OK to confirm.
After some time, an Operation Completed Successfully dialog will appear. Click OK.
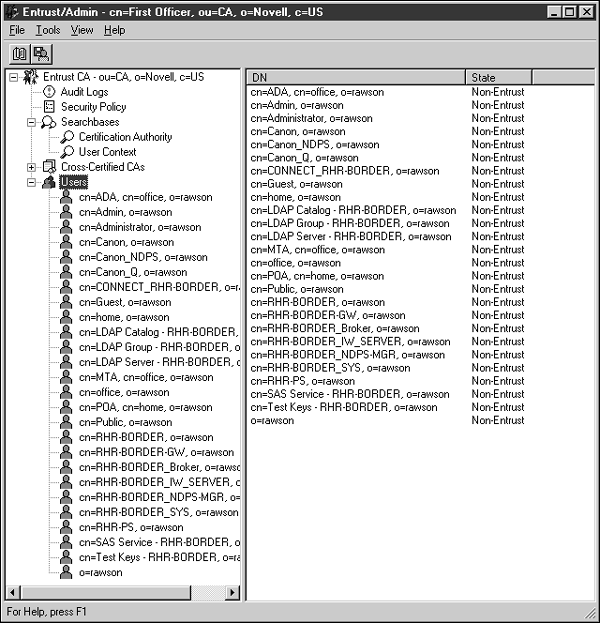
To display the list of existing users, right-click on users, and select New Search. Select your new Searchbase and click Find.
You may be prompted again; if so, select the new Searchbase. Shortly, you should see the object list appear, similar to the following:
From this screen you can generate a certificate for an existing user or create a new one. To generate a new user, right-click on users and select New User.
Fill in the First Name(s) and the Surname fields, but do not fill in the Serial Number field.
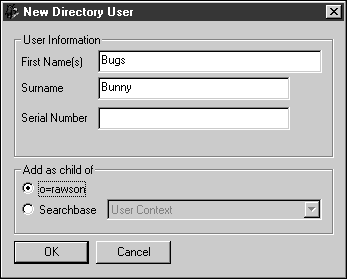
Click OK.
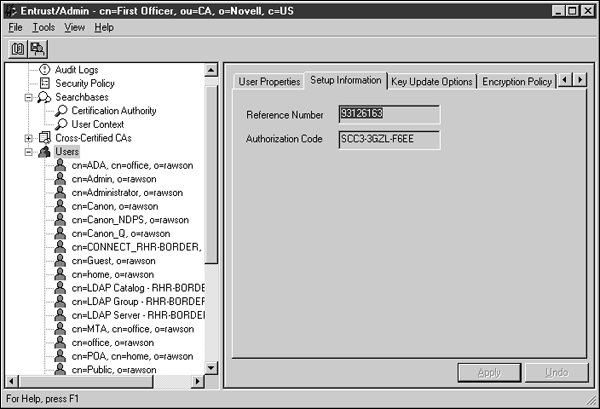
From the User Properties tab, click Apply to generate credentials.
When the Operation Completed Successfully dialog appears, click OK.
The following screen is now read off to a client workstation which is running Entrust Client so that the client can generate credentials:
To use the credentials, start the Entrust Client by selecting Start Menu | Programs | Entrust | Entrust Client.
From the Welcome To Entrust screen, click Create Entrust User.
The user selects a strong password (longer than 8 characters) and enters the information read to them by the First Officer, as shown in the screenshot for Step 12 of Start the Entrust Administration client.
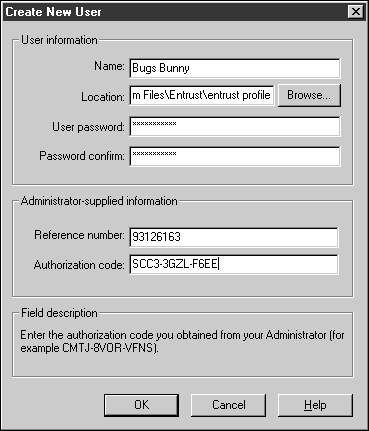
Click OK.
The user may select options at this time from the Entrust Options screen.
A new Entrust User is born.
Notice that a corresponding user was also created in NDS; however, these two users do not share a password. The password would need to be synchronized in another manner. An Entrust password simply decrypts the profile containing the user credentials.
Future NetWare/Entrust Development
In July 1998, Novell and Entrust Technologies Inc. announced a strategic agreement to combine their respective technologies to provide network users with single sign-on for NDS, Entrust's PKI software, and Entrust-Ready applications. With the agreement, Entrust PKI will be integrated with NDS and then bundled with NetWare 5.
Upon completion of the product integration, expected in early 1999, a 100-user evaluation copy of Entrust/Alliance PKI for NetWare will be bundled with NetWare 5. After the 90-day evaluation period, customers will have the option to purchase licenses for Entrust/Alliance PKI for NetWare from Entrust. Novell plans to distribute the combined products through its standard channels and plans to make other networking applications, such as Novell's GroupWise messaging solution, Entrust-Ready.
To learn more about Entrust Technologies Inc., visit their Web page at
* Originally published in Novell AppNotes
Disclaimer
The origin of this information may be internal or external to Novell. While Novell makes all reasonable efforts to verify this information, Novell does not make explicit or implied claims to its validity.