Using NDS Manager's Graphical Schema Manager Tool in NetWare 4.11
Articles and Tips: article
Senior Analyst
TechVoice, Inc.
01 Jul 1998
Up until recently, the NDS schema has been an area of mystery to most network administrators. Now Novell is providing a tool to help manage all those extended objects and attributes you get when you install various NDS-aware applications.
- Introduction
- NDS Schema Basics
- Accessing Schema Manager
- Schema Extensions in NWAdmin
- Working with Schema Manager
- Reporting on Object Attributes
- Creating a New Attribute
- Creating a New Object Class
- Conclusion
Introduction
Novell Directory Services (NDS) offers significant savings in time and effort in managing network users, servers, and other devices. NDS makes life simpler by placing all such services and devices into a single tree as objects. Novell's NetWare Administrator (NWAdmin) utility provides tools for administering each of these objects. Novell also offers a Windows-based tool called NDS Manager that is tailored to the key tasks of partition, replica, and schema management.
A previous AppNote (see "Using NDS Manager for Partition and Replica Management" in the June 1998 issue of Novell AppNotes) provided an overview of NDS Manager and described how it can be used to manage NDS partitions and replicas.
This AppNote discusses the Schema Manager tool that is included with NDS Manager version 1.24 and later. The Schema Manager allows network administrators to view the NDS schema on a given tree, add new attributes and classes, and modify existing classes. There is also a compare feature which allows you to compare the schemas on two different NDS trees, along with reporting capabilities for the base NDS schema and for custom extensions. Schema Manager is backward-compatible with all versions of NDS.
NDS Manager v1.24 (with Schema Manager) is available for download for use with NetWare 4.x. NetWare 5.0 will include Schema Manager as part of the NDS Manager utility installed with the operating system.
For more information, visit Novell's DeveloperNet Web site at:
http://developer.novell.com/nds/ndsmgr.htm
NDS Schema Basics
Administrators of NetWare 4.x networks are undoubtedly familiar with the various types of objects that make up the NDS tree: User objects, Server objects, Printer objects, and so on. Every object in the NDS tree belongs to an object class that specifies which attributes can be associated with the object. (NetWare utilities refer to attributes as properties.) All attributes are based on a set of standard attribute types, which in turn are based on standard attribute syntaxes. The structures for these objects and attributes are defined in a set of rules known as the NDS schema.
The schema describes all object classes that can exist in the tree, and determines what attributes each class may have and what values are permitted for those attributes. The schema also controls the relationship among objects in the tree in terms of which objects are subordinate to others.
Base Schema
The NetWare 4 operating system ships with a base schema that includes a large set of available objects and their attributes. For example, the base schema for the version of NDS that ships with NetWare 4.11 includes 42 object classes and 185 total attributes. Each object class uses one or more attributes to describe the object. However, no single object class uses all the attributes that are defined in the schema. For example, the User object class has 84 attributes defined for it. Some of these attributes are mandatory; the others are optional.
Extended Schema
Since the base schema defines 84 out of a total of 185 possible attributes for the User object class, that leaves 101 remaining optional attributes that could be added to this object class. By adding additional attributes to a class, you create extensions to the base schema. You can also extend the schema by inventing new attributes for specific purposes.
One example of such an extension, shown at Novell's BrainShare '98 technical conference in Salt Lake City, is an attribute for fingerprints added to the User object. This attribute allows users to authenticate to NDS by passing their finger over a scanner to verify their identity. With the addition of this attribute, NDS can compare the user's fingerprint attribute with the results from the scanner for a successful entry.
As developers worked with NDS, many discovered they required new classes of objects which the base schema did not include. For example, such things as backup services did not appear in the base schema, so developers created a new class for the task for inclusion in NDS. Defining new classes of objects is another way to extend the schema. Allowing schema extensions greatly expands the capabilities of NDS to provide users with site- or task-specific support.
The Role of Schema Manager
Novell developed the Schema Manager utility as a graphical tool for administering and customizing the NDS schema. Schema Manager allows administrators to view, extend, modify, print, compare, and diagnose their NDS schemas. It also provides support for developers who need to extend the schema for their applications.
If you have supervisor rights to a tree, you can use Schema Manager to:
View a list of all classes and attributes in the schema.
View information on an attribute such as its syntax and flags.
Extend the schema by adding a class or an attribute to the existing schema.
Create a class by naming it and specifying applicable attributes, flags, containers to which it can be added, and parent classes from which it can inherit attributes.
Create an attribute by naming it and specifying its syntax and flags.
Add an attribute to an existing class.
Compare the schemas of two trees and print the results.
View or print a report on a selected class or an attribute, or on the entire schema.
View or print the extensions to the schema.
Delete a class that is not in use or that has become obsolete.
Delete an attribute that is not in use or that has become obsolete.
Identify and resolve potential problems.
It is important to distinguish between the ways NWAdmin and Schema Manager work with objects. With Schema Manager you define classes and attributes to form "templates" for NDS objects. With NWAdmin you create specific instances of those classes and populate the attribute fields. This process is known as "instantiation" of the classes.
While Schema Manager can manipulate base schema classes and their attributes, you cannot delete any part of the base schema. In fact, if you add an attribute to an object class in the base schema, you won't be able to remove that attribute later on. (If you need to do that, you'll have to reinstall the tree.)
Schema Manager is smart enough to know not to delete any class or attribute that is currently used in your tree. If you need to do this, you'll first need to run a report on the tree to see where the class or attribute is used and remove those instances before you can delete them from the schema.
Note: Although Schema Manager can add or modify object classes or attributes in any version of NDS, it is limited in its reporting capabilities with earlier versions. It cannot compare an earlier NDS version schema with a later NDS version schema. For example, it cannot compare a schema from NetWare 4.11 with a schema from NetWare 5.0 (unless the DS.NLM versions were the same).
Uses for Administrators
For many sites, creating a custom class or attribute extension may not be in the cards. However, extensions can occur to the schema through patches, upgrades, or installation of NDS-enabled software. Schema Manager's reporting capability allows administrators to track such changes. At other times, merging trees may add extensions to a schema. The reporting capabilities of Schema Manager will prove useful both prior to and after the merge.
Uses for Developers
For developers, Schema Manager is an excellent tool for refining extensions. Specific beneficial features include:
One-button inheritance from existing object classes or attributes
Graphical selection for flag criteria
One-step deletion of extensions
Previously, all development for class and attribute extensions had to occur programmatically. Now, with the use of the New Class and New Attribute wizards, the task of putting together an extension is much easier. Equally important is Schema Manager's ability to delete any extensions--a job previously only possible programmatically. This greatly simplifies the job of working with extensions since you can create and then verify a new extension, or delete it if it isn't what you wanted.
Accessing Schema Manager
Schema Manager is not a standalone utility. Instead, it runs as a part of the NDS Manager utility. However, Schema Manager has its own version numbering, starting with version 1.0 (the current version as of this writing). This is also the version that will ship with NetWare 5.0 in mid-1998.
To help you keep these utilities straight, here is a summary of how each one can be accessed:
NetWare Administrator (standalone application)
NDS Manager (standalone application, or can run from the Tools menu in NWAdmin)
Schema Manager (integrated utility in NDS Manager v1.24 and later)
The version of NDS Manager (version 1.06) that ships with NetWare 4.11 does not include Schema Manager. NetWare 5.0, however, will include it as part of the OS install. If you are running NetWare 4.11 or earlier, you'll need to download NDS Manager version 1.24 in order to get Schema Manager.
Remember, NDS Manager is a separate utility from NWAdmin. Don't assume you have the latest version of NDS Manager just because you have updated to a newer version of NWAdmin.
Downloading the Latest NDS Manager
The NDS Manager v1.24 upgrade is included in the SETUP32.EXE file available for download from:
http://developer.novell.com/nds/ndsmgr.htm
SETUP32.EXE is 3.5MB in size and will perform either a local or network install. It requires 8.5MB of disk space (of which 1.5MB is for Schema Manager) for a complete installation. The file is the same for Windows 95 and Windows NT.
Once you download SETUP32.EXE, run the executable to invoke an InstallShield wizard. Do not install the new version of NDS Manager over the top of an existing version--you should install it into a separate directory.
Controlling Access to NDS Manager
In earlier versions of NDS Manager, the utility's executable file is stored in the SYS:PUBLIC directory. If you want to run NDS Manager as a standalone utility, run NDSMGR.EXE in the SYS:PUBLIC directory. For NDS Manager v1.24, the executable and DLL files are stored in an appropriate subdirectory of SYS:PUBLIC (WIN31 or WIN32).
If you decide to control access to NDS Manager, you can do so by limiting user access to these files for Windows 3.1 clients:
SYS:PUBLIC\WIN31
NDSMGR16.EXE
NMSNAP16.DLL
For Windows 95/98 and NT clients, limit access to:
SYS:PUBLIC\WIN32
NDSMGR32.EXE
NDSNAP32.DLL
Including NDS Manager in NWAdmin
If you want to include the new version of NDS Manager as part of NWAdmin rather than running it as a standalone executable file, follow the procedure outlined below for the version of Windows you have.
Windows 3.x. For Windows 3.x, edit the NWADMN3X.INI file in the WINDOWS directory to include the following lines:
[Snapin Object DLLs WIN3X] NDSMGR = NMSNAP16.DLL
If the INI file does not appear in the Windows directory, you need to run NWAdmin first, then exit it so the software will create that file.
Windows 95/98. For Windows 95/98, run REGEDIT to modify the workstation's registry. Choose the following entries:
HKEY_CURRENT_USER

      Software

           NetWare

                 Parameters

                       NetWare Administrator
Highlight the line labelled "Snapin Object DLLs WIN95". From the Edit menu, choose "New". Then choose "String Value" and type NDSMGR <Enter<.
Now highlight this "NDSMGR" line. Choose Edit/Modify and type the following in the Value data field: NMSNAP32.DLL. Click OK. The next time you run NWAdmin, NDS Manager will appear as an option in the Tools menu.
You can find more details about installing and troubleshooting NDS Manager in the online help for NWAdmin.
Schema Extensions in NWAdmin
Most adminstrators would welcome NDS schema extensions more readily if it weren't for the fact that NWAdmin currently only supports the base schema. As it is now, custom objects created using Schema Manager will appear as unknown objects in NWAdmin. Optional attributes added to a class using Schema Manager won't appear at all. This is true even though these attributes may be fully functional in another area. For example, if you add the attribute Queue Directory to the existing User class, it will not appear in the user dialog box in NWAdmin even though it does work for the Queue class object. (The only way to activate these attributes is to develop a custom snap-in for NWAdmin, as discussed later in this section.)
Double-clicking on these unknown objects in NWAdmin does not bring up a configuration or object dialog box. That's because NWAdmin does not know the location of (or even the existence of) the appropriate snap-in DLL for handling such management. However, you can perform some configuration by right-clicking on the object. This brings up the standard menu for configuring rights to this object and for this object in other objects.
Why No Support for Schema Extensions in NWAdmin?
To the casual observer, it would seem preferable to have NWAdmin automatically support custom objects or attributes created using Schema Manager. This might be done through some generic DLL which it could refer to in the event it discovered an unknown object class. Such support, however, would actually be counterproductive. The challenge is to provide developers and administrators with the maximum possible range of objects they could create, while still allowing NWAdmin to manage them. Any automated process would greatly restrict the type of object classes that could be created or the kinds of attributes that could be defined. Rather than limit the creative use of NDS, Novell opted to require the additional step of creating an NWAdmin snap-in for managing the new class or display the new attribute.
Also, any generic DLL might support just simple text entry or add a boolean operator. A key value of NDS is the ability to have the system do more of the work of managing NetWare. Automation such as that included with the Create New User dialog box (where NDS can activate the process of creating a home directory for a new user) would be impossible. While some administrators would find even a text field helpful, the majority want to go beyond such simple definitions.
Gaining Support for Extensions in NWAdmin
You can provide support in NWAdmin for all custom objects or attributes through snap-ins. These snap-ins must be written and compiled using appropriate code to perform operations on the object. The DeveloperNet Web site provides a set of sample code files for programming just such a snap-in. This is located at:
http://developer.novell.com/support/sample/tids/modscma/modscma.htm
While coding a snap-in should pose no problem for NDS developers, it is a non-trivial programming effort for the casual administrator. (One example starts out with almost 400 lines of C code.) Those interested in creating snap-ins are referred to the following articles, which cover the topic more throughly:
"Integrating with the NetWare Adminstrator Utility Using the Snapin Services SDK", Novell Developer Notes, December 1996.
"Incorporating NDS Schema Extensions into the NetWare Administrator Application", Novell Developer Notes, January 1997
"The Anatomy of a Simple IntranetWare Client/Server Application: Part 2" Novell Developer Notes, October 1997.
Novell Developer Notes can be accessed on the Web at the following URL:
http://www.novell.com/research/devnotes.htm
Working with Schema Manager
To many customers, the primary value of Schema Manager is its ability to identify and display extensions added to the base schema. You can display the extensions in a single tree, or you can compare one tree's schema with that of another tree. You can also look at individual classes and determine inheritance for various attributes.
Starting Schema Manager
To start Schema Manager, first run NDS Manager (either as a standalone utility or from the Tools menu of the NWAdmin utility). Select the Object pull-down menu and choose the "Schema Manager" option. You will see a main window similar to that shown in Figure 1.
Figure 1: Schema Manager's main window displays the classes and attributes currently defined in the selected tree's schema.
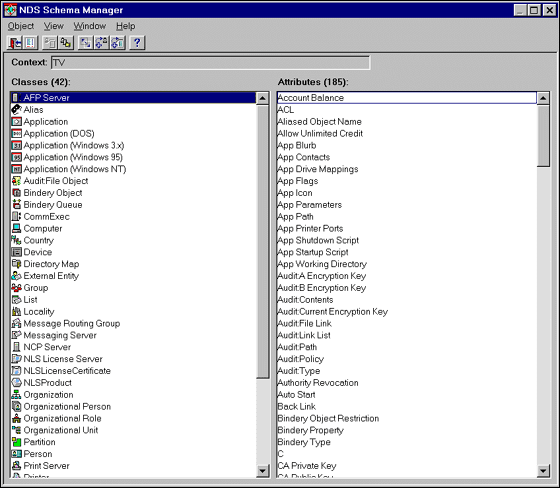
This main schema display uses icons to represent the different object classes in the schema. Generally these are the same icons you see in NWAdmin's tree display. On extended schemas, extensions are identified by the  icon. From this window, you can double-click on any class or attribute of interest to view additional details.
Schema Manager displays the schema for one tree at a time. If you want to view the schema of another tree, you will have to log in to that tree and rerun Schema Manager.
Displaying Schema Extensions
Schema Manager provides a one-step procedure for showing just a given schema's extensions. From the main window display, click on View | Show Only Extensions and the display will be restricted to just the extended classes or attributes in the schema.
Alternatively, you can select Object | Schema Extensions and then enter a tree name to generate an onscreen listing of the extensions that exist in the current tree. You can use the Save or Print buttons to keep a copy of this report.
Comparing Two Schemas
Until now, it hasn't been possible to compare schemas within NDS. This task is of particular importance for administrators wanting to merge two trees. Before that operation can occur, the variations between the two trees must be identified and reconciled. With Schema Manager, you can compare the schemas of two trees to discover their discrepancies before merging the trees, or anytime you want two trees to be parallel. To perform the comparison, you must have administrator rights at the root of each tree. If you haven't already logged in when you select a tree, a login dialog box will be provided.
To compare the schemas of two trees, choose Object | Schema Compare. You will see the Schema Compare entry box shown in Figure 2. Here you can browse for or type the names of the two trees containing the schemas you want to compare.
Figure 2: The Schema Compare option allows you to compare the schema on two selected NDS trees.
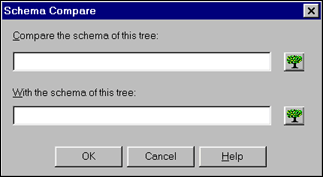
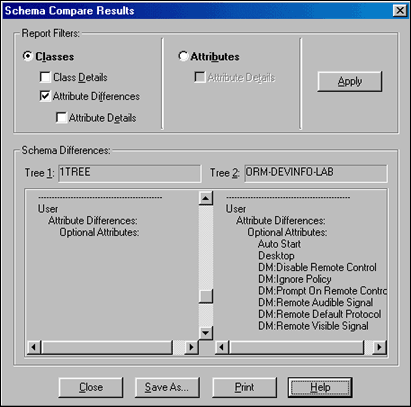
When you click OK, Schema Manager generates a report detailing the variations between the two schemas. A sample report is shown in Figure 3.
Note: NDS currently has no tool for reconciling the differences between two schemas. However, DS Standard from Computer Associates' LAN Software group (formerly Cheyenne Software) does provide this capability. For more information, visit
http://www.cheyenne.com/directory/dsstand.html
Figure 3: Sample results of a comparison between two schemas.
Determining the Origin of a Class's Attributes
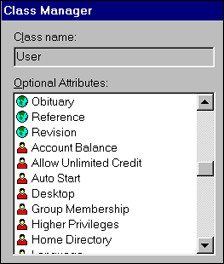
Schema Manager provides a quick and simple way to determine the origin of a particular class's attributes. Double-click on an object in Schema Manager's main window. (In our example, we'll select User.) Schema Manager displays the Class Manager dialog box shown in Figure 4.
Figure 4: Schema Manager shows any object's definition in the Class Manager dialog box.
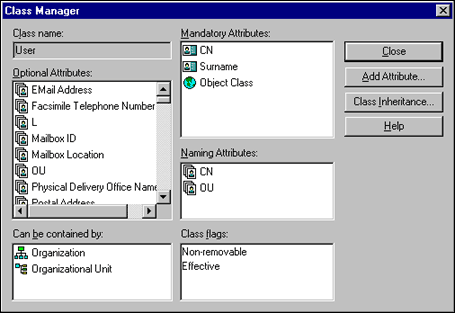
If you want to know what attributes come from which parent class, look closely at the icons displayed to the left of each attribute name in the Class Manager dialog box. These icons indicate the object class from which this class derives that attribute. Since each class in the base schema has its own individual icon, it is easy to spot and recognize where an attribute came from for this object.
To identify what attributes are assigned to this object class alone, the Class Manager listing displays this class's icon to the left of the attribute (see Figure 5).
Figure 5: The displayed class's icon is used to indicate all attributes assigned specifically to it and not inherited from another class.
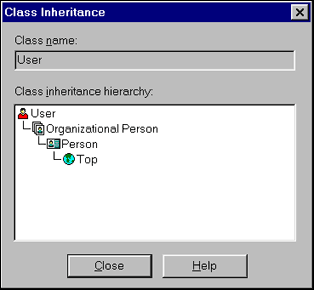
When you click on the Class Inheritance button, Schema Manager traces the origins of attributes for this object class and displays them as in Figure 6.
Figure 6: Schema Manager can show a graphical representation of the inheritance for attributes of a given class.
Reporting on Object Attributes
While the graphical displays of attributes and class objects is useful online, Schema Manager also provides for hard copy reports for documentation or offline analysis. In essence, a report duplicates the contents of the Class Manager screen with the following information:
Class Name
Mandatory Attributes
Optional Attributes
Naming Attributes
Supported Containers
Class Flags
These reports, however, are in the form of a text listing, with headers for the relevant sections. (Initially, these reports display on the screen, but there are buttons for saving or printing the text.)
To run a report, select Object | Schema Reports from the Schema Manager menu. You will see the dialog box shown in Figure 7.
Figure 7: Schema Manager offers reports on a highlighted class or on the entire schema.
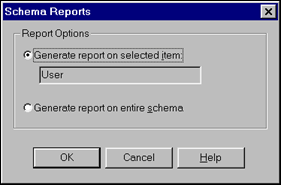
As you can see, Schema Manager offers two types of reports: single class or entire schema.
The entire schema report shows all existing classes and attributes. It is similar to Schema Manager's main display window, but without the object class icons.
The specific object class report shows only the attributes assigned to this class. It contains information similar to what is displayed in the Class Manager dialog box, but without icons for determining attribute inheritance. Also, the report's Class Inheritance information is not as complete as the online display. It shows only one level of inheritance for the object, as compared to the Class Manager dialog which displays the complete inheritance flow from Top downward.
When to Run a Schema Report
The schema reports offer administrators additional documentation of their NDS schema. Both types of reports should be run to provide a snapshot of where the NDS schema was at a particular time. Since the reports can be printed or saved on disk, they offer an easy way to compare past with present. Various tree schemas can be saved for comparison as well.
A schema report should be run after installation, to provide documentation of the base schema. Later, reports should be run prior to a tree merge to locate differences between the schemas--in particular, for classes or attributes that are named the same but have new characteristics. You can also run schema reports to verify that all your servers have identical schemas, as they should in a healthy NDS tree. (All schema changes are normally synchronized across the network.)
Note: Don't use Schema Manager to fix any identified discrepancies between schemas. With NDS, this lack of schema synchronization is a symptom, not the actual problem. You should investigate further to locate the reason why the server synchronization is not occurring.
Creating a New Attribute
Prior to the introduction of NDS Manager, customers interested in developing their own object classes or attributes had to do so programmatically. While this served for the developer community, it did not provide administrators with the level of support they wanted in their NetWare environment.
Schema Manager includes two wizards for the creation of new classes and new attributes. These guide the administrator (or developer) through the various steps required for a valid class or attribute. Once created, NDS immediately recognizes these extensions to the schema. It is not necessary to reload NDS on the server.
Note: These extensions still require an NWAdmin snap-in in order to create an instance of the new object class or to populate the new attribute field. No current NDS utility provides a wizard for creating this snap-in. In the future, the Java-based ConsoleOne utility may have such a wizard to automate this second half of the extension process. This could be implemented via a library of Java Beans which would provide equivalent functionality to a Windows DLL except in a non-programming environment.
Using the "Create Attribute" Wizard
Suppose you wanted to add an optional Security Clearance attribute to the User object class. In this way, you could create directories of those users with Top Secret, Secret, or No clearance at your site.
Using the attribute wizard is similar to any of the other Windows-based utilities provided with NetWare. Simply follow the onscreen instructions to:
Name the attribute--in this case "Security Clearance".
Indicate what type of field it is. For this example you'd use a "Case Ignore String" since that is a Unicode string that is case-insensitive for comparison operations. (Refer to the online help for details about this and other field types. Novell also provides The Schema Definition Reference which describes each type in great detail. It is available as part number 100 - 0036300 - 002.)
Optionally, you can define flags for this new attribute (see Figure 8).
Figure 8: The Create Attribute wizard allows you to set optional flags for various conditions.
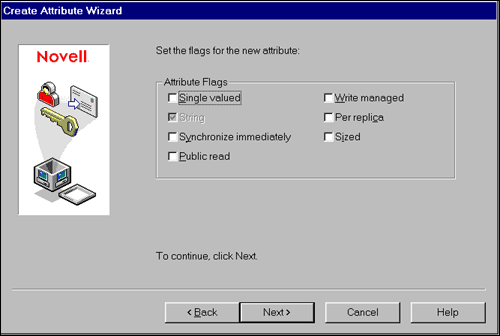
These flags are described in the following table.
Flag
Description
Single Value
Means the attribute syntax can only take on a single value. This flag is set only by NDS depending on the field type you chose earlier.
String
Allows string comparison-type algorithms. This flag is set by NDS.
Synchronize Immediately
When an object is created or modified with this flag set, NDS will immediately schedule a synchronization of the changes to other replicas of the partition.
Public Read
Allows any object with public access rights to read the value.
Write Managed
Allows the object itself to mange its rights.
Per Replica
Allows the value of an object to be different on each replica.
Sized
Only available when the selected syntax is one that logically supports a range. For all other syntaxes, this flag is not displayed. When you set this flag, you'll need to specify a valid upper and lower limit for the attribute. However, you can choose to set a lower limit only by setting the upper limit to -1.
When you have finished defining the attribute, save it. Schema Manager will place it into your extended schema, ready for use.
Creating a New Object Class
Suppose you wanted to add a new object class to the schema. One of the ways that NDS helps you in easing this process is by inheritance. Just as rights inherit down the tree, so do NDS object classes inherit attributes from parent classes. In fact, some NDS classes exist solely as a way of assigning a set of attributes to child classes. These are called "non-effective" classes. Classes you can create instances of--such as User--are called "effective" classes.
With inheritance, creating a new class can be extremely simple, especially if you only need to change one thing in an existing class definition.
Using the "Create Class" Wizard
As an example, suppose you decide you want to make your new Security Clearance attribute a mandatory attribute. Since you can't extend the schema by adding a mandatory attribute to an existing class, you must create a new object class and then define the mandatory attribute for that.
Since the User object class already exists with everything you want, you don't have to create the new object from scratch. Your new class can simply inherit everything from the User class, then you can just add the mandatory attribute. (This discussion assumes that you have created a snap-in for NWAdmin to handle the new class and attribute.)
To create the new class, follow the onscreen instruction in the Add New Class wizard as you:
Name the new class--for this example, call it NewUser.
Choose Effective Class (as opposed to a container class) since you want to create instances of this class in your tree.
Select the mandatory attributes for your new class. In this case, all you need to select is Security Clearance--the attribute you just created. You don't need to select any of the others because they are inherited from the User class.
Select the naming attributes for NewUser. (This is what appears in the context listing, such as Dave.Admin.Novell.) A naming attribute is not necessarily a reflection of the class an object belongs to. Many classes, such as Computer, User, and Server, are named by their CN (Common Name) attribute. In such names, the name attribute itself gives no indication as to which class the object belongs. Other naming attributes are more closely tied to a specific class, like the C (Country Name) used to name a Country object.
Note: If you select an optional attribute as a naming attribute, the optional attribute will become mandatory.
Choose the containers that will be able to hold NewUser. The defaults are O and OU.
The Class Wizard now shows you the completed class definition. If it is what you want, click Finish. The new class is added to the schema.
Conclusion
Schema Manager is an excellent tool for both administrators and developers. For the first time, administrators can quickly analyze their NDS schema and maintain documentation on its status. Developers now have a graphical tool for creating, modifying, or deleting schema extensions. Despite the hurdle of snap-ins, the benefits of having schema extensions far outweighs this drawback for sites requiring them. In the not-too-distant future, an automated ConsoleOne snap-in generator may become available. At that point, schema extensions will be much more accessible to everyone using NDS and NetWare.
* Originally published in Novell AppNotes
Disclaimer
The origin of this information may be internal or external to Novell. While Novell makes all reasonable efforts to verify this information, Novell does not make explicit or implied claims to its validity.