Using ZENworks to Manage Users' Desktops
Articles and Tips: article
Product Manager
Novell, Inc.
01 Jun 1998
Heed the words of the great Z.E.N. master and discover how to automate just about every aspect of your users' Windows desktop configurations, from policies and printers to locations and login restrictions.
- Introduction
- Policies
- Printers
- Client Configuration
- Location Profiles
- Mandatory User Profiles
- Dynamic Local User
- Scheduled Updates
- Login Restriction
- Summary
Introduction
ZENworks is an acronym for Zero Effort Networks. The name is not intended to imply that Novell is able to eliminate the work and effort associated with deploying and maintaining a network on the administrative side (although ZENworks does significantly reduce the costs and complexities of maintaining networked PCs). Rather, the name ZENworks was chosen to suggest that network administrators can now remove the obstacles and frustrations that prevent users from effortlessly accessing the resources on the network. Hence, zero effort is required from users.
This AppNote is the second in a three-article series about implementing ZENworks in a NetWare network. This AppNote looks at common administrative tasks that are simplified by ZENworks, such as:
User and Workstation policies
End user printer administration
Client configuration
Location profiles
Management of mandatory user profiles
Dynamic local user policy
Scheduled workstation updates
Login restrictions
ZENworks is now available in English, with versions in several other languages to follow. To learn more about ZENworks call 1-888-321-4272 (U.S. & Canada) or 1-801-228-4272 (international), or visit http://www.novell.com/products/nds/zenworks/.
Policies
Policies are a very powerful and useful component of the Windows 95 and Windows NT desktop operating systems. These policies allow administrators to remove the obstacles that can get in the way of end users. They also allow administrators to restrict end user access to specific Windows 95 and NT utilities such as the Control Panel.
Research has shown that policies have not been widely deployed because they can be difficult to administer. In the current Microsoft solution, administrators use a utility called POLEDIT to create the policy. POLEDIT outputs a file named NTCONFIG.POL (CONFIG.POL in Windows 95) that then needs to be copied to the public directory of the users' preferred server. In a large organization with multiple servers, the *.POL file may need to be copied to dozens of servers. This is a very labor intensive process that is prone to error. Moreover, each time the policy needs to be updated, the process must be repeated.
ZENworks eases the complexity of using policies by providing a solution to create the policy through NWAdmin and then store the policy within NDS. In other words, Novell leverages the Microsoft policy solution and makes it better through NDS. Providing the interface to create the policy through NWAdmin emphasizes Novell's single point of administration solution. Storing the policy within NDS eliminates the need to manually copy the policy file to the public directory of multiple servers because NDS automatically replicates the policy throughout the organization. NDS also provides fault tolerance for the policy since the policy can be pulled from any replica, unlike the current Microsoft solution which contains a single point of failure.
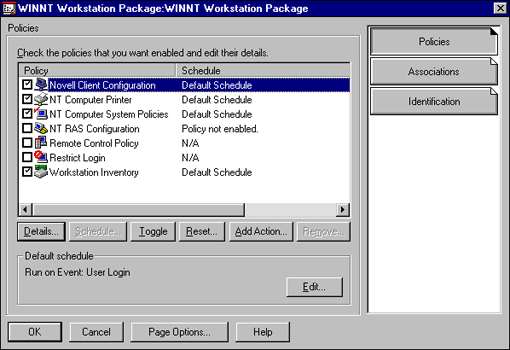
Policies can be created that allow for administration of the workstation-specific aspects of the Microsoft desktops (Workstation policies), and that allow for the administration of user-specific aspects of the Microsoft desktops (User policies).
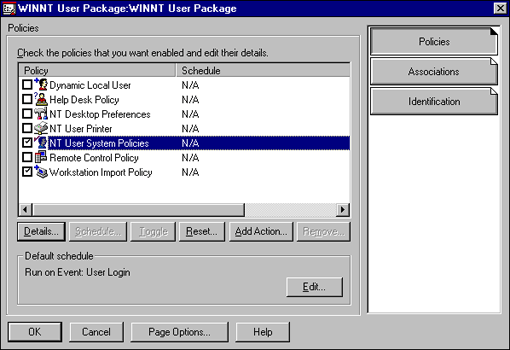
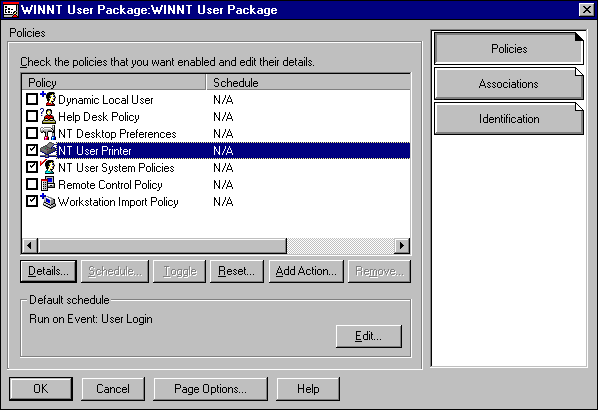
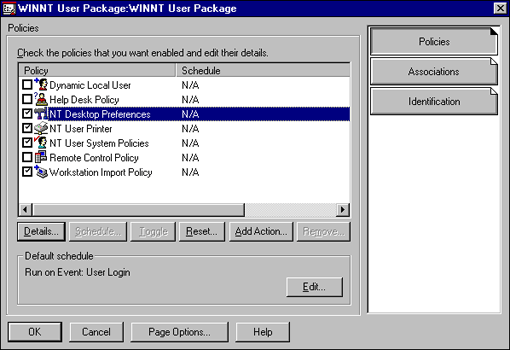
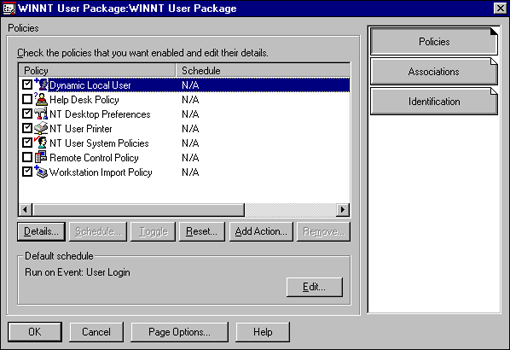
User policies are administered through the User Package in either Windows 95 or Windows NT. Figure 1 shows an example of system policies in a Windows NT User Package.
Figure 1: The User policy is administered in the Windows NT User Package.
User policies can be used to define restrictions such as:
Hide "Entire Network" in Network Neighborhood
Hide the Run Command
Hide the Find Command
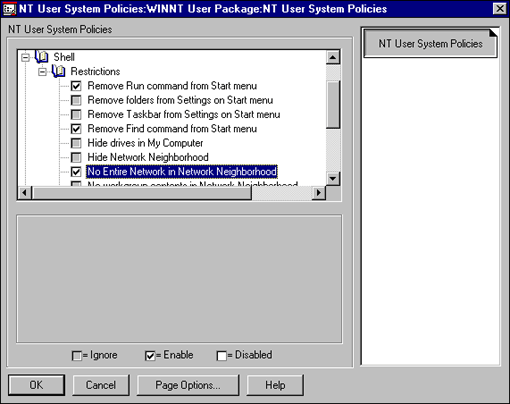
The interface shown in Figure 2 is identical to that of the Microsoft POLEDIT utility. Novell uses policies to remove the clutter from the users' desktops that gets in the way of the end users and slows them down.
Figure 2: User system policies detail.
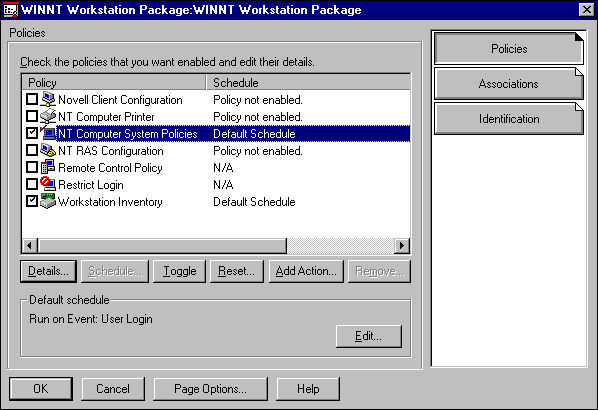
As shown in Figure 3, the Workstation (Computer) system policy is administered in the Windows 95 or NT Workstation Package.
Figure 3: The Workstation policy is administered in the Windows NT Workstation Package.
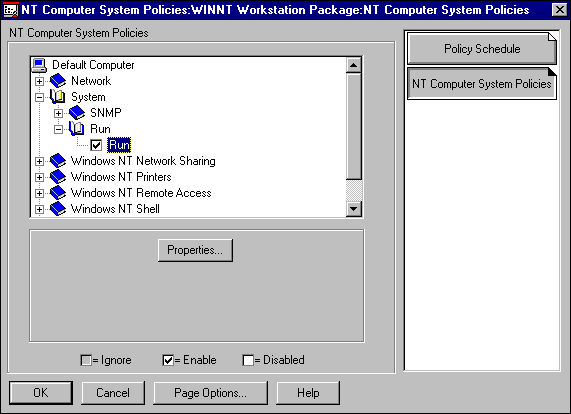
The Workstation policy can be used to configure options such as applications that will be automatically run on a workstation regardless of which user authenticates to the network using the PC. This is done with the Run property, as shown in Figure 4.
Figure 4: Application to run are configured with the Run property.
The example in Figure 5 shows how to automatically launch the Novell Application Launcher through the Workstation policy.
Figure 5: Adding an item to the run list.
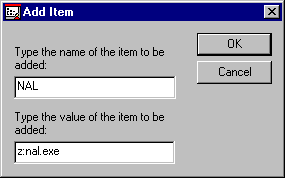
The User and Workstation policies are combined to create the desktop that is displayed to the end user. Any user that has been associated with our sample User Policy will not have access to the Run and Find commands on the Start menu, and the "Entire Network" option in Network Neighborhood will not be present on the desktop. NAL will also automatically be launched the next time this workstation is used to log in.
Printers
One of the most costly and time-consuming aspects of managing a network is maintaining printing functionality for all the end users. In most cases, creating a new printer and installing the appropriate driver on an end user's workstation requires a visit from an individual in IS to the physical workstation.
Every time an individual moves offices, or when a new printer becomes available, someone from the help desk is required to physically visit the workstation.
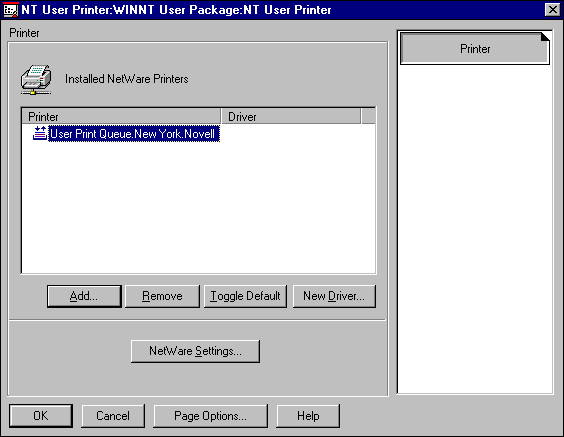
ZENworks provides a solution that allows administrators to configure the end users' printing environment through NDS, including configuring the appropriate printer driver. ZENworks provides the interface through NWAdmin for administrators to associate users or workstations with printers and printer drivers through NDS. The next time the end user authenticates to the network after the association has been made, the printer is created on the workstation and the printer driver is automatically installed. All this is done without any human intervention and without the need to give administrative rights to end users on the NT workstations in the organization through the Windows User Package (see Figure 6).
Figure 6: Printers and printer drivers can be associated to users through the User Package.
When the association is made to the user, the printers are created and the appropriate drivers are installed on any workstation the user uses to authenticate to the network. In other words, the printers follow the end user to any workstation and the end user always has access to the printers he/she is accustomed to printing to. This is possible because the user's printing configuration is now stored within NDS, removing all dependencies on a specific workstation. NDS delivers the printing configuration to any workstation that is used by that user.
Printers and printer drivers can also be associated with workstations through the Windows Workstation Package. When the association is made to the workstation, the printers are available to every user that uses the workstation. For example, a group of workstations could be associated with the printers that are physically located in the same area as the workstations. Any user that logs in from those workstations would have access to the nearby printers. This is possible because the workstation now has an identity within NDS that is delivered to the workstation when the workstation is booted.
When the printer is defined in either the Workstation or User package, the administrator first selects the queue, as shown in Figure 7.
Figure 7: Specifying a NetWare print queue.
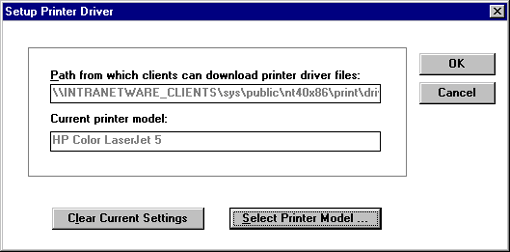
Once the queue has been selected, the appropriate manufacturer and printer model are selected (see Figure 8). The corresponding printer driver will be automatically downloaded to the workstation the next time an associated user logs in.
Figure 8: Selecting the manufacturer and printer model.

The driver is copied to the public directory of one of the servers on the network so that it is available for ZENworks to dynamically download and install (see Figure 9).
Figure 9: Specifying the path to the printer driver files.
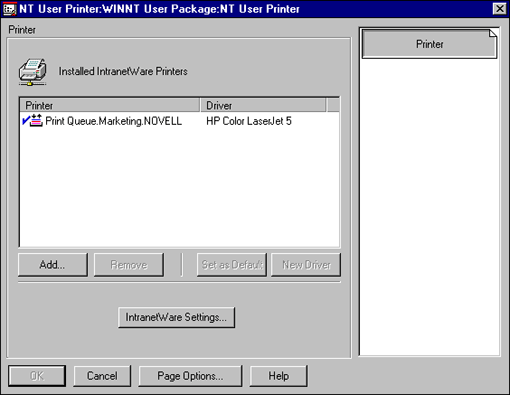
The installed printer is displayed on the Printer page as shown in Figure 10.
Figure 10: Installed printer displayed on the Printer page in the User Package.
The previous example showed how to configure the printers in the User Policy Package. The same process can be followed to assign and configure printers for workstations.
Imagine how easy it will be to manage print configurations using the ZENworks solution. For example, when an end user calls the help desk and needs access to the new color laser printer, the administrator is able to modify the user's print configuration remotely with a few clicks of the mouse in NWAdmin. The user is then asked to log out and log back in and the printer is created and the driver installed automatically while the end user is logging in. The network administrator never had to leave his/her office and the end user did not have any costly downtime!
Client Configuration
While visiting customers during our ZENworks product research, one customer related a scenario that was very painful for him. A few years ago, this customer called Novell Technical Support and explained a problem he was having. After hearing the description of the problem, the individual in Novell Technical Support was happy to report that the issue had already been resolved, and all the customer had to do was modify the NET.CFG file on all the workstations. This customer responded, "How do I modify the NET.CFG on 40,000 workstations? That would take me 18 months in man-hours and I need this completed today!"
ZENworks now provides a solution for administrators to configure the Novell Client software through NDS. The configurable parameters that are usually configured through the Network Control Panel include:
Preferred Server
Name Context
Opportunistic Locking
Packet Burst
Plus many more
With ZENworks, these parameters can be configured once in NDS by the network administrator, and the modifications will be implemented on every workstation that has been associated with the Workstation Package the next time the workstation is used to authenticate to the network.
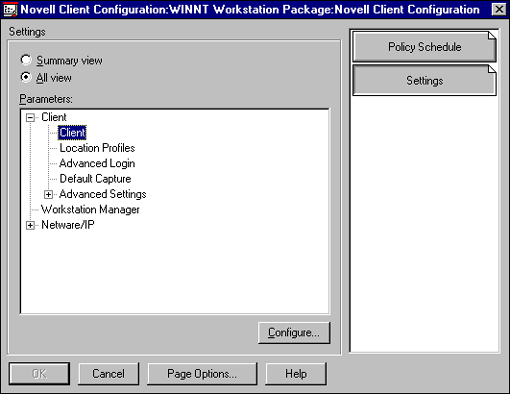
The Novell Client Configuration is managed through the Workstation Policy Package (see Figure 11).
Figure 11: Novell Client Configuration in the Workstation Package.
From the "All View" screen (shown in Figure 12), administrators can access all the Novell Client parameters.
Figure 12: You can switch between Summary View and All View.
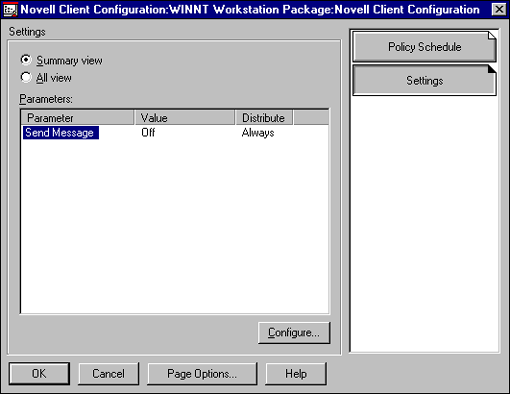
In this example we will disable the ability to send messages from the associated workstations. The Summary View in Figure 13 shows the settings that will be implemented on all the associated workstations the next time the workstation is used to authenticate to the network independent of the user.
Figure 13: Changing client parameters.
Using this solution, the previously mentioned customer could have made the necessary changes within NDS in a matter on minutes, and the necessary change would have been implemented on the 40,000 workstations the next time each workstation was used to log in to the network. What was once an 18 month process is now reduced to a couple of minutes!
Location Profiles
Many users struggle with using local network resources when they travel from location to location. For example, suppose you have end users that frequently travel between your company's New York and San Jose offices. When in New York, the users want to print to the printers in New York, and when the users are in San Jose they want to print to the printers in San Jose. Network administrators can make this "zero effort" for users by centrally configuring Location Profiles within NDS with ZENworks.
This is configured through the Location Profiles property sheet in the Client Configuration Policy (see Figure 14). Enter "New York" in the New Location Profile entry box and click Add.
Figure 14: Configuring Location Profiles.

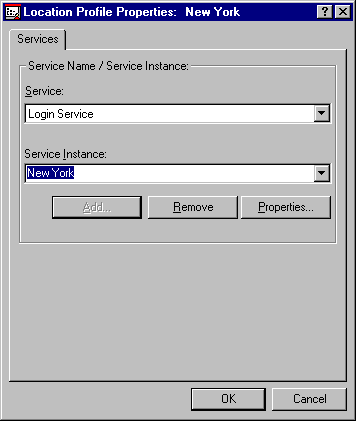
The "New York" Login Service you are configuring (see Figure 15) allows the administrator to configure settings such as the Preferred Tree and Name Context that will be used when the end user select the New York location. As you will see, the end user will be given an ability to identify the location he/she is logging in from and the workstation will be configured accordingly.
Figure 15: Defining the Login Service.
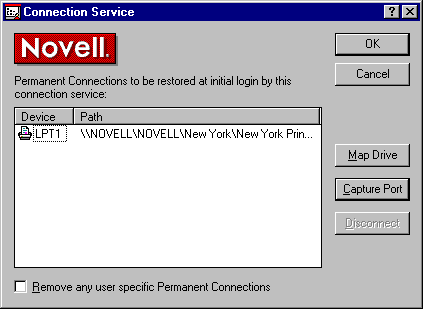
In addition to the Login Service, administrators must also configure a Connection Service. The Connection Service allows administrators to configure the drives that will be mapped and the printers to which the workstation will be captured when the location is chosen by the end user.
The screen in Figure 16 shows the New York Location Profile set up to capture LPT1 to the New York printer.
Figure 16: Capturing LPT1 to the New York printer.
A San Jose Location Profile can be configured identically to the New York Location Profile except that LPT1 is captured to the San Jose printer.
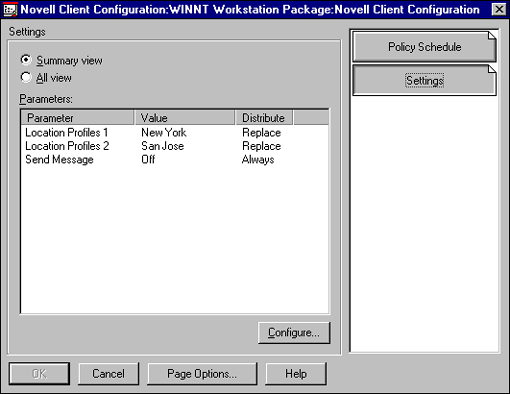
The settings that will be downloaded to the workstation are displayed in the Summary View of the Client Configuration Policy, as shown in Figure 17.
Figure 17: The Location Profiles are displayed in the Client Configuration Policy.
When users are presented the GUI login, they can select their location and receive the configuration appropriate for that location.
Mandatory User Profiles
Microsoft provides a solution for administrators to define the desktop settings such as wallpaper, screen saver, sounds, and so on. These settings can be made mandatory so that end users are not allowed to modify them. These mandatory configurations are called mandatory profiles.
The costs and complexities of using mandatory user profiles are similar to the issues with using Microsoft's policy solutions. The mandatory profile is made up of a single file or an entire directory structure that is stored on a single server. This single server is a single point of failure. Large organizations then must copy the profile to multiple servers across the organization. This process is repeated every time a modification to the profile is necessary.
The mandatory user profile is configured through the User package under the Desktop Preferences Policy (see Figure 18).
Figure 18: The mandatory user profile in the User Package.
Mandatory user profiles can be used to configure many of the normally user-defined preferences such as keyboard settings, wallpaper, screen saver, and so on. These settings can now be configured once by the network administrator and technically be deployed to every user in the entire organization.
For this example we will define a corporate wallpaper that will be present on every desktop in the Marketing organization. The path on the local drive to the desired wallpaper is input on the "Path" line. A path on the network where the desired wallpaper is also stored is input in the "Alternate Path" line (see Figure 19).
Figure 19: Setting the path and alternate path for wallpaper.
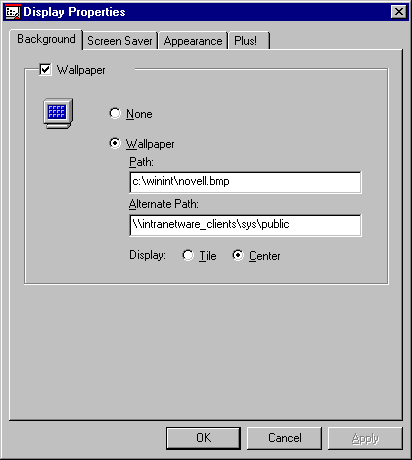
The next time the workstation is used to log in, ZENworks will attempt to load the wallpaper from the local path. If the wallpaper cannot be found in the local path, the file will be copied down from the alternate path to the local path and then loaded.
With ZENworks, administrators are able to make modifications to the mandatory user profile in NDS and NDS takes care of the replication throughout the organization. The profile does not need to be manually copied to multiple servers throughout the organization. NDS provides both fault tolerance and replication. ZENworks further enhances Novell's single point of administration solution since mandatory user profiles are now created and managed through NWAdmin and stored in NDS.
Dynamic Local User
The Dynamic Local User Policy provides a solution for network administrators to manage access to NT workstations through NDS. Because of the secure nature of Windows NT workstation, users must authenticate to the Security Account Manager (SAM) before they are granted access to the NT workstation. If the user does not have an account in the SAM database, or if the user improperly inputs the user credentials (username and password), the user is not granted access to the workstation resources.
The security of NT workstation is needed or required in many organizations, but the overhead required to manage the SAM databases on each and every NT workstation can become overwhelming. For example, one network administrator that Novell spoke with had 1,000 NT workstations spread throughout the hospital he managed. There were 2,500 doctors and nurses that worked in the hospital and needed to access the network from any NT workstation at any given time.
This administrator had to ensure that any doctor or nurse could walk up to any NT Workstation and be guaranteed access to the network and the NT workstation. There are three methods that could have been used to accomplish this:
Create 2,500 user accounts on all 1,000 workstations (2,500,000 total accounts)
Deploy NT domains to centrally manage access to the NT workstation
Leverage NDS to centrally manage access to the NT workstations
The first solution is unmanageable. It would take too long to create 2,500,000 user accounts and then there is no way the administrator could manage the accounts when users changed their passwords. The second solution is very expensive and makes no sense if the customer already has NetWare installed. Why should customers have to deploy costly NT domains just because they standardized on NT Workstation?
The NDS solution is the most cost effective and easy to implement. The ability to centrally manage NT workstation user accounts and access is configured through the NT workstation User Policy (see Figure 20).
Figure 20: Configuring a Dynamic Local User.
The NDS solution of managing NT workstation access is based upon dynamically creating user accounts on the NT workstation. This is accomplished through the Enable Dynamic Local Users option in the policy (see Figure 21).
Figure 21: Enabling dynamic local user creation.
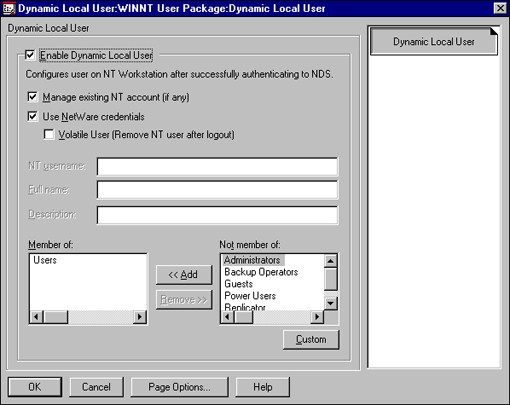
When Dynamic Local User is enabled, the authentication process is as follows:
The end user enters username and password.
The user credentials are validated through NDS.
After NDS has validated the credentials, the local SAM database is queried for an account with the same name.
If the account already exists, the user is authenticated to the NT workstation.
If the account does not exist, the Novell Client for Windows NT dynamically creates the account and the user is authenticated to the NT workstation.
Using this solution, users are able to roam from workstation to workstation and will always be guaranteed access to any workstation because NDS is centrally managing the local NT workstation User accounts.
Scheduled Updates
Another problem that was commonly seen in the organizations that Novell visited was the dilemma of distributing software such as Microsoft service packs to workstations. These service packs require administrative access to NT workstations and are difficult and expensive to distribute. One solution that Novell created is to provide the ability to schedule updates at workstations, and then have the update occur without the need of a user being present or even authenticated to the network.
Scheduled updates can be configured on both the User and Workstation Policies. In this example, we will work with the Workstation Policy. The desktop management solutions just described make extensive use of this ability. As can be seen in Figure 22, the various functions that were just discussed schedule themselves when the policy is configured.
Figure 22: Scheduling workstation updates.

Administrators could configure and run any software according to the configured schedule. This would be accomplished by simply clicking on the Add Action button and entering the name of the executable or DLL to be run. For example, administrators could add the SETUP.EXE for a Microsoft Service Pack and that service pack would be distributed at the configured time.
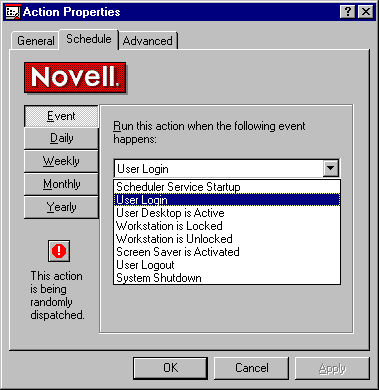
There are many options in scheduling the update to occur. The update could be scheduled to occur when an event (such as login, logout, or the activation of a screen saver) is detected. When the event is detected, the desired update is performed (see Figure 23).
The event can be scheduled to occur on a certain day of week at a specific time. For example, virus scans could be scheduled to occur on every workstation in the company at 12:00 midnight. As long as the workstation was powered on, a user does not have to be authenticated to the network on the PC, the workstation will authenticate to the network and perform the scheduled action.
Note: One of the innovative components of ZENworks is the ability for the workstation to authenticate to the network without any human intervention. This provides a solution for unattended software workstation updates that are managed through NDS.
The update can be scheduled to occur on a specific day of the week, every week, at a specific time. The action can be scheduled to occur on a specific day of every month, at a specific time. The event can also be scheduled to occur on a specific day of the year, at a specific time.
Figure 23: The scheduling options for an action.
Administrators can control the access rights that the scheduled action has to the NT workstation. The action can be given the same rights as the user that is authenticated on the workstation, system rights, or be defined as not secure (see Figure 24).
Figure 24: Assigning access rights for the scheduled action.
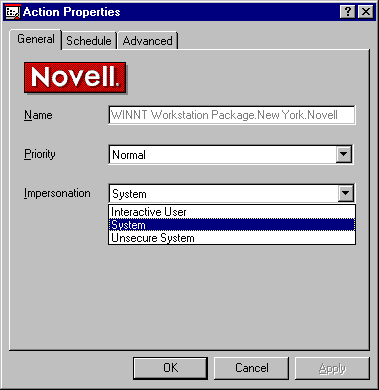
If the action has system rights, the action has administrative rights on the workstation. If the impersonation is defined as not secure, it runs with administrative rights but can prompt the current user for input.
ZENworks can be configured to take appropriate action should the scheduled action fail (see Figure 25).
Figure 25: Configuring what to do if the scheduled action fails.

The scheduled action can be configured so that the workstation is rebooted after the action has been run. The scheduled action can also be configured so that the action randomly occurs on the associated workstations during the scheduled time period. This prevents the scenario where too many workstations are attempting to complete the scheduled action at the same time.
Login Restriction
ZENworks provides a solution for administrators to retrict or allow login to specific workstations. As shown in Figure 26, users in the New York container would be allowed to authenticate to the network from workstations that have been associated with this Workstation Policy Package. Users in the San Jose container would not be allowed to authenticate with this Workstation Policy Package.
Figure 26: Setting up login restrictions in the Workstation Policy Package.
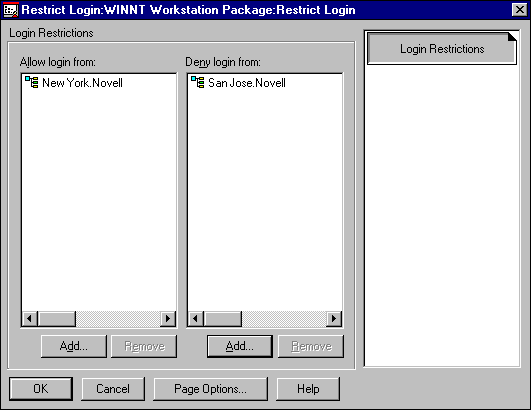
Using this solution, network administrators do not have to know and input the specific network addresses of the various workstations in order to allow or restrict network access.
Summary
Novell's ZENworks directory services-based desktop management tool provides a solution whereby desktop management and maintenance tasks are managed and stored through NDS, ZENworks allows network administrators, as the experts in their environment, to use that expertise to create the optimal desktop configuration for their environment and then apply that configuration across the organization. The administrator has to create the desktop configuration only once. Once the desired desktop configuration has been created, the administrator is able to leverage NDS to make sure this configuration is applied to every desktop, or selected desktops, throughout the organization.
The next AppNote in this series about ZENworks will look at how ZENworks simplifies application distribution, and how its help desk utilities help end users contact the appropriate individuals for support problems and how support can troubleshoot these problems remotely and securely.
* Originally published in Novell AppNotes
Disclaimer
The origin of this information may be internal or external to Novell. While Novell makes all reasonable efforts to verify this information, Novell does not make explicit or implied claims to its validity.