Using the Novell Internet Access Server (NIAS) and a Modem to Connect Your NetWare Server to an ISP
Articles and Tips: article
Technical Marketing Manager
Albee-Green Presentation and Design
01 Apr 1998
Feeling left out because your small company can't afford a dedicated line to connect to an Internet Service Provider? Here's a way to use the NIAS that comes with intraNetWare and NetWare for Small Business to set up an on-demand, asynchronous modem connection to your ISP.
- Introduction
- Three Approaches for ISP Connections
- NIAS Prerequisites
- NIAS Installation
- NIAS Configuration
- Testing the Configuration
- Conclusion
Introduction
Not every company can have a dedicated T1 connection to the Internet. Some businesses, especially small ones, simply cannot afford a dedicated line. Even if they could afford it, perhaps the service is not yet available in their area.
These reasons shouldn't prevent a company from hooking their LAN to the Internet, however. With Novell Internet Access Server (NIAS), a modem, and a phone line, any user can have a network connection.
This AppNote describes how to configure your intraNetWare or NetWare for Small Business server so it can initiate an on-demand, asynchronous, PPP connection to an Internet Service Provider (ISP). Your network users can then browse the World Wide Web, exchange e-mail, or search newsgroups as if they were working through a dedicated connection.
Three Approaches for ISP Connections
Many companies still rely on asynchronous modem connections to their friendly neighborhood ISP. This connectivity can be handled in one of three ways.
Having a Modem on Every Desk
This approach calls for modems to be installed at certain points throughout the network. Users with modems dial-up from their desk to an ISP and create a session. The downside of this approach is that companies must purchase phone lines and modems for each network user who requires Internet access. If those resources are scarce, some companies are forced to set up just a few kiosks throughout the network where users can come to browse the World Wide Web, send e-mail, search newsgroups, and so on. Typically these kiosks sit on somebody's desktop, and when other people come by to access the Internet, they must wait for an opportune time.
Using Modem Pools
The second connection option involves the use of a modem pool that many users on the network can share. Using Novell's NetWare Connect or similar product, the network administrator creates a communications server where users can share modems and phone lines.
While modem pools are generally superior to the first approach, this configuration also has drawbacks for some organizations. In order to support multiple modems, specialized hardware such as a multi-port communications board is required on which to attach the modems. Additionally, only one user can use one modem at a time. If all modems are currently occupied, users must wait for an opportune time. In addition, the network administrator must install special client software on each PC so that the browser software redirects requests to the communications server. And finally, not all clients are supported.
Using NIAS and a Modem
A third solution to this problem is to configure the Novell Internet Access Server (NIAS) to process TCP/IP requests by dialing the ISP whenever data must be sent. This solution only requires one modem and one phone line to connect the entire network. Since the software comes with intraNetWare and NetWare for Small Business, no additional software investment is required. Also, clients can install native TCP/IP protocol stacks--any client capable of communicating via IP can use the resource.
Whether this solution is best for your situation depends largely on the size of your network and Internet access needs. If you have several users that need simultaneous access to the World Wide Web, the 28.8 or 56Kbps line may be a substantial bottleneck. But if your network is small or if clients use the Internet mostly for e-mail, this solution may be the right one for you.
The remainder of this AppNote will show you how to install NIAS and configure it to dial-in over an asynchronous line to your ISP. The server will initiate the connection as needed, then disconnect when the users are done. From a user and administrator standpoint, it's as if your network had a dedicated connection.
NIAS Prerequisites
The hardware requirements for NIAS are similar to the hardware requirements of NetWare 4.11, that is:
A PC (or PC compatible) with a 386, 486 (SX or DX), Pentium, or higher processor
A minimum of 20 MB of RAM (at least 32MB recommended)
At least one network board
A CD-ROM drive that can read ISO 9660 formatted CD-ROM discs
In addition, you will need a modem and phone line to dial your ISP. Unless you want to install a multiport serial board, you can hook your modem up to the COM1 port on your PC.
Required Information From Your ISP
You will need to set up a PPP account with an ISP. An ISP typically provides two types of IP addressing--static or dynamic. A static address is one that you can configure right into your system because it never changes. Dynamic IP addresses are assigned when you call and make the connection with the ISP. Static addressing is usually preferred, however NIAS can work with both types. The important thing to remember is that your ISP must provide the addresses--you cannot make up your own.
NIAS Installation
NIAS is included with intraNetWare and with NetWare for Small Business 4.11. In fact, if you've installed the new NetWare for Small Business 4.11, the Quick Install already installed NIAS for you.
If you have intraNetWare, you will need to install NIAS from the CD labeled Internet Access Server 4. Follow these simple steps:
Insert the NIAS CD-ROM in the drive and mount the CD as a volume.
At the server's console prompt, type LOAD INSTALL.
Select "Install a Product Not Listed from" the "Other Installation Actions" menu.
Specify the path to the installation software. Press <F3< to select a path other than A:\, then type NIAS4:\NIAS\INSTALL.
Select Install Product from the "Installation Options" menu.
Select your server from the "Install to Servers" menu and press <Enter<.
You can install to remote servers or several servers at once if those servers are running RSPAWN.NLM.
Answer Yes to the Start Installation prompt.
You will be asked whether to install a set of previously created configuration files. If you have those files and would like to use them, select Yes; otherwise, choose No.
Insert the NIAS license diskette for your server in drive A:\ and press enter. The installation utility will begin copying files to your server. When the installation has completed, you will see the message: "Installation was successful. Bring down and restart each server on which you installed the software to ensure that it uses the newest NLM files." However, before you restart the server, complete the remaining steps.
Press <Enter<, then <Esc< to return to the "Installation Options" menu.
Select NCF Files Options from the "Installation Options" menu.
Select Edit STARTUP.NCF file from the "Available NCF Files Options".
Enter the location of the STARTUP.NCF file.
Add the following lines to the STARTUP.NCF file: SET MINIMUM PACKET RECEIVE BUFFERS=400 SET MAXIMUM PACKET RECEIVE BUFFERS=1000
Press <Esc< then select Yes to save the changes.
Press <Esc< twice then answer Yes to exit the installation utility.
At the server's console prompt, type DOWN, then RESTART SERVER.
With NIAS installed, you are now ready to configure your server for an asynchronous PPP connection.
NIAS Configuration
This section assumes you have already configured at least one LAN adapter. If you haven't, please do so before proceeding. You should also make sure your server is working properly by logging in from at least one client.
At the server's console prompt, type LOAD INETCFG. (If this is the first time you have loaded INETCFG, you will see a prompt to transfer all of the network commands from AUTOEXEC.NCF. Answer Yes to continue.) This section will take you through the necessary steps to configure your server for an asynchronous PPP connection.
Creating the WAN Interface
Select "Boards" from the Internetworking Configuration menu and press <Enter<.
Press <Insert< to configure a new board. A window will appear with a list of possible drivers.
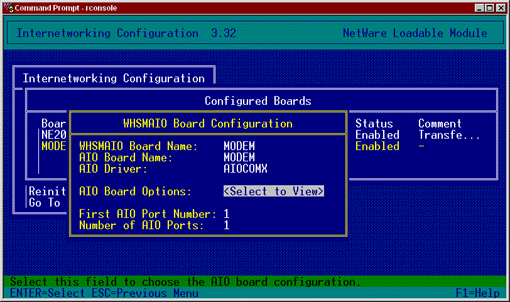
Select WHSMAIO from the Select a Driver list and press <Enter<.
Give the board a name. In this example we'll type MODEM. Press <Enter<.
Press <Enter< to select AIO Board options.
When asked if INETCFG should automatically load the AIO driver, answer Yes.
In the next window, you are prompted to select an AIO driver.
If you have a multiport serial adapter, select the appropriate driver. If you will be using the COM1 port of your server, select AIOCOMX and press <Enter<.
The settings should match the configuration of the board you chose. For COM1, the settings should be I/O Base 3F8, Interrupt 4. When the settings are correct, press <Esc<.
Figure 1: Configuring the WHSMAIO board with the AIOCOMX driver.
Press <Esc< again and when prompted to save changes, answer Yes.
Press <Esc< to return to the Internetworking Configuration menu.
Configuring the WAN Interface
Select "Network Interfaces" from the Internetworking Configuration menu and press <Enter<.
Your new interface should be visible at this screen. Select it and press <Enter<.
When prompted to select a medium, select PPP Routing and press <Enter<.
Change the Interface Speed to an appropriate setting for your modem.
Under Modem/DCE Type, press <Enter< to view a list of possible modems. Select your modem from the list and press <Enter<.
Figure 2: Setting up your modem for the PPP network interface.
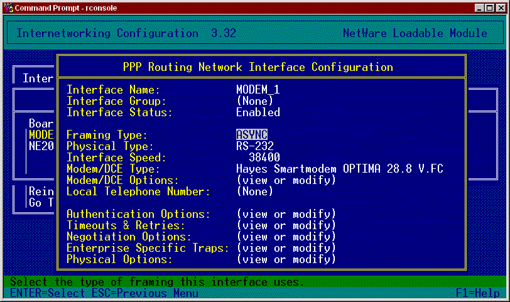
Under Authentication Options, press <Enter< and disable Inbound Call Processing. This modem will not be processing inbound calls; your server will originate the calls. Press <Esc< to return to the PPP Routing Network Interface Configuration screen.
Under Negotiation Options, press <Enter< and disable PPP Header Compression and PPP Data Compression. Press <Esc< to return to the PPP Routing Network Interface Configuration screen.
You can change any other options you desire; however, the rest of the options can usually be left at their default values. Press <Esc< to exit the screen. When prompted to save changes, answer Yes.
Press <Esc< to return to the Internetworking Configuration menu.
Configuring the WAN Call Directory
Select "WAN Call Directory" from the Internetworking Configuration menu and press <Enter<.
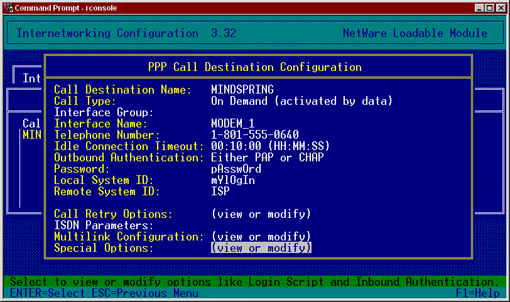
Press <Insert< at the Configured WAN Call Destinations window.
When prompted for a Call Destination, enter a value (perhaps the name of your ISP) and press <Enter<.
Press <Enter< to select PPP Routing.
Choose a value for Call Type. If the connection will be up continuously, select Permanent. If the server is to dial the ISP only when data needs to be sent, select On Demand.
Under Interface Name, select the interface created above. The value is MODEM_1 in our example.
Under Telephone Number, enter the number the server should call to initiate the connection.
The Outbound Authentication field lets you specify the PPP
If you are configuring a Permanent link, this field is optional. If you are setting up a Permanent link that doesn't use authentication, select None. If you're unsure whether your ISP uses authentication, set the value to Either PAP or CHAP.
For an On Demand link select Either PAP or CHAP. This will use whichever authentication protocol the ISP requests.
The ISP will give you a PAP or CHAP login or User ID. Enter this value in the Local System ID field. This value is case sensitive, so be sure to enter it exactly as it was provided. If prompted to convert the value to upper case, answer No.
The ISP will also give you a password. Enter this value in the Password field. This value is also case sensitive, so enter it exactly as provided.
Under Remote System ID, you can enter any value you wish to identify the remote system. In our example, we simply entered ISP.
Figure 3: Creating a Call Destination with login and password information from your ISP.
You can change any other options you desire; however, the rest of the options can usually be left at their default values. Press <Esc< to exit the screen. When prompted to save changes, answer Yes.
When prompted to Synchronize the inbound authentication database, answer Yes.
Press <Esc< to return to the Internetworking Configuration menu.
Configuring the TCP/IP Protocol
Select Protocols from the Internetworking Configuration menu.
Select TCP/IP from the Protocol Configuration menu and press <Enter<.
Set both TCP/IP Status and IP Packet Forwarding to Enabled.
Press <Esc< to exit the screen. When prompted to update the TCP/IP configuration, answer Yes.
Press <Esc< to return to the Internetworking Configuration menu.
Binding TCP/IP to the WAN Interface
Select Bindings from the Internetworking Configuration menu.
Press <Insert< to create a new binding for your interface.
Select TCP/IP from the list of configured protocols and press <Enter<.
Select A Network Interface from the Bind To menu and press <Enter<.
Select the network interface you created earlier and press <Enter<. In our example, the value is MODEM.
The next screen gives you three options for configuration. The option you choose depends on the information you received from your ISP.
If your ISP gave you a local IP address for the WAN link (with subnet mask), the address of their remote link (with subnet mask), and a block of addresses for your network (with subnet mask), follow the instructions for a Numbered Single Point-to-Point binding.
If your ISP gave you the address of their remote link (with subnet mask) and a block of addresses for your network (with subnet mask) but no local IP address for the WAN link, follow the instructions for an Unnumbered Point-to-Point binding.
If your ISP uses dynamic instead of static addressing, follow the instructions for a Dynamic binding.
Our example uses an Unnumbered Point-to-Point binding (see Figure 4).
Figure 4: Your ISP will provide IP addresses for either Numbered Single Point-to-Point or Unnumbered Point-to-Point bindings.

Numbered Single Point-to-Point. This is the procedure for performing a single point-to-point binding.
Under Remote Router will Dynamically Assign the IP Address, set the field to No.
Under WAN Network Mode, set to Numbered Single Point-to-Point.
Under Local IP Address, enter the address assigned by the ISP for the WAN link.
Under Subnet Mask of Connected Network, enter the subnet mask assigned by your ISP.
Press <Enter< at the WAN Call Destinations field.
Press <Insert< at the Configured WAN Call Destinations window.
Press <Enter< and select the WAN Call Destination you defined earlier.
Under Remote IP Address, enter the address of your ISP system.
Select Static Routing Table and press <Enter<.
Press <Insert< to create a new static route.
Select the Network route type.
For the IP address of Network/Host, enter 0.0.0.0 and press <Enter<.
Press <Esc< twice. When prompted to update the database, answer Yes.
Press <Esc< to return to the Configured WAN Call Destinations window.
Press <Esc<. When prompted to update the database, answer Yes.
Press <Esc<. When prompted to Update the TCP/IP Configuration, answer Yes.
Press <Esc< to return to the Internetworking Configuration menu.
The block of addresses provided by your ISP for your network should be assigned to the LAN adapter in your server and the client computers on your LAN.
Unnumbered Point-to-Point. This is the procedure for performing a single point-to-point binding.
Under Remote Router will Dynamically Assign the IP Address, set the field to No.
Under WAN Network Mode, set to Unnumbered Point-to-Point.
Select WAN Call Destinations and press <Enter<.
Press <Insert< at the Configured WAN Call Destinations window.
Press <Enter< and select the WAN Call Destination you defined earlier.
Select Static Routing Table and press <Enter<.
Press <Insert< to create a new static route.
Select the Network route type.
For the IP address of Network/Host, enter 0.0.0.0 and press <Enter<.
Press <Esc< twice. When prompted to update the database, answer Yes.
Press <Esc< to return to the Configured WAN Call Destinations window.
Press <Esc<. When prompted to update the database, answer Yes.
Press <Esc<. When prompted to Update the TCP/IP Configuration, answer Yes.
Press <Esc< to return to the Internetworking Configuration menu.
The block of addresses provided by your ISP for your network should be assigned to the LAN adapter in your server and the client computers on your LAN.
Dynamic Binding. This is how to perform a dynamic binding.
Under Remote Router will Dynamically Assign the IP Address, set the field to Yes.
Select WAN Call Destinations and press <Enter<.
Press <Insert< at the Configured WAN Call Destinations window.
Press <Enter< and select the WAN Call Destination you defined earlier.
Select Static Routing Table and press <Enter<.
Press <Insert< to create a new static route.
Select the Network route type.
For the IP address of Network/Host, enter 0.0.0.0 and press <Enter<.
Press <Esc< twice. When prompted to update the database, answer Yes.
Press <Esc< to return to the Configured WAN Call Destinations window.
Press <Esc<. When prompted to update the database, answer Yes.
Press <Esc<. When prompted to Update the TCP/IP Configuration, answer Yes.
Press <Esc< to return to the Internetworking Configuration menu.
Note: In order for this configuration to work, you should install the IntranetWare Service Pack v3.0 or later. This file is called IWSP3.EXE and is available from Novell's support web site (support.novell.com). If you have NetWare for Small Business 4.11, Service Pack 4 is installed for you automatically.
Testing the Configuration
Once you have configured NIAS for a WAN interface, you should reinitialize the system. Then at the server's console prompt, type the following command:
LOAD CALLMGR
If you configured your interface for a permanent link, the call should come up automatically. For a dynamic link, press <Insert<and select the WAN Call Destination you just configured as well as the IP protocol. The status column in the Call Connection Manager should display Out-Connecting and the modem should immediately begin dialing. If you press <Alt<-<Esc< and go back to the server's console window, you should see a message stating that the call connection was established.
To make sure the connection is live on the Internet, type the following at the server's console prompt:
LOAD PING
Enter the IP address of a known server. First, try the IP address of your ISP. Press <Esc< and the utility will begin pinging. You should see packets sent and received. Press <Insert< and enter another address outside your ISP's network such as Novell's NDS server (137.65.1.1). You should see packets sent and received from this destination as well.
To view the PPP traffic between your server and your ISP, type the following at the server's console prompt:
LOAD PPPTRACE
Select "Real-Time Monitor" from the utility's Available Options menu.
Conclusion
You have many options when connecting your network to the Internet. Budget and equipment constraints sometimes prohibit use of high-speed connections. But that shouldn't keep any network from getting connected. Using software included with intraNetWare and NetWare for Small Business 4.11, a modem, a telephone line, and an inexpensive ISP account, anyone can take advantage of the services an Internet connection offers network users.
* Originally published in Novell AppNotes
Disclaimer
The origin of this information may be internal or external to Novell. While Novell makes all reasonable efforts to verify this information, Novell does not make explicit or implied claims to its validity.