Using the Graphical SYSCON Utility in NetWare 3.2
Articles and Tips: article
Senior Research Engineer
Novell Developer Information
01 Apr 1998
- Introduction
- What's New in SYSCON for Windows
- Running SYSCON for Windows
- Managing User Information in SYSCON for Windows
- Managing Group Information in SYSCON for Windows
- Pull-Down Menus in SYSCON for Windows
- Conclusion
Introduction
Those who have used the DOS-based SYSCON utility in previous versions of NetWare 3 will be pleased to know that NetWare 3.2 comes with a graphical user interface (GUI) version of this utility that will run on Windows 3.x, Windows 95, Windows NT, and OS/2 workstations. This new version of SYSCON also adds features that are useful for server administrators, such as the ability to print reports on vital user, group and server statistics, and easier cut and paste capabilities when editing login scripts or the server AUTOEXEC.NCF file.
The graphical SYSCON utility, known officially as SYSCON for Windows, offers all the administrative features of the previous SYSCON utility, only it has a Windows interface instead of the menu-based C-Worthy interface. This adds convenience for network administrators who want to move from DOS-based utilities to the more convenient Windows-based utilities, such as those found in NetWare 4's NWAdmin and intraNetWare for Small Business' NEAT utilities.
This AppNote takes you through the new SYSCON utility so you can become familiar with the new interface and features. This explanation assumes you have already installed the files necessary to run SYSCON for Windows, and that you are logged in as Supervisor or equivalent.
If you have the NetWare 3.2 Enhancement Pack CD, you should have already run the PINSTALL program on the CD, which places the necessary update files in the appropriate directories. You can also obtain the SYSCON for Windows files from the Novell Support Connection CD that is available from Novell by monthly subscription (call XXX for ordering information).
For more information on purchasing or upgrading to NetWare 3.2, visit Novell's NetWare 3 home page on the Web at:
http://www.novell.com/intranetware/netware3
What's New in SYSCON for Windows
For those who are already familiar with the DOS-based version of SYSCON, here is a brief overview of what is new in the Windows version.
Graphical User Interface
The most notable difference in SYSCON for Windows is its graphical user interface. Instead of C-Worthy menus, the new SYSCON utility presents a list of servers, users, and groups in a "System Hierarchy" window. You can right-click on user or group icons to access pop-up menus of approprate options, or you can double-click on a user or group to modify its properties. In addition to the pull-down menus at the top of the main SYSCON window, there are speed buttons to perform selected functions such as accessing the "System Hierarchy" window, the "Server Information" window, the group or user maintenance windows, or the "Connections" window. The Exit speed button closes the SYSCON utility.
Options and settings are grouped onto tabbed pages for easier access and less on-screen clutter. Selections such as dates can be made from a graphical calendar instead of having to type the date by hand. The utility also includes a standard Windows-based help file that can be accessed through the Help pull-down menu.
More Flexibility in Editing and Printing
Because this version of SYSCON is Windows-based, it gives you a little more flexibility in its editing and printing capabilities. For example, when editing the server's AUTOEXEC.NCF file or a login script, you can highlight a section and use the Cut, Copy, Paste, or Undo icons at the top of the screen. There are short-cut icons for printing and saving the files as well. You can also right-click is also a find icon and the ability to change the editor font if you want to.
Ability to Print Reports
Perhaps one of the biggest advantages of SYSCON for Windows is its ability to print detailed reports on servers, users, and groups. These printouts contain valuable information that can be of use in managing the servers, users, and groups. A sample User Details report is shown on the next page.
Once you set up your NetWare 3.x servers the way you want them, it is a good idea to print at least one copy of information for each server, user, and group and store it in folders for each server you manage. This information could be useful if you need to recreate a configuration in the future.
Sample User Details Report
Novell Inc.                         32HERE: User Details
User Name:              [E3020005]    ELIEBING
Full Name:              Edward A. Liebing
Last Login:             Tue, 03 Mar 1998 at 08:52:51
Incorrect Login Count:              0
Account Locked:             No
Last Intruder Address:              01017050:00A024A58D0F:400C
Account Disabled                No
Console Operator:           Yes
Login Script:               map *1:=sys:\users\eliebing
                drive *1
                map
Groups Belonged To:         EVERYONE
                WP
Security Equivalents:           [Group]       EVERYONE
                [User]        SUPERVISOR
                [Group]       WP
Managed By:                 [User]        GUEST
                [User]        KNEFF
                [User]        MADAIR
Dir Trustee Assignments:        [ ]           SYS:
                [RWCEMF] SYS:MAIL/E3020005
File Trustee Assignments:       (None)
Account Expires:            Not Set
Max. Connections:           0
Days Between Password Changes:      Not Set
Password Expires:           Not Set
Grace Logins Allowed:           Not Set
Grace Logins Remaining:         Not Set
Require Unique Passwords:       No
Require Password:           No
Minimum Password Length:        Not Set
User Can Change Password:       Yes
Volume Restrictions:            SYS:    Used:  133152
                Restriction:  4000000
Station Restrictions:           (None)
Login Times Allowed:            Sunday:       03:30-23:59
                Monday:       03:30-23:59
                Tuesday: 03:30-23:59
                Wednesday:    03:30-23:59
                Thursday:     03:30-23:59
                Friday:                  03:30-23:59
                Saturday:     03:30-23:59
                Page: 1
Running SYSCON for Windows
To start SYSCON for Windows on a Windows 95 or Windows NT 4.0 work-station, click the Start button at the bottom of the screen and select the Run option. (For Windows 3.1x, select the File pull-down menu, then the Run option.) Enter the name of the executable file and the path, if necessary. The file is named SYSCONW.EXE and it is found in the SYS:PUBLIC directory.
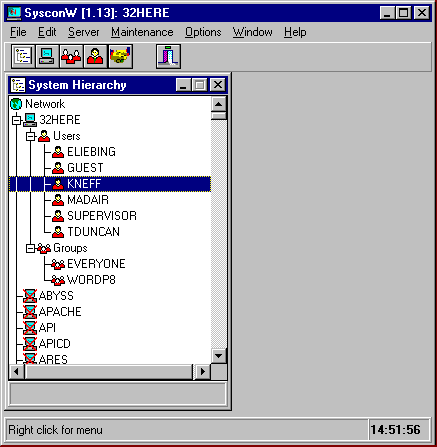
After the utility initializes, you will see a main window similar to the one shown in Figure 1. Note that the window's title bar displays the utility version number and the currently selected server (1.13 and 32HERE, respectively, in the sample screen shot). Below the title bar are the pull-down menu options (File, Edit, Server, and so on), and below that are various speed icons. At the bottom of the window is a status bar that displays the current time and context- sensitive "quick help" information.
Figure 1: The opening window displays a system hierarchy of servers, users, and groups.
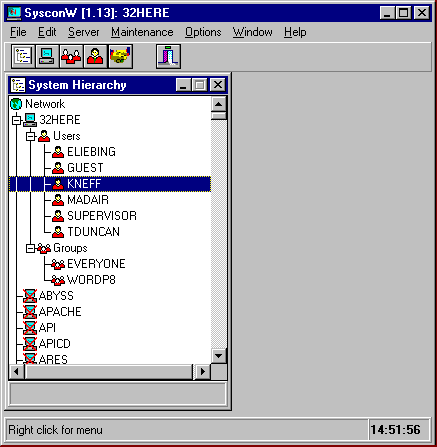
The main part of this opening display is the "System Hierarchy" window that lists all the NetWare 2.x, 3.x, 4.x, and intraNetWare servers found on your network. Beneath the icon for each server to which you are currently attached are a Users and a Groups icon. Clicking on the " + " to the left of these icons expands the hierarchy to display the users and groups associated with the server. Server icons that have an "X" through them represent servers you are not attached to.
If you right-click the mouse on the icon for a server to which you are attached, you will see a list of actions that you can perform on that server. As shown in Figure 2, the options include viewing server information, viewing connection information, setting supervisor options, editing and viewing the server's AUTOEXEC.NCF file, editing and viewing the system login script, viewing and printing the error log, creating a new user or group, and attaching to or detaching from this server.
Figure 2: A number of options are available when you right-click on a server icon.
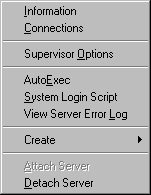
If you right-click on an icon for a server you are not currently attached to, you'll see only two available entries: "Server Information" and "Attach Server". If you want, you can then attach to the server in order to perform other supervisory functions as needed.
Note: While you can attach to and perform some functions on NetWare 4 and intraNetWare servers from SYSCON for Windows, it's best to perform such functions using the NetWare Administrator utility. The discussion in this AppNote will focus on using the graphical SYSCON utility on NetWare 3.x servers, with only passing remarks about NetWare 4 functionality.
Viewing Server Information
To view information about the server you have highlighted, right-click the mouse and select the "Information" option. You will see a screen similar to the one shown in Figure 3.
The "Server Information" window displays the server's name, whether login is enabled, the NetWare version and OS Revision (note that the NetWare 3.2 Enhancement pack update does not update these entries), the SFT level, whether Transaction Tracking is enabled, the number of connections supported and the number in use, the number of volumes supported, the server's network and node address, as well as the serial number and application number.
Figure 3: The "Server Information" window displays configuration details about the selected server.
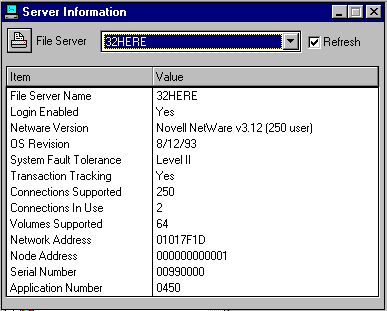
The File Server drop-down list at the top of the "Server Information" window allows you to select other servers if you want to view their information. You can observe information on any NetWare 3 or NetWare 4 servers on the network. Checking the "Refresh" option causes the dynamic information, such as Connections In Use, to be updated while the window is open.
For ease of reference, you can print a hard-copy report of this information by clicking the printer icon in the upper left-hand corner of the window.
Viewing Connection Information
To view the users who are currently connected to the server you are viewing, highlight the server in the main SYSCON window, right-click the mouse, then select the "Connections" option. You will see a screen listing the users that are currently logged in to the selected server, along with their login date and time, as shown in Figure 4.
Figure 4: The "Connections" window displays information about the users who are currently logged in.
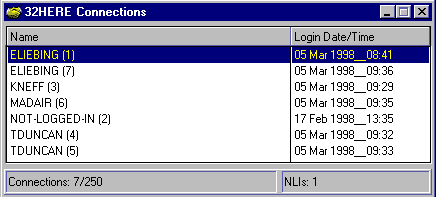
If you highlight a user who is logged in and then right-click the mouse, you will see a pop-up menu with four entries: Clear Connection, Amend User, View User, and Print User.
"Clear Connection" allows you to drop connections to those users who are not around when you need to down the server for some emergency.
"Amend User" allows you to modify any changes you may need for that user.
"View User" allows you to view the information about the designated user, but not change the information about that user.
"Print User" allows you to print a detailed information report about the designated user.
You will also see the Amend, View, and Print User Details options if you highlight a user from the System Hierarchy window and right-click the mouse. These options will be discussed in more detail under the heading "Managing User Information in SYSCON for Windows" later in this AppNote.
Setting the Supervisor Options
To access the supervisor options in SYSCON for Windows, highlight a server, then right-click the mouse and select "Supervisor Options" from the pop-up menu. You will see a window with four tabbed pages: Managers/Operators, Default Account Restrictions, Default Time Restrictions, and Intruder Lockout, as shown in Figure 5.
Figure 5: The supervisor options are arranged into four tabbed pages.
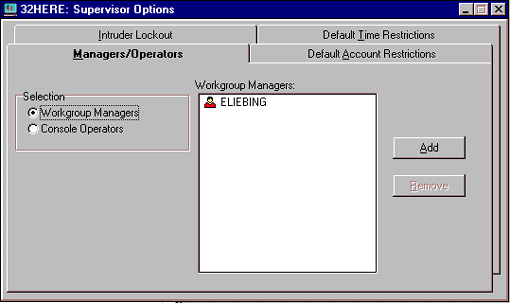
The Managers/Operators Tab. The "Managers/Operators" page allows you to set up Workgroup Managers and Console Operators. To set up a Work-group Manager, click the Add button and highlight a user or group you want to assign, then click Add to designate that person or group as a workgroup manager. Once you grant this title and give the proper rights to the volume, these users or groups can then govern the users/groups/applications assigned to them, as well as those users they create later on.
Creating a Console Operator works similarly, except you select the "Console Operators" option. Console Operators have more access rights to server information than normal users or groups. They can use the FCONSOLE utility to access connection information, change the system date and time, enable or disable logins, and enable or disable the Transaction Tracking System. If certain users need to perform these server tasks for maintenance purposes but you don't want to make them Supervisor equivalent, you can make them Console Operators so they can run the FCONSOLE utility.
To remove an existing Workgroup Manager or Console Operator, simply designate the selection you want to modify, highlight the user or group, and click Remove.
The Default Account Restrictions Tab. The "Default Account Restrictions" page allows you to globally initiate restrictions on items such as passwords and connections (see Figure 6). The "Has Expiry [Expiration] Date" option allows you to set up globally when user accounts will expire, using the calendar icon to select the date if you so desire. For those users whose accounts you don't want to expire on the selected date, you can change their individual account restrictions (as described under "Setting Individual Account Restrictions" later in this AppNote).
Figure 6: The default account restrictions apply globally to all users unless overridden by individual restrictions.
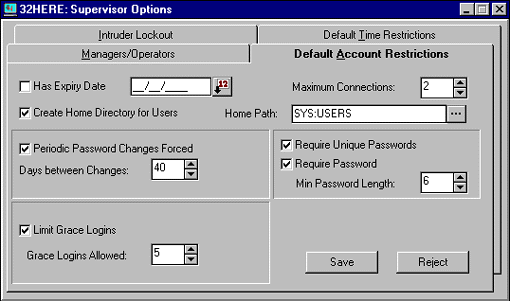
The "Maximum Connections" entry allows you to limit the number of concurrent workstations that users can be logged in from on the network. For instance, if you set the global maximum to two workstations, then all users created after this default has been set will be allowed to log in to at most two workstations at the same time.
If you check the "Create Home Directory for Users" entry, you will be allowed to designate where you want users' home directories to reside. SYS:HOME, SYS:USERS, or SYS:COMMON are popular directory structures to add user directories to. Each user added from now on will have a home directory created under the subdirectory designated here.
The rest of the supervisor options relate to passwords and login capabilities.
"Periodic Password Changes Forced" gives you the option of requiring users to change their passwords at regular intervals (up to 365 days). NetWare will prompt users when it's time to change their passwords.
"Require Unique Passwords" prevents users from reusing the same passwords over and over. If this option is enabled, NetWare will remember users' last eight or more passwords and will require them to use a different password if they try to reuse one.
"Require Password" determines whether users are required to have passwords. The minimum character length is set through the "Min Password Length" entry, which can be set from 1 to 20 characters.
"Limit Grace Logins" is used in connection with the "Periodic Password Changes Forced" entry. If you choose to limit grace logins as well as force password changes, on the day a user's password expires, the user will be able to log in without changing the password for only the number of times that appears in the "Grace Logins Allowed" entry. If users don't respond within the grace period allowed, the supervisor will need to reset their passwords for them.
Once you have made changes to the default account restrictions, click Save to have the changes take effect. If you change your mind after you have modified some of the restrictions, click Reject to cancel your changes.
The Intruder Lockout Tab. The "Intruder Lockout" page shown in Figure 7 allows you to set up global intruder detection on the server; individual variations can be set up as needed. With this option, you can prevent potential intruders from trying to guess their way into the system by locking that workstation for a specified amount of time if a repeated failed login attempt is detected.
With "Detect Intruders" enabled, you can set a number in the "Incorrect Login Attempts" box as the threshold for how many times a user or intruder can try to guess a password before the user's account is locked (the default is 7). The "Bad Login Count Retention Time" allows you to designate how long you want NetWare to retain its count of bad login attempts (the default is 30 minutes). After this time period expires, NetWare will start over on its bad login count.
Figure 7: The Intruder Lockout options help protect against password-guessing attacks.
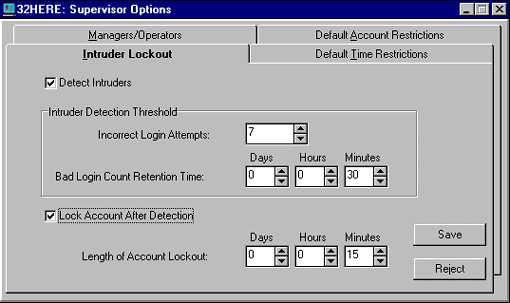
If you enable the "Lock Account After Detection" option, you will effectively prevent anyone from logging in using a locked account until the time specified in the "Length of Account Lockout" is reached.
Once you have made changes to the intruder lockout options, click Save to have the changes take effect. If you change your mind after you have modified some of the options, click Reject to cancel your changes.
|
T I P Be sure to set a long enough lockout time for you to be able to chase down where the intruder is trying to log in from. You can do this by noting the user name that was being used by the intruder, then double-clicking that user icon in the "System Hierarchy" window. In the "General Information" window, you will see the "Incorrect Login Count", the "Account Reset Time", and the "Last Intruder Address" listed. Use the "Last Intruder Address" to narrow down which workstation was being used by the intruder to break into the network. You can build a list of workstation node addresses by having all users log in from all of the workstations they normally use, and then going to the DOS prompt and typing the following: USERLIST /A >NADDRESS.TXT This command will save all of the workstation node addresses for user who are currently logged in to a file named NADDRESS.TXT, which you can print out for a handy reference of usernames, network, and node addresses. |
The Default Time Restrictions Tab. You can use the "Default Time Restrictions" page to set up the times of day when network users are allowed to log in to the server. Keep in mind that these default restrictions apply only to users who are added after the restrictions are set up. If individual users need access to the server at different times, you can change their allowed times in their personal time restrictions option.
As shown in Figure 8, the time restrictions grid is divided into half-hour blocks, with the hours of the day labeled using military time where 0 is midnight, 1 is 1:00 a.m., and so on up to 23 for 11:00 p.m.
Figure 8: Default time restrictions determine when users can log in to the server.
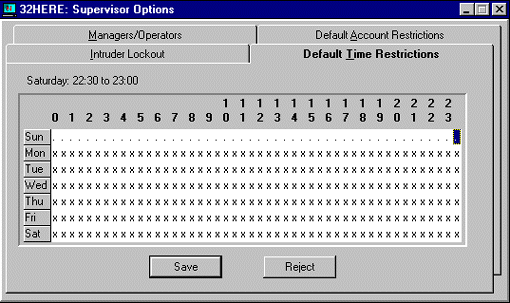
Users can log in to the server during times marked with a cross (X). To disallow logins during a time block, simply double-click on the cross (X) to turn it into a period (.), which indicates that users cannot log in to the server during that time.
If you want to change the setting for several blocks of time at once, there is an easier method than double-clicking on each X individually. Simply drag the mouse over the hours or days to highlight the desired time period. For example, if IS performs system backups every night from midnight to 4:00 a.m., you would highlight the area from Sun 0 (midnight) to Sat 4 (4:00 a.m.). Then right-click the mouse to bring up a list of options:
Set (set each half-hour block in the selected area to "X")
Clear (change each X in the selected area to " . ")
Set All (set all the half-hour blocks in the grid to "X")
Clear All (change each X in the entire grid to " . ")
Invert (change the crosses and dots in the highlighted area to the opposite of how they are currently set)
For this example, you would select "Clear" from the pop-up menu to disallow logins during the highlighted time period.
When you have finished setting the time grid the way you want it, click Save to enable the default time restrictions.
Closing the Supervisor Options Window. Press Ctrl+F4 to close the "Supervisor Options" window. If you have made any changes to any of the screens and have not yet saved those changes, you will be asked whether you want to save those changes now before leaving this window. After answering Yes or No, you will be returned to the "System Hierarchy" window.
Modifying the AUTOEXEC.NCF File
Another option when you right-click the mouse on the icon for a NetWare 3.x server that you are currently attached to is the "AutoExec" option. This option allows you to edit the system AUTOEXEC.NCF file that is stored in the server's SYS:SYSTEM directory. The AUTOEXEC.NCF file contains a list of console commands that you want the server to load every time it is started. These include commands for assigning the file server name, IPX internal network number, network interface board settings and bindings, as well as other NLMs (NetWare Loadable Modules) you want to load automatically.
If you have installed the NetWare 3.2 Enhancement Pack update, several lines will have been added to the AUTOEXEC.NCF file, as shown in Figure 9. The original AUTOEXEC.NCF file is saved under the name AUTOEXEC.BAK.
Figure 9: SYSCON for Windows provides easier editing of the server's AUTOEXEC.BAT file.
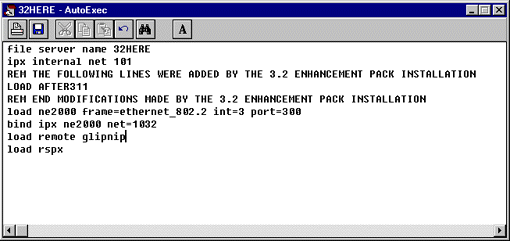
In SYSCON for Windows, you have a little more flexibility in the editing capabilities. For example, to cut and paste pieces of the file, highlight the part you want to edit/modify/move, then use one of the following icons:
 Cut the selected text and place it in the Clipboard
 Copy the selected text and place the copy in the Clipboard
 Paste the text from the Clipboard into the file
 Undo the previous editing change
On large AUTOEXEC.NCF files, you can use the  find icon to initiate a search to find a particular word or phrase. You can also change the editor font if you want by selecting the
  font icon. Of course, since the file is saved asASCII text, changing the font is purely for editing and printing purposes. To print the AUTOEXEC.NCF file, click the
  printer icon; to save your changes, click the
  diskette icon. Or you can right-click the mouse anywhere in the window to bring up a menu with the following options: Undo, Cut, Copy, Paste, Delete, Select All, Save File, and Print.
Press Ctrl+F4 to leave the AUTOEXEC.NCF file editor. If you haven't already saved your changes to the file, you will be prompted to do so at this time.
Editing the System Login Script
You can use the graphical SYSCON utility to access and edit the system login script. Simply right-click the mouse on the icon for a NetWare 3.x server that you are currently attached to and select the "System Login Script" option.
The reason this option is for NetWare 3 servers needs to be emphasized here. On NetWare 3 servers, the system login script is stored in a file named NET$LOG.DAT in the SYS:SYSTEM directory. In NetWare 4 and later versions, the login script entry for a designated container is an attribute of Novell Directory Services (NDS) and is stored as a string of information inside NDS. However, for NetWare 3 compatibility, NetWare 4 also allows system administrators to create a system login script for bindery connections to NetWare 4 servers. This specialized system login script file is called NET$LOG.DAT and is stored in the SYS:PUBLIC directory on a NetWare 4 server.
If you highlight a NetWare 4 server and choose the "System Login Script" option, you'll more than likely see the message "Servername—System Login Script Does Not Exist. Create It?" If you answer Yes, it will create a NET$LOG.DAT file in the SYS:PUBLIC directory, which has nothing to do with any NetWare 4 container login scripts that might currently exist. Understand that what you are creating is a system login script for bindery-based connections only. In many environments, bindery-based connections to NetWare 4 servers are not allowed, so follow your standard security procedures on this topic.
The same editing and printing features apply for the system login script as were explained above for the AUTOEXEC.NCF file. You can print, save, cut, copy, paste, undo, search, and change the font type in SYSCON's login script editor.
Press Ctrl+F4 to leave the system login script editor. If you haven't already saved your changes to the file, you will be prompted to do so at this time.
Viewing the Server Error Log
The "View Server Error Log" option is one of the last options you see when you right-click the mouse on the icon for a NetWare 3.x server to which you are currently attached. This option allows you to view the routing errors and other server error messages that are displayed on the server console screen and are stored in *.DAT files in the SYS:SYSTEM directory.
You can find text, change the font type, and print in SYSCON's error log viewer. Press Ctrl+F4 to leave the error log viewer, at which time you will be asked if you want to clear the error log file of its contents.
Creating Users or Groups
You can add users and groups from within the list of options that appears when you right-click on the icon for a server to which you are attached. Simply select the "Create" option, select either Create User or Create Group, and fill in the requested information, as described below.
Creating a New User. The initial window for creating a new user is shown in Figure 10.
Figure 10: The Create User window is for entering initial information about a new user.
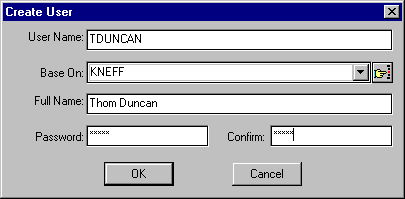
The User Name entry box allows you to give new users a name they can use to log in to the network.
|
T I P If you use eight characters or less for user names, the home directory names NetWare creates will match the user names (longer user names are truncated to form a standard DOS directory name). By keeping the user names to eight characters or less, you can place a command such as the following in the system login script and easily provide all users with a drive mapping to their home directory: MAP *1:=SYS:HOME\%LOGIN_NAME |
The "Base On" entry allows you to select an existing user whose properties you want to give to the new user. You can use wildcards to find the user account you are looking for. For example, to bring up a list of all existing user names that begin with K, type "K*" in the Base On entry box and click on the  selection icon. If there is only one user name that begins with K, it will be automatically inserted into the Base On entry box.
The Full Name entry box allows you to fill in the actual full name of the new user. If you use the "Base On" properties of another user and you don't specify a different name here, the new user will receive the full name of the person specified. You can also give the new user a password at this point.
|
T I P Using the "Base On" entry gives the new user all of the trustee assignments of the selected person, including the login script, trustee assignments to that user's home directory, group assignments, and groups belonged to. It may be best to create one or more "template" users with generic properties and trustee assignments to use when creating new users. |
Once you click the OK button, you'll be asked to select a path for the creation of a home directory, such as SYS:\USERS\TDUNCAN. You can also specify the volume on which to create home directories. Click OK and then OK again to confirm creation of the directory at the specified path.
Creating a New Group. You create groups in much the same manner as users. Right-click on the server and select the "Create | Create Group" options. You can then fill out the entries Group Name, Base On, and Full Name. (The "Base On" entry works the same way as for users, only it applies to groups.)
Logging In and Out of Servers
The last two options displayed when you right-click on a NetWare 3.x server icon are "Attach Server" and "Detach Server". If you are already attached to the server you selected, you will have the ability to detach from that server (unless it is the only server you are attached to).
If you are not currently attached to a server, you can highlight that server, right-click, and choose the "Attach Server" option. You will see the "Attach to File Server" window which prompts you to enter a user name and password. If you have proper security permissions, you can proceed to manage the users and groups on that server as well.
Managing User Information in SYSCON for Windows
By right-clicking on any user that is already created in the "System Hierarchy" window, you will see a pop-up menu with seven options: Amend User Details, View User Details, Delete User, Rename User, Print User Details, Change Password, and Create. These options are covered in detail in the following sections.
Amending User Details
To modify user information, you can either right-click on a user icon and select the "Amend User Details" option, or you can double-click on any of the already-created user icons to bring up an "Amend" window similar to the one shown in Figure 11. This window contains the following tabs: General Information, Login Script, Membership, Trustee Assignments, Account Restrictions, Station Restrictions, Volume Restrictions, and Time Restrictions.
Figure 11: The "Amend" window allows you to modify information about the selected user.
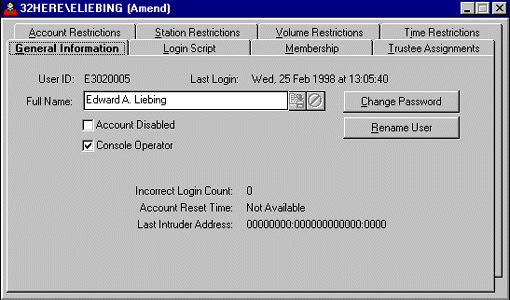
The General Information Tab. The "General Information" page displays the User ID number (how this user is known to the bindery) and the date and time this user last logged in. You can also see the user's full name or fill in a full name at this point. The save icon to the right of the "Full Name" entry allows you to save any changes you may have done to the name; the not icon rejects any changes that you may have made to this person's full name and restores the previous full name.
By clicking the Change Password button, you can assign this user a new password. By clicking Rename User, you can give this user a new login name. If you want to disable or re-enable this particular account, you can do so by checking or unchecking the "Account Disabled" box. If you want this user to be a console operator, check the "Console Operator" box.
The "Incorrect Login Count" shows how many times this user (if the user forgot the password) or an intruder has tried to guess this account's password before the account is locked. You will see 0 (zero) in this entry as long as the user logs in correctly or when the account reaches the time specified in the "Account Reset Time".
The "Account Reset Time" is normally blank unless this account has reached its incorrect login count threshold. In that case, this entry shows you how long the lockout period is. If no reset time has been set, you will see "Not Available" displayed in this entry.
The "Last Intruder Address" shows you the workstation address the suspected intruder was using in an attempt to log in. If it was a legitimate user who forgot his/her password and was trying to guess it, the network and node address displayed here will match the network and node address for the user's workstation. You'll also see the workstation's address displayed if the user typed the password wrong at least once but eventually logged in successfully.
The Login Script Tab. By clicking on the "Login Script" tab, you can view and edit the selected user's personal login script. Through the Edit pull-down menu at the top of the main SYSCON window, you can select the "Change Font" option and then select the font and type size you want to use in the editor window. (Font changes do not affect the actual ASCII text file named LOGIN that is saved in the SYS:\MAIL\userID directory.)
Through SYSCON for Windows, you can search and replace text from within the login script that you are currently in, or you can use the copy, cut, and paste feature to bring in script commands from other login scripts as you deem necessary. Simply right-click the mouse in the login script window, or click on the Edit pull-down menu for a list of the editing features at your disposal.
The Membership Tab. The "Membership" page allows supervisors to see the groups to which a user belongs and to add and remove groups as necessary. You can also see the user's security equivalences, as well as set up the user to be managed by other users and groups.
To add the selected user to a group other than the groups displayed in the "Groups Belonged To" column, ensure that "Groups Belonged To" is selected, then click the Add button to see the a list of all the groups that this user does not currently belong to. Then highlight the desired group, click Add, and then click the Close button when you are finished. (Be sure to add the proper file/directory security access at the group level for application access.)
Security equivalences are a short-cut way to assign rights to users by making them equivalent to other users and groups. When users are added to a group, they are considered to be equivalent to that group in security, sharing the same trustee privileges as the group. When you make a user equivalent to another user, the added user shares the same trustee privileges. For example, if you make a user equivalent to Supervisor, that user will have all rights to every volume on the server. For security reasons, this is not the wisest move, nor is giving a group the security equivalence of Supervisor.
The Managers button shows you which user or group has been assigned to oversee this user on this server. As you assign a user or group to manage this user, their assignment becomes what is known as an "Object Supervisor" over this person. Being an Object Supervisor gives those persons the rights necessary to modify the options in the designated user's "Maintenance" window (the one we are now describing). When you print the user details report, the users or groups that are managing this user are displayed under the "Managed By:" heading on the report.
|
T I P Be sure to give users that are designated as Managers (Object Supervisors) enough rights to perform the duties you want them to perform. For example, if you assign user TDUNCAN to be the manager over the group WordPerfect, then TDUNCAN would also need Access Control rights at the WP directory level and its subdirectories in order to grant proper trustee assignments to the other users. The manager would also need Access Control rights to the users of this group's Common area and possibly over the users' home directories as well, depending on how file access is set up on your server. An easier way to say this is whatever rights you give Object Supervisors at the directory/file level will be the rights the Object Supervisors can grant to those users or groups that they manage. Object Supervisors cannot give what they do not have. If Object Supervisors do not have Access Control rights to the users' home directories they manage, they cannot grant trustee assignments to others, nor can they control the trustee assignments granted to other users by the users that own the directories. It's all a matter of delegation and access. |
The Trustee Assignments Tab. Trustee and group assignments are the second level of security that NetWare provides (login/password being the first). Trustee assignments are the rights given to users for the directories and files they are allowed to access. These assignments affect not only the directory they are assigned in, but all the subdirectories underneath it, or until you reach a subdirectory level where a different assignment has been made.
The Trustee Assignments page is shown in Figure 12. In the Type column, you can see whether the assignment is for a file or a directory. This is followed by the path identifying the directory or file. Under Rights you can view the actual rights that are assigned.
Figure 12: Assigning a user trustee rights to directories and files.
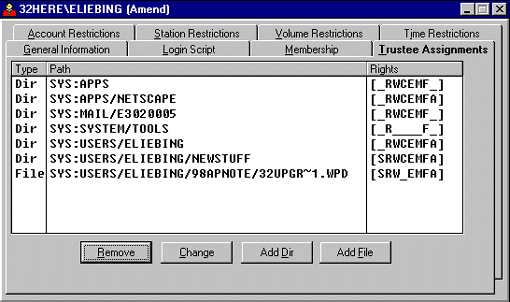
To remove a trustee assignment, highlight it and click the Remove button. You will see a confirmation promt asking if you want to delete the selected trustee assignment. Answering Yes deletes the assignment, while answering No cancels the deletion process. You can hold down the Ctrl key to mark multiple selections one at a time, or highlight one assignment and then hold down the Shift key to select multiple sequential assignments.
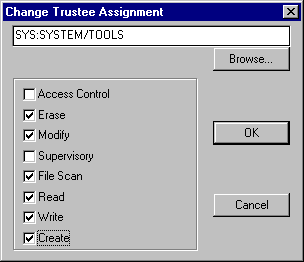
To change a directory or file trustee assignment, highlight the selection and click the Change button. In the resulting "Change Trustee Assignment" window (see Figure 13), you can check or uncheck the trustee rights to change the assignment. When you have finished changing the rights, click OK to save your changes.
Figure 13: Changing a user's trustee rights is as easy as clicking the mouse.
The sidebar "NetWare Rights Refresher" summarizes what the trustee rights mean and what they allow users to do with directories and files.
NetWare Rights Refresher
The eight NetWare trustee rights basically work the same whether they are assigned for a directory or for a file. Here is a quick summary of what these rights allow and when they should be granted.
|
Right |
Description |
When to Grant |
|
A (Access Control) |
Allows users to grant and revoke trustee assignments to other users and groups in this directory or file. Users with the A right can also modify the Inherited Rights Filter for the directory or file. |
Grant this right to directories where users need to share directory/file access, or to users who manage other users or application access. |
|
E (Erase) |
Allows users to delete existing files and directories. |
Users often need this attribute in home directories and other directories where they commonly store files. |
|
M (Modify) |
Allows users to change file and directory attributes, or file and directory flags. |
Grant this right if you want a user to be able to change flags on files in this directory. Certain applications change file attributes as they run and need Modify rights to work properly, so you might have to experiment with the applications or utilities that are run in this directory to see if users need this right. |
|
S (Supervisor) |
Allows users to give all rights to other users within this directory. |
Only grant this right to users who need to manage other users or applications within the directory (some applications insist that the installer have Supervisor access to the directory or be Supervisor equivalent). |
|
F (File Scan) |
Allows users to search the directory for files and directories. If users don't have this attribute to this directory, they'll see "File Not Found" when they type DIR in the directory. |
NetWare uses File Scan in conjunction with the Read right in order for users to be able to read and open applications in the directory. (Read and File Scan are the default rights users are granted for file access.) |
|
R (Read) |
Allows users to read information that is contained in the designated directory. |
Read and File Scan are the default rights users are granted for file access. |
|
W (Write) |
Allows users to write to a file within the directory. |
For users to actually write to a file or copy a file into this directory, they will need Write, Create, File Scan, and sometimes Modify (tomodify file attributes). |
|
C (Create) |
Allows users to create and write to new files as well as create new subdirectories. |
Users will also need the Read and Create rights if they are to re-open any files they close. |
If you want users to be able to copy files, they will need at least Read and File Scan rights in the directory from which they are copying files, and at least Write, Create, File Scan, and sometimes Modify rights in the directory into which they are copying files.
Click the Add Dir button on the Trustee Assignments page to add a directory for a particular individual. In the "Add Directory Trustee Assignment" window, click Browse to select the volume and directory you want to add. Once that is selected, you can choose the trustee rights you want to assign for that directory.
Click the Add File button to add a file for a particular individual. In the "Add File Trustee Assignment" window, click the Browse button to select the volume, directory, and file you want to assign. Once selected, choose the appropriate trustee rights for that file.
Setting Up Individual Account Restrictions. Whereas the "Default Account Restrictions" allow you to globally initiate restrictions on passwords and connections, the user "Account Restrictions" page shown in Figure 14 allows you to modify those restrictions to meet individual user needs.
Figure 14: You can set up restrictions on an individual user account.
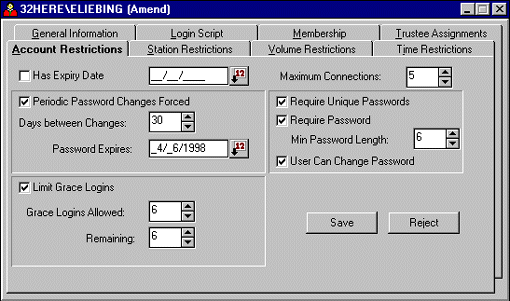
The "Has Expiry [Expiration] Date" checkbox allows you to set whether or not the designated user account will expire. If you have set up a global expiration date but you have certain user accounts that you don't want to expire on that date, you can change that restriction here. For instance, if you don't want this user account to have an expiration date, uncheck the "Has Expiry Date" box. You could also extend the date beyond the default setting if that meets your needs. Clicking the  calendar icon to the right of the entry box allows you to select the date from a graphical calendar interface.
The "Maximum Connections" entry allows you to limit the number of work-stations that this user can be logged in at concurrently. If you want this user to be able to log in on more workstations than the number that was globally set (two workstations in our earlier example), you would select a higher connection limit here (five in this example).
The rest of the account restrictions relate to passwords and login capabilities. The "Require Password" option determines whether users are required to have passwords or not. If so, you can specify that they be a certain minimum length in the "Min Password Length" entry. This value can be set from 1 to 20 characters; a reasonable value for general-use networks is 5 to 8.
If you check the "Require Unique Passwords" option, NetWare will remember the user's last eight passwords and will prevent those from being reused. The "User Can Change Password" entry allows you to set whether the user can change his or her own password or whether the supervisor must change it.
The "Periodic Password Changes Forced" entry gives you the option of requiring users to change their passwords after the specified number of days is up (the default is 30, but you can set the value up to 365 days). Or you can specify a precise date in the "Password Expires" entry box. NetWare will prompt the user when it's time for a new password.
The "Limit Grace Logins" entry is used in connection with the "Periodic Password Changes Forced" entry. If you select to limit grace logins, when the expiration day arrives users will be able to log in without changing their password for the number of times specified in the "Grace Logins Allowed" entry. If the user doesn't change the respond within the grace period allowed, the supervisor will need to reset the password.
After you make changes on this page, click the Save button to put those changes in effect the next time this user logs in. If you decide you don't want to save the changes, click the Reject button.
Setting Up Individual Station Restrictions. Through the "Station Restrictions" page (see Figure 15), supervisors or workgroup managers can limit a user to only log in from particular workstations on the network.
Figure 15: Setting station restrictions allows users to log in only from the specified workstations.
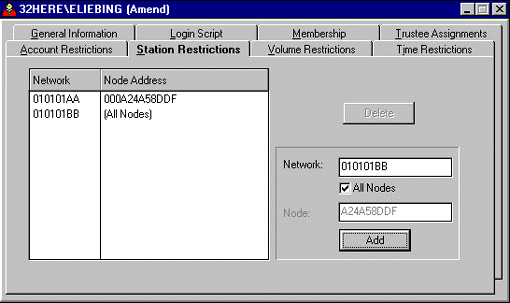
By entering the desired network and node addresses, you will effectively restrict the user to being able to log in only from certain physical workstations or certain network segments. Type the network address in the "Network" entry box. If you want to restrict users from logging on an entire network segment, check the "All Nodes" entry box. If you have certain workstations in mind, enter the network and node addresses one at a time and click the Add button after each entry. The station restrictions will be listed in the "Network/Node Address" columns.
|
T I P To see a list of network and node addresses for your users, have them log in to the server from all of the physical workstations you want to include in your station restrictions list. At the DOS prompt type USERLIST /A <Enter< The "/A" option displays the users' connection numbers and login names, followed by the network and node addresses of the workstations from which they have logged in. You can use this information to enter the restriction addresses you need. |
To remove a station restriction from the user, highlight the entry in the "Network/Node Address" columns and click the Delete button. You will be prompted whether you want to delete the selected station restriction. Answering Yes deletes the entry.
Setting Individual Volume Restrictions. The "Volume Restrictions" page allows you to limit the amount of disk space a user can access on a server volume. The "Volume" list shows you which volumes are available; simply highlight the one on which you want to set restrictions for this user.
The "Space in Use" column shows how much disk space (in kilobytes) this user is currently using on the selected volume. The "Space Limit" entry shows how many kilobytes the supervisor has allotted this user. If no limits have been set, the "Space Limit" column will display "No Limits". To set a limit, type a number (in kilobytes) in the "Space Limit" entry box and click the Save button.
|
T I P To find out how much volume space is available on your server, start the FILER utility and select the "Volume Information" option. The "Volume Information" windows will show you the server name, the volume name, the volume type, the total kilobytes on the volume, and the total kilobytes currently available. |
To see how much disk space users have left, view the "Volume Restrictions" window in SYSCON and subtract the "Space in Use" from the "Space Limit". If users run out of disk space, they can either delete their least used data, transfer unused data to a backup or archive, negotiate for more disk space, or move data to a volume where there is more disk space. If they do run out of disk space and then try to save data to the volume, they'll see an "Out of disk space" message.
Setting Individual Time Restrictions. The "Time Restrictions" page allows you to specify when this network user can log in to the server. Times that display a period ( . ) in the "Time Restrictions" window are either specified in the "Default Time Restrictions" or they have been specified for this user. To further customize the time restrictions for this user, double-click on an X to turn it into a period (.) and then click the Save button. You can also drag the mouse over the designated hours or days to highlight certain times in the "Time Restrictions" window. Then right-click the mouse to bring up the options list, which includes Set, Clear, Set All, Clear All, and Invert. These options work the same as for the default time restrictions window described earlier in this AppNote.
Viewing User Details
The second menu option when you right-click on a selected user icon is "View User Details". This option allows users and supervisor to view information about themselves and others, but you cannot modify that information directly in view mode. You can, however, right-click the mouse on any view window to access a pop-up menu with options that will let you modify the information.
The view-mode tab pages are the same as those for amending user information described above: General Information, Login Script, Membership, Trustee Assignments, Account Restrictions, Station Restrictions, Volume Restrictions, and Time Restrictions.
Deleting and Renaming Users
The next two options when you right-click on a selected user are "Delete User" and "Rename User". To delete a user from the server, highlight the user, right-click the mouse, and select the "Delete User" option. You will see a verification screen to ensure you want to delete this user. Answering Yes deletes the user and any associated mail directories and subdirectories.
The "Rename User" option allows you to give this user a different user name than the one initially selected. Again, if you keep the name to eight characters or less, you can match user names with the home directory names and use the %LOGIN_NAME variable to map a drive to users' home directories in the system login script.
Printing User Details
To print all of the information about a designated user, highlight that user, right-click the mouse, then choose the "Print User Details" option. You will see a "User Print Selection" window similar to the one shown in Figure 16.
Figure 16: You can select which information to include in the user details report.
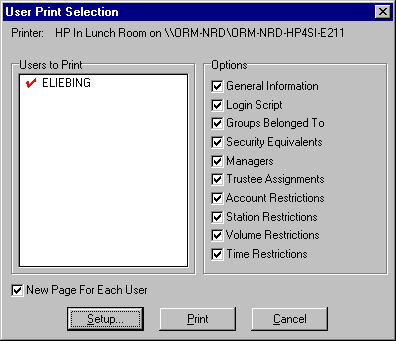
These options allow you to choose which user information items you want to include in the report about this user: General Information, Login Script, Groups Belonged To, Security Equivalents, Managers, Trustee Assignments, Account Restrictions, Station Restrictions, Volume Restrictions, and Time Restrictions. The default is to print all information on these options, with a separate or a new page for each user in the "Users to Print" list.
Changing Passwords and Creating Users
The final two options when you right-click on a selected user are "Change Password" and "Create" (new users or groups). These options are placed here for mainly for convenience, as there are other places where you can perform these same functions.
This "Change Password" option allows you to quickly change a user's password instead of having to go to the "General Information" screen for the user. Simply type in a new password, and then re-type it to confirm that you typed it correctly. Then click the OK button to save those changes or the Cancel button to ignore the password change.
The "Create" option from this list allows you to add new users (or groups, as explained later). Simply select the "Create User" option and fill in the information about the user as covered in the "Creating Users or Groups" section earlier in this AppNote.
Managing Group Information in SYSCON for Windows
By right-clicking on an already-created group in the "System Hierarchy" window, you will see a pop-up menu with six options: Amend Group Details, View Group Details, Delete Group, Rename Group, Print Group Details, and Create. These options are covered in the following sections.
Amending Group Details
By right-clicking on a group icon and selecting the "Amend Group Details" option, or by double-clicking on any of the group icons that appear under a logged-in server in the "System Hierarchy" window, you will see the "Group Maintenance (Amend)" window with three tabs: General Information, Membership, and Trustee Assignments, as shown in Figure 17.
Figure 17: You can change a group's full name or its bindery name.
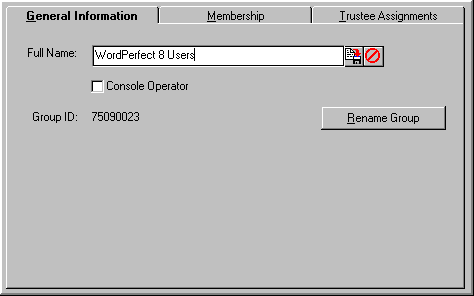
The General Information Tab.
The "General Information" page displays the group's full name and the group ID number (how this group is known to the bindery). If the group doesn't have a full name, you can enter one at this point. Click the  save icon to save the new name; the
  icon rejects any changes you may have made in the "Full Name" entry box.
If you want members of this group to be console operators, check the "Console Operator" checkbox. Click the Rename Group button to give this group a new name. You can then enter a full name that better matches the new group name if necessary.
The Membership Tab. The "Membership" page shown in Figure 18 allows you to add group members and managers to this group. To add members, click "Group Members" in the "Selection" box, then click the Add button. From the resulting "Available Objects" list, highlight the users you want to have in this group. You can use the Ctrl key or the Shift key to mark more than one user to be added to the group at the same time. Click the Add button at the bottom of the pop-up window to make them group members, and then click Close to close the window.
Note: The group EVERYONE automatically has all users that you create added to it. However, you can later remove users from this group if you need to.
Figure 18: You can add and remove members from the selected group.
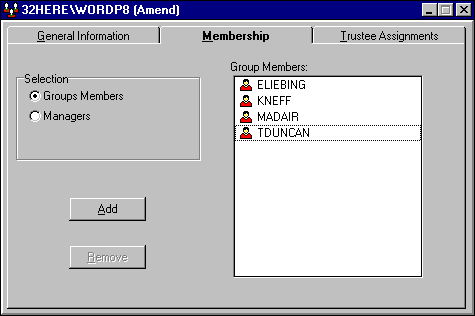
To remove a user from the selected group, highlight the user you no longer want in the group and click the Remove button. The user will be deleted from the "Group Members" list.
To set up a user to manage the selected group, click "Managers" in the "Selection" box, then click the Add button. From the resulting "Available Objects" list, highlight the user or group you want to manage this group. You can use the Ctrl key or the Shift key to mark more than one user to be added at the same time. Click the Add button at the bottom of the pop-up window, then click the Close button to close the window.
The Trustee Assignments Tab. Group trustee assignments are the most convenient way to globally assign file system rights to large numbers of users with common assignments. The trustee assignments given here affect not only the directory in which they are assigned, but all subdirectories until there is a new explicit trustee rights assignment at a lower directory level.
At the far left-hand side of the "Trustee Assignments" page is an indication whether the assignment is for a file or a directory. This is followed by the directory path identifying the directory or file. The "Rights" column lists the actual rights that are assigned.
At the bottom of the page are four buttons: Remove, Change, Add Dir, and Add File.
To remove a trustee assignment from this group, highlight the assignment and click the Remove button. You will see a message box asking if you want to delete the selected trustee assignment. Pressing Yes deletes the assignment, while pressing No cancels the deletion process. Use the Ctrl key to mark multiple selections one at a time, or select one assignment, then use the Shift key to select multiple assignments that are in a row.
To change a directory or file trustee assignment, highlight the selection and click the Change button. Then from the "Change Trustee Assignment" window, select the new trustee rights you want to assign. Click OK to save your changes.
To add a new directory trustee assignment for the group, click the Add Dir button. In the "Add Directory Trustee Assignment" window, click the Browse button to select the desired volume and directory. Once it is selected, choose the trustee rights for the directory (Access Control, Erase, Modify, Supervisory, File Scan, Read, Write, and Create). These rights are explained in the "NetWare Rights Refresher" sidebar earlier in this AppNote.
To add a new file trustee assignment for the group, click the Add File button. In the "Add File Trustee Assignment" window, click the Browse button to select the volume, directory, and file. Once it is selected, choose the appropriate trustee rights for the file.
Once the rights are added for either files or directories, click the OK button to add the trustee assignments to the "Trustee Assignments" window.
Viewing Group Details
The second option when you right-click on a selected group icon is "View Group Details". This option allows users and supervisors to view information about this group, but you cannot modify that information here. You can, however, right-click in any window to access a pop-up menu with options that will allow you to modify the information. The view-mode tab pages are the same as those for amending group information described above.
Deleting and Renaming Groups
The next two options when you right-clicks on a selected group are "Delete Group" and "Rename Group". To delete a group from server, highlight the group in question, right-click the mouse and select the "Delete Group" option. You will see a verification prompt to ensure you want to delete this Group. Answering Yes deletes the group and its associated trustee assignments.
The "Rename Group" option allows you to give this group a different name than the one initially selected. Highlight the group, right-click the mouse, and select the "Rename Group" option. You will see a "Rename Object" window where you can enter the new name for this group. Click OK to have the new name take effect.
Printing Group Details
To print all of the information about a designated group, highlight that group, right-click the mouse, then choose the "Print Group Details" option. The resulting "Group Print Selection" window allows you to choose which group information items you want to include in this group report. The options include General Information, Groups Members, Managers, and Trustee Assignments. The default is to print out all information on these options, starting with a new page for each group in the "Groups to Print" list.
Creating Groups
The final option for a selected group is "Create" to allow you to add new groups (or users, as explained earlier). This option is placed here for convenience, as there are other places where you can perform this same function. Simply select the "Create Group" option and fill in the information about the group as covered in the "Creating Users or Groups" section earlier in this AppNote.
Pull-Down Menus in SYSCON for Windows
Many of the options found in the pull-down menus at the top of the main SYSCON window have been covered throughout this AppNote. For reference, this section summarizes the options under each pull-down menu and gives quick-key equivalents where applicable.
The File Pull-Down Menu
|
Option |
Description |
|
Hierarchy |
Displays the "System Hierarchy" window that you see when SYSCON for Windows initially comes up. |
|
Save File (Ctrl+S) |
Allows you to save changes to login scripts or AUTOEXEC.NCF files that you edit. (You can perform the same function by clicking the Save button in the "Login Script" or "AutoExec" editing windows.) |
|
Print (Ctrl+P) |
Allows you to print user and group information from either the "Modify" or "View" windows. |
|
Print Setup |
Allows you to designate printers and their properties: type of paper, the paper's orientation (portrait or landscape), and network connections to shared printers. |
|
Printer Font |
Allows you to choose the font, type style, and type size for print jobs sent to the printer. The default is Arial, Regular, 9 point type. |
|
Exit |
Allows you to exit the SYSCON for Windows utility. |
The Edit Pull-Down Menu
These edit commands apply to editing login scripts and the AUTOEXEC.NCF file in SYSCON. They work the same as in all Windows-based applications. Many of the options are covered in the "Modifying the AUTOEXEC.NCF File" section earlier in this AppNote.
|
Option |
Description |
|
Cut (Ctrl+X) |
Cut the selected text. |
|
Copy (Ctrl+C) |
Copy the selected text to the clipboard. |
|
Paste (Ctrl+V) |
Paste cut or copied text at the cursor position. |
|
Delete (Ctrl+Del) |
Delete the entire login script or file. |
|
Undo (Ctrl+Z) |
Undo a previous edit operation. |
|
Select All (Ctrl+A) |
Select the entire contents of a login script or file. |
|
Change Font |
Change the font used in the edit window. |
|
Replace (Ctrl+R) |
Perform a search and replace. |
|
Find (Ctrl+F) |
Find a string of text. |
|
Find Next (F3) |
Repeat a previous Find operation. |
The Server Pull-Down Menu
The Server pull-down menu includes the same options as when you highlight a server and right-click on the mouse. However, if you select an option that affects all servers, such as Information, you can designate the server whose information you want to view. On options that affect only servers you are currently attached to, those servers will appear as your server choices. You can't attach to or detach from any servers from the Server pull-down menu.
|
Option |
Description |
|
Information |
Shows general information about the server(s). |
|
Connections |
Displays a list of users currently connected to the server. |
|
Supervisor Options |
Allows you to set the supervisor options on the server. |
|
AutoExec |
Allows you to view and edit the AUTOEXEC.NCF file. |
|
System Login Script |
Allows you to view and edit the server's system login script. |
|
Server Error Log |
Allows you to view the server error log. |
The Maintenance Pull-Down Menu
The Maintenance pull-down menu contains two options: "Group Maintenance" and "User Maintenance". Selecting "Group Maintenance" brings up a window displaying the groups that are currently created (see Figure 19). You can also see the server that you are currently attached to, along with seven buttons to the right of the "Groups" column: View, Amend, Print, Delete, Rename, Insert (Create), and Close.
Figure 1: The Group Maintenance window.
You can click on the down-arrow button at the right of the "Server" entry box to view a list of other servers you are attached to, then select another server to view its groups. The rights you have on other servers determine how much information you can see about the groups that reside there. For instance, if you only have common user access to a selected server that you are attached to, you will only have "View" and "Print" privileges.
The buttons to the right of the selected group (View, Amend, Print, and so on) perform the same functions as the corresponding options you see when you select a group from the "System Hierarchy" window and right-click the mouse. These group functions have been covered in the "Managing Group Information in SYSCON for Windows" section in this AppNote. Click the Close button to close the "Group Maintenance" window.
The "User Maintenance" window has the same buttons and functions, only for users instead of groups. These functions have been covered in the "Managing User Information in SYSCON for Windows" section of this AppNote.
The Options Pull-Down Menu
The Options pull-down menu contains three options: Save Settings, Save Settings on Exit, and Preferences. "Save Settings" allows you to save the current window positions and sizes immediately, while the "Save Settings on Exit" option saves the window positions and sizes the next time you close the SYSCON utility.
The "Preferences" option brings up a window with three controllable items. Unless you have some reason to change these settings, it's best to stick with the defaults.
"Refresh Frequencies" allows you to set the "Server Information Refresh Rate" which determines how often information that changes on the server is collected by SYSCON. This value can range from 30 seconds (the default) to 300 seconds (five minutes).
"Connections In Use Refresh Rate" allows you to determine how often user connection information is collected. This value can be set from 30 seconds to 300 seconds, with a default of 60 seconds.
"Connection Control" allows you to choose to use the Legacy nwcalls.dll for connection control. As explained on-screen, "This should only be checked if you are experiencing problems with SYSCONW not recognizing server connections, particularly on a Windows NT system running Microsoft's NetWare client."
Click the OK button to save any changes or click the Cancel button to exit without saving any modifications in the "Preferences" window.
The Window Pull-Down Menu
The Window pull-down menu in SYSCON is similar to the menu item found in all Windows-based applications. It lists the following options: Cascade, Tile, Arrange Icons, and Minimize All. Cascade places all of the open windows in an overlapping fanned fashion, with the most recently accessed window on top. Tile arranges the open windows in a non-overlapping fashion on the screen. Minimize All places all of the open windows at the bottom of the main SYSCON window, with the window headings displayed below the icons. Arrange Icons lets you determine how these icons are lined up on the screen.
Below these four options are listed the different windows that you currently have open, numbered in the order in which they were opened, with a checkmark by the most recently accessed window. You can type one of these numbers to instantly access the corresponding window.
The Help Pull-Down Menu
The Help pull-down menu has three options: Contents, Search for Help On, and About. These are standard Windows help options that allow you to view the information in the help files that comes with SYSCON for Windows.
Conclusion
This AppNote has described the features and functions of the new SYSCON for Windows utility included in the NetWare 3.2 Enhancement Pack. It has presented an overview of the new features and graphical interface that make it quite useful for network administrators, such as the ability to print reports on users, groups, and servers. Along the way, it has also given some tips for those who are already familiar with SYSCON's many options but are looking for guidance on how to adjust the various settings
* Originally published in Novell AppNotes
Disclaimer
The origin of this information may be internal or external to Novell. While Novell makes all reasonable efforts to verify this information, Novell does not make explicit or implied claims to its validity.