Maintaining a Healthy NDS Tree: Part 2
Articles and Tips: article
Premium Support Engineer
Novell Technical Services
BEHZAD ANARAKI
Premium Support Engineer
Novell Technical Services
01 Oct 1997
This second installment in a two-part series outlines a regimen of server health checks you can use to keep your NetWare 4 servers running smoothly and identify possible problems before they become serious.
Special thanks to Tom Buckley, John Mehl, and Kerry Loveless of Novell for their help with this AppNote.
Introduction
The purpose of this AppNote is to provide customers with a systematic routine for diagnosing and maintaining a healthy Novell Directory Services (NDS) tree. These tasks have been divided into three sections:
Tree Health Checks. Reference this section to determine the overall health of the tree.
Partition Health Checks. Reference this section before doing any partition operations.
Server Health Checks. Reference this section to identify health of replicas on a server.
This AppNote is the second of two parts. The first part covered the Tree Health Checks and the Partition Health Checks. This second part will cover the Server Health Checks.
The following NDS utilities are used for performing these health checks:
DSREPAIR.NLM (comes with NetWare 4.x)
DSTRACE.NLM (comes with NetWare 4.x)
DSMAINT.NLM (can be downloaded from DS410x.EXE for Netware 4.10 and DS411x.EXE for Netware 4.11
NDS Manager (Windows-based management utility that comes with NetWare 4.11)
SCANTREE.EXE. This program can be downloaded from the Novell Support Connection web site at http://support.novell.com. Search for filename SCANDS.EXE. (SCANTREE.EXE is not supported by Novell Technical Services.)
DSDIAG.NLM. As of this writing, this NDS diagnostics utility is in beta. Reference TID 2928396 for the Novell site to download this utility.
This AppNote assumes some familiarity with NetWare and NDS terminology and operations. Refer to previous AppNotes and other Novell documents for general information on NetWare and NDS.
Review of Tree Health Checks
Part 1 described several procedures for assessing the health of the NDS tree in general. These checks are summarized here for ease of reference.
Time Synchronization/NDS Version Check
Time synchronization must be checked regularly to ensure that NDS functions correctly. It is also a good idea to check the version of NDS (DS.NLM) that is running on your servers to ensure you have the most up-to-date Directory Services software.
Load DSREPAIR.NLM on a server holding a replica of the [Root] partition.
From the Available Options menu, select "Time Synchronization." Verify that time is synchronized ("Yes" should be displayed under the "Time is in sync" column).
Check the DS.NLM version that is also displayed. As of this writing, the minimum version for NetWare 4.10 servers is DS.NLM v5.01; NTS recommends using DS.NLM v5.06. For NetWare 4.11 servers, the recommended DS version is currently v5.73.
NDS Synchronization Check
To check NDS synchronization, run DSDIAG with the options described below.
Load DSDIAG.NLM on a server. (NTS recommends running this utility on a non-production server that receives the 0278 tree SAP packets of the tree being checked.)
At the Main Menu, select "Generate Report".
Select "Check Partition Status".
In the "General Options" screen, use the following settings:
Retrieve Partition Roots Using: NDS (default)
- Search Context: \tree_name
- Type: Readable (default)
- Depth: Subtree (default)
Retrieve replica ring from: Ring (default)
Report File: Enabled (Default filename SYS:SYSTEM\DPSTAT00.RPT)
Press <F6< to set Warnings options. Change "Display only partition roots/servers with warnings or errors" from Off to On. (This setting will show only partitions with problems, eliminating the need to review all partitions in the tree.)
Press <F10< to start the report (there can be up to 10 reports running at one time). Check the completed report for errors.
Continuity Check
This option in DSDIAG provides information that can be used to determine whether the NDS tree design adheres to Novell's recommended design rules for replica placement. These design rules should be observed as the tree changes and grows on your network. In summary, these rules are:
Always have three replicas for fault tolerance, but never more than ten replicas per partition.
Replicate locally.
The replica synchronization process must complete in under 30 minutes.
Always try to have fewer than 15 subordinate Organizational Units (OUs) under any single OU in the tree. This reduces the overall number of subordinate references.
To check NDS continuity, run DSDIAG with the options shown below:
Load DSDIAG on a server (NTS recommends running this utility on a non-production server that receives the 0278 tree SAP packets of the tree being checked).
At the Main Menu, select "Generate Report".
Select "List Replica Rings".
In the "General Options" screen, use the following settings:
Retrieve Partition Roots Using: NDS (default)
- Search Context: \tree_name
- Type: Readable (default)
- Depth: Subtree (default)
Retrieve replica ring from: Change from Single (default) to Ring to check every server in each replica ring.
Report File: Enabled (default filename SYS:SYSTEM\DPROOT00.RPT)
Press <F6< to set options for Warnings. Change "Display only partition roots/servers with warnings or errors" from Off to On. (This setting will show only partitions with problems, eliminating the need to review all partitions in the tree.)
Press <F8< to set Display options, and change Warnings from Off to On.
Press <F10< to start the report (up to 10 reports can run at one time). Check the finished report to ensure that the replicas meet the recommended design criteria.
Partition and Object Check
The partition and object check is recommended to provide the administrator with information about the number of objects in a partition and the tree. This check is useful in determining whether the NDS tree is within the recommended partitioning guidelines (partitions should not exceed 2,000 objects). Use SCANTREE.EXE to obtain the number of objects as follows:
From a workstation, log in as Admin or equivalent.
Map a search drive to the SYS:\PUBLIC\NLS directory.
Start the program by typing SCANTREE /d >[filename].
To determine the number of objects in a partition, add the number of subordinates listed in the report file for each container. For example:
OBJECT NAME (SUBORDINATES, ATTRIBUTES, ATTRIBUTE SIZE) O=test.
(10, 17, 2715)
In this tree, container O=test has 10 subordinate objects, 17 attributes, and an average attribute size of 2715. Add up the number of subordinates given for each container in the partition to get the partition total.
Server Health Checks
This section outlines various checks that are to be performed regularly to monitor the health of NDS on your NetWare 4 servers. First, however, it provides step-by-step instructions on how to properly install and remove servers in an NDS tree.
Installing a Server into an NDS Tree
Here is the recommended procedure to add a server into the tree:
Make sure time is synchronized in the NDS tree (reference "Time Synchronization/NDS Version Check" above).
Check the NDS synchronization and continuity status of the partition where the server will be added (reference "NDS Synchronization Check" and "Continuity Check" above). Resolve any errors before proceeding.
Load INSTALL.NLM on the server being added to the tree.
Select "Directory Options".
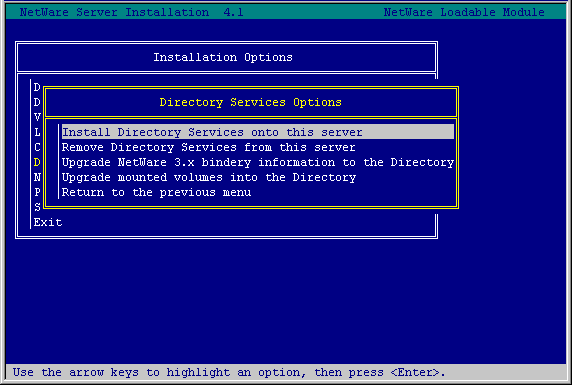
Select "Install Directory Services onto this server", as shown in Figure 1.
Figure 1: This option in INSTALL.NLM is used to install Directory Services on a new server.
INSTALL will proceed to place NDS on the server. If there are fewer than three replicas of the partition into which the server object is being added, a Read-Write replica will be automatically created on the server. If there are child partitions, the necessary subordinate reference replicas will also be created on the server.
If you continue to get the "Please Wait" message for over 30 minutes, run DSREPAIR.NLM (version 4.42 or newer) on the server holding the Master replica of the partition the server is being installed into. Run the "Repair local DS database" option from the Advanced Options menu.
Permanently Removing a Server from an NDS Tree
There are number of methods to remove a server from an NDS tree. The cleanest removal of a server is accomplished through INSTALL.NLM. When you uninstall or remove a server using INSTALL.NLM, the utility does the following:
Checks for Master replicas stored on the server being removed. If any are found, you are prompted whether you want to reassign them manually or automatically. If this is the only replica that currently exists, a replica will be created on another server.
Checks stored replicas to make sure they are all in the ON state and that all servers in the replica ring are up.
Checks all stored replicas for the server object that is being removed to ensure it exists as either an actual object or as a backlinked externally referenced object on every server in the replica ring.
Creates a switch file named SYS:_NETWARE\UNINSTAL.DS. This file contains a matrix consisting of the ENTRY ID, ENTRY TYPE, and ENTRY NAME (DN) for every real object and external reference.
Checks for volume objects associated with server object and deletes them (uses the volume ID stored in the root entry of the Directory Entry Table).
Deletes the server object from every replica it can attach to.
Clears inbound connections.
Deletes the NDS database files.
Although this procedure describes how to permanently remove a server from the tree, the procedure does allow for reinstallation of the server object by retaining all file system trustee assignments. However, if the server is reinstalled at a later time, replica information will not be restored, nor will references to the server object. Objects that had referred to the server object through values such as Default Server, Home Directory, Print Queues, or through objects such as Directory Maps and Print Servers, will not reestablish the reference to the new server object if it is reinstalled.
Follow the steps below to permanently remove a server from an NDS tree:
Make sure time is synchronized in the NDS tree (reference "Time Synchronization/NDS Version Check" above).
Check the NDS synchronization and continuity status of the partition in which the server object exists (reference "NDS Synchronization Check" and "Continuity Check" above). If any errors are found, resolve them before proceeding.
Load INSTALL.NLM at the server console.
Select "Directory Options".
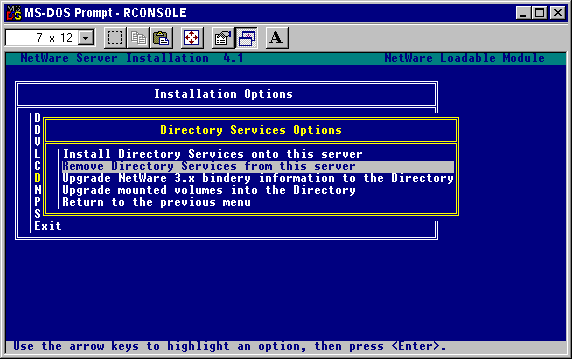
Select "Remove Directory Services from this server", as shown in Figure 2.
Figure 2: This option in INSTALL.NLM is used to permamently remove a server from the tree.
Set the following DSTRACE parameters on the server holding the Master replica of the partition the server object is being deleted from. At the server console prompt, type:
SET TTF=ON
Enables the DSTRACE information to be written to the DSTRACE.DBG file
SET DSTRACE=ON
Activates the trace screen for Directory Services transactions
SET DSTRACE=*R
Resets the DSTRACE.DBG file to 0 on this server
SET DSTRACE=+LIMBER
Enables backlink messages (the backlinker resolves external referencesbetween servers to ensure they refer to real entries)
SET DSTRACE=*L
Schedules the limber process (starts the process that will show the server being removed from the replicas of each server in the replica ring)
Once all partitions on the server have completed the synchronization process, type SET TTF=OFF to close the new DSTRACE.DBG file in the SYS:SYSTEM directory. This file can be reviewed by typing LOAD EDIT DSTRACE.DBG at the console prompt, or by opening it in a DOS text editor on a workstation.
Using the NDS Manager utility, verify that the server object has been removed from the tree and that the server has been removed from all replica rings it previously belonged to.
Temporarily Removing a Server from an NDS Tree
At times it is necessary to uninstall or remove a NetWare server object from the NDS tree only for a brief period of time. For example, in the case of an authentication key becoming corrupted, it is necessary to bring the server down and reinstall NDS on the server.
During the uninstall process, the NetWare server object is removed from the NDS tree. When the server object is removed, objects that reference that server in their required attributes can become unknown objects. Novell provides the DSMAINT.NLM utility to help you avoid the formation of unknown objects. DSMAINT replaces reference to the server with references to another object that you create or that already exists in the tree. After installing NDS on the server again, you can use DSMAINT to replace these references to the server in other objects' Host Server, Host Device, or Message (Default) Server attributes.
When uninstalling or removing a server using INSTALL.NLM, the utility:
Checks for Master replicas stored on the server being removed. If any are found, you are prompted whether you want to reassign them manually or automatically. If this is the only replica that currently exists, a replica will be created on another server.
Checks to make sure stored replicas are in the ON state and that all servers in the replica ring are up.
Checks all stored replicas for the server object that is being removed to ensure it exists as either an actual object or as a backlinked externally referenced object on every server in the replica ring.
Creates a switch file named SYS:_NETWARE\UNINSTAL.DS. This file contains a matrix consisting of the ENTRY ID, ENTRY TYPE, and ENTRY NAME (DN) for every real object and external reference.
Checks for volume objects associated with server object and deletes them (uses the volume ID stored in the root entry of the Directory Entry Table).
Deletes the server object from every replica it can attach to.
Clears inbound connections.
Deletes the NDS database files.
This procedure allows for the reinstallation of the server object by retaining all file system trustee assignments. References to the server object are maintained through running DSMAINT prior to removing the server. However, replica information will not be restored.
Follow the steps below to temporarily remove a server from an NDS tree:
Make sure time is synchronized in the NDS tree (reference "Time Synchronization/NDS Version Check" above).
Check the NDS synchronization and continuity status of the partition in which the server object exists (reference "NDS Synchronization Check" and "Continuity Check" above). Resolve any errors before proceeding.
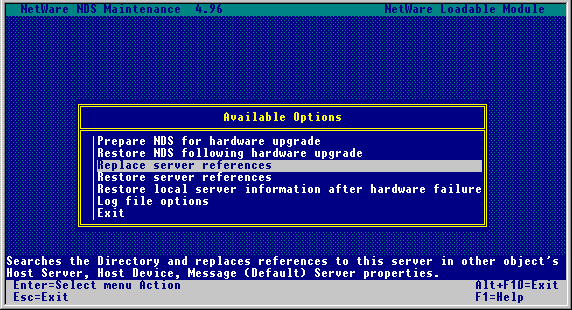
Load DSMAINT.NLM at the server console.
Select the "Replace server references" option, as shown in Figure 3.
Figure 3: This option in DSMAINT.NLM is used to temporarily remove a server.
As prompted, authenticate as Admin or equivalent user.
In the "Search And Replace Server Object" window (see Figure 4), you are required to fill in the "Begin search at" and "Replacement object" fields.
Figure 4: The "Search And Replace With Server Object" window in DSMAINT.NLM.

Enter the full name of the container where you want to begin searching for objects that reference this server's NetWare Server object ([root] in this case):
Begin search at: [root]
For replacement object, enter the full name of an object that you want DSMAINT to use to temporarily "hold" references to this server. This cannot be a NetWare Server object, but it can be any existing User object (.temp.novellis used as an example):
Replacement object: .temp.novell
Press <Enter< after you have typed in the required information.
Note: DSMAINT automatically removes volume IDs from the physical volumes on the server so that Volume objects are not removed duringa temporary server uninstall.
Remove the server from the tree using INSTALL.NLM (select "Directory options" and then "Remove Directory Services from this server").
When you are ready to reinstall the server into the tree, reinstall Directory Services on the server with INSTALL.NLM (select "Directory options" and then "Install Directory Services on this server").
Once NDS is operational on the server, load DSMAINT.NLM and select the "Restore server references" option to reverse the replacements made by the "Replace server references" option. You will be required to enter the full name of the User object you specified in Step 6 that is temporarily holding the references (see Figure 5).
Figure 5: When reinstalling the server, enter the same temporary object you used previously to "hold" the server references.

In NDS Manager, verify that the server is back in the tree and then re-establish any replicas that existed previously on the server.
Backing Up a Server's NDS Database (weekly backup recommended)
Current backup software only backs up objects in the tree. It doesn't back up partition boundaries. A feature of DSREPAIR allows for backup of the NDS database on a server into a file named DSREPAIR.DIB. This file is created and stored in the server's SYS:SYSTEM directory. It is a "snapshot" of all the replicas of each partition on that server at that moment in time. This information provides for disaster recovery at a server level. The DSREPAIR.DIB file can be restored, but only by Novell Technical Services.
To create the DSREPAIR.DIB emergency backup file, do the following:
At the server console, type:
LOAD DSREPAIR -RC
This creates the DSREPAIR.DIB file in the SYS:SYSTEM directory on the server.
Backlink/External Reference Check (monthly check recommended)
This procedure validates all entries within a server's external reference partition and attempts to locate a backlink for each external reference.
Load DSREPAIR on randomly selected servers in the tree. (NTS currently recommends that you use DSREPAIR.NLM version 4.47 because of the new features added to identify obituaries.)
From the Available Options menu, select "Advanced options menu".
Select "Check external references". After running this option, the log file will display the number of external references, along with the number of errors found. If the server is having problems walking the tree, it will display errors such as "-626 All Referrals Failed" and "-634 No Referrals".
Run DSTRACE as follows on randomly selected servers. At the server console, type:
SET TTF=ON
Enables the DSTRACE information to bewritten to the DSTRACE.DBG file
SET DSTRACE=ON
Activates the trace screen for Directory Services transactions
SET DSTRACE=*R
Resets the DSTRACE.DBG file to 0 on this server
SET DSTRACE=+BLINK
Enables backlink messages (the backlinker resolves external referencesbetween servers to ensure they refer to real entries)
SET DSTRACE=*B
Forces the backlink process to begin
Once all partitions on the server have completed the synchronization process, type SET TTF=OFF to close the DSTRACE.DBG file found in the SYS:SYSTEM directory. This file can be reviewed by typing LOAD EDIT DSTRACE.DBG at the console prompt or by opening it in a DOS text editor on a workstation.
Obituary Check (monthly check recommended)
Obituaries are attributes that are created for an object that has been flagged for a move, rename, or deletion. Because NDS is loosely consistent, a move or deletion takes time to be propagated to all the servers. Since servers do not receive updates simultaneously, the servers may all not hold the same information at a given time. For this reason, each server retains the old information until all of the other servers have received updates.
Once the object is flagged accordingly on all servers holding a replica of the partition (a process known as "skulking"), the object will be purged by the clean-up or janitor process. The janitor checks connectivity to all servers in the NDS database and sets the Up/Down status of the NCP Server entries. It will not run unless the partition is in sync (ALL PROCESSED=Yes). The purger process then runs and modifies the time stamps.
Backlinks are also notified that the object is going away. If a server's backlink is not notified that the object is gone and another object is created with the same name, it can result in a rename (an object named <number<<number<).
To perform a check for illegal obituaries, do the following:
Run DSREPAIR on randomly selected servers in the tree. (NTS currently recommends using DSREPAIR.NLM version 4.47 because of the new features added to identify the type of obituary.)
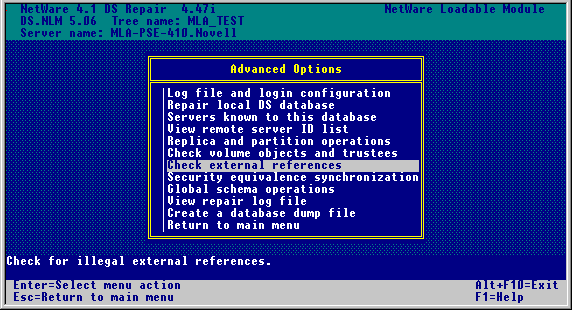
From the Available Options menu, select "Advanced options menu".
Select "Check external references", as shown in Figure 6.
Figure 6: The "Check external references" option in DSREPAIR.
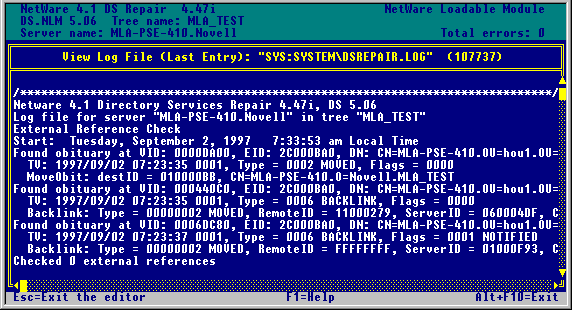
After running this option, the log file shows external references that are backlinked and lists any backlinked obituaries that have not yet completed (see Figure 7). The concern is for obituaries that have not completed, a condition which indicates a possible communication problem between servers.
Figure 7: Sample DSREPAIR.LOG file after running the "Check external references" option.
Run DSTRACE as follows on randomly selected servers. At the server console, type:
SET TTF=ON
Enables the DSTRACE information to be written to the DSTRACE.DBG file
SET DSTRACE=ON
Activates the trace screen for Directory Services transactions
SET DSTRACE=*R
Resets the DSTRACE.DBG file to 0 on this server
SET DSTRACE=+J
Enables debug error messages of the janitor process
SET DSTRACE=*J
Forces the janitor process to begin
You will see a display similar to the following (bolding added for emphasis):
313553C9:688:FB010000  SYNC: Start outbound sync with (2)
 [010000B8]<4SFT3_OSLAB.SERVERS_LAB.Novell>
  SENDING TO ------> CN=4SFT3_OSLAB
313553CA:040:FB010000   SYNC: sending updates to server <CN=4SFT3_OSLAB<
313553CA:061:FB010000    SYNC:[0100014C][(10:19:10),1,31] Admin.Novell (User)
313553CA:165:FB010000    SYNC: [08000291] obituary for treial.SERVERS_LAB.Novell
313553CA:168:FB010000     valueTime=313553BF,1,1 type=1, flags=0,
oldCTS=313553BB,1,1
313553CA:170:FB010000     valueTime=313553BF,1,2 type=6, flags=0,
oldCTS=313553BB,1,1
313553CA:173:FB010000     valueTime=313553BF,1,3 type=6, flags=0,
oldCTS=313553BB,1,1
313553CA:212:FB010000   SYNC: Objects: 1, total changes: 11, sent to server
<CN=4SFT3_OSLAB<
313553CA:214:FB010000  SYNC: update to server <CN=4SFT3_OSLAB<
successfully completed
This is an example of a normal obituary that is in the process of being deleted. When an object is flagged for deletion, it goes through four states before being purged: 0 Initial 1 Notified 2 OK to Purge 4 Purgeable
In the above example, the current obituary state is 0; it needs to go to a state of 4 to complete. If an obituary flag remains in the same state and is never purged, there may be a communication problem between servers or a server may have been removed improperly (servers in the tree still reference the removed server). Remember that the janitor is in charge of obituary clean-up and will not run until ALL PROCESSED=Yes.
Once all partitions on the server have completed the synchronization process, type SET TTF=OFF to close the DSTRACE.DBG file found in the SYS:SYSTEM directory. This file can be reviewed by typing LOAD EDIT DSTRACE.DBG at the console prompt or by opening it in a DOS text editor on a workstation.
TTS Issues (check settings as needed)
Novell's Transaction Tracking System (TTS) is required for NDS to function correctly. If a server experiences a TTS shutdown (-621 error), it indicates that the operating system is not able to track and write the transactions at the maximum transaction level set on the server. This problem may be a temporary problem related to a partition operation that generates a large number of transactions. Or, the server might be unable to handle the peak transaction requests generated on a regular basis.
Some NDS partition operations, such as removing a replica from the server, require the server to track and write a large number of transactions. When the operating system is unable to manage these requests, errors such as "Growing TTS memory tables" are generated at the console. This particular error indicates that the TTS file will not accept any new transactions, which usually results in TTS shutdown. Other TTS errors are listed below:
|
TTS exceeded the limit of number of active transactions. %d transactions delayed. 2049Transaction aborted for station #%u task #%u. 2028Enable TTS requested by user %S on station %u. 2021Disable TTS requested by user %S on station %u. 2016%S TTS shut down because backout volume %S was dismounted. 2009Error writing to TTS$LOG.ERR file. 1761Error opening or creating TTS$LOG.ERR file. 1757TTS ran out of memory expanding transaction node tables. %u memory allocation requests failed. 2055TTS disabled by operator. 1976TTS disabled because of error reading backout file. 1977TTS disabled because of error writing to file during backout. 1978TTS disabled because of too many defined volumes. 1979TTS disabled because of error writing volume definition information. 1980TTS disabled because of error reading backout file during record generation. 1981TTS disabled because of error growing TTS memory tables. 1982TTS disabled because of error allocating more disk space for the backout file. 1983TTS disabled because of directory error on TTS backout file. 1984Growing TTS memory tables |
Reducing the Maximum Transactions parameter can help the server track and write TTS transactions without becoming overburdened. You can set this parameter through the Server Manager (SERVMAN.NLM) utility.
To change the Maximum Transactions setting, do the following:
Load SERVMAN.NLM at the server console.
From the Available Options menu, select "Server Parameters".
Select the "TTS" parameter category.
The default setting for Maximum Transactions is 10,000. If TTS shutdown has occurred, try reducing the maximum number of transactions in half to 5000 (see Figure 8).
Figure 8: Setting the Maximum Transactions parameter for TTS in SERVMAN.NLM.
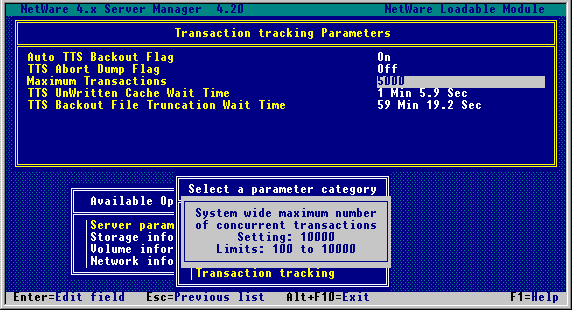
If the shutdown condition persists, reducing the setting to 1000 should resolve most TTS problems.
If TTS shutdown continues to occur with changes made to the Maximum Transactions parameter, change the TTS UnWritten Cache Wait Time parameter from its default setting of 1 Min 5.9 Sec to 11 Sec.
Note: When doing a remove replica operation, set the Maximum Transactions to 1000 and the TTS UnWritten Cache Wait Time to 11 Sec. This will prevent TTS shutdown for this partition operation.
Press <Esc< and save changes when exiting the SERVMAN utility.
Unknown Object Check (monthly check recommended)
Unknown objects are not usually a critical issue. They can be caused by a number of normal activities within the NDS tree. If you want to delete unknown objects to clean up your tree, follow the procedure given below.
Do not use the "Delete Unknown Class Leaf Objects" option in DSREPAIR, whichcompletely removes all objects that are of the class type unknown as long as theydo not have subordinate objects. This operation only looks in the local replica forunknown objects. The local replica may contain an unknown server object, whichis perfectly fine on another replica, but if you run this option it will delete the localunknown server and attempt to send out an obituary notifiying the other replicas. This can cause irrevocable damage to the NDS tree.
In NWAdmin, select Search... from the Object pull-down menu. In the Search window, make the following settings (see Figure 9):
Figure 9: Setting the Maximum Transactions parameter for TTS in SERVMAN.NLM.
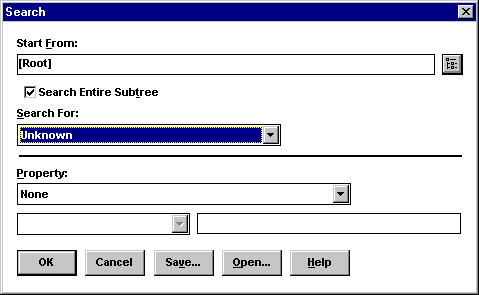
The unknown objects found are from this one server's point of view.
If any unknown objects are found, identify the object type (container or leaf). If the object is a leaf object such as a user or group, simply delete the object. If the object reappears, there is a replica ring mismatch. Contact Novell Technical Services to resolve the problem.
Run SCANTREE.EXE to check the tree for any remaining unknown objects (reference "Partition and Object Check" above).
Duplicate Tree Name Check (as needed)
Symptoms of duplicate tree names include -672 errors during a replica synchronization, or users losing rights for no apparent reason. Trees created with the same name as an existing production tree will not be given rights to the production tree, nor will they create security holes. You can search the network with DSDIAG.NLM to check if there are any duplicate tree names.
To check for duplicate tree names, do the following:
Load DSDIAG.NLM from the console prompt on a server that receives the 0278 SAP packets for the tree name being checked.
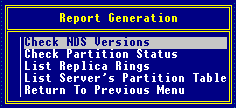
At the Main Menu, select "Generate Report".

Select "Check NDS Versions".
The "General Options" screen is displayed, as shown in Figure 10.
Figure 10: The "General Options" screen for checking NDS versions in DSDIAG.NLM.
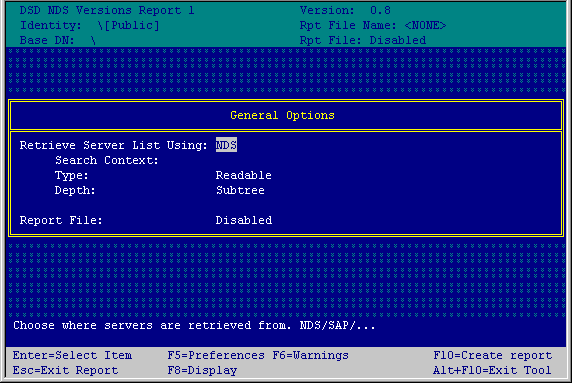
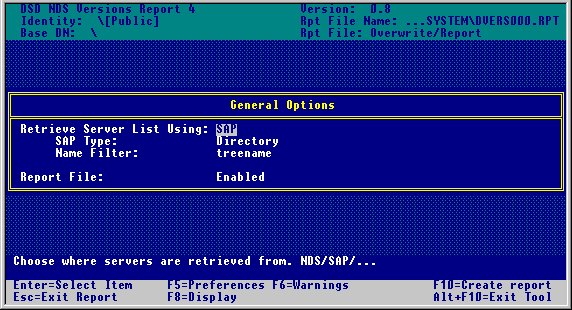
Change "Retrieve Server List Using:" from NDS (the default) to SAP. This will allow the following settings to be made (see Figure 11):
SAP Type: Change from Bindery (default) to Directory Name Filter: treename Report File: Enabled
Figure 11: The "General Options" screen for customizing the report in DSDIAG.NLM.
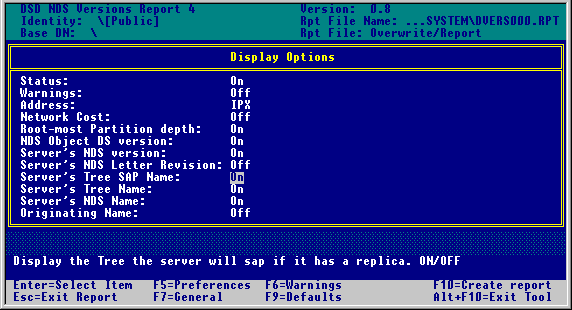
Press <F8< to access the Display Options screen. Change the following display settings (see Figure 12):
Server's Tree SAP Name: Off (default) to On Server's Tree Name: Off (default) to On
Figure 12: The "Display Options" screen for further customizing the report output in DSDIAG.NLM.
Type <F10< to create the report.
Using the report generated from DSDIAG.NLM (default report name SYS:SYSTEM\DVERS000.RPT), check each server in the tree to verify it has the correct Server's NDS name. If there is a Server NDS name that doesn't match the tree, it indicates that a duplicate tree name exists.
Go to the server with the duplicate tree and rename its tree using DSMERGE.NLM. Select the "Rename this tree" option, authenticate as prompted, and enter the new tree name as shown in Figure 13.
Figure 13: Renaming an NDS tree in DSMERGE.NLM.

Schema Check (monthly check recommended)
Because the NDS schema synchronization process is event driven, changes are scheduled to be recorded ten seconds after a schema change is made. These updates are propagated from one server to another in a trickle-down manner.
To check to see if the schemas in your tree are in synch, do the following:
Run DSTRACE as follows on the server holding the Master replica of the [Root] partition in the tree. At the server console prompt, type:
SET TTF=ON
Enables the DSTRACE information to be written to the DSTRACE.DBG file
SET DSTRACE=ON
Activates the trace screen for Directory Services transactions
SET DSTRACE=*R
Resets the DSTRACE.DBG file to 0 bytes on this server
SET DSTRACE=+SCHEMA
Enables debug messages about schema modification and synchronization
SET DSTRACE=*SS
Schedules schema synchronization of all schemas, not just the skulkerbetween servers
Once all partitions on the server have completed the synchronization process, type SET TTF=OFF to close the DSTRACE.DBG file found in the SYS:SYSTEM directory. This file can be reviewed by typing LOAD EDIT DSTRACE.DBG at the server console prompt, or by opening it from a DOS text editor on a workstation.
Check for the message "SCHEMA: All Processed = Yes" in the log file to verify that all schema changes have been synchronized.
Remote Server ID Check (monthly check recommended)
The remote server ID check operation in DSREPAIR uses the remote server ID cache table on the selected server to locate servers known to it. It then contacts each server in the list to verify that its ID on that server is correct in the table. This operation checks all remote server IDs in the list and repairs or deletes any that are incorrect. This operation could be slow on networks that must contact many remote servers. A -632 error is common when the remote server ID on this server is incorrect, indicating that it cannot authenticate to the remote server.
To run the remote server ID check, do the following:
Load DSREPAIR at the server console prompt.
From the Available Options menu, select "Advanced options menu".
Select "View remote server ID list".
Press <Enter< and select "Remote Server ID Options Menu".
From this menu, select "Verify all remote server IDs". This option executes authentication from server to server using the remote server's ID, thus verifiying this server's ID on other file servers.
NDS Tuneable Parameter Check
The NDS tuneable parameter check is useful to verify that a server's parameters have not been changed. This is a server-specific check, requiring each server in the tree to be checked. Some of these parameters can be changed through Novell's SERVMAN utility; others can be changed only with DSTRACE commands.These parameters should not be changed unless directed by Novell Technical Services to address a specific issue.
To check the current NDS tuneable parameter settings, do the following:
Run DSTRACE as follows on the server. At the server console, type:
SET TTF=ON
Enables the DSTRACE information to be written to the DSTRACE.DBG file
SET DSTRACE=ON
Activates the trace screen for Directory Services transactions
SET DSTRACE=*R
Resets the DSTRACE.DBG file to 0 on this server
SET DSTRACE=*P
Displays the adjustable NDS parameters and their settings on the Directory Services trace screen
Here is an example of the screen display:
Default TUNEABLE PARAMETER VALUES for DS.NLM v4.97 and above.
ServerStateUpThreshold = 30 minutes
External Reference Life Span = 192 hours
  *Note: This set parameter sets how long external
  references can stay unused before being deleted.
JanitorInterval = 2 minutes
FlatCleaningInterval = 60 minutes
BacklinkInterval = 780 minutes
Heartbeat Data = 30 minutes
Heartbeat Schema = 240 minutes
Requests In Progress threshold = 1000
Request IPX checksums = DISABLED
IPX:RIPDelay = 20 ticks
IPX:Retries = 3
IPX:TimeOutScaleFactor = 2
IPX:TimeOutShiftFactor = 4
Disk accesses before yield = 10
Connection Expriation Timeout = 135 minutes
NDS Packet CRC checking = ENABLED
Maximum Sockets Threshold = 75%
Outbound Synchronization = ENABLED
Inbound Synchronization = ENABLED
Schema Outbound Synchronization = ENABLED
Schema Inbound Synchronization = ENABLED
After the list of parameters is displayed, type SET TTF=OFF to close the DSTRACE.DBG file found in the SYS:SYSTEM directory. This file can be reviewed by typing LOAD EDIT DSTRACE.DBG at the console prompt, or from a DOS editor on a workstation.
Check the current listing against the previous listing to see if any settings have been changed.
Conclusion
By following the procedures and performing the server health checks outlined in this AppNote, you can maintain your NDS tree in tip-top condition and avoid many problems that can arise from improper handling of NetWare 4 servers.
* Originally published in Novell AppNotes
Disclaimer
The origin of this information may be internal or external to Novell. While Novell makes all reasonable efforts to verify this information, Novell does not make explicit or implied claims to its validity.