Using Novell Application Launcher 2.0 and snAppShot for Application Delivery
Articles and Tips: article
Senior Consultant
Novell Consulting
01 Aug 1997
Sure, it's easy to set up a single-executable application with NAL. But what about those complex mega-apps that make sweeping changes to the Windows registry and create all those .INI files? This AppNote shows how to deliver up even the most complicated of applications easily with snAppShot.
- Introduction
- What is NAL?
- Installing NAL 2.0
- Using NAL to Distribute a 'Simple' Application
- Using snAppShot to Deliver a 'Complex' Application
- NAL Explorer
- NAL 2.0 Future Enhancements
- NAL 2.0 Properties
- Summary
- Additional Information Resources
Introduction
A recent Gartner Report entitled "The Cost of Workstation Management" said the cost of a poorly-managed workstation is $10,000 per year. But the cost of a well-managed workstation is only $7,500. If we could reduce those costs by only $500, a customer with 1,000 workstations could save $500,000 annually. Talk about customer satisfaction! Novell Application Launcher (NAL) can do that.
Novell interviewed many its major accounts and found that up to 70% of help desk calls come from users selecting an application on the desktop and receiving a Window's error message because the dependencies for that application were not met. Until now there has not been an effective way to centrally organize, control access to, and distribute applications. Again, NAL is the answer.
NAL allows the network administrator, not the user, to control application dependencies in Novell Directory Services (NDS). Now when the user clicks on an application, the dependencies are automatically created, reducing help desk calls. Some of the application dependencies that are managed by NDS include:
Path to executable
Printer definitions
Login scripts
Registry entries
INI files
Application files
Text files
Scheduling of applications
This AppNote introduces Novell Application Launcher 2.0 and explains how to use snAppShot to deliver complex applications to users.
What is NAL?
The Novell Application Launcher allows users to run network applications that have been configured by the network administrator. It consists of Application objects (leaf objects) in your NDS Tree. The application's setup information (printer port captures, drive mappings, special application startup switches, and so on) is stored in the Application object, allowing you to manage applications centrally with the NetWare Administrator (NWAdmin) utility. NAL makes it easy to deliver new and updated network applications to your users, reducing the cost of administering desktops and your overall cost of network ownership. NAL enforces standard desktops for users and, when used with Policies and Profiles, can be a very effective way to control exactly what a user sees and can do at their workstation.
New Features in NAL 2.0
NAL 2.0 simplifies server-to-client software distribution and eliminates the need for manually installing software on each networked desktop. NAL is the only software distribution utility on the market which completely leverages NDS. You deal with applications as NDS objects in the Tree. By using NDS as a foundation, access to files and directories is controlled and the entire process remains secure. By using NDS as a repository for storing NAL information, you avoid the costs of recreating another separate database.
NAL gives network administrators the option of "pulling" or "pushing" software to desktops. Pull distribution lets you surface an application icon on the user's desktop. Clicking the icon launches an application (which resides on a server) or runs an install program, placing the application on the user's hard drive before launching it.
Push distribution loads applications onto target desktops without user intervention. This helps in distributing software that needs to reside on desktops, like an operating system or network client updates, as well as e-mail and custom business applications. (Server-to-server software distribution will be available in the future.)
NAL 2.0 delivers advanced software distribution capabilities through several key product features including:
Modifying Registries and INI Files. Network managers can distribute software to a wide variety of clients, including Windows 3.1x, Windows 95 and Windows NT desktops.
Snapshot Templates. Administrators can generate automated installation templates for custom applications. Now administrators can create customized packages of target applications and any associated files without writing complicated scripts.
Scheduled Delivery. Administrators can schedule software distribution for off-peak hours. Systems that are not turned on at night will load software when they boot up the following morning. Portable systems will update the next time they'reconnected to the network.
Easy Setup of Distribution Lists for Packages. Administrators can create software distribution lists through NDS containers, groups, and/or users.
NAL 2.0 is part of the ManageWise Group's product line and was released in May, 1997. It is available through the NT Integration CD, the Novell Software Evaluation Library (NSEL Release 6), or Novell's Web site at www.novell.com/managewise/NAL.
Product Components
NAL 2.0 consists of four components, two each for administrator and user functions.
Administrator Components. The NAL Snap-In is a Windows DLL that extends the base schema to make it possible to create Application objects in NDS. The snap-in files are APPSNP3x.DLL, APPSNPNT.DLL, and APPSNP95.DLL. NAL Snap-In adds the following:
An Application object class to the NDS Tree,which supports Windows 3.1x, Windows 95, and Windows NT. Previous versions of NAL added three separate Application object classes.
New NWAdmin property pages for the Application object, Organization object, Organizational Unit object, Group object, and User object.
NAL snAppShot (when used with the NAL Snap-in) provides a means to simplify installation of complex applications (those that make INI and/or Registry changes to client desktops). snAppShot observes changes that an application Setup program makes to a workstation's configuration and stores the information in an Application Object Template (.AOT) file.
NAL snAppShot also keeps track of the files that an application Setup program installs to the workstation. It copies the files, and stores them as a series of .FIL files. You use the information gathered by NAL snAppShot when you create and set up Application objects.
User Components. NAL Window (NAL.EXE) is the workstation component that displays the icons of the Application objects you set up for the user. NAL Window lets users create personal folders (with your permission), refresh applications, change views, and get information about folders and applications. Because you centrally manage the applications, users cannot change any icons or captions or disturb the drive paths of the applications.
NAL.EXE is a wrapper technology meaning that NAL.EXE takes care of several initialization functions and then runs the correct executable: either NALW31.EXE, NALW95.EXE, or NALWIN32.EXE. Once the correct executable is started, NAL.EXE terminates. One of the main functions of the wrapper (NAL.EXE) is to determine the proper launcher executable, based on the operating system of the client. For this reason, we recommend that the workstation always start NAL.EXE rather than going directly to one of the launching executables. Additionally, if you run NAL.EXE from a login script, you don't have to anticipate the operating system of the attaching client.
NAL Explorer (NALEXPLD.EXE) is optional software which can replace the NAL Window (NAL.EXE). It lets you deliver applications into the Windows Explorer on Windows 95 and Windows NT 4.0 workstations. Users can see the applications you have assigned them in the NAL Explorer window, the Start Menu, the System Tray, the Desktop, or any combination of these.
NAL depends on access to the network and NDS; therefore, it is reasonable to run these client executables from the server. Which client executable you use is a design decision, but generally speaking, the NAL Explorer offers more flexibility in that applications can be delivered in the Start Menu, which is familiar to most Windows 95 and Windows NT users.
Product Requirements
Server. A Novell NetWare 4.1 or later server (running Novell Directory Services) is required to support NAL objects. Your applications to be distributed must reside on NetWare 4 servers.
Client. User workstations require the following software:
Windows 3.1x, Windows 95, or Windows NT
Latest version of Client 32 or VLM 1.2 software
A Directory Services connection (no Bindery connections)
NAL Explorer requires Windows 95 or Windows NT4.0
The administrator's workstation requires the following software:
Windows 95 or Windows NT
Latest versions of Client 32 for Windows 95 or Windows NT
NetWare Administrator 4.11 or later
Rights Requirements. Before you install NAL 2.0, make sure you have Supervisor Object rights to the [ROOT] of the NDS Tree in which you'll install the NAL software, as NAL extends the base schema to support Application objects. As always, you should perform an NDS Health Check before installing any application which extends the schema. (See the AppNote entitled "Maintaining a Healthy NDS Tree: Part 1" in this issue for more information about NDS health checks.)
Users accessing NAL need File System Rights to the (1) directory in which you'll install NAL (usually SYS:PUBLIC), and (2) the directories where the applications to be distributed reside. (A future release of NAL will enable automatic assignment of file system rights when an application is launched.)
NDS rights are assigned as follows: The Container, Group, or User you associate with an Application object automatically receives Read and Compare property rights to that Application object.
Installing NAL 2.0
NAL 2.0 software installation consists of two executable files:
SETUPNAL.EXE.This program installs all four product components (NAL Snap-In, snAppShot, NALWindow, and NAL Explorer) into a network directory you specify. The default (and recommended) directory is SYS:PUBLIC.SETUPNAL.EXE contains on-line documentation for NAL 2.0.
SETUPSNP.EXE.This file is an additional, separate setup program for NAL snAppShot which you can install directly on an administrator's workstation (default directory is C:\SNAPSHOT). It creates a NALsnAppShot program group or folder and you can run it on a Windows3.1x, Windows 95, or Windows NT workstation.
Running SETUPNAL.EXE
Log into the NDS tree where you'll install the NAL 2.0 software.
Close all applications on the workstation youare using. Don't forget to close NetWare Administrator. If NAL 1.1 has been installed, make sure it's closed, too, and that no users are running it.
Run SYS:NAL20\SETUPNAL.EXE and respond to the prompts.
Directory
We suggest you install to the default SYS:PUBLIC directory.
Do you want to extend the NDS Schema?
You must extend the schema to use NAL 2.0 software. It can be done now or after NAL is installed. If you select Yes, Setup extends the schema in the NDS Tree that contains the directory in which you are installing the NAL software. You must be logged in as a User with Supervisor Object rights to the [Root]. If you select No, the first time you open NetWare Administrator after NAL is installed, a prompt will ask you on which NDS Tree you want to extend the schema. Select the appropriate NDS Tree and click Modify.
Do you want Setup to create sample Application objects?
Select Yes. After installation, you can explore the sample Application objects to become familiar with the features that NAL 2.0 Snap-In adds to NetWare Administrator.
At this point, SETUPNAL.EXE installs all product files in the directory specified (default is SYS:PUBLIC).
After Setup has completed, open NetWare Administrator and note the changes the NAL 2.0 Snap-In makes to the utility:
An object (Application) is added to the Create New Object list.
An Export Application Object option appears in the Tools menu.
A Show All Inherited Applications option appears in the Tools menu.
An Applications property and a Launcher Configuration property page are added to each Organization object, Organizational Unit object, and any User object that exists in the NDS Tree. An Applications property page is added to any Group object that exists.
If you chose to install sample Application objects, the NWAdmin95, NWAdminNT, and snAppShot sample Application objects appear in the NDS Tree (in the context of the file server). Click a sample Application object to explore that object's property pages. Notice that you can use the Page Options feature to select and sort the property pages in the order you like.
Upgrading from Previous Versions of NAL
If you have NAL 1.0 installed and want to use existing Application objects, NAL 2.0 offers a migration option that creates NAL 2.0 Application objects based on existing NAL 1.0x Application objects. The migration option is available from the Tools menu in NWAdmin. See NAL's online help for more information.
Using NAL to Distribute a "Simple" Application
A simple application is one which does not require any Registry or INI changes nor DLLs at the workstationCfor example, FILER.EXE. In this case, setup requires only two steps:
Create the Application object with the path to the executable.
Associate the object to a Container, Group, or User.
If you associate applications with Containers or Groups, users who are added later automatically gain access to network applications or software distribution packages. (Currently you cannot associate NAL objects to an Organizational Role. This is because of the big performance hit due to having to go through each user's Security Equivalence List. This will probably be implemented in a future NAL release, with a warning.)
If an application requires Registry or INI changes, you will need to use the snAppShot utility (discussed next).
Using snAppShot to Deliver a "Complex" Application
NAL 2.0 can be used to easily install "complex" applications--that is, applications which require local DLLs and Registry and/or INI changes. This is done with the new snAppShot utility. snAppShot will:
Take a snapshot of the machine you're running snAppShot on.
Ask you to install the application you want to distribute.
Take another snapshot of the machine to discover the changes made by the application installation.
Generate an Application Object Template (*.AOT) containing the differences between the "before" and "after" snapshot.
The .AOT file is then used for creating the Applicationo bject in NWAdmin.
Notes:
snAppShot will not do version checking on DLLs--it simply checks the date/time and file size.
You can export existing Application objects to *.AOT templates.
You should run snAppShot on a workstation similar to the workstations you'll be distributing the software to. The application you want to distribute should not have been previously installed on this workstation because it would already have the Registry/INI changes, DLLs, and so on.
In the real world, you should set up a dedicated, representative workstation for using snAppShot. It would be beneficial to have a quick way to revert back to the original workstation configuration for testing purposes (for example, using a utility such as Ghost).
As with any software application, the administrator decides on the architecture of the system. For laptops you might want all of the software on the local drive, whereas for desktop computers, you might want to run the application from the server. NAL 2.0 offers the ability to do it either way.
NAL distributes software based on the user, not the workstation. You would need to use the "System Requirements" attributes of NAL 2.0 objects or some level of user choice to accomplish workstation-based software distribution.
Following are the steps to install an application (Microsoft PowerPoint in this example) to a volume on an IntranetWare server. This application will then be delivered to users, updating their local desktop the first time this Application is launched.
From the administrator's desktop, select the following options: Start, Program, NAL snAppShot, snAppShot. You will see the screen shown in Figure 1.
Figure 1: The snAppShot Welcome screen.
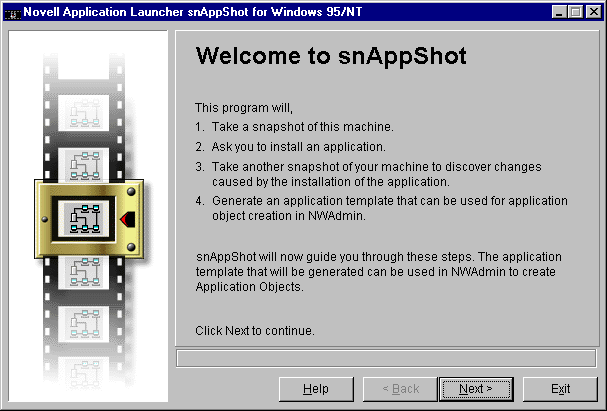
Click on Next>.
In the Application Information screen (see Figure2), enter a name for the application you will install: for example, Microsoft PowerPoint. Also enter a short description for the application: PowerPoint.
Figure 2: The NAL snAPPShot Applications Information screen.

Click on Next>.
Fill in the required fields in the Template and Configuration Information screen (see Figure 3). For demonstration purposes, use the following for your directory and file name for the template you will create:
Directory: \\file_server_name\SYS\Public\Nallib (recommended) File Name: PPoint.AOT
Installing to a network drive allows others to use the template files and keeps them in one central location.
Directory for application files (network directory recommended): file_server_name\volume:PowerPnt
This is where *.FIL files will be. NAL snAppShot keeps track of all the files that an application Setup program installs to the workstation, copies and stores them as a series of .FIL files.
Figure 3: The Template and Configuration Information screen.

You will now see the screen shown in Figure 4. Accept all defaults, unless you are sure of certain directories and/or files you want snAppShot to include or exclude when taking a "before" shot of this workstation.
Figure 4: The Include/Exclude screen.

Click on Next>.
You will see the screen shown in Figure 5. This screen tells you that snAppShot is ready to take a snapshot of your workstation.
Figure 5: The Ready to Take Snapshot screen.

Click on Next>.
snAppShot proceeds to take a "before" picture of your workstation's configuration files. While this is happening, the progress will be displayed as shown in Figure 6.
Figure 6: The "Taking Snapshot" screen.

When this process is completed, the screen shown in Figure 7 is displayed. You can now click on Run Setup... to start the setup program for the application you want to install.
Figure 7: The "Run Setup Program" screen.

In our example, you would begin the PowerPoint Setup program. After you click Run Setup..., you will see the screen shown in Figure 8:
Figure 8: The "Select Setup Program" screen.

The installation defaults to directory C:\MSOffice. Use \\file_server_name\volume\PowerPnt.
Select a Compact installation.
Once the installation to this workstation is complete, click on Next> to perform an "after" installation snAppShot.
Enter the path of the software just installed(file_server_name\volume\ PowerPnt) and click on Next>.
The creation of the Application Object Template (AOT file) is complete, as shown in Figure 9.
Figure 9: This screen appears when you have successfully created an Application Object Template file.

Creating the Application Object from the .AOT
Now you create an Application object in NWAdmin, as before. However, you need to select "Use this wizard with an application object template" (required). This will gray-out the "Application object name" and "Path to executable file" options, and prompt you through the rest of the creation process.
Browse to select your previously created PPoint.AOT in the "System application templates"window (file_server_name\sys\Public\Nallib)
Note: The file name and description you previously assignedare filled in automatically.
Use the following information in filling in your target and source directories:
Target Directory: file_server_name\volume\PowerPnt
Source Directory: file_server_name\volume\PowerPnt
The Application Object has been created, using the PPoint.AOT file.
Make sure the Application (PowerPoint) Property pages contains the following information:
The executable file path is:
\\file_server_name\volume\PowerPnt\PowerPnt\PowerPnt.EXE
Note: You're actually running this application from the network drive instead of installing it to the user's workstation. No other changes are neededfrom the Identification Page.
From the Associations Property page, associate this application to a User, Group, or Container.
From the Administrator Notes Property page, notice what snAppShot automatically filled in.
Check your results:
On the Macros page, confirm that these were defined from snAppShot.
On the Registry Settings Property page, confirm that all changes made to your workstation are defined from snAppShot.
On the INI Files Property page, confirm that the INI file changes made are defined from snAppShot.
On the Application Files Property page, confirm that all files installed are defined from snAppShot.
On the Icons/Shortcuts Property page, notice what was defined from snAppShot.
NALUsage Tips
Holding down <Shift<whileselecting "Help | About NAL"gives debug information.
Holding down <Ctrl<-<Alt<and double-clicking on the Tree Name while in "About"also givesyou additional information.
Inheriting Applications
At some point, an administrator will want to see what applications a user is getting from NAL, and through what associations. This is done by highlighting a User object and then selecting the "Show Inherited Applications" option under the Tools menu in NWAdmin. This option will provide information on all of the application objects associated with a user and all of the application objects inherited by that user. This gives you the ability to see all of the application objectsthat will be displayed in the NAL Window or NAL Explorer for a particular user. It categorizes the applications into the different areas the applications could show up, (Launcher, Start Menu, Desktop, or System Tray). It also shows if the application is a Force Run "push" application.
NAL Design Considerations
Your NDS tree design and placement of NAL objects may require additional NAL configuration.
By default, NAL looks for Application objects in the same container as the User who will be accessing it. Thisis due to the Container's Launcher Configuration property which says "Use Default Settings." If you do place an Application object at level(s) higher in the Tree than where the User account is, you will need to select the "Use Current Settings" button, then put a check in the box next to "Inherit container applications." This automatically fills in A0"levels. Customize this setting based on the following:
|
0 |
NAL won't look for application objects |
|
1 |
NAL looks in the immediate container for application objects |
|
2 |
NAL looks up two containers for application objects |
|
3 |
NAL looks up three containers for application objects, etc. |
|
-1 |
NAL looks up to the [Root] for applications objects |
Users will not see applications associated with them unless this is set correctly.
You need to be careful with the placement of Application objects. Even though you could place objects at the highest container in the Tree and use a -1 to have NAL search up to the [Root], this could cause additional traffic on your WAN, depending upon your partitioning and replica placement. Generally speaking, you should try and place NAL objects close to the users who will access them. This will be easy if you followed the lower-layer NDS design rules.
NAL Customization
When a user launches NAL, the NAL Window will display "Delivered Applications for <distinguished name<." You can customize this distinguished name by placing a Full Name property on the User's NDS object.
NAL Explorer
NAL Explorer is optional software which can replace NAL Window. It lets you deliver applications into the Windows Explorer on Windows 95 and Windows NT 4.0 workstations, but not Windows 3.1x. Users can see the applications delivered to them in NAL Explorer Window, the Start Menu, the System Tray, the Desktop, or any combination of these. NAL Window does not allow you to place objects in the Start Menu, System Tray, or Desktop.
To run NAL Explorer, you must have a recent version of SHELL32.DLL. This file is part of the Microsoft Windows 95 Service Pack 1 Update. You can download it from:
http://www.microsoft.com/kb/softlib/mslfiles/setup.exe
,or
http://www.microsoft.com/windows/software/servpak1/sphome.htm
We suggest that you read the NAL Explorer section of READNAL.TXT for troubleshooting pointers.
Installing the NAL Explorer
From the Windows 95 Start menu, select Run, then type Z:\PUBLIC\ NALEXPLD.EXE and press <Enter<. A NAL Explorer folder will be placed on the desktop (see Figure 10).
Figure 10: The NAL Explorer folder icon.

Using the NAL Explorer
You will notice that when you open NAL Explorer, the first folder you see is labeled with the NDS Tree Name. Currently, there is no way to change the name on this folder, nor is there a way to eliminate this folder.
When you then open up the Tree Name Folder, you will see another folder named with the distinguished name of the Group or Container you associated the Application with. If you want to customize this for your users, you simply add a more descriptive name to the Group's or Container's Description property. If you set up Groups by type of applications you want delivered, this can be a neat way to organize applications for your users.
Uninstalling the NAL Explorer
From the Windows 95 Start Menu, select Run, then type Z:\PUBLIC\ NALEXPLD.EXE /Uand press <Enter<.
|
Note: You must reboot the workstation forthis process to finish. This actually removesNAL Explorer from the workstation, removesthe DLLs originally installed, and cleansthe Registry settings from this program. |
NAL 2.0 Future Enhancements
This is a great first release of NAL 2.0. It provides complete application delivery to the desktop. Other enhancements being reviewed for future releases include the following:
Get Nearest Applications Server. Traveling users will pick up applications from the "closest"applications server. The administrator will still associate the user with one Application object.
Automatic Rights Assignment. Automatic assignment and revocation of file system rights when a NAL application is launched.
WindowsNT and NAL snAppShot. NAL AOTs work as long as your user is logged in as Admin or equivalent to the NT workstation. However, most users do not have the rights to change registry entries, copy files, update shortcuts, and so on. For the Workstation Manager1.1 release, we are including a scheduler that runs as an NT service. This scheduler can have full privilege of the machine or impersonate the logged on user when dispatching tasks. NAL 2.1 will interoperatewith this scheduler.
Server-to-Server Software Distribution.
Launch Applications Based on Computer vs. Container, Group, or User.
NAL 2.0 Properties
This section summarizes the properties of Novell Application Launcher 2.0, grouped by the property pages.
Identification Page
Application Icon Title. Text appears as the caption beneath the icon in the NAL Windows. Default is the same name as when you created the Application object.
Path to Executable File. The path where an application is installed (and will be launched) on a NetWare 4 server. This can be edited if you later move the application to another directory.
Install Only (mutually exclusive with Path to Executable File). Used with snAppShot to copy files down to a local workstation.
Run Once per machine. The Version Stamp "stamps" the workstation with a string. This string has nothing to do with the version of the product (although you could type this in here). This information gets stamped in the Registry as follows: (HKEY_CURRENT_USER\SOFTWARE\NETWARE\NAL)
GUID (Globally Unique Identification). This is how NALtracks Application objects on a workstation without the name being unique. If it didn'tdo this, you could install WordPerfect, delete it, install WordPerfect again, and it wouldn't work.
Change Icon associated with the application.
Environment Page
Command Line Parameters. For special start-up switches for the application's executable.
Working Directory. Path to the application's working directory. This will be the default directory when users do a File, Save.
Run: Normal (Default); Minimize application when run; or Maximize application when run.
Windows NT 16-bit "WoW" support:
Shared (Default) -- Run the 16-bit application in a shared (unprotected) 16-bit virtual DOS machine (VDM). If this application crashes, all 16-bit applications sharing this space will also crash.
Separate -- Run the 16-bit application in its own protected 16-bit VDM. If this application crashes, only it will crash and not affect any other application.
Enable Error Logging to File. The path to a file where any errors will be logged if the applications fails to install or launch. No status is tracked here except for errors (this will be enhanced in the future). Users need file system rights to write to this file in order for it to work.
Clean Up Network Resources. Default is On. NAL will clean up resources allocated, such as drives mapped, ports captured, and connections made to file systems for accessing the application. The Clean Up Network Resources option is enhanced in NAL 2.0 with a new "Monitor Module Name" option. Some applications, like WordPerfect, are actually wrappers. WPWIN.EXE runs WPWIN7.EXE and then terminates, while WPWIN7.EXE continues to execute. The problem is that NAL monitors WPWIN.EXE and quits before the application is really done. Monitor Module Name allows the administrator to type in the name of the real application that is going to run (WPWIN7.EXE in this case) and NAL can then monitor it for termination. The usual error message you see, indicating you need to use this feature, is "Application Not Releasing Resources" when you exit the application.
Drives/Ports Page
Any Drive Mappings or Ports Captured here are automatically "cleaned up" when you exit the application. This assumes you have left the "Clean Up Network Resources" option (discussed earlier) at the default of on.
Description Page
This can give your users more detailed information on the application vs. what they see as the caption in the NAL Window. Users would right-click on the object in the NAL Window and select Properties to view this description.
Fault Tolerance Page
Enable Load Balancing. You could enable this feature for a site which has several applications servers. NAL uses a random number to distribute the load (very simple and basic). NAL does not distribute the load based upon CPU utilization. Load balancing assumes fault tolerance. You would probably do Load Balancing on the same side of WAN links.
Enable Fault Tolerance. There are design considerations here. Your client cannot have its primary DS connection serverbe the Fault Tolerant server that "crashes". (Right-click on Network Neighborhood and select NetWare connections; there will be an "*"next to your primary DS connection server.) If this is the case, you will get error messages when you try to re-launch the application from another server in the Fault Tolerant list. When designing this feature, your application servers in the Fault Tolerant list need to be different from the server where you have your primary DS connection if you want fault tolerance to protect you from a server crash. In this scenario, it will still work if something happens to the application but the server still remains up. This is actually a Client issue, not a NAL issue. Also, if you have more than two servers in the Fault Tolerant list, NAL selects the next server by going right down the list. Fault Tolerant servers might be across WAN links.
Scripts Page
Both Pre-launch and Post-launch application scripts are available. The format used here is the same as with IntranetWare login scripts. Refer to the context-sensitive help for additional information, and for a list of login script commands that are not supported.
Any drive mappings or ports captured here are not cleaned up, even if Clean Up Network Resources is turned on. Also, drives mapped or ports captured here can overwrite existing ones vs. if they're set from the Drives/Ports page (discussed earlier).
Contacts Page
Users could access this page to see whom to contact if they are having a problem with their application. Again, users would right-click on the object in the NAL Window and select Properties to view the Contacts and their Phone Number/Email Address (assuming these properties are set on the Contact user's NDS object).
Associations Page
This controls which Containers, Groups, and/or Users can run the application. This is a Mandatory Property.
Administrator Notes Page
This is a text field (not viewable by users) which can be used to track changes made to the Application object or any other special requirements. snAppShot automatically fills in information here.
Registry Settings Page
Read the context-sensitive help on how to use this feature. We saw earlier how snAppShot automatically makes changes to this property. It is very similar to using REGEDIT if you decide to make manual changes.
INI Files Page
As with the Registry Settings Page, you should read the context-sensitive help on how to use this feature. Edits can be either manually entered or imported with the AOT from the snAppShot utility.
Application Files Page
This contains a list of files required to run applications. The snAppShot utility generates the application files automatically. As with the Registry Settings Page and INI Files Page, you should read the context-sensitive help on how to use this feature. Edits can be either manually entered or imported with the AOT from the snAppShot utility.
Schedule Page
This page allows you to set an application to run during certain times. If you schedule something to be run at 8 a.m. and a user logs in at 9 a.m., the application will run provided the "End Time" is past 9 a.m. See the context-sensitive help for detailed information on this page.
Text Files Page
Use this to change workstation files such as CONFIG.SYS and AUTOEXEC.BAT. See the context-sensitive help for more information and examples of using this feature.
System Requirements Page
This acts as a "filter" to control what applications appear in the NAL Window based upon workstation-specific criteria (minimum processor, minimum amount of RAM and/or free disk space, and operating system type). See the context-sensitive help for detailed information on this page.
Icons/Shortcuts Page
This allows you to control Icons that appear in the Windows 3.1x Program Manager and Shortcuts in Windows 95 and Windows NT Explorer. See the context-sensitive help for detailed information on this page.
Summary
NAL 2.0 saves administrators time and money . . . time because the administrator doesn't have to visit each desktop to install and/or update software applications, and money because it brings network use more in line with the actual number of users. In the past, a user occupied a licensed connection whether or not the user was using the application or printer, because the drive mappings and capture statements were entered in login scripts. NAL solves this problem by mapping drives and capturing printers only when the application is open and releasing the connection when the user exits the application. This means administrators can reduce the number of licenses, saving money on software purchases. In addition, NAL 2.0 puts desktop control and application dependencies in the hands of the administrator, not the user.
Additional Information Resources
NAL product home page is http://www.novell.com/managewise/NAL
TIDs are available from http://support.novell.com
BrainShare presentations on NAL are available from http://www.novell.com/events/brainshare/
NAL 2.0 White Paper is on the NAL home page
NAL has won Product of the Year from Networking Solutions magazine (details are available from http://nwsolutions.com.)
* Originally published in Novell AppNotes
Disclaimer
The origin of this information may be internal or external to Novell. While Novell makes all reasonable efforts to verify this information, Novell does not make explicit or implied claims to its validity.