Installing the "First" NetWare/IP Server
Articles and Tips: article
Senior Consultant
Novell Consulting
01 Jul 1997
NetWare/IP is still a valid way to tie IPX and TCP/IP network together, but it can be a bit daunting when you're faced with installing that first NetWare/IP server. Let a Novell Senior Consultant take you through the process step-by-step and you'll see it's really not as difficult as it may seem.
- Introduction
- Steps for Installing the First NetWare/IP Server
- Installing NetWare/IP on the Second Server
- Quick Summary of Procedures
Introduction
This AppNote is designed to help you install and configure NetWare/IP 2.2. Although it is entitled "Installing the 'First' NetWare/IP Server," this information will help you install subsequent NetWare/IP servers as well. For more information, refer to the August 1996 AppNote "NetWare/IP 2.2 Implementation and Troubleshooting Guidelines" which goes into more detail on deploying NetWare/IP in a LAN/WAN environment.
This AppNote assumes that you have already installed NetWare 4.1 or IntranetWare on an existing server, and that you have Novell Directory Services (NDS) configured and all patches applied that are required for your environment. If this is not the case, install a NetWare 4.1 or IntranetWare server with NDS and apply any required patches before installing NetWare/IP. You can obtain the latest patches from Novell's support web site at:
A Note About Type Conventions Used in This Document
As in all menu utilities from Novell, pressing the Escape key will either take you back one menu level or allow you to continue on. To eliminate redundancy, I have left out some of the "press the Escape key" instructions. When a new menu choice is described that is not displayed on your current screen, press Escape until you see the indicated choice.
Commands to load NetWare Loadable Modules (NLMs) are displayed in monospace type:
LOAD ANY.NLM
Menu choices are enclosed in quotes (select the "Return to previous menu" option). Key names, such as Escape, Enter, Insert, and Delete, are enclosed in pointed brackets (press the <Escape< key).
Steps for Installing the First NetWare/IP Server
This section gives step-by-step instructions for installing NetWare/IP on the first server in your network.
Step One: Check the Prerequisites
Prior to installing NetWare/IP, you should have the information listed in the prerequisite checklist. Below is an example of a filled-out checklist. A blank copy is included on the next page for your own use.
NetWare/IP Prerequisite Installation Checklist (Sample)
Install Date: March 25, 1997 Installed By: Joe NWIP Guru
|
Requirements |
Name |
IP Address |
|
|
TCP/IP Info for your server |
IP Address |
FS1 |
12.1.1.1 |
|
Your Network's Router Address |
12.1.1.254 |
||
|
Your Network's Subnet Mask |
FF.FF.FE.0 |
||
|
DNS Info |
Your DNS Domain Name |
Domain.Com |
|
|
DNS Host Name for this server |
FS1.Domain.Com |
12.1.1.1 |
|
|
Master DNS Name Server |
DNS.Domain.Com |
12.1.1.5 |
|
|
Replica DNS Name Server |
FS1.Domain.Com |
12.1.1.1 |
|
|
Your NWIP Domain |
NWIP.Domain.Com |
||
|
DSS Info |
Primary DSS Server |
FS1.Domain.Com |
12.1.1.1 |
|
Secondary DSS Server(s) |
1. FS2.Eng.Domain.Com 2. FS3.Dep.Domain.Com 3. FS4.Plr.Domain.Com 4. FS5.Fre.Domain.Com 5. FS6.Con.Domain.Com |
1. 12.1.2.5 2. 12.4.56.43 3. 12.36.234.24 4. 12.83.98.241 5. 12.238.97.40 |
|
|
NWIP Info |
NetWare/IP Servers |
1. FS3.Eng.Domain.Com 2. FS4.Dep.Domain.Com 3. FS5.Plr.Domain.Com 4. FS6.Fre.Domain.Com 5. FS7.Con.Domain.Com |
1. 12.1.2.6 2. 12.4.56.44 3. 12.36.234.25 4. 12.83.98.242 5. 12.238.97.41 |
NetWare/IP Prerequisite Installation Checklist
Taken from Novell AppNotes, July 1997 - photocopy as needed.
Install Date: Prepared By:
|
Requirements |
Name |
IP Address |
|
|
TCP/IP Info for your server |
IP Address |
||
|
Your Network's Router Address |
|||
|
Your Network's Subnet Mask |
|||
|
DNS Info |
Your DNS Domain Name |
||
|
DNS Host Name for this server |
|||
|
Master DNS Name Server |
|||
|
Replica DNS Name Server |
|||
|
Your NWIP Domain |
|||
|
DSS Info |
Primary DSS Server |
||
|
Secondary DSS Server(s) |
1. 2. 3. 4. 5. |
1. 2. 3. 4. 5. |
|
|
NWIP Info |
NetWare/IP Servers |
1. 2. 3. 4. 5. |
1. 2. 3. 4. 5. |
Step Two: Configure the Network Adapters and Protocols
Next, the network adapters in the server must be properly configured. I highly recommend using the INETCFG utility to accomplish these tasks. In fact, it is a good idea to use INETCFG to accomplish the tasks of any network adapter configuration. There are several advantages to using this utility. First, INETCFG stores configuration information in a file named NETINFO.CFG, rather than in AUTOEXEC.NCF (or, for SFT III servers, IOAUTO.NCF and MSAUTO.NCF). The LOAD and BIND commands stored in NETINFO.CFG are configured through the INETCFG menu system, which is simpler and less error-prone than manual entry. Second, after configuring an adapter with INETCFG, you can issue the REINITIALIZE SYSTEM command and have all changes take effect, without having to manually unload the LAN driver, reload it, and bind it again.
Before starting INETCFG, it is helpful to see how the network adapters in your server are currently configured. To do this, type the following command at the server console:
CONFIG <Enter<
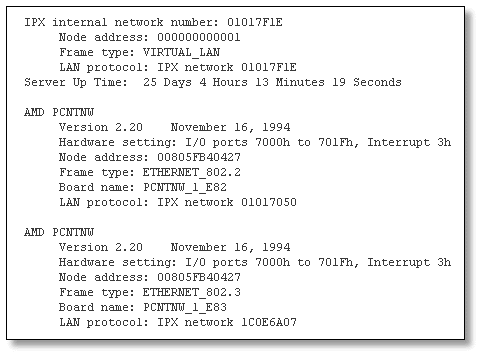
You will see a display showing the drivers that are loaded and the parameters being used (IRQ, I/O addresses, frame type, and so on), as shown in Figure 1.
Figure 1: The CONFIG command displays the current server configuration.
Start the INETCFG utility and, if necessary, input the parameters for each network adapter.
At the server console, type LOAD INETCFG <Enter< to start the INETCFG utility. If this is the first time you have loaded this utility, you will see the prompt shown in Figure 2.
Figure 2: Prompt displayed the first time you run INETCFG.
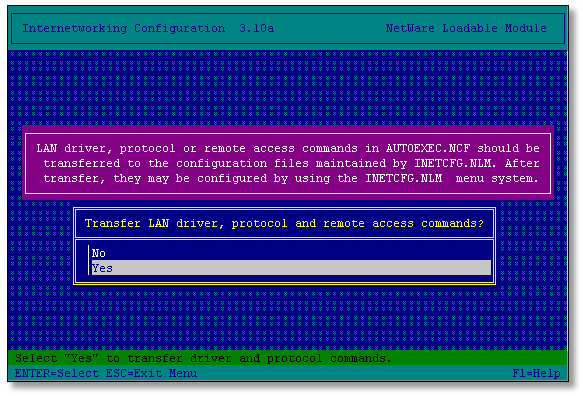
You can choose to transfer the current startup commands from the AUTOEXEC.NCF file into the configuration files maintained by INETCFG. If you want to do this (recommended), answer "Yes" to this prompt. Answer "No" if you prefer to input the information for each network adapter manually.
From the INETCFG main menu, select the "Boards" option (INETCFG refers to network adapters as "boards").
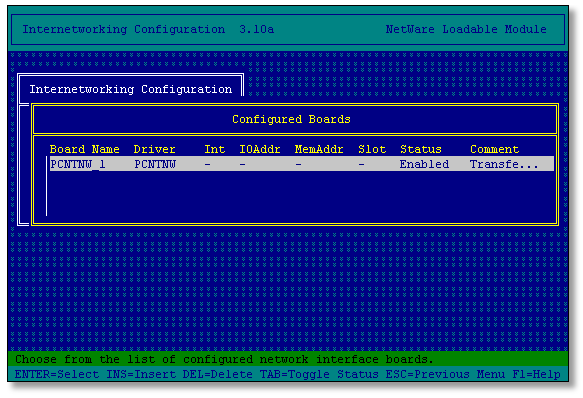
If you answered "Yes" to the prompt in Step 1, your board should be listed, as shown in Figure 3. Highlight the board and press <Enter< to verify that the imported information is correct . You will see the board shown in Figure 3.
If you answered "No" to the prompt in Step 1, no boards will be listed. Press <Insert< and select the appropriate entry from the "Available Drivers" list. Type in a Board Name and provide the requested information for your network adapter.
Press <Escape< to return to the main menu.
Figure 3: Your network adapter should be listed in the Configured Boards list.
From the main menu, select "Protocols" and verify the IPX configuration.
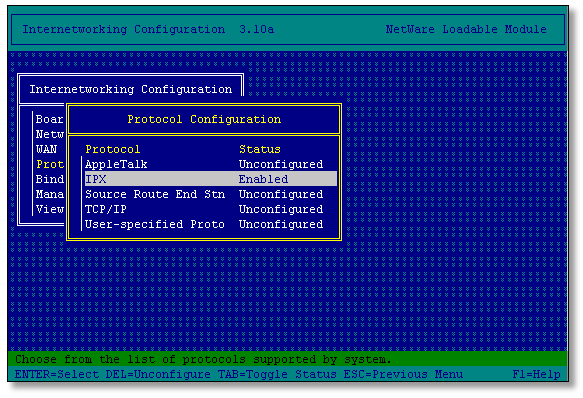
By default, IPX is enabled, as shown in Figure 4 (unless IPX was not already bound to your board in the AUTOEXEC.NCF when you imported this information).
Figure 4: The IPX protocol should be enabled.
Highlight "IPX" and press <Enter< to verify that the information is correct. You can change the Routing Protocol to "RIP/SAP Only" if no NetWare Link Services Protocol (NLSP) is being used on your network. Press <Escape< and answer "Yes" to save the changes.
Select "TCP/IP" and enable this protocol also.
Depending on your network, you may custom configure the other choices available. For example, if this server is to be configured as an IP-IPX gateway, you should enable packet forwarding. For our purposes, we will keep the defaults. Press <Escape< and answer "Yes" to update the TCP/IP configuration. Press <Escape< again to go back to the main menu.
From the main menu, select the "Bindings" option. The protocols that are already bound are displayed in the configured protocol list. Any protocols that have been enabled are available to bind to the network adapter (see Figure 5).
Figure 5: The IPX and TCP/IP protocols are available for binding.
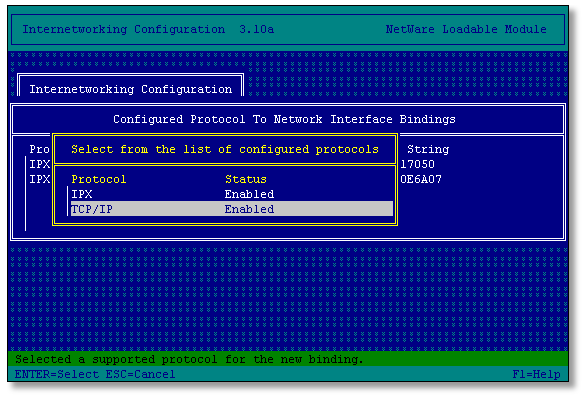
If a protocol you enabled is not listed, press <Insert< to see the protocols that are available. Select IPX and verify or type in your IPX network number and select the frame type you will be using to communicate to the server. After this has been saved, press <Insert< and select "TCP/IP". Type in the IP Address and Mask information and press <Escape< to save the changes.
(Optional) If you want to configure remote access to this server, you can select the "Manage Configuration" option and then select "Configure Remote Access To This Server". If you want this utility to control remote access, enable the Remote Access feature and type in a password.
You can also allow a Telnet connection to this server by enabling "TELNET Connection". However, this is best done from the UNISTART.NCF file in the SYS:SYSTEM directory. This will allow you to disable RCONSOLE and not require SAP 107 on the network to communicate to this server.
Exit the INETCFG utility. From the server console, unload the LAN driver you are using (if you are using RCONSOLE you will lose your connection and must restablich a new RCONSOLE connection). Then type REINITIALIZE SYSTEM <Enter< to have your configuration changes take effect immediately.
Type the CONFIG command from the server console to verify your changes. Both IPX and TCP/IP should be loaded, configured, and bound to the correct network adapter.
You can now go to the next step to begin the NetWare/IP installation process.
Step Three: Install NetWare/IP with INSTALL.NLM
As with all IntranetWare products, NetWare/IP is installed via the INSTALL.NLM utility.
From the server console, type LOAD INSTALL <Enter< to start the INSTALL utility.
Select "Product Options" from the main menu.
If the IntranetWare CD is available on the server from where you originally installed the software, select "Install NetWare/IP" from the menu.
If the CD is not available or the NetWare/IP software is located in another directory path, select "Install a product not listed". If the software is in a directory on this server, press <F3< and enter the full path to where the software is located (for example, SYS:PRODUCTS\NWIP). You may copy the software from the CD to a directory on the server (Products\NWIPSRV). If you are running INSTALL from a remote workstation via RCONSOLE, press <F4< and enter the full path to where the NetWare/IP software is located on the remote workstation. Press <Enter< to continue.
The main copy operation will begin. As it progresses, a screen similar to the one shown in Figure 6 is displayed.
Figure 6: INSTALL shows the progress of the main copy operation.
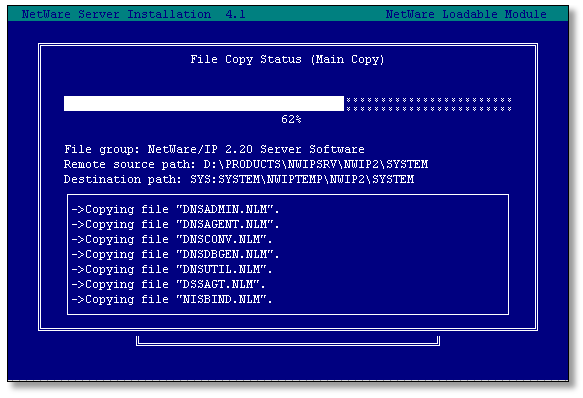
When the copy operation is finished, you will see a prompt to view the readme.txt file. Press <Escape< and answer "No" to forego reading the file at this time. (You should read this file after NetWare/IP is installed.)
From this point on, it is very important to read and follow the directions presented on the screen. This is key to the first NetWare/IP server being installed successfully.
You will next see a prompt to enter a local host name (see Figure 7).
Figure 7: You must enter a name to be associated with the server's IP address.
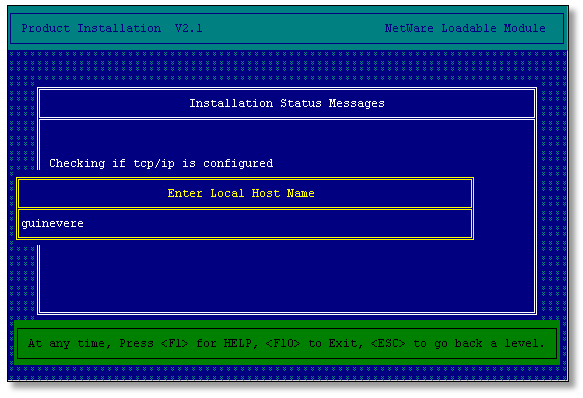
This name will be viewed in the Domain Name Service (DNS) database as an "a" record for this server's IP address. The field defaults to the NetWare server name. Unless you have a reason to change it, leave it at the default.
When the installation is complete, you will see the message shown in Figure 8. Press <Escape< as instructed.
Figure 8: Message displayed when NetWare/IP installation is complete.
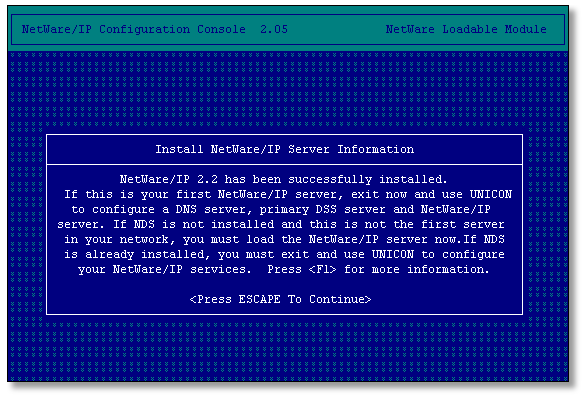
Answer "No" to the prompt asking Do you want to configure NetWare/IP Server? Read the message displayed in the next screen (see Figure 9) and press <Escape< to continue.
Figure 9: Warning message when NetWare/IP server is not configured.
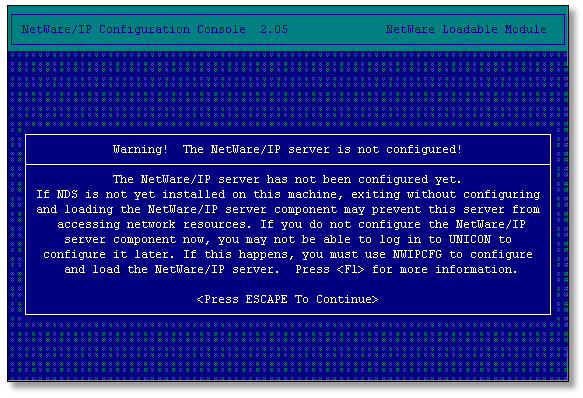
Press <Escape< again and answer "Yes" to the prompt to Exit NetWare/IP Server Configuration Utility. Read the screen shown in Figure 10.
Figure 10: Prompt displayed upon exiting NetWare/IP configuration.
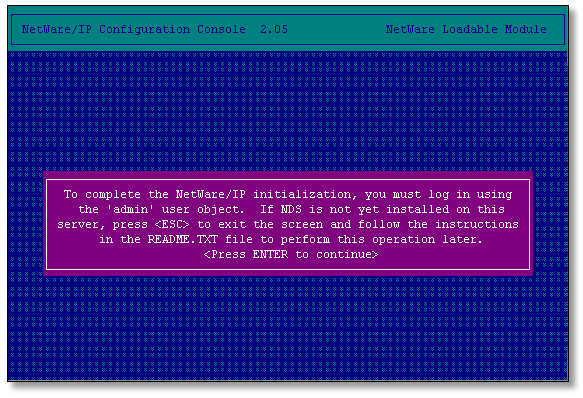
Press <Enter< to complete the NetWare/IP initialization.
The UNICON utility is automatically started. In the screen shown in Figure 11, type in the Admin password to have the necessary NDS objects installed into the tree. (For more detailed information on this, refer to the readme.txt file.)
Figure 11: To run UNICON, you must login to the server as Admin.
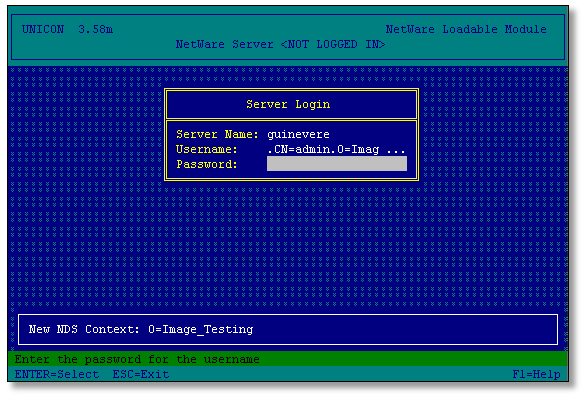
After the objects are copied, the message in Figure 12 is displayed.
Figure 12: Message displayed when NetWare/IP initialization is complete.
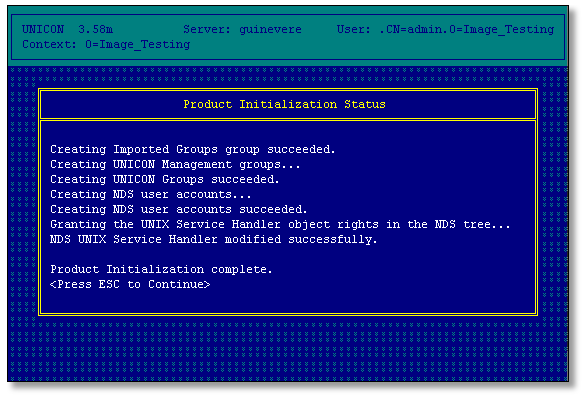
Press <Escape< as product initialization is complete.
The screen in Figure 13 is displayed.
Figure 13: Message displayed after modules are loaded.
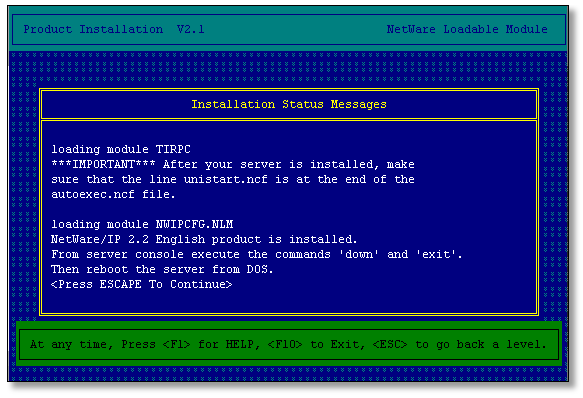
Disregard the message to down, exit and start the server again at this time. Simply press <Escape< to continue.
Step Four: Setting Up NetWare/IP Services
The final phase of installing the NetWare/IP server is to configure and start the appropriate services.
Administer DNS. First, you must initialize the DNS master database as follows to use this server as your DNS:
From the server console, type LOAD UNICON <Enter<.
Log in as Admin (or equivalent user) as prompted.
Select "Manage Services", "DNS", "Initialize DNS Master Database", and "DNS Domain".
Type in your domain name. For this example, the domain name is "novell.com" (see Figure 14).
Figure 14: Enter the domain name as prompted.
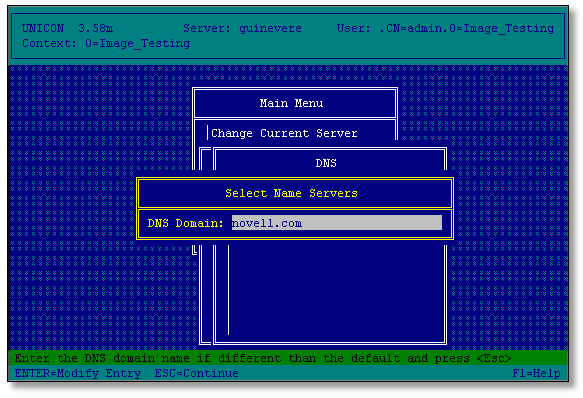
Press <Enter< and <Escape< to continue.
Answer "No" to the question "Do you want DNS for specific subnetworks?" unless you are currently using subnetworks. If you are, answer "Yes" and press <Insert< to enter subnetwork information. Press <Escape<. DNS will now be initialized.
Press <Escape< after DNS has started.
Configure NetWare/IP Subdomain. Next, follow these steps to configure the subdomain.
From the UNICON main menu, select "Manage Services", "DNS", "Administer DNS", "Manage Master Database", and "Delegate Subzone Authority".
Press <Insert< and type in a name for your domain (for example, "nwip.novell.com"), as shown in Figure 15.
Figure 15: Prompt to enter the domain name.
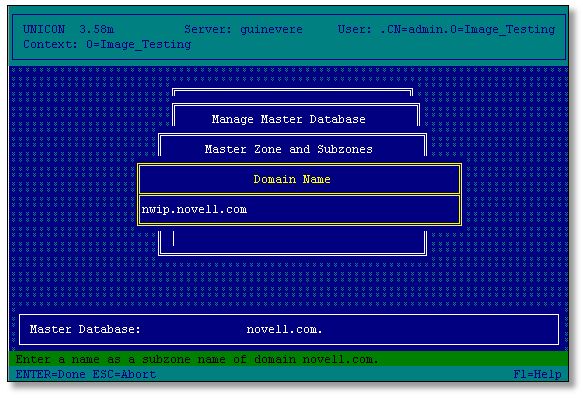
You now see a list of "Available Hosts" in which your server should appear. Select your server and press <Enter<. Press <Escape< once.
If you select "Manage Data", you will see your server listed as an "ns" record for the nwip subzone you created. There will also be other hosts information in this file the first time you view it. This is sample information which you may delete. Be careful not to delete the hosts information for your server or domain!
Configure the NetWare/IP Server. The next set of steps explains how to configure the NetWare/IP server.
Press <Escape< until you are back at the UNICON main menu.
From the main menu, select "Manage Services", "NetWare/IP", and "Configure NetWare/IP Server".
Enter the appropriate information as follows:
Type in the NetWare/IP domain you just created ("nwip.novell.com" in our example).
For "Preferred DSS", enter the IP Address of this server.
For "Forward IPX Information to DSS?", the default is "No". Change it to "Yes".
Press <Escape< and answer "Yes" to save the changes. Press <Escape< until you are back at the main menu.
Configure Primary DSS.
From the main menu, select "Manage Services", "NetWare/IP", "Configure NetWare/IP Server", and "NetWare/IP Administration Menu".
Select "Configure Primary DSS".
Type in the NetWare/IP domain you created ("nwip.novell.com" in our example. For "Primary DSS Host Name", type the fully qualified DNS name of the server (for example, "guinevere.novell.com"). Assign a unique "IPX Network Number" for the network. Press <Escape< to continue and answer "Yes" to save the changes.
Read the DSS configuration reminder shown in Figure 16 and press <Escape< to continue.
Figure 16: The DSS configuration reminder.
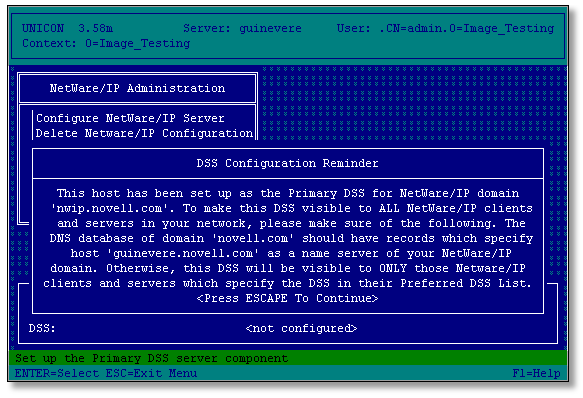
Start the Services for NetWare/IP.
From the UNICON main menu, select "Start/Stop Services", press <Insert<, and then select "Domain SAP/RIP Server".
Press <Insert< again, and then select "NetWare/IP Server".
Press <Escape< until you return to the main menu.
Configure Error Reporting. This step is optional but recommended for troubleshooting and viewing NetWare/IP information being sent and received from other NetWare/IP servers.
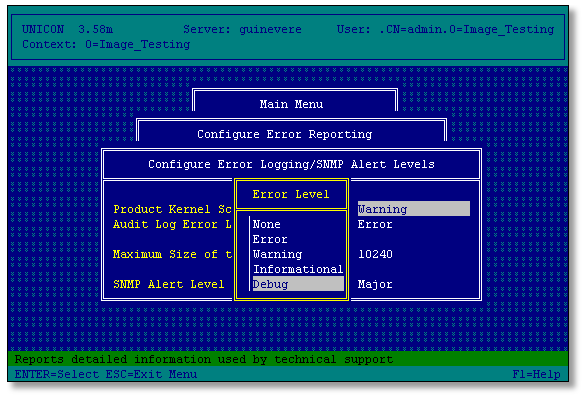
From the UNICON main menu, select "Configure Error Reporting" and then "Configure Error Logging/SNMP Alert Levels".
Highlight "Product Kernel Screen Level" and press <Enter<. Select the "Debug" option, as shown in Figure 17.
Figure 17: Setting the Debug error reporting option in UNICON.
Press <Escape< and exit the UNICON utility.
Your First NetWare/IP Server Is Installed
From the message displayed on the console, you see that NetWare/IP is installed, initialized and functional. You can always select the UNICON "Start/Stop Services" option to see which services are running.
Installing NetWare/IP on the Second Server
After setting up and configuring the first NetWare/IP server, the rest is easy. The second server (and any other subsequent servers) is installed very much like the first one by using the INETCFG and INSTALL utilities as discussed above.
Configure the Network Adapters with INETCFG
The steps are exactly the same for configuring the network adapters in the second server (and others). Refer to the specific steps given in the previous section for doing this with the INETCFG utility.
Install NetWare/IP Software via INSTALL.NLM
The steps for installing the NetWare/IP software on the second server are the same up to a point. From there on, INSTALL automatically detects the first NetWare/IP server configuration.
From the server console, type LOAD INSTALL <Enter<. Select "Product Options" and proceed as described earlier to either select "Install NetWare/IP" from the menu or indicate an alternate path to the software. The main copy operation will begin. Again, it is very important to read the screens and follow the directions presented.
Auto Detection of NetWare/IP Configuration. The installation should detect existing NetWare/IP server configurations. The screen displayed at this point will indicate the NetWare/IP domain it has detected a configuration for, which should be the domain you created for the first server. Press <Escape< and answer "Yes" to use the detected NetWare/IP configuration.
Auto Detection of DNS Resolver Configuration. Next you should be prompted with another information screen indicating that it has detected the DNS resolver configuration. The screen should display the DNS domain INSTALL found, which should be the one you created previously. Press <Escape< to continue. If the displayed information is correct, answer "Yes" to use the DNS resolver configuration.
Start the NetWare/IP Server
You should now be at the NetWare/IP Configuration Console, with NWIPCFG.NLM auto loaded via the install utility. At the bottom of the screen, you see that the DNS domain, NetWare/IP Server, and NetWare/IP domain have been detected and configured for you. Notice also that the NetWare/IP Server is not loaded. Start it by following these steps:
Highlight "Start NetWare/IP Server" and press <Enter<.
Press <Escape< to get back to the NetWare/IP Configuration Console.
Press <Escape< one more time and answer "Yes" to exit this utility.
Read the screen and press <Enter< to complete the NetWare/IP initialization.
Type in the Admin password to have the NDS objects installed into the tree.
Press <Escape< after initialization is complete and the screen displays that the product has been installed successfully. Disregard the message to down the server and exit at this point. Press <Escape< to continue.
You have now set up the second NetWare/IP server!
Configuring the Server as a Secondary DSS
At this point, the second server is only a NetWare/IP server that is using the already-installed Primary DSS for its database updates. To configure this or any other NetWare/IP server as a Secondary DSS, follow these steps:
Configure the Secondary DSS Information in UNICON.
Start the UNICON utility by typing LOAD UNICON <Enter<. Log in as Admin or equivalent when prompted.
Select "Manage Services", "NetWare/IP", and "Configure Secondary DSS".
The information is auto-detected from the NetWare/IP domain you created. Press <Escape< to continue and answer "Yes" to use the detected Secondary DSS configuration.
Verify that the information is correct (it should be) and press <Escape< to continue. Notice now at the bottom of the screen the "DSS:" field is now displaying "configured as a secondary".
Press <Escape< until you return to the UNICON main menu.
Start the Services for NetWare/IP. To start the appropriate services, select "Start/Stop Services" from the UNICON main menu. Press <Insert<, select "Domain SAP/RIP Server", and press <Enter<.
Notice that DNS also starts when you start the Domain SAP/RIP Server. This is because DSS is providing a lookup service to locate services in the database. Do not stop this DNS service!
Configure Error Reporting. This is optional but recommended for troubleshooting and viewing NetWare/IP information being sent and received from other NetWare/IP servers.
From the UNICON main menu, select "Configure Error Reporting" and then "Configure Error Logging/SNMP Alert Levels".
Highlight "Product Kernel Screen Level" and press <Enter<.
Select the "Debug" option.
Press <Escape< until you exit the UNICON utility.
Quick Summary of Procedures
For future reference, the following is a summary of the commands and keys to use in setting up the first and second Netware/IP servers.
First NetWare/IP Server
LOAD INETCFG

   "Boards"

   "Protocols"

   "Bindings"

   "Manage Configuration"

   "Configure Remote Access To This Server"

<Escape<and answer "Yes" to exit
REINITIALIZE SYSTEM
LOAD INSTALL

   "Product Options"

   "Install NetWare/IP" (or <F3<, type path where code is located) <Enter< <
   <Escape< and "No" (or "Yes" to view the readme file)<
   "Enter Host Name"

   <Escape< and "No"<
   <Escape< and "Yes"<
   <Enter<<
   "Login to NDS as Admin via UNICON"

   <Escape< <Escape<<
"Installation Complete"
LOAD UNICON (to configure DNS)

   "Manage Services"

   "DNS"

   "Initialize DNS Master Database"

   "Type in DNS domain" <Enter< <Escape< and answer "No" or "Yes" (your decision)<
   <Escape<<
   "Administer DNS"

   "Manage Master Database"

   "Delegate SubZone Authority"

   "Insert NWIP Domain"

   "Available Hosts"

<Escape< <Escape< <Escape< <Escape<
LOAD UNICON (to configure NetWare/IP Server & Primary DSS)&
   "Manage Services"

   "NetWare/IP"

   "Configure NetWare/IP Server"

   "Type NetWare/IP Domain"

   "Preferred DSSes"

   <Escape<<
   "Forward IPX Information to DSS?" Answer "Yes"

   <Escape< and "Yes"<
   <Escape<<
   "Configure Primary DSS"

   "Type in NetWare/IP Domain"

   "Primary DSS Host Name"

   "Unique IPX NetWork Number (in hex)" <Enter< <Escape< and answer "Yes"<
<Escape< <Escape< <Escape<
LOAD UNICON (starting services)

   "START/STOP Services"

   <Insert<<
   "Domain SAP/RIP Server"

   <Insert<<
   "NetWare/IP Server"

<Escape<
Second NetWare/IP Server
LOAD INETCFG

   "Boards"

   "Protocols"

   "Bindings"

   "Manage Configuration"

   "Configure Remote Access To This Server"

<Escape< and answer "Yes" to exit
REINITIALIZE SYSTEM
LOAD INSTALL

   "Product Options"

   "Install NetWare/IP" (or F3, type path where software is located) <Enter<<
   <Escape< and answer "No" (or "Yes" to view the readme file)<
   "Enter Host Name" <Enter<<
   <Escape< and answer "Yes"<
   <Escape< and answer "Yes"<
   "Start NetWare/IP Server"

   <Enter< <Escape< <Escape< "Yes" <Enter<<
   Login to NDS as Admin via UNICON

   <Escape< <Escape< <Escape<<
   <Escape< and answer "Yes"<
   "Installation Complete"

NetWare/IP server initialized and running.
LOAD UNICON (Configure Secondary DSS)

   "Manage Services"

   "NetWare/IP"

   "Configure Secondary DSS"

   <Escape< and answer "Yes"<
<Escape< <Escape< <Escape<
LOAD UNICON (Starting Services)

   "Start/Stop Services"

   <Insert<<
   "Domain SAP/RIP Server"

<Escape< <Escape< "Yes"
* Originally published in Novell AppNotes
Disclaimer
The origin of this information may be internal or external to Novell. While Novell makes all reasonable efforts to verify this information, Novell does not make explicit or implied claims to its validity.