Accessing IntranetWare Resources with the NWGINA Logon Interface and the NetWare Provider
Articles and Tips: article
Senior Research Engineer
Novell AppNotes
KEVIN RHODES
Software Engineer
Novell Internet Access Division
01 May 1997
Novell's NWGINA and NetWare Provider open the door to accessing a host of IntranetWare resources from within the familiar Windows NT interface. This AppNote guides users through the ins and outs of using the Novell network.
- Introduction
- The Novell IntranetWare Client for Windows NT GINA
- Logging Out or Logging In as Another User
- Accessing the IntranetWare Security Window
- The NetWare Provider
- Conclusion
Introduction
The Novell IntranetWare Client for Windows NT workstations is tightly integrated with the Windows NT operating system so that users can access and manipulate IntranetWare resources transparently. An integrated authentication module called NWGINA gives users a single, synchronized login to their Windows NT workstation as well as to all authorized NetWare and NT network resources. As a result, users don't have to worry about remembering multiple names and passwords. And because users gain access through Novell Directory Services (NDS), they have complete access to all NetWare services including stored files, printing, and applications.
In addition, the IntranetWare Client for Windows NT includes a NetWare Provider module that extends the NT network interface to enable users to access advanced IntranetWare features that are not exposed natively in Windows NT. Through My Computer, Explorer, and Network Neighborhood, users can easily navigate the NDS-based NetWare network and access NetWare file and print services.
This AppNote covers the following aspects of accessing IntranetWare resources:
The GUI interface as you log in to the network services supplied by NetWare/IntranetWare and Windows NT. This includes the Windows NT workstation GINA and Novell's GUI Login screen.
Several methods you can use to logout and shut down the Windows NT workstation.
Browsing network resources and performing IntranetWare tasks using the services of the NetWare Provider.
The Novell IntranetWare Client for Windows NT GINA
When the IntranetWare Client for Windows NT is installed, it replaces the Microsoft GINA (Graphical Identification and Authentication) DLL with Novell's NWGINA.DLL. When users log into an NT workstation, the IntranetWare Client transparently executes the NetWare 4 RSA public/private key login process contained in NWGINA.DLL. DLL. This DLL is integrated with the NT login so that users log in only once to access both local and network resources.
When you start up a Windows NT workstation with the IntranetWare Client for Windows NT installed, you see the Begin Login window that is initiated by pressing the Ctrl+Alt+Del keys simultaneously (see Figure 1).
Figure 1: The IntranetWare Client "Begin Login" window.

Pressing Ctrl+Alt+Delete brings you to the Novell IntranetWare Client Services v4.10 window, shown in Figure 2.
Figure 2: The IntranetWare Client graphical login window.
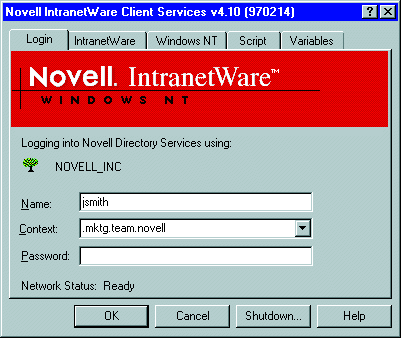
We'll look first at each of the tabs across the top of the window, and then we'll discuss the Network Status line and the buttons at the bottom.
The Login Tab
The Login tab is the default page, shown in Figure 2 above. The first line indicates whether you are logging in to Novell Directory Services or to a Novell server using Bindery Services. If you are logging in to NDS, you will see a tree icon and the name of the current NDS tree (NOVELL_INC in the sample window above). If you are logging in to a NetWare 3.x server or a NetWare 4.x server using Bindery Services, you will see a server icon and the name of the server you are logging in to. (The preferred NDS tree and preferred server can be set on the IntranetWare page.)
On the Login page are three entry boxes-Name, Context, and Password:
The Name entry box is for your username that you use to log in to NDS, a NetWare server, or NT services. Your network services name can be the same as the local NT user name used for Windows NT services access, or it can be different. If the names do not match, you can synchronize them so that you log in to Windows NT services under one name and into NetWare services with another (more on this later).
The Context entry box is used only if you are logging in to an NDS tree. This entry is greyed out if you are making a bindery connection to a NetWare server. The IntranetWare Client remembers the last five contexts that you have typed in. These are displayed if you click on the list button at the right of the entry box.
The Password entry box allows you to enter your password for either NetWare services, local NT services, or both. You must at least log on to the Windows NT computer or domain before you can use the computer. (If you only want to log in to Windows NT local services, go to the Windows NT tab and check the "Windows NT login only" box.)
Once you have entered the correct information, click on OK to proceed with the login/authentication process.
The IntranetWare Tab
Clicking on the IntranetWare tab allows you to choose whether you want to do an NDS Login or a Bindery Login, and specify the preferred tree or server.
NDS Login. Click on the Tree radio button to select an NDS login. You can then click on the list button at the right of the Tree entry box to see all of the NDS trees that are available on your network. You can also type the first characters of the tree name to alphabetically search through the list of NDS trees. If the characters you type do not match any tree name, you are brought to the top of the tree list.
Once you have selected a tree, you can also type in a preferred server that you want to authenticate to. This can help speed up the login process if this is a "home" server that you mainly use. After you select a new tree, you will see <ANY SERVER< displayed in the Preferred Server entry box. At this point you can simply type in your server's name if you know its full NDS object name. Otherwise, click on the drop-down list button to search for existing servers. You can either type in the NDS context where you want to start the search, or you can choose to start the search from the root of the tree. Click on the desired server in the resulting list to insert it into the Preferred Server box.
Once the preferred NDS tree and server are selected, click on the Login tab to return to the Login page, where you can enter your username and password to access NetWare services.
Bindery Login. Click on the Server radio button to select a Bindery Login. You can then click on the drop-down list button at the right of the Server entry box to see a list of servers that are available on your network. You can also type the first few characters of the server name to alphabetically search through the list of bindery servers. If the characters you type do not match any server name, you are brought to the top of the server list.
Once the preferred server is selected, click on the Login tab to return to the Login page, where you can enter your username and password to access NetWare services.
The Windows NT Tab
You can use the Windows NT tab to give the proper user information to access Windows NT local services or Microsoft's Domain Services. Remember that tou must at least have access to Windows NT local services in order to use this workstation.
In the Local Username entry box, type in the username that was assigned to you by the Windows NT Administrator, or by Novell's Workstation Manager utility. In the From entry box, choose the name of the workstation or a Windows NT Domain that you want to log in to. You can click on the drop-down list button to see a list of NT Domains that are available on your network. You can also type the first few characters of the name to alphabetically search through the list of domains or workstations.
If you want to only log in to the local services on the Windows NT workstation or only to a Windows NT domain, check the "Windows NT login only" box. This will eliminate the addition of NetWare services to the login process.
Click on the Login tab to return to the Login page, where you can type in your name and password to access the network services you have selected. If you want to access NetWare services and your Windows NT password is different than your NetWare password, enter your NetWare password. If you are accessing only the local services on the Windows NT workstation or a Windows NT domain with no NetWare services, enter your NT password.
The Script Tab
If you have an alternate login script or profile script that you prefer to run, it can be specified in the Script tab. For example, if you had an alternate login script stored locally as C:\SCRIPT\USER.TXT, you could enter that path and filename in the Login Script entry box on the Script page. An alternate profile script can be run only if the <DEFAULT< login script is selected. The IntranetWare Client remembers the last five scripts and paths for both user login and profile scripts and stores them in the Windows NT Registry. You can access previously-used entries by clicking on the drop-down arrow button.
To run the selected login scripts, make sure the Run Scripts box is checked. As you log in, the IntranetWare Client displays the results of running the script (user authentications, drive mappings, and so on) in a Login Results window. By default, the results screen should close by itself. However, if any errors occur as the login script executes, the window will stay open so you can view them. If you do not want the results window to close automatically even if no errors are encountered, uncheck the "Close script results automatically" box.
The Variables Tab
The Variables tab allows you to specify up to four variables that are passed to the login scripts that are executed when logging in using the graphical login utility. These can be used to pass additional parameters to customize your login script. Specify the substitution values you want for login script variables %2, %3, %4, and %5 (%1 is your login name). These are equivalent to the corresponding parameters you can pass in the LOGIN command from DOS. These variables can also be used to launch conditional portions of the login script. For example, if you wanted to log in and set up a test environment using an SVGA monitor, you could enter "SVGA" as the %2 variable.
Status Line and Bottom Buttons
The Network Status line near the bottom of the Novell IntranetWare Client Services window indicates the current state of the network connection. As the IntranetWare Client Services window comes up when you initially press Ctrl+Alt+ Delete to begin the logon process, you will see the Network Status change from "Disconnected" to "Ready" as the services become available for your use. You should wait until the status shows as "Ready" before you log in.
The four buttons at the bottom of this window perform the following functions:
Click the OK button after you have entered your name, password, and any other login parameters, to establish the connections you have specified.
Click the Cancel button to abort the login process. You will be returned to the Begin Login window and you will need to press Ctrl+Alt+Delete to log in to either NetWare services or to the Windows NT network or local services before you can access this workstation.
Click the Shutdown button to initiate the process of shutting down the computer screen. The Shut Down Computer window gives you the option of either shutting down the workstation so it can be turned off, or shutting down and restarting the workstation for further use.
The Help button brings up online help for the page that is currently displayed.
Logging Out or Logging In as Another User
Windows NT workstation allows you to log out/shut down the computer in a number of ways. By clicking Start on the taskbar and selecting Shutdown, or by pressing the Alt+F4 key combination, you can access the Shut Down Windows screen shown in Figure 3.
Figure 3: The Shut Down Windows screen.
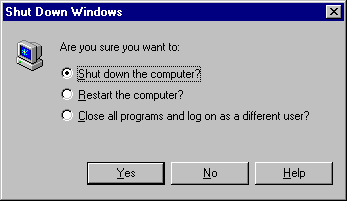
The "Shut down the computer?" option logs you out of the network, closes all active programs, and prepares the computer to be turned off. When it is ready, Windows NT displays a Shutdown Computer window informing you that it is now safe to turn off your computer. If you click on the Restart button, you can restart the workstation without having to turn the power off and back on again. (On some laptops, the Shutdown option shuts off the computer and you will have to turn it back on to restart it).
The "Restart the computer?" option logs you out, closes all active processes, and performs a hardware reset (similar to pressing Ctrl+Alt+Del on a DOS-based computer). If you select this option and hold down the Shift key as you click the Yes button, Windows NT will skip the hardware reset and restart Windows (similar to exiting Windows 3.x and then typing "WIN" at the DOS prompt on a DOS-based computer).
The "Close all programs and log on as a different user?" option logs you out, closes all active applications, and returns you to the Begin Login window. Press Ctrl+Alt+Delete to bring up the IntranetWare NWGINA login window so you can log in to different NetWare/IntranetWare services or use a different user identification.
Accessing the IntranetWare Security Window
Pressing Ctrl+Alt+Delete anytime the IntranetWare Client is running brings up the IntranetWare Security window. This window contains information about your current login to both NetWare/IntranetWare and local/network Windows NT resources. For example, the IntranetWare Login Information box displays information similar to the following:
Ed is logged into NDS Tree NOVELL_INC

as CN=eliebing.OU=cdr.OU=orm.O=novell

Login Date: 3/25/97 1:42:04 PM
The Windows NT Login Information displays information similar to this:
Administrator is logged into EDSCOMP
There are a number of buttons at the bottom of the window that allow you to perform several security-related tasks and other general tasks.
|
Lock Workstation |
Allows you to lock the workstation so that no one will be able to use it unless they know your password or are a system administrator. To unlock the workstation, press Ctrl+Alt+Delete to bring up a window in which you can enter your password. |
|
Change Password |
Allows you to change passwords for the user accounts on the listed resources (includes NT and Novell). You must first provide the old password, and then Type the new password and a confirmation of the new password. |
|
Logout |
Allows you to log out of your present network session and returns you to the Begin Login window where you can press Ctrl+Alt+Delete to log in as another user or to other network/local resources through the NWGINA interface. |
|
Task List |
Brings up the Windows NT Task Manager (the same window you see if you right-click on the task bar and select Task Manager), with three tabs: On the Applications page is listed all of the applications that are running and their status. If an application is no longer responding, you can shut it down by highlighting it and clicking on theEnd Task button. The Processes page lists the processes that are currently running. You can terminate an errant process by highlighting it and clicking on the End Process button. The Performance page shows CPU and memory usage, along with other performance- related statistics. |
|
Shutdown |
Allows you to end your current session and either shut down the computer so you can turn it off, or shut it down and restart it for further use. |
|
Cancel |
Closes the IntranetWare Security window and returns you to the Windows NT desktop. |
The NetWare Provider
Like Windows 95, Windows NT allows users to access any number of different networks simultaneously. Each of these networks must have a provider--piece of software that provides network services through the Windows NT interface. The provider is not a standalone application with its own interface; rather, it is integrated into the Windows NT desktop environment. Windows NT 4.0 adopted the same environment as Windows 95. When users access a utility such as My Computer, Explorer, or Network Neighborhood, requests for network services are routed through the Multiple Provider Router to the appropriate network provider.
Novell's Network Provider for the IntranetWare Client for Windows NT is a DLL called NOVNPNT.DLL. This module uses the Novell 32-bit Client Libraries to access the IntranetWare Client Redirector (NWFS.SYS), which returns information from the NetWare network to Windows applications such as My Computer, Explorer, and Network Neighborhood. Novell's Network Provider extends the functionality of these utilities to include features specific to NetWare and NDS. With the Novell Provider, IntranetWare NT Client can browse and access network resources--even resources on multiple NDS trees. The Novell Network Provider establishes connections to NetWare servers, volumes, directories, and files, as well as print queues, either through UNC paths or through map and capture functions.
This section begins with an overview of how to browse network resources using the three Windows NT utilities and the services of the NetWare Provider. It then focuses on the various NetWare tasks you can perform through Explorer and Network Neighborhood.
Browsing Network Resources
Because Windows NT 4.0 uses the Windows 95 user interface as its default user interface, you can browse the resources available to your computer through three different utilities:
My Computer-browses through the resources available on your computer
Explorer-browses through folders in a hierarchal fashion
Network Neighborhood-browses through the resources available on the entire network
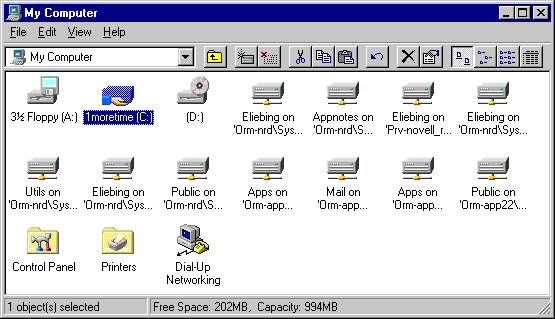
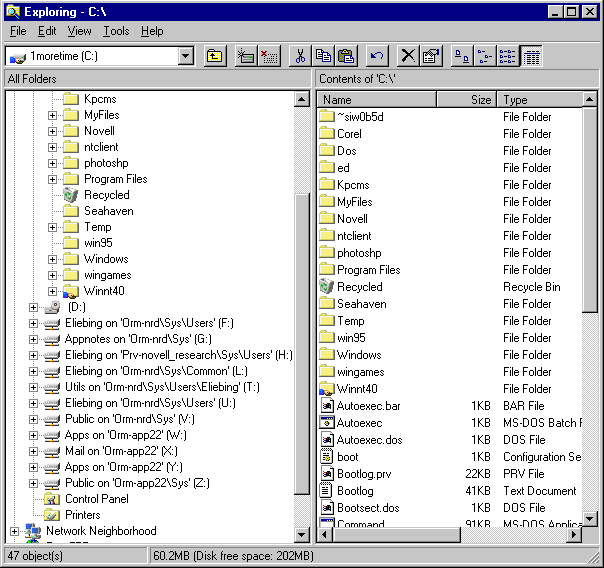
Browsing Using My Computer. When you start up My Computer, it displays all of the physical devices available on your computer (floppy drives, local hard drives, network drives, and so on). It also displays the Control Panel folder and a folder for printers installed on your computer, as shown in Figure 4.
Figure 4: My Computer displays the resources available on your computer.
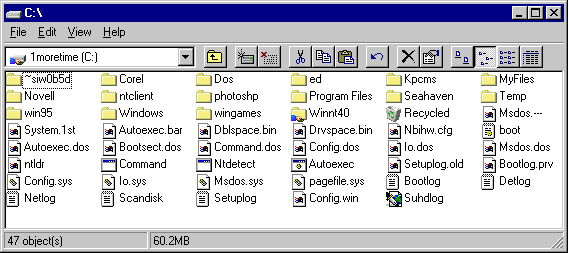
To view lower levels within a drive, simply double-click on its icon. For example, double-clicking on the C: icon shows the contents of the drive, as shown in Figure 5.
Figure 5: Clicking on a drive shows its contents.
Double-clicking on a folder opens another window for that directory and shows its contents.
|
Note: You can set up My Computer,Explorer, and Network Neighborhood so that the currently openwindow is used instead of opening a new window for every new directorythat you explore. To do this, select View | Options from the pull-downmenu. Select the "Browse folders by using a single window that changes when you open eachfolder" option. To make this effective, click the Apply button at thebottom of the Options window. If you choose the "single window"option, you should also choose to display the Toolbar so you canmore easily navigate up and down the directory structure. To addthe Toolbar option, select the View pull-down menu, then checkthe Toolbar entry. |
Double-clicking on a data file opens the file in a corresponding application that has been matched to the data file either automatically because of the data file's extension, or manually by selecting the application.
Double-clicking on an application runs it. You can also click on a self-extracting executable file to unzip the file. If you associate an unzip program with zipped files, clicking on a file with the appropriate extension will unzip the file.
Double-clicking on a print queue icon shows the print queue to a designated printer if that printer definition has been previously installed on the workstation. Otherwise, Windows NT asks if you would like to set up the selected print queue. (This is explained in the AppNote entitled "Setting Up Network Printing with Novell's IntranetWare Client for Windows NT" in this issue.)
Browsing Using Explorer. When you launch Explorer by selecting Start | Programs | Windows NT Explorer, you will see a window displaying all folders on the local and network drives. The list on the right displays the contents of the folder currently selected at the left, as shown in Figure 6.
Figure 6: The Windows Explorer displays all folders on local and network drives.
|
Note: To create a shortcut to theExplorer utility on the desktop, right-click on the Windows desktop,select New | Shortcut | Browse, and then double-click on the Explorerutility found in the Windows NT directory. Select Next until youreach the Finish button. The Explorer utility icon will appearon the Windows desktop for quicker access. You can then drag theicon and place it over the Start button on the taskbar, whichmakes the utility appear above the Settings/Documents/Programsportion of the Start Button'smenu. Now you can access the Explorer utility any time withouthaving to close all your open windows to get to your desktop. |
Explorer operates much as File Manager did in Windows 3.x. To browse through the directory hierarchy, double-click on a folder or drive icon. Browsing by exploring simplifies copying and moving files. Another way to access the Explorer is to right-click on any folder or object and select the "Explore" option from the resulting menu.
|
Caution: Using the Explorer utilityto browse through network drives can cause problems with networkbackup applications and file compression features that key offthe Last Accessed bit to determine which files to backup or compress.As you browse, Explorer opens every file in every directory thatyou explore so that it can determine which icon to display alongwith the file. This file open changes the Last Accessed bit onall files in the directory, even though the files were not actuallyaccessed by the user. This can prevent time-sensitive file compressionand incremental backups from working properly. There is currentlyno fix for this problem, other than to refrain from using Explorerwhen browsing directories on network drives. |
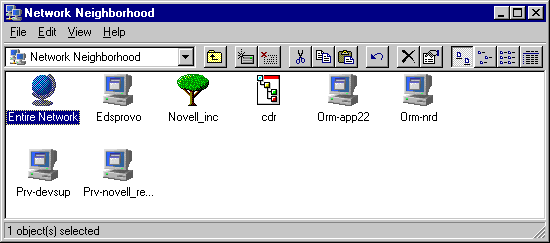
Browsing Using Network Neighborhood. Network Neighborhood allows you to browse not only through your own computer, but through other computers in your workgroup and through your entire network. When you start up Network Neighborhood, it shows icons for:
The entire network
The name of the NT workstation or its corresponding workgroup
Your current NDS tree
Your default context in that tree
Servers to which you are authenticated and licensed through NDS
Servers to which you are Bindery authenticated
In the sample screen shown in Figure 7, "Edsprovo" is the name of the NT workstation, "Novell_inc" is the current NDS tree, "cdr" is the default container (context), and "Orm-app22" and "Orm-nrd" are servers to which the user is authenticated and licensed through NDS.
Figure 7: Network Neighborhood.
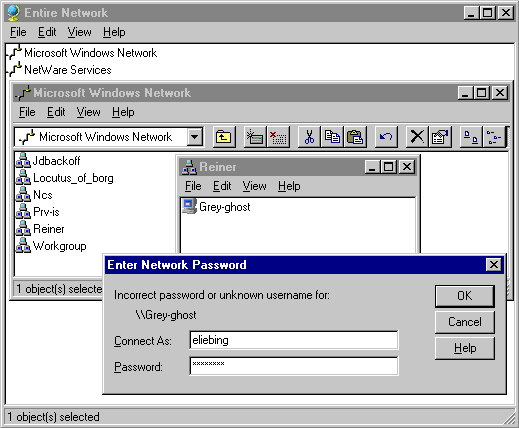
To browse all network resources, click on the Entire Network icon. The Entire Network window displays two network choices: Microsoft Windows Network and NetWare Services.
Double-clicking on Microsoft Windows Network displays the Windows NT and Windows 95 domains that are available to you. By clicking on a domain and then on a desired server or shared workstation, you can see the resources that are available to you on that NT computer. If you are not currently connected to that computer, you'll see the Enter Network Password window (see Figure 8) when you try to access the resource. Type in the correct username and password to access the resources assigned to you on that computer.
Figure 8: Accessing a shared resource in a Windows NT domain.
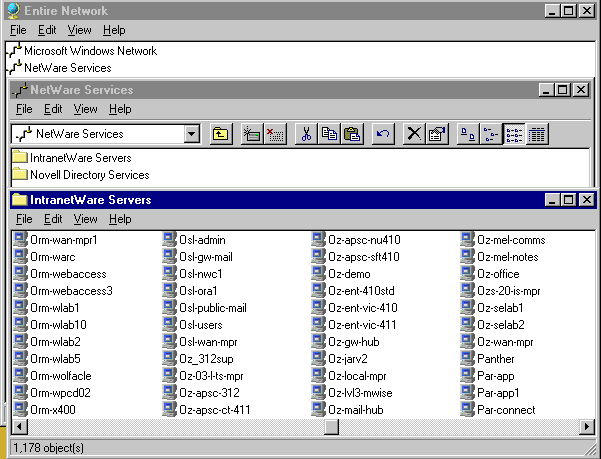
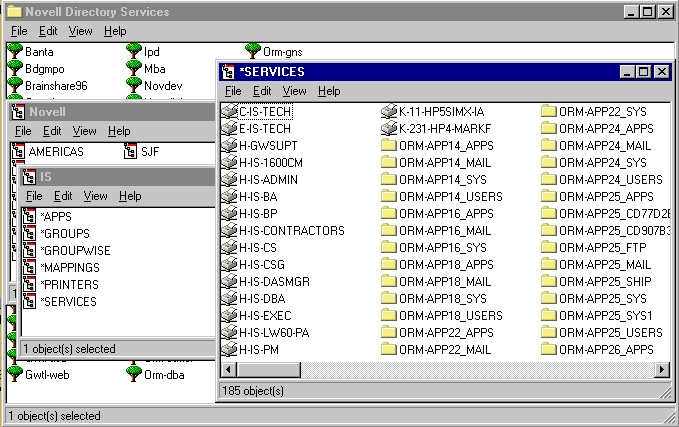
When you double-click on NetWare Services from the Entire Network window, you'll see that network resources categorized under IntranetWare Servers and Novell Directory Services folders, as shown in Figure 9.
Figure 9: NetWare resources are categorized under IntranetWare Servers and Novell Directory Services folders.

The IntranetWare Servers folder is designed for bindery-based versions of NetWare (3.x and earlier), whereas the Novell Directory Services folder is designed for users on a NetWare 4 network. NetWare 4 users can choose either folder, depending on how they prefer to view network resources.
When you double-click on the IntranetWare Servers folder, you see a list of servers available on the network, as shown in Figure 10. This listing allows you to browse through servers, volumes, directories, files, and print queues.
Figure 10: Browsing IntranetWare servers.
Going the other route from Entire Network and choosing the Novell Directory Services folder shows you a list of NDS trees that exist on your network. To log in to a tree, either double-click on the tree, or right-click on the tree and select the "Login to NDS Tree" option. You will be prompted for a username and password.
Once you are authenticated, you can "walk" the tree by selecting containers one level at a time. The NetWare Provider displays the NDS Volume and Print Queue objects that exist in the current container, as shown in Figure 11.
Figure 11: Browsing NDS trees.
Performing NetWare Tasks Within Explorer
You can perform a limited number of NetWare tasks from within Explorer. To access this functionality, highlight a network drive and select the Tools option from the menu bar at the top of the window, as shown in Figure 12.
Figure 12: The Tools menu in Explorer.
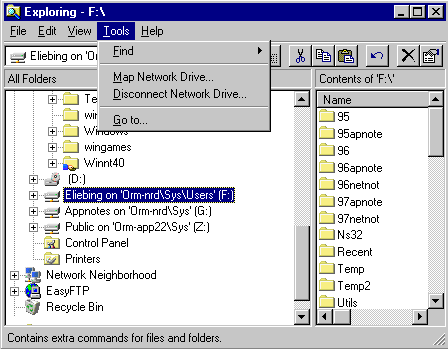
The resulting menu gives you the following options:
|
Option |
Function |
|
Find |
Search for a file |
|
Map Network Drive |
Map a network directory to a drive letter |
|
Disconnect Network Drive |
Unmap a previously mapped drive |
|
Go to... |
Access a directory directly without having to traverse the hierarchy |
Users can also view volume information and change NetWare passwords from within Explorer. These tasks are explained below, starting with mapping and unmapping drives.
Mapping a Network Drive. To map a drive, select the Map Network Drive option from the Tools menu from within the Explorer utility. The next available drive letter is displayed in the Drive entry box, as shown in Figure 13. You can select another letter by clicking on the pull-down arrow button to the right of the Drive entry box.
Figure 13: The Map Network Drive window.
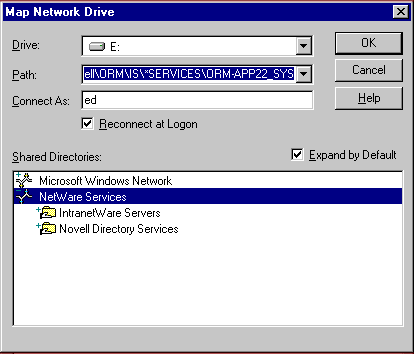
In the Path entry box, enter the directory path, using UNC syntax (for example, \\srv1\sys\apps\misc). If you want to have this drive mapping automatically re-established when you start Windows NT and log in to NetWare, check the "Reconnect at logon" box. Click OK to complete the mapping.
If you do not know the UNC directory path, you can select from the networks available in the Shared Directories portion of the Map Network Drive window. These typically include the Microsoft Windows Network and the NetWare server and NDS services from the NetWare Services entries. Once you select a server or service, you can browse through the server volume structure or, in the case of NDS, through the containers until you reach the volume/directory you want to map to.
Note that because of the way Windows NT operates, a drive mapped in this fashion will be "map rooted" when you access the directory from within Windows Explorer or any other GUI utility. In other words, if you map drive G to SYS:APPS\MISC, when you access drive G you will see the contents of the \MISC directory. You can browse down from that level to any subdirectories, but you cannot browse up from the \MISClevel.
Unmapping a Network Drive. To undo an existing drive mapping, select the Disconnect Network Drive option from the Tools menu. A window will appear listing the currently mapped drives, as shown in Figure 14.
Figure 14: Unmapping a network drive.

Highlight the drive you want to unmap and click on OK.
Finding a File. To search for a file (or group of files) on the network, select the Find option from the Tools menu, and then select Files or Folders. The dialog box shown in Figure 15 is displayed.
Figure 15: The Find dialog box.
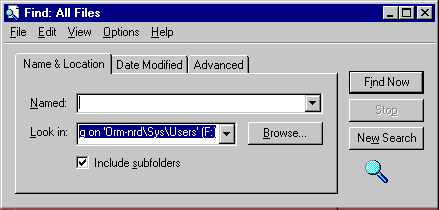
Type the name of the file you want to locate in the Named entry box; you can use wildcard characters (* and ?) in the name. Click on the pull-down arrow button to select from a predefined list of name options. Specify the path you want to search in the "Look in" box. Clicking on the pull-down arrow button displays a list of volumes you can choose from. The Browse... button lets you specify the directory level to begin the search. Check the "Include subfolders" box if you want to search in all subdirectories of this directory.
Under the Date Modified tab, you can specify date ranges for the search. For example, you can set up your file search to look only at files that were modified between January 1 and March 31, 1997. You can also search on files that haven't been modified for a certain period of time.
The Advanced tab lets you refine the search parameters even further, specifying that you want to search for files that are a particular type (such as an Adobe Photoshop image, an internet document in HTML format, and so on), for a file that contains a specific text string, or files of a certain size.
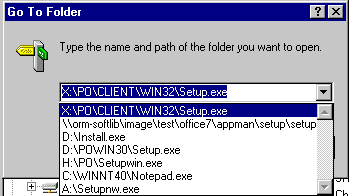
Accessing a Directory. To access a directory directly, without having to traverse the hierarchy, select the "Go to..." option from the Explorer Tools menu. Type the name and path of the folder you want to open. Or, you can click on the pull-down arrow button to select a previously accessed folder from the list, as shown in Figure 16.
Figure 16: The Go To Folder window.
Viewing NetWare Volume Information. To see information about a particular NetWare volume, right-click on the drive icon (not a folder icon) for the volume and select Properties from the resulting menu. You will see a window of information similar to the one shown in Figure 17.
Figure 17: The volume properties information window.
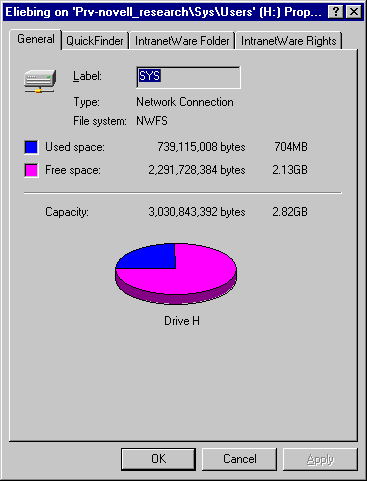
The General tab displays the volume name, type, file system, the total and available space in KB, and the total and available number of directory entries. The IntranetWare Folder and IntranetWare Rights tabs can be used to assign NetWare attributes or trustee assignments. (An example of this is given at the end of this AppNote.)
Performing NetWare Tasks in Network Neighborhood
You can perform numerous NetWare tasks from within Network Neighborhood. For example, you can view connection information, log in and out of servers, view properties of servers and trees, send messages, map network drives, and view information about volumes, directories, and files. You can also manage file system trustee rights and attributes using a more intuitive graphical interface than the command-line utilities previously used (RIGHTS, GRANT, REVOKE, and so on). This section shows just some of the many tasks you can do in Network Neighborhood with the services of the NetWare Provider.
Using the IntranetWare Login. The NetWare Provider allows you to log in to any server or NDS tree at any time during your current session. To do this, right-click on the Network Neighborhood icon and select IntranetWare Login. You will see the window shown in Figure 18.
Figure 18: The Novell NetWare Login window.
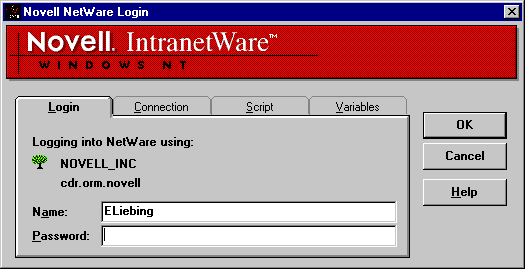
This login window looks similar to the IntranetWare NWGINA screen that you see when you initially log in to a Windows NT workstation, except that the IntranetWare tab is called AConnection@ and the Windows NT tab is not available. This means you don=t have the option here to re-log in to the local workstation or Windows Domain from this screen. To bring up that screen, you must shut down the computer and restart it.
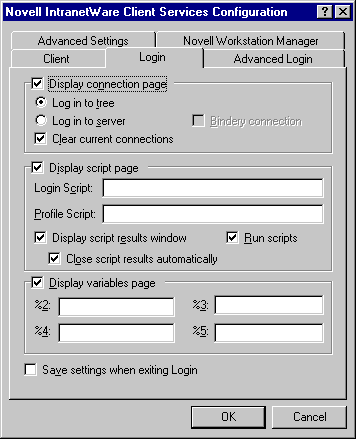
The options under the Login, Connection, Scripts, and Variables tabs work as described earlier for the initial NWGINA login process. The tabs a user sees can be restricted by the administrator. To do this, right-click on the Network Neighborhood icon and select Properties. (You can also bring up the Properties page by holding down the Alt key and double-clicking on the Network Neighborhood icon.) Select the Services tab, then double-click on the Novell IntranetWare Client for Windows NT to bring up its Configuration page. Under the Login tab, shown in Figure 19, you can set whether you want the user to see tabs for the Connection page, the Script page, and the Variables page. To take away a tab, simply deselect the check in the box to the right of the Page entry.
Figure 19: The Login configuration tab.
Changing Default IntranetWare Connections. The NetWare Provider allows you to change your default NDS tree and server at any time during your current session. To do this, right-click on Network Neighborhood and select IntranetWare Connections. You will see a screen similar to the one shown in Figure 20.
Figure 20: The Current IntranetWare Resources window.

Your default NDS tree and server are indicated by an asterisk (*). To change the current default, highlight the one you want and click on Set Current. Note that changing the default server changes which server is used to display available trees and servers in Network Neighborhood. If SAP filtering is in effect, then the list of available servers and trees will probably be different after changing the default server. You can remove a connection by highlighting the resource and clicking on the Detach button.
NDS Tree-Related Tasks. This set of tasks is accessed from the list of NDS trees you see after you start Network Neighborhood and choose Entire Network, NetWare Services, then the Novell Directory Services folder. If you highlight an NDS tree and right-click on the mouse, a menu of options is displayed, as shown in Figure 21.
Figure 21: The NDS tree menu of options.

These options allow you to do the following:
|
Option |
Function |
|
Open |
View the contents of the tree. This option works only when you have logged in to that particular tree. |
|
Explore |
Opens the Explorer to view the contents of the tree. Again, this option works only when you have logged in to that particular tree. |
|
WhoAmI |
Shows NetWare connection information. This option is available only for trees to which you have logged in. |
|
Change Context |
Allows you to change your default NDS context. |
|
Logout |
Log out of a tree to which you are logged in. |
|
Authenticate |
Allows you to authenticate to another NDS tree. |
|
Login to NDS Tree |
Log out of your current NDS tree and log in to the selected tree. |
|
Set Current Tree |
Allows you to make a different NDS tree as your current tree. |
|
Map Network Drive |
Allows you to map a network drive with temporarily or permanently. |
|
Create Shortcut |
Create a shortcut link to the tree. |
|
Properties |
Show NDS tree properties |
Following are some examples of using these options.
Changing NDS Context. To change your NDS context in Network Neighborhood, right-click on an NDS tree and select the "Change Context" option from the menu. The resulting window (see Figure 22) shows your current context and allows you to change to a different default context.
Figure 22: The Change Novell Directory Services Context window.
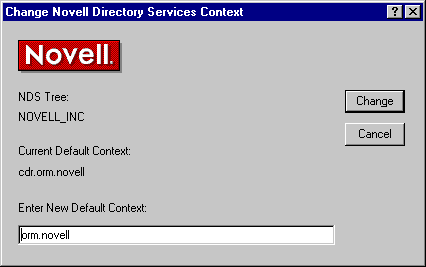
Type the new context in the entry box and click on the Change button.
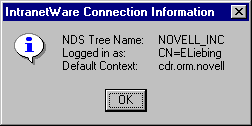
Viewing NDS Connection Information. Selecting the WhoAmI option after right-clicking on an NDS tree will display information concerning your login ID and and context, as shown in Figure 23.
Figure 23: The IntranetWare Connection Information window.
Viewing NDS Object Properties. Select the Properties option to display information about the highlighted object. For example, if you highlight an NDS Organization container, right-click, and select Properties, you will see the organizational unit structure, such as OU=CED.OU=PRV.O=Novell, along with the NDS Class of the container that you selected (such as Organizational Unit or Organization), and the NDS Tree in which the container is located (such as NOVELL_INC).
NetWare Server-Related Tasks
The next set of tasks can be accessed from the list of NetWare servers you see after you start Network Neighborhood and choose Entire Network, NetWare Services, and the IntranetWare Servers folder. When you highlight a server and right-click on the mouse, a slightly different menu of options is displayed than for an NDS tree, as shown in Figure 24.
Figure 24: The IntranetWare Servers menu of options.

These options allow you to do the following:
|
Option |
Function |
|
Open |
Log in to a server and view its contents |
|
Explore |
Log in to a server and view its contents using the Explorer |
|
WhoAmI |
Shows server connection information. This option is available only for servers to which you have logged in. |
|
Logout |
Log out of a server to which you are logged in. |
|
Authenticate |
Attach to a server (don't run scripts, clear connections). |
|
Login to Server... |
Log in to a server (clear connections, run login scripts). |
|
Send Message |
Send messages to users and groups on this server. |
|
Map Network Drive |
Allows you to map a drive to a specific directory on the server. |
|
Create Shortcut |
Create a shortcut link to the server |
|
Properties |
Show server properties |
Following are some examples of using these options.
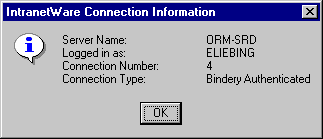
Viewing Connection Information. By right-clicking on a server and selecting the WhoAmi option, you will see a window showing the server connection information. An example for a bindery-based server is shown in Figure 25.
Figure 25: The IntranetWare Connection Information window for a bindery server.
Logging Out of a Server. From the initial Network Neighborhood screen, highlight a server that you are logged into and right-click the mouse. Select Logout from the resulting menu, and you will be logged out from that server. Press the <F5< key to refresh the screen. The server you logged out of should be removed from the list of resources in Network Neighborhood.
Logging In to a Server. To log in to a server in Network Neighborhood, double-click on the server icon, or highlight the server and right-click with the mouse. If you have NDS rights to access the server (or your WINNT username and password are the same on the server), you will be authenticated in the background. Otherwise, the GUI login utility will be launched, asking you to enter your username and password. Depending on how your login capabilities are set up, you will also see the login tabs that you see as you initially log on to this Windows NT workstation, including Login, Connection, Script, and Variables. However, at this point, you do not see the Windows NT tab, for you are logging in only to NetWare services at this time.
Sending a Message. You can send a message to a user or group through the Send Message option. As you bring up the Network Neighborhood, right-click on the home server of the users you want to send a message to and select the Send Message option. In the Send Message window, type in your message and then select the user(s) or group(s) that you want to send a message to as shown in Figure 26.
Figure 26: The Send Message Window.
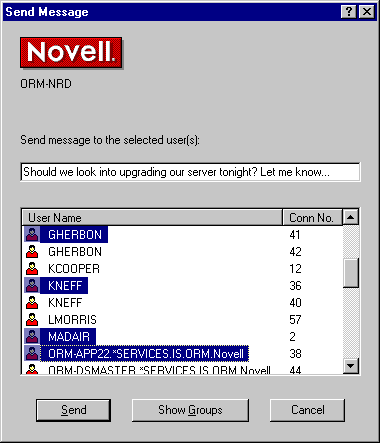
The Show Groups button at the bottom of the window toggles between displaying users or groups. Choose the desired list and then highlight the user or group you want to send a message to. To select more than one user or group, click on the first user, then hold down the Crtl key when clicking on other users or groups. Click on the Send button to send the message.
Viewing Server Properties. To see the properties of a server, right-click on the server icon and choose Properties from the pull-down menu. You will see information similar to that shown in Figure 27.
Figure 27: The IntranetWare server properties page.

This window shows you the manufacturer and the version of NetWare you are running, the server OS's revision date, how many connections are in use, how many licensed connections the server supports, the NDS tree the server is a member of, and the fully distinguished NDS name of the server if you are looking at the properties of an NDS-based server.
Viewing Volume Information. To view a server's resources (volumes and print queues), simply double-click on the server's icon.
|
Note: If the server is a bindery-basedserver and you are not already attached, the Provider will firsttry your original username and password to log in. If that fails,you will be prompted for your NetWare username and password. |
As with servers and other objects, right-clicking on a volume displays a menu of options. The options for a volume include opening the volume's directories, exploring the volume, mapping a network drive, creating a shortcut to place this volume/directory on the desktop, and viewing the volume's properties.
Mapping a Network Drive to a Volume. To map a drive to this volume, select Map Network Drive. This time the Path is filled in for you, so you simply specify the drive you want to map it to, as shown in Figure 28.
Figure 28: The Map Network Drive window.

If you are logging in as someone different than who you normally log in to this server as, or if you normally don=t log in to this server, fill in the username that you will use when you connect to this server/volume. To have this mapping be automatically re-established when you log in to NetWare, check the "Reconnect at logon" box. Click OK when finished. (All mappings created this way are map rooted at the volume level.)
Viewing Volume Properties. Choosing the Properties option on a volume displays usage information about the volume, as shown in Figure 29.
Figure 29: The IntranetWare Volume Properties window.
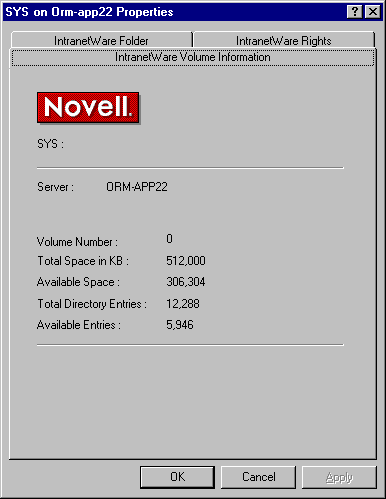
The functions and information you will find under each of the three tabs are as follows:
The IntranetWare Volume Information tab shows you the volume's name and number, the server to which the volume is a part of, the total amount of disk space in KB, the available space on the volume, the total number of directory entries, and the number of directory entries that are available.
The IntranetWare Folder tab shows you the available name spaces on the volume, who owns the volume, the volume's creation date, last update, and last archive date, as well as the attributes that are set on this volume.
The IntranetWare Rights tab shows you the trustees who have rights to this volume at the root level and their effective rights. (If you go further down the volume path, you will see more trustee assignments and their rights than you do at the volume root.)
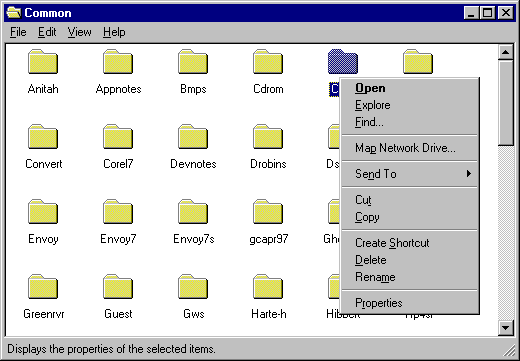
Working with Directories on a Volume. To work with directories on a volume, double-click on the volume. Highlight a directory and right-click on it. You will see a menu similar to the one shown in Figure 30.
Figure 30: The menu of options for a network folder.
This list of options is similar to the other Properties menus we have seen. However, it includes additional Send To, Cut, and Copy options, as well as options for renaming and deleting the directory.
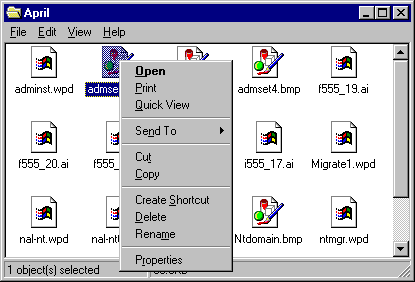
Working with Files on a Volume. To work with files within the directories, double-click on the directory and then highlight a file and right-click on it. Again you see the familiar list of options, as shown in Figure 31.
Figure 31: The menu of options for a network file.
Managing File System Rights and Attributes
From within the object Properties dialog, you can set a file system object's attributes and assign trustees without having to run the NWADMIN utility. This is done using the services of the NetWare Provider from within the Network Neighborhood or Explorer.
When you select a network directory or file, right-click, and choose Properties, you see a dialog box with tabs such as General, IntranetWare File, and IntranetWare Rights (see Figure 32).
Figure 32: The Properties window for a network file.
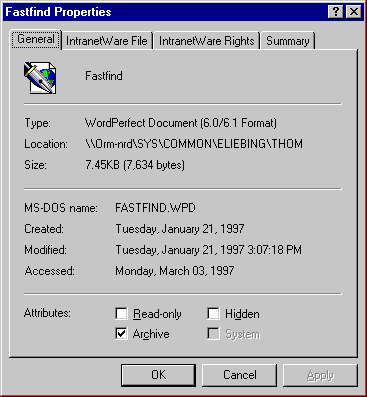
You may also see other tabs, depending on the type of file you are viewing. For example, word processing files may have a Summary tab which shows information that has been entered about the document but isn't always displayed. Executable files will give you a number of other tabs as well. If you don't have rights to change the properties of a directory or file, all of the options will be grayed out. If only some options are grayed out, the grayed options are not supported by your version of NetWare.
The General Tab. The General tab is a Windows tab that contains information about the object itself. (This is the only tab you'll see if you have selected a local object.) The example shown in Figure 32 shows the General information about a WordPerfect (.WPD) file on the network, where it is located, its size, its name, when it was created, modified, and last accessed, as well as its file attributes. In the Attributes section at the bottom of the window, you can set the standard DOS attributes for the file or directory.
The IntranetWare File Tab. The IntranetWare File tab (note that the name of the tab changes to reflect whether you have selected a file or directory) lists information that NetWare knows about the directory or file. The example shown in Figure 33 shows the NetWare information about the same .WPD file.
Figure 33: The IntranetWare File page.
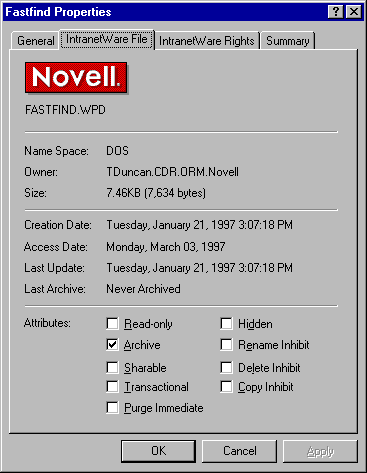
For this file, you see information about the file's name space it's using, the owner, its file size on a NetWare server (rather than its DOS size), as well as its creation/accessed/updated/archived information.
In the Attributes section is a list of NetWare attributes for the file or directory. These attributes are defined as follows:
|
Attribute |
Definition |
|
Read-only |
Allows the file to be read, but not deleted or modified. This is a DOS attribute that NetWare uses too. Selecting Read-only causes Rename Inhibit and Delete Inhibit to be selected as well. |
|
Archive |
Marks a file that has changed since it was last backed up. |
|
Sharable |
Allows multiple users simultaneous access to files and directories (usually used with the DOS Read-Only attribute). |
|
Transactional |
Indicates that the file or directory is protected by NetWare=s Transaction Tracking System (TTS). TTS prevents data corruption by ensuring that either all changes are made or no changes are made when a group of files or directories are modified. |
|
Purge Immediate |
Notifies NetWare to immediately purge the object when it is deleted. Purged files cannot be salvaged. |
|
Hidden |
"Hides" a file so that it does not show up in a DIR listing. |
|
Rename Inhibit |
Prevents any changing of the file or directory's name. |
|
Delete Inhibit |
Protects the file or directory from deletion. |
|
Copy Inhibit |
Disallows any copying of the file. This option works only with Macintosh workstations, but is available here because some Macintosh files use DOS naming conventions. |
The IntranetWare Rights Tab. The IntranetWare Rights tab shows a list of trustees and the rights they have to the selected directory or file, as shown in Figure 34. Checkmarks indicate the rights granted to each trustee. The effective rights (those the user can actually exercise) are displayed at the bottom of the page.
|
Note: For security reasons, Supervisorrights, though listed, cannot be modified here. You must use NWADMINto view or modify Supervisor rights. |
Figure 34: The IntranetWare Rights page.
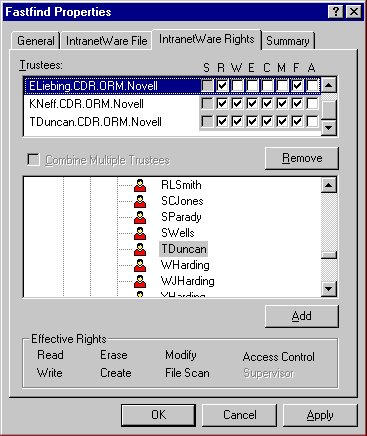
Adding, Modifying, and Removing Trustee Rights. Follow the procedures below to add, modify, or remove trustee rights assignments:
To add a trustee, search through the list of user objects in the tree and click on users to select them. This portion of the NetWare Rights page works similarly to Explorer. You can browse through contexts to find users and groups to add. Clicking on the Add button adds the selected users to the list of trustees. The new trustees are given Read and File Scan rights by default.
To modify the rights of a listed trustee, click on the boxes. Clicking on an empty box adds a checkmark, while clicking on a marked box removes a checkmark.
To remove a trustee's rights, click on the trustee and then click on the Remove button. To remove the trustee altogether, click on the trustee, click on Remove, and then click on Apply.
Combining Multiple Trustees. You can select two or more objects and combine their attributes and trustee lists. To do this, proceed as follows.
In Network Neighborhood or Explorer, select the two objects whose trustee assignments you want to combine (two files, named Toolkit and Migrate, are used in this example). Hold the Ctrl key down while you select the files, and then keep holding it down while you right-click the mouse.
Select Properties from the pull-down menu.
Select the IntranetWare File tab to view the attributes for both of these files together. The window will appear as shown in Figure 35.
Figure 35: The IntranetWare File display for two selected files.
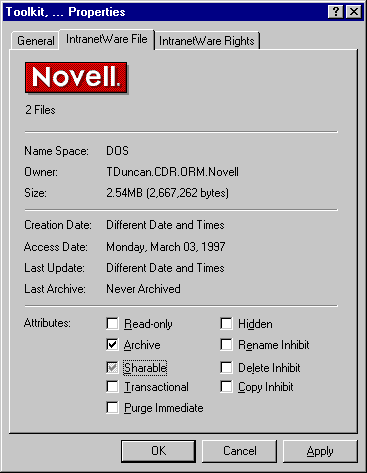
The black checkmark by the Archive attribute indicates that both files have that attribute set. The greyed out checkmark by the Sharable attribute indicates that only one of the files (Migrate) has this attribute set.
Clicking on the Sharable attribute will clear the Sharable flag from both files.
A second click on the Sharable attribute will set it for both files
A third click will return the attribute to its greyed state, meaning that the Sharable attribute will not be altered for either file.
Note: The Attributes only exhibit this three-state behavior when multiplefiles are selected and the flags differ between the files.
To view the list of trustees for the selected objects, click on the IntranetWare Rights tab. The Trustees list at the top shows all of the trustees who have rights assigned for the selected files (see Figure 36).
Figure 36:The IntranetWare Rights display for two selected files.
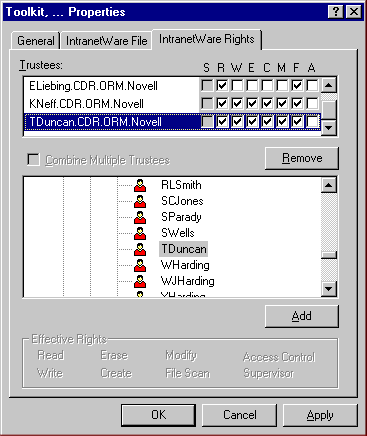
Although it is not readily apparent from the heading displayed at the top of the window ("Toolkit, ... Properties"), you are looking at a list of users who have rights assigned to either Tookit or Migrate, or both. In this example, Toolkit has the trustee ELiebing with the Read and File Scan rights set. Migrate has Kneff and Tduncan as trustees, with various file rights set.
To add a new trustee to both files, click on a user icon in the middle portion of the NetWare Rights page and click on Add. The selected user will be added to the Trustees list. Each file now has its original trustees plus the added trustee.
Conclusion
This AppNote has covered ways to access IntranetWare resources using the NWGINA login interface and NetWare Provider that come with the IntranetWare Client for Windows NT. There are many other features and capabilities offered by the NetWare Provider. We suggest that you take time to explore some of the other options on your own, using the online help where necessary to understand what the options do.
* Originally published in Novell AppNotes
Disclaimer
The origin of this information may be internal or external to Novell. While Novell makes all reasonable efforts to verify this information, Novell does not make explicit or implied claims to its validity.