Managing NT and NDS Account Information Using the Novell Workstation Manager
Articles and Tips: article
Software Engineer
Novell Internet Access Division
01 Apr 1997
The Novell Workstation Manager is another great tool from Novell to help you centrally manage both Windows NT and Novell Directory Services information. This AppNote describes the ins and outs of using this program.
- Introduction
- Workstation Manager Components
- Enabling the Novell Workstation Manager
- Windows NT Configuration Objects
- Centrally Managing the NT Workstation Client Software
- Conclusion
Introduction
The Novell Workstation Manager allows all user account information, both for Windows NT and Novell Directory Services (NDS), to be centrally managed within NDS using a single administrative utility. This eliminates the need to have a large number of NT user accounts residing in the local Security Access Manager (SAM) of each workstation or implementing costly NT domains to manage NT user accounts, while still preserving NT workstation security.
This AppNote explains how to use the Novell Workstation Manager to manage NT and NDS account information. After giving an overview of the Novell Workstation Manager and its various components, this article will walk you through the enabling process, including how to load the required .DLLs, registry settings, and the enabling of Novell Workstation Manager on NT workstations. The AppNote also describes Windows NT configuration objects and how those objects (containing user names, group memberships, and desktop information) interact with NWGINA, a graphical identification module and one of the components of Workstation Manager. Managing existing NT accounts is also discussed, along with managing volatile users, adding the NT user to NT groups, and administering user profiles and system policies.
The Novell Workstation Manager is a software component developed by Novell to store Windows NT user and desktop configuration information in Novell Directory Services. If a users NDS user account is associated with this configuration information then that user will be able to access the network via any NT workstation configured with the Workstation Manager. If the user does not have an account on the workstation at the time they log in, Workstation Manager can create one using the associated NT user information. Once the user is attached to the network, an associated individual profile and policy can be downloaded to the workstation to provide a personalized desktop on each NT workstation being used.
Workstation Manager Components
The Workstation Manager has two components:
Novell's implementation of the Graphical Identification and Authentication module for Windows NT, NWGINA
NetWare Administrator snap-in DLL that allows the NT user information to be stored in NDS
NWGINA is the component that collects the user's username and password and then authenticates the user to NDS and the NT Workstation. The NWGINA process runs in the context of the secure desktop and has administrator-level access to the local workstation. This administrator-level access allows NWGINA to dynamically create and delete NT user accounts, provided it can obtain the necessary user information.
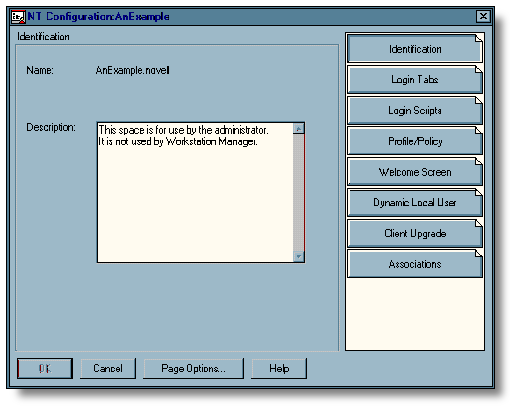
The second component of Workstation Manager allows the NT user information to be stored in NDS. It consists of a DLL that snaps into the NetWare Administrator, Novell's NDS administrative utility. Once the snap-in is installed, the network administrator can create NT Configuration (NTC) objects within NDS containers as shown in Figure 1.
Figure 1: This NTC object stores all the information necessary for NWGINA to dynamically create a pre-configured user account on the NT workstation and grant a user access to NT when that user logs in to the NDS tree.
Enabling the Novell Workstation Manager
To create NTC objects in NDS, the NW Admin snap-in DLLs for the Workstation Manager need to be loaded with the NetWare Administrator application (NWADMNNT.EXE). The snap-in itself is comprised of the following files:
NWSMGR32.DLL
NWSMGRR.DLL
These files are currently installed along with the NetWare Administrator executable (NWADMNT.EXE) using the ADMSETUP.EXE utility present in the NetWare Client for Windows NT installation directory (see the AppNote entitled "Installing the NWAdmin Plug-Ins for Windows NT Workstations and Servers" in this issue).
The registry settings to direct NWAdmin to load the Workstation Manager snap-in must be added to the user registry for each user who wants to view or manage Workstation Manager information. The required registry settings are:
HKEY_CURRENT_USER

 Software

   NetWare

     Parameters

       NetWare Administrator

         Snap-in Object DLLs WINNT

NWCSNAP: REG_SZ: NWSMGR32.DLL
ADMSETUP.EXE will add these settings for the user who runs the install utility. These settings can be set automatically if you run the WORKMAN.REG file present in the NetWare Client for Windows NT installation directory.
Because this registry setting is in HKEY_CURRENT_USER, it is a part of the user profile. Thus, if the user moves to a different workstation, logs in and pulls the same user profile from the network, that user may administer the Workstation Manager Objects from any NT Workstation. If the individual is not using a network stored profile-in other words, the user is using a different NT user profile for each workstation-then the user profile may not contain the necessary registry settings for the snap-in. Consequently the user will not be able to administrate Workstation Manager Objects until the necessary registry settings are created. In the near term, this problem is solved by using a roaming profile. The ultimate solution will be to include the Workstation Manager snap-in in the shipping NetWare Administrator and/or changing the NetWare Administrator Architecture to allow adding snap-ins on a global basis.
Enabling Novell Workstation Manager on NT Workstations
The NWGINA component is included as a part of the Novell NetWare Client for Windows NT. NWGINA needs to be enabled for Workstation Manager by setting the following key and values in the NT Local Registry:
HKEY_LOCAL_MACHINE

 SOFTWARE

    Novell

       NWGINA

          Workstation Manager

             Enabled: DWORD: 0x1

Trusted Trees: REG_SZ: Treename1, Treename2
Treename1 and Treename2 are replaced with the name of the trees from which this workstation will obtain Workstation Manager objects.
You can enable Workstation Manager automatically by running SETUPNW.EXE /W: treename 1, treename 2. (For more information, see the Workstation Manager help file.) Alternately, Workstation Manager can be configured manually through the Client property pages or by using a system policy.
Windows NT Configuration Objects
To dynamically create users on the local workstation, NWGINA needs to know the appropriate user name, NT group membership, desktop and policy information, and so forth. To store this information, the network administrator creates an NTC object with NetWare Administrator. When a user uses an NT Workstation to log in to NDS, NWGINA can use the information contained by an NTC object to create a local user account for workstation access.
Associating NDS Users with NT Client Objects
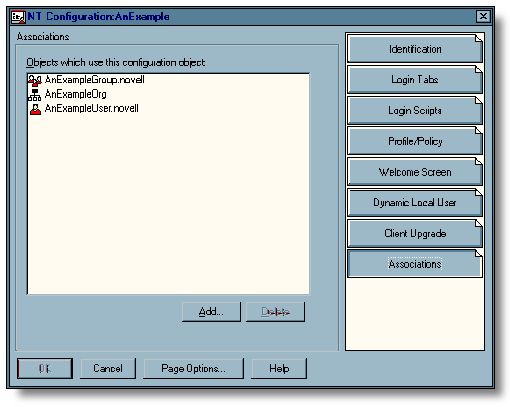
A network administrator may want to provide different types of workstation access to different NDS users. This can be done by creating a number of different NTC objects. NDS users can be associated with the appropriate NTC object using the Associations page of the NTC object (see Figure 2).
NTC objects can be associated to user, group, or container objects. To add an association, simply use the Add button and browse for the object to be associated. If there is more than one NTC object associated with a user due to group or container memberships, NWGINA will use the first NTC object it finds in the following search order; user then group then container. When looking for container associations, NWGINA will first look at the current container and then subsequent parent containers until it reaches either an NTC object or the root of the tree.
Figure 2: NDS objects that are associated to a particular NTC object are listed in the Associations window. NDS users can be associated to an NTC object individually or through group or container associations.
The Dynamic Local User Configuration
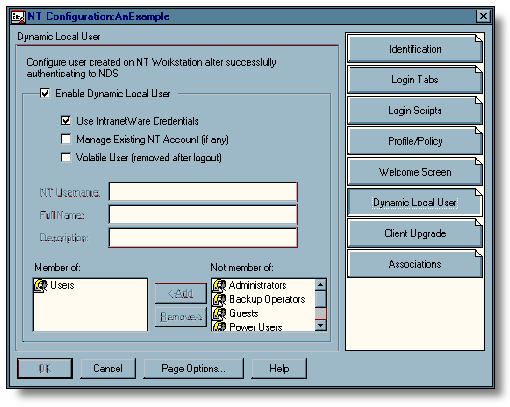
Once a user has been associated to an NTC object, NWGINA can retrieve information from the NTC object to create an NT user account on the workstation (see Figure 3).
Figure 3: The specifics of the credential set, group memberships, account duration etc. are defined in the Dynamic Local User page of the NTC object.
Enabling Dynamic Local User Creation
NWGINA requires that you specify whether a local user is to be created. Use the Enable Dynamic Local User check-box to indicate whether to create the local user. If this box is not checked, NWGINA does not create a user in the local SAM. Instead, NWGINA attempts to find an existing NT user with the credentials indicated in the Windows NT tab of the NWGINA login interface. If Enable Dynamic Local User is checked, then NWGINA gets the NT user name from the NT Client Configuration object and queries the local SAM to see if the user name already exists. If it does exist, NWGINA authenticates the user to the NT workstation and access is granted. If the user name does not exist, NWGINA creates the user in the local workstation SAM.
Defining the NT User Account
When creating the NT user account, NWGINA can use either the same credential set used for NDS authentication or a predetermined credential set specified in the NT Client Configuration object. To use the IntranetWare credentials, check the Use IntranetWare Credentials check-box. When using IntranetWare credentials to create the workstation NT user account, NWGINA queries the user's NDS user account for the login name, full name, and description. The password given to the NT user account is the same as that for the NDS user account.
If IntranetWare credentials are not used, other credentials must be specified in the NT User name field. Full Name and Description can also be included to provide a complete user description. The password set for this user is randomly generated; therefore, this account would not be accessible when selecting the Windows NT Login Only option. If you don't use IntranetWare credentials and the User object does not already exist, Workstation Manager will create the User object as a volatile User object, which means that the User object will be automatically deleted. This will be apparent as the volatile user check box will be automatically selected if the use NetWare credentials check- box is not selected.
Managing Existing NT Accounts
Workstation Manager will not modify pre-existing NT user accounts, including the user password, unless you specifically indicate it to do so by clicking on the Manage Existing NT Accounts check-box. Check this check-box if the User object you want to manage with Workstation Manager could possibly already exist in the local SAM. If the user exists and this option is set, Workstation Manager will overwrite the existing account information with the information provided in the NT Client Configuration object. This allows Workstation Manager to manage the existing account if one exists. Furthermore, if the NT Client Configuration object is configured to create volatile users, then the NT account will be deleted when the user logs out.
Managing Volatile Users
The user account NWGINA creates on the local workstation can be either a volatile or nonvolatile account. A volatile user account is created in the local SAM when the user logs in to the workstation and is deleted when the user logs out. This prevents a large number of user accounts from accumulating in the local SAM. This also prevents users from gaining access to the workstation without first authenticating to NDS. If using IntranetWare credentials for the NT user account, the NT Client Configuration object can be configured to create non-volatile user accounts. A nonvolatile user account is created when the user logs in and is not deleted when the user logs out. The account remains in the local SAM and is available for later use independent of the Workstation Manager or network availability.
Adding the NT User to NT Groups
When NWGINA creates the NT workstation user, it can provide group membership to any default NT user groups. The groups to which the user belongs are listed in the Workstation Groups box. The default configuration is for the user to be added to the Users group only. Other groups can be added with the Add button or deleted with the Delete button.
User Profiles and System Policies
User profiles are an attractive feature of Windows NT. With user profiles, each user's desktop can be configured with desired colors, shortcuts, cursors, backgrounds, etc. If desired, an administrator can also define a mandatory profile which all users are forced to use but are not allowed to alter. These profiles can be stored on the local workstation or on a network server. NWGINA and Workstation Manager allows user profiles to be stored on the network, making them available for the user regardless of which physical NT workstation is being used (see Figure 4).
Figure 4: The Workstation Manager Profile/Policy page is used to define the location of the NT user's profiles and policies.
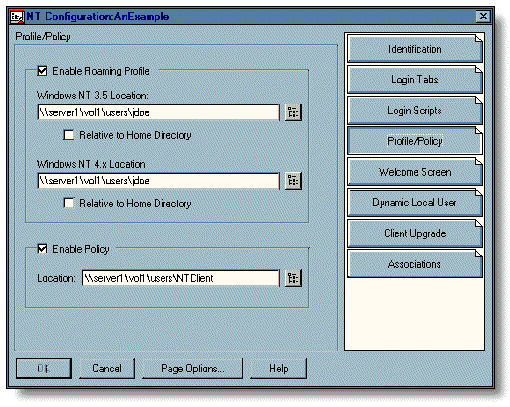
Workstation Manager is configured to enable roaming profile support by checking the Enable Roaming Profile check box. Once this is checked, the location of the profile directory is specified in either the Windows NT 3.5 Location or the Windows NT 4.x Location box. There are separate boxes for Windows NT 3.51 and 4.0 because it is unknown which OS will be used with the NTC object. Because the profile structure differs between the two operating systems, both options are provided.
A user's profile can be referenced from the user home directory as defined in their NDS user object. This allows multiple users to be associated with a single NTC object and still allow for individual profiles. Profiles can also be pulled from a specific location specified by a UNC path. This allows administrators to require a group of users using a single NTC object to use a single, predefined profile.
The NT Client supports NT system policies. By default, NWGINA looks for a policy file named NTCONFIG.POL in the \\<preferred server< \SYS \PUBLIC\WINNT directory. The policies in this file are then applied to the workstation during the NT workstation login process. The Workstation Manager allows administrators the ability to override this default and causes NWGINA to use a different policy file accordingly. To use a different policy file, the Enable Policy check-box needs to be checked and the UNC path and filename for the desired file needs to be entered in the Location box. The Browse button can also be used to find the proper path and filename.
Configuring the NWGINA and GUI Login Tabs
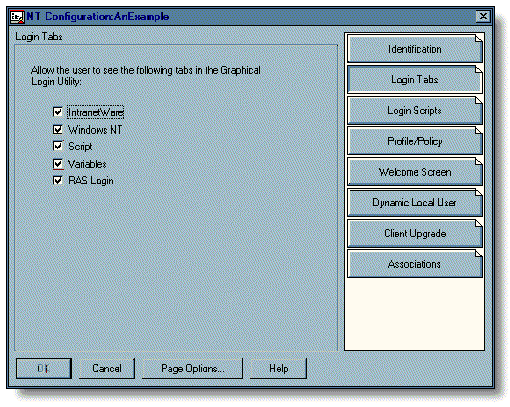
The NWGINA interface is designed to provide significant ease and flexibility when logging in to NDS and the local workstation. NWGINA uses different tabs to display different login and configuration options. GUI Login also has most of the same tab options. Administrators may not want to have all these tabs available for every user to modify. The tabs that are displayed on the NT workstation can be centrally controlled and configured with the Workstation Manager. The choice is made simply by checking the desired tabs check box. Once the user logs in to the NT workstation, those settings are downloaded to the workstation and enforced (see Figure 5).
Figure 5: The Login Tabs page is used to define which tabs are displayed and which are not.
Controlling Login Script Processing
With Workstation Manager administrators can control the login script processing that is done on the workstation. This is done using the Login Scripts page (see Figure 6).
Figure 6: Login script processing is enabled with the Enable Login Scripts check box. If this box is not checked, login scripts will not be processed. The login script window behavior is controlled with the Open Login Script Window and Automatically Close Script Window check-boxes.
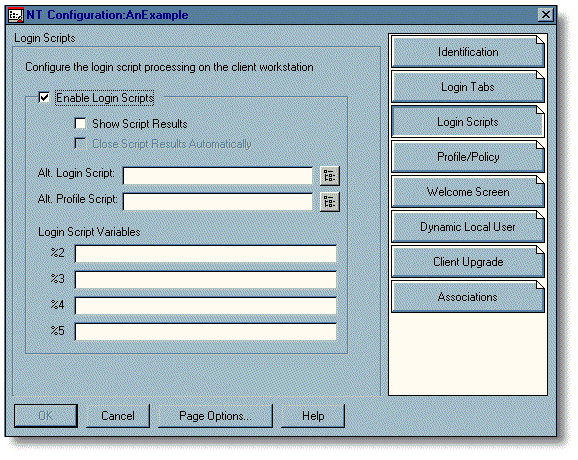
Through the Workstation Manager, alternative user and profile login scripts can be used in lieu of those defined in the NDS user object. Alt. Login Script defines an alternative user login script and Alt. Profile Script defines an alternative profile login script. These entries use a UNC path to a text file on a network server containing the script.
Login script variables provide a useful method for customizing login scripts to specific users or groups. Workstation Manager allows for central administration of these variables through NDS. A total of 4 variables, %2, %3, %4, and %5, are available for login script processing purposes. The values for each of these variables can be defined in the Login Script Variables page.
Configuring the NWGINA Welcome Screen
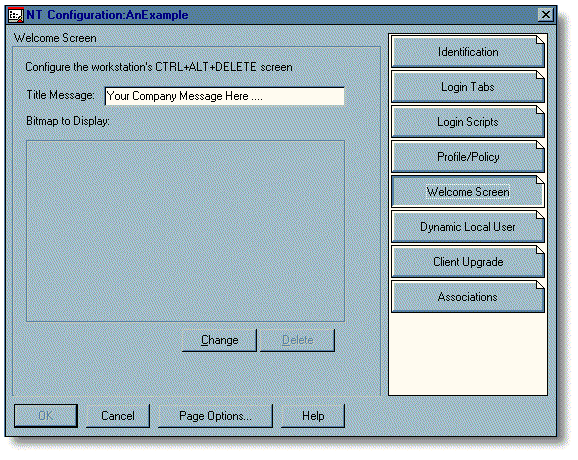
When a user first starts an NT workstation, a window containing a default bitmap message indicates that, the user must log in to the workstation by pressing <Ctrl<<Alt<<Del< before doing anything else. This initial window is the NWGINA welcome screen. Because this screen is presented before login, everyone who accesses the workstation will see it. Consequently, there is significant potential for passing information to network users with this screen. To allow customers the ability to use this information tool, NWGINA allows network administrators to modify the text in the window header and replace the bitmap displayed in the welcome screen.
The Welcome Screen page of the NTC object (Figure 7) allows administrators to configure the welcome screen of NT workstation clients.
Figure 7: The Title Message field contains the text displayed in the welcome screen window header. If left blank, the default message is used. The "Bitmap to Display" box shows the bitmap that will be placed within the welcome screen window.
|
Note: If no bitmap is specified, the default NWELCOME.BMP is used. To select a different bitmap,use the Change button and browse to the desired bitmap. |
Centrally Managing the NT Workstation Client Software
Another significant capability provided by the Workstation Manager is the ability to push a NetWare client software upgrade to the workstation from a central location. This is possible with the Automatic Client Upgrade (ACU) feature, which is performed through the login script process.
ACU works well for DOS, Windows, and other non-secure operating systems because all workstation users had unrestricted access to the local workstation. Windows NT, on the other hand, provides for workstation access control and where only users who have administrative privileges on the workstation can access and modify the operating system files. Thus, ACU can only be performed when an administrator-level user authenticates to the workstation. Workstation Manager can create this administrator user upon login and allow the client upgrade to take place.
The Client Upgrade Process
Client upgrades are performed through the login script, so the first step is to create a login script with the necessary upgrade commands. The NTC object is then enabled to perform a client upgrade by opening the Workstation Manager snap-in and checking the Enable Automatic Upgrade check box and specifying the ACU login script in the Alternate Login Script Location box (Figure 8).
Figure 8: After the NTC object has been configured as indicated, NT workstations are upgraded the next time they use that NTC object. When NWGINA authenticates to a trusted tree and reads the NTC object properties, it compares time stamps of the NTC object with the time stamp of the NTC object used previously to determine if this is the same object used the last time a login was performed.
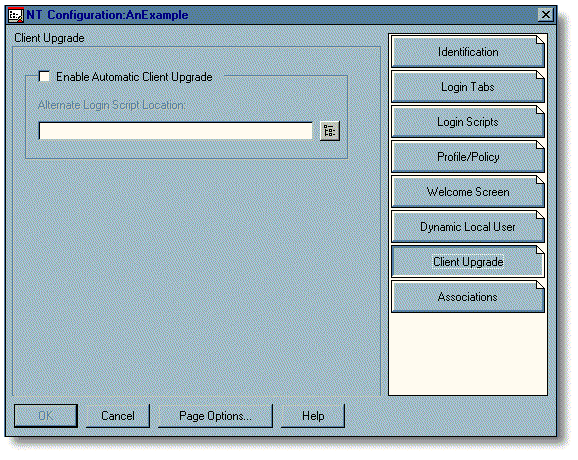
If, while authenticating, NWGINA compares time stamps and discovers that the object is different than the one used the last time a login was performed, the NTC object, NWGINA checks the Enable Automatic Client Upgrade box to see if an upgrade needs to be performed.
|
Note: If the NTC object was previously configured to perform a client upgrade and nothing was changed other than the text file containing the login script, the upgradewill not be performed. Modifying the login script itself doesnot modify the time stamp of the NTC object. The NTC object itselfmust be changed in some way. If it is not, NWGINA will not knowthat a new upgrade needs to be performed and consequently thedesired upgrade will not take place. |
If the upgrade is to be performed, NWGINA does not create the NT user account indicated in the Dynamic Local User page; instead, an account that has administrative access to the NT workstation is created. Once this is done, the ACU login script is started and the workstation client is upgraded.
Within the login script, the necessary upgrade commands are performed. These can be as simple as running SETUPNW /U or a more complicated sequence of actions. For a full explanation of Automatic Client Upgrade, please refer to the Novell NetWare Client for Windows NT online documentation.
Because NWGINA has just authenticated an administrative level user to the workstation, it maintains the integrity of the secure workstation by not allowing the user desktop to be built. This prevents the individual using the workstation from gaining administrative workstation access during the upgrade process. <Ctrl<<Alt<<Del<is also disallowed to prevent the upgrade process from being disrupted. Once the login script is completed, NWGINA automatically reboots the Workstation to complete the upgrade process.
After the workstation reboots, the user has to enter valid user credentials and log in again. NWGINA again compares the time stamp of the NTC object with the one previously recorded. This time the time stamps are identical and NWGINA knows that the client upgrade has already been performed. NWGINA proceeds to log in and grants the user NetWare and workstation access as normal.
Conclusion
The Workstation Manager provides a significant solution to IntranetWare customers who desire to have NT Workstation as the desktop of choice. The flexibility and control of NTC objects and users from a central location with the NetWare Administrator utility has caused much excitement in the industry. The features provided include a single point of administration for NT workstation user accounts and NDS user accounts. Also included is the ability to centrally configure and control user desktops using profiles and policies. The NWGINA and GUI Login interface can also be configured. The ability to perform Automatic Client Updates without having to physically approach the workstation also provides a significant value to the network administrator.
Installing the NetWare Administrator Snap-in
To install the Workstation Manager snap-in and create a NTC object, perform the following steps:
Install the Workstation Manager snap-in by running ADMSETUP.EXE..
Run the WORKMAN.REG file to automatically set the following registry keys:
HKEY_CURRENT_USER

        Software

          NetWare

            Parameters

              NetWare Administrator

                Snap-in Object DLLs WINNT

                  NWCSNAP: REG_SZ: NWSMGR32.DLL
Start NetWare Administrator and create a NTC object. If you will be using this object to upgrade network clients then configure ACU at this time, remember to create the login script for the ACU process.
Associate the appropriate users, groups and containers to this object.
Client Setup Steps for the Novell Workstation Manager
The client setup depends upon whether the NetWare Client for Windows NT has already been installed on the workstation or not. If the client has not yet been installed on the local workstation then either of the following methods can be used.
Run SETUPNW /W: trusted trees list on the each workstation.
Run SETUPNW /U following the steps below:
Create or modify an unattended file so that it contains the setting "WorkstationWizardTrustedTrees=list of trees".
Run SETUPNW /U[:path and filename of unattended file] on each workstation.
If IntranetWare Client for Windows NT Has Already Been Installed
In this case, the Workstation Manager is already available and simply needs to be enabled and the trusted trees defined. This can be done with the SETUPNW command as shown above. Alternatively, it is possible to do through theproperty pages, without reinstalling the workstation client. WorkstationManager may also be enabled and configured on all network Workstations using system policies.
Run POLEDIT.EXE from a NT server or the NT resource kit.
Load the NetWare Client administrator template NWNT.ADM. This can be found in the I386\NLS\ENGLISH directory on the client installation media.
Create a new policy file for "Default Computer" that has the desired options set. Make sure that the Workstation Manager policy is checked and the trusted trees list is included.
Save the policy file as NTCONFIG.POL in the <preferredserver<\SYS:\PUBLIC\WINNT directory.
The next time a user logs into the network, this policy will be pushed to all workstations and Workstation Manager will be enabled.
* Originally published in Novell AppNotes
Disclaimer
The origin of this information may be internal or external to Novell. While Novell makes all reasonable efforts to verify this information, Novell does not make explicit or implied claims to its validity.