Integrating Windows NT Users and Groups into IntranetWare Networks Using Novell Administrator for Windows NT
Articles and Tips: article
Senior Technical Writer
Management Products Division
01 Apr 1997
In a mixed NT/IntranetWare environment, the last thing you want to have to do is manage users and groups separately. Find out how the Novell Administrator for Windows NT lets you manage NT systems, users, and groups through Novell's NWAdmin program.
- Introduction
- Overview of the Novell Administrator for Windows NT
- Installing Novell Administrator for Windows NT
- Integrating NT and NDS Users Using the Integration Utility
- Managing NT Systems, Users, and Groups With NWAdmin
- Summary
Introduction
The Novell Administrator for Windows NT (NAdminNT) is another component of Novell's solution for integrating Microsoft Windows NT users and servers into business networks, intranets, and the Internet. NAdminNT synchronizes existing NT domains and workgroups with NDS to simplify management of NT users and groups. Because NT's Security Accounts Manager (SAM) database isn't extensible, NAdminNT doesn't bring NDS users and Groups into NT. Instead, it creates and administers NT users, NT local groups, and NT global groups via NDS. NAdminNT associates new or existing NT users to a new or existing NDS user. NAdminNT administers NT local and global groups separately because they are significantly different from NDS groups. An example would be the NAdminNT using NT groups for NT resources and NDS groups for NDS resources.
This AppNote describes the benefits to system administrators of implementing NAdminNT to better integrate their IntranetWare users with Windows NT. After giving a brief overview of NAdminNT components, this AppNote:
Provides instructions for installing NAdminNT
Describes how to use the NAdminNT integration utility
Discusses the management of NT systems, users, and groups using Novell's NWAdmin program
See http://www.novell.com/intranetware/ntint/ for a complete discussion of Novell's NT integration strategy.
Overview of the Novell Administrator for Windows NT
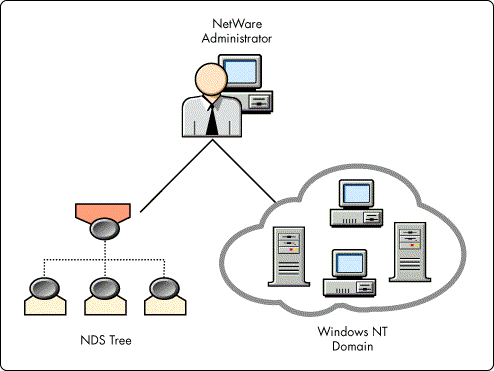
NAdminNT is an add-on to the NetWare Administrator (NWAdmin) utility, Novell's administration interface to NDS. NAdminNT takes full advantage of NDS to bring NT user account information into NDS to provide a single, centralized point of administration for users and groups, substantially reducing the cost of owning and managing a heterogeneous network (see Figure 1).
Figure 1: NDS acts as the master repository for all information across entire networks, ensuring that users get secure access to network resources regardless of where those resources exist.
Benefits of Using Novell Administrator for Windows NT
The Novell Administrator for Windows NT reduces network management time and costs by integrating many of the dual-administration tasks typically required in mixed PC/server environments:
It eliminates the need to manage users from two separate consoles.
It reduces the labor of administering multiple NT domains by providing a single point of administration.
It saves entry time by providing templates for creating multiple user accounts.
NAdminNT also automates many of the transition tasks to ensure the quality of NT domain-based information:
It migrates current users in NT domains into NDS so that the administrator doesn't have to manually enter each NT user into NDS.
It reduces and eliminates the need for trust relationships within Windows NT server environments by managing domains with NWAdmin.
It synchronizes databases to create one global network directory map, allowing changes made on NDS accounts to automatically reflect on all NT accounts.
It preserves and continually synchronizes any administration changes made during downtime, including changes made to the Primary Domain Controller (PDC), the master copy of NT domains, even when the administration console is not currently running.
It scales to support as many as 5,000 users and group objects per domain.
It integrates with NWAdmin to provide end-to-end administration of customers' heterogeneous network.
Novell Administrator for Windows NT Components
NAdminNT addresses the problem of redundant IntranetWare and NT domain administration by providing a single point of administration which is enabled by installing the following components:
NetWare Administrator Snap-in Service
NDS Schema Extensions
Integration Utility
NDS Event Monitor
NDS Object Replication Service
NetWare Administrator Snap-in Service. During installation, a component of NAdminNT snaps in to NetWare Administrator, allowing administrators to centrally manage NT domains and workgroup systems with NetWare Administrator, and ensuring data integrity and synchronization between NDS and NT. Because all Windows NT user account information is synchronized to NDS, you will no longer need to use NT's User Manager utility.
Using the snap-in service, the network administrator can manage NDS objects that represent NT domains and workgroup systems. NT users and groups are represented in NDS as native NDS objects with a reference to the NT Server object in which their membership is held. The NDS User object is extended to include an attribute that identifies in which NT systems this user has membership.
NDS Schema Extensions. The schema in NDS defines the types of NDS objects that are allowed and the properties associated with each object type. Additional types of NDS objects and additional properties for existing objects can be defined by users with Supervisor rights to the [Root].
To manage NT objects from NDS, NAdminNT extends the standard NDS schema to accommodate the new objects. New NT-related objects include:
NT Domain object
NT Workgroup System object
NT User object, NT Global Group object
NT Local Group object
NT Hybrid User object
These schema extensions are performed during the installation of NAdminNT.
Once the schema extensions are in place, the NetWare Administrator must be able to manage the new objects. The NAdminNT snap-in service modules to NetWare Administrator extend the capabilities of the NetWare Administrator to include this feature.
Integration Utility (IGRATE.EXE). NAdminNT includes an integration utility (IGRATE.EXE) to migrate existing NT users into an NDS tree. NDS then becomes the master repository for all user and group information. This utility can be launched from NWAdmin or run as a standalone utility.
Using NAdminNT is a secure way to integrate NT Domains and NDS because all communication between NetWare and NT occurs over a private, authenticated NDS connection, rather than piggybacking or sharing another connection. Another important part of a secure integration is that NAdminNT runs as a service on NT, which means it is a trusted privileged process.
NDS Event Monitor. The NDS Event Monitor (NDSDM.NLM), which resides on the NetWare server, securely gathers NDS events and notifies the NDS Object Replication Service (ORS), as shown in Figure 2.
Figure 2: The Event Monitor catches changes to NDS objects that are of interest to NT systems.
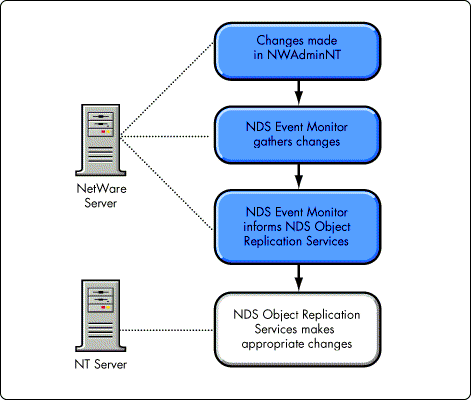
If you rename an NDS User object that has membership in an NT domain, the Event Monitor recognizes the change and notifies the ORS. The ORS then makes the appropriate update in the NT SAM database.
NAdminNT allows the administrator to configure, through NetWare Administrator, how often NDS events are synchronized on NT systems. This design adds minimal overhead to network traffic.
The NDS Event Monitor also sends appropriate changes to an NT system that has been down. Once the system comes back on line, it is brought up to date with the current content of the NDS database.
An NDS Event Monitor is required on the NetWare server that holds the master replica of the partition where NT systems reside. The network administrator should also install the Event Monitor (NDSDM.NLM) on one or more NetWare servers that have read/write replicas in case the server holding the master replica goes down.
NDS Object Replication Service (ORS). The NDS ORS receives NDS object changes from the Event Monitor NLM that pertain to the NT system. The ORS validates these changes according to NT constraints and makes the corresponding changes in the NT SAM database.
The ORS resides on each NT primary domain controller (PDC), backup domain controller (BDC), and every workgroup system targeted for administration through NDS.
|
Note: While the ORS software resideson the BDC, it remains dormant until the BDC is promoted to PDC.Then the administrator would have to manually start the NDS Object Replication Service. |
While a domain stores the user accounts database in one primary location, workgroups spread the database across multiple servers in the network. The ORS is started on each server in a workgroup that stores user accounts.
The ORS resides on top of the Novell NT Client on the PDC and communicates with the NetWare server via IPX. Since the ORS issues NCP's and NCPX requests through Novell's NT Client, if the Novell NT Client is running over IP, the ORS would also be running over IP. (The Novell NT Client should soon offer these types of services.)
Installing Novell Administrator for Windows NT
Before installing NAdminNT, you must meet the following prerequisites:
Install the NetWare 4.1x CLIB Update Kit.
The Event Monitor (the NDSDM.NLM which runs on the NetWare server that participates in synchronization) requires the NetWare 4.1x CLIB Update Kit. You can download the update-LIBUPB.EXE-from Novell's WWW site at the following URL:
http://support.novell.com/cgibin/search/download?/pub/updates/nwos/nw311/libupb.exe
To install the Update Kit, download LIBUPB.EXE onto your workstation and execute LIBUPB.EXE (a selfextracting executable). See the LIBUPB.TXT file for the rest of the installation instructions.
Make sure the NT system you install from and each NT system you install the NDS ORS to have a current version of Novell's NT Client installed (version 4.10 or later). You can download the latest Novell NT Client from the following URL:
http://www.novell.com/intranetware/clientwinnt.html
Make sure that each NetWare server on which you install the Event Monitor (NDSDM.NLM) has SAP turned ON.
To Make Sure SAP is On:
From the NetWare server console, type LOAD INETCFG.
Choose Bindings.
Choose IPX External Net.
Choose Expert Bind Options.
Choose SAP Bind Options.
Ensure SAP State is set to ON.
Make sure the system from which you run the Installation Program does not have any connections or drive mappings to any NT systems where you are going to install the NDS ORS. If you are running the installation from a remote workstation, you should be logged in as Administrator.
Make sure you have the TCPIP.NLM loaded on the NetWare server.
IPX is used as the protocol to communicate the changes from NDS to the NT SAM. While the TCPIP.NLM is required, the TCP/IP protocol is optional and if loaded on the NetWare server to which the NDS Event Monitor (NDSDM.NLM) will be copied, TCP\IP is also needed on the NT server.
Make sure the NT Event Log Viewer is not open on any of the systems where you're installing the NDS Object Replication Service.
Overview of the Installation Process
The NAdminNT installation program is like a "coach" or "wizard." It walks you through most of the steps in a linear fashion, prompting you for information as you go along.
To install NAdminNT, simply launch the installation program and follow the program prompts. The installation wizard can be launched from the Windows NT Explorer by double clicking on SETUP.EXE, or choosing Run from the Start menu and typing the path to SETUP.EXE. The SETUP.EXE file is located in the directory where you expanded the self-extracting executable for NAdminNT.
The installation program walks you through the following tasks:
Extending the NDS Schema to add objects and attributes required to support NAdminNT
This step is performed only once per Directory tree.
Installing an Event Monitor (NLM) on NetWare servers which monitors changes to users and groups
If these users and groups exist on NT systems, these changes are forwarded to those systems in a secure manner. The Event Monitor is installed on each server that holds an NDS partition with users and groups for NT systems.
Adding snapin modules to NetWare Administrator which supports the new NAdminNT objects and attributes
Registering snapin modules for use with NetWare Administrator.
Adding the NDS Object Replication Service to Windows NT systems
This service handles updating local users and groups as it receives changes from NDS.
Rules of Thumb for Installing NAdminNT
These rules of thumb provide answers to common questions about the installation program:
Which Components Should I Install? For an explanation of what each component does, see the section "Novell Administrator for Windows NT Components" above. If you are installing NAdminNT for the fist time, select all the components. If you have already installed NAdminNT once, you might want to select only those components you need.
For example:
If you've just added a new NT domain or workgroup and want to manage it through NDS, choose only the NDS ORS component. The ORS will then be installed on the NT domain or workgroup that you select. This component prepares your NT systems to be synchronized with NDS. A single NT system or domain can be integrated with at most one NDS tree.
If you've created a new partition with NT users and groups and need changes in this partition to be communicated to the NT systems, choose the second and third options-add the NetWare NLM and the NWADMIN Snapins/NT Integration Utility. The NLM and NWADMIN Snapins/ Integration Utility will be installed to a server (that you select) that has a master replica of the newly created partition. In an environment of multiple trees, you must install NAdminNT on each tree.
Where Do I Install NDS Event Monitor? Select a NetWare server that holds a master or read/write replica of a partition in which you plan to place NT users and groups. You should always first choose the server that holds the master replica. You should also install the Event Monitor on one or more IntranetWare servers that have read/write replicas in case the server that holds the master replica goes down.
When changes are made to NDS users that are synchronized with NT users, the NLM on the IntranetWare server pings the NT systems to let them know what information should be updated.
|
Tip: To view your NDS tree's partition information and to verify that your NDS partitions aresynchronizing correctly, use NDS Manager. |
Where Do I Install ORS? Select the NT domains and/or workgroups that you want to participate in NT/NDS integration. The domains and workgroups you choose should contain users that you want to be able to manage in NDS.
If you select a domain, NAdminNT will find the PDC and BDC in the domain and automatically install the NDS ORS on them.
|
Note: While the ORS software resides on the BDC, it remains dormant until the BDC is promoted to aPDC. Then the administrator would have to manually start the NDS Object Replication Service. |
NAdminNT creates an NT Domain object or NT Workgroup System object (depending on what systems you choose to install the ORS on) in the Directory tree you select. You can also select the location in the NDS tree-the NDS context-that the objects will be placed in.
Where Should I Create the NT Domain? NAdminNT needs to create an NDS object to represent each NT domain or workgroup system you want integrated with NDS. In the Installation Program, you can browse for the context where you want to insert each object. Novell recommends you place each object that represents an NT system closest in the tree (the same container in the same partition) to where NDS users for the NT system are placed. Functionally, the objects can be placed in any context-although for management purposes they make most sense in the same container as the NT users.
|
Note: Large domains (containing more than 2500 users) should be placed in separate NDS partitions. |
Integrating NT and NDS Users Using the Integration Utility
With IGRATE.EXE, you can integrate NT users into NDS or NDS users into NT. You can also synchronize an existing NT user with an existing NDS user.
How User Accounts Are Propagated
When you integrate NDS users to NT, the NDS properties will be used when the NT accounts are created. When you integrate NT users to NDS, the NT user properties will be used when the NDS accounts are created. However, since NDS and NT have many common user properties, when you synchronize an existing NDS user with an existing NT user, the NDS user properties will overwrite the NT properties. If you use an NDS user template when you perform an integration operation, the properties in the template are first applied, and then the properties that are currently set for the user are applied. In other words, the template does not overwrite existing user properties.
How User Passwords Are Set
The password on the existing user will not be changed, but the user being created will use the password that is defined in User Properties (in the Integration Utility). The default setting is No Password, with Require Password Change at Next Login.
Launching the Integration Utility
The Integration Utility can be launched as a standalone executable or as a snapin from NWAdminNT. To launch the integration utility as a standalone executable, create a shortcut that points to IGRATE.EXE in the SYS:PUBLIC\WINNT directory. To launch the integration utility from NetWare Administrator, launch NWAdmin and choose NT Integration Utility from the Tools menu.
Before you can perform any integration or synchronization operations, you must update (upload) NT information into NDS.
Uploading NT Information into NDS
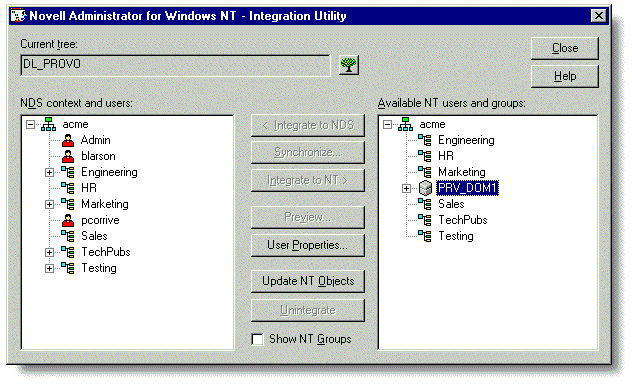
During installation of NAdminNT, an NT Domain and/or an NT Workgroup System object was created in your Directory tree. To upload the user account information from the domain or workgroup system, simply launch the Integration Utility from the browser on the right side select the NT Domain object or NT Workgroup System object that was created during install, and choose Update NT Objects (see Figure 3).
Figure 3: During the upload of NT information, all communication between the NT systems and the Integration Utility is made using NCPX calls.
Should you experience errors, consult the help file for error code documentation related to NCPX communication.
|
Note: Manage NT accounts with NWAdmin. That way, if you change a property of an NDS user that has an integrated NT user account, all changes will be sent to the NTSAM database and the NT user properties will be changed to matchthose of the NDS user. Do not use NT'sUser Managerutility, because changes made in the domainor workgroup system with User Manager will not get synchronizedwith NDS unless you redo a complete upload of NT informationCandthis can take a long time if you have large domains or a largenumber of workgroup systems participating in NT/NDS integration. |
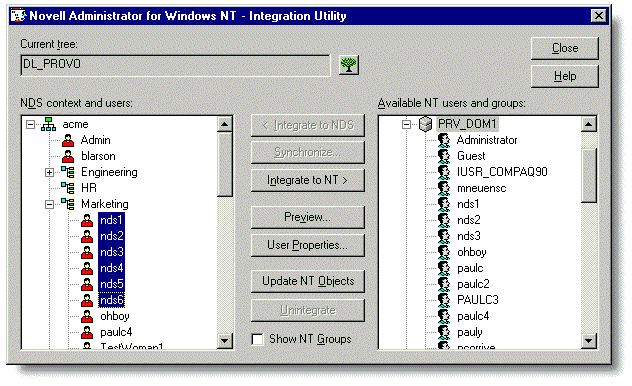
Integrating NT Users to NDS
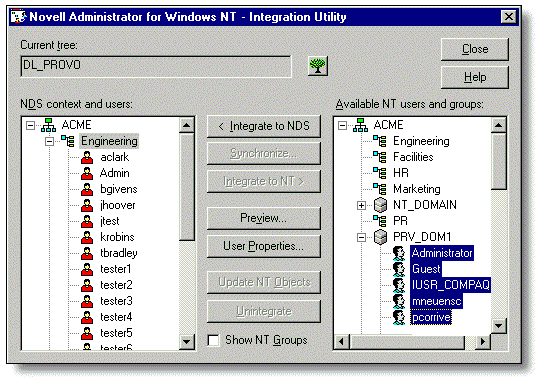
You can select NT users in the Integration Utility and integrate them to NDS. An NDS user account will be created for each NT user selected (see Figure 4).
Figure 4: Once the NT users are integrated to NT, the NT User objects will appear as Hybrid User objects under the NT Domain object or NT Workgroup System object (to show you that they have a counterpart NDS user). You can manage Hybrid Users with NetWare Administrator.
To integrate NT users to NDS, do the following:
Launch the Integration Utility.
From the browser on the right, select the NT users you want to integrate to NDS (create NDS accounts for).
Note: NT users will be contained in the NT Domain object or NT Workgroup System object.
From the browser on the left, select the container(context) where you want to create the NDS accounts for the NT users selected on the right.
(Optional) Choose User Properties and specify password and template options.
Choose Integrate to NDS.
Choose Preview to do a pre-test, or choose Continue.
Integrating NDS Users to NT
The NDS users you select in the Integration Utility will be integrated to NT, meaning an NT user account will be created for them in the NT domain or NT workgroup system you select.
Figure 5: When the NDS users are integrated into NT, the NT User objects will appear as Hybrid User objects under the NT Domain object or NT Workgroup System object (to show you that they have a counterpart NDS user). You can manage Hybrid users with NetWare Administrator.
To integrate NDS users to NT, do the following:
Launch the Integration Utility.
From the browser on the left, select the NDS users you want to integrate to NT (create NT accounts for).
From the browser on the right, select the NT Domain or Workgroup System object where you want to create the NT accounts for the NDS users selected on the left.
(Optional) Choose "User Properties" and specify password and template options.
Choose Integrate to NDS.
Choose Preview to do a pre-test, or choose Continue.
Synchronizing Existing NDS Users with Existing NT Users
You can synchronize an NDS user with an NT user, which is helpful if you upload NT users that have the same user name as their corresponding NDS user account. Instead of having to manually synchronize the properties of the user's NT and NDS accounts, you can synchronize them with one click in the Integration Utility.
|
Note: You can synchronize only one NT user with one NDS user at a time. |
When you synchronize an existing NDS user with an existing NT user, the NT user will appear as a Hybrid user object under the NT Domain object or NT Workgroup System object to show it has a corresponding NDS account. The Hybrid user will assume the properties of the NDS user, rather than the NT user. You can manage the Hybrid user with NetWare Administrator.
For example, if you have an NT user named DJOHNSON and synchronize that user with an NDS user named DJOHN, the NT user will be renamed DJOHN and will assume the properties of user DJOHN.
Figure 6:This is the screen you will use when synchronizing existing NT users with NDS users.
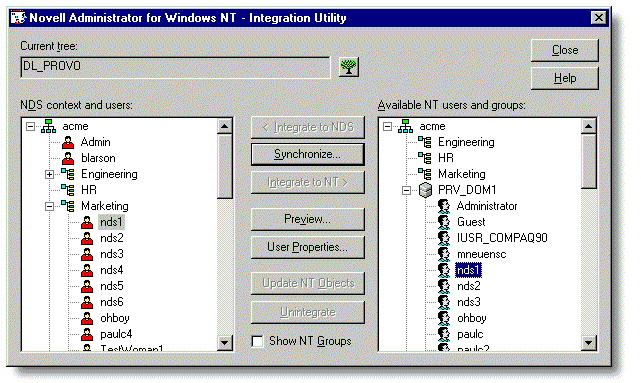
To synchronize an existing NT user with an existing NDS user, do the following:
Launch the Integration Utility.
From the browser on the left, select the NDS user you want to synchronize.
From the browser window on the right, select the NT user you want to synchronize.
Choose Synchronize.
Choose Preview to do a pre-test, or choose Continue.
Performing Other Operations with the Integration Utility
Other tasks you can perform with the Integration Utility include:
Use an NDS template to create new accounts.
This task lets you specify that an NDS User template be used to determine the values of the user properties rather than having the NDS user values selected by default. By using the NDS template, you can integrate many NT user accounts without having to repetitively enter information that isn't stored in NT user accounts but is stored in NDS user accounts.
Unintegrate NT users.
This task lets you undo an integration operation.
Specify password requirements before integrating users.
This task lets you to specify how the password will be created. Once the password is created, the user will use it to log in to both NetWare and NT.
For further help and instructions on using the Integration Utility, see the online help in the utility.
Managing NT Systems, Users, and Groups With NWAdmin
NetWare Administrator (NWAdmin) is the main user management utility for NDS. NWAdmin lets you manage all of the NDS objects in your NDS tree.
The NAdminNT installation program places several new objects in your tree. For example, an NT Domain object and/or an NT Workgroup System object was placed in the context you selected during installation. Both of these objects are container objects. When you uploaded NT information to NDS with the Integration Utility, any NT users or NT local or global groups that existed in the domain or workgroup system were placed in the container object.
Creating and Managing NT Users and Groups
You can create and manage NT users and groups using NWAdmin. Create an NT user if you want to manage a user that resides in an NT domain or workgroup. Create an NT local or global group if you want to simplify management through group assignments. The advantage of creating NT users and groups in NWAdmin is that you no longer need to use two user management utilities. Now you can manage both NDS and NT users and groups using only NWAdmin.
To create NT users and groups, do the following:
Launch NetWare Administrator.
Right-click on the NT Domain object or the NT Workgroup System object in your tree.
Choose Create.
This list shows all objects you can create under an NT Domain or Workgroup System object.
Select the object you want to create and choose OK.
Complete the fields in the Create dialog and choose Create.
Once you have created NT users and groups, you can manage their properties. Simply select the NT User object or NT Local or Global Group object in NWAdmin, right-click the object, and choose Details.
Managing Integrated (Hybrid) User Accounts
Once you have integrated NT users to NDS, or NDS users to NT, you can manage the NT Hybrid user two ways. One way to manage a Hybrid user is to locate the Hybrid User object under the NT Domain object or NT Workgroup System object and double-click on the Hybrid User object. The details for the Hybrid user are displayed.
Figure 7: From this dialog you can set the Hybrid user's password and account restrictions. These attributes are specific to the user's NT account. To manage the attributes specific to the user's NDS account, you must work with the NDS user identified in the NDS Username field.
|
Tip: A Hybrid user is simply an NT user that has a corresponding NDS user account in the NDS tree. |
Another way to manage a Hybrid user is to locate and right-click on the NDS user that is associated with the Hybrid user. From the Application Servers page, select the NT system where this NDS user has an associated NT user and choose Details. The details for the Hybrid user are displayed, as shown in Figure 8.
Figure 8: From this dialog, you can manage the NT user attributes of the NDS user.

Summary
The benefits to system administrators of implementing NAdminNT are many. NAdminNT helps administrators to easily integrate their IntranetWare users with Windows NT. This AppNote has given an overview of NAdminNT components, and has provides instructions for installing NadminNT. It has also discussed how to use the NAdminNT integration utility, and discussed issues related to the management of NT systems, users, and groups using Novell's NWAdmin program.
NAdminNT provides a powerful way to integrate NT domains and workgroups into a Novell IntranetWare network. By leveraging the power of NDS, NAdminNT lets network administrators manage their NT and IntranetWare networks from a central location, saving time and money in the process.
* Originally published in Novell AppNotes
Disclaimer
The origin of this information may be internal or external to Novell. While Novell makes all reasonable efforts to verify this information, Novell does not make explicit or implied claims to its validity.