Setting Up Network Printing with Client 32 for Windows 95
Articles and Tips: article
Support Engineer
Novell Technical Services
BRENT HEGERHORST
Software Engineer
Distributed Networks Business Unit
01 Nov 1996
Explains how to set up network printers, how to use point-and-print, and how to share a local printer with the NetWare NPRINTER Manager for Windows 95
- Introduction
- Installing a Printer with the Add Printer Installing a Printer with the Add Printer Wizard
- Printing to a Network Printer
- Configuring an Installed Printer
- Using Point-and-Print for Network Printers
- Using the NetWare NPRINTER Manager for Windows 95
- Conclusion
Introduction
NetWare Client 32 for Windows 95 supports "deviceless" printing. In other words, it is no longer necessary to associate an LPT port with a specific printer and use a print capture to redirect the output to a network printer. Instead, GUI applications send print data directly to a Windows 95 printer device (such as a NetWare print queue), which points to a network printer. Windows 95 writes the printer configuration information to the Registry.
To support printing from MS-DOS or Windows 3.x applications, you can still set up an LPT port capture and redirect output to the network printer specified in the capture. Captures are global--if you do a capture at an MS-DOS prompt, the capture exists under the GUI; if you do a capture in the GUI world, it exists for MS-DOS boxes. However, any flags you set up under a DOS capture cannot be translated into the GUI world. There's no way to associate a Windows 95 printer device with an LPT port.
Client 32 for Windows 95 also supports "point-and-print" to simplify printer setup for users. Point-and-print allows you to store the print driver files for a network printer in a publicly-accessible network directory. When users want to use the printer, they can install it quickly without having to know the printer manufacturer/model and the location of the print driver.
In addition, a 32-bit NPRINTER Manager for Windows 95 is available to provide the same functionality previously supplied by the NPRINTER or RPRINTER program. By loading this on a Windows 95 workstation, you can share a locally-attached printer with other users on the network.
This AppNote covers the following aspects of setting up network printing:
Installing a network printer and its associated driver with the Windows 95 Add Printer Wizard
Printing to a network printer
Configuring an installed network printer
Setting up point-and-print for network printers
Using the NPRINTER Manager for Windows 95
Installing a Printer with the Add Printer Wizard
Windows 95 provides the Add Printer wizard to simplify the process of installing printers. The Printers folder acts as a central place for running the wizard and for managing printing processes.
|
Note: In the initial release of Windows 95, you must use NetworkNeighborhood or Explorer to install printers for Novell DirectoryServices (NDS) print queues. The Add Printer option in MyComputer can only see Bindery print queues, due to a problem withMicrosoft's SHELL32.DLL which limits this functionality for theprovider. There is an update available in Microsoft's Service Pack 1that will allow you to use My Computer to see NDS print queues.The Service Pack can be found at http://www.microsoft.com/. |
Below are the steps for installing a network printer using the Add Printer Wizard in Windows 95. These instructions assume a NetWare print queue (Bindery or NDS) has already been created for the printer.
In Windows 95, open the Printers folder. You can do this in one of the following ways:
From the Start menu, point to Settings, and then click on Printers.
In My Computer, double-click on the Printers folder.
In Control Panel, double-click on the Printers folder.
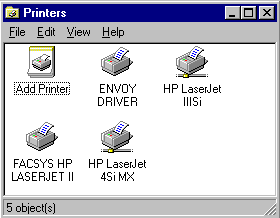
The Printers folder contains icons for any printers that are already installed, plus an Add Printer icon, as shown below:
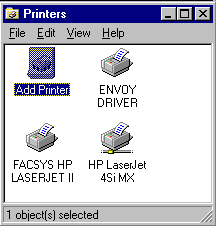
Double-click on the Add Printer icon to launch the Add Printer Wizard.
Note: You can also launch the Add Printer Wizard by double-clicking on a print queue in Network Neighborhood or Explorer. This only works for print queues that haven't yet been set up on yourworkstation.)
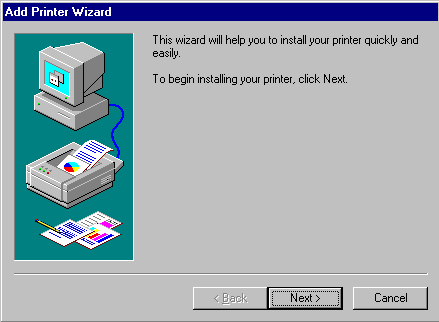
Click on Next > to begin installing your printer.
The next screen asks whether the printer is directly attached to your computer (a local printer) or if it is attached to another computer (a network or "remote" printer). The only difference between installing a remote printer and a local printer with the Add Printer Wizard is that you must specify the path to the remote printer.
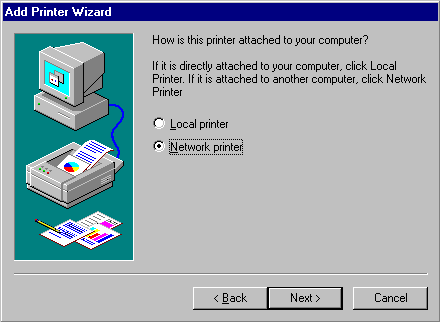
For this example, assume you are installing a network printer. Select "Network printer" and click on Next >.
Since you have selected a network printer, you need to specify the path to the print queue that has been set up for the printer. You can either type the UNC path or click on the Browse... button to browse the network resources and select the print queue. In this example, the UNC path is \\Prv-srvcomm\E31-HPIIISI.

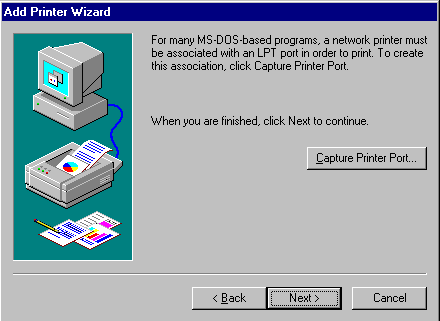
With Windows 95, printers are not normally linked to an LPT port, but to a port "path" through the network. However, capturing printer ports is still available for backward compatibility with DOS programs. If you will need to print from DOS-based programs, answer Yes to the question at the bottom of the screen and then click on Next >. (Otherwise leave the answer as No, click on Next>, and skip to Step 6.)
In the next screen, click on the Capture Printer Port... button to associate the printer with an LPT port.
In the Capture Printer Port dialog box, select the LPT port you want to associate with this printer in the Device entry box (LPT1 in the example below):
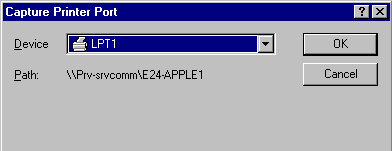
Click on OK, and then click the Next> button.
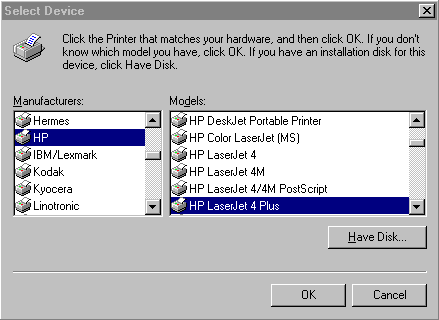
Choose the manufacturer and type of printer you are installing. The example below shows the selection of an HP LaserJet III Si non-PostScript printer from Hewlett-Packard. (If your printer is not listed but you have Windows 95 drivers for it, click on the Have Disk... button and follow the on-screen instructions.)

Click on Next >.
The next screen prompts you to name the printer:
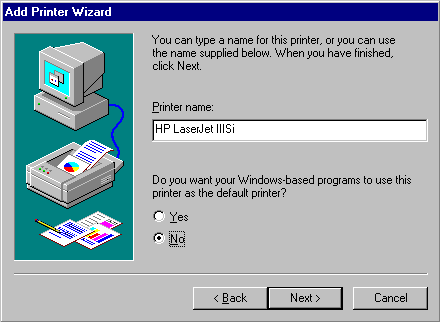
You can either accept the default name supplied or type another name for the printer. If you want this to be the default printer for Windows-based programs, answer Yes to the question at the bottom of the screen. Click Next >.
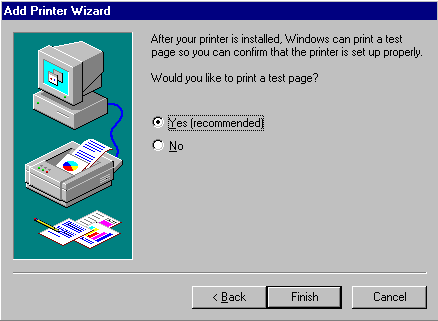
The final question asks if you want Windows to print a test page to confirm that the printer is set up properly. Answer Yes or No and click on Finish.
An icon for the newly-installed printer should now appear in the Printers folder, as shown below:
If you chose to print a test page, you will see a prompt asking if the test page printed correctly. If it did not, answer No and go through the on-screen troubleshooting steps to find the problem. If the test page printed, answer Yes. The user can now print to the printer, as explained under the next heading.
Printing to a Network Printer
You can print two different ways: from within an application, or using a printer shortcut.
Printing from Within an Application
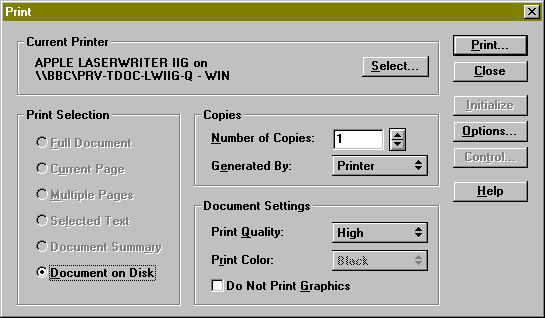
You can print from within an application in Windows 95 in the same manner as with Windows 3.x. The only noticeable difference in the print dialog is the absence of an LPT port in the "Current Printer" designation, as you can see in the following example:
Printing Using a Shortcut
In Windows 95, "shortcuts" allow you to copy an icon that relates to any program, document, or printer and move the icon to the desktop or to another folder for quick access to frequently used resources. For example, you can create a printer shortcut icon and place it on the desktop for easier access.
Once a printer shortcut is set up, you can simply drag and drop a file onto the printer shortcut icon. The shortcut will automatically open the associated application and execute the print command.
Configuring an Installed Printer
To configure the printer after it is installed, right-click on the printer's icon in the Printers folder. The resulting menu lists several options for the printer, as shown in the example screen below:
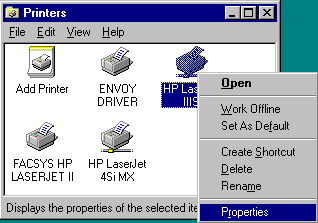
These pull-down menu options are defined as follows:
|
Option
|
Description
|
|
Open |
Opens the printer's print queue and displays current print jobs |
|
Work Offline |
Stores print jobs until the printer is turned online by clicking the Work Offline option again. This option is available only for portable computers or for computers using a network printer. For local printers, use the Pause Printing option. |
|
Set As Default |
Makes the selected printer the default printer |
|
Create Shortcut |
Creates a shortcut icon for the printer |
|
Delete |
Deletes the printer definition |
|
Rename |
Allows you to rename the printer |
|
Properties |
Sets printer properties and allows you to capture a printer |
Below are some examples of what you can do with these options. The examples assume you are working from the Printers folder. Many of these same tasks can also be performed by right-clicking on printers and print queues that are viewed in Explorer.
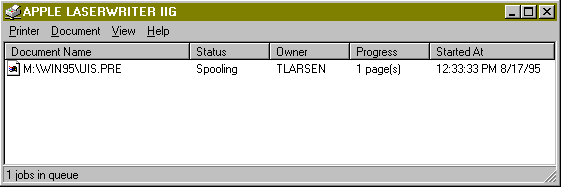
Displaying Jobs in a Print Queue
To see jobs in a print queue, select "Open" from the pull-down menu. This opens the print queue and displays the current print jobs, as shown below:
|
Note: You can access this same queue window by double-clicking on theprinter icon in the Printers folder, or on the print queue in Exploreror Network Neighborhood. |
Modifying Printer Properties
To change the properties associated with the printer, select Properties from the menu. From here you can configure general printer settings, details on the printer, printer settings, paper, graphics, fonts, and device options. The General Tab. The sample screen below shows the options under the General tab:

By default, the Comment field contains the server/print queue name. You can change this to add a customized comment about the printer, such as when it is available or what it is used for. The Separator Page option is not available for network printers. You can click on Print Test Page to send a test page to the printer for troubleshooting purposes.
Details Tab. The Details tab lets you add or delete LPT ports, specify a new printer driver, capture and end capture, and configure the timeout settings. An example of this page is shown below:
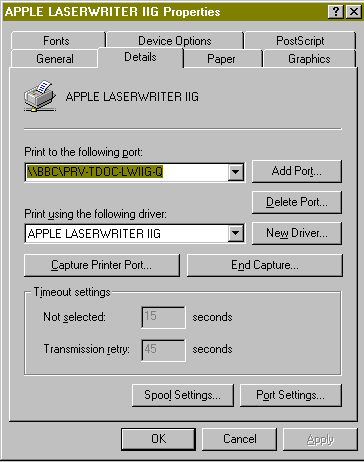
The port (destination) that was used when setting up the printer is displayed under "Print to the following port:". To add a new port to this list, click on on the Add Port... button. (You can also click on the down-arrow button to the right to select from a list of possible destinations for the print output.) An Add Port dialog box similar to the following will appear:
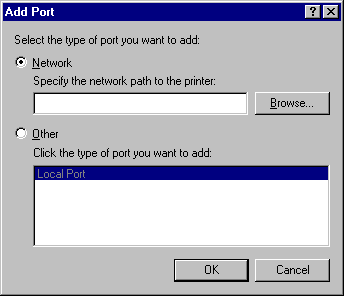
To add a network port (print queue), type in the network path to the printer. Or click on Browse... to select the queue from a list of defined print queues. Click OK when finished.
If you want to print to a file, click Other and then enter a filename for the port name. The filename will be added to the list of available ports, so that print jobs will go to a file with the specified name.
Capturing an LPT Port. To capture an LPT port, click on the Capture Printer Port button on the Details page. In the Capture Printer Port dialog box, choose the LPT port you want to connect and enter the path of the printer to connect with. In most cases, you should enter the path in the format: \\servername\queuename.
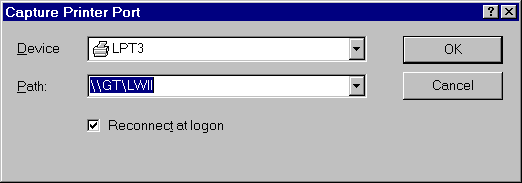
Click on OK to complete the printer port capture. Many longtime NetWare users are familiar with the banner page, form feed, and other parameters that could be set for captured LPT ports. Windows 95 does not require LPT port captures for printing, but you can still set these parameters for your network printers. One way is through the Printer Settings tab, described next.
The Printer Settings Tab. Clicking on the Printer Settings tab brings up the page shown below (the layout of this page may vary slightly depending on which version of NetWare Client 32 you have):
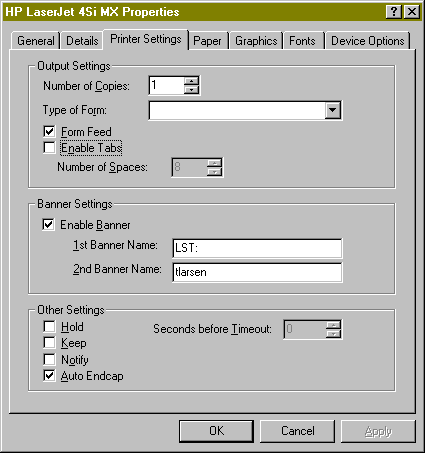
From here you can access the full set of capture parameters, such as banner page and form feed options. (If the computer was not set up to print from DOS or Windows 3.x applications, this tab is ignored.) If the printer was set up to print applications from DOS or Windows 3.x, you can also make capture settings in the same way as for previous NetWare clients (in the login script or from the command line). To check the current settings, go to a DOS box and issue the CAPTURE SHcommand.
|
Note: If you have more than one printer set up to service the same queue,Windows 95 will only use the settings for the first printer that it finds.To avoid unexpected results, be sure to make the capture settingsthe same on all defined printers servicing the same queue. |
If you want to set default printer settings for all future print captures, select Control Panel | Novell NetWare Client32 | Properties. Click on the Default Capture tab. These settings will affect existing captures after you restart your computer. They do not affect captures made from a login script or from the command line.
Using Point-and-Print for Network Printers
Point-and-print simplifies the process of installing a network printer for Windows 95 users. With NetWare Client 32 for Windows 95, the network administrator can configure a printer so that a user can simply "point" to the printer or queue and Windows 95 will retrieve printer-specific information from the network, including:
The printer manufacturer and model
The printer driver
The name of the server on which the printer driver files are stored
From this information, it can be determined which driver to retrieve from a public directory on the server and copy to the Windows 95 workstation.
|
Note: If you are running the Microsoft Client for NetWare Networks withFile and Print Sharing enabled, you can set up point-and-print toretrieve printer drivers from the Windows directory on the computerthe printer is attached to. Client 32 users can use point-and-print evenif it was set up using the Microsoft NetWare Client. In the case wherepoint-and-print is set up twice for the same printer (once usingNetWare Client 32 and once using the Microsoft Client for NetWare),Client 32 users will use the point-and-print configuration that wasdone using Client 32. This discussion focuses on setting up point-and-print for a network printer. |
You can use point-and-print for either Bindery or NDS printers and print queues. The printer driver files are stored in the NetWare bindery or in the NetWare Directory via extending the NDS schema.
Setting Up a Network Printer for Point-and-Print
To set up point-and-print for a network printer and store the printer information on a NetWare 3.x or 4.x server, complete these steps:
Start Windows 95 and log in to an NDS tree or NetWare server as Admin/Supervisor or equivalent user. (This should be the tree or server where you want the path to the printer driver files to be located.)
In Network Neighborhood, browse the network until you find the NetWare printer or print queue you want to set up. Right-click on the queue and select Properties from the resulting menu.
Click on the "Setup Point and Print" tab. (This tab only appears if youhave logged in as Admin/Supervisor or equivalent.) A dialog box similar to the following is displayed:
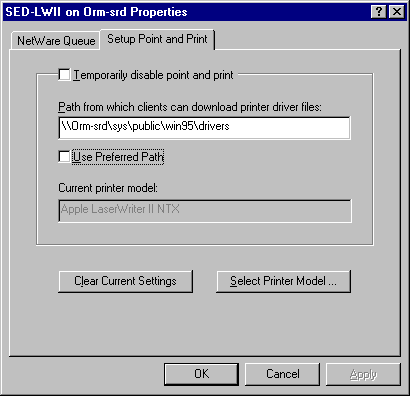
Specify the path for the printer driver files. (You must be logged in to the tree or server where the path is located and have sufficient rights to copy files to the specified directory.)
It is recommended that you choose the preferred (default) path by checking the Use Preferred Path box. The default path is SYS:PUBLIC\WIN95\DRIVERS. If you don't want to use this path, uncheck the box and type another UNC path in the entry box (for example: \\ORM-SRD\SYS\DRIVERS).
|
Note: If you need to later on, you can check the "Temporarily disable point and print" box to disable point-and-print for this printer. Client 32 saves the path and printer model information so you can easily re-enable point-and-print without having to respecify information orrecopy the printer drivers. |
Click on Select Printer Model and select your printer maufacturer and model from the lists provided in the Select Device dialog box, as shown below:
Click on OK. The appropriate printer driver files will be copied to the directory specified in Step 4. (The exact files that get copied are specified for each printer manufacturer and model in the MSPRINT.INF file.)
After the driver files are copied, click OK to close the point-and-print setup window.
Users will need at least Read and File Scan rights to the path specified in Step 4. Since all users have these rights in the SYS:PUBLIC directory, you do not need to grant any additional rights if you use the preferred path or any subdirectory of SYS:PUBLIC. If you specify a different directory for the Windows 95 print driver files, you will need to grant the rights explicitly. If you later change the path for the printer driver files, you must reselect the printer model. Printer-specific settings such as paper size are not retrievable for a NetWare print queue. You'll have to adjust these printer settings manually after the printer is installed on the Windows 95 workstation.
Installing a Printer with Point-and-Print
To use point-and-print to install a NetWare printer, users should follow these steps:
Choose one of the methods below to "point" to the printer you want to install and launch the Add Printer Wizard:
In Network Neighborhood, double-click on the NetWare server icon for the server containing the desired print queue. Drag and drop the print queue into the Printers folder.
In Network Neighborhood, double-click on the desired print queue.
In Network Neighborhood, highlight the desired print queue and select File | Open from the pull-down menus.
From the Printers folder, start the Add Printer Wizard by double-clicking on the Add Printer icon.
Follow the instructions in the Add Printer Wizard as it prompts you to set up the printer. The steps are basically the same as described earlier in this AppNote, except that you don't need to select the printer manufacturer and model. Windows 95 will automatically copy the files for the printer driver (including .DRV, .DLL, .HLP, and other files, as needed) to the WINDOWS\SYSTEMdirectory.
Using the NetWare NPRINTER Manager for Windows 95
NetWare's print services allow print queues to be serviced from printers that are attached to file servers or to workstations. In NetWare 3 and 4, the NetWare Print Server software can be installed on a file server by loading PSERVER.NLM. (In NetWare 3, you have the option of running PSERVER.EXE on a DOS workstation to create a dedicated print server.) To use printers attached to DOS workstations as network printers, Novell provides a terminate-and-stay-resident (TSR) program to be loaded on those workstations. This program is called NPRINTER.EXE in NetWare 4 and RPRINTER.EXE in NetWare 3. The NetWare NPRINTER Manager for Windows 95 (NPTWIN95.EXE) provides the same functionality for a printer attached to a Windows 95 workstation. The workstation must be running NetWare Client 32 for Windows 95; NPRINTER Manager is not compatible with the Microsoft Client for NetWare Networks. The NetWare NPRINTER Manager requires the following hardware and software on the workstation:
An Intel (or compatible) 386, 486, or Pentium CPU
Windows 95 with NetWare Client 32 for Windows 95 loaded
A printer directly attached via a parallel or serial interface cable
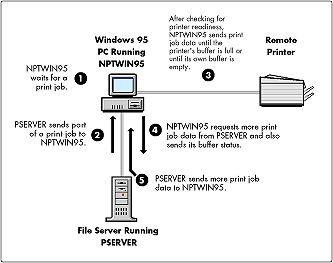
The functionality of the NPRINTER Manager is similar to that of the DOS-based version (NPRINTER.EXE). Because of this, you need to set up NetWare's print services in the traditional manner, including the association of a print server, printer and print queue. PSERVER.NLM should be loaded on the NetWare server. When you load PSERVER.NLM on a NetWare server, the PSERVER software initializes itself based on configuration information stored in its Print Server ID directory (NetWare 3) or in the defined attributes of its Print Server object (NetWare 4). After logically attaching to the appropriate file servers, PSERVER builds a list of the printers it will service and associates the print queues with their designated printers. To have PSERVER service a remote printer via NPTWIN95, you need to add a network printer to the NPRINTER Manager. This is where you specify the type of connection (parallel, serial, or other/unknown), whether NPTWIN95 will use interrupts or polled mode to communicate with the printer, the size of the "pass-along" buffers, and the serial communication parameters (if applicable). The exact configuration process is explained below. NPTWIN95 is configured with the profile access through the NPRINTER.INI file, and accesses the Windows 95 Registry to find out port information as it loads. Once this is done, NPTWIN95 establishes an SPX client connection with the print server and is ready for PSERVER to start sending print jobs. The overall process by which NPTWIN95 processes print jobs is illustrated in Figure 1.
Figure 1: PSERVER passes print job data to NPTWIN95, which sends it to the remote printer.
Configuring NPRINTER Manager on a Workstation
Two main functions need to be performed to automate the NetWare NPRINTER Manager on a Windows 95 workstation:
Add the network printer to the NPRINTER manager.
Add the NPRINTER Manager to the Windows 95 startup folder.
This section also provides instructions on how to install the NPRINTER Manager on a local drive so it will work without anyone being logged in at the workstation.
Add a Network Printer. The Windows 95 workstation must be individually configured to have a locally connected printer available as a network device. After completing these steps, network users can capture the printer or queue as they would any other NDS printing object in Windows 95.
Start the NPTWIN95 program (usually located in the SYS:PUBLIC folder on your server).
The first time NPTWIN95 is executed, the "Add Network Printer" window is displayed, as shown below. (If you have previously run NPTWIN95 and added a printer, choose the Printers menu, and then choose "Add.") This is where you specify which printer object on the network will print to the printer connected to the workstation. You can specify either an NDS printer object (available only if you are authenticated to a server) or a Bindery-based print server and printer.
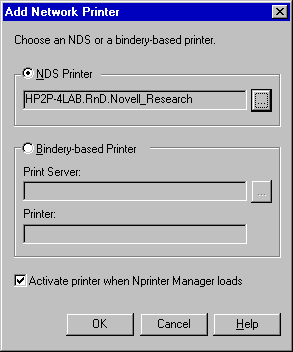
If the exact syntax is not known for an NDS printer, click the button labeled "..." to browse for the desired object. The NDS printing objects displayed may or may not be available if they are configured differently than the workstation's hardware or if the configured print server is not currently running.
The Bindery-based Printer option also has a button labeled "..." to browse for a print server and attached printers. The print servers displayed are those which are advertising to the server. When the desired print server is selected, only the printers available for that print server will be displayed.
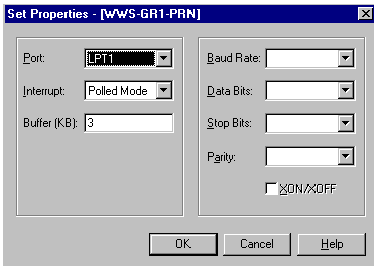
If a "Set Properties" dialog box displays, set the printing properties in the box. Click on OK when finished. (This dialog box will only display if the selected printer was previously defined as "Other/Unknown.")
If you want NPRINTER Manager to load this printer the next time it runs, check the "Activate printer when Nprinter Manager loads" box. If you uncheck this box, the remote printer will be loaded only for this NPRINTER Manager session.
Click OK. If NPRINTER Manager is successfully set up, a screen displays with printer-specific information. (If the information is not correct, choose "Clear" from the Printers menu and add the printer again.)
From the Printers menu, choose Exit. (This exits NPRINTER Manager, but leaves the NLMs required for printing loaded.)
Add NPRINTER Manager to the Startup Folder
To automatically load NPTWIN95 when you run your workstation, add NPTWIN95 to the workstation's Startup folder.
In Windows 95, choose Start, and then Settings.
Choose Taskbar, and then click on the Start Menu Programs tab.
Choose Add, and then Browse.
Navigate to the NPTWIN95 file and double-click on it.
Choose Next, and then double-click on StartUp.
Type the name that you want to see on the Startup menu (for example, NPRINTER), and then choose Finish. (If Windows prompts you to choose an icon, choose one, and then choose Finish.)
Running NPRINTER Manager without Logging In
To avoid having to have a user logged in to the network just to run NPRINTER Manager, you can run the program from a local drive. To ensure the proper execution of the program, you must copy not only the executable file but all associated files to the same directory on your local drive. To do this, follow these steps:
Open My Computer, choose a local drive, and create a folder called "NPRINTER."
Open Network Neighborhood and navigate to the SYS:PUBLIC folder on the server.
Copy the following files from the SYS:PUBLIC folder to the NPRINTER folder in My Computer:
NPTWIN95.EXE(this usually displays without the .EXE extension)


NPTWIN95.DLL


NPTWIN95.HLP


NRDDLL95.DLL


NWADLG95.DLL


NWADMR95.DLL


NWCOMN95.DLL


BIDS45F.DLL


CW3215.DLL


OWL252F.DLL
Conclusion
Once you have printing set up properly for NetWare Client 32 for Windows 95 workstations, users should be able to print to network printers as easily as to locally-attached printers. For more information about NetWare Client 32 and printing, refer to the SETUPNW.HLP online help file.
* Originally published in Novell AppNotes
Disclaimer
The origin of this information may be internal or external to Novell. While Novell makes all reasonable efforts to verify this information, Novell does not make explicit or implied claims to its validity.