Accessing Network Resources with the GUI Login Utility and the NetWare Provider
Articles and Tips: article
Product Support Engineer
Novell Technical Services
JACK HUDLER
Software Engineer
NetWare Client Engineering
01 Nov 1996
Explains how to use the NetWare-specific features provided by these utilities.
Introduction
NetWare Client 32 for Windows 95 comes with numerous tools and utilities to help both users and administrators. This AppNote examines the Client 32 GUI Login utility and the NetWare Provider. The NetWare GUI Login utility allows users to log in and run scripts while they are in the Windows 95 environment. The NetWare Provider extends the functionality of Microsoft's My Computer, Network Neighborhood, and Explorer utilities to include features specific to NetWare and Novell Directory Services (NDS).
This AppNote looks at these tools and describes how they can be used to access network resources with NetWare Client 32 for Windows 95. This information can be used to help network administrators, trainers, and users understand the capabilities available with Client 32.
The GUI Login Utility
Included as a part of Client 32 for Windows 95, the NetWare GUI Login utility (LOGINW95.EXE) allows users to run login scripts, map search drives, and update environment variables--all from within Windows, which has never been possible before. Formerly, Novell provided only a command line utility, LOGIN.EXE, to enable users to log in to the network. The GUI Login for Windows 95 is based on Novell's new graphical login user interface and Login API library, which are portable to other client platforms. (NetWare Client 32 for DOS/Windows includes a similar GUI Login utility.)
The GUI Login utility supports both Bindery and NDS connections, with their respective login scripts (NET$LOG.DATin the SYS:PUBLIC directory for NetWare 3.x, container and profile login scripts in Directory Services for NetWare 4.x). It supports all NetWare 3.x and 4.x login parameters. However, it does not allow the loading of 16-bit DOS TSRs from the login script.
GUI Login handles tasks such as authenticating the user to the NDS tree or to a bindery server, establishing connections to services, redirecting drives, redirecting ports for printing, controling password synchronization, detecting grace logins, setting up host machine environment variables, executing scripts, and executing programs and batch files.
|
Note: LOGINW95.EXE can only be run from the workstation's local harddrive. It cannot be executed from a copy placed on a server. |
Once Client 32 is successfully installed, the Novell GUI Login automatically runs when the user starts Windows 95. Here's how the process works. Upon startup, Windows 95 checks to see if a network client is loaded. In the case of Client 32, the workstation will have an initial attachment to a NetWare server at this point. Windows 95 then calls the corresponding network provider (NetWare's) to perform its login function, which in our case is supplied by the GUI Login utility.
After you log in to NetWare, Windows 95 requires you to log in to the workstation itself. NetWare Client 32 caches the login information so that, if the user's Windows 95 name and password are the same as those for the network, the Windows 95 login will not be invoked. (If no network client is detected during the Windows 95 startup, only the Windows 95 login is displayed to log the user in to the workstation.)
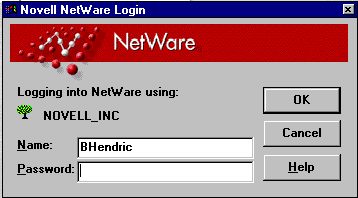
Logging In with the Simple Login Option
With Client 32 loaded on a Windows 95 workstation, the user will see the NetWare GUI Login window after the Windows 95 workstation is started up. The sample window shown below illustrates the GUI Login's simple (default) login option, where the user is asked for only a name and password:
Enabling Additional Login Tabs
To enable the other available login tabs, go into Windows 95, select Control Panel | Network, highlight Novell NetWare Client 32 and click on Properties. Click on the Login tab to see the page shown below:
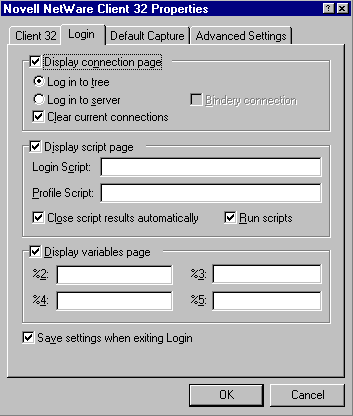
Check the box next to the page(s) you want to add to the default GUI Login screen: Connection, Script, and Variables.
|
Note: The login options you can configure here correspond to keys in theRegistry database. The path is HKEY_LOCAL_ MACHINE |Network | Novell | System Config | Network Provider | GraphicalLogin. Below are the key names with their default values (0=OFF,1=ON): |
||
|
Name |
|
Value |
|
Connection Tab |
|
0 |
|
Script Tab |
|
0 |
|
Variables tab |
|
0 |
With all of the additional login pages enabled, the next time the user logs in to Windows 95, he or she will see an expanded login window similar to the one shown below:
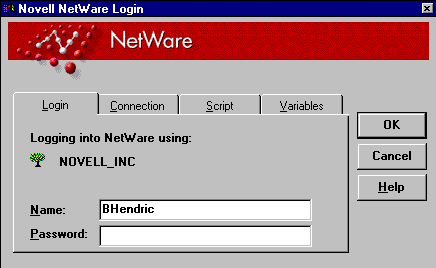
The sections below briefly describe the four categories of settings that can be configured when logging in: Login, Connection, Script, and Variables.
The Login Tab
The Login tab presents the same options as the default login screen (shown above under "Logging In with the Simple Login Option"). In this window, the user can enter a username and password. If Client 32 has successfully connected to the network, the utility displays the NDS tree or NetWare server being used under the "Logging into NetWare using" label.
The Connection Tab
The Connection tab allows you to specify an NDS tree or NetWare server to connect to. You can click on the buttons to the right of the tree or server names to browse for other NDS trees and NetWare servers that are available on the network (see the sample screen below):

If you have selected a Server connection, you can click on "Bindery connection" to specify that you want a Bindery-based connection instead of the default NDS connection. You can also click on "Clear current connections" to specify that you want your current connections cleared when you run the GUI Login utility.
The Script Tab
If you have an alternate login script or a profile script that you prefer to run, it can be specified in the Script tab:
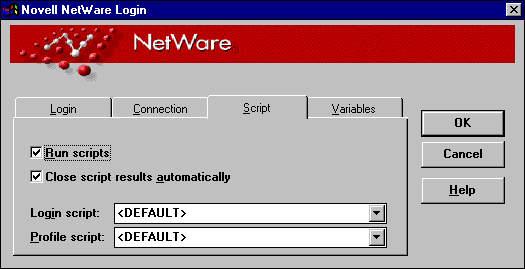
For example, if you had an alternate login script stored locally as C:\SCRIPT\USER.TXT, you would enter that path and filename in the Login Script entry box.
The Script option remembers the last five scripts and paths for both user and profile scripts and stores them in the Registry database. These can be accessed by clicking on the pull-down arrow buttons.
After the login script executes, you can request to see the results of running the script. The Login Results window displays user authentications and drive mappings, as shown below:
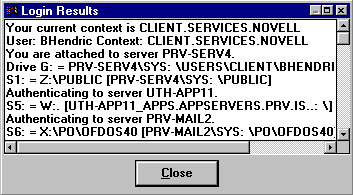
By default, the results screen should close by itself. However, if any errors are encountered, the window will stay open so you can view them. If you want the results window to close automatically, check the "Close script results automatically" box under the Script tab.
The Variables Tab
The Variables tab allows you to specify up to four variables that are passed to the login scripts that are executed when logging in using the graphical login utility. These can be used to pass additional parameters to your login script:
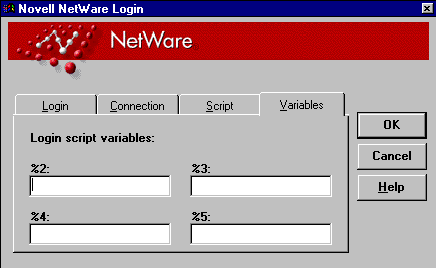
Simply specify the substitution values you want for login script variables %2, %3, %4, and %5 (%1 is your login name). These are equivalent to the corresponding parameters you can pass in the LOGIN command from DOS. These variables can also be used to launch conditional portions of the login script. For example, if you wanted to login and set up a test environment using an SVGA monitor, you could enter "SVGA" as the %2 variable.
GUI Login Tips and Tricks
This section provides some tips and tricks to be aware of when using the GUI Login utility with NetWare Client 32 for Windows 95. (For additional troubleshooting information, see "Troubleshooting and Optimizing NetWare Client 32 for Windows 95" in this issue.)
Executing External Commands (@). External commands can be executed from within a login script by using the # command or the @ command. LOGINW95.EXE uses @ to spawn a process for the command to run and then will continue with the login script. The # command waits for the process to complete before going on.
|
Note: The GUI Login for NetWare Client 32 for DOS/Windows 3.1 also hasthe capability to process the @ command. However, the LOGIN.EXEcommand line utility ignores the @ command in the login script. |
Logging In to Multiple Trees. To log in to multiple NDS trees when using the GUI Login utility, use the following syntax in your login script:
TREE <treename</<.full.NDS.name<
Avoid Multitasking while Logging In. Although Windows 95 allows you to perform other tasks while Client 32 processes a login script, you should avoid doing so as it can cause errors. For example, opening Network Neighborhood while Client 32 is processing a login script causes the Multiple Provider Router to page fault.
Playing .WAV Sound Files. Longtime NetWare users may be familiar with the FIRE PHASERS login script command that generates a sound during the processing of the login script. NetWare Client 32 ships with a PHASERS.WAV sound file that is played by default when the FIRE PHASERS command is issued in login script.
If you want a different sound to be heard, you can specify another .WAV file by specifying the filename in the login script as follows:
FIRE FILENAME.WAV
or
FIRE PHASERS FILENAME.WAV
You could also rename your .WAV file to PHASERS.WAV if you want that .WAV file to play every time.
The NetWare Provider
Windows 95 allows users to access any number of different networks simultaneously. Each of these networks must have a provider--a piece of software that provides network services through the Windows 95 interface. The provider is not a standalone application with its own interface; rather, it is integrated into the Windows 95 desktop environment. When users access a Windows 95 utility such as My Computer, Explorer, or Network Neighborhood, requests for network services are routed through the Multiple Provider Router to the appropriate network provider. (See the AppNote entitled "Overview of NetWare Client 32 for Windows 95" in this issue for more information about the Windows 95 networking architecture.)
The NetWare Provider for Windows 95 is the network provider Novell has developed for use with Client 32 for Windows 95. The NetWare Provider takes full advantage of the Windows 95 user interface and is fully integrated with Microsoft's My Computer, Explorer, and Network Neighborhood utilities. Novell's NetWare Provider extendes the functionality of these utilities to include features specific to NetWare and NDS. With the NetWare Provider, Client 32 users can browse and access network resources--even resources on multiple NDS trees.
The NetWare Provider contains many of the same features as NETWARE.DRV provides for Windows 3.1 clients. The Provider can perform the following tasks:
List resources
Map drives
Capture printers
Log in and log out of servers and trees
Authenticate users to Directory Services
The NetWare Provider establishes connections to NetWare servers, volumes, directories, and files, as well as print queues, either through UNC paths or through map and capture functions.
|
Note: Only certain NetWare-related objects are displayed when you browseresources in any of the Windows 95 utilities. This is becauseMicrosoft didn't supply any APIs for displaying other types of objects(such as User objects) in Windows 95 browsers. As always, Novellsupplies other utilities (such as NWAdmin and command lineutilities) to perform operations on NDS leaf objects. |
This section begins with an overview of how to browse network resources using the three Windows 95 utilities and the services of the NetWare Provider. It then focuses on the various NetWare tasks you can perform through Explorer and Network Neighborhood.
Browsing Network Resources
In Windows 95, you can browse the resources available to your computer through three different utilities:
My Computer--browses through your computer
Explorer--browses through folders in a hierarchal fashion
Network Neighborhood--browses through the entire network
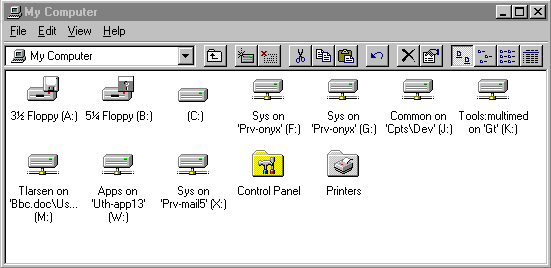
Browsing Using My Computer. When you start up My Computer, it displays all of the physical devices available on your computer (floppy drives, local hard drives, network drives, and so on). It also displays the Control Panel folder and a folder for printers installed on your computer, as shown:
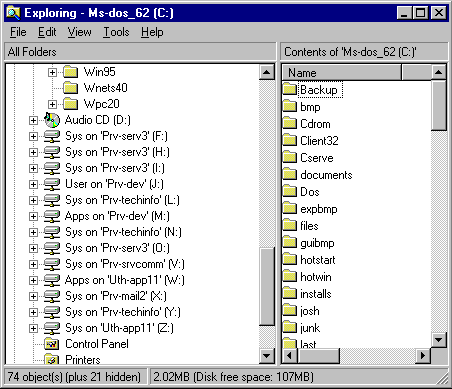
To view lower levels within a drive, simply double-click on its icon. For example, double-clicking on the C: icon shows the contents of the drive, as shown below:
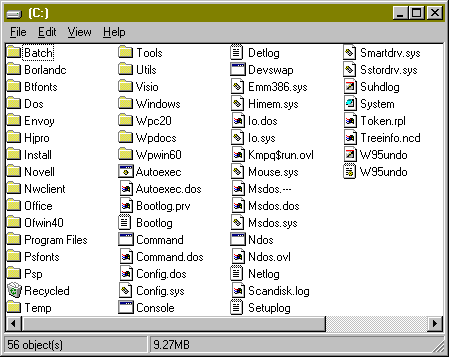
Double-clicking on a folder shows its contents. Double-clicking on a data file opens it. Double-clicking on an application runs it.
Double-clicking on a print queue icon shows the print queue if that printer has been previously installed on the workstation. Otherwise, Windows 95 asks if you would like to set up the selected print queue. (This is explained in the AppNote entitled "Setting Up Network Printing with Client 32 for Windows 95" in this issue.)
Browsing Using Explorer. When you launch Explorer by selecting Start | Programs | Windows Explorer, you will see a window displaying all folders on the local and network drives. The list on the right displays the contents of the folder currently selected at the left, as shown below:
Explorer operates much as File Manager did in Windows 3.x. To browse through the directory hierarchy, double-click on a folder or drive icon. Browsing by exploring simplifies copying and moving files.
Another way to access the Explorer is to right-click on any folder or object and select the "Explore" option from the resulting menu. The sample screen below shows the result of right-clicking on a NetWare volume icon and selecting Explore:
Browsing Using Network Neighborhood. Network Neighborhood allows you to browse not only through your own computer, but through other computers in your workgroup and through your entire network. When you start up Network Neighborhood, it shows icons for:
The entire network
Your current NDS tree
Your default context in that tree
Servers to which you are authenticated and licensed through NDS
Servers to which you are Bindery authenticated
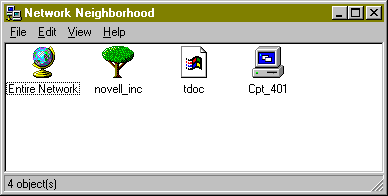
In this sample screen, "novell_inc" is the current NDS tree, "tdoc" is the default container (context), and "Cpt_401" is a server to which the user is authenticated and licensed through NDS. (This screen shows the use of Large Icons to represent network components, whereas previous screens used Small Icons. This is selectable from the Windows 95 View menu. Other view options are List and Details.)
To browse all network resources, click on the Entire Network icon. The network resources are categorized under NetWare Directory Services and NetWare Servers folders, as shown below:
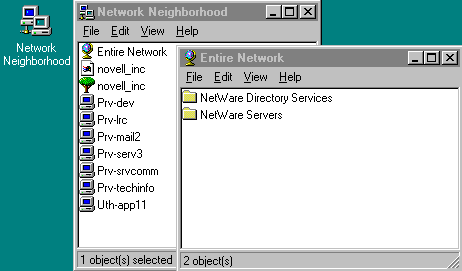
The NetWare Directory Services folder is designed for users on a NetWare 4 network, whereas the NetWare Servers folder is designed for Bindery-based versions of NetWare (3.x and earlier). NetWare 4 users can choose either folder, depending on how they prefer to view network resources.
When you double-click on the NetWare Directory Services folder, you see a list of NDS trees that exist on your network. To log in to a tree, either double-click on the tree, or right-click on the tree and select the "Login to NDS Tree" option. You will be prompted for a username and password. Once you are authenticated, you can "walk" the tree by selecting containers one level at a time. The Provider displays the NDS Volume and Print Queue objects that exist in the current container, as shown in the example below:

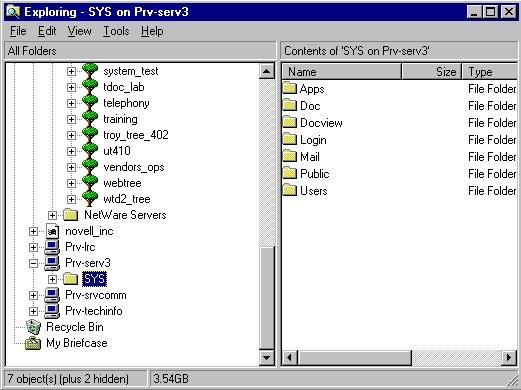
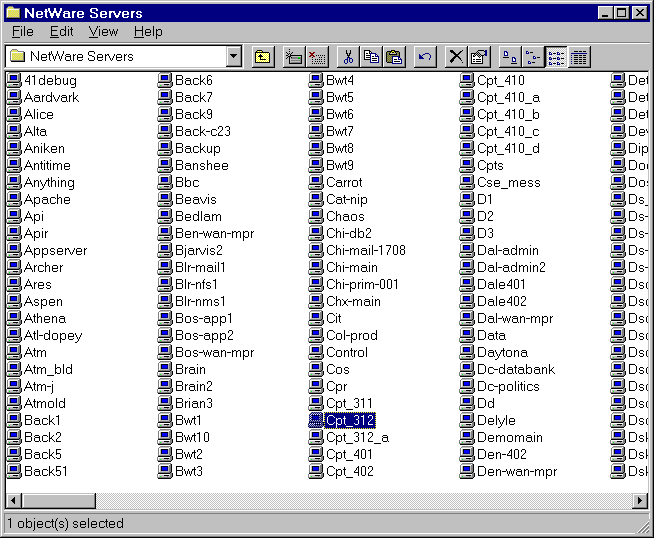
Going the other route from Entire Network and choosing the NetWare Servers folder allows you to browse through servers, volumes, directories, files, and print queues. When you double-click on the NetWare Servers folder, you see a list of servers available on the network, as shown below:
Performing NetWare Tasks in Explorer
You can perform a limited number of NetWare tasks from within Explorer. To access this functionality, highlight a network drive and select the Tools option from the menu bar at the top of the window:
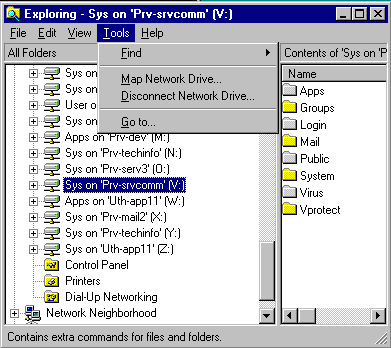
The resulting menu gives you the following options:
|
Option
|
Function
|
|
Find |
Search for a file |
|
Map Network Drive |
Map a network directory to a drive letter |
|
Disconnect Network Drive |
Unmap a previously mapped drive |
|
Go to... |
Access a directory directly without having to traverse the hierarchy |
Users can also view volume information and change NetWare passwords from within Explorer. These tasks are explained below, starting with mapping and unmapping drives.
Mapping a Network Drive. To map a drive, select the Map Network Drive option from the Tools menu. The next available drive letter is displayed in the Drive entry box, as in the sample below. You can select another by clicking on the pull-down arrow button to the right if the Drive entry box.
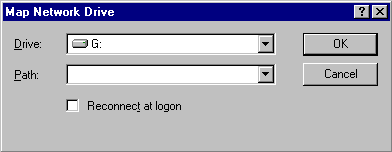
In the Path entry box, enter the directory path, using UNC syntax (for example, \\srv1\sys\apps\misc). If you want to have this drive mapping automatically re-established when you start Windows 95 and log in to NetWare, check the "Reconnect at logon" box. Click OK to complete the mapping.
Because of the way Windows 95 operates, a drive mapped in this fashion will be "map rooted" when you access the directory from within Windows 95 Explorer or any other GUI utility. In other words, if you map drive G to SYS:APPS\MISC, when you access drive G you will see the contents of the \MISC directory. You can browse down from that level to any subdirectories, but you cannot browse up from the \MISClevel.
Unmapping a Network Drive. To undo an existing drive mapping, select the Disconnect Network Drive option from the Tools menu. A window will appear listing the currently mapped drives:
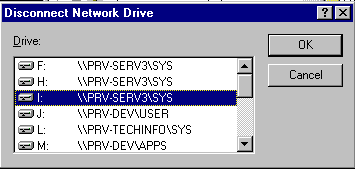
Highlight the drive you want to unmap and click on OK.
Finding a File. To search for a file (or group of files) on the network, select the Find option from the Tools menu, and then select Files or Folders. The following dialog box is displayed:
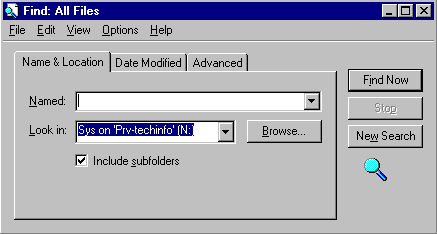
Type the name of the file you want to locate in the Named entry box; you can use wildcard characters (* and ?) in the name. Click on the pull-down arrow button to select from a list of name options. Specify the path you want to search in the "Look in" box. Clicking on the pull-down arrow button displays a list of volumes you can choose from. The Browse... button lets you specify the directory level to begin the search. Check the "Include subfolders" box if you want to search in all subdirectories of this directory.
Under the Date Modified tab, you can specify date ranges for the search. For example, look only at files that were modified between September 1 and October 31, 1996. You can also specify a search for files that haven't been modified for a certain period of time. The Advanced tab lets you refine the search parameters even further, specifying that you want to search for files that contain a specific text string, or files of a certain size.
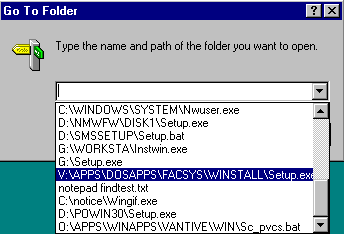
Accessing a Directory. To access a directory directly, without having to traverse the hierarchy, select the "Go to..." option from the Tools menu. Type the name and path of the folder you want to open. Or, you can click on the pull-down arrow button to select a previously accessed folder from the list, as shown below:
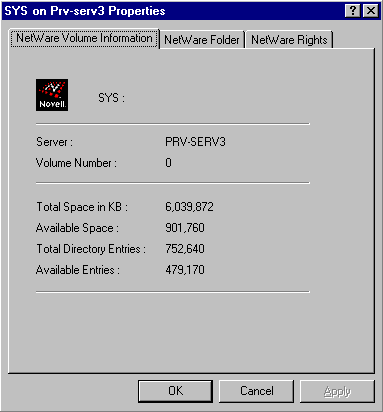
Viewing NetWare Volume Information. To see information about a particular NetWare volume, right-click on the drive icon for the volume and select Properties from the resulting menu. You will see a window of information similar to the one shown below:
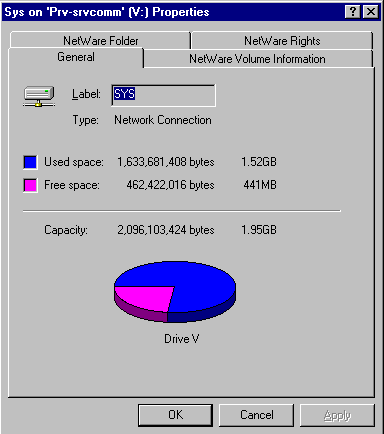
The NetWare Volume Information tab displays the volume number, the total and available space in KB, and the total and available number of directory entries. The NetWare Folder and NetWare Rights tabs can be used to assign NetWare attributes or trustee assignments. (An example of this is given at the end of this AppNote.)
Changing NetWare Passwords. To change a user's NetWare password from within Explorer, double-click on the Control Panel folder and select the Passwords option. The following screen is displayed:
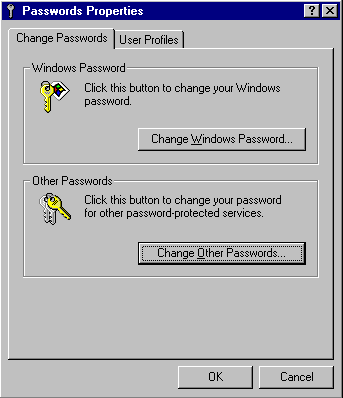
Click on the Change Other Passwords... button. In the Select Password dialog box, highlight Novell NetWare and click on the Change... button. You can now change the password for your current NetWare server or tree by entering the old password first and then typing the new password twice. If you are attached to more than one NetWare server, this option allows you to synchronize your passwords across all the servers.
Performing NetWare Tasks in Network Neighborhood
You can perform numerous NetWare tasks from within Network Neighborhood. For example, you can view connection information, log in and out of servers, view properties of servers and trees, send messages, map network drives, and view information about volumes, directories, and files. You can also manage file system trustee rights and attributes using a more intuitive graphical interface than the command-line utilities previously used (RIGHTS, GRANT, REVOKE, and so on). This section shows just some of the many tasks you can do in Network Neighborhood with the services of the NetWare Provider.
Changing Default NetWare Connections. The NetWare Provider allows you to change your default NDS tree and server at any time during your current session. To do this, right-click on Network Neighborhood and select NetWare Connections. You will see a screen similar to the following:
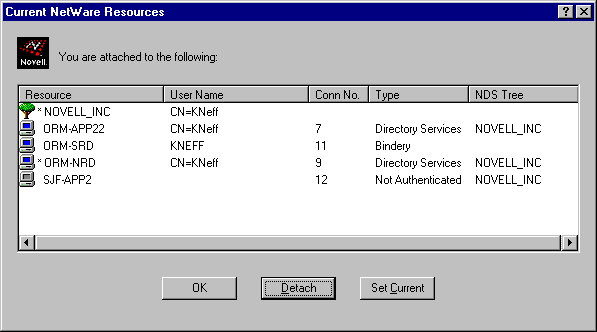
Your default NDS tree and server are indicated by an asterisk (*). To change the current default, highlight the one you want and click on Set Current. Note that changing the default tree or server affects Network Neighborhood's entire view of the NetWare servers. For example, when you change to a different default NDS tree, Network Neighborhood will display only objects that exist in that tree.
Sending Messages. Newer versions of the NetWare Provider allow you to send broadcast messages to users on the network. To do this, click on Network Neighborhood, right-click on the server that the uers are connected to, and then choose the Send Message option. Type the message you want to send under "Send message to the selected user(s):". Select the users or groups to receive the message and click on Send.
You can only send messages to users who are currently connected to the server. The groups shown are those that are listed in the server's bindery. The maximum length of your message is 250 characters, including the "From: <Username<(##)" string placed at the beginning of the message. <Username< is your NetWare user account name and ## is your connection number.
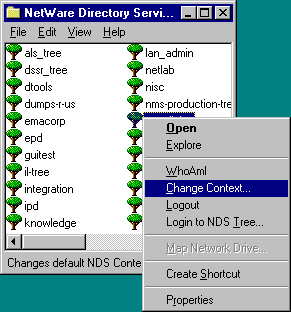
NDS Tree-Related Tasks. This set of tasks is accessed from the list of NDS trees you see after you start Network Neighborhood and choose Entire Network and the NetWare Directory Services folder. If you highlight an NDS tree and right-click on the mouse, a menu of options is displayed:
These options allow you to do the following:
|
Option
|
Function
|
|
Open |
View the contents of the tree. This option work only when you have logged in to that particular tree. |
|
Explore |
Opens the Explorer to view the contents of the tree. Again, this option works only when you have logged in to that particular tree. |
|
WhoAmI |
Shows NetWare connection information. This option is available only for trees to which you have logged in. |
|
Change Context |
Allows you to change your default NDS context. |
|
Logout |
Log out of a tree to whcih you are logged in. |
|
Login to NDS Tree |
Log out of your current NDS tree and log in to the selected tree. |
|
Create Shortcut |
Create a shortcut link to the tree. |
|
Properties |
Show NDS tree properties |
Following are some examples of using these options.
Changing NDS Context. To change your NDS context in Network Neighborhood, right-click on an NDS tree and select the "Change Context" option from the resulting menu. The resulting window shows your current context and allows you to change to a different default context:
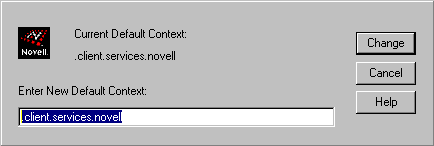
Type the new context in the entry box and click on the Change button.
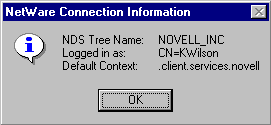
Viewing Connection Information. Selecting the WhoAmI option after right-clicking on an NDS tree will display information concerning your context and connection, as shown below:
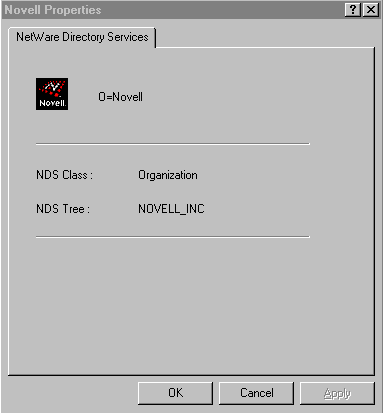
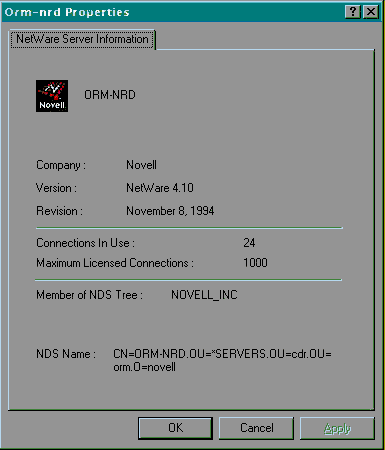
Viewing NDS Object Properties. Select the Properties option to display information about the highlighted object. For example, if you highlight an NDS Organization container, right-click, and select Properties, you will see information similar to the following:
NetWare Server-Related Tasks. The next set of tasks can be accessed from the list of NetWare servers you see after you start Network Neighborhood and choose Entire Network and the NetWare Servers folder. When you highlight a server and right-click on the mouse, a slightly different menu of options is displayed than for an NDS tree. An example is shown below:
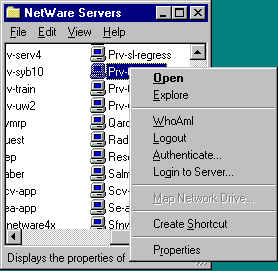
These options allow you to do the following:
|
Option
|
Function
|
|
Open |
Log in to a server and view its contents |
|
Explore |
Log in to a server and view its contents using the Explorer |
|
WhoAmI |
Shows server connection information. This option is available only for servers to which you have logged in. |
|
Logout |
Log out of a server to which you are logged in |
|
Authenticate |
Log in to a server (NDS login) |
|
Login to Server... |
Log in to a server (Bindery login) |
|
Create Shortcut |
Create a shortcut link to the server |
|
Properties |
Show server properties |
Following are some examples of using these options.
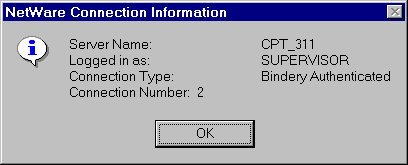
Viewing Connection Information. The following screen shows Bindery server connection information:
Logging Out of a Server. Highlight a server that you are logged into and right-click the mouse. Select Logout from the resulting menu:
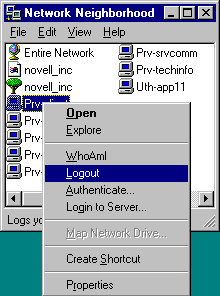
Press <F5< to refresh the screen. The server you logged out of should be removed from the list of resources in Network Neighborhood.
Logging In to a Server. To log in to a server in Network Neighborhood, double-click on the server icon, or highlight the server and right-click with the mouse. Select the "Authenticate..." option for an NDS login, or the "Login to Server..." option for a Bindery-based login. The GUI login utility will be launched, asking you to enter your username and password.
Viewing Server Properties. To see the properties of a server, right-click on the server icon and choose Properties from the pull-down menu. You will see information similar to that shown below:
Viewing Volume Information. To view a server's resources (volumes and print queues), simply double-click on the server's icon.
|
Note: If the server is a Bindery-based server and you are not alreadyattached, the Provider will first try your Windows 95 username andpassword to log in. If that fails, you will be prompted for yourNetWare username and password. |
As with servers and other objects, right-clicking on a volume displays a menu of options. The options for a volume are shown below:
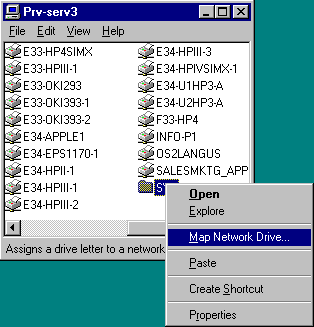
Mapping a Network Drive to a Volume. To map a drive to this volume, select Map Network Drive. This time the Path is filled in for you, so you simply specify the drive you want to map it to. (All mappings created this way are map rooted at the volume level.)
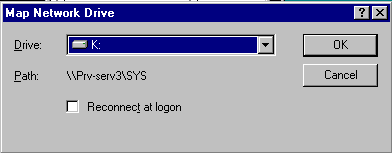
To have this mapping be automatically re-established when you start Windows 95 and log in to NetWare, check the "Reconnect at logon" box. Click OK when finished.
Viewing Volume Properties. Choosing the Properties option on a volume displays usage information about the volume, as shown in the example below:
Working with Directories on a Volume. To work with directories on a volume, double-click on the volume. Highlight a directory and right-click on it:
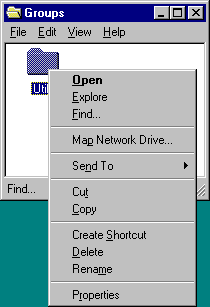
This list of options is similar to the other Properties menus we have seen. However, it includes additional Send To, Cut, and Copy options, as well as options for renaming and deleting the directory.
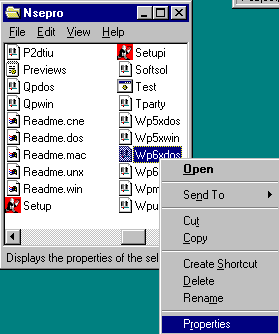
Working with Files on a Volume. To work with files within the directories, double-click on the directory and then highlight a file and right-click on it. Again you see the familiar list of options, as shown below:
Managing File System Rights and Attributes
From within the object Properties dialog, you can set a file system object's attributes and assign trustees without having to run the NWADMIN utility. This is done using the services of the NetWare Provider from within the Network Neighborhood or Explorer. When you select a network directory or file, right-click, and choose Properties, you see a dialog box with three tabs:
General
NetWare File
NetWare Rights
|
Note: If you don't have rights to change the properties of a directory or file,all of the options will be grayed out. If only some options are grayedout, the grayed options are not supported by your version ofNetWare. |
The General Tab. General is a Windows 95 tab that contains information about the object itself. (This is the only tab you'll see if you have selected a local object.) The example below shows the General information about a .BMP file on the network:
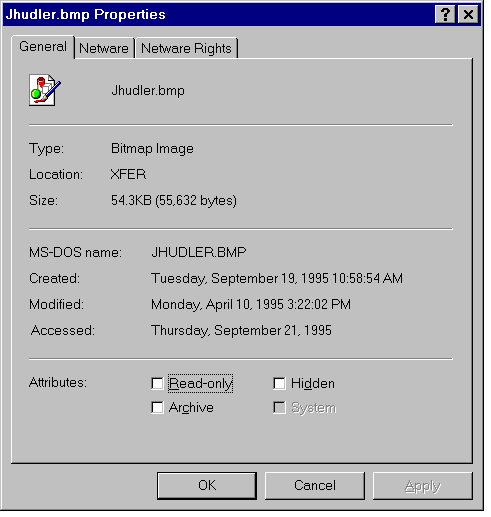
In the Attributes section you can set only the DOS attributes for the file or directory.
The NetWare Tab. The NetWare tab lists information that NetWare knows about the directory or file. The example below shows the NetWare information about the same .BMP file (note that the name of the tab changes to reflect whether you have selected a file or directory):
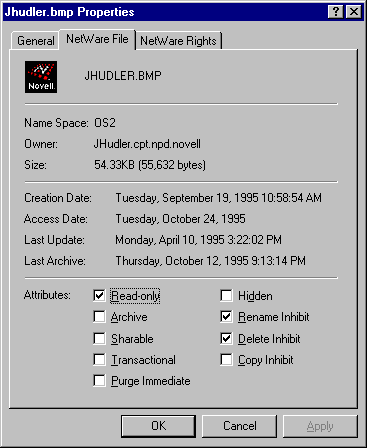
In the Attributes section is a list of NetWare attributes for the file or directory. These attributes are defined as follows:
|
Attribute
|
Definition
|
|
Read-only |
Allows the file to be read, but not deleted or modified. This is a DOS attribute that NetWare uses too. Selecting Read-only causes Rename Inhibit and Delete Inhibit to be selected as well. |
|
Archive |
Used to mark a file that has changed since it was last backed up. |
|
Sharable |
Allows multiple users simultaneous access to files and directories. This attribute is usually used with the DOS Read-Only attribute. |
|
Transactional |
Indicates that the file or directory is protected by NetWare's Transaction Tracking System (TTS). TTS prevents data corruption by ensuring that either all changes are made or no changes are made when agroup of files or directories are modified. |
|
Purge Immediate |
Notifies NetWare to immediately purge the object when it is deleted. Purged files cannot be salvaged. |
|
Hidden |
"Hides" a file so that it does not show up in a DIR listing. |
|
Rename Inhibit |
Prevents any changing of the file or directory's name. |
|
Delete Inhibit |
Protects the file or directory from deletion. |
|
Copy Inhibit |
Disallows any copying of the file. This option works only with Macintosh workstations, but is available here because some Macintosh files use DOS naming conventions. |
The NetWare Rights Tab. The NetWare Rights tab shows a list of trustees and the rights they have to the selected directory or file, as in the example below. Checkmarks indicate the rights granted to each trustee. The effective rights (those the user can actually exercise) are displayed at the bottom of the page.
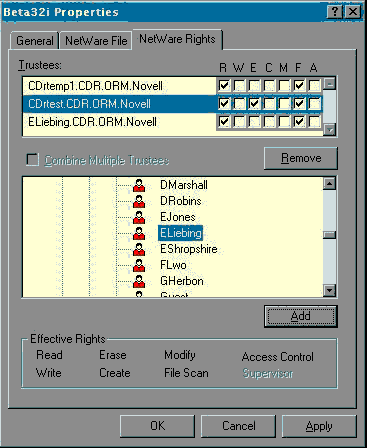
|
Note: For security reasons, Supervisor rights are not listed or modifiedhere. You must use NWADMIN to view or modify Supervisor rights. |
Adding, Modifying, and Removing Trustee Rights. Follow the procedures below to add, modify, or remove trustee rights assignments:
To add a trustee, search through the list of user objects in the tree and click on users to select them. This portion of the NetWare Rights page works similarly to Explorer. You can browse through contexts to find users and groups to add. Clicking on the Add button adds the selected users to the list of trustees. The new trustees are given Read and File Scan rights by default.
To modify the rights of a listed trustee, click on the boxes. Clicking on an empty box adds a checkmark, while clicking on a marked box removes a checkmark.
To remove a trustee, click on the trustee and then click on the Remove button.
Combining Multiple Trustees. You can also select two or more objects and combine their attributes and trustee lists. To do this, proceed as follows.
In Network Neighborhood or Explorer, select the two objects whose trustee assignments you want to combine (files A and B in this example):
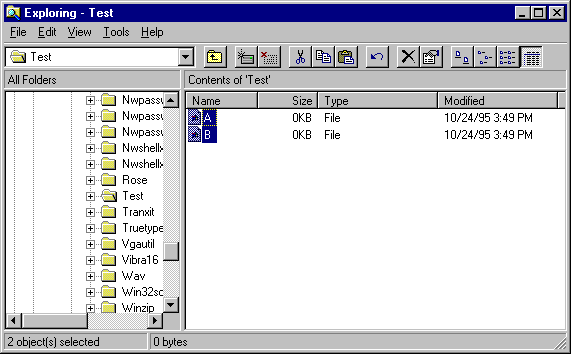
Right-click the mouse and select Properties from the pull-down menu.
Select the NetWare File tab to view the attributes for both of these files together, as shown in the sample screen below:
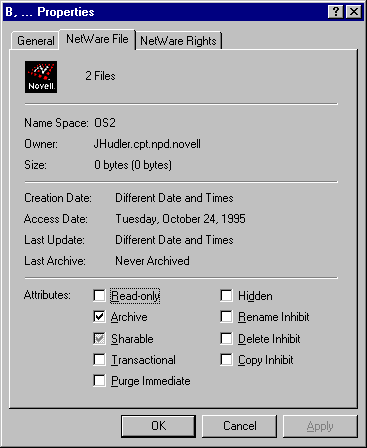
The black checkmark by the Archive attribute indicates that both File A and File B have that attribute set. The greyed out checkmark by the Sharable attribute indicates that only one of the files (File B) has this attribute set.
Clicking on the Sharable attribute will clear the Sharable flag from both files.
A second click on the Sharable attribute will set it for both files.
A third click will return the attribute to its greyed state, meaning that the Sharable attribute will not be altered for either file.
|
Note: The Attributes only exhibit this three-state behavior when multiplefiles are selected and the flags differ between the files. |
To view the list of trustees for the selected objects, click on the NetWare Rights tab. The Trustees list at the top shows all of the trustees who have rights assigned for the selected files, as in the example screen below:
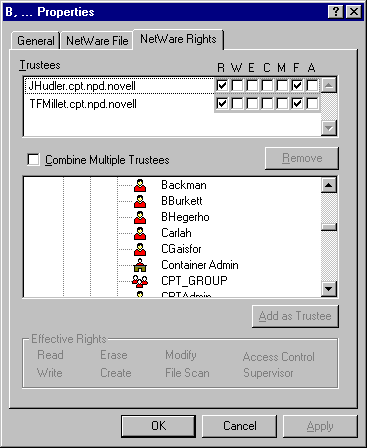
Although it is not readily apparent from the heading displayed at the top of the window ("B, ... Properties"), you are looking at a list of users who have rights assigned to either File A or File B, or both. In this example, File A has the trustee JHudler with the Read and File Scan rights set. File B has TFMillet as a trustee, also with the Read and File Scan rights set. To add a new trustee to both files, click on a user icon in the middle portion of the NetWare Rights page and click on Add. The selected user (Carlah, for example) will be added to the Trustees list, as shown below:
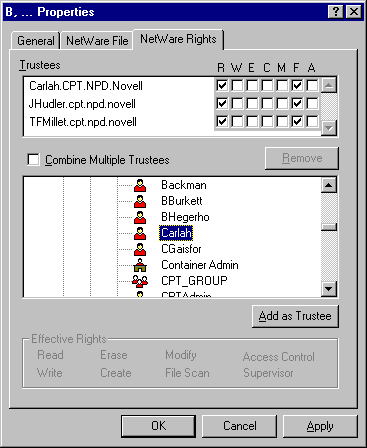
Each file now has its original trustees plus the added trustee. To combine the two lists of trustees, check the "Combine Multiple Trustees" box. If one user has more rights to a file than other users when you combine multiple trustees, every user gains the same rights as the user with the most rights assigned.
Conclusion
There are many other features and capabilities offered by the NetWare Provider. We suggest that you take time to explore some of the other options on your own, using the online help where necessary to understand what the options do.
* Originally published in Novell AppNotes
Disclaimer
The origin of this information may be internal or external to Novell. While Novell makes all reasonable efforts to verify this information, Novell does not make explicit or implied claims to its validity.