Configuring NetWare Client 32 for Windows 95
Articles and Tips: article
Support Engineer
Novell European Support Centre
KEVIN WILSON
Support Engineer
Novell Technical Services
KEVIN RHODES
Software Engineer
Distributed Networks Business Unit
IAN STILES
Software Engineer
Distributed Networks Business Unit
01 Nov 1996
Discusses TCP/IP and NetWare/IP configuration, Dial-Up Networking for remote access, and the use of System Policies for users, groups, and computers.
- Introduction
- TCP/IP and NetWare/IP Configuration
- Client 32 Dial-Up Installation
- Preparing a NetWare Connect Server
- Managing Client 32 Settings through System Policies
- Administrator Defaults and Smart Defaults
- Workstation File Caching with NetWare Client 32
- Other Client 32 Configuration Tips
Introduction
Numerous options and parameters are available for configuring NetWare Client 32 for Windows 95, both during an installation or upgrade and afterwards. This AppNote describes some of the more common configurations for Client 32.
With the growing number of networks that are being connected to TCP/IP to access resources on the Internet, configuring NetWare Client 32 for TCP/IP and NetWare/IP is a common requirement. In addition, many network administrators have questions about how to integrate Client 32 with a Dynamic Host Configuration Protocol (DHCP) or Boot Protocol (BootP) server to automate the assignment of dynamic IP addresses. These issues are discussed in the first section of this AppNote.
NetWare Client 32 for Windows 95 supports the Dial-Up Networking capabilities in Windows 95. This allows remote users to access the network through a modem connection to remote access servers such as Novell's NetWare Connect or the Remote Access Server (RAS) in Windows 95. The second section of this AppNote describes how to configure Client 32 for Windows 95 for remote user access.
In certain environments, administrators need control over the users' desktop configurations. Windows 95 includes an administrative feature called System Policies to establish set configurations that can be applied to individual users, groups of users, or specific computers. The third section of this AppNote tells how to manage and control the configuration of NetWare Client 32 for Windows 95 workstations through System Policies.
Other ways to simplify the configuration of NetWare Client 32 for Windows 95 include the use of administrator defaults and "smart" defaults, which are also covered in this AppNote.
The AppNote concludes with a discussion of how to configure one of Client 32's most innovative features: workstation file caching.
TCP/IP and NetWare/IP Configuration
NetWare Client 32 for Windows 95 does not come with a TCP/IP stack, but it is fully compatible with any TDI-compliant protocol stack. If you need TCP/IP support, you'll need to install the Microsoft TCP/IP protocol stack (TCPIP.VXD) or another TDI-compliant TCP/IP stack. (A NetWare TCP/IP stack is planned for a future Client 32 release.)
Client 32 does come with the NetWare/IP protocol, which requires that the Microsoft TCP/IP stack be installed. NetWare/IP replaces the IPX protocol (which provides the transport in the native NetWare environment) with the TCP/IP protocol. This is done by "wrapping" IPX packets inside of IP packets. You cannot simultaneously access NetWare servers over IP and IPX. However, a NetWare/IP server can be set up as an IP-to-IPX gateway so that all IPX SAPs are propagated to the DSS server. This makes it possible for NetWare/IP clients to access IPX servers.
In NetWare Client 32 for Windows 95, NetWare/IP can be configured with either DHCP or BootP. However, configuration via DHCP or BootP is dependent on the TCP/IP stack used. Currently, Client 32 uses the Microsoft TCP/IP stack that ships with Windows 95. This version of TCP/IP uses DHCP for configuration setup.
Novell provides a DHCP server with NetWare/IP v2.2 in the form of DHCPSRVR.NLM (current version is v2.0B). This NLM can be loaded on any NetWare 4.x server, including servers that provide DNS and DSS information. It can answer both DHCP and BootP requests.
Since some of the NetWare/IP parameters are Novell-specific, the DHCP server must be capable of providing this information. Novell's DHCP server provides a DHCPCFG.NLM utility for writing the configuration information to the DHCP server database. (Future versions may include a Snap-In DLL for the NetWare Administrator utility.) In addition to providing the standard IP information (leasing of an IP address, subnet mask, IP gateway, DNS domain name and up to three server names), Novell's DHCP server can also distribute information specific to NetWare/IP, such as NetWare/IP domain, NSQ broadcast, up to five nearest NetWare/IP servers, and up to five preferred DSSes. Lastly, Novell's DHCP can provide NetBIOS Name Server Information (also known as WINS) and NetBIOS node types b, p, h, and m.
Both DHCP and BootP clients can use Novell's DHCP server. BootP clients (such as those running Novell's 16-bit TCP/IP stack) can even obtain an IP address lease from the DHCP server and receive NetWare/IP information. Windows 95 clients can also receive all information, including both WINS and NetWare/IP-specific information, from a NetWare/IP DHCP server.
The following sections give a brief overview on how to configure and troubleshoot NetWare/IP on systems running Microsoft Windows 95 and NetWare Client 32 for Windows 95.
|
Note: This discussion is only concerned with installing and configuring NetWare/IP clientsoftware on a Windows 95 workstation. Information on configuring NetWare/IP ona NetWare server is beyond the scope of this document. For more information onserver configuration, consult the electronic manuals integrated within the product. |
Setting Up TCP/IP on a Windows 95 Workstation
For NetWare/IP access, you will need to make sure the following parameters are set correctly via either a manual or automatic configuration:
IP address
Subnet mask
Gateway (default router)
DNS domain
DNS server
If the Microsoft TCP/IP stack is not already installed on your system (if you don't see it listed in Control Panel's Network Configuration window),install it now by selecting the following under Control Panel | Networks:
Add -> Protocol -> Microsoft -> TCP/IP
Once TCP/IP is installed, highlight it in Control Panel | Networks and click on Properties. You have two choices: to manually assign all IP configuration information yourself (specify an IP address) or to get this information automatically from a DHCP server (obtain an IP address automatically). If you choose to get this information automatically, skip the rest of this section and go to "Setting Up NetWare/IP."
Enter the IP address for your gateway (default router) in the Gateway page of the TCP/IP Properties dialog box.
Add your DNS Domain Name and the DNS Server IP address (to the DNS Server Search Order) via the DNS configuration page of the TCP/IP Properties dialog.
Setting Up NetWare/IP
If "Novell NetWare/IP Protocol" is not already installed (if you don't see it listed in Control Panel's Network Configuration window), install it by selecting the following under Control Panel | Networks:
Add -> Protocol -> Novell -> Novell NetWare/IP Protocol
Once "Novell NetWare/IP Protocol" is installed, highlight it and click on Properties. As with the TCP/IP configuration, you have the option of manually configuring the NetWare/IP parameters (Custom configuration) or getting these parameters automatically from a preconfigured DHCP server (Auto detect configuration). If you choose manual, enter your NetWare/IP domain name via the Parameters page of the NetWare/IP Protocol Properties dialog box.
Post-Installation Checks
After completing the previous two procedures (TCP/IP and Novell NetWare/IP Protocol setup), you should see the following items listed in Control Panel | Network | Configuration:
Novell NetWare Client 32
LAN Adapter/Driver (for example, NE2000)
IPX 32-bit Protocol for Novell NetWare Client 32
IPX/SPX-compatible Protocol
Novell NetWare/IP Protocol
TCP/IP
Also verify that the "Bindings" option in TCP/IP Properties (not the bindings option of NetWare/IP) has "Novell NetWare/IP Protocol" enabled.
Basic Troubleshooting
Following are some basic troubleshooting steps you can take if you encounter problems with your TCP/IP and NetWare/IP configuration.
Verify that you can ping all hosts on your network.
If you cannot ping any IP addresses, verify the TCP/IP parameters with the WINIPCFG utility, which can be found in the Windows 95 directory.
If you can ping the IP hosts on your local segment but no IP hosts on a remote segment, check the state of your IP routing table with the NETSTAT command. You should have a default route entry of 0.0.0.0 in the table, with the next hop being the IP address of an IP router connected to your segment.
If you can ping local hosts and the IP address of the remote interface in your TCP/IP router, check the routing table of the remote host that you are pinging to see if it includes a route to your local segment.
Verify that the DNS name resolution is working.
Assuming that you can ping all hosts on the network with their IP address, make sure that you can also ping these addresses using host names. If you cannot, make sure that your DNS client resolver points to the correct DNS server and that the DNS domain is correctly specified (see Step 4 under "Setting Up TCP/IP", above).
Verify that the NetWare/IP client driver is loading successfully.
When configuring the NetWare/IP network driver, enable the "VERBOSE" option. This option writes information to the NIOS.LOG file located in the \NOVELL\CLIENT32 directory. By default the NIOS.LOG file is not created. To enable it, add the following line to the \WINDOWS\SYSTEM.INI file under the [386Enh] heading:
NWEnableLogging=TRUE
If the driver fails to load, it is most likely because a DSS server cannot be contacted and the DSS parameters cannot be obtained. Check the following:
The DNS server is setup with a separate NetWare/IP domain containing all registered DSS servers for that domain.
The PREFERRED DSS parameter is configured with the IP address or host name of a DSS server in your NetWare/IP domain.
With NetWare/IP2.2, it is possible to get access to the DSSparameters without contacting the DSS server directly, assuming that the NetWare/IP server has contacted a DSS server at least once before. In this case, specify a NEAREST NWIPSERVER and disable the NSQ_BROADCAST parameter in your Windows95 NetWare/IP configuration options.
Verify that you can contact the NetWare/IP server.
If the NetWare/IP driver loads successfully but you cannot contact a NetWare/IP server, check the following:
The correct frame type is running on the NetWare/IP server (ETHERNET_II or ETHERNET_SNAP).
NLSP is not activated on your NetWare/IP server.
The DSS and NWIP databases contain an entry for the NetWare/IP server that you are trying to connect to. This can be done by loading the following two modules on the NetWare server and checking the output files generated:
load DSSDBDMPload NWIPDUMP
With the DISPLAY SERVERS command, check whether all the other servers in the network are receiving SAP updates from the "problem" server. If the problem server fails to appear in any of the SAP tables of the other servers, try the following:
Look at the SAP information of this server (via IPXCON in NetWare 4.1x, the DISPLAY SERVERS command on the server console, or by using the NetWare/IP DSSDBDMP module). If it is blank, the SAP database is not being updated.
Try resetting the SAP database with the RESET ROUTER console command
Try stopping and starting all NetWare/IP services by rebooting the servers.
Reset the DSS database by loading the module with the /RESETDB option (LOAD DSS /RESETDB)
The problem could possibly be related to a corrupt Btrieve database. The Btrieve database files (NWIPRIP.BTRand NWIPSAP.BTR) are located in the SYS:ETC directory. Try reinstalling these files from the original source.
Client 32 Dial-Up Installation
Dial-Up Networking allows mobile users to attach to a network and work as if they were directly connected. Through Dial-Up Networking, remote connections can be made to remote access servers such as Novell's NetWare Connect and the Remote Access Server (RAS) in Windows 95 and Windows NT.
This section shows the basic installation steps to configure a Windows 95 Client Dial-Up adapter. It also provides basic information on setting up a NetWare Connect 2.0 server to work with Client 32 and Dial-Up Networking.
Before proceeding with a Client 32 dial-up installation, you should be familiar with the following terms:
PPP Point-to-Point Protocol
SLIP Serial Line Internet Protocol
RAS Remote Access Server
NRN NetWare Remote Node
RNS Remote Node Service
If you need more information, refer to the Windows 95 and NetWare Connect documentation.
Installing a Dial-Up Adapter
To install a dial-up adater in the Client 32 workstation, follow these steps.
In Windows 95, select My Computer | Control Panel | Add/Remove Programs. Click on the Windows Setup tab.
Double-click on "Communications" in the list of components.
Check Dial-Up Networking, as shown below:
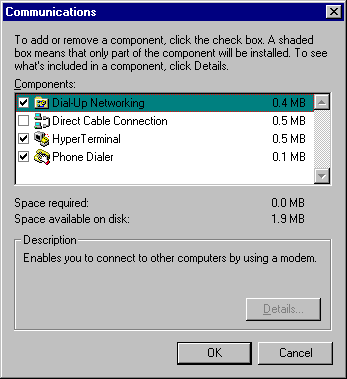
Click on OK to close the Communications dialog box, then click on OK again to proceed with copying the necessary files. Be sure you have the proper Windows 95 diskettes/CD-ROM/network drive mapping in place so you can provide the path to the Windows 95 *.CAB files. The Dial-Up Adapter will be added to the Network Properties list.
Refresh My Computer by closing and reopening the icon. You will see a Dial-Up Networking folder as one of the objects in the My Computer window. Double-click on this folder to open it. You will see a Make New Connection icon, as shown below:
Double-click on the Make New Connection icon to install a modem. The following screen will appear:
If this is a first-time installation, click on Next> to have Windows 95 detect your modem. (If you already have a modem installed, check the box to select your modem from a list and then click Next>. These steps assume a first-time installation.)
A window similar to the following is displayed while Windows 95 looks for a modem:
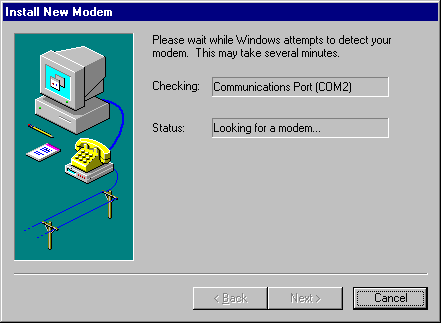
The modem that was automatically detected will be displayed as shown in the sample dialog box below. If necessary, make changes to the Manufacturer and Model to match the modem you have installed.
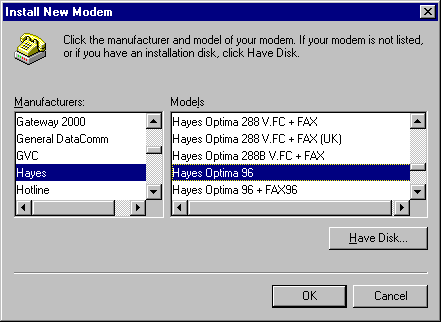
Click on OK to continue.
Verify the modem you have selected and click on Next >.
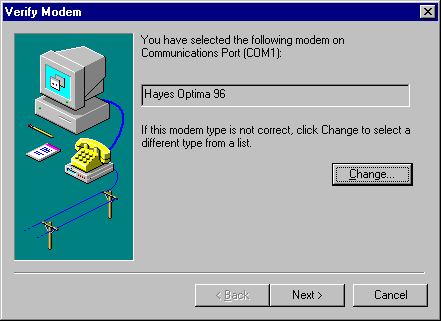
When the modem installation is completed, the following screen is displayed:
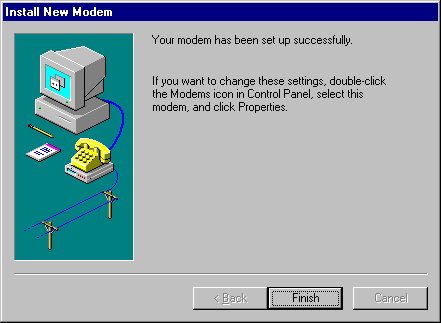
Click on Finish.
Enter a descriptive name for the type of computer connection you are dialing up. The default name is "My Connection". In the example below,we have entered "NetWare Connect".
Click on Next >.
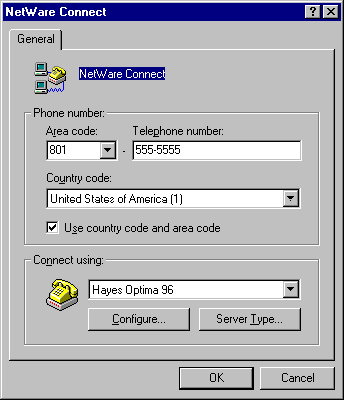
Enter the Telephone Number and Country Code for the computer you want to call:
Click on Next >.
A new icon is created in the Dial-Up Networking folder for the connection you just defined. The name of this icon is the descriptive name you entered in Step 10.
Configuring the Dial-Up Connection
To configure the newly-created dial-up connection, proceed as follows.
Right-click on the newly-created icon and select Properties.
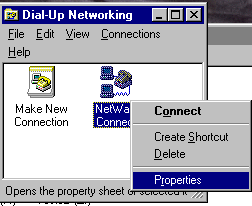
From the "General" page, click on Server Type to configure the Dial-Up server.
Click on the down-arrow next to "Type of Dial-Up Server" to see a list of choices similar to the following:
NRN: NetWare Connect PPP: Windows 95, Windows NT 3.5, Internet Windows for Workgroups and NT 3.1
Select the type of dial-up server you will use for this connection.
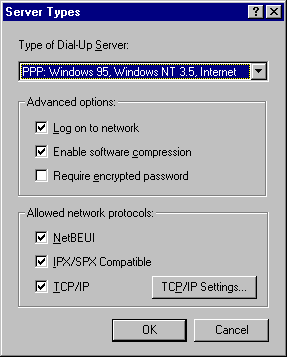
Set the other options as follows:
Check "Log on to network " if you want to execute the network login utility upon establishing the dial-up connection.
Under "Allowed Network Protocols", check the protocols you want to use. These must be supported and configured on the Dial-Up server.
If needed, click on TCP/IP Settings to configure TCP/IP. These settings will depend on how the Dial-Up server is configured. You can use either a server-assigned IP address or specify an IP adddress. If you choose to specify an IP address, fill in the address. If you choose a name server-assigned address, you'll need to provide the appropriate information for Primary/Secondary DNS and Primary/Secondary WINS.
You can also specify IP Header Compression (default is On), as well as a default gateway on the remote network.
Using the Dial-Up Connection
To use the dial-up connection that has been created and configured, go back to the Dial-Up Networking folder and double-click on the icon you created. A screen similar to the following is displayed:
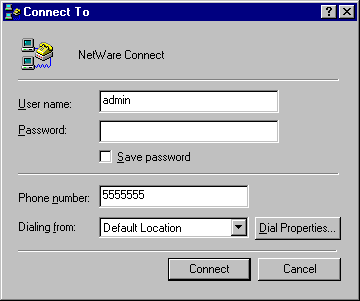
Enter the user name and password if needed to connect to the Dial-Up server.
Note: If you are connected to NetWare servers via a local network connection, you will beforced to log out before establishing the dial-up connection. Windows 95 displays the following message: You are currently using NetWare servers which will beinaccessible if you establish this connection. Click OK tocontinue dialing. Click Cancel if you do not want to dial atthis time. If you do not log out of the network before you run the dial-up connect, you stand agood chance of corrupting the Registry entries for your network connection. Whenthis happens, you must remove all of your network connection information and add it again. In extreme cases, you have to reinstall Client 32 before you can once again establish a network connection.
If the "Login to network" option has been enabled, the network login screen will appear and prompt for the network username and password.
Once the connection to the Dial-Up server has been established, you can use the Details button on the connection to see the server connection type and the protocols the connection has provided.
Preparing a NetWare Connect Server
This section gives information on how to enable a remote Windows 95 workstation to connect to a NetWare Connect server using the "NRN: NetWare Connect" option that comes with Windows 95 Dial-Up Networking.
|
Note: For additional information, obtain the file NWCINF. EXE (last updated 02/27/96).This file contains several readme text files that explain issues and patches needed toset up NetWare Connect to work with Windows 95. NWCINF.EXE is available fromNetWire on CompuServe in NWGENFIL Library 3. It is also available on the WorldWide Web at http://support.novell.com/. More detailed information is also given in Novell FaxBack Document #200996 (call 801-861-7642). |
Server Tasks
The dial-up server must be a dedicated remote server running NetWare Connect version 2.0.25 or later (no other products installed). To upgrade to this version from version 2.0.18, install the patches NWC201.EXE and NWC202.EXE. Instructions for installing these patches can be found in the NWC201.TXT file provided in NWC201.EXE and in the NWCINF.EXE file.
If you have NetWare Connect 1.0 and RNS on your server and you upgrade to NetWare Connect 2.0, you have the option to retain RNS as a service on NetWare Connect 2.0. However, if you delete and reinstall NetWare Connect 2.0, RNS is no longer listed as an install option. To manually add RNS services to NetWare Connect 2.0, follow these steps:
Copy the following files from your NetWare Connect 2.0 disks to SYS:SYSTEM (if they are not already present):
|
Filename |
Source |
|
RNS.LAN |
Disk 8 |
|
RNSNCF.NLM |
Disk 8 |
|
RNSNCF.HLP |
Disk 8 \nls\4 |
|
RNSNCF.MSG |
Disk 8 \nls\4 |
|
RNS.DEF |
Disk 8 \connect (copy to SYS:SYSTEM\CONNECT) |
|
SVCS.DEF |
Disk 8 \connect |
|
SVCDEF.MSG |
Disk 9 \nls\4 |
|
SVCDEF.NLM |
Disk 9 \nw3x (for NetWare 3.x servers) |
|
SVCDEF.NLM |
Disk 9 \nw4x (for NetWare 4.x servers) |
After copying these files, run the following command:
LOAD SVCDEF SYS:\SYSTEM\CONNECT\RNS.DEF
Now when you load NWCCON, you will see RNS listed as a loadable/configurable service.
If you want to establish an IP connection with the client, the PPPRNS service must be running on the server. In addition to starting the service, you need to execute the command SET PPPTSM CALLBACK = OFF. With this setting, all dial-back numbers must be set at the server. Roaming users will be able to use the dial-up connection only from one of these preconfigured numbers.
For security, enable the Password Authentication Protocol (PAP) or CHAP and make sure remote client passwords are set. PAP is enabled through the NWCCON utility (select these menu options: Configure NetWare Connect,Services, PPPRNS, Configure Security). PAP uses the remote clientpassword, which is set through NWCCON or SETREMPW.
If you want to establish an IPX connection, the RNS service must be installed and running on the server. The file RNS.TXT(found in NWCINF.EXE) lists the steps for installing this service. Once RNS is installed, you need to activate it using a frame type of Ethernet 802.3 and a unique IPX address. (Using Ethernet 802.2 frames may work under certain circumstances, but it didn't perform consistently when tested at Novell under lab conditions.)
Finally, add the following lines to the server's AUTOEXEC.NCFfile:
LOAD IPXNLP LOAD DHCPD
Client Tasks
To configure a workstation running NetWare Client 32 for Windows 95, follow the general procedure given earlier in this AppNote for adding dial-up networking support. When you create the new Dial-Up Networking connection, uncheck NetBEUI and check either IPX or TCP/IP or both, depending on need. For TCP/IP, enter the appropriate DNS information. If dynamic IP addressing will be used, let the server set the address.
Check the "Logon to network" box if you want the logon window to appear so users can log in upon establishing the dial-up connection.
Managing Client 32 Settings through System Policies
System Policies significantly increase the level of control and manageability that administrators can have over the network. Using system policies, administrators can restrict user access to the Control Panel, customize desktop configurations, determine software settings, restrict users from unauthorized applications, and so on. System policies can be divided into three categories:
User system policies
Group system policies
Computer system policies
|
Note: Client 32 for Windows 95 v1.0 supported only User and Computer system policies.Support for Group system policies has been added in later releases. |
This section demonstrates how to use System Policies to manage Windows 95 workstations running NetWare Client 32 for Windows 95. (For more general information on using System Policies, refer to the Windows 95 Resource Kit on the Windows 95 CD-ROM.)
Overview of System Policies
System Policies are used to mandate Registry settings for Windows 95 workstations. These settings are defined with a System Policy Editor (POLEDIT.EXE) and stored in a policy file (CONFIG.POL,). When a Windows 95 workstation logs into a NetWare file server, it automatically checks the SYS:PUBLIC directory for system policy (*.POL) files. If any such files are found, the workstation copies the settings from the policy file to the USER.DATand SYSTEM.DAT files in its Registry, thus overwriting any settings that may already be defined.
The SYSTEM.DAT file contains settings defined for a specific computer or for the default computer. The USER.DAT file contains policy settings defined for a specific user or for the default user. In a bindery-only environment, the USER.DATfile is stored in the SYS:MAIL directory of the preferred server for each user. In an NDS environment, however, the MAIL directory only exists if bindery emulation is running. Administrators of NDS environments must specify the path for the USER.DAT file in the Home Directory attribute of the NDS user profile. This can be done through NWAdmin by choosing a user, clicking on the Environment tab, and entering a Home Directory for the user.
Policy files are created from a policy template with an .ADM extension. Microsoft provides a template called ADMIN.ADM which contains policies for administering the Windows 95 desktop and configuration. The customized policy template that comes with NetWare Client 32 for Windows 95 is called CLIENT32.ADM. You can combine settings from both templates, if desired.
Policies can be implemented for either automatic or manual download. This is set through the Computer-specific settings when using the ADMIN.ADM template in the POLEDIT utility. For manual download, the location of the policy file is defined in the local computer's Registry. When the user logs in to the network, the computer will go to this specified location and download the defined policies. For automatic download, the policy file must be named CONFIG.POLand placed in the SYS:PUBLIC directory on the preferred server where all users will have access to it. If no preferred server is specified, the policy file in the SYS:PUBLIC directory of the server with the first connection is used.
When a policy file is created, it is possible to designate within the file policy settings that pertain to particular users, groups, or computers. Thus only the designated users or computers will implement the defined policies. If you plan to have user or group policies, you must enable User Profiles on each workstation. This can be done through the Control Panel | Passwords | User Profiles tab. Click on "Users can customize their preferences and desktop settings."
For Group Policies to work with Client 32, you must either install the Client 32 software that ships with NetWare 4.11 or apply patch C3295D.EXE or later (which includes a NWGROUP.DLL file from Novell). Also, group policies need to be installed on each workstation. To do this, follow these steps:
In Windows 95, open Control Panel and select Add/Remove Programs. Click on the Windows Setup tab, and then click Have Disk.
In the Install From Disk dialog box, click Browse and specify the ADMIN\APPTOOLS\POLEDIT directory on the Windows 95 CD-ROM. Click OK and OK again.
In the Have Disk dialog box, make sure Group Policies is checked, and then click the Install button.
This places the GROUPPOL.DLL file in the Windows SYSTEM directory and makes required Registry settings. To verify that this has been done, you can run Regedit and seach for GROUPPOL.DLL.
Creating System Policies Using the CLIENT32.ADM File
Here are the general steps to create your own system policy settings using the CLIENT32.ADM template file. These instructions assume you have drive W mapped to the SYS:WIN95\ADMIN\NETTOOLS\ NETSETUP directory and drive Z mapped to the SYS:PUBLICdirectory.
From within Windows 95, start the Policy Editor program by selecting Start | Run and entering the following path:
W:\WIN95\ADMIN\NETTOOLS\NETSETUP\POLEDIT.EXE
Select the Client 32 administration template CLIENT32.ADM. This file is found in the W:\ADMIN\POLICY95\NLS\ENGLISH directory.
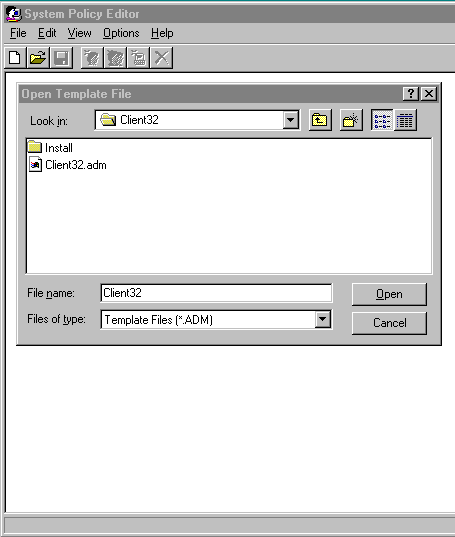
Click Open and wait for the template to be loaded.
Start a new policy file by selecting File | New File. This will automatically create the Default User and Default Computer icons, as shown below:
Settings defined for the default user and default computer will be applied to all users or workstations that log in to the preferred server.
Double-click on the Default Computer icon to open the policy template and view the Policies page. An example is shown below:
This window shows all Registry settings that can be defined on acomputer-specific basis, based on the current template. These settings will be placed in the SYSTEM.DATfile.
To change the default policy settings, you double-click on the book icon for the appropriate category of settings. You have three options when defining a setting in the resulting dialog box:
 Grayed - Initially, all Client 32 settings have a gray box in front of them. This indicates that no modifications have been made and the setting will not be changed when the user logs in.
  Checked - A check indicates that the setting will be changed to "On" or to the value you specify when the user logs in. If the option was previously checked the last time the user logged on, no changes will be made.
  Cleared - A clear box indicates that the setting will be changed to "Off" for On/Off settings. For others, it indicates that the setting will be cleared from the Registry. If the setting was implemented previously,the previously specified settings will be cleared from the Registry.
As an example of how to make the settings, suppose you wanted to do the following:
Change the preferred server
Prevent users from specifying a preferred tree
To do this, you would double-click on the "Novell NetWare Client 32" book icon, and then open the Client 32 options. In the resulting list of options, check the "Preferred server" box and type the name of the new preferred server in the entry box at the bottom of the window. Clear the "Preferred Tree" box to disable this setting.
After you have done this, the settings would appear as in the following example screen:
You can make your own changes to the settings in a similar manner, according to your particular situation. Click on OK when you are finished making changes.
Double-click on the Default User icon to see the Registry settings that are available to be defined on a user basis. These settings will be placed in the USER.DAT file. (The CLIENT32.ADM template does not include any user settings. If you want to make your own user settings, you will need to include the ADMIN.ADM template that comes with Windows 95.)
To create policies for specific users, click the User button on the menu bar. Type the login name of the user the policies are being created for and click OK. This will create a new user icon which you can open and select the settings desired.
To create policies for specific NetWare groups, click the Group button on the menu bar. Type the full NDS group name (for example, group1.client.novell) if you are using NDS, or the bindery group name if logging in as a bindery user. This will create a group icon which you can open and select the settings desired.
To create policies for specific computers, click the Computer button on the menu bar. Enter the machine name of the workstation for which the policies are being created, or click Browse to select a name from a list.(To find the name of the workstation, open the Network option in Control Panel and select the Identification tab.) This will create a computer icon which you can open and select the settings desired.
Save your changes by selecting File | Save. Name the file CONFIG.POLand save it in the SYS:PUBLIC subdirectory on your preferred server.
Exit the POLEDIT.EXEprogram.
The new system policy settings will take effect the next time the workstation is started.
Administrator Defaults and Smart Defaults
You can simplify the installation of Client 32 by specifying default values for configuration settings in a file named ADMIN.CFG. This configuration method is good for administrators who want to install and configure Client 32 at the same time, who are familiar with the NET.CFG file syntax, and who need to configure settings that can't be configured using the System Policy Editor.
The ADMIN.CFGfile must beplaced in the same folder as the SETUP.EXE file that you run to install Client 32. It is a text file with the words "Admin Defaults" as its first line. The valid parameters for this option are Overwrite and Version, as in the following example:
Admin Defaults

   Overwrite = false

Version = 0
The Overwrite parameter setting can be True or False. True means that all configuration settings in the ADMIN.CFG file are always written to the Registry. False means that the configuration settings in the ADMIN.CFG file are written to the Registry only if they aren't already there.
The Version parameter can be set o any number from 0 to 4,294,967,295. If this number is greater than the ADMIN.CFG version stored in the Registry, the configuration settings in the ADMIN.CFG file are written to the Registry and this number is stored as the new version number. Otherwise, they aren't. Since no version number exists in the Registry the first time Client 32 is installed, the Administrator Defaults, including the version number, are written to the Registry.
For information about the configuration settings you can specify in the ADMIN.CFG file, see "Administrator Defaults Parameters" in the SETUPNW.HLPonline file.
Smart Defaults
Any time the Client 32 installation program (SETUP.EXE) runs, the Smart Defaults function also runs. Therefore, Smart Defaults apply whether you are installing NetWare Client 32 via SETUP.EXE on a workstation with Windows 95 already installed, via MSBATCH, or via Automatic Client Update (ACU).
During the installation of Client 32, the following settings are checked and used if applicable:
If the Microsoft Client for NetWare Networks is installed, any values that have been specified for settings that are applicable to Client 32 are preserved.
If there is a NET.CFG file, all applicable NET.CFG entries are preserved by moving them to the Registry. Some parameters are not used or needed for Client 32; these are not moved to the Registry.
Since NetWare Client 32 for Windows 95 does not include its own TCP/IP protocol stack, any existing TCP/IP parameters are not moved from the NET.CFGfile to the Registry.
If there is an ADMIN.CFG file, the parameters specified there in are moved to the Registry.
The following NET.CFGoptions are moved to the Registry. (Other NET.CFG options are ignored. Obsolete NET.CFGparameters are also ignored.)
DESKTOP SNMP

  LINK SUPPORT

  NETWARE DOS REQUESTER

  NIOS

  NWIP

  PROTOCOL IPX

RESOURCES
The following syntax rules must be obeyed:
The NET.CFG options must be spelled as shown above.
The NET.CFGoptions are not case sensitive.
A line cannot be more than 512 characters long.
Spaces, tabs, or equal signs can be used to separate parameters andvalues.
Valid values must be specified for the parameters.
If a current NetWare Client is running, its NET.CFG file is used. If not, the first NET.CFG file found in the following locations is used:
C:\NOVELL\CLIENT32

C:\NWCLIENT

C:\NET\BIN
Otherwise, the first NET.CFGfile found in the search path is used.
Workstation File Caching with NetWare Client 32
The file caching feature in NetWare Client 32 represents a major step forward for client caching. Because data is held in workstation memory, client-side caching eases network and server congestion, allowing more users access to network resources and improving performance of already existing applications. The Client 32 cache has several patents pending and more to come. The cache has been extensively tested at Novell and various third-party sites to help ensure data integrity.
Cache Size
As a general rule, the larger the cache, the better the network file I/O performance. Under Windows 95, the cache size that is allocated is 25 percent of free memory after Windows 95 is loaded.
|
Note: In the current version of Client 32, the memory used for its cache is staticallyallocated and is not shared with the system. A future version will share memory withthe system such that as Windows 95 needs memory, cache memory will be givenback, and vice versa. |
Overriding the Default Cache Size. The default cache size may be configured by the user. To do this on a Windows 95 workstation, use the menu sequence Start | Settings | Control Panel | Network. Highlight the Novell NetWare Client 32 component and select Properties. From there, look for the keyword "Max Cache Size" and set that value to the desired cache size (specified in kilobytes). To turn the cache off ALT together, look for the keyword "File Cache Level" and set it to zero.
Ensuring Data Integrity
File data that is being written to a network server is held in the client's workstation memory for a period of time after the application has reported that the file was saved. Therefore, it is important not to turn the power off on the workstation until the data has actually been written. The file data will be written immediately to the network if the application closes the file or if the application is exited. This reduces the chance of a user turning the machine off while data has not yet been committed to a network file.
The preferred way to ensure the file data has been written is to completely exit all applications that have written data and then exit Windows. If the user is willing to do this, there are a couple of options that can be turned on that will also increase network performance. With the same general directions for setting the cache size, use the following options:
Close Behind Ticks = 36

Delay Writes = ON
The "Close Behind Ticks" setting specifies how long the client will hold files open after they are closed, to optimize the case where applications frequently close and reopen the same file. The time is measured in ticks (36 in the above example is 2 seconds). This option takes effect regardless of the "File Cache Level" setting.
The "Delay Writes" option allows the write data to lag behind the application's Close File request. This allows the application to continue without having to wait for the data to be actually written to the network server, thereby improving apparent performance. When this option is on, the data is written in a "lazy" fashion (meaning 8KB of data are written every 1/18th of a second), so as to not bottleneck the server and disk channel. This option only takes effect if write operations are being cached.
Data Integrity of Cached Files After an Auto-reconnect. Consider the case where an application writes data to a network file, the file is cached at the client, is then written to the server, but is sitting in the server's cache memory when the server experiences a network fault. Normally, this data would be lost because the client received a successful acknowledgment from the write request and freed the cache block because it was no longer "dirty" or in use.
With Client 32, write data is held for a period of time after the acknowledged write so that if this condition occurs, the file will be auto-reconnected after the server comes back up and this data will be rewritten to the server's cache. While this method is not 100% reliable, there is a way to get 100% reliability for this case at the cost of file write I/O performance. This is accomplished by setting the "Auto Reconnect Level" to 4 (the default is 3). See Appendix B for a listing of what the various automatic reconnection levels mean.
Other Client 32 Configuration Tips
This AppNote has discussed only a few of the many tips and tricks for configuring NetWare Client 32. There are numerous other issues and configuration parameters you may need to be aware of. We recommend that you read the README.TXT file and the Frequently Asked Questions (FAQ) lists that come with NetWare Client 32 for Windows 95. Another good source of information are the Technical Information Documents (TIDs) available from Novell Technical Services.
* Originally published in Novell AppNotes
Disclaimer
The origin of this information may be internal or external to Novell. While Novell makes all reasonable efforts to verify this information, Novell does not make explicit or implied claims to its validity.