Upgrading Windows 95 Workstations with Automatic Client Update (ACU)
Articles and Tips: article
Product Manager
Distributed Networks Business Unit
MIKE NEUENSCHWANDER
Technical Writer
Distributed Networks Business Unit
01 Nov 1996
Tells how to use ACU to automatically upgrade Client 32 when users log in.
- Introduction
- Overview of the ACU Process
- Preparing for ACU
- Running the Automatic Client Update
- Other Uses for ACU
- Summary
Introduction
In the past, when Novell released updates to the NetWare client software, network administrators had to go to each workstation and manually upgrade the client software. To reduce this administrative burden and make it easier to distribute and install NetWare client software, Novell has developed Automatic Client Update (ACU) to automate the process of updating NetWare client software for users.
The components necessary to run ACU are included as part of NetWare Client 32 for Windows 95, as well as in later releases of Client 32 for DOS and Windows 3.x. For Windows 95, ACU can be used to upgrade workstations running the Microsoft Client for NetWare Networks and any version of NetWare Client 32 for Windows 95.
The Client 32 for Windows 95 ACU does not upgrade workstations running the NETX Shell or the NetWare DOS Requester (VLMs). However, the ACU that comes with NetWare Client 32 for DOS and Windows 3.x can perform this type of upgrade. For information on running ACU on DOS and Windows 3.x workstations, see the AppNote entitled "Upgrading Network Client Software with Automatic Client Update (ACU)" in the May 1996 Novell Application Notes.
This AppNote covers the following aspects of ACU for Windows 95:
An overview of the ACU process
Steps for setting up ACU
An example of using ACU to update Windows 95 workstations to the latest release of NetWare Client 32 for Windows 95
Other uses for ACU
Overview of the ACU Process
Novell's Automatic Client Update provides a way for network administrators to upgrade NetWare client software automatically. In a typical scenario, the administrator places instructions in a login script to run the Client 32 SETUP.EXE program if certain update conditions are met. Once the login script is set up properly and a special ACU installation directory is created on the server, ACU automatically upgrades the client software when users log in, without requiring any intervention from the user or the administrator.
Automatic Client Update is initiated by calling the SETUP.EXE utility for Client 32 for Windows 95--with the /acu option added. The usual method for setting up ACU is to include the SETUP /ACU command in a login script. When a user logs in, SETUP checks the version of the client software currently running on that user's workstation. If the version is determined to be older than the currently available update, the SETUP program installs the new client software on the workstation.
To determine whether the client software is current or old, the SETUP program compares the version contained in the NWSETUP.INI configuration file to the version stored in the Windows 95 Registry. SETUP.EXE reads the NWSETUP.INI file each time it runs to get instructions such as where to copy the drivers during the installation. NWSETUP.INI is located in the same directory as SETUP.EXE(the \ENGLISH subdirectory). Within this file is a section containing the current version of the client software, which for Client 32 v2.11 looks similar to the following:
[ClientVersion]

Version=1.1.0.0
From left to right, the four fields which refer to the version of the client software are Major Version, Minor Version, Revision, and Level. Details on setting these fields are given later in this AppNote. With each new version of Client 32, Novell supplies an updated NWSETUP.INI file containing different values for the Major Version, Minor Version, and Revision fields. Taken together, these values identify the particular version of the client software. For example, in v1.0 of Client 32 for Windows 95, the values were 0.1.0. For the latest release (v2.11), the values were changed to 1.1.0.
The Level field in NWSETUP.INI is intended to be a customer-defined field. It is initially set to 0 by Novell, but you can set it to any number you want, from 0 to 65000. You can use this field to cause updates when the Client 32 software itself hasn't changed, but you have made some other change that needs to be implemented on all user workstations. (See the heading "Updating Individual Files with ACU" for an example of such a usage.)
The other half of the comparison is found in the Registry database on each Windows 95 workstation. When NetWare Client 32 for Windows 95 is initially installed on a workstation, a Client Version key is added to the Registry with four fields that correspond to the ones specified in the NWSETUP.INI file. By default, the values are set to match those found in NWSETUP.INI.
A client upgrade will take place under two conditions:
If the "version number" formed by the four fields in NWSETUP.INI is greater than what is stored in the Client Version key in the Registry.
For example, if the fields in NWSETUP.INI are 1.1.0.0 and the Registry fields are 0.1.0.0, the automatic update process will be initiated because 1.1.0 is considered a higher version than 0.1.0. The major/minor version and revision fields take precedence over the level in comparing the values. Thus, if NWSETUP.INI has 1.1.1.9999 and the Registry has 1.1.2.0, the update process will not run even though the Level of 9999 is greater than the Level of 0.
If no Client Version key is found in the Registry.
This would be the case for a workstation running the Microsoft Client for NetWare Networks.
Before the ACU process finishes, it changes the settings in the Registry to match those in the NWSETUP.INI file so that the Automatic Client Update will not be activated again until the settings in either the Registry or the NWSETUP.INIfile are changed.
Preparing for ACU
The basic process by which the NetWare client software is automatically updated with ACU is simple. Before you perform the actual ACU process, you need to complete the preliminary tasks described below.
|
Note: These instructions assume you have already installed the Client 32 for Windows 95files onto a NetWare server, as explained in the AppNote "Installing NetWareClient 32 for Windows 95" in this issue. If you downloaded the Client 32 softwarefrom an online source, make sure you have also downloaded and followed theinstructions for applying the latest updates (if any). |
Copying the Client 32 Setup Software to a Server
The first preparatory step is to copy the files needed to run the Client 32 SETUP.EXE program to a directory on a NetWare server(s). This should be done on each server that users to be upgraded will attach to upon logging in.
Log in to the server as Admin or a user with Admin equivalence.
You will need to have sufficient rights to modify login scripts and to copy files to a directory all users can access.
On the NetWare server, create an ACU install directory (folder) that can be accessed by all users to be upgraded.
For example, create a directory called C32WIN95 in the SYS:PUBLIC\CLIENT directory. Users will need at least Read and File Scan rights to run SETUP.EXE, and placing the files in a subdirectory of SYS:PUBLIC ensures users will have those rights by inheritance.
Copy all NetWare Client 32 for Windows 95 installation files into the ACU install directory you created in Step 2.
If you have installed the Client 32 software onto a server (for example, by running the network install version of the Client 32 download file), the files are found in the \ENGLISHdirectory.
Copy all Windows 95 cabinet (*.CAB) files into the ACU install directory.
These cabinet files are found in the \WIN95directory of the Windows 95 CD-ROM.
Make sure that all clients scheduled for automatic upgrade have Read and File Scan rights to the ACU install directory.
If you have created the ACU install directory somewhere other than under SYS:PUBLIC, you will have to manually assign these rights using the NetWare Administration utility.
Running REGEDIT
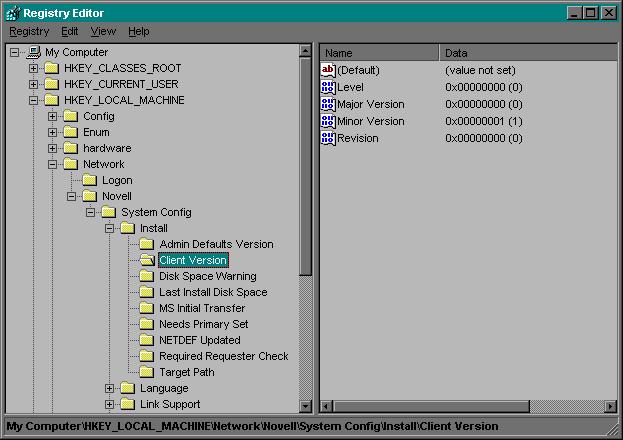
Next, you need to find out what version identifiers exist in the Registry of the workstations you want to update. From a representative Windows 95 workstation, run the REGEDIT.EXE utility to view and, if necessary, modify the Registry database. If you have already installed Client 32 for Windows 95, you will see keys corresponding to the Major Version, Minor Version, Revision, and Level specified in the NWSETUP.INI file. These keys are found in the path HKEY_LOCAL_MACHINE | Network | Novell | System Config | Install | Client Version, as shown in the sample screen in Figure 1.
Notice that REGEDIT lists the same four version fields as are found in the NWSETUP.INI file, only here they are in alphabetical order and the values are specified in both hexadecimal and decimal notation. SETUP.EXE compares the values in the Registry and in NWSETUP.INI to determine whether the ACU process should run.
Figure 1: The Client Version is stored in the Registry database.
The ACU process runs only when SETUP.EXE determines that these fields in these Registry fields either (1) do not exist, or (2) contain values which are less than those in the NWSETUP.INIfile.
Checking the NWSETUP.INI File
The next step is to check several settings in the NWSETUP.INI file to ensure that the client updates will occur as intended. NWSETUP.INI is a text file located in the same directory as SETUP.EXE. You can open it in Notepad or another text editor.
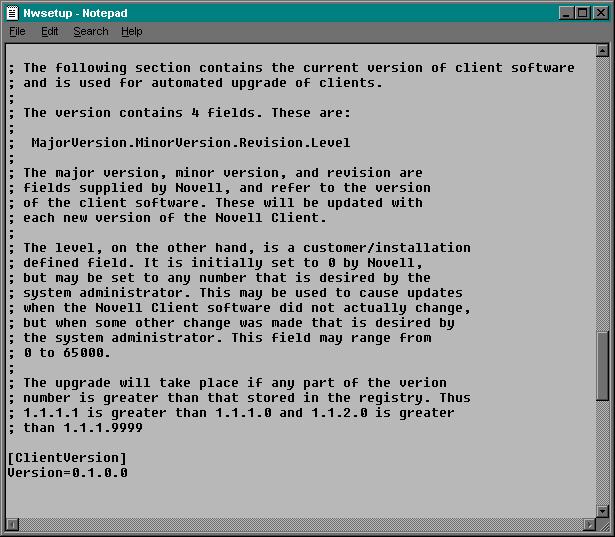
Setting the Client Version. Scroll down until you see the version section of the file. Look for the [ClientVersion] heading, as shown in Figure 2.
Figure 2: Client Version fields are also found in the NWSETUP.INI file.
In most cases you won't need to change the version parameters. With each release of the Client 32 for Windows 95 software, Novell provides a new NWSETUP.INI file with updated values. The new values are designed to be higher than in previous versions, so you can usually just leave them at the default setting.
You may want to change the version parameter settings (the Level field in particular) in cases where the Client 32 software itself hasn't changed, but you have a new driver that needs to be installed or a configuration setting that needs to be made on all workstations. For example, you could modify the version parameters to identify what type of LAN driver is running on the workstation (NDIS or ODI) and the revision of the driver.
|
Note: If you do modify fields other than Level, you will need to make correspondingchanges in the NWSETUP.INI files shipped with future releases of Client 32 forWindows 95 to maintain the ACU functionality. |
If the values were set as shown in Figures 1 and 2, the ACU process would not run because the Registry contains the same values in the Client Version fields as are specified in NWSETUP.INI (0.1.0.0 in both places). If you have newer files that need to be installed on this workstation, you need to change either the values in the Registry or those in the NWSETUP.INI file so that the version in NWSETUP.INI is greater than the corresponding version in the Registry. For example, 1.1.1.1 is greater than 1.1.1.0.
Setting the ACU Options (User Intervention). In Client 32 for Windows 95 v1.0, the Automatic Client Update required user intervention in two places during the upgrade. In the C3295B.EXE update and later releases of Client 32 for Windows 95, two ACU options were added to the NWSETUP.INI file to allow the administrator to decide whether user intervention will be required during the automated upgrade of clients. These options appear as follows with their default settings:
[AcuOptions]

DisplayFirstScreen=NO

DisplayLastScreen=NO
If you want no user intervention during the automated upgrade, leave both of these options set to NO.
Setting the "DisplayFirstScreen" option to Yes will cause the following prompt to be displayed at the beginning of the ACU process:
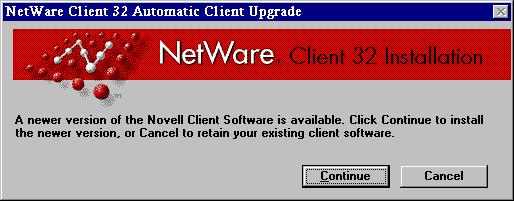
If the user chooses Continue, the upgrade starts automatically. If the user chooses Cancel, the workstation will continue to function with the existing client software. However, each time the user logs in with the older client, the versions are compared and the option to upgrade is again presented.
Setting the "DisplayLastScreen" option to Yes causes the following prompt to be displayed when the new client installation is complete:
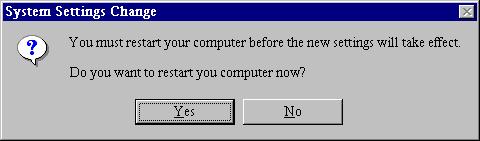
To reboot and load the new client software, users should click on Yes. If they click on No, the workstation will continue through the remainder of the login and finish initializing with the older client software.
Modifying the Login Script
Next, you need to modify the login script(s) that the users who are scheduled for automatic client upgrade will use. Depending on which type of login script you modify, you can allow different clients to be upgraded. For example, if you modify a user login script, only that user will run the ACU process. If you modify a container login script, all users in that container will run the ACU process.
The command you need to call at the beginning of the login script is SETUP /ACU. Both the Login Processor from Microsoft and Novell's GUI Login utility allow Windows programs to be run using the @ command. There are two ways to call this command from a login script:
Using UNC Syntax. You can use the Universal Naming Convention syntax to specify the server name, volume, and path to the ACU install directory. For this syntax, place two backslashes (\\) before the server name and then separate the volume name and all subsequent directory names with a single backslash (\).
For example, if you copied the ACU files to the \C32WIN95 directory under SYS:PUBLIC\CLIENT on server SRV1, the line in the login scriptwould appear as follows:
@\\srv1\sys\public\client\c32win95\setup.exe /acu
Note: Be sure to use the @ command and not the # command in the login script. The @ command allows other processes to run besides the login script and avoids problems with the workstation hanging when you run SETUP /ACU from a login script.
Mapping a Drive. You can map a drive to the ACU install directory and call SETUP.EXE from that drive.
For example, if you map drive G to SYS:PUBLIC\CLIENT\C32WIN95 on server SRV1, the line in the login script would appear as follows:
G:SETUP.EXE /ACU
Whichever format you use for this command, make sure you put it in the correct login script:
For workstations running Bindery-based client software (such as the Microsoft Client for NetWare Networks that ships with Windows 95), or bindery emulation on a NetWare 4.x server, you'll use the system login script (NET$LOG.DAT in the PUBLIC directory). Or you can use individual user login scripts, which are contained in the LOGIN files in each user's mail directory. These scripts are accessed from the SYSCON utility.
For workstations running Directory Services-based client software (suchas previous versions of NetWare Client 32 for Windows 95) on a NetWare4.x network, you can use either a container or a profile login script. These scripts are accessed using either NetWare Administrator (NWAdmin) or the NETADMIN utility.
Once you have modified the appropriate login script(s), you have completed the administrative steps necessary to upgrade all the workstation running Windows 95 to the latest version of Client 32 for Windows 95.
Running the Automatic Client Update
The Automatic Client Update process is initiated when users log in and run the login script into which you have inserted the SETUP /ACU command. To give you better idea of how ACU works, let's look at an example. Suppose you have ten Windows 95 workstations on your single-server network. These workstations are all running the initial release of Client 32 for Windows 95. You have just downloaded the latest Client 32 software update (v2.11 as of this writing) and you want to upgrade all ten workstations to this new version of Client 32 for Windows 95. The workstations are all located in an Organization (O) container named "Novell" in your NetWare 4 NDS tree.
Follow the instructions that come with the Client 32 update to copy all new or updated files to your ACU installation directory. When you are finished, this directory should contain all the files necessary to run the Client 32 SETUP program, including the updated SETUP.EXEand NWSETUP.INI files. For this example, the ACU directory is SYS:PUBLIC\CLIENT\C32WIN95.
Using a text editor, open the NWSETUP.INI file and scroll down until you find the [ClientVersion] heading. Note that the line under this heading reads "Version=1.1.1.0". Since this is a higher version than "0.1.0.0" which was stored in the Registry on the Windows 95 workstations when you first installed Client 32 for Windows 95, you don't need to change anything.
Leave both settings under the [ACUoptions] heading set to the default of NO.
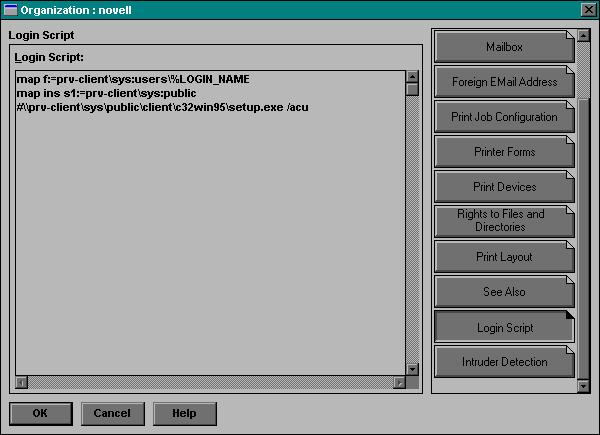
Place the SETUP /ACU command in the appropriate login script. In this example, the SETUP /ACU command is inserted into the container login script for the Organization named "novell" (see Figure 4).
Figure 4: Example of the SETUP /ACU command inserted into a container login script.
The next time a Windows 95 workstation user logs in, the login script will be processed as usual. When the SETUP /ACU command is run, it compares the settings in NWSETUP.INI with those listed in the workstation's Registry. In this case, ACU detects a higher version in NWSETUP.INI than in the Registry, so the ACU process is activated.
A progress indicator is displayed as the newer files are copied:
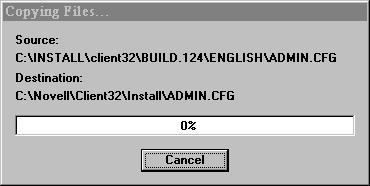
Before ACU finishes, it changes the settings in the Registry to match those in the NWSETUP.INI file. After the workstation is rebooted, the login script is processed again. This time, the Automatic Client Update will not be activated because SETUP.EXE detects that the Registry now contains the same settings as NWSETUP.INI.
Other Uses for ACU
Updating Individual Files with ACU
In some cases, you may want to update one or more individual files without upgrading the entire client software. For example, suppose Novell releases a new version of LOGINW95.EXE and you decide that all your Windows 95 users need the additional functionality provided in this update. Because this isn't a new version of Client 32 for Windows 95, no new NWSETUP.INI file is provided with different client version numbers. However, you can force the ACU process to run by changing the Level setting.
To do this, open the current NWSETUP.INI file in a text editor and change the Level number so that it is higher than it was when you first opened the file. For example, if the Level number is 0, make it a 1. Make sure you copy the new LOGINW95.EXE file (or any other files, such as LAN drivers, that you want to update) into your ACU installation directory. The next time your users log in, ACU will detect a higher Level setting and rerun SETUP.EXE to copy the newer Client 32 files to the workstation.
Upgrading to 32-bit ODI LAN Drivers
You can use ACU to automate an upgrade from a 16-bit LAN driver configuration to a 32-bit ODI driver. Here are the steps:
With a text editor, open the NWSETUP.INI file (located in the same directory as the Client 32 for Windows 95 SETUP.EXE program).
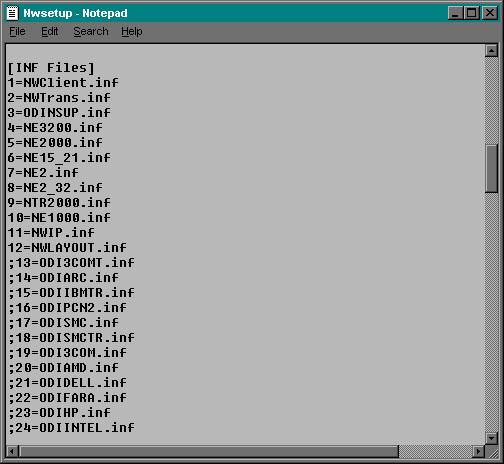
Find the line under the [INF Files] heading that corresponds to your network adapter. For example, if you have a 3Com EtherLink III adapter,the line is:
;19=ODI3COM.inf
Remove the semicolon (;) from the line. This causes SETUP.EXE to copythat INF file to the C:\WINDOWS\INF directory, where it can be used to install and configure the 32-bit ODI driver.
Copy the 32-bit driver *.LAN file (such as 3C5X9.LAN) to the ACU install directory (SYS:PUBLIC\CLIENT\C32WIN95).
Add the "/o" command line parameter to the login script command that calls SETUP, as in the following example:
@\\prv-client\sys\public\client\c32win95\setup.exe /acu /o
The "/o" parameter instructs SETUP to override the NDIS default and install Client 32 with a 32-bit ODI driver.
|
Note: Don't use the "/o" parameter unless you know that no workstations that will run ACUneed NDIS. Otherwise, the workstations may lose their access to the network. |
Running ACU via NAL
Although ACU is normally run from a login script, it doesn't have to be. If the workstation can be manually rebooted after the installation of the new client software has completed successfully, you can use the Novell Application Launcher (NAL) utility to run ACU. You'll need to set up an application object within NDS that executes SETUP /ACU and assign users to the application object. If you want ACU to run automatically, assign the application to users as "launched automatically" rather than a "launched by user" application. (For more information on NAM, refer to "Using the Novell Application Launcher (NAL) Utility with Client 32 for Windows 95" in this issue.)
Summary
When the costs of owning a network are analyzed, the price of the network operating system is only a small part. The biggest percentage of the total cost of owning a network is administration costs. Novell is committed to reducing these costs by providing tools and technologies to ease the administrative burden of setting up and maintaining the network. Automatic Client Update is just one example of this commitment. It can significantly reduce the time and effort required to upgrade workstations when new versions of client software are released.
* Originally published in Novell AppNotes
Disclaimer
The origin of this information may be internal or external to Novell. While Novell makes all reasonable efforts to verify this information, Novell does not make explicit or implied claims to its validity.