Backing Up and Restoring Novell Directory Services in NetWare 4.11
Articles and Tips: article
Software Engineer
Novell Directory Services Team
KEN NEFF
Technical Publications Architect
Novell Developer Information
01 Oct 1996
Explains enhancements made to SMS modules to facilitate NDS backup and restore procedures for NetWare 4.11 networks.
- Introduction
- What's New in the SMS Target Service Agents
- Developing a Data Protection Plan
- General NetWare 4/NDS Backup and Restore Issues
- Backing Up NetWare 4 Networks
- Restoring NDS and File System Information
- Example Restore Scenarios
- Information for Special Restore Conditions
- Conclusion
- Appendix A: Additional References
- Appendix B: NetWare 4.1 and 4.11 Certified Backup Solutions
- Appendix C: Current Software Versions
- Glossary of SMS and NDS Terms
Introduction
In NetWare 4.11, improvements have been made to Novell's Storage Management Services (SMS) modules to provide more effective backup and restore capabilities for Novell Directory Services (NDS), as well as more efficient server recovery after a failure. The Target Service Agents (TSAs) included with NetWare 4.11 have been enhanced to simplify backup and restore procedures. Since the updates are all made in the Target Service Agents, you can simply install the new TSAs when you upgrade to NetWare 4.11, and any SMS-compatible backup program can take advantage of the enhanced functionality they provide.
This AppNote gives network administrators, information systems personnel, systems engineers, and technical support providers procedures for backing up and restoring NDS and file system information in NetWare 4.11 networks. After a brief overview of what has changed in the new release of the SMS TSA modules, it presents general concepts that are necessary to understand concerning backup and restoration in the NetWare 4/NDS environment. It describes how to devise a comprehensive backup plan for NetWare 4 networks, how to properly restore NDS information in various example scenarios, and what to be aware of in certain special situations.
This AppNote is not intended to be an exhaustive guide to backing up and restoring NDS. Individual network environments will vary, and exact procedures differ among various backup/restore products. For specific details, consult the documentation and readme files that come with your NetWare operating system software and with your particular backup application.
This AppNote assumes the reader is familiar with the basics of SMS and NDS. A glossary of backup and restore terms is included for ease of reference. Sources for additional information are listed in Appendix A of this AppNote.
|
Note: Some of the procedures outlined in this AppNote are advanced proceduresthat should be performed by or with the assistance of someone who isexperienced in NetWare 4 and NDS. If you need help with any of theseprocedures, contact your authorized Novell support provider. |
What's New in the SMS Target Service Agents
This section presents an overview of the enhancements made to the SMS TSA modules released with NetWare 4.11 ("Green River").
|
What About NetWare 4.1? These enhanced TSAs are also available for the NetWare 4.1 platform by downloading the latest SMS update file from Novell. See Appendix C for details on obtaining updated files |
Simplified NetWare Server Recovery
In a network environment, the most likely failure scenario is the loss of a single server or its SYS volume. Since in the past this has involved a fairly complex recovery procedure, the enhancements to the SMS file system TSA are designed to facilitate server recovery in this scenario. Trustee rights assignments, ownership information, and other NetWare attributes are preserved when recovering from a server or SYS volume failure.
The new file system TSA that ships with NetWare 4.11 is named TSA410.NLM. (This is the same filename as the TSA that shipped with NetWare 4.1, but the enhancements are available only in the new version dated 7-23-96 or later.) This TSA provides a new major resource called "Server Specific Info", which appears in the list of Resources displayed by SMS-based backup programs, along with the SYS volume and other volumes. Selecting "Server Specific Info" packages critical server information into five files that can be backed up and subsequently used for recovery purposes:
SERVDATA.NDS contains server-specific NDS information. The file is used by the INSTALL.NLM utility to recover from an unplanned SYS volume failure. This is the file that allows trustee assignments and other NetWare information to be preserved. The restore procedures given laterin this AppNote show how to use this file to recover from a SYS volume failure in a multiple-server environment where replicas exist on other servers.
DSMISC.LOG is a text file containing a list of replicas, including replica types, which the backed up server held at the time of backup. It also provides a list of the other servers that were in the failed server's replica ring. DSMISC.LOG is used in the restore procedures to provide helpful information needed to prepare NDS for recovery of the failed server. An example DSMISC.LOG file is shown in Figure 1.
VOLSINFO.TXT is a text file containing needed information about the server's volumes, including name space, compression, and data migration information, at the time of backup. This file can be used during restore procedures to provide helpful information in preparing volumes correctly for a restore. An example VOLSINFO.TXT is shown in Figure 2.
STARTUP.NCF is the NetWare server boot file that loads the NetWare server's disk driver and name spaces and some SET parameters.
AUTOEXEC.NCF is the NetWare server executable batch file, located in the NetWare partition of the server's disk, used to load modules and set the NetWare operating system configuration.
Figure 1: Example DSMISC.LOG file.
Wednesday, August 28, 1996   2:30:11 pm

    Backing up server-specific NDS data

    Successfully read addresses of the local server object.

    Current partition/replica list

    Partition OU=ENG.O=abc, current replica list:

        CN=SMS410_S5.O=abc, type read/write

        CN=SMS410_S4.O=abc, type read/write

        CN=SMS410_S3.O=abc, type master

    Partition OU=GROUPS.O=abc, current replica list:

        CN=SMS410_S5.O=abc, type read/write

        CN=SMS410_S4.O=abc, type read/write

        CN=SMS410_S3.O=abc, type master

    Partition OU=SERVICES.OU=EAST.OU=SALES.O=abc, current replica list:

        CN=SMS410_S5.O=abc, type read/write

        CN=SMS410_S4.O=abc, type read/write

        CN=SMS410_S3.O=abc, type master

    Partition OU=SALES.O=abc, current replica list:

        CN=SMS410_S5.O=abc, type subordinate reference

        CN=SMS410_S4.O=abc, type read/write

        CN=SMS410_S3.O=abc, type master

    Partition [Root], current replica list:

        CN=SMS410_S5.O=abc, type read/write

        CN=SMS410_S4.O=abc, type read/write

        CN=SMS410_S3.O=abc, type master
Figure 2: Example VOLSINFO.TXT file.
SMS410_S1

    Current File System Information by Volume

    Wednesday, August 28, 1996 2:45:05 pm


    SYS:

      Supported Name Spaces:

        DOS

        MACINTOSH

        NFS

        LONG

      Extended File Formats:

        Compression is enabled.


    VOL1:

      Supported Name Spaces:

        DOS

        MACINTOSH

      Extended File Formats:

        Compression is enabled.


    VOL2:

      Supported Name Spaces:

        DOS
|
Maintaining Server References During a Brief Shutdown Besides protecting your servers against unplanned outages, new options in the NetWare 4.11 INSTALL.NLM utility enable you to maintain references to Server objects when the server is brought down temporarily for a planned hardware upgrade or other brief shutdown. See the article entitled "Maintaining NDS Information for a Netware 4.11 Server During a Brief Shutdown or Hardware Upgrade" in this issue. |
There are two ways to back up this server-specific information with SBACKUP. The first way is to select "Server Specific Info" from the Resource list when doing a file system backup. The second way is to simply select a Full file system backup of the entire NetWare server--the server-specific information is included by default. If you are using a third-party backup program and you do not see "Server Specific Info" listed as a resource, double check with the vendor before assuming that these files are being included in a full system backup.
The procedure described in Scenario 1 under "Example Restore Scenarios" provides details on how to use these files when recovering from a server or SYS volume failure.
Backup and Restore of Extended Schema
The new TSANDS.NLM for NetWare 4.1 and 4.11 (dated 7-23-96 or later) backs up and restores all extensions to the NDS schema. TSANDS.NLM sends every object--those defined by both native and extended schemas--to the backup program for backup. Previous versions of TSANDS, however, do not send the definitions of the object types you have added to the NDS database. The resulting backup of NDS contains the information for objects defined in an extended schema, but not the extended schema that defined those objects. Before restoring NDS objects, you had to first re-extend the schema so that the definitions for extended objects would exist in the tree. Otherwise, NDS would contain restored objects that it did not know how to use and would display them as Unknown objects.
The enhanced TSANDS.NLM backs up the extensions to the NDS schema and restores those extensions by default. You no longer have to re-extend the database before NDS can recognize restored objects defined by an extended schema.
Improved Error Handling and Reporting
If you have partitioned your NDS database, TSANDS.NLM will probably have to access more than one server to build a complete picture of your NDS tree. When unable to find a replica containing necessary information, previous versions of TSANDS would report an error and stop the backup process.
The new TSANDS.NLM does not stop the backup process when it encounters such problems. Instead, it stores the names of unavailable objects in a log file and continues to back up as much of your NDS tree as possible. Because the backup process does not stop, you will have a complete backup of all the portions of your tree that were available when you made the backup. If a problem occurs and the backup is incomplete, the errors will be logged. You can then use the information from the error log to correct any network errors, such as an unavailable WAN link, or any procedural problems, such as a local administrator who needs additional rights to the tree. (Some third-party backup programs use the information in the error log to retry the backup of items listed in the log. Check with your vendor for details.)
The TSANDS.CFG Configuration File
For the best protection of your NDS data, you should perform a full Directory backup, which backs up the NDS schema and all containers in the tree starting with the [Root] container. However, there are situations where you might prefer to begin backing up NDS from a container other than [Root]. For example, backing up a tree that is spread across several geographic locations can affect network performance due to the amount of NDS backup traffic crossing the WAN links. To alleviate this problem, you can assign local administrators to back up each location's portion of the tree.
When backing up a portion of the NDS tree, a local administrator must tell the backup program where to begin the backup. The administrator can specify the starting container either by browsing the tree and finding the appropriate container, or by typing the container's complete name. But a local administrator might forget or not know how to determine the container's complete name (which specifies its location in the NDS tree). Also, if for security reasons a local administrator does not have the Browse right to the [Root] container, he or she won't be able to browse the tree to find the starting container's context.
|
Some third-party backup programs do not allow you to specify the container from which to start a backup. They always begin the backup at the [Root] container. Check with your application vendor for information regarding how your backup program handles backing up portions of the NDS tree. |
To make it easier to back up portions of the NDS tree, Novell developed the TSANDS.CFG file, which allows you to specify the names of containers where you want backups to begin. TSANDS.CFG is simply a text file that contains a list of NDS contexts. It is located in the SYS:SYSTEM/TSA directory on the server that TSANDS.NLM is loaded on. When a local administrator chooses to back up NDS, the enhanced TSANDS.NLM reads the TSANDS.CFG file and presents the containers listed in the file as additional backup options.
For example, suppose you wanted to begin your NDS backup from the Sales.East.ABC container. You would create a TSANDS.CFG file containing the line ".OU=Sales.OU=East.O=ABC" and save it in the SYS:SYSTEM/TSA directory of the server running TSANDS.NLM. Now, when your SMS-compatible backup program asks TSANDS.NLM what resources are available for backup, it lists the following options:
Full Directory Backup
Schema
[Root]
.OU=Sales.OU=East.O=ABC
You can list as many containers as you need in the TSANDS.CFG file, but each container's name must appear on a separate line in the file.
The TSANDS.CFG file eliminates the need for a local backup administrator to have the Supervisor right to the entire NDS tree. It can also be useful if the starting container is several levels down below the [Root] container, or if the starting container's name is long. If you include the starting container's name in the TSANDS.CFG file, the local administrator can quickly choose the starting container from a list instead of having to browse the tree or type the complete name.
As an example of how to use the TSANDS.CFG file, consider the NDS tree shown in Figure 3.
Figure 3: To eliminate NDS backup traffic over WAN links, you can designate local administrators to back up NDS partitions at each geographic location.

In this example, ABC Corporation has offices in three geographic locations (East, Central, and West) and has created an Organizational Unit (OU) container for each of these locations. They have divided the tree into three partitions: [Root], .OU=West.O=ABC, and .OU=Central.O=ABC. To keep NDS backup traffic from crossing the WAN links between ABC's three offices, the network administrator has delegated backup responsibilities to local administrators at each office. A special User object was created in each regional container: BA_East, BA_Central, and BA_West.
Since the [Root] partition is on the same local network as the East container, the BA_East user begins backups at the [Root] container. To prevent BA_East from being able to back up the other partitions over ABC's WAN links, the network administrator uses the NetWare Inherited Rights Filter (IRF) to filter out the Supervisor right for BA_East in the Central and West containers. When BA_East logs in and begins an NDS backup from the [Root] container, TSANDS.NLM starts backing up [Root], moves down the tree to the ABC container, and continues with the East container. Because the BA_East user does not have rights to the Central or West containers, TSANDS.NLM will not allow BA_East to back up these containers.
In addition, the network supervisor creates a TSANDS.CFG file containing the line ".OU=West.O=ABC" and places it on the server in the West office that runs TSANDS.NLM. A similar TSANDS.CFG file containing the line ".OU=Central.O=ABC" is created and placed on the server in the Central office that runs TSANDS.NLM. Now, when BA_West and BA_Central want to back up NDS, they can simply choose the correct container to begin a backup at their local containers.
TSAs for Windows 95 and Macintosh Workstations
The NetWare 4.11 release of SMS includes a new TSA for Windows 95 workstations (TSAW95). This TSA enables you to back up and restore information from workstations running Windows 95 and Novell's NetWare Client 32 for Windows 95. Also included is the TSA for Macintosh clients (MacTSA) that was previously available separately. This TSA enables you to back up and restore workstations running the Macintosh operating system and MacIPX, part of the NetWare Client for Macintosh.
Enhancements to the SBACKUP Utility
Along with the enhancements to the SMS TSA modules, Novell has added several new features to the NetWare SBACKUP utility. These will be described in a future AppNote.
Developing a Data Protection Plan
While maintaining tape backups is important, it is only part of what should be involved in a comprehensive data protection plan. To adequately protect valuable network data (including both file system and NDS database information), your overall plan should include provisions for the following:
Redundant hardware
NDS partitioning and replication
Backup and restore system
Disaster prevention and recovery
Redundant Hardware
Although the reliability of computer systems has improved considerably over the last several years, hardware failures still can--and will--occur. Numerous technologies are currently available to provide more reliable data storage and better protection against hardware faults. Many of these technologies involve hardware redundancy of some kind.
For example, RAID (redundant array of inexpensive disks) hard disk systems are capable of maintaining data even if one of the disks fails. NetWare's disk mirroring and duplexing feature protects against hardware failures in the disk channel. NetWare SFT III takes fault tolerance a step further and allows two servers to be mirrored. If a failure halts operations on one server, the other one continues to service the network without interruption.
Another possibility is to maintain a "standby" server to which you can attach your regular server's external disk subsystem in case the server experiences an internal hardware failure. Several third-party vendors offer standby-server products that allow a "hot copy" of data from one system to another.
NDS Partitioning and Replication
In a network with more than one server, NDS provides online backup of the NDS database through the placement of partition replicas on multiple servers. For example, in a two-server network with one partition, the NDS database is protected by placing a replica of the partition on each server. If one replica is lost because of a hard disk failure or because volume SYS is damaged on a server, the partition information remains intact due to the replica on the other server.
Maintaining replicas of every partition provides an online backup and recovery safeguard for NDS information. In the event of an unforeseen loss of a server or volume, the network administrator can (by following the procedures outlined in this AppNote) restore lost NDS data through an active replica. Replication also allows a replica that becomes damaged to be either rebuilt or recreated from another replica.
Replication is the first line of protection for the NDS database. However, there are situations when replication can not or does not provide sufficient protection against the potential loss of NDS data. One such situation is a single-server network. Since you don't have another server to store a replica on, there is no online backup available through replication. Another case is when the network administrator (or any user with sufficient rights) accidentally deletes a valid NDS object. The deletion is propagated to all other replicas, making it impossible for the object to be recovered from a replica. A third situation could occur if a major catastrophe (such as a fire, flood, earthquake, or terrorist attack) destroyed an entire site, wiping out the servers that held all the replicas of an NDS partition.
If you lose a partition and do not have a replica of that partition, you couldlose access to a part of your NDS tree. Have one replica stored on a serverin an alternate location, if possible. (In certain situations this will increasenetwork traffic over wide-area links; you'll need to weigh the benefits anddrawbacks to determine the best NDS configuration for your network.)
To guard against loss of NDS data, it is absolutely essential that a backup of NDS be maintained on a regular basis, using an SMS-based backup program.
Backup and Restore System
While replication provides the fault tolerance needed to maintain a working NDS tree, you must also include a full, offline, SMS-based backup of NDS in your data protection plan. Keep in mind that NDS is a distributed name system that is dependent upon files stored on multiple servers. You cannot back up and restore the NDS files directly. You must use the TSANDS.NLM which is used by SBACKUP and other SMS-based applications.
Performing regular NDS backups protects your NDS database from loss or failure in the following situations:
The partition in a single-server network fails (no online replica is possible).
Due to inadequate replication, you lose all replicas of a partition after a hardware failure or disaster.
A valid NDS object is accidentally deleted by the network administrator.
A serious NDS failure occurs and, as a result, the replicas are in a state which renders the Directory nonfunctional.
All servers are destroyed because of a disaster (such as a fire or flood). In this case, you must perform a complete restoration of NDS and file system data from your backups. Recommended procedures for doing this are given later in this AppNote.
For backing up and restoring NetWare 4, Novell recommends that you use products which fully support the SMS architecture, and which use TSANDS.NLM to back up NDS and TSA410.NLM to back up the file system. Applications that do not fully utilize these SMS services may not be able to provide full support for all of NetWare 4's features. Before purchasing a backup solution for NetWare 4, verify how your preferred solution handles these features. (See Appendix B for a list of backup products that have been certified for NetWare 4.)
The examples in this AppNote use Novell's SBACKUP as the backup/restore application. For instructions on using third-party backup programs, refer to the documentation provided by the application vendors.
|
Note: Because implementation details vary from vendor to vendor, it is importantto review the documentation and readme files included with the SMSbackup application of your choice. If the solution you choose has beentested and approved by Novell Labs, you can obtain information on theproduct from Novell Labs Certification Bulletins (call Novell Labs FaxBack at801-861-2776 or 1-800-414-5227, or GO NOVLABS on CompuServe, orvisit http://labs.novell.com on the World Wide Web). |
Disaster Prevention and Recovery
A disaster prevention and recovery plan provides both preventative and responsive action to system or NDS failure caused by hardware failure in a NetWare server or by corruption in an NDS partition. Writing and testing efficient disaster recovery plans and procedures is essential for recovery from catastrophic failures (fire, floods, earthquakes, and so on). The procedures outlined in this AppNote will help get you started. For more information on disaster recovery plans, see the manufacturer's documentation for your backup system or contact your Novell support provider.
General NetWare 4/NDS Backup and Restore Issues
When dealing with NetWare 4 and NDS from a backup/restore perspective, there are several technical issues you need to be aware of. These issues are discussed in this section.
NDS is a global, distributed name service.
It is important to remember that with NDS, you are dealing with a global, distributed name service. The network of servers that comprise an NDS tree continually exchange updates and other time-sensitive information. Like the bindery in NetWare 3, the NDS "database" exists as a set of files that are stored on NetWare servers. The NDS files are stored on a server's SYS volume, and they are hidden so that users won't delete them or tamper with the contents of the Directory. However, you can't just back up the NDS files like you could the bindery files.
NDS backup is not server-centric.
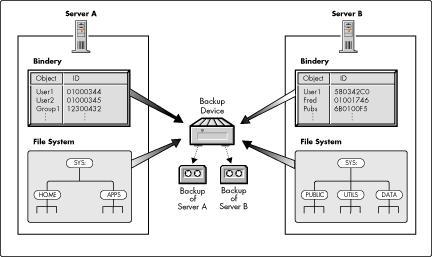
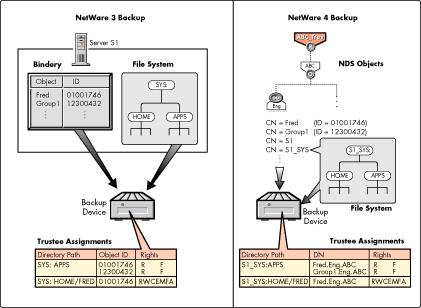
If you are accustomed to the NetWare 3 environment, you are probably used to being able to back up your network on a server-by-server basis. For each server, you could specify what you wanted to back up--the data, the trustee assignments, the bindery--in any combination. It didn't matter if Server B was down while you were backing up Server A, or if user JDOE had an account and trustee rights assigned on both servers. NetWare 3 maintained the bindery, user account, and trustee rights separately on each server (see Figure 4).
Figure 4: NetWare 3 backup is done on a server-by-server basis.
NDS is not server-centric, and neither are its backup and restore procedures. When backing up NDS, you are essentially backing up data that is spread out over multiple servers. A user in one partition may have trustee rights assigned on a server that doesn't hold a replica of the user's NDS object. To handle all the necessary links and dependencies between objects, the backup/restore system must be able to navigate the entire NDS tree. SMS-based backup products use the TSANDS agent to "walk the tree" and access the necessary data.
Objects are backed up by name, not by ID number.
In both NetWare 3 and NetWare 4, a random ID number is assigned when an object is created. Both versions use object ID numbers to keep track of things like users' trustee rights to directories and files in the file system. These object IDs are listed in the Directory Entry Table (DET) on each server volume, and are thus server-centric.
In NetWare 3, the object ID numbers are backed up along with file system data and other bindery information about objects. In NetWare 4, SMS-compatible backup products store objects' full distinguished names on the backup media (see Figure 5).
Figure 5: In NetWare 4, SMS-based backup programs write distinguished names, instead of object IDs, to the storage media.
An object's distinguished name is a unique identifier consisting of the names of each object between itself and the [Root] object of the tree, separated by dots. For example, the distinguished name of user Fred in the NDS tree shown in Figure 5 is "Fred.Eng.ABC". (The name backed up is actually the typeful distinguished name: .CN=Fred.OU=Eng.O=ABC. Typeless names are shown in this AppNote for simplicity's sake.)
In NetWare 4, file system information that relies on object ID numbers (such as trustee assignments and ownership) is converted and linked to the object's distinguished name. Because this information is backed up by object name, it can be restored anywhere in the NDS tree. For example, data files can be restored to any server in the tree and the file system trustee assignments and ownership information for the user will be preserved.
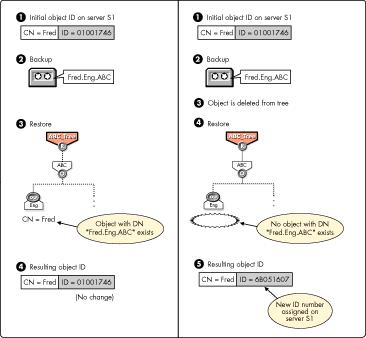
If an object with the same distinguished name as on the backup media already exists in the NDS tree, its object ID is not overwritten during a restore. If an object with the same name does not already exist in the tree, it is assigned a new object ID when restored (see Figure 6).
Figure 6: If an object with the same name does not exist in the NDS tree, a new object ID number is assigned when the object is restored.
Trustee assignments are stored as part of the file system and are identified by object ID numbers. Trustee assignments are included by default when the file system is backed up with the SMS TSAs. If a User object is deleted or lost and then recreated or restored, its object ID will not be the same as it was before. This is why TSA410.NLM uses objects' full distinguished names to back up the trustee rights from the file system. If a User object is deleted and recreated with a new ID, the user's trustee assignments in the file system can be restored. As long as an object with the same name as on the backup media exists in the NDS tree when the file system is restored, the TSA can interact with NDS to rebuild the DET to reflect new object ID numbers. Note that for this to work, NDS objects must be restored before file system information is restored.
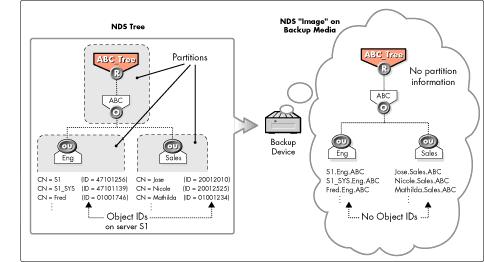
Partition boundary information is not backed up.
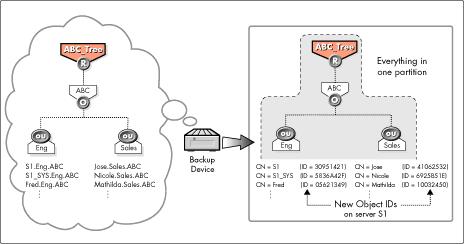
In an NDS tree, replica information can change over time and is dependent on the current state of the Directory. When NDS information is backed up, no information about partition boundaries (or replicas) is stored on the backup media. (However, the replica list for each server is stored in the DSMISC.LOG file as part of the server-specific information.) As shown in Figure 7, the "image" of the Directory stored on the backup media looks like a tree with everything in one partition.
Figure 7: Partition boundary information is not backed up.
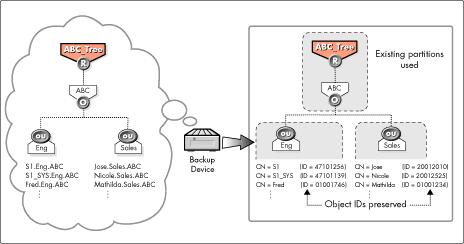
Restoring NDS does not affect the current partitioning and replication in the tree. If partitions and replicas exist when NDS information is restored, those partitions and replicas will be fully utilized (see Figure 8).
Figure 8: When restoring to an existing NDS tree, current partitions are used and object IDs are preserved.
If partition information does not exist when a restore is performed (for instance, after a total loss of an NDS tree), the entire tree structure is placed into one partition (see Figure 9). You must then manually re-establish the partitions and replicas.
Figure 9: When restoring an NDS tree from scratch, all objects are restored into one partition and new object IDs are assigned.
Backing Up NetWare 4 Networks
This section gives guidelines and procedures on how to obtain a "good" backup of the NDS database and file system data in a NetWare 4 network.
Backup Considerations for Various Network Environments
Novell has identified three representative network environments, each of which has different ramifications on backup and restore strategies.
Single Server/Single Partition. In a single-server network, replication is not possible because there is no other server on which to store a replica. In this environment, you absolutely must maintain a full offline backup of NDS. This is the only way you'll be able to restore lost NDS data.
Multiple Servers/Single Partition. In a network with more than one server holding a single NDS partition, you should have at least three replicas of the partition. Maintaining an offline backup of NDS is also essential. If the servers are all located at the same site, be prepared in the event of a disaster that could destroy all the servers at once. Store a complete set of your backup media at another location if possible.
Multiple Servers/Multiple Partitions. In this environment, both online replication and offline NDS backup are essential. Wherever possible, have at least three replicas of each partition located on servers throughout the network. Try to avoid having all replicas of a partition located on servers at the same site. It is a good idea to keep a complete set of your backup media off-site as well. Because SMS backup ignores partition boundaries, restoring the NDS tree (especially a partial restoration) is more involved. You'll need to keep a written record of how your partitions and replicas are set up.
|
Note: If you lose one partition and all its replicas, it is possible to restore theobjects that existed in that partition. However, the procedure for rebuildingthe links to the lost portion of the NDS tree requires significant technicalexpertise and should be performed with the assistance of a qualifiedtechnician. For details, see the discussion of Scenario 5 under "ExampleRestore Scenarios" in this AppNote. |
Central vs. Distributed Backup Administration
Since NDS is a global network service, there can be multiple administrators who assist in maintaining the tree. In dividing up this responsibility, be sure to consider your backup needs and grant the necessary rights to those users who will perform the backup and restore operations. In many cases, it works well to have one overall administrator who has ultimate responsibility and a global view of the entire NDS tree for backup and restore purposes. Having a central backup administrator with full rights to the entire tree will help eliminate problems with incomplete backups resulting from the backup user not having sufficient rights to certain portions of the NDS tree.
If you do back up and restore NDS and file system data for remote sites from a central location, you should ensure that all WAN connections (routers, bridges, telecommunications links, and so on) are functional before you begin. If your host and target servers/workstations are not able to communicate across the network, a complete backup or restore is not possible.
In networks with remote sites connected via WAN links, you can eliminate backup traffic across WAN links and speed up backup and restore operations by creating local administrators to back up data at the remote sites. You might also design your NDS tree so that you have replicas of every partition stored at the same site as the backup host server. Then you can back up and restore NDS without having data go across WAN links. As mentioned earlier, the TSANDS.CFG file can facilitate the selection of containers when you delegate backup responsibilities to local administrators.
General Backup Procedures
How Often to Back Up NDS. In general, NDS should be backed up on a regular basis. The frequency of this backup depends on how often changes and updates are made. For a tree that changes often, you may want to perform an NDS backup every time you do a full backup of all servers on the network. You should definitely back up NDS prior to major tree modifications.
An NDS tree cannot be backed up entirely if all replicas of any partition are offline. To get a full backup, the entire NDS tree needs to be functioning (all partitions synchronizing normally). If not, you will have to include and exclude containers to get a usable backup.
Backing Up NDS. To back up NDS, the TSANDS.NLM module must be loaded on at least one server in the tree. Preferably it should be the server containing a replica of the largest partition. This will minimize network traffic during the backup process and improve performance when the backup program must perform name resolution across the NDS tree. You can load TSANDS.NLM on other servers for more efficient backup of large networks.
TSANDS.NLM allows selective backup and restoration of portions of the NDS tree. (Not all third-party backup programs support this option. Check with the application vendor for details on product features.) In SBACKUP, you can begin the backup of the Directory from any container object in the tree, and the process will continue from that point downward to the end of that portion of the tree. If the selected container is the Root of the tree, the entire NDS tree will be processed. This allows you to back up the entire tree or subsets such as a single branch, a single container, even a single leaf object. Also, a scan option allows backup of only those objects for which the backup user has Supervisor rights.
|
Note: We recommend that you back up the entire NDS tree in a sessionwhenever possible. Although partial NDS backups and restores arepossible, there are numerous precautions and additional issues you musttake into account. (For more information, see the section on "Partial NDSRestores" later in this AppNote.) |
Backing Up the File System. To back up file system data, the appropriate SMS TSA must be loaded on each server for which a file system backup is to be created. For NetWare 4.1 and 4.11 servers, load TSA410.NLM. (If you still have servers running NetWare 4.01 or 4.02, load TSA400.NLM on those servers. TSA modules are also provided for NetWare 3.x servers.) Once these SMS TSA modules are loaded, you can proceed to load the device drivers for your backup hardware and run the backup program of your choice.
To get a proper backup of file system information, make sure your backup application can handle the NetWare file system's name spaces, extended attributes, trustee rights, data compression, and so on. It is also useful to have the ability to do a trustee-only backup (the option to exclude data streams).
Backing Up the Server-Specific Information Files. Because of their crucial role in properly recovering failed servers, the server-specific information files described earlier in this AppNote should be backed up regularly. If you have a large network with many servers, you might consider copying all the server-specific information files for all of your servers onto a single server, and then backing up that server on a daily basis. You could create a directory on the server for this purpose, with separate subdirectories for each server's server-specific information files. This way, you will be sure to have a current set of files for every server on your network.
Specific Steps for Backing Up NetWare 4 with SBACKUP
This section provides specific steps for backing up NetWare 4-- both NDS and the file system--using Novell's SBACKUP software. Because SBACKUP is based on the SMS platform, there are many similarities in how SBACKUP and other SMS-based products operate. We recommend that everyone read this section, regardless of which backup program you are using, to get a general idea of how to back up a NetWare 4 network with SMS-based products.
Before starting the backup, make sure NDS is fully functional (all partitions are synchronizing properly). If your backup host and target servers communicate across a WAN, check the status of the WAN links to verify that they are operational. All servers and workstations at remote sites that are participating in the backup must be able to communicate across the network.
Load the SMS TSAs
At the designated server, load TSANDS.NLM. (This module must beloaded on at least one server in the tree, preferably the one with the largest partition. However, you can load TSANDS.NLM on other servers for more efficient backup of large networks.)
Load TSA410.NLM on each NetWare 4.1x server for which a file system backup is to be created. This will also allow the "Server Specific Info" to be backed up.
Load SBACKUP and Its Supporting Modules
At the server on which you will run the backup program, load supporting drivers for the backup tape device.
Load SBACKUP.NLM (or another SMS-based backup program of your choice).
Back Up NDS (TSANDS.NLM)
From SBACKUP's main menu, choose the "Backup" option. The program displays a list of servers running SMS Target Service Agents; select a server that has TSANDS.NLM loaded. If the server has other TSAs loaded, select "Novell Directory" from the list of Target Services.
Following the screen prompts, login as the backup user, specifying the correct context if necessary. The username must be the complete NDS name (for example, .CN=Admin.O=ABC).
Select the backup device and media, and set the location of your log and error files. From the Type of Backup menu, select "Full: All Data on Target" and then enter a description of this backup session. Press <F10< to save your choices and continue.
Note: Selecting "Full: All Data on Target" does a full backup of the Directory, including the schema (extended or otherwise). The schema by itself can also be backed up by selecting Custom and selecting "Schema" fromthe resource list.
SBACKUP asks whether you want to proceed with the backup now or later; make your choice. If necessary, enter a label for the backup media. As the backup begins, SBACKUP displays a screen showing the progress of the program and any errors encountered.
After the entire NDS tree has been processed, you should see a prompt that says "The backup process was completed normally." Press <Enter< and then <Esc< to return to the main menu. Select "Log/Error File Administration" and review both the log and error files to verify that the NDS backup was completed successfully. At the bottom of the error log will be an area "The following data sets were not backed up." In this area will be the NDS objects that could not be backed up for some reason during that backup session.
Steps 5 through 9 need to be performed only once per NDS tree (unless you are doing a selective backup).
Back Up the File System (TSA410.NLM)
To back up the file system on each server, return to the main menu and choose the "Change Target to Back Up From or Restore To" option. From the list of servers with Target services loaded, select the desired server. If the server has other TSAs loaded, select the "NetWare File system" target service.
Following the screen prompts, login as the backup user. Specify the correct context if necessary. The username must be the complete NDS name (for example, .CN=Admin.O=ABC).
Select the backup device and media, and set the location of your log and error files. From the Type of Backup menu, select Full, Differential, Incremental, or Custom. By default, SBACKUP's "Full: All Data on Target" option backs up a complete NetWare server, including all files, directories, trustee rights, and the five server-specific information files.
Note: Selecting Custom and then "Server Specific Info" will allow you to create and back up only the server-specific information files.
When prompted, enter a description of this backup session. Press <F10< to save your choices and continue.
SBACKUP asks whether you want to proceed with the backup now or later; make your choice. If necessary, enter a label for the backup media. As the backup begins, SBACKUP displays a screen showing the progress of the program and any errors encountered.
After the specified portion for the file system has been processed, you should see a prompt that says " The backup process was completed normally." Press <Enter< and then <Esc< to return to the main menu. Select " Log/Error File Administration" and review both the log and error files to verify that the file system backup was completed successfully.
Repeat Steps 10 through 15 for each server needing to be backed up.
Verifying the Backup in a Test Environment
Your ability to restore NetWare 4 NDS and file system information hinges on the reliability of your backup. At this time, it is not advisable to perform a partial NDS restore on your production network to verify that your backup system works. If possible, you should set up a small test environment with one to three non-production servers and use that to test your system's backup and restore capabilities. Verify that NDS can be restored from the backup media. Also make sure you can restore data that spans more than one tape (this is a quick way to ensure the integrity of backed-up data).
|
Backup and Restore Tips for NetWare 4 Use replication as the firstlevel of protection for NDS. In multiple server networks, have at least three replicas of every NDS partition stored on various servers throughout the network. Use your offline SMS backup to restore NDS data only if it cannot be restored from a replica. Choose a backup product that is certified for NetWare 4. To handle NDS and other NetWare 4-specific features, the third-party backup program you use should be certified by Novell Labs. It should also support SMS and its TSAs. (For product certifi-cation information, call Novell Labs FaxBack at 800-414-5227 or 801-861-2776.) Make sure you have the latest versions of backup-relatedsoftware. Periodically check with Novell and with your third-party vendor to ensure you have the latest version of the backup program, device drivers, TSAs, and so on. Novell provides updates on NetWire, the World Wide Web, and the Novell Support Connection (NSC) CD-ROM. Stay current with the newest operating system patchesand NLM versions. Check Novell's electronic distribution sources(NetWire,World Wide Web, NSC CD-ROM) for updates to the NetWare 4 operating system, DirectoryServices (DS.NLM), NDS utilities (such as DSTRACE and DSREPAIR), and so on. Keep a record of where NDS partitions and replicas are located. Restoring NDS is much smoother if you have a recordof your partitions and replicas. Be sure to note the full name of the container intowhicheach server is added and which replicas (if any) are stored on the server. Use theDSMISC.LOG file to help you do this. Ensure that NDS is fully functional before backing up or restoring. All NDS partitions should be synchronizing withouterrors. If you are backing up the entire NDS tree, WAN links should be up and servers should be able to communicate with each other. Back up NDS regularly. The frequency of backing up NDS depends on howoften you make changes to your tree. Fortrees that change often, back up NDS every timeyou do a full network backup. Always back up NDS before making major modifications tothe tree. Back up the server-specific information files regularly. Successful recovery of NetWare 4 servers hinges on havinga current backup of the five server-specific information files for every server on your network. Besure to include these files as part of your regular server backup plan. Verify the completeness of each backup and restore session. After each backup and restore session, check the appropriateerror and log files to make sure the process completed successfully and didn't skip crucial portions of your data. Don't change NDS object names and contexts when restoring. Don't use a restore situation to "redesign" your NDS tree. The restore process will go much more smoothly if you keep the NDS tree thesame and restore servers to the same container objects as they were in before. Always restore NDS information before restoring file system information. File system trustee assignments will be affectedby restoring NDS objects. To avoid problems, always restore NDS information before yourestore the file system data. Remember to "re-update" your software when reinstalling servers. After reinstalling NetWare 4 or NDS from the original media,remember to reapply OS patches and recopy updated drivers, NLMs, utilities, and so on, before proceeding with a restore. |
Restoring NDS and File System Information
This section gives guidelines and procedures that have been tested and verified by Novell for restoring NDS information and file system data in a NetWare 4 network.
To successfully restore lost NDS data, it is essential that you maintain a regular backup of the server-specific information files for all servers on your network. It also helps to have a basic understanding of how NDS works and a knowledge of how your particular tree is set up. For example, you should have a record of where Server objects, Volume objects, and Admin objects are located. You should also keep a record of the partitions, master replicas, and read/write replicas stored on your servers. The information provided in the DSMISC.LOG file can help you.
General Restore Procedures
Whenever possible, use an active replica to restore what was lost from the NDS tree. If this is not feasible, follow this general process to restore from an SMS backup:
Restore NDS information first.
Restore file system data and trustees second.
It is vital that you perform these steps in the order indicated above. Because NDS backup and restore is based on object names, it is essential that objects with trustee rights being restored exist in the tree before you restore file system data and trustee assignments. A replica containing the object does not have to be on the server. NDS creates external references as necessary. (An external reference is a pointer to an NDS object not found locally on the server; it is used to authenticate and reference objects that are not local to the server.)
NDS should be functional (partitions synchronizing normally) before you proceed with a restoration. It is difficult for an NDS restore to complete successfully in a dysfunctional tree.
Example Restore Scenarios
The instructions in this section detail specific recovery procedures for the following scenarios:
Loss of a SYS volume or an entire server in a multiple-server network where replicas exist on other servers
Loss of a SYS volume or an entire server in a single-server network with no replication
Loss of a non-SYS volume
Loss of the entire NDS tree
Review these example restore scenarios and follow the steps that are appropriate for your situation.
Scenario 1: Loss of a Server in a Multiple-Server Network Where Replicas Exist
In a multiple-server environment, it is possible for one server to go down but for the rest of the servers in its replica list to remain intact. The same situation exists if the hard disk(s) containing the SYS volume on one server becomes damaged, since a hard disk failure involving volume SYS affects the entire server and halts all NetWare operating system activities. Because the NDS files are stored on volume SYS, loss of the SYS volume is equivalent to removing NetWare 4 and NDS from the file server. You must reinstall NetWare 4 and NDS before you restore your data.
Procedure. Following are the steps to restore a server/SYS volume in a multiple-server network where replication is present. These steps assume you have a current backup of the server-specific information for the failed server.
|
Note: Do not delete the Server or Volume objects for the failed server in the NDStree. Leaving these objects intact preserves references that other objects (suchas Directory Maps and Queues) may have to these objects. If the Server orVolume objects are deleted and you had objects that depended on them, youwill need to re-establish the relationships through a selective NDS restore.Refer to "Information for Special Restore Conditions" for more information. |
From your backup host server, run your backup program and restore "Server Specific Info" from a tape backup.
You can restore this information to any target server using an SMS-based backup program. If you are using SBACKUP, the steps are as follows:
From SBACKUP's main menu, select the "Restore" option. Select a server that will receive a copy of the server-specific information files and enter the administrative username and password as prompted.
If the backup host server was lost or if the backup session files are not available, select "Restore Without Session Files". Otherwise, select "Choose a Session to Restore" and specify the path to the session log file of the session you want to restore.
Select "Perform Custom NDS Restore". In the Restore Options screen, highlight "Subsets of the Session to Be Restored" and press <Enter<.
Highlight "Include major TSA resources" and press <Enter<. Then press <Insert< and select "Server Specific Info" from the Resource list. Press <F10< until you see the prompt "Proceed with the Restore?" Answer Yes to continue.
The server-specific information files (SERVDATA.NDS, DSMISC.LOG, VOLSINFO.TXT, STARTUP.NCF, and AUTOEXEC.NCF) will be restored to a subdirectory under SYS:\SYSTEM on the server you have selected. The subdirectory name will be a DOS 8.3 name derived from the source server name. These files will be used throughout the restore procedure.
If the failed server held a master replica of any partition, use DSREPAIR to designate a new master replica on a different server in the replica list. (Use the information contained in the DSMISC.LOG file to determine what replicas were stored on the failed server.) If there is not another server that contains the same replicas as the failed server, Step 2 might need to be repeated on another server that contains the missing replicas. (Again, you can use the replica lists in DSMISC.LOG to determine which servers to load DSREPAIR on to complete this step.)
To change the replica type, run DSREPAIR on another server in the replica list that has an active read/write replica of the partition. The steps are:
Load DSREPAIR.
Choose "Advanced options menu."
Select "Replica and partition operations."
Note: Normally you should use PARTMGR or the Partition Manager tool in NWAdmin to perform partition operations. This option in DSREPAIR is tobe used only when the master replica of a partition islost because of server or hardware failure.
Select the partition you want to edit.
Select "View replica ring" to see a list of servers that have replicas of the partition.
Choose the server you want to hold the master replica and select "Designate this server as the new master replica."
If the failed server contained any non-master replicas, you need to remove all replica pointers to the failed server. If there is not another server that contains the same replicas as the failed server, Step 3 might need to be repeated on another server that contains the missing replicas. (Use DSMISC.LOG to determine what other replica types the failed server contained, and to determine which servers to load DSREPAIR on to complete this step.)
To remove the failed server from the replica ring, the steps are:
From the DSREPAIR Available Options menu, select "View replica ring."
Select the name of the failed server.
Select "Remove this server from the replica ring." You will see a warning message. Choose "Yes" to continue.
Exit DSREPAIR.
Install the new hard disk or server hardware.
Follow any instructions provided by the manufacturer to verify that the server's hard disks are working. The new hard disk should have the same (or larger) storage capacity as the drive it replaces. Use the "Server Specific Info" files to verify configuration information.
Run INSTALL.NLM and reinstall NetWare 4 on the new server.
When prompted, re-enter the same server name, NDS context, and internal IPX number that the server had prior to the failure. Use the STARTUP.NCF and AUTOEXEC.NCF files included with the server-specific information for needed information. After INSTALL copies the preliminary files, the option to "Choose a directory tree" is displayed. Press <F5< (the option to restore NDS, as indicated at the bottom of the screen). A new window will come up with two options: A: (the default) or "Press <F3< to specify a different path".
If the server-specific information files are on floppy diskette, insert the diskette into drive A and continue. Otherwise, press <F3< and specify the path to where the server-specific information files were restored in Step 1. After you enter the path and press <Enter<, the files will be copied to the new server. DSMISC.LOG and VOLSINFO.TXT are copied to the SYS:SYSTEM directory along with AUTOEXEC.NCF. STARTUP.NCF is copied to the C:\NWSERVER directory.
NDS is also restored at this time, using the information contained in SERVDATA.NDS (TSANDS.NLM is not needed). Once this is done, NDS is fully functional on the server, except that the partitions and replicas have not yet been re-established.
When prompted, insert the NetWare License diskette for the server.
Edit the STARTUP.NCF and AUTOEXEC.NCF configuration files.
If the STARTUP.NCF or AUTOEXEC.NCF files have changed since they were backed up as part of the server-specific information, both the original and new configuration files are displayed so you can compare them and make edits as necessary. If no changes were made to the configuration, the option to edit the original is not given and you will see the current configuration files only. Make the proper changes and continue.
At this point, all the files necessary to do an SMS remote file system restore have been copied to the new server. You have a choice as to how to proceed in INSTALL, as indicated by the online help at the bottom of the screen: <Enter< to Quit or <F3< to Continue installation.
Pressing <Enter< skips the copying of the remaining system and public files and takes you directly to the final exit screen in INSTALL. Since you will be restoring the entire file system from a backup anyway, this option saves you time and is the recommended procedure, unless the failed server is the host backup server. In that case, press <F3<, wait while INSTALL copies the system and public files, and then exit INSTALL. Otherwise, press <Enter< and exit INSTALL now.
Using the VOLSINFO.TXT file (type LOAD EDIT SYS:SYSTEM\ VOLSINFO.TXT to view the file), determine what name spaces need to be loaded for each volume involved in the restore. At the console, load the required name space modules (MAC.NAM, OS2.NAM, and so on).
At the console, load the file system TSA by typing LOAD TSA410.NLM. Using an SMS-compatible backup program, start the restore of the file system for each volume affected by the failure.
Note: If the server that failed was the host server for the backup program, first take the steps necessary to reinstall the backupsoftware and storage device drivers.
If the server had volumes other than SYS that were unaffected by the failure, no further action is needed because the SERVDATA.NDS file preserves the trustee assignments on these other volumes.
After the restore of the file system is completed, down the server and bring it back up.
Re-establish replicas on the failed server using Partition Manager.
Use DSMISC.LOG to aid in this process. It contains a copy of the replica list that resided on the server at time of backup. From the server console, you can type LOAD EDIT DSMISC.LOG to view the log file contents.
Scenario 2: Loss of the Only Server in a Single-Server Network
In a single-server network, a failure in that server will bring all network operations to a halt. The same situation exists if the failure affects only the hard disk(s) containing the SYS volume. Since there are no replicas in a single-server network, you can't recover any NDS information from a replica. After repairing or replacing the failed hardware, you must restore the entire NetWare environment, including NDS, from an SMS backup.
Procedure. To restore the single-server network from a backup, perform the following steps:
Correct the problem that caused the server hardware to fail.
Reinstall NetWare 4 and NDS on the server through the INSTALL utility.
Use the same server name, Admin parent container and password as were used when the backup was created. Make sure all hard disk partitions are at least as large as they were on the previous server, and that all volumes are defined as before. (Reconfiguring your server and volumes during a restoration is not recommended. Once your server is back up and running, you can make any changes that are necessary.)
INSTALL should mount all volumes as part of the installation process.
Load the SMS TSAs and the NLMs necessary for your backup/restoreprogram.
At the server console, type LOAD TSANDS and then LOAD TSA410. On the backup host computer, load the backup device drivers and program software. If you are using Novell's SBACKUP, load the required backup device drivers and then type LOAD SBACKUP tostart the program.
Restore the entire NDS session from your SMS backup.
You will have no session files to work from at this point. From Sbackups main menu you can choose "Log/Error File Administration". Then select "Create Session Files" from the menu and this will create the session files. This is an optional step depending on what method is used below.
Restore the file system data to volume SYS from your SMS backup.
If the server had other volumes that were unaffected by the failure, you may restore only the trustee assignments (without data streams) for those volumes.
When setting up the restore session, be sure to go into Custom Restore and, under "How to scan the session to be restored", set the "Delete existing trustees before restoring" option to Yes. This will purge existing trustees before restoring the backed-up trustee assignments from the backup.
Note: Third-party backup program might not have this option. If this is the case, type LOAD DSREPAIR at the server console and choose the "Unattended full repair" option. This automatically includes the option to purge invalid trustee information on the server's volumes.
If desired, you may restore just the directory structure without data streams on these volumes. Since the data files already exist, only the directory structure is needed to get the trustee assignments back. There are two methods for doing this with SBACKUP:
Method 1. If session files exist, you can do a custom restore of the full session. If session files don't exist you must use method 2 or you do have the option to recreate session files shown in step 5 above. Leave all options at default except "Exclude Files". Under Exclude Files, insert the following three patterns into the list: * *. *.* This method is faster because SBACKUP can use the offsets recorded in the session file to position the tape for each parent.
Note: If file level trustee assignments exist, they will not be restored if you use Method 1.
Method 2. The other method is to simply change the "Exclude Data Streams" option to Yes under the "How to scan session to be restored" custom restore options. This method will work whether the session is being restored with or without session files. It is only as fast as a full session restore because SBACKUP must scan the entire tape sequentially. This method should be used when no session files exist and/or when file level trustee assignments have been used.
Note: If you're not using SBACKUP, refer to your third-party backup program's documentation for similar instructions.
(Optional) Verify proper restoration of the data, trustee assignments, file ownership, and other related information by spot-checking some of there stored directories and files.
Commands that might be helpful include RIGHTS /T /S (displays users, groups and other objects that have explicit trustee assignments in a directory and its subdirectories) and NDIR (displays owners and other NetWare file information).
Scenario 3: Loss of a Non-SYS Volume
If you experience a hard disk failure that does not involve volume SYS, you do not need to modify or reinstall NDS. All that is required is a restoration of file system data and trustee rights.
Procedure. To restore a volume after a hard disk failure not involving volume SYS, follow these steps:
|
Note: Do not delete the Volume object for the failed volume from the NDS tree.Leaving the Volume object intact preserves any references that other objects(such as Directory Maps and Queues) may have to that volume. If theVolume object is deleted and you had objects that depended on it, you willneed to re-establish the relationships through a selective NDS restore. Referto "Restoring Information for Special Conditions" for more information. |
Bring down the server and replace the bad hard disk(s).
Bring the server back up and recreate the volume using INSTALL.
At the server console, load INSTALL.NLM. Create a NetWare partition on the new disk and redefine the volume. INSTALL will prompt you to log in, after which it places the Volume object back into the NDS tree. When prompted, choose to mount the server volume(s).
Restore the file system from your SMS backup.
If you are using SBACKUP, select the Custom restore option, choose "Subsets of the session to be restored," and then choose "Include major TSA resources." Press <Ins< and select the desired volume from the list. Proceed with the restore as usual.
(Optional) Verify proper restoration of the data, trustee assignments, file ownership, and other related information by spot-checking some of there stored directories and files.
Commands that might be helpful include RIGHTS /T /S (displays users, groups and otherobjects that have explicit trustee assignments in a directory and its subdirectories) and NDIR (displays owners and other NetWare file information).
Scenario 4: Loss of the Entire NDS Tree
If all servers on a network are destroyed because of a disaster, you must perform a complete restoration of NetWare 4, NDS, and file system data. This process will go much more smoothly if you have documented your NDS tree and the location of Server objects, partitions, and replicas. It is also a good idea to record bindery context settings and other relevant information.
Procedure. To restore an entire network from a full backup in a multiple-server environment, follow these steps:
Reinstall NetWare 4 on the first server. By default, this server will hold the master replica of the Root partition.
When INSTALL asks for the names for Organization (O) objects immediately under the Root object, use the same names as existed before in the tree. Otherwise you'll end up with new, empty containers in the restored NDS tree. When this installation is complete, you'll have a working NDS tree containing one NetWare 4 server with a master Root partition.
Install the remaining servers to complete a "skeleton" of your network.
Before restoring a full NDS session, you should create a "skeleton" of your network: all servers and volumes should be up and running; their NDS objects should exist in the NDS tree in the same context as they resided in before (INSTALL will ask which container you want each server to be placed into); all servers should be communicating with one another; and time synchronization should be working properly.
Note: If you can get some of the servers operational, but not all of them, you can still proceed with the restoration. However, you may see errors and experience problems due to NDS objects having dependencies that cannot be resolved.
The User object used to create the backup session (such as Admin or equivalent) should exist in the same container, with the same password, and with the same NDS rights, as when the backup was performed.
Once this step is completed, you still have just one partition--the Root--but (because ofthe INSTALL program's defaults) you now have two replicas of that partition. These are stored on the second and third servers you installed.
If your network is small and you have a server with enough free disk space to hold the entire NDS tree, the restoration will go faster if you do not re-establish your former partitions and replicas yet. Use PARTMGR or the Partition Manager tool in NWAdmin to remove the two default replicas created by INSTALL before proceeding. In larger networks, you may not have a server with enough disk space to restore the entire NDStree without partitioning it first. If this is the case, you should re-establish your former partitions and replicas at this time and skip Step 5 below.
Restore the full NDS session from your SMS backup.
On the backup host machine, load the necessary drivers and support modules for your backup program. If you are using SBACKUP, start the program as usual. Since you have no session files to work from at this point, choose the option to restore without session files.
Since TSANDS has no concept of partitions and replicas, the NDS tree structure is restored into the single Root partition.
Restore file system information to each server.
When setting up the restore session, be sure to go into Custom Restore and, under "How to scan the session to be restored", set the "Delete existing trustees before restoring" option to Yes. This will purge existing trustees before restoring the backed-up trustee assignments from the backup.
Choose the option to restore without session files. Restore each server's data onto the appropriate volumes. As you restore files, trustee assignments are also restored.
Re-establish partition boundaries and distribute replicas to the other servers.
Refer to your written documentation of the network. When you are finished, your NDS tree should exist as it did before the disaster, with all partitions and replicas in place.
(Optional) Verify proper restoration of the data, trustee assignments, file ownership, and other related information by spot-checking some of the restored directories and files.
Commands that might be helpful include RIGHTS /T /S (displays users, groups and other objects that have explicit trustee assignments in a directory and its subdirectories) and NDIR (displays owners and other NetWare file information).
Scenario 5: Loss of a Single Partition
With adequate replication, your network should be protected against the most common losses of NDS data. This scenario covers the unlikely situation where you lose just one partition within the NDS tree and, for some reason, no replica of that partition exists. This should be an extremely rare circumstance.
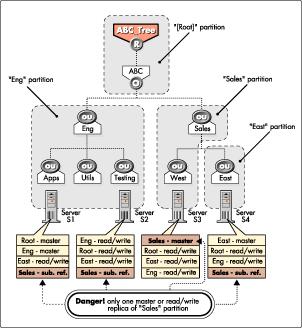
To understand this scenario, consider the example NDS tree shown in Figure 9. In this NDS tree, the administrator has inadvertently deleted all but the master replica of the "Sales" partition. This single replica is stored on server S3.
In this situation, NDS automatically creates subordinate reference replicas of the Sales partition on the other three servers in the tree. However, subordinate references are not full replicas. They contain only enough information to locate other replicas and track synchronization.
|
Note: A subordinate reference is created wherever a parent partition exists on aserver but a child partition of that parent is not on that server. In Figure 9,servers S1, S2, and S4 each hold a replica of the Root partition (the parentpartition of Sales), but not of Sales (a child partition of Root). Therefore,NDS creates subordinate reference replicas of Sales on these three servers. |
If server S3 is lost due to hardware failure or disaster, you lose the only full replica of the Sales partition. In essence, you now have a "hole" in your NDS tree between the East partition and the Root partition. You cannot recover the partition from another read/write replica (since none exists).
To avoid getting into this situation, always follow the established guidelinesfor NDS partitioning and replication. Wherever possible, design your treeso that you don't have all replicas of a partition located on servers at thesame site. Never delete replicas unless you have a specific need to do so.Store a duplicate set of your regular backups off-site. As always, havingdisaster recovery procedures in place can mean the difference betweengetting a site back online quickly or having to go through a painstakingtree re-creation process.
Figure 10: Having only one master or read/write replica of a partition is a risky configuration that is not recommended.
In this scenario, it is possible to rebuild the links to the lost portion of the NDS tree and then restore the objects from a backup. However, the procedure for doing this requires significant technical expertise and should be performed with the assistance of a qualified technician.
Procedure. If you lose a single partition in a multiple-partition tree and have no replicas of that partition, proceed as follows:
Do not attempt any NDS recovery or repair procedures.
Call Novell Technical Support at 1-800-NETWARE (638-9273) or 801-861-5588. Ask for assistance from the NDS Support group to rebuild the links to the missing partition in your tree.
Once the partition links are rebuilt, the Technical Support Representative will guide you through the process of restoring the objects that were in the lost partition from your SMS backup.
Information for Special Restore Conditions
This section describes conditions that may arise in certain special cases involving the restoration of NDS information.
|
Note: Unless stated otherwise, this information applies to the versions ofNetWare 4, DS.NLM, SBACKUP, and SMS TSAs that were current atthe time of publication (see Appendix C for a listing). New softwarerevisions may make some of these concerns obsolete. Be sure to read thedocumentation and readme files that accompany any patches, updates,or revisions you receive from Novell. |
Partial NDS Restores
The SMS TSAs allow you to do selective restores from the backup media. However, partial restoration of NDS from a backup can have subtle consequences, particularly when only a single object or a selected group of objects is restored.
In the NDS schema, objects are defined to have certain attributes. Some of these attributes are mandatory (meaning they must contain a value); others are optional. For some NDS objects, the value for a particular attribute is a reference to another object upon which the object depends. For example, a Queue object has a Queue Directory attribute that contains the file system path to the queue directory. It also has a Host Server attribute that identifies the file server on which the queue directory resides. This information is used to determine the physical location of the resource.
The specifics of restoring objects vary depending on what type of object is involved and whether the object's dependencies are physical entities (servers and volumes) or logical entities. In some cases you can simply restore an object by itself and everything will work fine. In other cases, an object may restore but not be functional unless you also restore its dependent object(s).
Objects with Mandatory Attributes. NDS objects with mandatory attributes include Directory Maps, Queues, Printers, and Print Servers. Such objects (including objects defined in an extended schema) need to have their dependent objects in the tree when restoring. If the object referenced in a mandatory attribute is not in the tree when the restore takes place, the original object gets created but is not functional. Once the dependency is in place, the original object can be restored over the top of the existing object from an SMS backup.
Objects with Non-Mandatory Attributes. Objects such as Alias, Group, Organizational Role, and Profile have dependencies that are optional, not mandatory. When restoring these objects, if the optional dependency is not present in the tree, a temporary placeholder will be created until the dependent object is restored. For example, if a Group is restored but all its members (Users) do not exist in the tree, placeholder (Unknown) objects are created until the User objects are restored. At that time, the placeholder objects become real User objects and the User and Group objects are fully functional.
|
Note: In a network with many interdependent objects and trustee assignments, thismanual restore process can become tedious. A partial restore of NDSobjects may not be the best option for recovery in these cases. Recreatingthe objects through the NDS utilities might be a better solution. |
Unknown Objects After a Restore
An NDS object is "unknown" whenever not enough information is known about the object, such as when one of its mandatory attributes is missing. (In NWAdmin, unknown objects appear with a "?" icon.) During a restore of NDS, unknown objects are created when restoring an object which has an Access Control List or any other attribute that refers to other objects that do not currently exist in the tree. This condition is common in a restore, since only one object can be restored at a time. When this condition arises, a "place-holder" (the unknown object) is created until the real object is restored.
As an example, say that object User1 has been given property and object rights to User2. If User1 and User2 are deleted and only User2 is restored, an object named User1 will be created but it will have a base class of "unknown." This occurs because the ACL of User2 lists User1, which does not currently exist. The unknown object is used as a placeholder in the tree. If User1 is later restored, it will replace the unknown object.
If the restore session does not include the actual object for which the placeholder was created, the object will remain in the tree as type "unknown". You can expect to see unknown objects after a restore if all network resources (servers, volumes, and so on) are not in place before the restore is started. Objects which remain unknown after a restoration is completed are those for which NDS could not resolve the dependencies. Once the dependent objects or resources are in place, you can either delete the Unknown objects and recreate them, or do a selective restore to overwrite the Unknown objects.
Overwriting Updated Software
Many of the restore procedures in this AppNote instruct you to reinstall NetWare 4 after a server hardware failure that involves the SYS volume. Keep in mind that after you reinstall the operating system from the original media (CD-ROM or diskettes), your server will have the initial-release versions of the OS and all system and public files. If you have updated the OS or any of the NLMs included with the operating system since the initial release, these updates must be reapplied or selectively restored from your most recent backup.
It is especially critical to reapply any OS patches and to recopy new versions of DS.NLM, DSREPAIR.NLM, and other NDS utilities. Also make sure you have the latest backup device software and drivers.
Bindery-based Objects and Applications
Older, bindery-based applications such as E-mail, printing, and even some backup programs, depend on object ID numbers instead of object names. Now that NDS-aware versions are available for most popular applications, the assignment of new object IDs to restored objects is not as much a concern. In addition, enhancements to the SMS TSA modules and the ability to back up server-specific information provides a method of preserving object IDs.
If you have a mixed NetWare 3-NetWare 4 enviornment, or if you are still using bindery-based applications, Novell recommends that you upgrade to NetWare 4 and NDS-aware versions as soon as possible. Although NetWare 4 provides a bindery services (bindery emulation) feature that allows applications that need the bindery to continue to function in the NDS environment, emulating the bindery should be seen as a temporary measure necessary only until NDS-aware applications are installed. Whenever possible, use bindery emulation only to continue to support dynamic objects that are created or manipulated programmatically.
Modifying Admin's Rights to the [Root] Object
By default, the NetWare 4 installation process creates a User object named Admin that has Supervisor rights to the [Root] object in the NDS tree. For security and management reasons, many customers choose to create other administrative user objects with rights to lower portions of the tree. Once this is done, these customers typically either delete the default Admin object or rename and modify it so it no longer has rights to the [Root] object.
Novell strongly recommends that, before you modify the default Adminobject in any way, you create another object with Supervisor rights to[Root] to use for backup and restore purposes.
Failure to follow this recommendation can lead to problems when NDS must be reinstalled prior to a complete NDS restoration from a backup. The scenario is as follows: You revoke Admin's rights to [Root], and the modified rights are backed up when you back up NDS. You later start a restore and log in as user Admin because you presume it has all rights to the entire tree. However, since you are doing a complete NDS restore, the backed-up [Root] object and its ACLs are restored over the default ones. If the Admin user on tape doesn't have the proper rights to [Root], the restore cannot be completed successfully.
The recommended solution here is to create a "backup" user that has the rights necessary to back up and restore NDS. After you reinstall NetWare 4, recreate the Backup user in the proper context (create the necessary containers if needed), and grant the Backup user the same rights that were granted it on the backup. You can then log in as the Backup user and proceed with the restoration.
Loss of Host Server for Certain Backup Products
Some third-party backup programs require that you restore from exactly the same context and using the same username as were in place when the backup was made. If the host server is lost, you need to replace it with a new server located in the same container of the NDS tree. Check with your backup system vendor for more information.
Errors During Backup/Restore Procedures
Following are some of the most common error messages you might see when backing up and restoring NDS with SBACKUP. Note that these are NDS error messages that are passed to SBACKUP from the SMS TSAs. These same errors may be seen in other SMS-based backup programs as well. (For more information about errors in third-party backup programs, refer to the vendor's documentation.)
|
Error
|
Description
|
|
-601 (invalid name) |
These errors indicate that the backup program could not read NDS data because an object name contained invalid characters. The backup session will typically terminate with these errors. Either exclude the indicated object or resolve the invalid name problem before attempting to back up NDS again. |
|
-626 (all referrals failed) |
These errors indicate that an object could not be found. It is possible that the object exists, but the server could not communicate with a server holding a copy of the object or its parent. The communication problem needs to be resolved before attempting to back up NDS again. |
|
-672 (access denied) |
These errors indicate that the backup program encountered data in the NDS tree which it did not have sufficient rights to access. Either grant the backup user rights to the entire tree or exclude the restricted portions of the tree prior to starting the backup. |
For more information on these and other error messages, see the Novell System Messages manual. A more complete list of NDS errors is contained in the DSDOCx.EXE file (where x is the revision number), available from NetWire on CompuServe, from Novell's ftp server on the Internet, or from Novell's World Wide Web site at http://www.novell.com.
Conclusion
When the backup and restore issues discussed in this AppNote are understood and the recommended procedures are carefully followed, loss of NDS information can be avoided in almost every case. As further information becomes available, updates to the Novell-recommended backup and restore procedures documented in this AppNote will be disseminated through Novell's regular support channels.
Appendix A: Additional References
Following are some additional information resources on NetWare 4, Novell Directory Services, SMS, and related topics.
Novell product manuals and readme files
Related AppNotes:
"Backing Up and Restoring NetWare Directory Services in NetWare 4" (August 1995)
"Ten Proven Techniques to Increase NDS Performance and Reliability" (April 1996)
"Universal Guidelines for NDS Tree Design" (April 1996)
"Managing Novell Directory Services Traffic Across a WAN: Part 1" (June 1996)
Online documents:
NDS Troubleshooting Tips (TNDS2.EXE from http://support.novell.com)
NDS Terms and Error Codes (DSDOC2.EXE from http://support.novell.com)
"Storage Management Services", NetWare Connection, September 1996 (visit http://www.nwconnection.comor call 801-423-3475)
Novell's Guide to NetWare 4.1 Networks (Novell Press, call 1-800-762-2974or 317-596-5200)
Novell's Four Principles of NDS Design (Novell Press, call 1-800-762-2974 or 317-596-5200)
Novell Consulting Toolkit CD (Novell part no. 172-000239-001; call 800-453-1267 ext 5387)
Classes on NDS design, implementation, and administration are available through Novell Authorized Education Centers. Call 800-233-3382 or 801-861-5508 for more information.
Appendix B: NetWare 4.1 and 4.11 Certified Backup Solutions
The backup solutions listed in the NetWare 4.1 column have been "Yes" Certified by Novell Labs for use with NetWare 4.1 as of September 26, 1996. If you want to use the updated modules listed in Appendix C for NetWare 4.1, verify with the application vendor that the product supports the enhanced capabilities. Products listed in the NetWare 4.11 column were in the process of being certified at publication time. Check the Novell Labs Certification Bulletins for updated status (call Novell Labs FaxBack at 801-861-2776, or GO NOVLABS on CompuServe, or visit http://www.novell.com on the World Wide Web).
|
Company |
Product |
NetWare 4.1 |
NetWare 4.11 |
|
Cheyenne Software, Inc. |
ArcServe |
5.01f, 5.01g, 6.0 |
6.0 (with enhancement pack) |
|
Emerald Systems |
Xpress Librarian |
3.0c |
--- |
|
Hewlett Packard |
HP SureStore Tape |
12000e |
--- |
|
Hewlett Packard |
JetStore 6000e |
Model C1529A |
--- |
|
IBM Storage Systems Division |
ADSTAR Distributed Storage Manager (ADSM) |
V1 Rel 2 Level 0.3,V1 Rel 2 Level 0.5 |
V2 Rel 1 Level 0.5 |
|
Legato Systems* |
Stacatto |
3.10 |
--- |
|
Novastor Corporation |
NovaBack |
6.0 |
--- |
|
Rememory Corp |
REMSERVE |
1.96 |
--- |
|
Seagate Software Inc. (Palindrome) |
Backup Director for the Workgroup |
3.5 |
--- |
|
Seagate Software Inc. (Palindrome) |
Backup Director NLM |
3.1a |
--- |
|
Seagate Software Inc. (Palindrome) |
Network Archivist |
3.1a |
--- |
|
Seagate Software Inc. (Palindrome) |
Seagate Storage Manager |
--- |
4.12 |
|
Seagate Software, Inc (Arcada) |
Backup Exec for NetWare -Enterprise Edition |
5.01, 5.01a, 7.01, 7.01a, 7.01b, 7.11a, 7.11d |
7.01b, 7.11a, 7.11d |
|
Seagate Software, Inc (Arcada) |
Backup Exec for NetWare -Single Server Edition |
5.01, 5.01a, 7.01, 7.01a, 7.01b, 7.11a, 7.11d |
7.01b, 7.11a, 7.11d |
|
Seagate Software, Inc (Arcada) |
Backup Exec for NetWare -Advanced Autoloader Module |
5.01, 5.01a, 7.01, 7.01a, 7.01b, 7.11a, 7.11d |
7.01b, 7.11a, 7.11d |
|
Symantec Corporation |
Norton Enterprise Backup |
1.51 |
--- |
|
Systems Enhancement Corp. |
Total Network Recall |
1.96 |
--- |
|
Vinca |
Vinca Standby Server |
--- |
3.0 |
|
Xenon Technologies |
Profile |
1.96 |
--- |
* Legato Systems' Networker for NetWare is only certified on NetWare 3.11.
Appendix C: Current Software Versions
The following is a list of current versions of NetWare 4 and backup- related software as of the time of publication (September 26, 1996). You should periodically check with Novell and third-party vendors for the latest software releases.
Novell product patches and updates are available through NetWire on CompuServe, by anonymous ftp to novell.ftp.com, or from Novell's World Wide Web server (http://www.novell.com) on the Internet. (The x in the filenames represents a number that is incremented each time a new revision is released.)
Note that NetWare 4.11 includes all of the enhancements to the SMS modules and TSAs described in this AppNote, as well as its own version of DS.NLM and related utilities. The update files listed below are for use with NetWare 4.1 only.
|
Description |
Location / Filename |
Current Version as ofPublication Date |
|
NetWare 4.1 OS Patches |
nwos/nw410/ 410PTx.EXE |
410PT6.EXE |
|
Directory Services and Utilities |
nwos/nw410/ 41NDSx.EXE |
41NDS9.EXE - Includes:DS.NLM 5.01DSREPAIR.NLM 4.35 |
|
SBACKUP and supporting files |
nwos/nw410/ SBACKx.EXE |
SBACK6.EXE |
|
SMS (TSAs, SMDR, and support NLMs) |
nwos/nw410/ SMSUPx.EXE |
SMSUP6.EXE - Includes:TSANDS.NLM 4.13TSA410.NLM 4.14DSBACKER.NLM 4.96*DSMAINT.NLM 4.96* |
* These versions of DSMAINT and DSBACKER are required to provide the same server recovery options as in the NetWare 4.11 INSTALL.NLM utility.
Glossary of SMS and NDS Terms
Directory. Often used as an abbreviated term for the NDS database as a whole. To avoid confusion with references to a directory in the file system, this AppNote uses "Directory" (with a capital D) when referring to NDS.
Master Replica. The first replica created when the partition is defined. It is a writable replica used to provide database integrity during partition operations (splits, joins, moves, rebuilds, and type changes). The master replica "locks" all replicas of the partition so that no other partition operations can be performed while that operation is in progress. For each partition of the NDS tree, there can be only one master replica. (This is sometimes erroneously referred to as the "master partition").
NDS Tree. The hierarchical structure into which objects are organized in NDS, resembling an inverted tree wherein objects representing groups of network resources branch downward from a single Root object.
Novell Directory Services (NDS). A global, distributed name service used in NetWare 4, replacing the server-centric bindery used to keep track of network resources in previous releases of NetWare.
Object. A logical representation of a physical entity or network resource such as a server, volume, user, group, print queue, directory map, and so on.
Partition. A subtree, or branch, within the NDS tree identified by the name of its top-most object (the one closest to the root of the tree). A partition contains only NDS objects and related data. It does not include any information about file system data files or directories.
Read-Only Replica. A third type of replica that is not writable, so it can be used for authentication but not for login requests. It can only be updated from other replicas, not from a client application. Read-Only replicas are seldom used.
Read/Write Replica. A replica created for a partition that can be used for authentication. Since they are writable, read/write replicas can also be used for users' login requests. You can have any number of read/write replicas of a partition.
Replica. An identical copy of an NDS partition. Replicas allow multiple copies of each partition to be stored on NetWare 4 servers around the network.
Replica Ring. All of the replicas of a given partition are referred to as a replica ring or replica list. NDS changes--such as an administrator deleting a queue object or a user changing his or her password --are propagated to all replicas in the ring.
[Root]. The top-most container object in an NDS tree, from which all other container objects branch downward.
Schema. The rules governing what types of objects can be stored in the NDS database and what attributes they can have. The NDS schema is extensible to allow developers to define and use objects that aren't included in the default schema that comes with the NetWare 4 software.
Storage Management Data Requester (SMDR). The communication link between the backup application (SME) and the SMS TSAs. It is the function of SMDR to locate the SMS TSAs on the network and to communicate instructions to the intended agent.
Storage Management Engine (SME). The central component in an SMS-based backup system. The SME handles all the user interaction and forwards the users' requests to the TSAs and to the device driver. SMEs communicate with network clients through a common interface that ensures cross-platform support and the ability to support new platforms and versions with minimal changes. The SME contains most of the value-added features and is the component most often provided by third-party developers. Novell provides a basic SME with NetWare called SBACKUP.
Storage Management Services (SMS). An open architecture for interfacing storage management products with the NetWare operating system. The SMS architecture provides a standard interface for storing, accessing, and managing data on a variety of computing platforms (NetWare servers, DOS/Windows clients, Macintosh clients, and so on).
Subordinate Reference. A type of replica that NDS automatically creates and maintains to link parent and child partitions in the tree. A subordinate reference replica is created whenever a parent partition exists on a server, but the child partition is not on that server. A subordinate reference replica does not contain all of the NDS objects normally stored in a partition. Instead, it contains only a copy of the child partition's root-most object, including all of its attributes. The partition root object contains attributes necessary for locating other replicas and tracking replica synchronization.
System Independent Data Format (SIDF). An international standard (ISO 14863 and ECMA 208) defining a common format for storing data on secondary storage devices such as tape. SIDF ensures compatibility between current and future SIDF-based products, and stored or archived data.
Target. Any item on the network that requires backup. Examples of targets include NetWare servers, client workstations, NDS databases, print servers, and SQL database engines.
Target Service Agent (TSA). A software module that knows how to scan, read, and write the target file system data. The primary functions of an SMS TSA are to prepare the target data for backup or restoration, and to communicate with the SME. The TSA is the only module in SMS that needs to understand the details of the target file system's structure (path specifications, directory hierarchy, access rights, and so on). Because the knowledge of the target file system structure is confined to the TSA, the TSA can package data from the target and present it to the SME in a generic format.
* Originally published in Novell AppNotes
Disclaimer
The origin of this information may be internal or external to Novell. While Novell makes all reasonable efforts to verify this information, Novell does not make explicit or implied claims to its validity.