Setting NET.CFG Parameters with the NWSETUP Utility and Accessing Online Help
Articles and Tips: article
Technical Writing Manager
Distributed Networks Business Unit
EDWARD A. LIEBING
Research Engineer
Systems Research Department
01 May 1996
A shareware utility called NWSETUP.EXE is available for use with NetWare Client 32 for DOS/Windows. This Client 32 Configuration utility dynamically changes NET.CFG parameters for Client 32 and places them in the NET.CFG file for you. Many of the new parameters are dynamically configured inside of NIOS.EXE without your having to reboot the client workstation for the configuration to take effect. This AppNote discusses the NET.CFG settings that you can make using the Client 32 Configuration utility. It also discusses the NET.CFG Reference Help menu and other help files that can assist you in working with NetWare Client 32.
- Introduction
- Installing and Running the NWSETUP Utility
- Setting the NET.CFG Parameters
- Using the Client 32 NET.CFG Reference Help Menu
- Other Help Files Included with NetWare Client 32
- Conclusion
Introduction
A Novell programmer has written NWSETUP.EXE, a Client 32 Configuration utility that dynamically changes NET.CFG parameters for Client 32 and places them in the NET.CFG file for you. Many of the new parameters are dynamically configured inside of NIOS.EXE without your having to reboot the client workstation for the configuration to take effect.
This AppNote discusses the NET.CFG settings that you can make using the Client 32 Configuration utility. It also discusses the NET.CFG Reference Help menu that can assist you in setting other NET.CFG parameters that are not covered in the Client 32 Configuration utility.
Installing and Running the NWSETUP Utility
This shareware utility can be found on the World Wide Web at the URL http://www.itsnet.com/~eal. Go to the Download Area and Other Links page and select the NWSETUP.ZIP heading. Then download the file in whatever fashion your Web browser permits.
Once downloaded, unzip the file and copy NWSETUP.EXE into the C:\NOVELL\CLIENT32 directory (the default), or into whichever directory you chose to store NIOS.EXE and the other Client 32 components. Then go into Windows' Program Manager, bring up the NetWare Tools group and highlight it. Select File | New from the Program Manager menu, select New Item, and type C:\NOVELL\CLIENT32\NWSETUP.EXE in the Command Line entry box. Then click on OK.
The NWSETUP icon appears in the NetWare Tools group with the words NETCFG being crossed out. Click on this icon to bring up the Client 32 Configuration utility.
Setting the NET.CFG Parameters
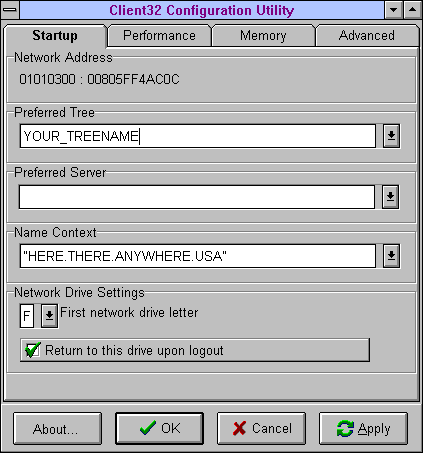
From the main NWSETUP window, you can select from four categories related to NET.CFG parameters: Startup, Performance, Memory, and Advanced. The Startup page is selected by default when you start the utility (see Figure 1).
Before we look at the specific settings on the Startup page, let's discuss some general usage considerations. First, the utility features "bubble help" instead of a separate help file. As you move the cursor around the fields on the screen, NWSETUP displays a brief explanation of what each setting is for, as well as the minimum and maximum settings.
Figure 1: Settings on the Startup page in the NWSETUP utility.
After you make changes in NWSETUP, click on the Apply button to have the new dynamically-configurable settings take effect immediately. The new settings will be written to the NET.CFG file or to NIOS if the parameter is dynamically configurable. To cancel changes that you make while in the utility, click on the Cancel button at the bottom of the screen. To save changes and exit the utility, click on OK. Click on About... to find out how to register the shareware program (cost is US$9.00 per user license).
The Startup Page
The top of the Startup page displays the workstation's network and node addresses. You also see the current Preferred Tree, Preferred Server, Name Context, and Network Drive Settings. On NetWare 4 networks, NWSETUP reads these settings from your existing NET.CFG file and displays them in the fields on this page.
The Preferred Tree, Preferred Server, and Name Context fields have a pull-down list arrow to the right of them. Clicking on this arrow allows you to select from the NDS trees and servers on your network. You can also click inside these fields and type in a different tree name, server name, or context.
The "First network drive letter" setting also has a pull-down arrow. If you want, click on the box next to the "Return to this drive upon logout" entry at the bottom of the page. Whenever you log out, your workstation will always return to the first network drive letter specified above.
The following table summarizes the settings on the Startup page.
|
"Startup" Parameter
|
Definition
|
Default
|
|
Preferred Tree |
Specifies the user's most frequently accessed tree. |
---- |
|
Preferred Server |
Specifies the user's most frequently accessed server. |
---- |
|
Name Context |
Specifies the user's NDS context in the preferred tree. |
---- |
|
Network Drive Settings First network drive letter Return to this drive upon logout |
Designates which drive letter will be the first network drive. Forces NetWare to return to the first drive letter when the user logs out from a network drive. |
F OFF |
The information in the Startup page is read in from the NET.CFG file and is static information. Any changes you make here are written to the NET.CFG, but do not take effect until you reload the CLIENT32.NLM file (typically when you reboot the workstation).
The Performance Page
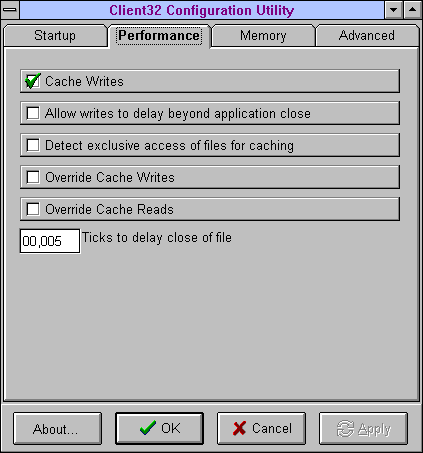
The parameters on the Performance page include such settings as cache writes, write delays, exclusive access detection, override cache reads and writes, and the number of ticks to delay a close of a file (see Figure 2).
Caching file reads and writes improves the speed of network access, since the client anticipates what files or portions of files the user might want next. The downside is a slight reduction in reliability, since there is no guarantee that a write has actually been made to the disk should the connection be lost unexpectedly.
Figure 2: Settings on the Performance page.
These settings, along with their defaults and explanations, are listed in the following chart.
|
"Performance" Parameter
|
Definition
|
Default
|
|
Cache writes |
When this option is ON, the client will cache writes until a certain size block is written, as opposed towriting each write request as it is made. |
ON |
|
Allow writes to delay beyond application close |
If this option is ON, the cache buffer is forced to flush immediately when an application closes. Otherwise, the buffer's data will remain in memory until it wouldnormally have been flushed. |
OFF |
|
Detect exclusive access files for caching |
If a file is being used exclusively by a single user, the client has more flexibility in caching (since it doesn't have to worry about simultaneous reads or writes and therefore inaccurate data). By detecting whether a file is being accessed by only one user, the client willdeliver faster network access. |
ON |
|
When turned ON, this bidirectional protocol allows a client to cache data even though others are granted access to that data. As long as actual access has not occurred (that is, no one has read the file even though they could), the client will continue caching the file. As soon as the server notifies the client that actual access has been made to the file (someone opened it to read or write), the client flushes any dirty buffers (in the case of a write) or invalidates readbuffers (in the case of a read) before continuing. |
||
|
Override cache writesOverride cache reads |
If you know you are the only person using the files you are currently accessing, you may turn these options on to improve performance. This is mosthelpful when using a phone line or low-speed connection. |
OFFOFF |
|
Ticks to delay close of file |
For environments where files are opened and closed frequently, Client 32 supports an optimization technique where close requests are delayed for a short period. If the file is opened again during that period, it is reused without hitting the network. Thedelay period is specified in ticks and is configurable.Range 0 - 65,535. |
9 |
The Memory Page
The Memory page allows you to set the NIOS memory pool size, the number of network printers, and print job headers and tails. You can also set the amount of cache that is to be used for Client 32's local cache capabilities (see Figure 3).
The NIOS memory pool provides an advanced system-level cache of memory blocks for use by the client. The memory allocated by this cache can be returned to NIOS at its request, or when the application is done with the memory. This gives the client valuable flexibility as far as system memory usage goes.
The theory behind the memory pool is that multiple modules may want to allocate a chunk of memory for a short period of time. Rather than returning the memory immediately to the system, the application would prefer to hold on to the memory in case it is needed again. Since memory is a limited resource, the solution is either to have the module wait a period of time before returning the memory to the system, or to have the system ask for the memory back when its needed. Because the module is unaware of the memory needs of other modules, the first solution is limited. The memory pool represents an implementation of the later solution.
Figure 3: Settings on the Memory page.
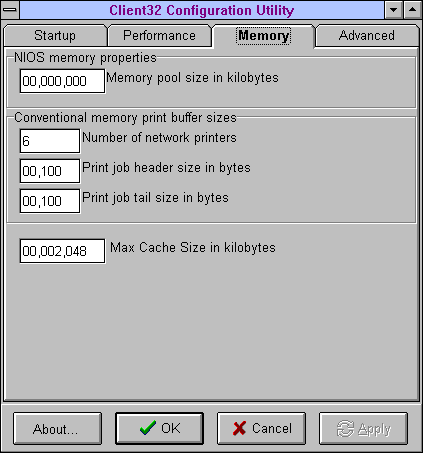
All settings on this page take effect once you restart your computer. The settings, along with their defaults and explanations, are listed in the following chart.
|
"Memory" Parameter
|
Definition
|
Default
|
|
NIOS memory properties: Memory pool size in kilobytes |
This configuration parameter specifies the amount ofmemory (in kilobytes) to allocate for the pool.Range 0 - 99999999. |
128 |
|
Conventional memory print buffer sizes: Number of network printers Print job header size in bytes Print job tail size in bytes |
The actual number of configured network printers.Range 0 - 9Range 0 - 16,384Range 0 - 16,384 |
3 6464 |
|
Max cache size in kilobytes |
Range 0 - 99999999 |
0 |
If no memory parameters are specified, Client 32 uses 25% of the available memory when it loads. (See "Workstation File Caching" in the NetNotes section for more information.)
The Advanced Settings Page
The Advanced Settings page consists of a number of subpages covering the following topics: Security, File System, Cache, Communication, Connection, NETX, Scope, IPX/SPX, and Troubleshooting. To see the parameters that can be set within a particular advanced page, click on the page's tab. Figure 4: Settings on the Advanced page.

|
Note: For an overall explanation of the file cache levels, see"Workstation File Caching with Client 32" in the NetNotessection of this issue. |
Most of the settings changed under the Advanced page are dynamically changed within NIOS. The settings, along with their defaults and explanations, are listed in the following chart.
|
"Advanced" Parameter
|
Definition
|
Default
|
|
Cache (File cache level) |
||
|
File Cache Level No file caching |
Corresponds to File Cache Level=0 setting inNET.CFG. |
OFF |
|
Partial File (Read-Ahead/Write-Behind) |
Corresponds to File Cache Level=1 in NET.CFG. Read-ahead is a caching mode where, on a read request, an entire block of data (up to 4KB) is read from the network rather than just the partial size requested. The assumption is that other nearby data (within the 4KB block) is likely to be accessed next,thus reducing network access. Read-ahead mode is most efficient if the file is being accessed sequentially. Random accesses to large files causes performance to deteriorate, so read-ahead isturned off when random access is detected.Write-behind is a caching mode where data is written into a cached data block until an entire data block is filled, then the entire block is written to disk at once (as opposed to writing directly to the networkin smaller chunks). |
OFF |
|
Full Caching (only open files) |
Corresponds to File Cache Level=2 in NET.CFG. With full caching, as many 4KB blocks as necessaryare read until the entire file is read into memory. |
OFF |
|
Full Caching (open and closedfiles) |
Corresponds to File Cache Level=3 in NET.CFG. With this setting, open files (as well as closed files) are kept in cache as long as memory is available. In this case, Client 32 retrieves closed files from local cache, but only if no changes have been made to thefile on the network since the last time it was in cache memory. |
OFF |
|
Write through cache to server's disk |
Corresponds to File Cache Level=4 in NET.CFG. With this turned ON, Client 32 waits until it receives an acknowledgement that data is written to disk, thus avoiding both client and server caching mechanisms. (This affects performance when it is enabled, but itprovides better data protection.) |
ON |
|
Communication |
||
|
Packet checksum level: |
Packet checksum is another level of packet validation for NCP packets. This is an IPX checksum, which may be in addition to other error checking that yournetwork board or driver may be doing. |
|
|
Checksum disabled |
OFF |
|
|
Prefer not to checksum, but will if required |
ON |
|
|
Prefer to checksum, but won't ifnot supported |
OFF |
|
|
Require checksum or don't communicate |
OFF |
|
|
Internet packet size settings: |
||
|
Allow large internet packets |
ON/OFF |
ON |
|
Large internet packet start size in bytes |
Sets the size at which to begin packet sizenegotiation (1514 for Ethernet, 4096 Token Ring).Range 1 - 65,535 |
65,535 |
|
NCP retry seed time-out in ms |
Range 1 - 65,535 |
55 |
|
NCP max retry time till pop up inseconds |
Range 1 - 600 |
10 |
|
Connection |
||
|
Auto-reconnect level: |
Describes the level of auto-reconnection that the client will support in the event that the client loses its connection to the server. (Each level includes theprevious level, plus the additional features listed.) |
|
|
No auto-reconnect |
Corresponds to Auto Reconnect Level=0 in NET.CFG. |
OFF |
|
Devices (connections,directories, printers) |
Corresponds to Auto Reconnect Level=1 in NET.CFG. This is the lowest level of auto-reconnection, providing the same capabilities as were possible withthe NetWare DOS Requester (VLM) client. |
OFF |
|
Devices and read-only files |
Corresponds to Auto Reconnect Level=2 in NET.CFG.Adds read-only files to connections, directories, and printers. |
OFF |
|
Devices, files, locks(risky but fast) |
Corresponds to Auto Reconnect Level=3 in NET.CFG. When the client writes to the server's hard drive, the server writes back an acknowledgment before the data is actually written. This is risky because if the server goes down before that data has been written to disk, the client cannot be sure what has been written. To help ensure data integrity, Client 32 will rewrite any previously written data still in the cacheupon auto-reconnection. |
ON |
|
Devices, files, locks(slow but safe) |
Corresponds to Auto Reconnect Level=4 in NET.CFG. This option is called true commit. It means that writes are made to the server's hard drive before the server sends an acknowledgment to the client. This option isslower, but should be used when data reliability is very important. |
OFF |
|
Name Resolution Order |
Specifies the order that the client uses to access all supported name services to resolve names. Possiblevalues include NDS and BIND. |
---- |
|
File System |
||
|
Packet Burst Settings |
Packet Burst speeds up network access and replies by allowing multiple packets to be sent with a single acknowledgment reply. This cuts down on unnecessary network traffic by eliminating the need for a reply to be attached to each packet sent or received. |
|
|
Number of buffers |
Range 0 - 9. (0=OFF, 1-9=ON) |
1 |
|
Write window size |
Specifies how many packets are written to the serverbefore the server must send a reply. Range 3 - 255. |
10 |
|
Read window size |
Specifies how many packets are read from the serverbefore the workstation must send a reply. Range 3 - 255. |
24 |
|
Write interpacket gap in ms |
Sets the starting gap between write packets in a burst. If more gap time is needed, the setting isincreased dynamically. Range 0 - 300. |
0 |
|
Read interpacket gap in ms |
Sets the starting gap between packets in a read burst from the server. If more gap time is needed the setting is increased dynamically. Range 0 - 300. |
0 |
|
Allow read-only file to be opened as read-write |
Needed for old FCB-based applications that assume they can open files as read-write even if they only intend to read the file. The file may be located wherethe user has only Read rights, such as SYS:PUBLIC. |
OFF |
|
IPX/SPX |
||
|
IPX Retry count |
Sets the number of times the workstation resends a packet. On networks that lose many packets, thisretry count may need to be increased. Range 0 - 65,535. |
20 |
|
SPX tick timeout values: |
(A tick is 1/18 of a second.) |
|
|
Active ping frequency |
Specifies how often one side of an SPX connection checks to see if the other side still exists and is active.Default is 3 seconds (54 ticks). Range 0 - 65,535. |
54 |
|
Passive ping becomes active |
Specifies how long one side of an SPX connection waits before a passive ping becomes active. Defaultis 6 seconds (108 ticks). Range 0 - 65,535. |
108 |
|
Ping timeout, drop connection |
Specifies how long one side of an SPX connection waits after not hearing anything from the other side before it begins tearing down the connection on itsend. Default is 30 seconds (540 ticks).Range 0 - 65,535. |
540 |
|
NETX |
These variables apply to NETX applications. |
|
|
System string overrides: |
||
|
Short machine name |
Similar to the Long Machine Name, except that it isused specifically with overlay files. |
IBM |
|
Long machine name |
Tells the shell emulator what type of machine is beingused each time the %MACHINE variable is accessed. |
IBM_PC |
|
DOS name |
Sets the name of the operating system used in theshell emulator. |
DOS |
|
Hold FCBs open past close |
Continues to keep an open File Control Block handlefor a file that has been closed. |
OFF |
|
Display directories first, then files |
If you prefer to see files displayed before directories,turn this setting ON. |
OFF |
|
Show '.' and '..' directories |
Sets the Show Dots = parameter in NET.CFG. Used in displaying hierarchical directory structures inWindows, thus allowing you to travel up levels in the directory structure. |
OFF |
|
Synchronize time with server upon connection |
Resets the workstation to match the server's timewhen it connects to the server. |
ON |
|
Bytes to add to environment |
Range 0 - 16384. |
0 |
|
Scope |
||
|
Resource scope behavior |
Scope is not configurable in the current release of Client 32. Should it become configurable with a later release, here is how it will work. The "scope" of a resource defines the realm in which that resource is visible. The resource types that Client 32 monitors separately for scope are connections, drive root mappings, drive relative mappings, and printer redirections. A realm is generally a process group; for example, a DOSBOX (under Windows) or a Task Switcher DOSBOX (under DOS). Windows programsare processes within the system process group. |
|
|
Default, mix of behaviors |
By default, connections, drives, and printers areglobal; search drives and the current directory are private. |
|
|
All private to process |
Private scope means that when a resource is created, it stands alone and does not inherit attributes from any other resource. For the case of a whole process group being launched as private, no resources are initialized other than the F:\LOGIN drive. Changes made to private resource are visible only in theprocess group that created the resource. |
|
|
Global to all processes |
Global scope means that a resource is shared, allowing access from any process group on the system. Any changes made to a global resource arevisible from any other scope. |
|
|
System handles network errors |
Client software generates a network error when it doesn't receive a response from the server. This setting determines the method for handling a network error, whether it is handled by Client 32 or by the application that is running. ON means Client 32handles network errors. |
ON |
|
Drives global across DOS boxes |
If drive mappings are global and a new drive is mapped in one DOS box, that drive would also be visible in any other DOS box on the system. If the drive were later deleted, it would disappear from allother DOS boxes as well. |
OFF |
|
Security |
||
|
Packet Signature Level: |
Packet signing on the first 64 bytes of a packet ensures some degree of data integrity. Signing packets need to be used only when data integrity isan issue, since it affects performance. |
|
|
Signing disabled |
OFF |
|
|
Prefer not to sign, but will ifrequired |
ON |
|
|
Prefer to sign, but won't if notsupported |
OFF |
|
|
Require signing or don'tcommunicate |
OFF |
|
|
Packet Encryption Level: |
Packet Encryption ensures that data cannot be read on a wire by a network analyzer (also affects performance). This option is not yet supported. |
|
|
Troubleshooting |
||
|
File sharing violation properties: |
||
|
Retries upon sharing |
Specifies the number of times a resource will try toaccess a file after access is denied because the file was locked. Range 1 - 65,535. |
5 |
|
Delay ticks between retries |
Specifies how long the resource will wait between retries resulting from access being denied becausethe file was locked. (A tick is 1/18 of a second.) Range 1 - 65,535. |
1 |
|
Use video BIOS for pop up messages |
Configures Client 32 to use BIOS or direct video memory access when displaying pop-ups. If set to ON, Client 32 uses BIOS calls; otherwise Client 32 uses direct video memory access. Direct video memory access is faster and is the default. If Client 32 pop-ups do not behave correctly on a system,setting this parameter to ON may eliminate the problem. |
OFF |
|
Beep when pop up alert occurs |
Allows for the pop up alert screen to beep. |
ON |
|
Log messages to log file |
When turned ON, this setting creates and places initialization information in the NIOS.LOG file located in the C:\NOVELL\CLIENT32 directory. |
OFF |
|
Maximum log file size in bytes |
Default setting (0) means no size limit.Range 0 - 99,999,999. |
0 |
Using the Client 32 NET.CFG Reference Help Menu
The Client 32 Configuration Utility sets a number of parameters for Client 32 under the NetWare DOS Requester heading in the NET.CFG file. However, it does not cover parameters that are under other headings, such as NIOS, NWIP, Protocol IPX, or Protocol TCPIP. To obtain assistance for setting parameters under these headings, use the NetWare Client 32 NET.CFG Reference help file.
The NetWare Client 32 NET.CFG Reference help file is called NETCFG.HLP and is located in the C:\NOVELL\CLIENT32\NLS\ ENGLISH directory. To create an icon for the NETCFG.HLP file, highlight the NetWare Tools group in the Windows Program Manager (or equivalent utility). Go to the Files pull-down menu and select New , then New Item, and click OK. In the New Item window, type C:\NOVELL\CLIENT32\NLS\ENGLISH\ NETCFG.HLP in the Command Line entry. An icon for the NETCFG.HLP file will be added to the NetWare Tools group window.
By double-clicking on this icon, you can read the information contained in the help file (see Figure 5).
Figure 5: The initial screen in the NetWare Client 32 NET.CFG Reference menu.
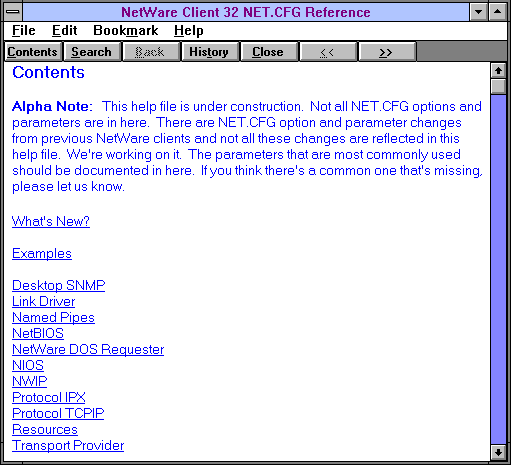
From this initial window, you can select from a number of topics to assist you in properly configuring the different NET.CFG parameters. The first topic, What's New?, will show you which NET.CFG options are new to Client 32, as well as which options have changed for Client 32. These changed options are categorized under the various headings that you can place in the NET.CFG file, including Desktop SNMP, NetBIOS, NetWare DOS Requester, Protocol IPX, Protocol SPX, and Protocol TCPIP.
The Examples topic shows some examples of setting up certain scripts, such as the Desktop SNMP option, the NetWare DOS Requester option, the Protocol TCPIP option, and the Resources option.
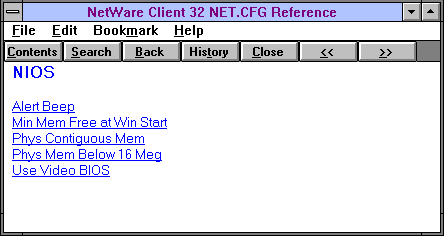
The rest of the NET.CFG Reference topics correspond to the different headings that are available in the NET.CFG file. For example, under the NIOS heading in NET.CFG are five parameters that you can set: Alert Beep, Min Mem Free at Win Start, Phys Mem Below 16 Meg, and Use Video BIOS (see Figure 6).
Figure 6: The parameters that you can set for NIOS.
You can click on a particular parameter and read when and why you would apply the parameter to your present situation. You can also search for specific parameters by clicking on the Search button, and then typing in a key word relating to the parameter you are interested in. The related topics are displayed in the bottom portion of the Search screen. By highlighting a selection and pressing the Go To button, you can read the information about that topic.
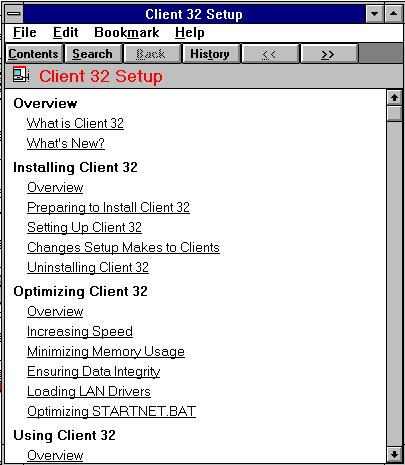
Other Help Files Included with NetWare Client 32
NetWare Client 32 for DOS/Windows comes with a number of .HLP, .MSG, and .TXT files that can assist you in better using the software. When you initially install Client 32, a README.TXT file is placed in the C:\NOVELL\CLIENT32 directory. The README file that comes with the beta version of Client 32 contains instructions on some of the bugs they have encountered as well as some workarounds. If you choose to install SNMP support for the workstation, a READSNMP.TXT file is copied into the C:\NOVELL\CLIENT32 directory.
The installation program also creates a Client 32 Help icon in the NetWare Tools group, which gives you access to other information about Client 32. Figure 7 shows the initial Help screen for Client 32 (subject to change).
Figure 7: The initial help screen for Client 32.
From here, clicking on the different topics brings you to those areas in the help file. You can also use the Search button and type in keywords that can help you narrow the field of what you want to see. When keywords match, the help system displays topics in the Select a Topic portion of the Search screen. Clicking on the Go To button takes you to the highlighted topic.
The C:\NOVELL\CLIENT32\NLS\ENGLISH directory contains several .HLP files that you will want to view:
|
SETUP.HLP |
Client 32 installation help |
|
NWCFGDW.HLP |
NET.CFG parameters defined |
|
NWMSGDW.HLP |
System messages for Client 32 |
In addition, the following .HLP files can be copied into the C:\WINDOWS\NLS\ENGLISH directory:
|
NETWARE.HLP |
The NetWare User Tools help file |
|
LOGINW31.HLP |
The help file for the GUI Login utility. This file also contains additional information on how to set up the Login Setup screen inside the NetWare User Tools utility. |
|
NWNWD.HLP |
The help file for the NetWare Windows Diagnostics Tool. This help file is found on one of the ADMIN diskettes and is installed separately from Client 32. |
|
APPSNAP.HLP |
The help file for the NetWare ApplicationManager. This help file is found on one of theADMIN diskettesand is installed separatelyfrom Client 32. |
|
NAL.HLP |
The help file for running the NetWare Application Launcher. This help file is found on one of the ADMIN diskettes and is installed separately from Client 32. |
There are also additional help files for when you install TCP/IP or NetWare/IP, SNMP, or TSA support. These are found on Disk 4 of the Client 32 for DOS/Windows diskettes.
Adding Help Icons for Easier Access.
You can access the help screens through the utilities that you install, or you can create icons for the help files. Creating icons can be very useful for viewing the help files at any time from within Windows, since you don't have to be in the actual utility to read the information found in the help files.
Here are the steps to create an icon for a help file of your choice. (For this example, we'll select the NETWARE.HLP file.)
In Windows Program Manager, highlight the NetWare Tools group.
Select File, New, and Program Item, and click OK.
In the Program Item Properties window, browse to the C:\WINDOWS\ NLS\ENGLISH directory. Once there, type in*.HLP in the File Name portion of the Browse. You will then see all of the .HLP files that you can choose from.
Select the NETWARE.HLP file and click OK. The directory path and file name are added to the Command Line entry in the Program Item Properties window.
Click OK to add the NETWARE.HLP icon to the NetWare Tools group (see Figure 8).
Figure 8: Help file icons added to the NetWare Tools group for easy access.
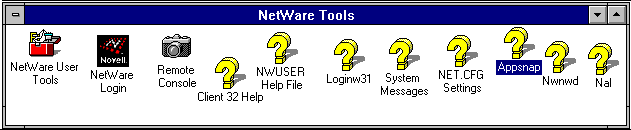
As you can see from Figure 3, you might want to rename the icons to something other than the file name so you can recognize them more easily. For example, rename NETWARE.HLP to something like NWUSER Help File, or whatever name helps you remember what utility this help file is used with. (You can specify the name by modifying the Description entry in the the Program Item Properties window when you create the item.)
Conclusion
Take time to explore both the Client 32 Configuration Utility and the Client 32 NET.CFG Reference help file. This will not only help you set Client 32's parameter options more effectively, it will also help you set the NET.CFG parameters for the various Client 32 technologies.
The help files discussed at the end of this AppNote contain a lot of useful information that is not covered in this special issue of Novell Application Notes. We recommend that you take the time to set up these information resources and find out what they have to offer.
* Originally published in Novell AppNotes
Disclaimer
The origin of this information may be internal or external to Novell. While Novell makes all reasonable efforts to verify this information, Novell does not make explicit or implied claims to its validity.