Using the Client 32 GUI Login Utility and the NetWare Application Manager (NAM)
Articles and Tips: article
Product Support Engineer
Novell Technical Support
BRAD ANDERSON
Product Manager
Distributed Networks Business Unit
01 May 1996
NetWare Client 32 includes two new utilities designed to help users and administrators: a GUI login utility and the NetWare Application Manager (NAM). The NetWare Login utility allows users to login and run scripts while they are in the Windows environment. NetWare Application Manager works with Novell Directory Services (NDS) to allow administrators to centrally control users' Windows desktops. NAM lets administrators use their own workstations to install new network applications or upgrade existing applications, and to have these applications dynamically appear on users' Windows desktops. This AppNote provides information on how to use both of these utilities.
- Introduction
- Accessing the GUI Login Utility
- NetWare Application Manager Overview
- Using the NetWare Application Manager
- Exploring the NAM Options
- Conclusion
Introduction
One of Novell's ongoing goals is to make networking easier, both for administrators and for users. A fundamental technology for accomplishing this goal is Novell Directory Services (NDS). NDS simplifies network use by providing a single, global, logical view of all network resources. With NDS, users can access network resources with a single login, regardless of where the users and resources are located. In addition, NDS offers a single point of control for administrators with the graphical NetWare Administrator (NWADMIN) utility.
NetWare Client 32 is another key technology for reducing the level of complexity associated with the network. As part of Client 32, Novell has developed a GUI login utility and the NetWare Application Manager (NAM). The graphical "NetWare Login" utility allows users to login and run scripts while they are in the Windows environment. NAM works with NDS to simplify management of network applications by allowing administrators to centrally control users' Windows desktops. NAM lets administrators use their own workstations to install new network applications or upgrade existing applications, and to have these applications dynamically appear on users' Windows desktops. This AppNote provides information on how to use both of these utilities.
Accessing the GUI Login Utility
The NetWare GUI Login utility allows users to log in through Windows, execute a user or system login script, update search drives, and update environment variables--all from within the Windows environment, which has never been possible before. Both Bindery and NDS connections are supported.
An icon for the NetWare Login utility is added to the NetWare Tools program group during the Client 32 installation process. Figure 1 shown an example of the NetWare Tools program group.
Figure 1: The NetWare Login icon is placed in the NetWare Tools program group during Client 32 installation.
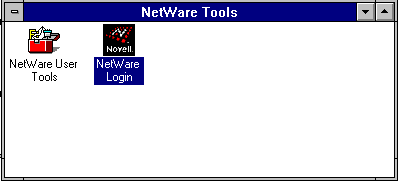
When you double-click on the NetWare Login Icon, you see the following basic login window:
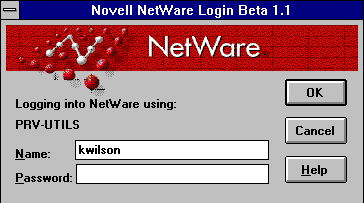
This is the default Login screen, which allows the user to enter a username and password.
Accessing the Advanced Login Options
If you want to access the advanced login options, you need to add the "/a" option to the NetWare Login utility's command line. To do this, click once on the NetWare Login icon and press <Alt<+<Enter< to bring up the Program Item Properties window (see Figure 2).
Figure 2: Add the "/a" option to LOGINW31.EXE to get the advanced login options.
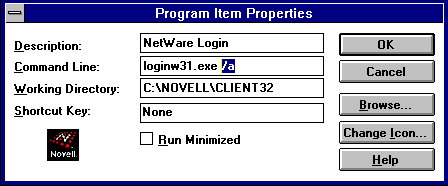
Click OK to save the changes to the Program Item Properties.
Other parameters you can set at the command line are:
/c = Display the Connection page /s = Display the Scripts page /v = Display the Variables page
With the "/a" (all GUI Login pages) option added to the command line, the next time you double-click on the NetWare Login icon, you will see a window similar to the one shown in Figure 3.
Figure 3: The GUI Login window with all pages available.
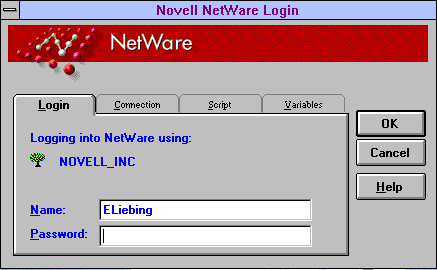
There are four categories of settings that can be configured when logging in: Login, Connection, Script, and Variables. The sections below briefly describe the options you can set in each category.
|
Note: Additional information for the GUI Login utility can beconfigured in the NetWare User Tools under the NetWareSettings for Windows. For more information, see theAppNote entitled "Using Novell's NetWare User Tools(NWUSER.EXE) for Client 32 Workstations" in this issue. |
The Login Tab
The Login tab presents the same options as the default login screen. The user can enter a username and password. Above these entry boxes, the utility displays which NDS tree or NetWare server is being used, as shown in Figure 3.
The Connection Tab
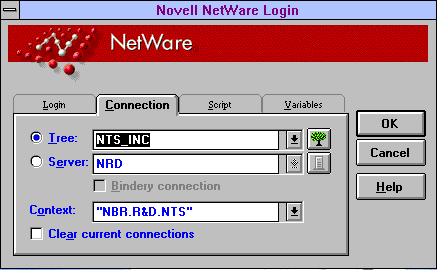
The Connection tab allows you to specify an NDS tree or NetWare server to connect to (see Figure 4).
The Tree and Server entry boxes show which NDS tree or NetWare server you will connect to. You can click on the tree or server buttons to the right to browse for other NDS trees and NetWare servers that are available on the network.
If you have selected a Server connection, you can click on "Bindery connection" to specify that you want a Bindery-based connection instead of the default NDS connection. Finally, you can specify whether you want your current connections cleared when you run the GUI Login utility.
Figure 4: Options under the Connection tab.
The Script Tab
If you have an ALTernate login script or a profile script that you prefer to run, it can be specified in the Script tab (see Figure 5). For example, if you had an alternate login script stored locally as C:\SCRIPT\USER.TXT, you would enter that path and filename in the Login Script box.
Figure 5: Options under the Script tab.
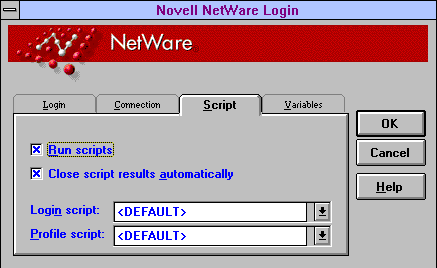
The Script option remembers the last five scripts and paths for both user and profile scripts. These can be accessed using the pull-down arrow buttons.
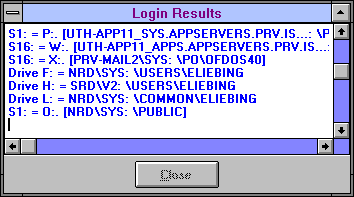
After the login script executes, you can request to see the results of running the script. The Login Results window displays user authentications and drive mappings, as shown in Figure 6. If you want this results window to close automatically, check the "Close script results automatically" box under the Script tab.
Figure 6: The results of running the selected login script are displayed in the Login Results window.
If you have set the Restore Permanent Settings option in the NetWare User Tools, you will also see a window displaying the permanent connections being re-established as you login.
The Variables Tab
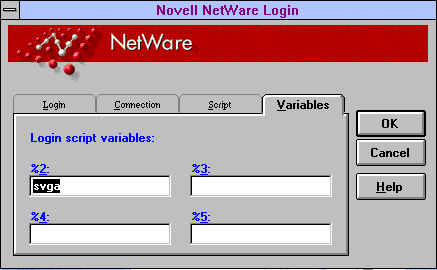
The final category of settings enables you to specify up to four variables along with your login name (see Figure 7). These can be used to launch conditional portions of the login script. For example, if you wanted to login and set up a test environment using an SVGA monitor, you could enter "SVGA" as the %2 variable.
Figure 7: Options under the Variables tab.
NetWare Application Manager Overview
Generally, to make a new application available to users on a network, administrators have two choices: install it as a standalone application on each user's local hard drive, or install it as a shared application on the network. The first option is the most time intensive, as it requires the administrator to install, upgrade and support the application at each user's computer. The second option, though it saves time, still presents a number of problems:
The administrator is required to visit each user's workstation to create the necessary Windows icon. Any upgrades or other changes to the application may require additional visits.
If a user is not logged in to the network when the applications Windows icon is double-clicked, an error message is received stating that the path is invalid. This may confuse the user and require support from the administrator.
The user may delete the icon, then need the administrators help to restore it.
The NetWare Application Manager solves these problems, thus eliminating time-consuming effort and significantly reducing installation costs of new network applications. The following sections describe the benefits of using NAM to deliver network-based applications for users.
Simplifies Application Administration. Using NWADMIN, NAM gives administrators the ability to create NDS objects that represent network-based applications. These objects contain information about where the network applications are physically located on the network and which users are authorized to use those applications. Administrators no longer have to visit each user's workstation to create a Windows icon for each application on the network. They simply use NAM and NDS to centrally administer and deploy network applications from the convenience of their own workstation. Access to files and directories is handled through NDS file system security, ensuring that network security is maintained.
Allows Dynamic Updates. NAM allows administrators to assign network applications by user, group, container, or any combination of the three. Network applications are delivered to users' Windows desktops dynamically, and any changes made are refreshed automatically.
Eliminates the Need for Login Scripts. Because the NDS application objects store pointers to the actual location of network applications, users no longer need to have drive mappings established through login scripts. Each NDS application object can also store subroutines (similar to login scripts) that can map additional drives and capture printers as users launch applications. Then as a user exits an application, drive mappings and printer ports are returned to their original configuration.
Frees Up Licensed Server Connections. Users often need access to an application installed on a server other than their default server. Without NAM, the administrator is required to map drives in login scripts for the users to easily access that application. Each user that has a drive mapped to the server that contains the application uses a licensed connection whether he or she is using the application or not. The NetWare Application Manager solves this problem by mapping the drives only when needed and then releasing the mapping (and hence, the connection) when the user exits the application. This reduces the number of user licences required on that server to only those that concurrently access the application.
Reduces Login Time. NAM also reduces the amount of time it takes to log in to the network. When a user logs in, much of the time required to complete the login is generated by drive mappings and printer port captures in the system and user login scripts. This information is now stored in each NDS application object and is executed when the application is launched, instead of at login time.
Simplifies User Access to Network Applications. To access network applications, users run a component of NAM called the NetWare Application Launcher (NAL) which is normally stored in a common directory on the network, such as SYS:\PUBLIC. NAL can be run from a login script if the NetWare GUI login utility is being used, or it can be placed in the Windows Startup or other program group.
NAL presents users with an NDS-delivered set of network applications that the administrator has assigned to them. When users are not logged in to the network, no network applications are displayed. In addition, users cannot delete the application icons or change any of the path information.
To launch an application, a user simply double-clicks on the appropriate icon in the group. The NetWare Application Launcher does the rest, taking care of drive mappings and paths automatically. The administrator can also specify that some network applications are to be launched automatically when the user runs the NetWare Application Launcher.
When using the NetWare Application Launcher, standard Windows program items that represent network applications are no longer required and can be deleted from Windows desktops.
Provides Location Independence for Applications. Because the NDS-delivered network applications are associated with a user's network login ID, they "follow" the user around the network. Regardless of the login location, the user always sees the same set of network applications. This ensures that people who work from multiple locations or physical workstations always see a consistent set of network applications.
Enables Configurable Support Information. For each NDS delivered network application, the administrator can include a support number and E-mail address to use if help is required. This information is displayed in the properties of each application icon on the users' desktop. The help information can be tailored so each user is directed to the support group for his or her location. The administrator can also specify that some network applications are to be launched automatically when the user runs the NetWare Application Launcher.
In addition, if an application in unavailable for some reason, the administrator can easily modify the NDS object that represents the application so when the user selects it, they are informed that the application is not available.
Installing Workstation-based Software with NAM
Not only does the NetWare Application Manager simplify the administration of network applications, it can also help the administrator distribute software to workstations across the network. NAM can be used to:
Install standalone workstation applications from the network
Install the workstation portion of network applications
Upgrade existing workstation based applications
Upgrade NetWare Client software
Upgrade Windows 3.x to Windows 95
This can all be accomplished from a central location without requiring the administrator to visit each individual workstation.
Third-Party Application Support
The NetWare Application Manager includes a software develop-ment library called NWAPP. When developing NetWare 4-aware applications, independent software vendors (ISVs) can use this library to create application objects in NDS that represent their application. Creating NDS application objects automatically at the time an application is installed on a NetWare 4 network eliminates the need for the installer to create the NDS application object manually.
The NetWare Application Manager also gives ISVs the opportunity to build their own application launcher that leverages NDS application objects. Some ISVs may even opt to include application launching capabilities into their own desktop metaphor products, such as the Novell PerfectOffice DAD Bar, Sidekick, TabWorks, Norton Desktop, and so on.
By leveraging the auto-launching feature of the NetWare Application Manager, critical service providers such as desktop virus scanners can allow administrators to strictly enforce usage policies.
|
NDS Directory Assistance Through the DeveloperNet program, Novell assists third-party software developers in their goal to support NDS and NDS services such as NAM. This program provides training and support for independent software vendors (ISVs) to assist them in developing applications that leverage the capabilities of NDS.Call 1-800-RED-WORD (733-9673) or 801-429-5281 for information. |
Using the NetWare Application Manager
Though the exact procedures for using NAM to install workstation-based software will vary from application to application, the general procedure is as follows:
Install the NetWare Application Manager on the network.
If you have followed the installation procedure described in the AppNote "Installing NetWare Client 32 for DOS/ Windows" in this issue, you will find the NetWare Application Manager files in the 32DOSWIN\ADMIN\NAM directory. You may want to copy the contents of this directory and its subdirectories into SYS:PUBLIC for easier access. These files can also be found in the \NAM directory on the Admin - 2 diskette.
Copy the application program files or create an image of the application's installation disks on a network file server.
Applications can be stored on NetWare 3.x servers, but you need at least one NetWare 4 server to have access to NDS and the NWADMIN utility, which is required to use the NetWare Application Manager.
Create an NDS application object pointing to the application or its image. (This is done through the NWADMIN utility.)
Associate the application object with a user, group, or container.
Ensure that the user, group, or container has the necessary file system rights to access the installation files.
Users will then be presented with the new application icon in their NetWare Application Launcher (NAL) program group. When a user double-clicks on the icon, the installation or setup routine is automatically launched.
The help files included with the NetWare Application Manager provide complete, detailed instructions for using it to install many applications, including PerfectOffice, Microsoft Office, Lotus Notes, Novell's Client 32 and Windows 95, and others.
|
Note: When working with NWADMIN and NAM to create NDSapplication objects, especially on a large network, allowsufficient time for NDS to complete the updates. Changesmay take time to appear after you make them, dependingon the number of replicas that must be updated. |
NAM Example
The rest of this AppNote provides step-by-step instructions for an example exercise that will familiarize you with the capability and options NAM provides. For this example, we will set up the NetWare Diagnostics (NWD) utility to be delivered by NAM.
By completing this exercise, you will learn how to do the following:
Create application objects in NDS.
Assign users to the applications.
See how NAM creates the icons on the user's desktop when loaded.
Test the different options NAM provides.
Log in to a server as Admin or a user with Admin equivalence. You need to have the Write right at the root of the tree.
If you have not already done so, copy the NetWare Application Manager files from the 32 DOSWIN\ADMIN\NAM subdirectory into the SYS:PUBLIC directory. After changing to the NAM subdirectory, type the following command:
XCOPY *.* Z: /S <Enter<
In this example, drive Z is mapped to SYS:PUBLIC. The /Sparameter is needed to copy all of the .MSG, .DLL, and .HLP files from the NAM\NLS\ENGLISH subdirectory into the SYS:PUBLIC\NLS\ENGLISH directory.
Edit the NWADMIN.INI file in your workstation's C:\WINDOWS directory. If the NWADMIN.INI file does not exist, launch Windows and then launch NWAdmin. The NWADMIN.INI file will be created if one does not exist.
Add the following line under the indicated heading:
[Snapin Object DLLs]

Snapin1=z:\public\appsnap.dll
or
Snapin1=\\nrd\sys\public\appsnap.dll
The second version uses the UNC (Universal NamingConvention) to designate the server\volume\directory\file path.
The next time NWADMIN is run from this workstation, the NDS schema will be updated to include the new application objects associated with NAM. (You will need to add the above lines to the NWADMIN.INI file of all workstations on which you will work with the NAM objects in NWADMIN. )
A common problem here is that users in advertently put the appsnap.dll line under the [Snapin View DLLs] heading. If users do this, the following error message will be returned:
APPSNAP.DLL, version: 4.00.1, does not correspond with the version

the NetWare Administrator requires (version: 4.10.2). Install the correct version before

restarting the NetWare Administrator.
Launch NWADMIN.
In NWADMIN, create a test Organizational Unit (OU) under the Organization object in your NDS tree. Give this OU a name that will differentiate it from other OUs (such as your name). In this example, "TestOU" will represent your container object.
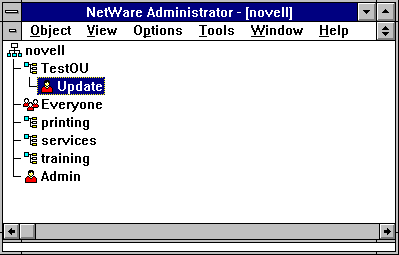
Create a test user in your OU. Name the user Update. Make the user Admin equivalent (for convenience purposes). The following screen shows the TestOU and the user Update created under the Organization "novell" in our test NDS tree.
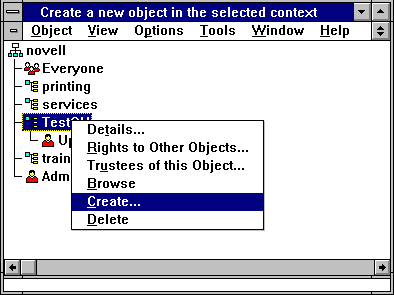
You are now ready to create the Application object in your test OU. Right-click on TestOU to bring up the menu of actions you can perform. The following window will be displayed:
Select "Create" to create a new object, and then select the type of Application object you want to create (in this case, a Windows 3.x Application object):
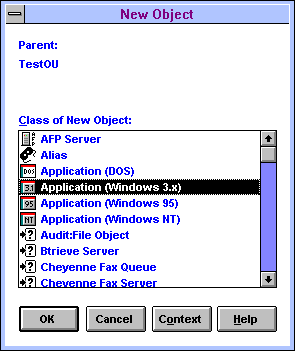
Click on OK to continue.
Enter the application name and path as displayed in the "Create Application" window:
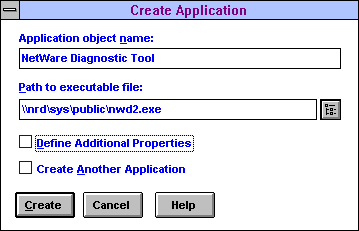
You can use the browse button to find the executable file of your choice. The path to the application will be entered using Universal Naming Convention.
For this example, we are using NWD2.EXE, the NetWare Windows Diagnostic tool that ships with Client 32. NWD2.EXE and its related files are located in the 32 DOSWIN\ADMIN\DIAGTOOL directory. These files had already been copied to the SYS:PUBLIC directory using the command:
XCOPY *.* Z: /s <Enter<
Drive Z was mapped to the SYS:PUBLIC directory. The /S parameter was needed to copy the .HLP file from the DIAGTOOL\NLS\ENGLISH directory to the SYS:PUBLIC\NLS\ENGLISH directory.
Click on the Create button to create the Application object. The NWD object will now appear in the NWAdmin list as shown:
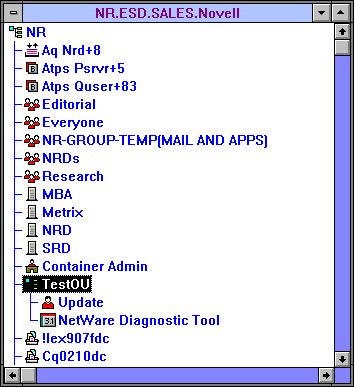
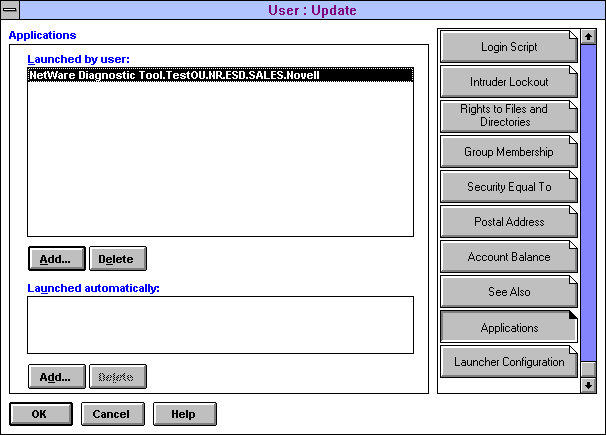
The next step is to assign users to the application. Highlight the Update user and right-click to bring up the actions menu. Select the Details option to see the Details window. In the bottom right-hand corner of the window, you will see two new selections: Applications and Launcher Configuration. Click on Applications. Then click on the Add button under Launched by user. Find the application you created (NWD) and double-click on it. The Applications page will then look like this:
Place NALW31.EXE in the startup folder. In this example, NALW31.EXE (and its related files) have already been copiedto the SYS:PUBLIC directory. In Windows' Program Manager, go into the Startup folder and select File, New, Program Item, and click OK. In the Program Item Properties window, type Z:\PUBLIC\NALW31.EXE in the Command Line entry box. Click OK to finish placing the NetWare Applicaiton Launcher icon into the Startup group.
Restart Windows. Now use the GUI Login utility to log in as the Update user you created. (Be sure you are in the proper NDS context and have given proper rights and a drive mapping to SYS:PUBLIC to user Update.)
You will see NALW31.EXE display a bitmap image as it queries NDS and creates the icons. After Windows has initialized, you will see the following:

You can now launch the NetWare Diagnostic utility by double-clicking on the icon.
Exploring the NAM Options
Now let's look at some of the options NAM provides.
In NWADMIN, double-click on the NAM Application object you just created. On the Drives/Ports page, insert a drive mapping and capture a printer port, as shown below (substitute a print queue that exists in your network). You can enter the information manually or by using the browse buttons.
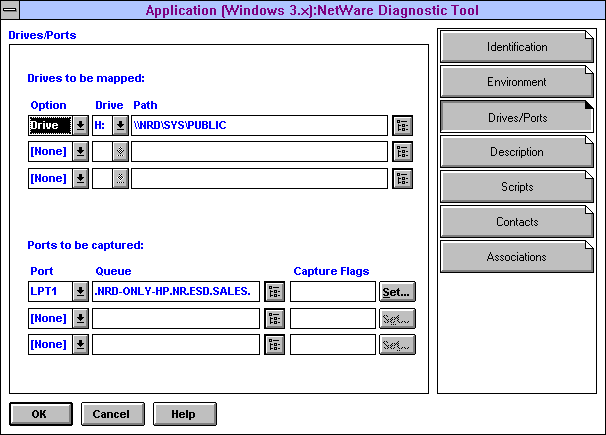
Click OK to save the settings, then minimize NWADMIN.
Double-click on the NetWare Diagnostics icon. NWD2.EXE will initialize. Go to a DOS prompt and execute MAP to verify that drive H has been mapped. Then execute CAPTURE /SH to verify that the port has been captured.
Close NWD2. From a DOS prompt, execute MAP and CAPTURE /SHagain. The mapping and capture will have been deleted.
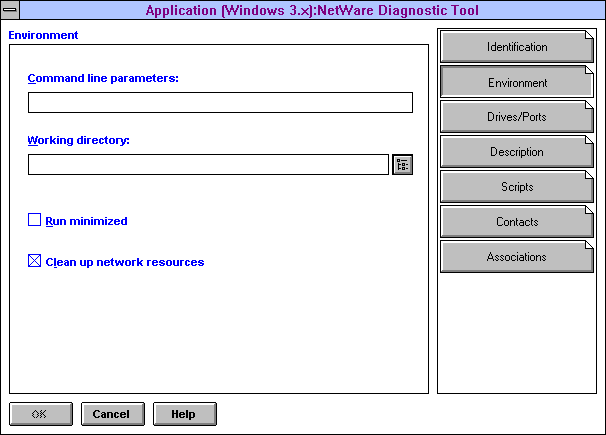
By default, NAL will clean up all resources it configures when the application is shut down. This can be configured on the Environment page, as illustrated next.
In NWADMIN, open the Environment page for the NWD Application. Here you can set command line parameters and a working directory. You can also have the application run minimized and clean up network resources when it closes, as described above.
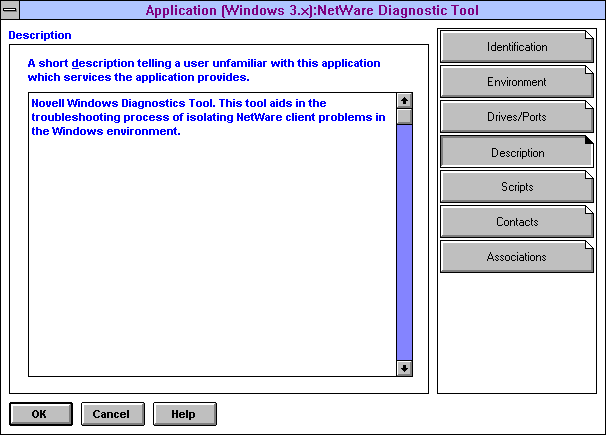
Open the Description page. Here you can type in a short description of the application, as shown in the sample screen below. You will see later where users can see this description.
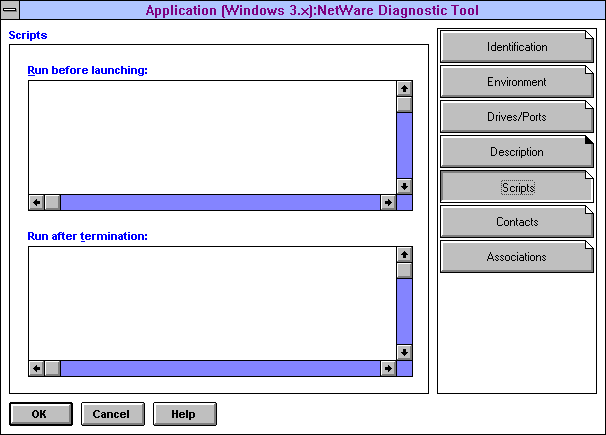
Open the Scripts page. Here you can create scripts (using the same syntax as login scripts) that are run before the application is launched and after the application is shut down. An example of this page is shown below:
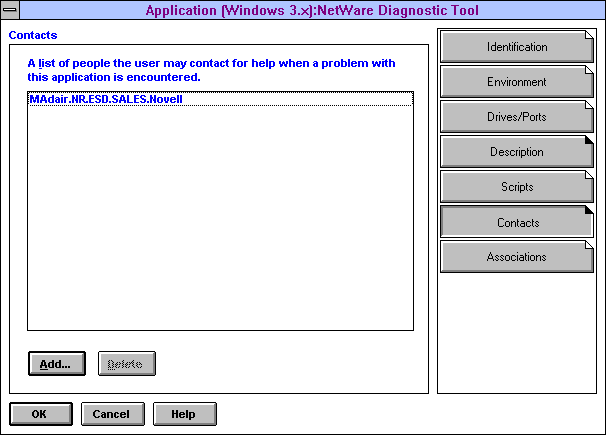
Open the Contacts page. Users can send E-mail to the contacts listed here if they have questions or problems with this application. You will see later where users can see the contact list.
To see how a user would send E-mail to the contacts, right-click on the NetWare Diagnostics icon in the group NAL created on your desktop. Select the "Properties" option from the resulting menu. Notice that the short description you entered in NWAdmin is displayed under the Description tab:
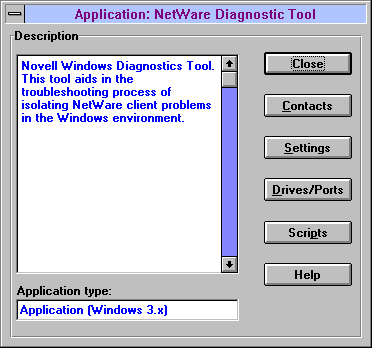
Click on Contacts. A list of users that have been defined as contacts for the application is displayed:
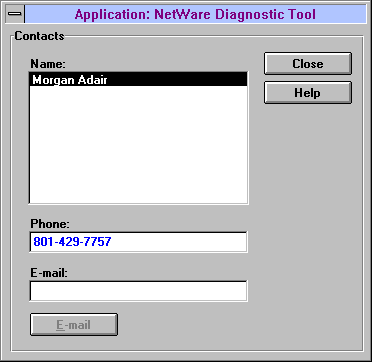
Once you enter the E-mail address in the entry box, the user can click on the E-mail button to send the message. Click on Close to exit this window.
Click on Settings. The details of the application are displayed. These fields can be viewed but not edited.
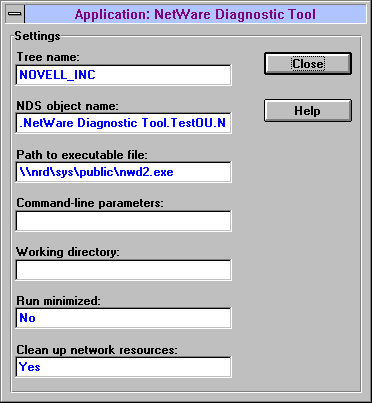
Click on Close to exit this window.
Click on Drives/Ports. You will see the drives and LPT captures you defined to be configured when the application is executed.
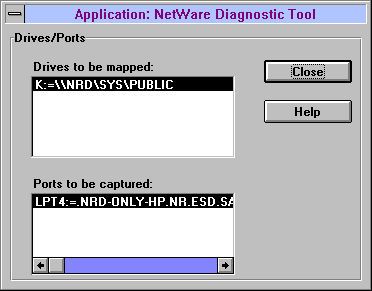
Click on Close to exit this window.
Close the Application properties sheet and return to NWADMIN. The final button under the NWD Application object is Associations. Click on it to view all NDS objects that are associated with the application.
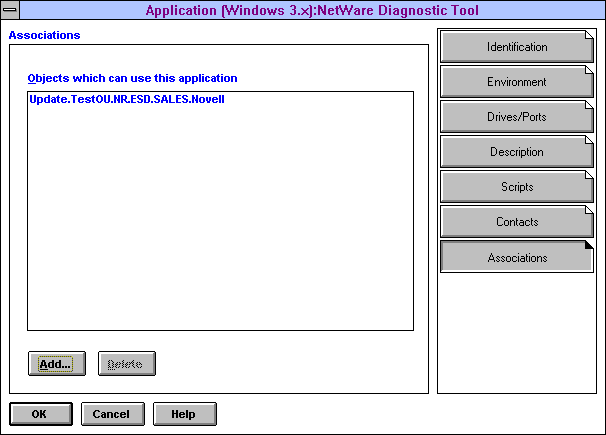
Click Cancel to exit this window.
In NWADMIN, edit the details of the Update user you created. Click on the Launcher Configuration button. By default the user will use the parent container's settings. You can modify the settings according to your needs. To see how some of the settings work, change the settings to look like those shown in the following screen:
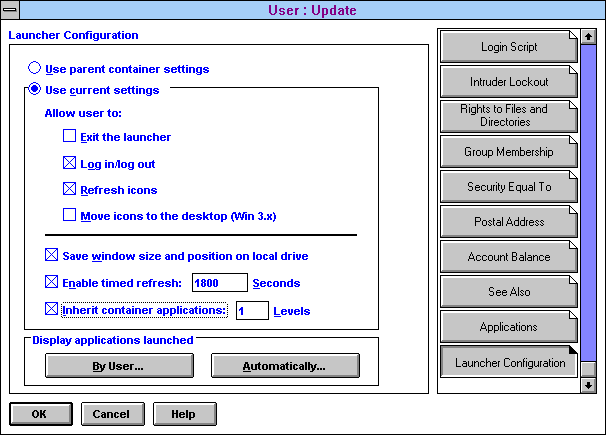
The user will now use these settings instead of the parent container's settings. If the "Exit the launcher" box is not checked, the user will not be able to close the group created by NAL. If the "Move icons to the desktop (Win 3.x)" box is not checked, the user will not be able to move icons from the group created by NAL .
Note: The "Enable timed refresh" setting determines how often the workstation will send a packet to the server to query NDS for new application objects. For purposes of experimentation, set the refresh time to 15 seconds. (It is not recommended that you set this value as low as 15on a production network.)
Click OK to save the changes.
Close the group NAL.EXE created, and then do File | Run | Z:\PUBLIC\NALW31.EXE. (You have to close NAL and run it again for the changes you just made in NWADMIN to take effect).
Try to close the group--the group should not close. Try to drag an icon from the group NAL created to another group--you should not be able to move any icons from the group NAL created.
In NWADMIN, create another Application object under the TestOU that you created. This one can be for the NWADMIN utility itself:
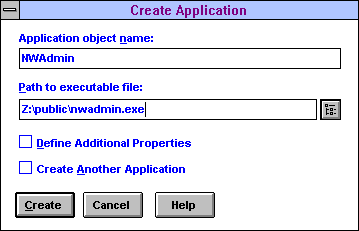
Make the Update user you created a user of the new application (NWADMIN). You set this up under the Applications option for the user in NWADMIN.
Make the program group created by NAL the active group. The new icon for NWADMIN should appear in the program group within the time specified in the "Enable timed refresh" setting (15 seconds with our experimental value). The exact time the icon takes to show up will vary according to the size of the NDS tree you are in and how long it takes for updates to be synchronized across all replicas of your partition. In small NDS trees, this can be a short time; in larger trees, it can take longer.
If the icon does not appear after a reasonable amount of time, click on View | Refresh. The group created by NAL should appear as follows:

In NWADMIN, remove the NWD application from the Launched by user section and add it under Launched automatically, as shown below:
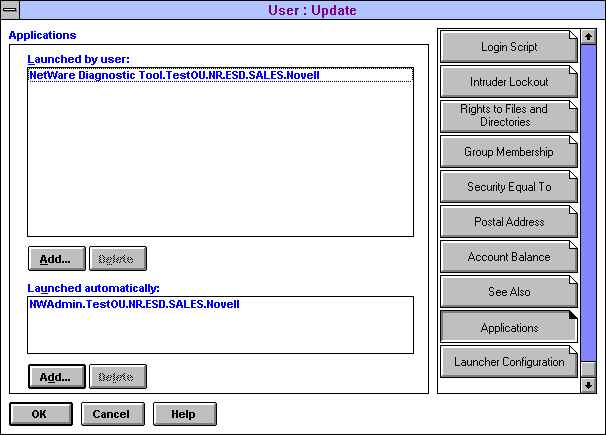
Shut down Windows and start it back up again. This time when NAL executes, NWD2 should automatically be launched (synonymous with placing it in the Windows Startup folder). Only the icon for NWADMIN will appear in the group NAL creates, as shown below:

Conclusion
The GUI Login utility and the NetWare Application Manager are examples of Novell's commitment to making network administration easier and more cost-effective. The GUI Login utility enables users to connect to NDS trees and servers, and run login scripts, without having to leave the Windows environment. The NetWare Application Manager uses NDS to store information about network applications and allow management of users' Windows desktops from the administrator's workstation. NAM also makes accessing network applications easier by always presenting users with the same set of network applications, regardless of their login location.
Novell views the NetWare Application Manager as a crucial NetWare service and is making it available to customers free of charge. It is included in Novell's NetWare Client 32, and it will be included in all future releases of NetWare. It is also available electronically via CompuServe in the NetWare Operating System Files forum (GO NWOSFILES) and through Novell's World Wide Web home page at www.novell.com.
Novell will continue to enhance the NetWare Application Manager. Future releases will include features such as software metering, application fault tolerance, and application load balancing. This will make it easier to manage networks and network applications.
* Originally published in Novell AppNotes
Disclaimer
The origin of this information may be internal or external to Novell. While Novell makes all reasonable efforts to verify this information, Novell does not make explicit or implied claims to its validity.