Installing NetWare Client 32 for DOS/Windows
Articles and Tips: article
Research Engineer
Systems Research Department
01 May 1996
NetWare Client 32 for DOS/Windows features an improved installation process, including both DOS-based and Windows-based installation programs. This AppNote provides an overview of the NetWare Client 32 Windows-based installation. It also lists the changes that the installation program makes to the workstation's configuration files and Windows support files.
- Introduction
- Installing NetWare Client 32 for DOS/ Windows
- Running the Client 32 Windows-based SETUP Program
- What's Different in the DOS Install
- Changes to the Workstation's Configuration Files
Introduction
NetWare Client 32 for DOS/Windows features an improved installation process, including both DOS-based (INSTALL.EXE) and Windows 3.1x-based (SETUP.EXE) installation programs. This AppNote provides an overview of installing NetWare Client 32. It also lists the changes that the installation program makes to the workstation's AUTOEXEC.BAT, CONFIG.SYS, STARTNET.BAT, NET.CFG, and Windows support files.
Installing NetWare Client 32 for DOS/Windows
You can install NetWare Client 32 from either the DOS prompt (using the INSTALL.EXE program) or from within Windows (using the SETUP.EXE program). There are minor differences between the two programs. The explanation in this AppNote will focus on the Windows installation process; the differences in the DOS version are covered later in the AppNote.
Before you install the Client 32 software, ensure that your workstations meet the following hardware and software requirements:
A 386 processor or higher
MS DOS 5.x or PC DOS 5.x or above
Windows 3.1 or Windows for Workgroups 3.11 (optional)
A VGA or better graphics board and monitor
A minimum of 4MB of memory (plan on at least 8MB if you runWindows)
An XMS memory manager (HIMEM.SYS or equivalent)
|
Note: This AppNote covers how to install NetWare Client 32 onworkstations running Windows 3.1. If you are runningWindows for Workgroups 3.11, see the README file thatcomes with the Client 32 software for setup requirements. |
Obtaining the NetWare Client 32 for DOS/Windows Software
The NetWare Client 32 for DOS/Windows software is available for downloading from Novell's NetWire home page on the World Wide Web (WWW), and from NetWire on CompuServe.
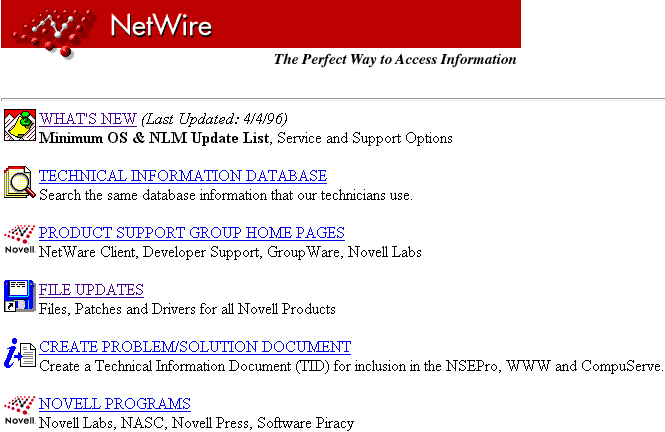
From the NetWire WWW Home Page. As of April 20, 1996, you can find the NetWare Client 32 for DOS and Windows 3.1x software on the World Wide Web as follows (as always, this is subject to change at any time). Set your Web browser to http://netwire.novell.com to access the Novell NetWire home page. Then click on What's New (see Figure 1).
Figure 1: The NetWire home page on the World Wide Web.
On the What's New page, click on the line that says "Download Novell's 32-bit Client for Windows 95." This brings you to http://netwire.novell.com/home/client/client32/ index.htm, where you should see the heading NetWare Client 32 with the following two selections:
BETA NetWare Client 32 for DOS and Windows 3.1x BETA

NetWare Client 32 for Windows 95
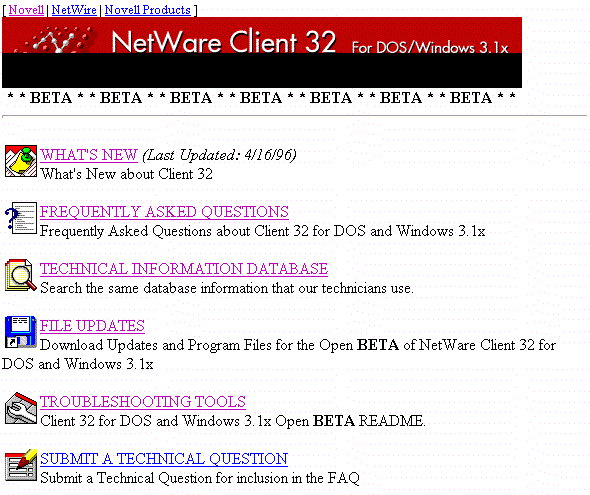
Click on NetWare Client 32 for DOS and Windows 3.1x to go to the NetWare Client 32 for DOS/Win home page (see Figure 2).
Figure 2: The NetWare Client 32 for DOS/Windows home page.
From there, click on FILE UPDATES. Under the Program Files heading, select "Download NetWare Client 32 for DOS and Windows 3.1x." Scroll down to the Download Areas, where you can choose whether you want to download files for a network install or for a diskette install of Client 32. Click on your choice to begin the download process.
|
Note: The Updates heading contains links to patches and updates that are available. You should download these as well. |
From NetWire on CompuServe
To access the NetWare Client 32 for DOS/Windows software on CompuServe, type GO NWCLIENTS at any CompuServe prompt. Then select "Download NW Client 32 for DOS/Win (Open Beta)" to download the software, along with any patches and updates.
Extracting the FilesThe NetWare Client 32 for DOS/Windows files are contained in a self-extracting compressed file that creates a full subdirectory structure as it decompresses. The subdirectory structure should be similar to the following:
DOSWIN32 (or whatever name you give the parent directory)

  CLIENT32

  NIOS

  ADMIN

  SYSTEM

  WINDRV

  LANDRV32

  LANDRV16

  TCPIP

  SNMP

  TSA

  NLS

UNICODE
Making Floppy Diskettes
The Client 32 software comes with a MAKEDISK.BAT file that allows you to place the Client 32 files onto floppy disks for installation purposes. To create diskettes, go to where you have extracted Client 32, such as G:\APPS\DOSWIN32, and type MAKEDISK A: <Enter<. You will see a message similar to the following:
******************************************************

 This program makes NetWare Client 32 for DOS diskettes.

 Make sure you have eight formatted diskettes.

 Make sure you have a search drive mapped to your DOS utilities.

 To exit at any time hit CTRL-C or CTRL-BRK.

 ******************************************************

 Please insert the first diskette into a:

 Press any key to continue . . . .
If you have eight formatted diskettes ready and the DOS system directory set in your DOS PATH variable, begin the process by inserting the first diskette into the drive you specified and pressing a key to continue. (If you don't have the diskettes and the PATH variable ready, press Ctrl-C to exit. MAKEDISK uses the XCOPY command, so it must be able to find XCOPY.EXE. When you are ready, start the batch file over again.)
Once the copy process is complete for the first diskette, follow the on-screen prompts to remove the diskette, label it, and insert the next diskette. Proceed to insert the diskettes one by one, naming them as directed on the screen, until you have all of them named. When this process is completed, you will have a set of working diskettes for installing Client 32, labelled as follows:
Disk 1 DOS

Disk 1 WIN

Disk 2

Disk 3

Disk 4

Disk 5 LAN Drivers

Admin 1

Admin 2
To run the Windows-based Client 32 installation program from the floppy diskettes, place Disk 1 WIN into drive A . From Windows' Program Manager (or equivalent), choose File | Run, and type A:SETUP.EXE. To run the DOS-based installation program, place Disk 1 DOS into drive A or B, change to that drive, and type INSTALL <Enter<.
Installing Client 32 from the Network
The remainder of this AppNote assumes you are performing the Client 32 installation procedure from a network drive. The instructions assume you have extracted the Client 32 files and subdirectory structure onto a network drive.
|
Note: If you want to perform the client installation on yourmachines without user intervention, you can use Client 32'sAutomatic Client Update (ACU) feature. In order for theACU process to work, the parent directory you create forthe Client 32 files must match the one specified in the ACUlogin script. For more information, see the AppNoteentitled "Upgrading Network Workstations with AutomaticClient Update (ACU)" in this issue. |
Running the Client 32 Windows-based SETUP Program
To give you an overview of the installation process, the following explanation covers installing Client 32 from within Windows from a network drive. First, go into Windows' Program Manager and select Run from the File pull-down menu. In the Command Line box, type the full directory path up to and including the Client 32 SETUP.EXE file (for example, L:\COMMON\DOSWIN32\SETUP.EXE). Then click on OK.
The initial screen for the NetWare Client 32 Installation program is displayed. Click on Continue. After reading the license agreement screen, click on Yes to proceed.
The first screen of consequence is the Directory Locations screen. Here you specify what your target directory is for the Client 32 software and where the files for Windows will go (see Figure 3).
Figure 3: Specify your destination directory locations.
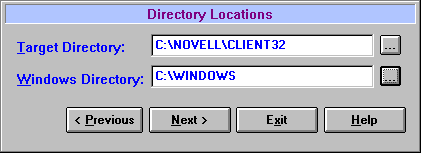
The Target Directory is where the Client 32 files will be copied on the workstation; Windows Directory is where the Windows files are located. For a new installation, the defaults are C:\NOVELL\ CLIENT32 for the Target Directory and wherever Windows loaded from for the Windows Directory (C:\WINDOWS in the above example). You can choose different Target and Windows directories by typing in different directory locations. Or click on the "..." button to the right of the entry boxes to browse your drives and select another directory. Click on the Next> button to continue.
Selecting a LAN Driver
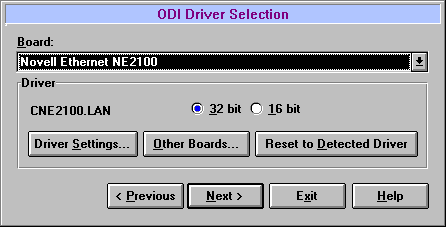
In the Windows installation procedure, you next see the ODI Driver Selection screen (see Figure 4).
Figure 4: The network board/LAN driver configuration screen.
|
Note: This part of the installation is slightly different whenrunning the DOS-based INSTALL.EXE. See the subheading"What's Different in the DOS Install" later in this AppNotefor details. |
The installation program checks to see if you are already running on a network. If you are, it selects an appropriate LAN driver for the currently-installed network board. The installation program also talks to the loaded NIOS or LSL to find out which NET.CFG file was used when loading the previous client software. Once it knows which file to use, the install program parses that NET.CFG for pertinent information on network board settings, TCP/IP and NetWare/IP information, and information about SNMP or TSA configurations. This information is then used to build a new NET.CFG file that is placed in the target directory, along with the new Client 32 software.
If the workstation is not currently attached to the network, the installation program looks in the following three locations on the local hard drive for an existing NET.CFG file:
The current Target Directory
NOVELL\CLIENT32
NWCLIENT
If the program can't find a NET.CFG, you will need to type in all of the configuration information when prompted.
Automatic Board/Driver Selection. In the Board entry box, you will see a selection matching the network board you have installed. Under the Driver section of the window is the LAN driver for that board. Client 32 supports the C-code 32-bit .LAN drivers that come with the client software, some assembly-based 32-bit .LAN drivers that ship with NetWare 4.1, and the 16-bit .COM drivers that ship with Client 32 or that work with the NetWare DOS Requester software. (See the "LAN Drivers for Client 32" subheading in the "NetWare Client 32 for DOS/Windows: Architecture and Features Overview" AppNote in this issue for a discussion of the various types of LAN drivers that are available for use with Client 32.)
If the installation program can find a 32-bit driver to match your installed board, you will see the board and LAN driver listed in the ODI Driver Selection window. If it cannot find a 32-bit driver match in its list of certified LAN drivers, the installation program will prompt you to load a driver from another location (such as drive A).
If you are using a 32-bit .LAN driver, you should have an .LDI (LAN Driver Initialization) file to go with the driver. This file contains valid settings that the driver can use, as well as other information provided by the manufacturer about the driver. Client 32 reads the driver information (including the filename itself) from within the .LDI file, so the .LDI filename must match the name designated inside the .LDI for it to work.
If you are using a 16-bit LAN driver, you should have an .INS file that contains configuration information about the 16-bit .COM driver.
Selecting a Third-Party LAN Driver. If the board and driver you are using is not listed but you have the driver and support file, click on the Board entry box and select "User Supplied Driver" from the resulting list. Select if the driver is 32-bit or 16-bit, and then click on the Next> button. You will see the ODI Driver Path window, where you must enter the full directory path and filename of the ODI driver you are using.
|
Note: If your board's LAN driver didn't come with an .LDI or .INSfile, contact the board manufacturer to obtain one. |
You will then see the Select a Board window with a list of boards to choose from. Select the correct board and click on OK. You will then be returned to the ODI Driver Selection window with User Supplied Driver in the Board entry box and the name of the driver under the Driver entry. Click on Next> to go to the next screen.
Setting Additional Options
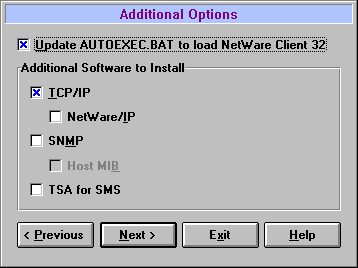
As shown in Figure 5, the installation program next displays the Additional Options window, where you specify whether you want to install support for the following:
TCP/IP and/or NetWare/IP
Simple Network Management Protocol (SNMP) and a Host MIB
A Target Service Agent (TSA) for NetWare's StorageManagement Services (SMS)
|
Note: The Windows-based installation program assumes you areinstalling Client 32 support for both DOS and Windows, sothese options are not listed in the Additional Optionswindow. |
Updating the AUTOEXEC.BAT. The first entry specifies whether you want the installation program to update the AUTOEXEC.BAT so that it will load NetWare Client 32. To do this, the installation program adds these two lines to the AUTOEXEC.BAT file:
PATH C:\NOVELL\CLIENT32\;%PATH%

@CALL C:\NOVELL\CLIENT32\STARTNET
The call to the STARTNET.BAT file is placed at the bottom of the AUTOEXEC.BAT file. If you want to place this call somewhere else, either allow the installation program to make the changes, then move the @CALL line using a text editor, or unclick the "Update AUTOEXEC.BAT..." option and manually perform the deed.
Figure 5: The Additional Options window.
TCP/IP Configuration. If your workstation was already set up for TCP/IP connectivity, the TCP/IP box will already be selected. With this option selected, you will see the TCP/IP Configuration window when you click on Next> to proceed (see Figure 6). Here you need to fill in the information about Client IP address, router address, subnetwork mask, and DNS domain name.
Figure 6: The TCP/IP Configuration window.
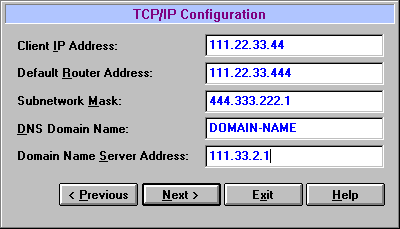
If your TCP/IP information is contained in an existing NET.CFG file in the current Target Directory, in C:\NOVELL\CLIENT32, or in C:\NWCLIENT, the installation program will read the TCP/IP settings and place them into the TCP/IP Configuration window for you. However, if your TCP/IP settings are in a NET.CFG file in some other directory, you will have to type in the TCP/IP information manually. Note that you cannot supply more than one router address on the Default Router Address line, but you can add additional addresses later.
|
Note: If you change the TCP/IP configuration in INSTALL, theBIND statements in the TCPIP section of the NET.CFG fileare not updated. You'll need to make the changes manually. |
If the workstation's TCP parameters are dynamically determined by programs such as BOOTP, DHCP, or RARP, leave the screen blank and move on. If you put spaces in the address slots, the installation program won't pull the information into its proper places. Simply proceed to the next screen.
NetWare/IP Configuration. If you have selected to install support for NetWare/IP, you will see the NetWare/IP Configuration windows after you have completed the information in the TCP/IP window and clicked on the Next> button. Fill in the NetWare/IP Domain Name, the IP address of the Preferred DSS, and the Nearest NWIP Server address for workstation access. Click on the Next> button to proceed to the next installation supplement that you have chosen, or to the actual Client 32 installation portion of the program.
SNMP Configuration. If you have selected to install support for configuring SNMP, you will see a window similar to the one in Figure 7.
Figure 7: The SNMP Configuration window.
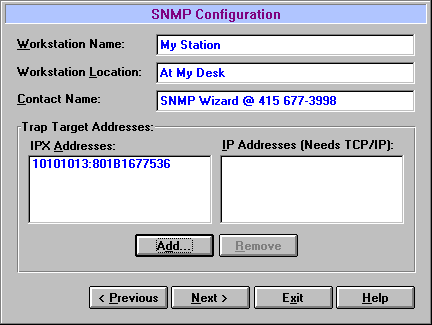
In this window, you need to fill in the Workstation Name, which identifies the computer; the Workstation Location, which describes the location of the computer (in 80 characters or less); and the Contact Name so you know who is supporting this computer. You also need to fill in the network addresses of the SNMP manage-ment consoles for the Trap Target Addresses. If the SNMP console is running on IPX, type in the IPX addresses needed in the IPX window. If the console is running on IP, type in the appropriate addresses in the IP window (you will need to be running TCP/IP to communicate appropriately to IP consoles).
If you have selected to install support for host resources for the MIB (Management Information Base), the next window allows you to add local devices, such as a printer or modem, to that database. Click on the Add button, type in the information that you want to include, and click OK. Then in the Directory Level to Search from Root entry, type the number of directories away from the root directory you want the SNMP agent to scan for installed software. If you want SNMP to scan for additional paths that are more level away than you designated earlier, put those in under the Additional Search Paths field. Click Add, type in the directory that you want SNMP to inventory, and click OK. Once you are finished, click the Next> button to move to the next installation supplement screen or to the actual Client 32 installation portion of the program.
TSA Configuration. If you selected support for the Target Service Agent (TSA) for Storage Management Services (SMS), you will see the TSA for SMS Configuration window, similar to the one in Figure 8.
Figure 8: Setting up TSA for SMS support.
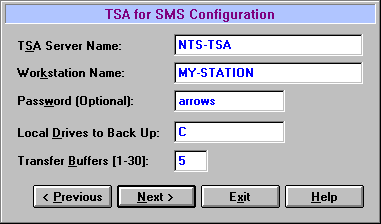
In this screen, you first select the backup server that is running the tsa_sms.nlm for SBACKUP or equivalent backup software. Then enter a name for your workstation. This can be any name that identifies your workstation and is different from all other workstations in your office or on the network. It's best to keep these names simple, yet unique.
The third entry allows you to (optionally) set up a password for SBACKUP access. Be sure to coordinate any passwords you set here with the network administrator so that he or she will know which password to use to access the workstation when running the SBACKUP procedure.
The Local Drives to Back Up entry lets you specify the local hard disk drives you want to back up. Click in this field or press <Enter< to see a list of local disk drives that you can select from (at least drive C should be selected). Just the drive letters should be entered (no colons or slashes), separated by spaces or commas.
The Transfer Buffers entry can be set from 1 to 30 buffers. Each buffer matches the size of the network protocol you are running and is memory reserved for storing data before it is sent over the network . If you are using Ethernet, each buffer adds about 1.5KB; if you are using Token Ring, it is 4KB per buffer. If you want to speed up file transfers, set this number between 5 and 10.
Copying the Client 32 Files
Once you have set the additional options, the installation program begins copying the files for install Client 32 software to the workstation. Figure 9 shows the screen that is displayed while the files are being copied.
Figure 9: The actual installation process.
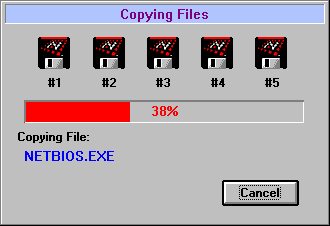
Once the process is completed, you can either reboot your computer so the installation will take effect, or you can return to Windows or to DOS so you can then reboot.
What's Different in the DOS Install
There are a couple of important differences between the two installation programs. The first difference is that after you read the license agreement, you see a screen that allows you to select which installation options you want. In the DOS-based installation program, the Client 32 for DOS and Client 32 for Windows options are selected by default, but you can unselect them if you need to. The additional options are the same ones you see the Windows-based installation's Additional Options window shown in Figure 5.
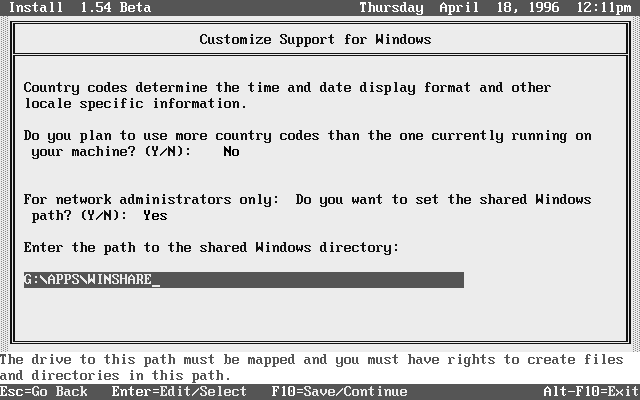
Customize Windows Support
If you choose to install support for Windows, the DOS version allows you to add customized support for Windows, which involves country codes, as well as shared Windows support for network administrators (see Figure 10).
Figure 10: The Customize Support for Windows screen.
Country Codes. The first question asks if you plan to use more than one set of country codes. If you answer No, INSTALL copies only one set of Unicode files into the \NLS subdirectory under the \NOVELL\CLIENT32and \WINDOWS directories. This saves installation time and disk space. Otherwise, INSTALL will copy all of the Unicode tables to the \NLSsubdirectories.
The DOS INSTALL program uses the COUNTRY=CountryName parameter in the config.sys file to decide which set of Unicode files to copy. If there is no COUNTRY parameter specified, the DOS Requester defaults to ENGLISH as its primary table selection and places only the *.001 Unicode files in the \NOVELL\CLIENT32 and \WINDOWSdirectories (unless specified otherwise).
Below is a list of the three-digit numerical extensions for Unicode files (each country is assigned a specific extension):
001 = US English and Canadian English 002 = Canadian French 031 = Netherlands 032 = Belgium 033 = France 034 = Spain 039 = Italy 041 = Switzerland 044 = United Kingdom 045 = Denmark 046 = Sweden 047 = Norway 049 = Germany 061 = Australia 081 = Japan 351 = Portugal 358 = Finland
Language support for DOS is not handled by the Unicode files. The NWLanguage DOS variable placed in the startnet.bat file defines the language in which you see the DOS utilities, errors, and other messages displayed. The following is a list of the languages that will be available for NetWare:
ENGLISH FRANCAIS DEUTSCHE ITALIANO ESPANOL
Shared Windows Directory. The second question under the "Customize Support for Windows" screen is for network administrators who have set up a shared Windows directory using the SETUP /A option when they installed Windows on a network drive. This only needs to be done once for all users who will access the shared copy of Windows. Users can then run SETUP /N to set up individual files (about 300 KB) either locally or in a personal Windows directory on the network (such as G:\USERS\ED\ WINDOWS), while they access the shared Windows directory on the network for the rest of Windows.
The question that you see is "Do you want to set the shared MS Windows path?" with the default of NO. If you choose "Yes," you will be asked to enter the path to the shared directory, such as G:\APPS\WINSHARE. You must have rights to create files and directories in the path specified.
With the proper directory path in place, the Client 32 INSTALL program copies the necessary files that are shared into the selected directory. Then INSTALL modifies only the .INI files that are copied locally or in the personal Windows directory of those users who have run the SETUP /N command and that Client 32 finds in the workstation's local Windows directory.
When you are finished, press <F10< to save your changes and return to the INSTALL window.
Additional DOS Installation Options
Configuring SNMP Parameters. The Configure SNMP Parameters screen for DOS is fuller than the one in the Windows install program (see Figure 11).
Figure 11: The Configure SNMP Parameters screen.
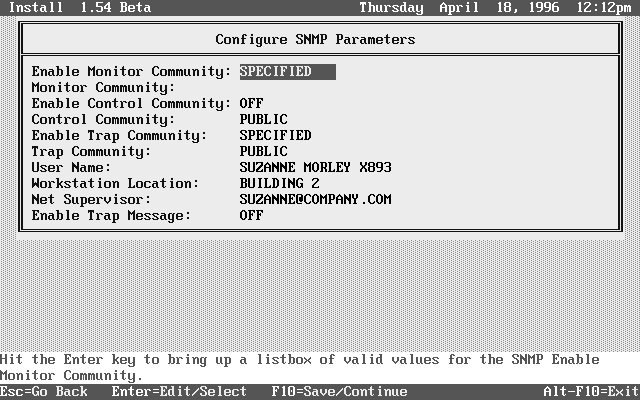
The DOS Install allows you to enable a monitor community, for which you can select any community, specify a particular community, or turn off the monitor community option. If you choose Any or Specified, you will need to specify from which monitor community you wish to have this workstation monitored. You can also enable a control community, which you can select any control community, specify a particular community, or turn off the control community option. If you choose Any or Specified, you will need to specify from which control community you wish to have this workstation monitored (PUBLIC is the default).
You can also enable a trap community, which you can specify a particular trap community or turn off the trap community option. If you choose Specified, you will need to specify from which trap community you wish to have this workstation monitored. The User Name entry is the same as the Windows Workstation Name entry, and the Net Supervisor entry is the same as the Contact Name entry in Windows.
In the Configure HOSTMIB Parameters, the DOS install separates the different printer, modem, and tapedrive names into their own entries. Simply fill in the blanks according to what the workstation has for resources and continue. The Directory Search Depth and Directory Search Path entries correspond to Window's Directory Level To Search from Root and Additional Search Paths entries.
LAN Board/Driver Selection. The last difference between the two install methods is that the DOS Install program selects the LAN driver last, whereas the Windows Setup program performs this function first. However, the functionality of auto-detecting boards and drivers is the same for both versions. INSTALL looks for an installed network board and automatically selects a 32-bit .LAN driver for the board if it finds one in its list of certified drivers. It then displays the Installation Configuration Summary screen, which is explained below.
If INSTALL cannot find a 32-bit LAN driver match, you will see a prompt asking if you want a 32-bit or 16-bit LAN driver. Choose the type of driver you have, and then specify where the driver is located as prompted (A:\ is the default path). Insert the diskette containing the LAN driver you want to load, or specify the directory where the LAN driver and .LDI or .INS files are located.
Installation Configuration Summary Screen
After you have configured everything else, you will see the Installation Configuration Summary screen (see Figure 12).
Figure 12: The Installation Configuration Summary screen.
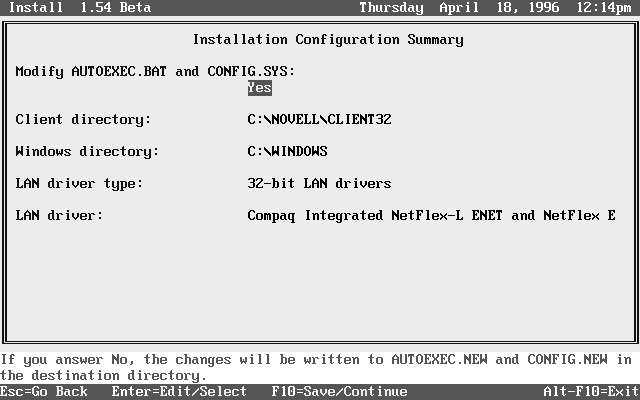
The first line in the Installation Configuration Summary screen, Modify AUTOEXEC.BAT and CONFIG.SYS, is set to Yes by default. If you keep the default setting, the INSTALL program will make changes to these configuration files.
In the AUTOEXEC.BAT file, the INSTALL program adds these two lines:
PATH C:\NOVELL\CLIENT32\;%PATH%

@CALL C:\NOVELL\CLIENT32\STARTNET
By default, the INSTALL program creates a \NOVELL\CLIENT32 directory at the root of drive C and places the NetWare Client 32 files in that directory. It then places the Unicode files in the \NLS subdirectory, and the proper *.MSG (message) files in the \NLS\ENGLISH subdirectory (or the subdirectory that corresponds to the language you selected). INSTALL also adds the CLIENT32 directory to the DOS PATH, and then AUTOEXEC.BAT calls the STARTNET.BAT file to load the client software.
INSTALL checks the following two settings in the CONFIG.SYS file:
Files = 35

Buffers = 20
If the settings are already higher than these minimum values, they will not be affected. Because the NetWare Client 32 for DOS/Windows does not use DOS's internal tables as the NetWare DOS Requester does, it ignores the LASTDRIVE parameter and the /E: environment space settings on the SHELL line in CONFIG.SYS.
The NetWare Client 32 for DOS/Windows requires DOS to be loaded into the High Memory Area (HMA). Be sure to include the DOS=HIGH command in the CONFIG.SYS file. If you selected Windows support, INSTALL also makes some changes to the WIN.INI, PROGRAM.INI, and SYSTEM.INI files, as covered under the "Changes to Windows Support Files" subheading.
The screen also displays the directory to which the client files will be copied and the Windows directory. You can change these defaults if you need to.
The next two lines indicates which type of LAN driver (32-bit or 16-bit) and network board were automatically selected for the network interface board found in the workstation.
After making changes or accepting the selections, press <F10< to continue. INSTALL will copy the files to the designated directories. Once the files are copied, INSTALL prompts you to reboot the workstation.
Changes to the Workstation's Configuration Files
In both installation programs, the installation procedure tries to read current information from whatever NET.CFG file the NIOS or LSL is using. It then uses that information to build a new NET.CFG that is copied into the C:\NOVELL\CLIENT32 directory. The installation program also creates a STARTNET.BAT file that is placed in the C:\NOVELL\CLIENT32 directory. The following sections describe these changes in more detail.
Changes to the STARTNET.BAT File
Depending on what type of LAN drivers and protocols you are loading, the STARTNET.BAT will look similar to the following (this example loads both IPX and TCP/IP protocols and support NLMs):
SET NWLANGUAGE=ENGLISH

 C:\NOVELL\CLIENT32\NIOS.EXE

 LOAD C:\NOVELL\CLIENT32\LSLC32.NLM

 LOAD C:\NOVELL\CLIENT32\CMSM.NLM

 LOAD C:\NOVELL\CLIENT32\ETHERTSM.NLM

 LOAD C:\NOVELL\CLIENT32\CNE2000.LAN FRAME=ETHERNET_802.2 INT=3 PORT=300 RETRIES=5

 LOAD C:\NOVELL\CLIENT32\CNE2000.LAN FRAME=ETHERNET_II INT=3 PORT=300 RETRIES=5

 LOAD C:\NOVELL\CLIENT32\TCPIP.NLM

 LOAD C:\NOVELL\CLIENT32\IPX.NLM

 LOAD C:\NOVELL\CLIENT32\CLIENT32.NLM
The first line in STARTNET.BAT sets the language variable for the workstation to English (since the NetWare Client 32 for DOS/Windows is language-aware). The first module to be loaded is NIOS.EXE, then the client-based NLMs and LAN drivers. Note that after NIOS loads, the command format changes to match the way NLMs are loaded on a NetWare server. You use the same syntax as in the server's AUTOEXEC.NCF file, with LOAD and UNLOAD commands used to initialize and uninstall NLMs and NetWare LAN drivers.
The NetWare Client 32 LSL module (LSLC32.NLM) is loaded after NIOS, followed by the C-based Media Support module (CMSM.NLM). The STARTNET.BAT file then loads the topology support module for your network. The network topology in this example is Ethernet, so the ETHERTSM.NLM module is loaded for Ethernet support.
Next, the STARTNET.BAT file loads the CNE2000.LAN driver, which is a C-based version of the NE2000.LAN server driver. Note that 32-bit drivers do not use NET.CFG for configuration settings such as frame type, interrupt, I/O port, and retries. These settings are specified in the LOAD command. (The entire command should be on the same line in the batch file, or it should be no more than 128 characters long per line.)
If needed, you can load the LAN driver for multiple frame types and bind IPX to each of them. In this example, the CNE2000.LAN driver is loaded twice to bind the board to the two frame types needed for IPX and TCP/IP communications. However, the NetWare Client 32 does not have built-in router code as the NetWare server does.
After loading the CNE2000.LAN driver and specifying the configuration settings, the STARTNET.BAT file loads the transport protocols--TCPIP.NLM and IPX.NLM in this example. The last module loaded is the NetWare Client 32 Requester itself (CLIENT32.NLM).
Example STARTNET.BAT for 16-bit LAN Driver. If you select a 16-bit LAN driver, different network connectivity modules are loaded in the STARTNET.BAT file:
SET NWLANGUAGE=ENGLISH

 C:\NOVELL\CLIENT32\NIOS.EXE

 C:\NOVELL\CLIENT32\N16ODI.COM

 C:\NOVELL\CLIENT32\NESL.COM

 C:\NOVELL\CLIENT32\NE2000.COM

 LOAD C:\NOVELL\CLIENT32\LSLC32.NLM

 LOAD C:\NOVELL\CLIENT32\PC32MLID.NLM

 LOAD C:\NOVELL\CLIENT32\IPX.NLM

 LOAD C:\NOVELL\CLIENT32\CLIENT32.NLM
N16ODI.COM is a 16-bit shim module that prevents driver locking when the 16-bit driver talks to the 32-bit components above it, and vice versa. NESL.COM is the NetWare Embedded Support Layer module that allows calls for PCMCIA and Plug-and-Play hardware to get to the driver. The NE2000.COM driver reads its configuration parameters from the NET.CFG file, as in the previous 16-bit NetWare clients. PC32MLID.NLM is a shim for connecting 16-bit LAN drivers into the 32-bit client.
Changes to the NET.CFG File
Because 32-bit LAN drivers read their configuration information from STARTNET.BAT, this changes which information is read from the NET.CFG file. Below is an example NET.CFG file for Client 32 using a 32-bit driver:
Link Driver NE2000

 (NOTE: 32-bit driver settings are found in the

 STARTNET.BAT file, and the settings below are

 ignored.)

   Frame Ethernet_II

   Frame Ethernet_802.2

   Protocol IPX E0 ETHERNET_802.2

 NetWare DOS Requester

   First Network Drive = F

   NETWARE PROTOCOL = NDS, BIND

   Preferred Server = NRD

   Preferred Tree = NOVELL_INC

   NAME CONTEXT = "NR.ESD.SALES.NOVELL"

   CONNECTIONS = 16

   PRINT HEADER = 100

   PRINT TAIL = 100

 Protocol IPX

   IPX SOCKETS 40

 Protocol TCPIP

   PATH TCP_CFG C:\WINDOWS

   IP_ADDRESS 111.222.332.44 LAN_NET

   IP_NETMASK 111.222.333.4

   IP_ROUTER 111.22.33.444

   BIND CNE2000 #1 ETHERNET_II LAN_NET

   ip_address   n.n.n.n PPP_NET

   Bind   NCOMX #1 PPP PPP_NET
Client 32 for DOS/ Windows reads the NET.CFG file a little differently than the NetWare DOS Requester does. For example, the Link Driver entries are not used for the 32-bit IPX.NLM. Instead, the NetWare Client 32 uses the driver settings specified in the LOAD command, as shown in the example STARTNET.BAT file. Therefore, 32-bit LAN drivers do not look at the information in NET.CFG.
The TCPIP.NLM, on the other hand, does look in the NET.CFG for the TCP/IP information found under the Protocol TCPIP heading. (The frame type is read from the STARTNET.BAT file when the LAN driver initializes.) If you are loading TCP/IP, you should check the IP address to ensure that it is correct. Also, make sure that the LAN driver name in the BIND line under Protocol TCPIP matched the LAN driver name that is configured in STARTNET.BAT's LOAD command.
The NetWare Client 32 for DOS/Windows also changed the IPX Sockets entry under the Protocol IPX heading in the NET.CFG file. You can change a number of other NET.CFG parameters as well. These are covered in the AppNote entitled "Setting NET.CFG Parameters through the NWSETUP Utility" in this issue.
Changes to the Windows Support Files
If you allow the Client 32 installation program to include Windows support, the program modifies the progman.ini, win.ini and system.ini files, but keeps copies of the originals with a *.OLD extension. The changes you see here depend on how much NetWare support you are already using.
PROGMAN.INI. Changes to progman.ini are the addition of a NW.GRPline to the [Groups] heading and placing that group in the Order line.
WIN.INI. The only change to win.ini is the addition of a LOAD NWPOPUP.EXEline under the [Windows]heading.
NETWARE.INI. If you enable the Hot-key aspect, the only change to netware.ini is the addition of a HotKeyEnabled=1 line under the [options]heading. This file is empty until you enable a Hot-key.
SYSTEM.INI. Changes to the system.ini file are as follows:
[boot]

   network.drv=NETWARE.DRV


   [boot.description]

   network.drv=Novell NetWare (v4.0)


   [386Enh]

network=*VNETBIOS,VNETWARE.386
The Windows-based installation for Client 32 removes all instances of DOSNET, VTCPIP.386, and VIPX.386. Setup then removes the Device=VTCPIP.386 line from the [386 Enh] section. The installation program does nothing with VNETBIOS. If the line is already in the workstation's SYSTEM.INI file, it will still be there once the Client 32 installation is complete.
If you are using a 16-bit LAN driver rather than a 32-bit LAN driver, Setup appends the following line in the [386 Enh] section:
Device = VLANINT.386
For Windows for Workgroups 3.11 workstations, Client 32 setup adds the following line to the [boot] section:
secondnet.drv=netware.drv
Setup also adds the following line to the [boot.description] section:
secondnet.drv=Novell NetWare (v4.0)
Files Copied to the Workstation
The exact files that are copied to the Client 32 workstation depend on which Client 32 support options you selected during installation. The list below was generated after installing Client 32 with DOS and Windows support, plus all of the additional options you can choose within the installation process: TCP/IP, NetWare IP, SNMP, and TSA. The example below is for a workstation with an NE2000 network board, so other LAN drivers are not shown.
This listing is based on the first Beta release of the NetWare Client 32 for DOS/Windows. Some of the dates, times, and file sizes will undoubtedly change in subsequent releases of the NetWare Client 32 for DOS/Windows software.
Files Copied to C:\NOVELL\CLIENT32 and Below
Directory of C:\NOVELL\CLIENT32

AUTOEXEC NEW           1,129 02-01-96   4:51p

CLIENT32 NLM         452,864 03-21-96  11:11a

CMSM     NLM          56,993 03-11-96   2:32p

CNE2000  LAN          13,147 02-13-96  11:07a

CNE2000  LDI          10,980 01-05-96   1:26p

CONFIG   NEW           1,060 02-01-96   4:51p

DOSNP    EXE          10,773 03-18-96   3:40p

ETHERTSM NLM          14,411 03-11-96   3:40p

FDDITSM  NLM          14,624 03-11-96   3:51p

HOSTMIB  NLM          54,909 01-26-96   9:15a

IPX      NLM         113,726 03-19-96   9:09a

LGNW3116 DLL         199,970 01-25-96   4:12p

LOGINW31 DLL         558,080 01-26-96  12:10p

LOGINW31 EXE           4,544 02-14-96  10:54a

LSL      COM          18,356 01-10-96  12:16p

LSLC32   NLM          18,571 02-27-96  10:31a

N16ODI   COM           8,959 02-27-96   2:39p

NBIHW    CFG              32 04-09-96   6:18a

NE2000   COM          23,505 11-27-95   3:05p

NE2000   INF          18,336 11-14-95   2:45p

NE2000   LAN           7,841 10-02-95   2:41p

NESL     COM           9,696 01-10-96   1:51p

NET      BNW             406 02-08-96   6:09p

NET      CFG             327 02-23-96   1:37p

NETBIOS  EXE          24,514 09-01-95  11:49a

NIOS     DRV           7,680 12-21-95   7:03a

NIOS     EXE         239,392 03-13-96   2:18p

NMR      NLM          11,448 01-30-96   5:06p

NWICFG   NLM           3,611 01-26-96   9:08a

NWIP     NLM          51,506 03-18-96   8:01a

PC32MLID LAN          31,509 02-27-96  12:45p

PCNTNW   LAN          21,005 11-16-94   2:20a

PCNTNW   LDI           9,778 04-01-96   9:13a

PDOSETH  COM          22,961 02-27-96   2:09p

PDOSFDDI COM          23,054 02-27-96   2:09p

PDOSMLID NLM          12,110 02-27-96   8:05p

PDOSTOK  COM          23,667 02-27-96   2:09p

PHASERS  WAV          11,114 12-01-94   3:14p

README   TXT          13,476 03-21-96   1:38p

READSNMP TXT          36,700 06-21-94   6:08p

SAMPCFG  WRI           6,016 05-01-95   8:03a

SNMP     NLM          53,712 01-07-96   2:32p

SNMPIPX  NLM           8,257 01-07-96   2:58p

SNMPUDP  NLM           6,414 01-07-96   2:52p

SPX_SKTS NLM          38,223 01-24-96   1:30a

SROUTE   NLM           9,339 02-27-96  12:13p

STARTNET ALL             590 04-01-96   2:27p

STARTNET BAT             290 04-01-96   2:35p

STARTNET BNW             122 02-08-96   6:09p

TCPIP    NLM         208,362 03-19-96   3:39p

TOKENTSM NLM          16,439 03-11-96   3:50p

TSASMS   COM          21,403 03-07-96   2:40p

WINSOCK  DLL          62,464 03-19-96   3:39p

WLIBSOCK DLL          46,266 10-01-95   5:07p
Directory of C:\NOVELL\CLIENT32\NLS
(no files)
Directory of C:\NOVELL\CLIENT32\NLS\ENGLISH
CMSM     MSG            3,275 02-27-96  10:13a

ETHERTSM MSG             913 03-11-96   3:40p

FDDITSM  MSG             925 02-27-96  11:55a

HOSTMIB  MSG           1,095 12-11-95   3:59p

LOGIN    DAT          56,832 01-05-96   3:13p

LOGIN    MSG          11,511 01-12-96   8:16a

LOGINW31 HLP          22,263 10-09-95  11:19a

LSL      MSG           3,596 01-10-96  12:14p

LSLC32   MSG           2,048 02-27-96  10:31a

NESL     MSG           1,134 01-10-96   1:50p

NWCFGDW  HLP         161,881 03-15-96   4:26p

NWMSGDW  HLP         148,536 02-16-96   1:32p

PC32MLID MSG           6,217 02-27-96  12:44p

PDOSMLID MSG           1,694 02-27-96   8:05p

SETUP    HLP         148,766 03-21-96   9:57a

SNMP     MSG           3,816 07-20-95   5:46p

SNMPIPX  MSG             970 08-16-95  10:11a

SNMPUDP  MSG             817 08-16-95   2:59p

TCPIP    MSG           4,437 03-19-96   3:38p

TOKENTSM MSG             985 02-27-96  11:44a
Directory of C:\NOVELL\CLIENT32\TCP
(no files)
Additional .HLP and MSG files also added to the \ENGLISH directory, depending on which installation options you select.
Files Copied to C:\WINDOWS and Below
Directory of C:\WINDOWS\SYSTEM
CALWIN16 DLL       102,213 03-06-96   9:20a

CLNWIN16 DLL          63,641 03-05-96   9:40p

CLXWIN16 DLL           7,011 02-21-96  11:43p

CTL3D    DLL          20,976 06-13-95   9:03a

CTL3D32  DLL          26,624 09-16-95  12:30a

CTL3DV2  DLL          27,632 09-09-95   3:15a

LOCWIN16 DLL          58,435 02-21-96   5:44p

NCPWIN16 DLL         138,275 03-06-96   3:53a

NETWIN16 DLL         175,861 03-06-96  11:37a

NWCALLS  DLL         147,856 02-14-96  12:56p

NWGDI    DLL         119,792 01-16-96   4:48a

NWIPXSPX DLL          41,088 01-09-96   2:17p

NWLOCALE DLL          43,440 02-14-96   7:33a

NWNET    DLL         225,392 02-14-96   4:39p

NWPSRV   DLL         279,770 01-26-96  10:55a

NWDRVLGO BMP          52,744 01-11-96   1:22a

NWPOPUP  EXE          17,776 03-18-96   8:52a

NWPSRV   DLL         279,770 01-26-96  10:55a

NWUSER   EXE           5,232 01-16-96   4:57a

PRTWIN16 DLL         279,260 03-08-96   7:39p

TLI_SPX  DLL          52,837 12-13-95  11:24a

TLI_WIN  DLL          15,713 08-07-95   4:56p

VLANINT  386           9,377 06-23-95   1:18p

VNETWARE 386          15,670 11-08-95   9:23a

NETWARE  DRV         159,344 03-26-96   4:07p
Directory of C:\WINDOWS\NLS (This example used the English default.)
000_UNI  001       722 01-11-96   4:59p

1252_UNI 001         727 01-11-96   4:51p

1253_UNI 001         727 01-11-96   4:59p

1254_UNI 001         722 01-11-96   4:59p

1255_UNI 001         722 01-11-96   4:59p

1257_UNI 001         722 01-11-96   4:59p

874_UNI  001         727 01-11-96   4:48p

949_UNI  001      20,085 02-16-96   2:46p

UNI_000  001       1,235 01-11-96   4:59p

UNI_1252 001       1,017 01-11-96   4:48p

UNI_1253 001         985 01-11-96   4:59p

UNI_1254 001       1,076 01-11-96   4:59p

UNI_1255 001       1,108 01-11-96   4:59p

UNI_1257 001         869 01-11-96   4:59p

UNI_874  001         699 01-11-96   4:48p

UNI_949  001      34,395 02-16-96   2:46p

UNI_COL  001         665 01-11-96   4:51p

UNI_MON  001       2,361 01-11-96   4:47p
Directory of C:\WINDOWS\NLS\ENGLISH
LOGIN    DAT       57,856 03-07-96  12:15p

LOGIN    MSG      11,588 03-08-96   2:30p

LOGINW31 HLP      41,141 03-05-96  11:02a

NETWARE  HLP     493,121 03-05-96   8:33a
Additional .HLP and MSG files also added to the \NLS and \NLS\ENGLISH directories, depending on which installation options you select.
* Originally published in Novell AppNotes
Disclaimer
The origin of this information may be internal or external to Novell. While Novell makes all reasonable efforts to verify this information, Novell does not make explicit or implied claims to its validity.