Using DS Standard to Migrate Networks to NetWare 4.1
Articles and Tips: article
Senior Analyst
Network Technical Services
01 Feb 1996
This AppNote discusses Preferred Systems' DS Standard tool and how to use it to migrate servers from NetWare 3.x to 4.1. DS Standard copies objects in the NetWare 3 bindery and translates them into the appropriate NetWare 4 Directory Services objects. This AppNote gives details on the process of performing a capture and migration of NetWare 3 objects to a new NetWare 4 tree.
- Introduction
- Advantages of Using DS Standard
- Installing DS Standard
- The Discover Operation
- The Model Operation
- The Configure Operation
- Conclusion
Introduction
Preferred Systems' DS Standard offers a unique tool for creating and manipulating NetWare Directory Services (NDS) trees. This tool is particularly useful when migrating servers from NetWare 3.x to 4.1, as it translates NetWare 3 bindery objects into the corresponding NetWare 4 NDS objects.
This Application Note introduces DS Standard and identifies its advantages in performing NetWare 3.x to 4.1 migrations. It briefly describes how to install the product and then walks you through the three operations involved in server migration: discovering, modeling, and configuring. This discussion highlights the migration aspects of DS Standard; the product has many other uses in the design, creation, and day-to-day management of NetWare Directory Services. These aspects will be covered in future AppNotes.
Advantages of Using DS Standard
DS Standard is faster and simpler to use than the traditional migration tools that come with NetWare. In essence, it combines key functions of these NetWare utilities:
MIGRATE.EXE
INSTALL.NLM
MIGPRINT.EXE
NWADMIN.EXE
All of these tools can and do perform the appropriate upgrading needed to recreate NetWare 3.x bindery objects into NetWare 4.1 Directory Services objects. However, DS Standard offers a number of advantages:
Offline operation
Dependency verification
Drag-and-drop operation
Proportional migration
Remote configuration
Offline Operation
Perhaps the most important advantage is that DS Standard works with the captured bindery information offline. All of NetWare's utilities work with the information online with live data. If you corrupt or destroy objects using the native utilities, you have to recreate them yourself. There's no way of backing up to the earlier stage prior to migration.
DS Standard works by taking a snapshot of your existing NetWare 3.x bindery. It stores and retains this snapshot in a separate data-base used only by DS Standard. You can manipulate, trim, modify, or otherwise play with your "bindery" view as long as you like before sending it over to a new or existing NDS tree. If you change your mind or need to get back the original bindery data, it is still there on the NetWare 3.x server (until you actually upgrade the NetWare operating system on the server).
You don't have to do anything to your bindery view if you don't want to. You can use DS Standard to simply transfer its objects straight across to a "model" NDS tree. At that point, you can manipulate the objects (add, modify, move, delete) in DS Standard as you would with the NWADMIN utility. But since you are working offline, if you make a mistake you can back up and start over.
You also have the advantage of Find and Replace capabilities. You can search for any of the objects' attributes or properties, and then replace or append them as appropriate, as you would if you were using a word processor. We'll look at some of the many uses for Find and Replace later in this AppNote.
Since you are working offline, you can try out various configurations for your trees, organizations, containers and objects. You can export the trial views and send them to key people in your company to evaluate. This is especially convenient if you have several offices that are geographically separated. Rather than investigating trial configurations on a complete NetWare 4.1 setup for test purposes, you can evaluate using the DS Standard software.
This offline capability also enhances the speed at which you can process the new NDS tree. DS Standard stores the trees and any changes you make to them in its back-end XBase database. This local database allows you to make changes or updates much faster than in a fully-distributed, replicated database such as NDS. Also, your various tests will not impact network performance over WAN links--a key difference when compared with NWADMIN.
Offline operations are particularly helpful when performing the complex merge of two trees. Novell's DSMerge utility performs this operation in real time and requires you to synchronize both servers before doing so. By contrast, DS Standard allows the capture of two or more trees upon demand, again without the delays imposed by replication. In addition, the offline merge can be done during regular business hours, without affecting the live network. You can configure the merged tree when you're ready, without having to wait for everyone to log out of the network.
Dependency Verification
After a bindery copy, DS Standard will run through your new NDS objects to verify ("resolve" in Preferred Systems parlance) the various dependencies each object has in the tree. In this way, if the name of a former bindery object has changed in order to comply with NDS requirements, objects which reference its old name will be automatically updated to reflect its new name.
Drag-and-Drop Operation
While NWADMIN does allow you to drag-and-drop objects from one part of a tree to another, it does not allow you to move objects from a NetWare 3 to a NetWare 4 server. With DS Standard, you can display a view of both servers within the program. You can then readily move objects or groups of objects from one view to the other.
Proportional Migration
Performing a migration using NetWare's own tools is an all-or-nothing approach. You cannot pick and choose which users, groups, or other objects to transfer. You must accept all objects from the old bindery into the new Directory Services tree. You will then have to prune your tree using NWADMIN to shape it to your new configuration.
DS Standard allows you to display the view of the NetWare 3's bindery, then select those objects you wish to transfer. You can copy the entire contents over, or you can choose just one object.
In this way, you can migrate some part of your existing network to NetWare 4--such as a department or series of groups. You can then train that part of the organization in the use of NetWare 4 before moving on to another group. This reduces the strain on training and support departments during the migration.
Remote Configuration
Another advantage to DS Standard lies in its ability to export a copy of an NDS view to a file. You can then send this file to an administrator at a remote site for use in configuring Directory Services at that site. (The site will, of course, require a copy of DS Standard to perform this operation.)
Performing a remote configuration like this assures you that the site will have a consistent tree to integrate back into the corporate global Directory Services. Also, the remote site will not require the level of expertise with NDS that you might have at your testing facility or central MIS department.
Installing DS Standard
DS Standard runs entirely on a Windows workstation. No server NetWare Loadable Modules (NLMs) are required. To run DS Standard, you will need the following minimum hardware and software on a client workstation:
A 386 processor with 8MB of RAM
15MB of free disk space to store DS Standard's files (plus an additional 3MB of space for each server bindery you are capturing to move into an NDS tree)
Setting in the CONFIG.SYS file of FILES=40 (fewer file handles will either slow the system or cause it to hang)
NetWare DOS Requester/VLM client software (this is essential, as DS Standard won't run without it)
Beyond this you will find that DS Standard installs like any other Windows program. Before you run it, however, you have to perform a licensing operation.
|
Note: If you have Preview, Master, or Service Provider licensesfor DS Standard, the licensing step is not required. |
Licensing File Servers
You need to apply a license to each server you want to discover. Each DS Standard package ships with two licenses: one for a bindery server and one for a server running NDS. The bindery-based license will also work with a NetWare 4 server running under bindery emulation. (Bindery and NDS consolidation licenses are also available. Contact Preferred Systems for details.)
DS Standard essentially ignores any bindery server lacking a license. You will not be able to Discover it at all. With at least one NDS server licensed in your environment, you can discover the majority of your NDS tree. What you will not get is server-dependent attributes to non-licensed servers, such as print queues or user trustee assignments. For instance, if users have trustee rights to a non-licensed server, DS Standard will ignore such rights. When you transfer these user objects to the NDS tree, they will lack any reference to those rights.
DS Standard requires that the license be for the same number of users as (or more than) the NetWare 4 license. For example, if the maximum number of connections your NetWare license allows is 250, you need a 250-user DS Standard license. (User limits don't apply to bindery-based licenses.) If, however, you have a 50-user DS Standard license, and you try to apply it to a NetWare 4 server with a 250-user limit, DS Standard will display an error message. You'll need to contact Preferred Systems for an appropriate license.
DS Standard includes a program called DS License Manager which appears in the program group. This license manager will both license and unlicense a server. To perform licensing, you must be logged in and authenticated to all servers you intend to license. In other words, you must be logged in as SUPERVISOR or equivalent on the bindery servers, and as ADMIN or equivalent to the NDS servers. When you launch the License Manager, it displays the dialog box shown in Figure 1.
Figure 1: The DS License Manager dialog shows you which servers you have available to license.
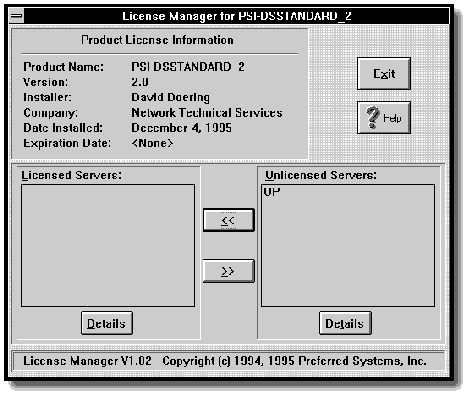
When you choose one of the unlicensed servers from the right-hand column, the License Manager will ask you for a unique serial number (provided in the software package) to license that server. If you try to use the same serial number in use by another server, the program will beep at you and display a message to the effect that that license is already in use.
Note that you will also need to provide this same unique serial number when you unlicense the server.
|
WARNING! Do not attempt to use a single DS Standard license to first capture one bindery, then remove that licensead apply it to another NetWare 3.x server to do a further capture. This is an explicit and direct violationof the license agreement.You must use only one license per server. |
Launching DS Standard
Once you license the appropriate servers, you can exit the License Manager and launch DS Standard itself. To do this, double-click on the DS Standard icon in the program group. The main screen is shown in Figure 2.
Figure 2: The DS Standard main screen is essentially a desktop where you will manipulate your views.
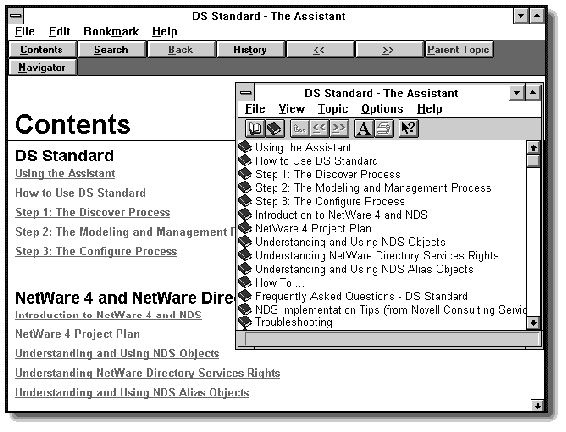
DS Standard also includes a tool called The Assistant (Figure 3), which explains NDS basics as well as important considerations involved in the upgrade process. It also offers various case studies to serve as models for your upgrade. (These include Novell's corporate-wide upgrade and Chase Manhattan Bank's upgrade to NetWare 4.) Finally, it has detailed information provided by Novell in the form of Application Notes, NDS Implementation Guide, and Rules of Thumb.
Figure 3: The Assistant provides access to a large database of text materials on performing upgrades.
You should read much of this material prior to embarking on an upgrade. In particular, there's a lengthy update to the manual explaining the addition of a text reader to DS Standard, new procedures for configuring passwords, and how to do Find and Replace.
Three Operations
Your server migration using DS Standard requires you to perform three operations:
Discover. You use the Discover operation to take a snapshot of a server's bindery or of an NDS tree. (Preferred Systems calls this "capturing a view" of that server or tree.) This captures all users, groups, print servers, print queues, printers, file and directory trustee assignments, user account information, security equivalences, password restrictions, group memberships, login scripts, and so on into DS Standard's off-line database.
Model. You use the Model operation to tailor the proposed tree, cutting and pasting information from a bindery view to an NDS view. (Modeling does not affect the original versions of the bindery or the NDS tree.)
Configure. You use the Configure operation to apply your new NDS tree configuration to your NetWare 4 server.
The remainder of this AppNote walks you through each of these migration operations in detail.
The Discover Operation
For our purposes here, we assume you have an existing NetWare 3 server that you want to migrate to a new NetWare 4 system. Since you will run DS Standard from a convenient workstation, you can use either of the upgrade options NetWare offers:
If you choose to do an Across-the-Wire Migration, discover both the NetWare 3 and NetWare 4 servers by logging into each.
If you choose the Same-Server Migration, you discover the NetWare 3 bindery first. You then perform the upgrade to the server software, after which you run the Discover operation on the new NetWare 4 NDS.
The following steps work either way. We'll assume an across-the-wire migration for the sake of convenience.
Capturing a View
You start the migration process by capturing a view from the NetWare 3 server. First log in as ADMIN in the branch(es) of the NDS tree you manage. Then log in as Supervisor with the /NS option (LOGIN SUPERVISOR /NS) to the bindery servers targeted for migration.
|
Note: Do not log into the NetWare 4 server as supervisor (that is,using bindery emulation). You need to be logged into NDSas ADMIN at the Root level. Don't forget to use the /NSoption to avoid running a login script. |
To run Discover, you'll need to be authenticated to the NDS tree and all the servers you are working with. Make sure you have the appropriate rights to NDS and to the file system. You do not need ADMIN rights to the [Root] of the tree if you are a container Admin; you only need full rights to the portion of the tree you are working on. However, you will need at least Browse object rights and Read, Compare property rights to the first level below [Root] in the branch of the tree in which you are working, down to the container where you do have administrative privileges.
Setting Bindery Discovery Options. Launch DS Standard at your workstation. From the Tools menu, select Options, and then Bindery Discover (since you're going to discover a NetWare 3 server). You'll see the screen shown in Figure 4.
DS Standard offers a default Organization name of "Organization". You'll most likely want to change this to the appropriate name you have selected (TSI in our example screen).
User passwords do not migrate because they are encrypted. (This is true of DS Standard as well as all of NetWare's utilities.) This dialog provides a default password for all users of "defaultpw" (represented on the screen as *********). You can modify this default password as necessary. Further password manipulation is available once the Discover operation is complete.
Figure 4: The Bindery Discover options include a default password.
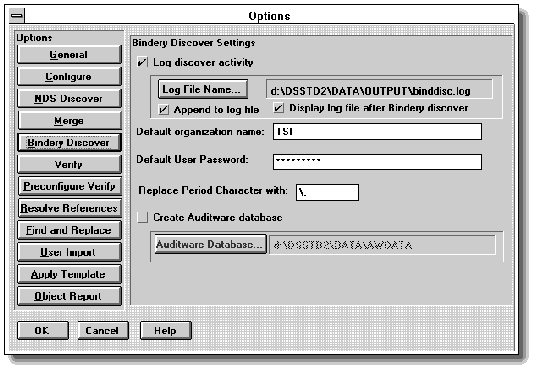
You might have to also modify usernames in order to correctly translate them into NDS. That's because NetWare 3 permitted the use of the period ( . ) as part of a username. In NetWare 4, periods are used as a context separator by NDS. So you need to substitute a new set of characters in the place of any periods in usernames. The default is a backslash and a period ( \. ).
Performing the Bindery Discover. Once you have made these selections, you can proceed with the discovery. Exit the Options dialog and choose the Bindery Discover button from the menu bar. DS Standard asks you to give a name to your NetWare 3 view. A quick name would be the server's own name such as 3XSERVER. You also need to type in your name as creator of this view. After that, choose OK and the program performs the discover.
That's all it takes to capture a view from a NetWare 3 server. The length of time that the discovery process will take depends on several factors: your workstation hardware, the level of network traffic, the number of objects in your bindery, and the number of inter-object dependencies (users-groups, print servers-queues-printers, and so on). As far as hardware is concerned, the faster your processor and the more RAM you have, the faster the program does the discovery. On a relatively fast workstation such as a 486DX-100 with 8MB of RAM, the discovery of a bindery with one hundred objects can take several minutes. Discovery of larger binderies on a heavily utilized network will take longer.
Looking at the View. Once the discovery process is completed, the program displays the captured view as shown in Figure 5.
Figure 5: DS Standard places all of the objects discoverd from a NetWare 3 bindery into a default single-container view.
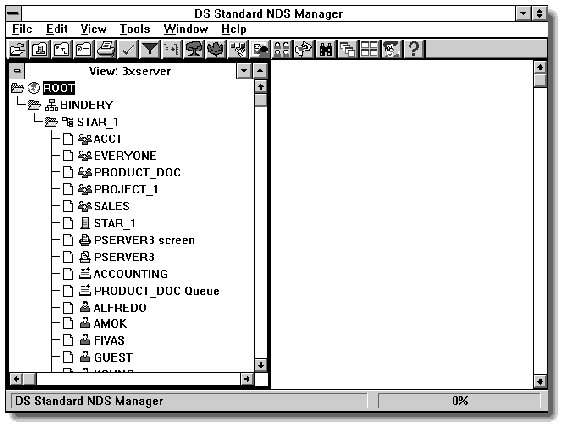
Note how the view of a NetWare 3 bindery has all bindery objects under a single container object named after the 3.x server. In our example, the container object is called 3XSERVER. Note as well that the program has changed the bindery objects into the appropriate NDS leaf objects.
Not only does DS Standard collect all object information as part of its discovery, it also gathers file system trustee rights and stores them as part of the view. (As we mentioned earlier, it will only gather those rights if you have DS Standard licenses on the appropriate servers.) It will recreate those rights when you transfer objects to the new NDS tree.
Repeat the discovery process for each NetWare 3 server that you want to include in your new NDS tree.
The Model Operation
Rather than simply using the default view in Figure 5, you will most likely want to modify the view to include additional containers, groups, and other objects. This is where the off-line modeling process of your new tree begins. However, before you start manipulating the discovered view, we suggest you save it by using the Export option. This will give you a retreat point to go back to if you aren't happy with the changes you make.
At this point, you can flesh out the desired NDS tree by creating container objects (countries, organizations, and organizational units) and moving or copying leaf objects to where they belong in the tree.
To create new objects, choose the Add Object option from the Edit menu. DS Standard presents you with a list of valid NDS objects. Choose Container, for example, and DS Standard will ask you to name the new container. After typing in a name, click on OK to accept it. The program places a new container at the point in the tree you have highlighted.
|
Tip: The fast way to do this is to highlight the point you want toinsert a new object and then click the right mouse button. DSStandard displays the list of available objects, and you've savedyourself a few mouse clicks. |
Other hot-key combinations you're likely to use are the familiar Shift-Click or Control-Click to select multiple objects. You can then drag and drop two or more objects from one container into another.
Find and Replace. DS Standard allows you to modify an object's properties just as you would using NWADMIN. For example, you can assign a new location or telephone number to that object. You can reset password, time, or other account restrictions as well. The program's Find and Replace feature can be used to great advantage at this stage of the migration.
The Find and Replace capability works for virtually all properties of all NDS objects supported by DS Standard: fax numbers, group member-ships, login scripts, trustee assignments, and so on. The program generates a log file that can be used for exception reporting. You can then choose whether to run a replace on all or selected pieces of the matches.
|
Note: DS Standard cannot create server and volume objects. OnlyNetWare's INSTALL.NLM can place a server or volume intothe tree. If you need to rename these objects, you must do sousing INSTALL.NLM prior to configuring with DS Standard. |
One example of using Find and Replace is if you want to identify the origin of objects as coming from a specific NetWare 3.x bindery. To identify objects that came from the ENG server, for instance, you could insert a string such as "Eng_" in front of the name of each object. A user object named USER would then become Eng_User, and so on.
You can also use Find and Replace on object properties to quickly fix references to other objects whose names change during the migration. Most notably this occurs when you migrate user login scripts over to NetWare 4. References to particular print queues will necessarily have to change. While NetWare includes an entire other utility to handle migrating queues (MIGPRINT.EXE), DS Standard can search for references to the old print queue name and replace it with the new one. With DS Standard, this can be done globally, whereas with either the Migrate or Install approach, you'd have to use NWADMIN to do this manually for each object. DS Standard can also change MAP statements and search drive mapping statements to Directory Map objects in login scripts.
Apply Template. The template capability allows you to select any NDS object and use it as a "boilerplate" to set up new objects of the same type. This way you only have to type in redundant information such as drive mappings, fax and phone numbers, time restrictions, and trustee assignments for applications once. You can then apply this new "profile" to many users at once, or apply only selected attributes without the whole template. Either way, you eliminate many opportunities for typing errors and save a tremendous amount of time.
Working with Multiple Views. If you are migrating a NetWare 3 server into an existing NDS tree, you'll find it easier to manipulate objects if you discover the NDS environment and open multiple views. Working with multiple views is like working with two documents in a word processor. Just as you can cut, copy and paste text between the two documents, you can also cut, copy and paste NDS objects from one view to another.
To open a second view (or more, if you need to), choose the Open File icon. DS Standard offers you a list of your previously discovered (and saved) views. Select the view you want from the list. DS Standard displays this new view on top of the other. Click on the Tile icon and DS Standard will place the views side-by-side, as shown in Figure 6.
Figure 6: In DS Standard you can display two views and move objects from one to the other.
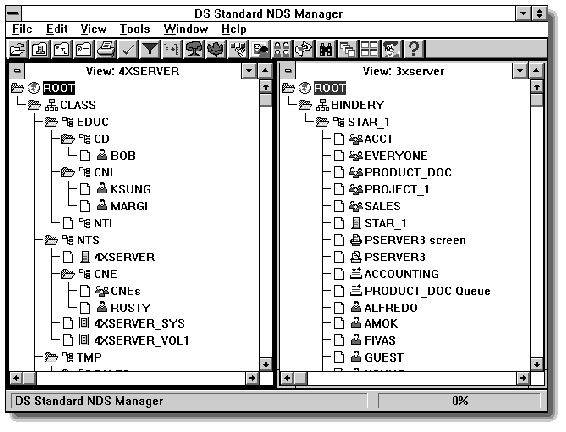
Suppose you want to move all the discovered bindery objects to your new NDS tree. In that case, you can simply drag the 3XSERVER Root icon from its view and drop it over the appropriate container icon in the NDS (4XSERVER) view. You have just defined over 100 objects in the NDS tree in one move. Compare this with the time it would take to migrate or create those objects manually using NWADMIN.
Suppose you only want to move a subset of those bindery objects. That's where Shift-Click and Control-Click come in. By using these hot-key combinations, you can selectively choose just the objects you want before dragging them over to the new view.
Merging Duplicate Objects. If you are consolidating two or more NetWare 3 servers into one NDS tree, you more than likely will encounter duplicate objects. When DS Standard encounters objects with the same name, it can either append or replace the information from one duplicate to the other. You get to specify which for each type of information. For example, the program will append two login scripts together. It separates the two by adding the line "Merge Login Script".
Before DS Standard performs a merge, it will ask you if you really want it to merge the two objects. If you confirm by clicking OK, the program proceeds with the merging. This confirmation prompt can be turned off in the Merge Options, if you so desire. In fact, it is a good idea to review the Options settings to make sure the merge will occur according to your expectations.
Once you have tailored the tree according to your plan, analyze it by printing out the view of the tree or running the ready-made object reports that come with DS Standard. If necessary, you can use the Verify Tree function and Resolve References to repair any unresolved references in your model.
The Verify Process
After you have made changes to your view, DS Standard verifies references to other objects. In NDS, numerous inter-object references are made between dependent objects such as Users and Groups. For each User object that has a Group listed in its Group Membership property, DS Standard will check to see that the specified Group object exists in the tree. Likewise, for each Group object, the program checks to see if each referenced user has that Group's name in its Group Membership property.
The same type of verification occurs for Printer/Queue/Print Server object dependencies, Volume/Server object relationships, Messaging Server and Message Routing Group objects.
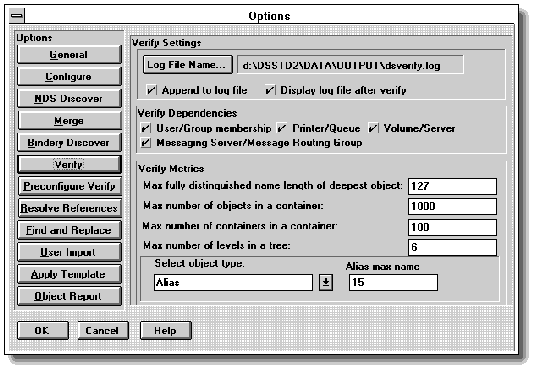
DS Standard also checks your view to see if it adheres to certain NDS tree metrics such as tree depth, object name length, and maximum number of objects/subcontainers per container. From the Options | Verify dialog, you can set values for these tree metrics that DS Standard will use as it checks your view (see Figure 7).
Figure 7: The Options|Verify menu allows you to specify values for tree metrics that DS Standard will use when verifying your view.
Any discrepancies encountered during the verify operation are noted in a log file named DSVERIFY.LOG, which displays after the program completes the verification.
Resolving References
After you manipulate the objects in your tree, DS Standard will also analyze the tree and repair any unresolved references within it. For example, if VOL1 was originally in the Sales OU but was moved to the Acme OU, the Resolve Reference function would update the reference to point to the new location.
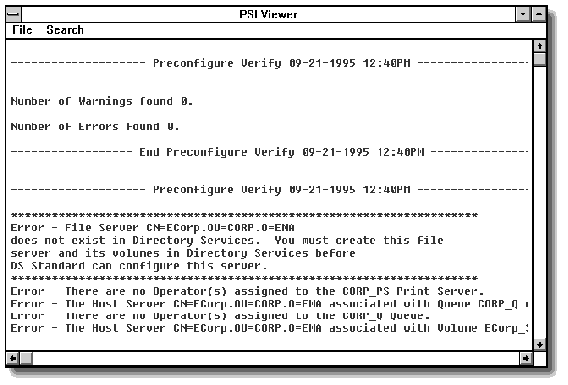
DS Standard logs all activities into a file (unless the user chooses to turn logging off via the Options menu option). The log file for reference resolutions is DSRESOLV.LOG. You can view these logs by choosing the File menu's Open Log option. A sample preconfigure verify log appears in Figure 8.
Figure 8: DS Standard maintains logs on all of its operations.
Up to this point you have made no changes in your actual NDS tree. All of the discovery and modeling has occurred within the DS Standard database. You can continue to evaluate and modify this proposed NDS tree until you are comfortable with it. When your analysis is complete and you are satisfied with your final NDS model, you are ready to run the Configure operation.
The Configure Operation
The final step in the migration process is to run the Configuration operation to update your live NDS tree with the new information from your model. This operation is like restoring a volume from a backup tape--it creates any objects not currently in the NDS tree, and either appends or overwrites (depending on the "Options" setting for Configure) information on existing objects with the new object data from the DS Standard database.
As you might suspect, the Configure operation will take longer than the Discover process. That's because DS Standard needs to write and verify the updates to the NDS tree.
Before running the Configure operation in DS Standard, you must physically install new NetWare 4 servers into the NDS tree using Novell's INSTALL.NLM utility and bring all servers and volumes online. DS Standard will not Configure if NDS is not installed. The program modifies existing trees, but does not install them. So you have to have at least a minimal tree on the system for DS Standard to work. Such a minimal tree appears after you do an installation of NetWare 4.1, but before you add users.
You should also use Novell's MIGRATE.EXE, FILER, SBACKUP, or other NetWare-aware tape system to transfer data files and directories to the new server(s). MIGRATE.EXE offers a "file system only" option which is very useful for moving the data files.
|
Note: You can wait until after the Configure operation to transferfile system data, but there are several issues to be aware of.If the data has not been migrated prior to the configure, youcan instruct DS Standard to create empty directories (theOptions|Configure menu controls this) so thecorresponding directory trustee assignments can becreated. DS Standard will not create empty (zero-byte) files;therefore, if the actual files are not present during aconfigure, the file trustees will not be configured. Thishappens for files only, not directories. If this occurs, simplygo back and re-configure the objects with file trustees afterthe files have been migrated. The file trustees will then becreated for those objects. |
To run Configure, you must be authenticated to the NDS tree and all the servers you are working with. You'll need the same rights to NDS and to the file system as described earlier for the Discover operation.
In DS Standard, choose the Tools menu's Options option, then choose Configure. The program presents a set of configuration settings you can choose (see Figure 9).
Figure 9: DS Standard's Configuration menu offers a set of options about properties and passwords.
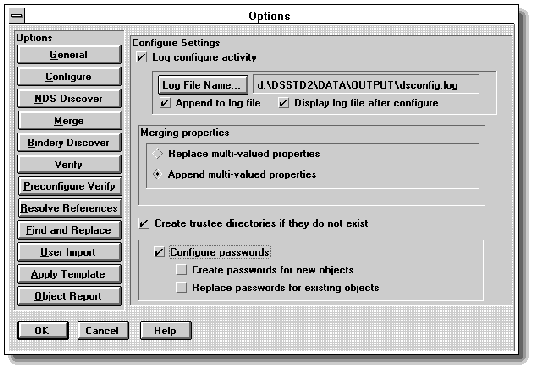
Once you set your configuration options, return to the main menu where you have your new NDS tree view. Select the desired objects in the view either individually, or all at once using the Select All button. Choose the Configure Selected Objects option from the View menu to write the objects into the live NDS tree.
DS Standard proceeds to verify that your destination server has the same name, as do the volumes. (It does this verification because it cannot rename servers or volumes. You'll have to rename them yourself if you need to using the NetWare INSTALL.NLM utility.) If the names aren't the same, DS Standard issues an error message and stops the configuration.
Once this verification is finished, DS Standard performs the modification, creating the users, groups, print servers, print queues, printers, file and directory trustee assignments, user account information, security equivalences, group memberships, login scripts, and so on in the live NDS tree. It stores any messages into the DSCONFIG.LOG file, then returns you to the main menu. You should review this log file for any errors that may have occurred during the Configuration operation.
You have now successfully migrated a NetWare 3 server to Directory Services using DS Standard.
Conclusion
An automated tool such as DS Standard can significantly reduce both the time as well as the expertise needed to perform an upgrade to NetWare 4. The more servers you have to cope with, the more savings you'll see. In addition, DS Standard's ability to export tested NDS trees for installation at remote sites will further reduce the difficulties involved in standardizing such sites to a global tree.
For further information on DS Standard, contact:
Preferred Systems, Inc. 250 Captain Thomas Boulevard West Haven, CT 06516
|
Voice: |
203-937-3000 or 800-222-7638 (U.S. only) |
|
Fax: |
203-937-3032 |
|
BBS: |
203-937-3019 |
|
CompuServe: |
GO NVENB (Preferred Systems section) |
|
E-mail: |
SYSOP@PREFSYS.USA.COM |
|
Internet: |
http://prefsys.com |
* Originally published in Novell AppNotes
Disclaimer
The origin of this information may be internal or external to Novell. While Novell makes all reasonable efforts to verify this information, Novell does not make explicit or implied claims to its validity.