Novell Research: Installing and Configuring GroupWise Remote
Articles and Tips: article
Senior Research Engineer
Systems Research Department
01 Feb 1996
GroupWise Remote is an electronic messaging client designed to run on standalone laptops and workstations. GroupWise Remote allows users to access their master GroupWise mailboxes from a remote location. GroupWise Remote is ideal for users who travel or work from their homes. Remote users can exchange mail messages, appointments, notes, and phone messages with those on the master GroupWise system and other GroupWise Remote users. This AppNote starts with a brief introduction to GroupWise Remote; prerequisites, installation, and setup of the GroupWise Remote client are covered in detail. Information is provided for system administrators and users including requirements, setup worksheets, and terminology definitions. This AppNote provides a concise guide for getting a large base of users up and running with GroupWise Remote with relatively little effort.
- Introduction
- GroupWise Remote
- GroupWise Master System Requirements
- Windows and OS/2 Client Requirements
- GroupWise Remote Installation and Setup
- Setting Up GroupWise Remote
- Novell's Remote Users Guidelines
- Summary
- Sources
Introduction
Remote computing needs are no longer the domain of a few "in-the-know" individuals. More users than ever are insisting on a reliable, easy to use method for maintaining a virtual umbilical cord to the office and the outside world. Many of them wouldn't know parity from stop bits--and why should they? This AppNote provides a concise guide for understanding GroupWise and GroupWise Remote client technology. The critical elements required for providing GroupWise Remote for a user base are all provided here in one place. The goal is to provide a concise guide to make it easy to provide that latest in remote computing capabilities to the widest possible base of users. For those of you that are new to GroupWise or for those who would like a quick review of some of the basic terminology, we have included a glossary of GroupWise and Groupware terminology at the end of this AppNote.
|
Note: If you would like more information on the majorcomponents of a GroupWise system, refer to "BasicGroupWise Concepts for Support Professional" in theJanuary 1996 issue of Novell Application Notes. |
This AppNote begins with a brief introduction to GroupWise Remote. We will then cover the prerequisites, installation, and setup of the GroupWise Remote client. Information is provided for system administrators and users including requirements, setup worksheets, and terminology definitions.
We have included a sample similar to the "one-pager" that Novell's Information Services department provides to Novell employees to get them up and running in minutes with GroupWise Remote.
GroupWise Remote
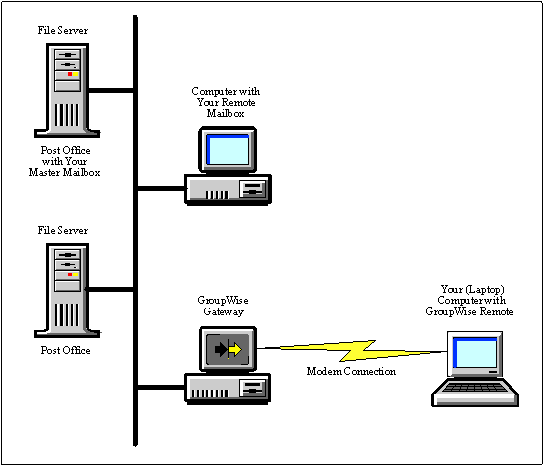
GroupWise Remote is an electronic messaging client designed to run on standalone laptops and workstations. GroupWise Remote allows users to access their master GroupWise mailboxes from a remote location. GroupWise Remote is ideal for users who travel or work from their homes. GroupWise Remote users can exchange mail messages, appointments, notes, and phone messages with those on the master GroupWise system and other GroupWise Remote users. GroupWise Remote is available for Windows, Macintosh, and DOS. The following figure illustrates a GroupWise system with both a network connected and modem connected GroupWise Remote client.
Figure 1: GroupWise system with GroupWise Remote clients.
GroupWise Remote Interface and Functionality
GroupWise Remote clients share the same software code as GroupWise network clients. The functionality and user interface are preserved in GroupWise Remote clients. Network and remote client applications are identical for both Windows and Macintosh clients.
Most of the features users enjoy when using the GroupWise network client are also available when using the GroupWise Remote client. Users can send and receive mail messages, schedule meetings, assign tasks, send calendar notes, and manage personal calendars. Users can forward, reply to, or delete any message type. They can also accept, decline, or delegate any scheduled meeting, task, or note.
GroupWise Remote users can create folders, personal groups, and route workflow with the "Rules" feature. Message status tracking is also preserved, as is the ability to retract messages and reschedule meetings. The only features not available in GroupWise Remote are those requiring a live network connection to other users' mailboxes, such as busy searches or proxy access.
GroupWise Remote has two categories of users. The first category of users has a GroupWise network client at the office (where the master GroupWise system is installed) and use GroupWise Remote when they travel or work at home. The second category of users is permanently based away from the master site (a satellite office or users who always work at home). The users in this second category rely on GroupWise Remote for regular communication and coordination with those at the master site.
In both cases, each GroupWise Remote user must have a master mailbox at the master site. Each user's master mailbox requires a license; an additional license is not required to use GroupWise Remote to access their master mailbox.
A remote mailbox is created on the hard disk of the remote user's system when GroupWise Remote is installed. The remote mailbox can contain any (or all) of the information from the master mailbox at any given time, based on the information items the GroupWise Remote user has requested.
Master and remote mailboxes can--and usually are--modified and updated at the same time. For example, while a GroupWise Remote user is creating or replying to messages, the user's master mailbox can receive new messages from other GroupWise users. The next time the GroupWise Remote user connects to the master system, mailbox information in is merged and synchronized.
Figure 2: GroupWise Remote mailbox and master mailbox with requests and bi-directional synch process.
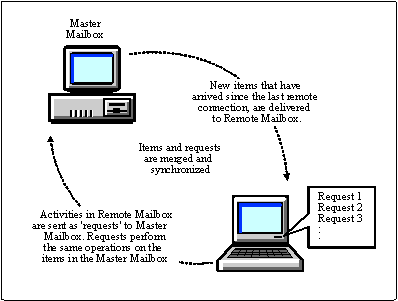
The remote mailbox allows users to work off-line--users do not need a live connection to the master GroupWise system to do work in GroupWise Remote. Actions that modify the remote mailbox (opening a message or creating a personal group) create a request to make the same modification to the master mailbox.
Licensing Issues
The Remote Client software is licensed by the same mailbox license mechanism used by network Clients. Any platform version of the Remote Client software can be used without additional licensing to access any licensed mailbox. You can also use Remote on your home computer, as long as all of these workstations where the software is stored are used to access the same licensed mailbox, they can all operate under a single mailbox license.
GroupWise Master System Requirements
Beyond the client requirements for GroupWise Remote, the master GroupWise system must meet a set of minimum requirements in order to support remote users. Requirements include proper setup and configuration for each remote user, in addition to at least one message server and one gateway as part of the back-end GroupWise system.
Master System Prerequisites
Remote requires you to have a mailbox (your master mailbox) on your master GroupWise system. You must also have a password assigned to your master mailbox.
To support GroupWise Remote, the GroupWise administrator must install a Message Server and the Async Gateway or X.25 Gateway at the master GroupWise site. This AppNote does not cover the installation and setup of the 'back-end' GroupWise system. For more details on GroupWise systems, see The GroupWare Support Professional's Guide. The document is available from the GroupWare Support Remote Document Server (send Internet mail to public@novell.com for RDS instructions) and on the World Wide Web at
http://netwire.novell.com/servsup/groupware/pubs/profguid.htm
The following section provides an overview of the requirements that must be met before GroupWise Remote clients can be used.
Message Server. The Message Server is the message transport agent (MTA) required for routing messages between post offices and through gateways in the LAN-based GroupWise system. Several platform versions of the Message Server are available, including DOS, OS/2, UNIX, and NLM (NetWare Loadable Module) versions. Any Message Server version can be used to support GroupWise Remote users, regardless of what platform version of GroupWise Remote they are using (Windows, DOS, or Macintosh). GroupWise sites with multiple post offices already have at least one Message Server installed.
Async Gateway or X.25 Gateway. Usually the system administrator will want to install the Async Gateway to support GroupWise Remote users. The Async Gateway provides a telephone interface to GroupWise Remote users using standard data modems. OS/2 and DOS versions of the Async Gateway are available. The X.25 Gateway can be used if GroupWise Remote users are using wireless modems and connecting through the communication services of RAM Mobile Data. The X.25 Gateway also works for users dialing in through an X.25 PAD (Packet Assembler/Dissembler).
When setting up the Async or X.25 Gateway, the administrator assigns a gateway login ID and password that all GroupWise Remote users use to establish connections in GroupWise Remote.
|
Note: Requirements for the Message Server, Async Gateway, andX.25 Gateway are not included in this AppNote because therequirements vary depending on the platform version. Formore information about these products, call NovellGroupWare Product Information at (800) 861-2507. |
Windows and OS/2 Client Requirements
The GroupWise Remote requirements are summarized in the following table.
|
Hardware/Software
|
Minimum Requirements
|
Recommended Requirements
|
|
Computer |
80386/20MHz |
80386/25MHz or better |
|
DOS Version |
3.3 |
5.0 or higher |
|
Windows version |
3.1 |
3.1 or higher |
|
OS/2 version (if running under OS/2) |
2.1 |
2.1 or higher |
|
Extended memory |
4MB |
8MB or more |
|
Disk space |
13MB required for remote files |
17MB |
GroupWise Remote Installation and Setup
The Client disks in the "GroupWise Client/Admin Pack" install GroupWise Remote to the GroupWise system on your network. You can then install GroupWise Remote from the network to your computer.
GroupWise Remote Disks
The Client disks CANNOT be used to install GroupWise Remote directly to a standalone computer. If you have a stand-alone computer, such as a laptop at a remote location, you must use the Remote Client disks to install GroupWise Remote. The Remote Client disks are available in the GroupWise Remote for Windows Materials Pack, which also includes a copy of this manual. To order the GroupWise Remote for Windows Materials Pack or to receive additional information, please call the GroupWise Sales Center at (800) 861-2507. If you are outside of the United States, Puerto Rico, the U.S. Virgin Islands, or Canada, please contact your local WordPerfect affiliate or authorized reseller.
A Getting Started Checklist
This checklist summarizes the steps for getting started with GroupWise Remote for Windows.
Verify that your computer meets the minimum system requirements for running GroupWise remote.
Fill out the setup worksheet (included on the next page of this AppNote).
Install GroupWise Remote.
Start and setup GroupWise Remote.
Create a modem connection.
Create a network connection (if applicable). Test your connections.
Retrieve information (items, Address Book, and so forth) from your master mailbox.
The Setup Worksheet
The following worksheet will help you gather the information necessary to set up GroupWise Remote. This information is also provided in the GroupWise User's Guide.
User Information
|
Full Name |
|
|
User ID |
|
|
Master Mailbox Password |
|
System Information
|
Domain |
|
|
Post Office |
|
Modem Information
|
Description (Name) |
|
|
Com Port |
|
|
Baud Rate (May depend on master GroupWise system's gateway modem.) If you are having difficulty synchronizing, try using a lower try using a lower baud rate. |
Time Zone Information
|
Remote User's Time Zone |
|
|
Time Zone observes Daylight Saving Time? |
Yes/No |
Modem Connection Information
|
Connection Name |
|
|
Gateway Phone Number |
|
|
Gateway Login ID |
|
|
Gateway Password |
|
|
Modem Script (name and location if required) |
|
|
Disconnect Method* |
When All Updates Are Received Do Not Wait forResponses Manually |
|
Redial Attempts* |
Default = 5 |
|
Redial Retry Interval* |
Default = 1 minute |
Network Connection Information
|
Connection Name |
|
|
Path to Post Office |
|
|
Disconnect Method* |
When All Updates Are Received Do Not Wait forResponses Manually |
* Disconnect Method, Redial Attempts, and Redial Retry Interval have default settings. Unless your system administrator supplies you with different values for these settings, use the default settings for now. You will be given the opportunity to change them later.
Installing From Floppy Disks
Many users will favor using the Remote Client disks which are NOT included with the standard GroupWise client package. This will be the first choice for users that have limited access, if any, to the network where their post office directory is located.
Window 3.1 Setup Instructions. The GroupWise Remote files are in compressed format on the Remote Client disks. To decompress and install the files onto your computer's hard drive, complete the following steps.
Make sure that Windows is running.
Insert the Remote Client 1 disk in your computer's floppy drive.
Choose the File menu in the Windows Program Manager, then choose "Run" to open the Run dialog box.
Type a:setup.exe (use the appropriate letter indicating your floppy drive) in the Command Line box.
Proceed to "Choosing Standard or Custom Install" as described below.
Windows 95 Setup Instructions. Complete the following steps to set up GroupWise Remote with Windows 95.
Make sure that Windows is running.
Place the GroupWise Remote Client 1/Install diskette in your computer's floppy drive.
Double click on the "My Computer" icon, then double-click on the icon for the floppy drive.
Double click on the Setup icon.
Proceed to the "Choosing Standard or Custom Install" section of this AppNote.
Installing From the Network
To install from the network, you need to know the path to the RMSETUP.EXE program. This program is located in the OFWIN40 subdirectory of your post office directory. The system administrator should provide assistance in locating and providing proper access rights to this directory.
Window 3.1 Setup Instructions. Complete the following steps to set up GroupWise Remote with Windows 3.1.
Make sure that Windows is running.
Choose the File menu in the Windows Program Manager, then choose Run to open the Run dialog box.
Type the complete path to the RMSETUP.EXE program in the Command Line box.
Include RMSETUP.EXE in the path. For example, X:\POSTOFF\OFWIN40\RMSETUP.EXE, where POSTOFF is your post office directory.
Proceed to the "Choosing Standard or Custom Install" section of this AppNote.
Windows 95 Setup Instructions. Complete the following steps to set up GroupWise Remote with Windows 95.
Make sure that Windows is running and that the Novell NetWare Client 32 is properly installed.
From the Window's Start menu, select run from the run menu.
Type the complete path to the RMSETUP.EXE program in the Command Line box.
Choosing Standard or Custom Install
You can choose Standard Install or Custom Install. Each option is described in the Installation Type dialog box shown below.
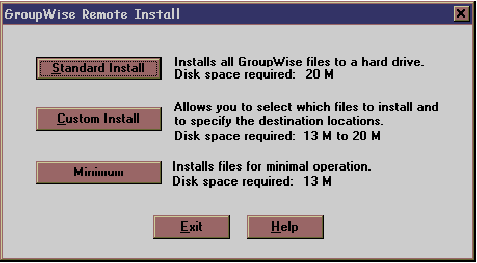
Standard Install. Complete the following steps to install all GroupWise files to your hard drive.
Choose Standard Install to start the installation. The Standard Install dialog box appears, informing you of the program's progress. When all files have been installed, the Set Up Program Manager Group dialog box appears.
Note that for Windows 95, items added to a Program Manager group will instead be added as items contained within the Windows 95 Start Menu.
You can either choose OK to accept GroupWise as the name of the group you want Remote to appear in, or type another name in the Program Group box and then choose OK. The GroupWise Installation Complete dialog box appears when GroupWise has been successfully installed. Choose OK to close the dialog box, then continue with the "Setting Up GroupWise Remote" section of this AppNote.
Custom Install. This option lets you select the GroupWise Remote files you want to install onto your hard drive.
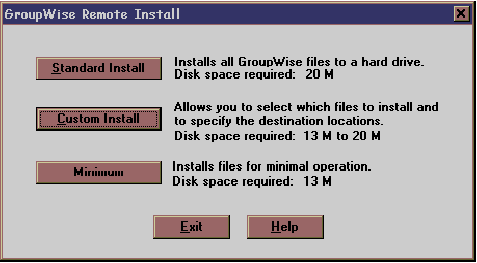
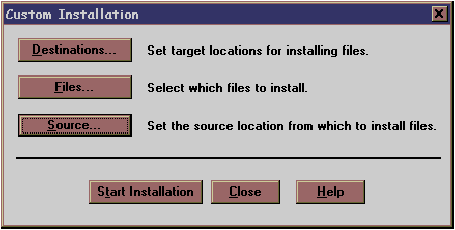
Choose "Custom Install" to open the Custom Installation dialog box.
Choose "Source" to open the GroupWise 4.1a Installation dialog box.
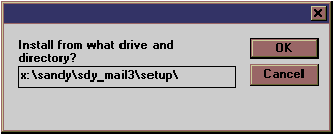
You can either choose OK to accept the source drive and directory shown, or type the source drive and directory you want and then choose OK.
Choose Destinations to open the Directory Selections dialog box.
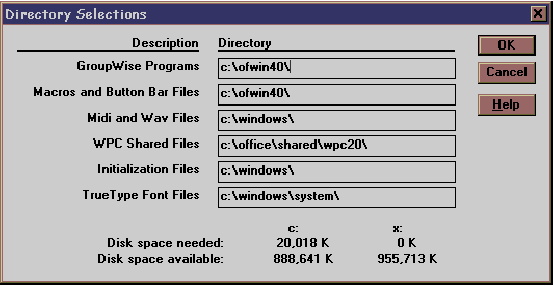
You can either choose OK to accept the destination drives and directories as shown, or type the destination drives and directories you want and then choose OK.
Choose "Files" to open the GroupWise Installation Options dialog box. All options in the GroupWise Installation Options dialog box are already selected.
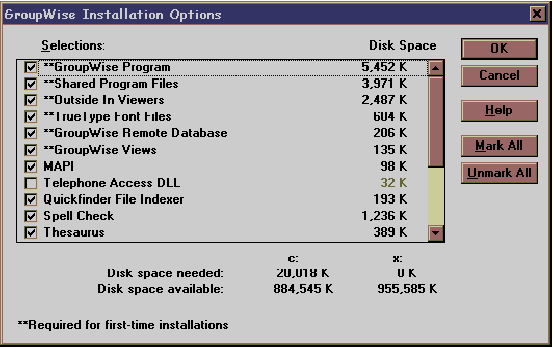
Deselect the files you don't want to install, then choose OK to return to the Custom Installation dialog box.
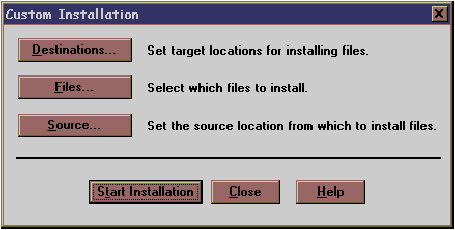
Choose "Start Installation." The "Custom Install" dialog box appears informing you of the program's progress. When all files have been installed, the "Set Up Program Manager Group" dialog box appears.
You can either choose OK to accept GroupWise as the name of the group you want Remote to appear in, or type another name in the Program Group box and then choose OK.
The "GroupWise Installation Complete" box appears when GroupWise has been successfully installed. Choose OK to close the box, then continue with "Setting Up GroupWise Remote."
Setting Up GroupWise Remote
GroupWise Remote is designed to make it easy for first time users to get up and running. Intelligence is built into GroupWise Remote that monitors the configuration and requirements.
The First Time You Load GroupWise Remote
When a non-configured Remote client is first loaded, a dialog will appear as shown below.
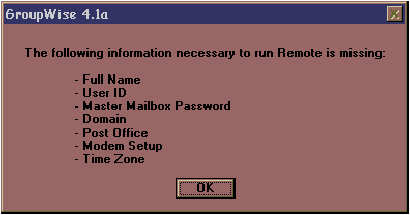
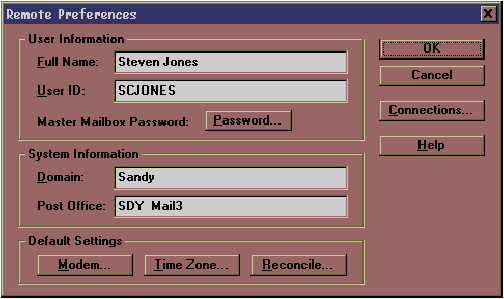
This dialog provides a list of required items for Remote to function that are not yet configured. Remote will automatically guide the user through configuration of these items. Remote will not run until all the configuration has been completed. First, Remote moves the user automatically into the Remote Preferences dialog. This dialog is accessed by double clicking on the "Remote" icon which is available only in the Remote version of the client. After initial setup and configuration, the Remote preferences can be accessed by selecting "Preferences" from the File Menu.
User and System Information
From the "Setup Worksheet", fill in the appropriate values for Full Name, User ID, Domain, and Post Office. Click the Password button to fill in the Master Mailbox Password.


Type, then retype your password to your master mailbox. It is required that you have a password already setup for your master mailbox in order to GroupWise Remote to function.
Modem
The next step in the first-time configuration of Remote is your modem configuration. Click the Modem button on the Remote Preferences dialog.

Select the Modem button to bring up the Modem list dialog.


Time Zone
The next step in configuring Remote is setting up the proper time zone. This is done by pressing the Time Zone button on the Remote Preference's dialog. This will show the Time Zone dialog:

Press the Set Time Zone button to see the following:

The default settings for daylight savings time are usually correct. If you are in a place that does not use daylight savings time such as Arizona, you can edit the settings. Once you have completed the time zone and daylight savings time settings, look for the status updates in the Set Time Zone dialog for the proper information:

The next step in configuring GroupWise Remote is to create connections.
Creating a Connection
Connections are logical entities used to store the information neccessary to conect from your remote mailbox to your master mail box. The following sections describe how connections are created and configured.
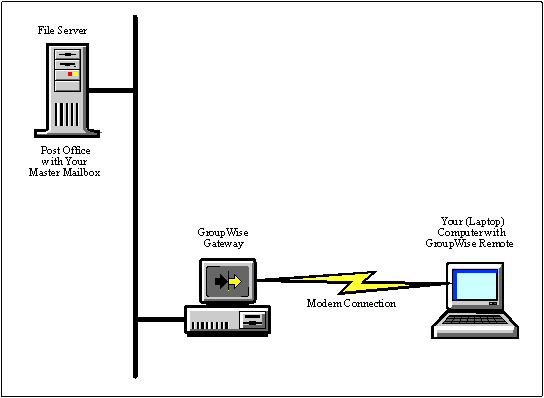
Modem and Network Connections. GroupWise Remote provides for both network and modem connections. In most cases, you will use your modem to connect to your master GroupWise system via a gateway, as shown below. Network connections can be invaluable when large amounts of information need to be downloaded to a Remote machine; for example, when retrieving a large address book or e-mail with large attachments.
Creating a Modem Connection. You can create both a modem connection and a network connection, the switch the connections depending on your current needs. For example, you can create a network connection to use while at your master site and a modem connection to use while away from your master site. This section provides steps for creating a modem connection. The next section, "Creating a Network Connection", explains how to create a network connection.
Figure 3: A modem connection.
You can switch between a modem connection and a network connection only if there are no pending requests on the connection you're switching from.
If you are continuing from "Setting Up GroupWise Remote", the Remote Preferences dialog box should be open.
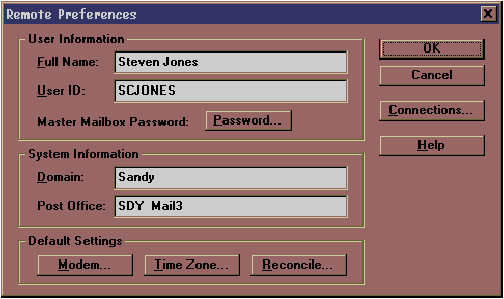
Complete the following steps to create a modem connection.
Choose "Connections" to open the Create Connection dialog box. If you have not set up any connection, the Create Connection dialog box appears as shown:

This dialog will be available after initial configuration via the Create button on the Connections dialog box.
Click the OK button on the Create Connections dialog box while making sure that Modem is selected.
Type the connection name listet on your worksheet in the "Connection Name" box.
Type the gateway phone number listed on your worksheet in the "Phone Number" box.
You can use a comma to signal a one-second pause in the dialing [such as 9,(800) 555-1212]. The 9 accesses an outside line and the comma causes a one-second pause to wait for the dial tone before dialing the number. Unrecognized symbols such as dashes, spaces, and the parentheses are ignored and can be included in the phonenumber (such as (800) 555-1212).
Type the gateway login ID listed on your worksheet.
Choose "Password" to open the Enter Password dialog box.

Type the gateway password listed on your worksheet. Choose OK.

Retype the password, then choose OK again.
Select one of the methodsin the Disconnect Method group box. The table below explains each method. Change the Redial defaults by typing new parameters in the Attempts and Retry Interval boxes.
Disconnect Methods
|
Method
|
Description
|
|
When All Updates Are Received |
Disconnects after requests are sent and all responses to the requests are received (or disconnects automatically when the time allowed by the system administrator has expired). |
|
Do Not Wait for Responses |
Disconnects immediately after requests are sent and waiting responses are received. Waiting responses are responses that are waiting for you at your master GroupWise system. |
|
Manually |
Lets you manually control when to disconnect (or disconnects automatically when the time allowed by thesystem administrator has expired). |
Choose OK to return tothe Connections dialog box.
Select your connection, then choose Select to return to the Remote Preferences dialog box.
|
You can create more than one modem connection. For example, if your master GroupWise system's gateway has multiple phone numbers that you can use to call in, you can create a modem connection for each phone number. Then, when connecting to your master GroupWise system, you would choose the modem connectionyou want to use. To create additional modem connections, repeat the steps you completed to create your first modem connection. |
Your system administrator sets a time limit for Remote users to remain connected to the master GroupWise system. If you select "When All Updates Are Received" or "Manually" as your disconnect method, this time limit may cause you to be disconnected sooner than you expected. If you are frequently disconnected in these modes, contact your system administrator.
You can specify the number of times you want GroupWise Remote to automatically redial if the line is busy. You can also specify the interval between each attempt.
Your modem connection is now defined.
Creating a Network Connection. In addition to your modem connection, you can set up a network connection. Only a single connection, modem or network, is required for GroupWise Remote to be fully functional. For a network connection, you must have network access to a post office directory on the network. For example, if your computer has a drive mapping to the post office containing your master mailbox, Remote can use that network connection to send requests and retrieve responses from your master mailbox.
|
Note: You can connect to any post office in your master GroupWise systemto access your master mailbox. You do not need to connect to thepost office containing your master mailbox. |
Figure 4: A network connection.
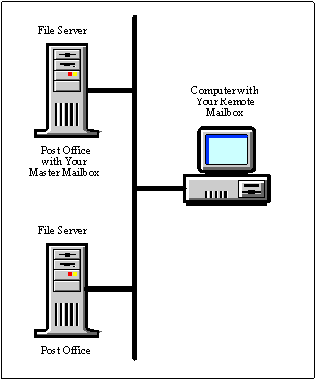
A network connection is very useful for retrieving large amounts of items, large items and your address book to your remote computer before you leave your master site because it transfers information faster than a modem connection. In particular, it can save long-distance phone costs associated with retrieving your master mailbox or large user lists via a modem. The Remote menu is only visible in the GroupWise Remote client as shown in the following screen.

The steps for creating a network connection are as follows:
Choose the Remote menu in the Main Window, then choose "Send/Retrieve" to open the Send/Retrieve dialog box.

Choose "Connections" to open the Connections dialog box, then choose "Create."

Select "Network," then choose OK to open the Network Connection dialog box.

Type the connection name listed on your worksheet in the "Connection Name" box.
Type the complete path to any post office directory in your master GroupWise system in the Path to Post Office box. (See your worksheet.)
Select the Disconnect Method you want.
Choose OK to close the Network Connection dialog box.

Choose "Select," then choose "Close" to return to the Main Window. Notice that "Network" appears in the" Type" column on your Connection List.
If you plan to use the network connection first (such as to retrieve information from your master mailbox while you are still at your master site), select Network as the connection setup. If you plan to use your modem connection first, select a connection that shows "Modem" in the "Type" column.
Once you have completed setup and configuration including: Full Name, User ID, Mater Mailbox Password, Domain, Post Office, Modem, Setup, Time Zone, and Connection information. GroupWise Remote is ready for operation.
Editing a Connection. After you have created a modem or network connection, you can change it through the appropriate Connection dialog box.
Choose the Remote menuin the Main Window, then choose "Send/Retrieve" to open the Send/Retrieve dialog box.
Choose "Connections"to open the Connections dialog box.
Select the connection you want to edit, then choose "Edit" to open the appropriate Connection dialog box.
Make your changes, then choose OK to return to the Connections dialog box.
Choose the connection you want to use, choose "Select," then choose "Close" until you return to the Main Window.
Testing Your Connections
Before trying to retrieve information from your master mailbox or before sending items to other GroupWise users, you should verify that no problems exist with the connections you created. Instructions for testing a modem connection and a network connection are provided below.
Testing Your Modem Connection. To verify that your modem connection works, you should connect to your master GroupWise system.
Choose the Remote menuin the Main Window, then choose "Send/Retrieve" to open the Send/Retrieve dialog box.
Select your modem connection in the "Current Connection" drop-down list. Because you are simply testing the modem connection to see if it works, you should not retrieve any information at this point.
Deselect "Items" so that no information will be retrieved.
Choose "Connect" to initiate the connection.
|
Hint: The modem on your remote computer will make a dialing sound which will change to a screeching noise when it makes contact with your gateway'smodem. |
This procedure could take several minutes depending on the number of times your modem dials before it makes contact, and how many requests and responses your system has to transfer.
If the connection is working, the Connection Status dialog box displays a message stating "Connection Status: Connected."
If your disconnect method is set to "Manually," double-click the Control-menu box to disconnect and close the Connection Status dialog box. If the test was successful, skip to the next section. If the test wasn't successful, the GroupWise Error dialog box may appear.
Choose OK in the GroupWiseError dialog box, then choose "Close" in the Connection Status dialog box.
Choose "File," then choose "Preferences."
Choose "Remote" to open the Remote Preferences dialog box.
Choose "Modem" to open the Modem Configuration dialog box.
Choose "Port" to open the Port Settings dialog box. Check your worksheet to make sure that the settings are correct. You can select an option and choose "Help" for a description of the option.
Close all dialog boxes,then repeat steps 1-5 above to re-test the connection.
If the connection still does not work, contact your system administrator.
Testing Your Network Connection
To verify that your network connection works, you should connect to your master GroupWise system.
Choose the Remote menu in the Main Window, then choose "Send/Retrieve" to open the Send/Retrieve dialog box.
Select your network connectionin the "Current Connection" drop-down list. Because you are simply testing the network connection to see if it works, you should not retrieve any information at this point.
Deselect "Items"so that no information will be retrieved.
Choose "Connect" to initiate the connection. If the connection is working, the Connection Status dialog box displays a message stating "ConnectionStatus: Connected."
If your disconnect method is set to "Manually," double-click the Control-menubox to disconnect and close the Connection Status dialog box. If the test was successful, skip to the next section. If the test wasn't successful, the GroupWise Error dialog box may appear.
Choose OK in the GroupWise Error dialog box, then choose "Close" in the Connection Status dialog box.
Choose "Remote,"then choose "Send/Retrieve."
Choose "Connections"to open the "Connections" dialog box.
Select your network connection, then choose "Edit" to open the "Network Connection" dialog box.
Check your worksheet tomake sure the correct path appears in the "Path to Post Office" box. If the path is correct and your test is still unsuccessful, contact your system administrator. If the path is incorrect, type in the correct path as listed on your worksheet, then choose OK.
Choose "Close"to return to the Send/Retrieve dialog box, then choose "Connect"to re-test the connection.
Changing Your Remote Preferences. You can change any of the user and system information, default settings, and connection definitions that you set in "Remote Preferences."
Changing the user ID, domain, or post office will cause you tolose all information in your remote mailbox.
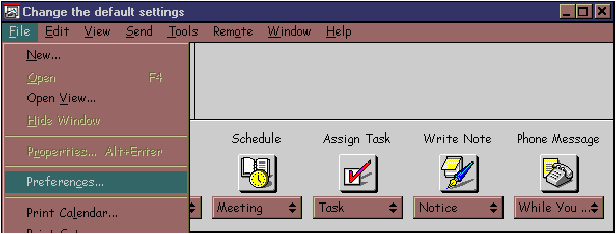
Choose the "File" menu in the Main Window, then choose "Preferences."
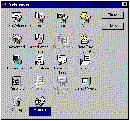
Double-click on "Remote" to display the Remote Preferences dialog box.
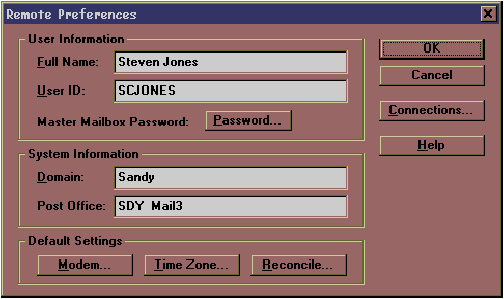
Make your changes, then choose OK. If you changed the user ID, domain, or post office, a prompt box appears telling you which information you changed and warning you that all information in your remote mailbox will be lost. Choose "Y" to continue or choose "N," then Cancel if you do not want the changes saved.
Choose "Close" in the Preferences dialog box to return to the Main Window.
Novell's Remote Users Guidelines
Novell's Information Services provides a trimmed down version of setup information with the basic steps required for setting up GroupWise Remote for a user. The list is quick and easy to follow if some of the systems work is in place such as drive mappings with access rights to the server with the user's post office directory. The following page is a sample worksheet based on that document.
This document should prove useful as a "template" for system administrators that are providing remote setup information to a large base of users.
|
RemotePC UsersWhat you need to know and do! Installing GroupWise Remote: PC Laptops You will need 20MB of free disk space. |
Attached to the network and with your "X:" drive mapped the "server_name", fromthe Window Program Manager, choose 'File','Run'
Then type 'X:\postoff\ofwin40\rmsetup'.
Choose the standard Install
Setup for GroupWise Remote:Here is what you need to know: Full Name = Your Full NameUserID =*Your Full Name or assigned UserIDDomain = *DomainPostOffice = *PostOffice*This should be provided by the System Administrator.
The Master Mailbox Password must be set within GroupWise on the network, then used in GroupWise Remote.
Connections:
Network: To create a network connection, select the folder or directory "Post-Office-Name"from the file server "Mail-Server-Name" on your X Drive.
Modem: The 2 phone numbers are (800) 555-1212 and (801) 555-1212. The Gateway ID is "GateID," and the password is "passkey."
If you have questions, please call x1234.
e-mail Master
Summary
In today's world of network computing, the disconnected user is commonplace. With GroupWise Remote, users can exchange mail messages, appointments, notes, and phone messages with those on their master GroupWise system, other GroupWise Remote users, and other users e.g. the Internet if the system offers the appropriate gateway. GroupWise Remote offers the ability for users disconnected from the network, for example on an airplane, in a hotel room, at home, etc. to be productive while disconnected from the network. GroupWise Remote is available for Windows, Macintosh, and DOS.
This AppNote has provided a thorough overview of GroupWise Remote, its requirements, installation, and configuration. The critical elements required for providing GroupWise Remote for a user base were provided here in one place.
Look for more information on GroupWise Remote and other remote computing technologies in future AppNotes.
Sources
This AppNote was a collection of material gathered from the following sources. If you would like more detailed information on Remote and other GroupWise topics, refer to the following documents.
On the World Wide Web: http://netwire.novell.com/servsup/groupware, BROWSE through GroupWise TechTips, Instant Experts, and Professional's Guide.
|
Resource
|
NovellDocumentation Number
|
|
TechBrief: GroupWise 4.1 Electronic Messaging Architecture |
106-000633-001 |
|
TechBrief: GroupWise™ Remote Product Overview |
106-000641-001 |
|
TechBrief: Mobile Computing Working the Way People Work |
106-000646-001 |
|
Novell's Messaging Strategy: Delivering Tomorrow's Messaging Technology Today |
N/A |
|
GroupWiseUser's Guide |
167-000121-001 |
|
GroupWiseReference Guide |
100-003124-001 |
|
GroupWareSupport Professional's Guide |
N/A |
Groupware and GroupWise Terminology
Client. The client is the end user application. This is typically the GroupWise or GroupWise Remote client. However, GroupWise can be triggered as a resource available to applications that create content such as word processors and spread sheets via the Messaging Application Programming Interface (MAPI) and simple MAPI. For example, the file menu in both WordPerfect and MS Word offer a Send menu item that will trigger the launching of the chosen messaging system on the particular client.
Independent software vendors can build their own clients with the GroupWise SDKs available through Novell's DeveloperNet.
Items. Items include mail, appointments, tasks, notes, and phone messages. Items also include responses; many of the requests that you send generate responses. Assume you have sent a request to retrieve items from your master mailbox. After processing your request, your master GroupWise system creates a response that contains the items you requested. Remote can then retrieve and process the response.
Post Office. The post office is the directory structure on a network file server that provides the message storage area for a specific group of users. Multiple post offices can exist within a domain.
Master Site or Master GroupWise System. The master site or master GroupWise system is simply the system where your master mailbox is located.
Domain. A domain is a collection of post offices; your post office belongs to a specific domain. It serves as a basic administration unit consisting of the post offices and gateways directly serviced by a message server.
Master Mailbox. Your GroupWise mailbox in your master GroupWise system. A master mailbox is required even if the user never actually accesses her master GroupWise mailbox directly.
Remote Mailbox. A copy of your master mailbox containing items including folders that are selectively copied (downloaded) from your master mailbox including any and all items you choose. The remote mailbox allows users to work off-line--users do not need a live connection to the master GroupWise system to do work in GroupWise Remote.
Request. Actions that modify the remote mailbox. When you open a message or create a personal group, it creates a request to make the same modification to the master mailbox.
Message Server. A message server is a Message Transport Agent (MTA) within the GroupWise system that provides routing services among post offices and through gateways. To support GroupWise Remote, the GroupWise administrator must install a Message Server and the Async Gateway or X.25 Gateway at the master GroupWise site.
Gateway. A gateway is the connection and translation software for communicating between GroupWise and another messaging system.
System Administrator. The System Administrator is the person responsible for completing the setup and configuration of the "back-end" master GroupWise system. System administrators are also responsible for distributing information such as the domain, post office, user ID, gateway login ID, and password.
* Originally published in Novell AppNotes
Disclaimer
The origin of this information may be internal or external to Novell. While Novell makes all reasonable efforts to verify this information, Novell does not make explicit or implied claims to its validity.