Exploring the NetWare Web Server
Articles and Tips: article
Corporate Integration Manager
Systems Engineering Division
01 Feb 1996
The World Wide Web is one of the most popular services currently available on the Internet. With the recent release of the NetWare Web Server, Novell has made it easy to set up a Web site within your own company and on your own NetWare server--without having to understand the complexities of Unix. This AppNote introduces the NetWare Web Server and explains how to install, design, and maintain the product.
- Introduction
- The NetWare Web Server
- Installation
- Web Server Setup and Administration
- Security: Implications of User and System Access
- User Home Pages
- Log Files
- Improving Web Server Performance
- Adding Other Internet Services
- For More Information
Introduction
Unless you've been living on a desert island for the past few years, you know that the Internet is the hottest topic in the computing industry. Just go to your local bookstore and see how many books have been published recently on the subject.
Of course, the Internet isn't new; it's been around since the 1970s. But now it provides an important world-wide link that serves businesses, education, and governments. The World Wide Web (WWW or "the Web") is just one service found on the Internet, but it's now the most popular. Web servers provide easy information access to a Web Browser such as Netscape and Mosaic. However, the basis of the Web has been in Unix, which is why many companies have dedicated Unix gurus to implement and maintain their Web server.
Novell has provided Internet-connectivity software for many years with such products as LAN WorkPlace, NetWare NFS, and the MultiProtocol Router. Now, with the recent release of the NetWare Web Server, it becomes easy to set up a Web site in your own company and on your own NetWare server--without having to delve into the complexities of Unix.
The goal of this Application Note is to show you how to install, design, and maintain the NetWare Web Server. In a follow-up AppNote, we'll explore how to fully-utilize the server-side scripting languages found in the software to create some great web pages.
If you aren't familiar with the WWW and the related terminology, I suggest you read an introductory book on the Web (I've listed several at the end of this AppNote). You can also find information about the Web on the Web itself (see "Getting Started on the WWW", http://www.law.washington.edu/webstart/webstart.html. At the very least, you should know the following acronyms: TCP/IP, HTTP, HTML, and URL.
The NetWare Web Server
Why have a Web server? The key point to remember about the Internet is that it is accessible to millions of people. That's the main reason why it has become so popular. Internet service is available in over 130 countries, and Web browsers are available for most computers and operating systems. Therefore, Web servers provide a means of easily distributing information worldwide--or within your own company--to nearly all computing platforms.
If you've ever had responsibility of disseminating information to your fellow employees, you know the hassles that can occur. Your previous choices were limited to e-mail, voice mail, regular mail, or inter-company mail. The problem with these mail systems is that you must send the information to each user--even if the recipient doesn't want or need the information.
A Web server serves as a single repository for information. Here, users can browse any information that's available to them. They can view documents in a standard format (HTML, or HyperText Markup Language). They can download files. They can "see" the company in a pleasing and graphical environment that is easy to use.
Here are some of the many possible uses for having a Web server:
Publish company manuals
Publish resource guides for pension plans
Find and download commonly-used files
Provide links to other web sites
Provide sales information to your customers
Create cheap advertising medium
Create a user group bulletin board
|
This AppNote is availableas a series of HTML files, complete withgraphics and links to various topics. Theoriginal document was created using WordPerfect3.5 for the Macintosh,then exported as anHTML document. I then edited the resutingcoded file and created links to the graphics.To view this article, set your browser to http://www.novell.com/and look for Novell Application Notes |
Features
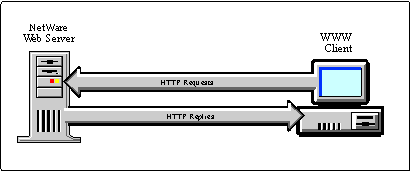
The NetWare Web Server is a set of NetWare Loadable Modules (NLMs) that run on the NetWare 4.1 operating system. The software uses the NetWare file system and NetWare security to provide Web services to NetWare and non-NetWare users (see Figure 1).
Figure 1: The NetWare Web Server provides Web services to WWW clients.
In addition, there are flexible management controls you can implement to restrict access to any part of the Web environment: documents, scripts, images, and private data.
The Web Server is fast, scalable, and reliable. Besides using the already optimized NetWare LAN and disk subsystems, it works on the NetWare 4.1 Symmetric Multiprocessing (SMP) and SFT III platforms. Moreover, it takes advantage of the multiprocessing capabilities in NetWare SMP.
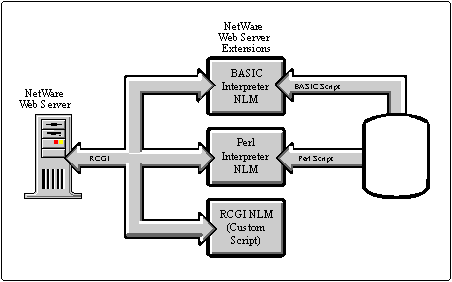
The package includes the WordPerfect Internet Publisher, which allows you to easily create HTML Web pages using WordPerfect 6.1. It includes a license for the Netscape Navigator browser. Also included are the Basic and Perl script interpreters, plus a remote CGI application to link with Unix databases (see Figure 2).
Figure 2: NetWare Web Server package components.
Server Requirements
The basic requirement for the Web Server is an Intel-based NetWare 4.1 server with at least 16MB of RAM. The server software requires 2.5MB of disk space, with an additional 3.5MB for the online documentation.
The "language" of the Internet is TCP/IP. Therefore, you must have valid IP configurations for your servers and routers. For more information on installing the TCPIP.NLM, refer to your NetWare documentation. If you do not wish to install IP for each of your clients, you must install an IP-IPX gateway somewhere on your network. Several such products are available today, including NOV*IX for Internet (Firefox, Inc.), IWare Connect (Quarterdeck Corp.), and Passport (Internet Junction, Inc.). Some IP-IPX gateways may need to run in other servers because they replace Novell's TCP/IP driver.
Installation
The Web Server installs like most other NetWare server software: via INSTALL.NLM. If you know PINSTALL, the entire installation will take less than 10 minutes. Most configuration is performed with the Windows-based Web Server administration utility on the client.
Here's how to install the Web Server (refer to the product's Quick Path Card for more details):
Insert the NetWare Web Server CD-ROM into the server's CD-ROM drive.
Mount the CD as a NetWare volume by typing CD MOUNT WEB.
Now go to the server console (or use RCONSOLE) and load the installation utility by typing LOAD INSTALL.
Select "Product Options" from the menu.
Select "Install a Product Not Listed."
A screen pops up, telling you to insert a disk into drive A or select another path. Press <F3< to select another path.
Type WEB:\DISK1\ and press <Enter<.
You will be asked two questions: (1) Do you want to view the README.TXT file? (yes/no) and (2) Do you want to install theon-line docs? (yes/no). It's a good idea to answer Yes to both.
You will next be asked to enter the Web Server administrator's password. This password should be different than the NetWare administrator's password so that other users can be delegated to "Webmaster" duty without giving them access to any other part of the network.
As part of the installation, the default Web Server directory structure is created and files are copied into it. The NetWare Web Server is automatically started after you set the Web Server password. The password is used in the administration utility to reload the server.
Directory Structure
The default directory structure for the Web Server is shown in Figure 3. Sample scripts, icons, and Web pages are copied to their appropriate directories.
Figure 3: The default Web Server directory structure.
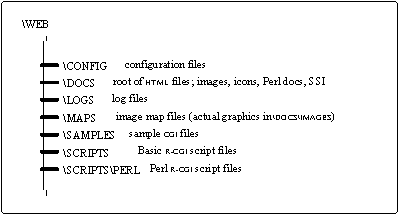
The root of the Web Server structure is SYS:WEB. This defines the boundaries that users can explore. No one can see data from any other part of the server unless explicitly granted rights to do so. This is the basic security mechanism of the Web Server.
NLMs
Four NLMs are initially used. These NLMs perform the following functions:
NETDB.NLM. Network database access for configurations and IP address information (including DNS if installed)
BASIC.NLM. Basic language interpreter
PERL.NLM. Perl scripting interpreter
HTTP.NLM. HyperText Transfer Protocol Web server
A fifth module, CGIAPP.NLM, is available for CGI applications.
The UNISTART.NCF file is either created or appended (it will already exist if your server has any other Unix or IP connectivity products installed) to include the following Web Server startup commands:
load netdb.nlm

load basic.nlm -d sys:web

load perl.nlm

load http.nlm -d sys:web
The parameter -d sys:web indicates the Web Server root directory.
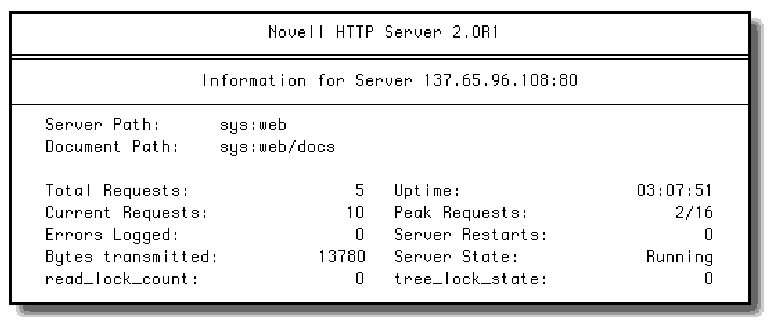
Once the Web Server software is loaded, the server screen should appear like the one shown in Figure 4.
Figure 4: The server screen after the Web Server software is loaded.
There is only one more procedure to perform on the server. By default, NetWare 4.1 sets the maximum number of packet receive buffers to 100. The Web Server should have more due the increased LAN I/O required, so place the following command in your AUTOEXEC.NCF:
SET MAXIMUM PACKET RECEIVE BUFFERS=1000
That's all there is to the server side of the installation. You now have a fully-functional Web server that's ready to serve. If all you want is an open, read-only system for your clients, there's no more setup to complete. HTML documents, images, and other data can be placed into the Web Server directory structure and be immediately accessed by anyone with a browser.
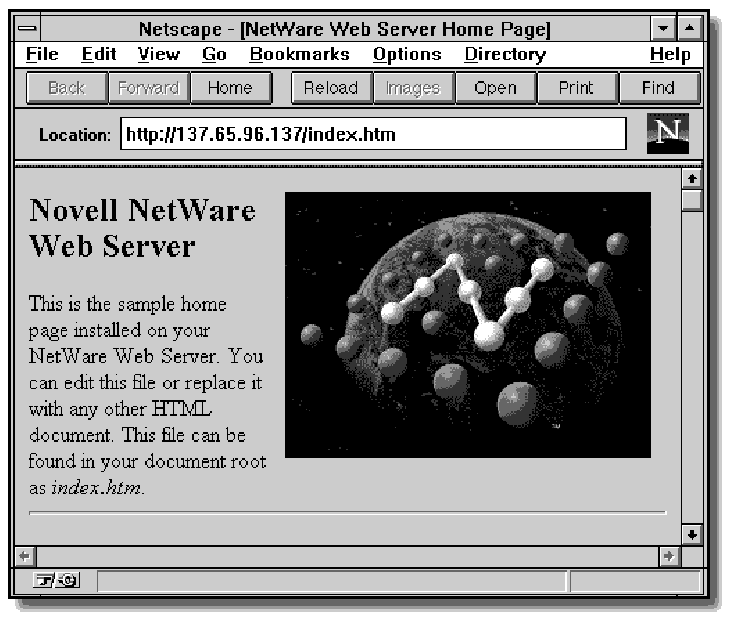
Give it a try. Go to a workstation and load up your favorite browser. For the server's Uniform Resource Locater (URL), enter HTTP://server IP address. The sample INDEX.HTM file shown in Figure 5 is downloaded and displayed.
Figure 5: The sample INDEX.HTM file.
You install Netscape Navigator and the WordPerfect Internet Publisher from the client as well. See the documentation included with the NetWare Web Server package.
Web Server Setup and Administration
In order to manage and administer the Web Server, you need a workstation with the following hardware and software:
386, 486, or Intel Pentium PC with 8MB RAM
1MB free disk space
Windows 3.1, Windows for Workgroups 3.11, or Windows 95
NetWare client software (VLM or Client 32)
IPX and WinSock v1.1-compliant TCP/IP stacks loaded
NetWare Web Server Administration Utility
The Web Server Administration utility is a Windows application that allows you to manage the Web Server and change its configuration. The application is WEBMGR.EXE and is stored in SYS:PUBLIC.
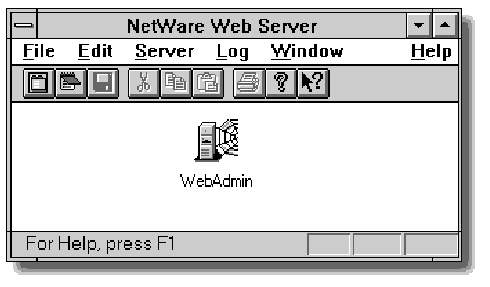
The icon for the WEBMGR.EXE is automatically placed in the NetWare Web Server program group (see Figure 6).
Figure 6: The icon for the Web Server Administrative utility.
|
Note: Although you can be very specific about who should accessyour server, if all you want is a general "let everybody seemy world" Web server, you may rarely use this utility. Infact, the administration utility does not have to be executedeven once to use the Web Server as a general publishingtool. |
To configure the Web Server, launch WEBMGR.EXE by double-clicking on the icon. Then do the following:
Choose "Select Server..." from the File menu.
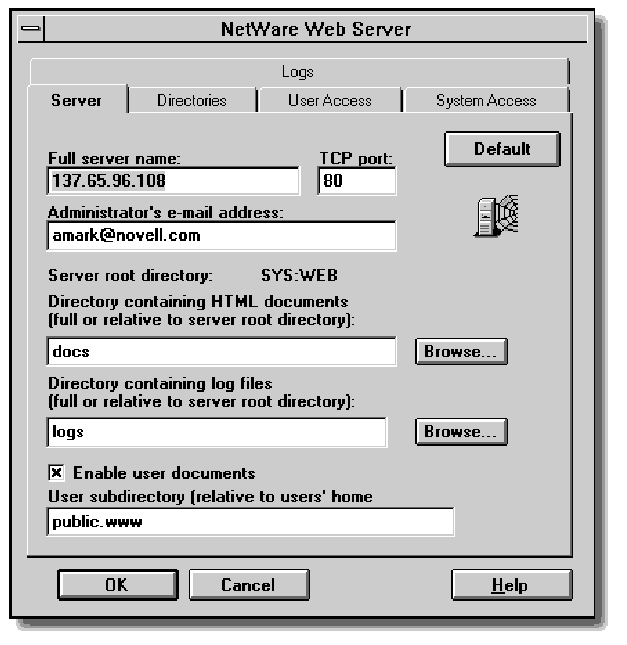
Point to the server directory which contains the configuration files. Normally this is SYS:WEB. Click the OK button. The main configuration screen will display (see Figure 7).
Figure 7: The NetWare Web Server main configuration screen.
|
Note: After changes are made, the Web Server software (notNetWare) must be reloaded. There are two ways toaccomplish this. The first is to click the OK button at thebottom of the main configuration screen and then choosethe "Save and reload server" option. The other method is toselect "Reload..." from the Server menu. |
Server Configuration
The first tabbed page selected is for the Server configuration. This is where you set the main Web Server parameters. Normally you don't change this information very often.
Full server name. The default is the server's IP address. But if you have Domain Name Service (DNS) running, enter a unique name and append the domain (for example, NWWEB1.MyCo.com).
TCP port. Most Web browsers default to port (or socket) 80. If you change this number, browsers must specify the port number in the URL (as in HTTP://137.65.96.108:81/INDEX.HTM, where 81 is the new port).
Directory containing HTML documents. This is the directory where you will place HTML documents (either relative to the server root or a full path). The default is DOCS. This means that all Web pages, images, icons, and other data must be stored in directories within or below SYS:WEB/DOCS.
Directory containing log files. This indicates the directory where the log files are stored, again either relative to the root or a full path.
Note: The server root directory is SYS:WEB. This default can be overridden when the server loads with the -d option, but it should be changed with caution: a valid directory structure must exist for your Web Server to operate. Also, no Web user can access data outside of the Web Server directory structure, except foruser home pages.
Enable user documents. This option allows any user to publish Web pages. If selected, enter in the next field the user subdirectory (relative to the user's home directory) where personal Web pages are found. The default is PUBLIC.WWW. Somy pages might be found in SYS:USERS/ALAN/PUBLIC.WWW. I'll explain more about this under "User Home Pages" below.
Directories Configuration
To define what function each directory has, move to the Directories tabbed page (see Figure 8). This is an important step if you define other paths for script processing and image maps. But for normal document publishing, you normally do not need to change this configuration. Some of the information in this section will be further explained in the next Web Server AppNote.
Before you can work on a directory, it must already exist.
Create new directory specs by entering a path, defining itsfunction, and then clicking on the "Contains" pull-down arrow. The options are documents, scripts, or image maps. I'll define each of those types below.
Change existing directory specs by clicking on the directory and then on the "Contains" pull-down arrow.
You can later define access to the directory by system or by user (see the heading "User Access" below).
Figure 8: The Directories configuration page.
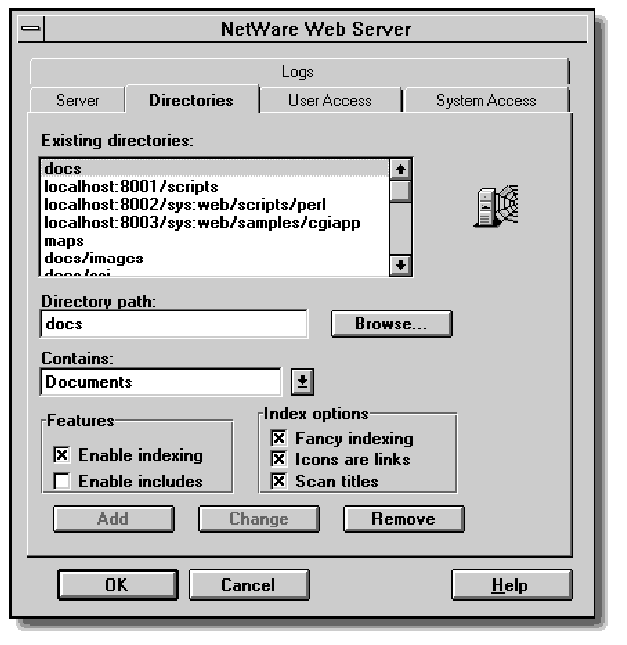
The file types contained in a directory must be stated in the configuration (in the "Contains" box). This is to tell the server whether or not the files should be processed. There are three basic file types:
Documents. These files are general and require no server processing. Then include HTML docs, images, icons, and nearly everything else.
Scripts. This type is for processing specific scripts such as CGI, Perl, and Basic. I'll go into more detail about these files in the next AppNote.
Image maps. These control the "hot spots" within a graphic. When you click on a mountain in a picture, for example, the server returns a specific script to display information about a skire sort. The alternative is for the user to click on a hypertext link (such as "Click here to see the ski resort.").
Document and image map directories can have these options assigned to them:
Enable indexing
Enable includes
Enable Indexing. If this feature is checked, the three Index options to the right are highlighted. This feature has the Web Server generate an index automatically whenever a client sends a URL that identifies a directory rather than a specific file (in other words, when the URL does not specify a file to load). This is useful when the contents of a directory change often or when a directory contains many files. Here's a quick explanation of the index options:
Fancy indexing. The Web Server generates entries that show icons, file size information, and file descriptions in addition to filenames.
Icons are links. The Web Server creates index entries in which icons are active links to the associated document. When the user clicks on an icon, the browser is automatically redirected to the URL for the filename.
Scan titles. This is an automatic directory indexing feature that enables the Web Server to generate a description for each file in the directory by scanning the HTML documents for titles(*.HTM). This feature requires significant server processing power.
When the user specifies a URL without a filename, and a default file (usually INDEX.HTM) isn't found, the Web Server produces a directory listing like the one shown in Figure 9.
Figure 9: Directory listing shown when a URL without a filename is specified and a default file isn't found.
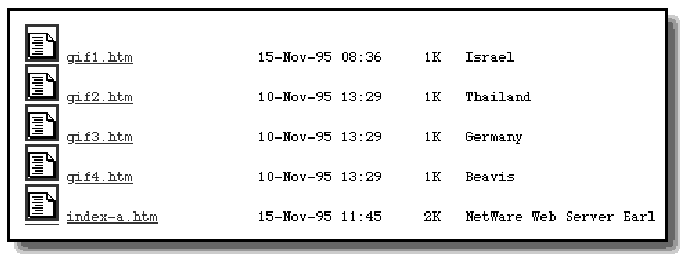
When the user clicks on the icon or the filename, the file is viewed or the HTML document is requested and processed.
Enable Includes. This option allows the server to make slight modifications to HTML documents before sending them to the client. The changes are controlled by server-side include commands that are embedded in the HTML document. I'll cover more about this in the next AppNote.
User Access
Click on the User Access tab to specify which NetWare Directory Services (NDS) users are authorized to access the Web Server directories (Figure 10). If you want to control a specific directory, the directory must already exist and be defined in the Directories configuration.
Figure 10: The User Access page is for specifying which users are authorized to access the Web Server directories.
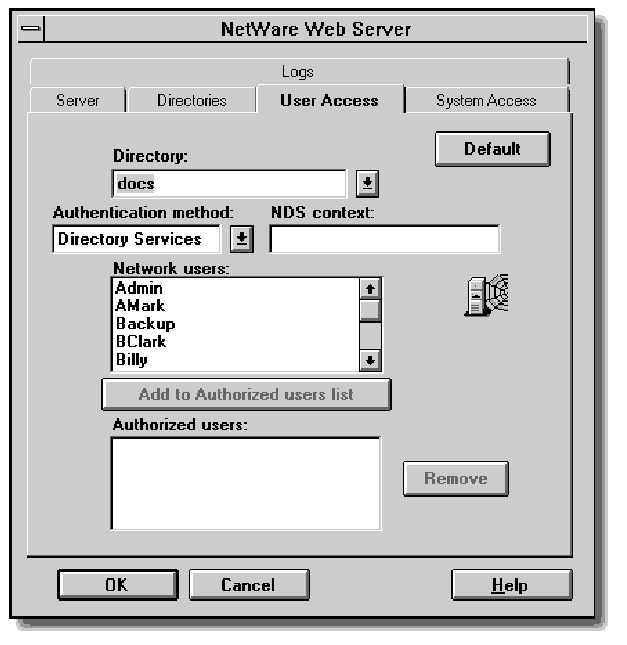
Authorization is by directory on a per-user basis. This means that you define exactly who can access a Web Server directory, or you allow everyone full read-only access to the directory.
To set up user access on a directory:
Select the directory.
Set the NDS context. Leave blank for the top of the NDS tree (such as O=SkiCo), or enter a container path (ou=pilots.o=SkiCo, or pilots.SkiCo).
Select each network user and click the button "Add to Authorized users list." The name appears in the field beneath.
You must reload the Web Server before the changes take effect. Remember that only specified users are authorized to access a directory; all other users have no access.
With user access defined on a directory, the URL that specifies the directory requires a name and password in order to be processed. Figure 11 shows the browser's request for a valid username and password.
Figure 11: Example of a browser's request for a username and password.
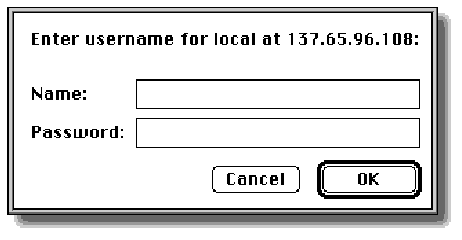
The password sent from the browser to the server is encoded but insecure. This is a problem of Web servers in general. Anyone with a protocol analyzer can see the user's name and UUENCODED password.
Currently, there is no standard to securely encrypt data over the Internet, although there are many proposals and proprietary implementations. (NDS, on the other hand, uses a very secure method of password verification. See the AppNote "Understanding the Role of Identification and Authentication in NetWare 4" in the October 1994 issue for more information.)
System Access
The user access described above works only on NDS users. By clicking on the System Access tab, you can define which domains and IP addresses have access to the Web directory (see Figure 12).
Figure 12: The System Access page lets you define access to the Web directory.
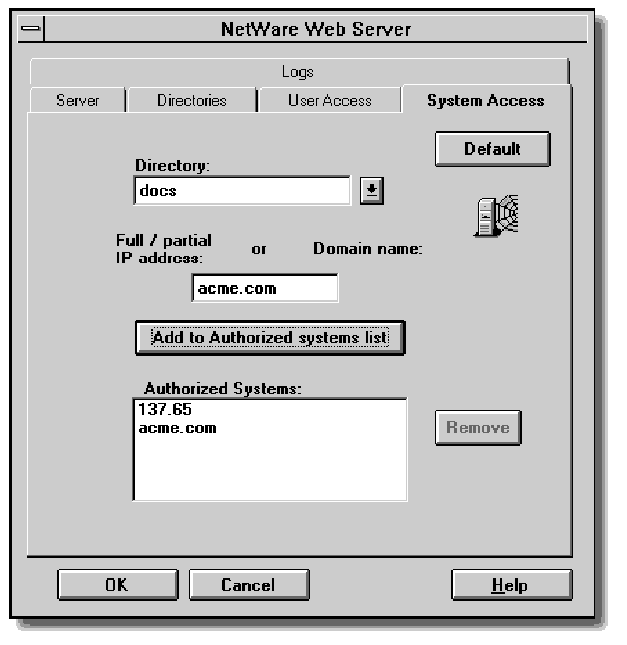
Complete the following steps to configure system access:
Select the directory.
Enter the domain name or full/partial IP address. Here are a few examples: shallow.com, 137.65.100, 192.200,155, sales.snowboard.com.
Click "Add to authorized systems list."
Save the changes by clicking OK, and then reload the WebServer.
Security: Implications of User and System Access
Security: Implications of User and System Access
These two methods of restricting access to Web Server documents provide an easy security mechanism. Below are various scenarios that describe what happens when various types of security access are implemented.
Enter Name/Password. With this type of security, the screen shown in Figure 11 is displayed by the browser. In order for the URL to be retrieved and processed, the user must enter a valid name and password. If the name or password is incorrect, the Web Server returns this message:
Authorization Required

Browser not authentication-capable or authentication

failed.
Remember that passwords sent via this method are encoded but not secure. Anyone with advanced knowledge in document encoding can decode the password.
Forbidden. If a user specifies a URL that he or she does not have rights to (using system access), the server sends an HTML file to the browser with this message:
403 Forbidden

Your client does not have permission to get URL [url]

from this server.
Incorrect URL. This occurs when the document requested doesn't exist. The server returns the following message:
404 Not Found

The requested URL [url] was not found on this server.
Web Server Configuration Files
Look in SYS:WEB/CONFIG to see the Web Server configuration files:
HTTPD.CFGcontains the basic server setup commands.
ACCESS.CFG is where resource information, such as directory document information for user and system access, is stored.
SRM.CFG is the resource configuration file where directory and icon information is stored.
MIME.TYP maps file extensions to MIME types recognized by the server.
The location of these configuration files can be changed by modifying HTTPD.CFG.
External User Access
You might want your Web Server accessible by users outside of your company, or by users without NetWare usernames. However, you still want to restrict access to certain directories. There is a simple Unix-like procedure you can use to accomplish this.
As mentioned above, there is a configuration file named ACCESS.CFGin the SYS:WEB/CONFIG directory. This text file describes which users and systems have access to which directories. Since the password file it references is outside of the DOCS directory (in SYS:WEB), passwords can't be seen by any unauthorized users.
The basic procedure for defining external user access is:
Create the user and password files.
Edit ACCESS.CFG in the controlled directory and specify the access.
There is a DOS-based PWGEN application stored in SYS:PUBLIC which translates a simple text file into a one which has the password encrypted.
To create the user and password files:
Create a text file (infile.www) which contains a list of usernames and passwords, in the following format:
username:password
Enter one name per line. For instance:
alan:crystal4ujulie:httprules
Create the password file by issuing the DOS command
pwgen infile.www outfile.www
where infile.www contains the username: password data and outfile.www is any valid DOS filename. The resulting file may look like this:
alan:6oJBDHqZkYFrXu7r4ZXiCg==julie:aLZh7hV+ENvjDydfASrlVg==
These passwords are case sensitive. They are generated using standard Unix-type encoding and are not extremely safe. NetWare encryption techniques are supremely more sophisticated.
Copy the output file to SYS:WEB.
To edit ACCESS.CFG and specify the access:
Edit ACCESS.CFGand insert the following lines:
<directory docs/beta<<
AuthType Basic

AuthName Access-to-my-stuff

AuthUserFile outfile.www

Options Indexes FollowSymLinks
To allow all users specified in the output.www file, add lines using the following syntax:
<Limit GET<<
require valid-user

</Limit<<
</directory<
To limit specific users, add lines using a syntax similar to:
<Limit GET<<
require user alan

require user julie

</Limit<<
</directory<
You must reload the Web Server before the changes take effect.
You can also set access control for a specific directory by creating a ACCESS.WWW file in that controlled directory. This may involve more management that just editing ACCESS.CFGin WEB/CONFIG. But it provides more flexibility because (1) you don't have to reload the server, and (2) each user can set up access to their Web area.
To configure security for an individual directory:
Create ACCESS.WWW in the controlled directory.
Add lines similar to the following:
AuthType Basic

AuthName Access-to-my-stuff

AuthUserFile outfile.www

Options Indexes FollowSymLinks

<Limit GET<<
require user alan

require user julie

</Limit<
User Home Pages
This is a handy feature for your users, and one that requires no intervention by the network administrator. User home pages are stored in their own home directories, in a subdirectory specified on the server configuration page.
|
Note: The user must have a home directory on the same serverthat is running the Web Server software. |
For example, suppose my home directory is SYS:USERS/ALAN. To allow other users to visit my Web pages, I do the following:
Create a subdirectory named PUBLIC.WWW (or other name asspecified by the administrator).
Create a home page with the name INDEX.HTM. If no such file exists, a directory listing is returned. (The default name INDEX.HTM is configurable by the administrator by changing an entry in WEB/CONFIG/SRM.CFG.)
More subdirectories can be created, and the whole Web environment is maintained by the user.
Now anyone can access my home page by specifying the URL as HTTP://servername/~ALAN. The key is to use the tilde (~) followed by the user's login name. You can also specify a fully-distinguished name, such as:
HTTP://servername/~.ALAN.SED.NOVELL
In order for this URL to work, though, the user must have a home directory as defined in NDS.
If I wanted to restrict access to my Web pages, I would create a text file named SYS:USERS/ALAN/PUBLIC.WWW/ACCESS.WWWwith the following lines:
AuthType Basic

AuthName Access-to-my-stuff

AuthUserFile outfile.www

Options Indexes FollowSymLinks

<Limit GET<<
require user alan

require user julie

</Limit<<
</directory<
Log Files
Getting back to the Web Server Administration utility, there are various log file options to configure in the utility. These are accessed by clicking on the Logs tab (see Figure 13.)
Figure 13: The Log file options screen.
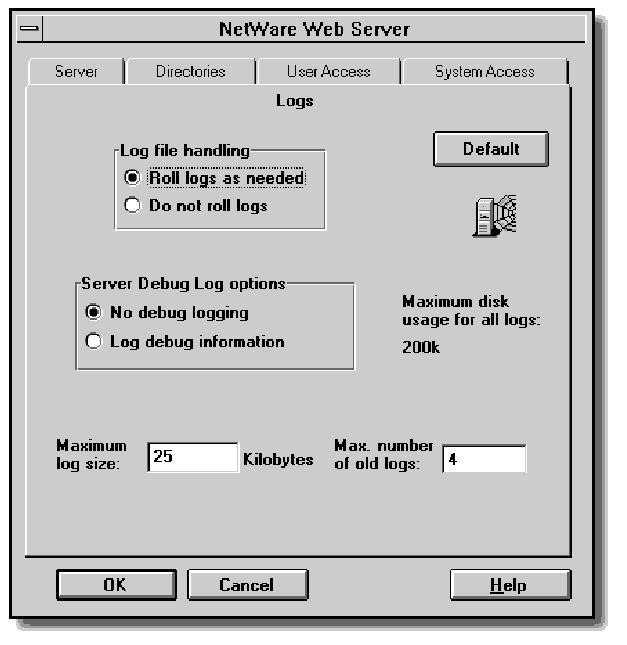
The log files created are stored in the SYS:WEB/LOGS directory. You can specify options to control the maximum size of the log files and how you want the Web Server to handle them.
Following are descriptions of two log files you should check on a regular basis: the ERROR.LOGand the ACCESS.LOG.
ERROR.LOG. The ERROR.LOG file displays system error information, such as access failures due to incorrect passwords (intruder alerts), and users trying to access files that don't exist (which may indicate incorrectly-written HTML documents).
ACCESS.LOG. This file shows all transactions from each client. An example is shown below:
137.65.96.66 - - [06/Dec/1995:12:40:01 -0700] \
"GET /alan/germany.gif? HTTP/1.0" 304 0

137.65.96.66 - - [06/Dec/1995:12:40:01 -0700] \
"GET /alan/backgrnd.gif? HTTP/1.0" 304 0

137.65.96.66 - - [06/Dec/1995:12:40:05 -0700] \
"GET /novlogbg.gif? HTTP/1.0" 404 -

137.65.96.66 - - [06/Dec/1995:12:40:58 -0700] \
"GET /index.htm? HTTP/1.0" 304 0

137.65.96.2  - - [06/Dec/1995:21:56:43 -0700] \
"GET /webpres/perform.gif? HTTP/1.0" 200 157

137.65.96.2  - - [06/Dec/1995:22:28:52 -0700] \
"GET /NDS:o=dreck? HTTP/1.0" 404 -

137.65.96.66 - - [07/Dec/1995:10:36:39 -0700] \
"GET /server/command?status HTTP/V1.0" 200 -

137.65.96.66 - - [07/Dec/1995:10:36:42 -0700] \
"GET /server/command?status HTTP/V1.0" 200 -

137.65.96.2  - - [07/Dec/1995:16:12:51 -0700] \
"GET /ssi/submit.ssi?name=alan&street=3939&\
&city=sandy&state=ut&zip=39393 HTTP/1.0" 200 865 &

137.65.96.66 - - [08/Dec/1995:13:37:16 -0700] \
"GET /server/command?pause HTTP/V1.0" 401 -

137.65.96.66 - - [08/Dec/1995:13:37:16 -0700] \
"GET /server/command?pause HTTP/V1.0" 200 -

137.65.96.66 - - [08/Dec/1995:13:37:16 -0700] \
"GET /server/command?restart HTTP/V1.0" 401 -

137.65.96.66 - - [08/Dec/1995:13:37:16 -0700] \
"GET /server/command?restart HTTP/V1.0" 200 -

137.65.96.66 - - [08/Dec/1995:13:37:16 -0700] \
"GET /server/command?status HTTP/V1.0" 200 -
Improving Web Server Performance
Most Web documents are small, but it usually takes many of them to make up one Web page. This means several files per page request are sent to the client for processing. Since Web servers are I/O intensive, anything you can do to get the data into and out of the server faster will improve performance. This includes having:
A fast LAN adapter
A fast disk subsystem
A fast LAN
You can also change server SET parameters related to the LAN and disk channels. These and other optimization techniques are described in several AppNotes on optimizing the NetWare server:
"The Benefits of Using Intelligent LAN Adapters in NetWare 4" May 1995
"NetWare 4.x Performance Tuning and Optimization, Part 1" May 1993"
NetWare 4.x Performance Tuning and Optimization, Part 2" June 1993"
NetWare 4.x Performance Tuning and Optimization, Part 3"October 1993
If your server will be running Perl, Basic, or SSI scripts, then the faster the CPU, the faster the response time. You can also turn off some of the directory processing features (such as "fancy indexing") which can slow down the server in some cases.
To really throw the server throttle into high gear, install the NetWare Web Server on an SMP machine running NetWare SMP. The only changes needed are in the UNISTART.NCF and UNISTOP.NCF files. All you do is change LOAD HTTP to LOAD HTTPSMPso the Web Server will run on multiple CPUs.
Adding Other Internet Services
If your Web Server is to be easily accessible, it should have a DNS name, such as SalesWS.acme.com. Established IP networks will already have a DNS server. Once your Web Server has an entry in the DNS server's table, it can be accessed by name, rather than by IP address.
It is also possible to install DNS on the NetWare Web Server. For the full suite of Web protocols, including DNS and FTP, use the Unix Services for NetWare software. If you only want DNS capabilities, install NetWare/IP (free with NetWare 4.1).
With DNS installed on the Web Server, there exists a file named SYS:ETC\RESOLV.CFG. Make sure that the entries in this file are correct, or each client request will try to get resolved to an incorrect host. This will add many seconds to your response times and indicates an inefficient system.
For More Information
In the next Web Server AppNote, we plan to cover these areas:
Server Extensions--explore the worlds of Perl, Basic, SSI, and R-CGI.
Creating Dynamic Web Pages--taking information from databases or NLMs and sending the resulting information to the client browser "on the fly."
Creating your own cool Web page--you don't need a degree in rocket science, either.
Additional References
After spending several hours browsing the book stores, I can assure you that there are plenty of reading materials on the Web. Unfortunately, you'll need to purchase at least two books just to get about 80 percent of the information you need for creating super Web pages.
Books about the Web generally fall under three categories:
What the Web is all about and URLs to suit everyone's needs.
How to design your own HTML documents in (pick one) 30 minutes, 1 day, 7 days.
Advanced Web stuff, like Perl scripting, CGI, and interface programming.
Here are some books that I have used to provide basic, intermediate, and advanced information:
World Wide Web Secrets, by Paul J. Perry, IDG Books.
Includes CD-ROM with Web access and server software. Explains Web basics, shows how to use browsers, cites interesting URLs (Web sites). Also gives the user a quick understanding of HTML documents.
Teach Yourself More Web Publishing with HTML in a Week, by Laura Lemay, Sams.net Publishing.
Covers HTML 2 and 3 standards, using images, sound, and video in documents, and CGI scripting. This book will help you create cool Web pages with the latest browsers.
Foundations of World Wide Web Programming with HTML and CGI, by Ed Tittle, Mark Gaither, et al, Programmers Press.
Has less on HTML than on CGI. In fact, you should know HTML before getting this book. Goes into advanced scripting and how to set up your own Web site. Includes a CD-ROM with tools and utilities.
* Originally published in Novell AppNotes
Disclaimer
The origin of this information may be internal or external to Novell. While Novell makes all reasonable efforts to verify this information, Novell does not make explicit or implied claims to its validity.