Installing and Configuring UnixWare 2.0
Articles and Tips: article
Technical Marketing Support Specialist
UNIX Systems Group
LESTER TEMPLE
Senior Software Engineer
UNIX Systems Group
01 Jul 1995
UnixWare® 2.0 has been designed with a simpler, faster installation. Thanks to several new utilities, much of the installation process has been automated. This AppNote examines the new installation features of UnixWare 2.0. After detailing the hardware requirements, the AppNote goes through the installation process step-by-step. This information is intended as a supplement to the UnixWare installation manual.
- Introduction
- New Installation Features
- Hardware Requirements
- The Installation Process
- Ensuring Hardware Compatibility
- Conclusion
Introduction
UnixWare 2.0 installation has been re-engineered to give you a simpler, faster installation process. In fact, Novell is aware of a claim that you can install the base system on a Pentium machine in about 18 minutes. We're not suggesting that you should expect this result yourself; we're just pointing out that the process is probably not as difficult as you might assume. As you read this AppNote, notice how many times the word "automatic" appears.
First, we'll look at installation features new to UnixWare 2.0. Next, we'll take a look at hardware requirements. Then we'll go step-by-step through the installation process. After that, we'll tell you where to obtain further help if you need it.
This AppNote is designed as a supplement to the UnixWare installation guide. The most important step in ensuring a successful installation is also the most neglected: read the manual. Your installation manual provides detailed information on installation procedures. This documentation is quite good, so don't set it aside and ignore it. The Release Notes are also required reading. They contain last-minute documentation changes, discuss software notes, and specify how to get UnixWare support.
This AppNote assumes you have a working familiarity with Unix-Ware, but have never installed it. You need not have a background in NetWare to perform this installation.
New Installation Features
In terms of installation, several changes in the 2.0 version make installation easier.
The installation process has a new user interface (it isn't a GUI, but it is better).
You need only one boot diskette rather than three.
User interaction takes place up front. Since all questions are provided at the beginning, no intervention is required during file installation.
The installation process is faster, via CD-ROM,tape, or the network. (If you plan to do a network installation, be sure you have an install server, properly configured, on your network.)
Hardware support is improved.
You can perform a network installation via TCP/IP as well as IPX/SPX.
The auto configuration feature simplifies setting up your system.
The Device Configuration Utility (DCU) simplifies some tedious installation tasks.
Autoconfiguration
UnixWare's new autoconfiguration utility works for EISA, MCA, and PCI controllers. (ISA cards are limited in that they carry no information on board.)
This new utility provides several advantages:
Automatic detection of boards and their configuration parameters
Dynamic assignment of drivers to new boards
New administrative tools to change configuration
Dynamic configuration of drivers during their initialization
Installation using multiple SCSI boards
No user prompting required in most cases
New Device Configuration Utility (DCU)
Platform hardware configuration setup assumed
Minimizes hardware knowledge required of user
Simplifies hardware configuration and system installation
How Autoconfiguration Fits into System Installation. Here is the process that autoconfiguration performs:
Boots the installation diskette
Installs host bus adapter (HBA) diskettes (as needed)
Optionally runs DCU interactively
Loads HBA drivers
Specifies network card (if card is readable, reconfigures it)
The Device Configuration Utility (DCU)
Like the new autoconfiguration, the new DCU is important enough to UnixWare 2.0 installation to discuss separately. The DCU is an interactive administrative tool that's called during network installation. The DCU provides several useful functions:
Provides an interface during installation
Runs from /etc/inittabto assign drivers to new boards
Lets you select and deselect software drivers during installation
Lets you modify your hardware configuration information
Lets you enable or disable hardware instances
Lets you perform hardware parameter conflict checking
Is called by pkgadd post-install scripts to update configuration files
The DCU rarely asks you to alter values. If fact, we advise that under normal conditions, you make no changes. If you enter incorrect values, your installation may fail, or the system may be unable to recognize your devices. You may even disable your devices by using incorrect values. On the other hand, if a device halts your installation process, rather than physically removing the board you can use the DCU to "logically" remove the device, allowing installation to proceed.
Hardware Requirements
The minimum hardware requirements specify what you need for successful installation and execution of UnixWare (see Figure 1.) These minimum requirements may be inadequate under certain conditions. Keep your specific needs in mind when you make decisions about minimum hardware configurations.
Figure 1: Minimum hardware requirements for a successful UnixWare 2.0 installation.
|
Application Server |
Intel 386 25MHz processor16MB of RAM160 MB available disk space |
|
Personal Edition |
Intel 386 25MHz processor12MB of RAM140 MB available disk space |
Adequate RAM and Disk Space
Minimum disk requirements refer to the space required to successfully install the operating system; this minimum space requirement doesn't include adequate space for file storage. If you plan to use an application server as a file server, you'll have to make a judgment call to gauge the actual space requirements. You might base the disk requirements on past configurations, or discuss your needs with software vendors.
Basing a multiuser system on minimum CPU configuration such as a 386/25 will lead to poor performance. A Personal Edition supporting one user, running a non-graphic application or serving as a NetWare client, might work satisfactorily with such a CPU, but a more realistic system sports a minimum 486/33 or Pentium CPU.
Available RAM is critical to performance. More RAM allows for less swapping and provides better support for users and for development efforts. Swapping occurs when RAM becomes full. The system uses swap space to transfer portions of RAM to disk, so reducing the swapping that occurs leaves the system free to concentrate on user production instead of on system overhead.
The Installation Process
You will need to know ahead of time your system IP values, DNS, and network frame type. You'll have to enter these values when you reach the network adapter configuration stage of the installation.
Let's look at the installation process for UnixWare 2.0. Figure 2 shows you an installation roadmap to help you find your way through the procedure.
Figure 2: An installation roadmap for UnixWare 2.0.
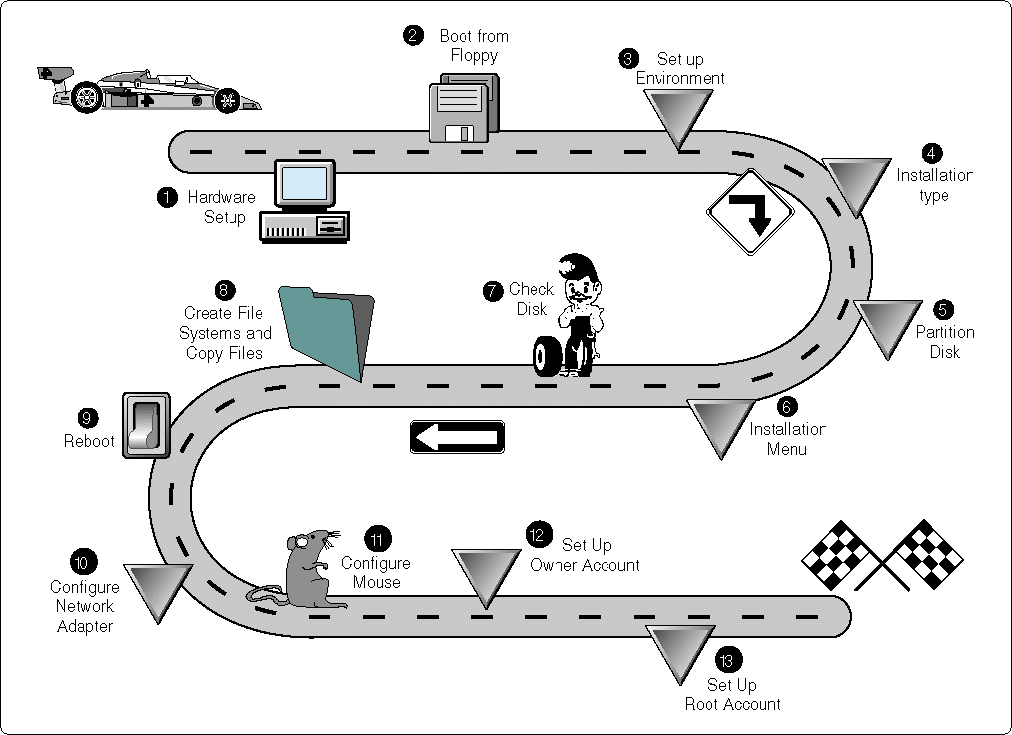
As you can see from Figure 2, installing and configuring UnixWare 2.0 involves a series of procedures you can logically follow from one step to the next. UnixWare 2.0 lets you gather the information you need at the proper time. You shouldn't have to abort an installation in the middle to go find information you didn't know you would need.
Let's look briefly at each of the steps identified in Figure 2. Some of them are so basic they require little discussion.
1. Performing the Hardware Setup
Complete the following steps to set up your hardware before you install UnixWare 2.0.
Before beginning the actual installation of UnixWare 2.0, be sure that all your network devices are properly attached and powered up.
Configure all devices, making certain that no hardware conflicts exist to create problems during installation.
If your system is EISA, PCI, or MCA, make certain the device configuration utilities are accurate.
If appropriate, register any ISA boards so you can take advantage of UnixWare's auto configuration abilities.
2. Booting from Floppy Diskette
Complete the following steps to boot from diskette.
Power off the system.
Place the UnixWare Install diskette into the appropriate drive and turn the power on. This process installs the mini kerneland begins the installation process.
3. Setting Up the Environment
Complete the following steps to set up your environment.
To set up the environment, you must configure and designate the keyboard type.
You also have the option to load host bus adapter(HBA) drivers. If your system has a SCSI adapter, you must load the HBA diskette when prompted. If you're unsure of the configuration, load the HBA diskette anyway; the installation process automatically loads and configures the drivers.
A new feature of UnixWare 2.0 is that the device drivers are dynamically bound to the hardware configuration. This means that you no longer must set the hardware at specific values during installation.
At this point, the installation process gives you the option to invoke the DCU. This interactive administrative tool facilitates the installation process. You can choose to invoke the utility or to proceed.
The installation process automatically loads and checks the hardware drivers.
4. Choosing the Installation Type
You've completed the necessary access to the installation diskette. You can now choose to do a local installation, with a CD-ROM or QIC tape device, or to do a network installation over either TCP/IP or SPX. Only installed devices will appear as choices; for example, if there is no QIC tape drive, such a device won't appear as an installation choice.
To install UnixWare 2.0 over a network connection, an install server must be enabled somewhere on the network. If you need to set up an install server, you can use the icon located on the UnixWare Application Server in the Administration Tools window. On-line help is available, but the utility is reasonably straightforward.
If your network supports both protocols, choose the TCP/IP option. If the install server as been properly configured with the network host names, IP addresses, and IP router information, all networking values will be supplied automatically to the local installation. This information further simplifies the installation process.
5. Partitioning the Disk
To place an operating system on the hard drive, you must allocate the appropriate system partition and size. The installation process lets you choose to use the entire hard disk as the active UNIX partition, or to select a custom disk configuration. The custom option gives you an FDISK utility you can use to view and change the partitions on the hard drive.
Remember to reserve enough disk space for the operating system as well as for user and application space.
6. Using the Installation Menu
The installation menu gives you a final opportunity to make last changes to the system before any modifications are written to the hard drive. The choices on the menu are "Package Selection", "Disk Configuration", "Disk Operations" and "Return to Previous Menu."
The "Package Selection" option lets you customize the UnixWare operating system. "Packages" are software modules that add functionality to the OS. (Appendix D of the Installation Handbook discusses these packages in detail.)
The installation process can recognize package dependencies. In other words, if you select a package that depends on a package you haven't yet selected, the system makes you either select the independent package or deselect the dependent package. The installation process also informs you if the number of packages you've selected exceed the disk space available. You must then deselect some packages.
The "Disk Configuration" submenu gives you three options. The "Disk Partitions" option is actually the FDISK utility. The "File Systems" option lets you customize file system types and file system sizes. If you have more than one hard drive, it lets you place the file systems on selected disks.
The default file system for the root and user file systems is vxfs, a journaling file system that provides system fault tolerance and the recommended file system type. However, if you need backward compatibility with a legacy file system,the s5 and ufs file systems are available to you.
The "Disk Operations" option lets you disable the scanning of the hard drive.
The "Return to Previous Menu" option needs no explanation.
At this point in the installation process, all options and parameters are complete. Once you select the "Accept All Settings and Install Now" option on this menu, the system begins the unassisted operating system installation.
7. Checking the Disk
Next, this automatic utility simply shows you a bar graph indicating what percentage of the task has been completed. It requires no user intervention. The capacity of the hard drive determines how long this process takes.
We recommend that you do not disable this step. It maps the bad blocks on the hard drive so the OS won't use them. A complete check of a 511MB SCSI disk drive, for example, takes 5 minutes.
8. Creating File Sys-tems and Copying Files
This automatic process also requires no user intervention. Once the bad blocks are mapped, the system begins to create file systems and to copy files. How long this process takes is determined by the speed of the I/O subsystem and the number of packages you selected. Copying the default packages on a 486/50, for example, takes about half an hour.
9. Rebooting the System
Once all files have been copied to the hard drive, the system automatically reboots. When it comes back up, the kernel rebuilds. Installation continues.
10. Configuring the Network Adapter
Complete the following steps to configure your network adapter.
Choose the "NICs" package. You'll see the "Network Interface Card Selection" screen. This screen lists all network adapters supported on UnixWare 2.0.
Choose the appropriate adapter and quantity. UnixWare's installation process then loads the drivers.
If the adapter is EISA, PCI, or MCA, UnixWare's installation process automatically configures it. If you have an ISA adapter, you'll be prompted for configuration values.
At this point, you can enter system IP values, DNS, and network frame type. If there is a bootup server in the network, you can prompt it at this point for the appropriate values. Press <F8< for the reboot server, and it will let you enter these values.
11. Configuring the Mouse
The mouse selection screen gives you an interactive setup utility, complete with test. UnixWare supports bus, serial, and PS/2 mice.
12. Setting Up the System Owner
UnixWare installation lets your system define two users: the system owner and the root user. When you set up the system, you become the system owner. You choose your user ID, user name, user number, and password.
13. Setting Up the Root Account
The root account is the most powerful user on the system. The installation process automatically sets up this account. Only the password is then required in order to use it.
Ensuring Hardware Compatibility
Since UnixWare has many dependencies on the hardware, it's imperative that you use compatible hardware. This requirement represents a paradigm shift from operating systems such as DOS and NetWare, where hardware support is taken for granted.
To ensure compatible hardware, you can pursue several avenues. For example, Novell has instituted the 'YES, It Runs with UnixWare" branding program to assure compatibility with the UnixWare operating system. Look for the certification "branded" on the product.
To distribute Novell product certification information, Novell Labs offers a FaxBack system. Novell's FaxBack is on-line 24 hours a day, seven days a week. You can reach it in the US at (800) 414-LABS or at (801) 429-2776. By calling the FaxBack and obtaining the Master Index catalog, you can quickly obtain specific information on UnixWare and NetWare when you call back and request a specific document number.
Conclusion
With UnixWare 2.0, installation is easier and faster than ever. Thanks to several new utilities, much of the installation process has been automated. Make sure your hardware is compatible, use the installation manual, and make the choices you need to make before you start. Your UnixWare installation will be smooth and problem-free.
* Originally published in Novell AppNotes
Disclaimer
The origin of this information may be internal or external to Novell. While Novell makes all reasonable efforts to verify this information, Novell does not make explicit or implied claims to its validity.