Using Novell's NetWare User Tools (NWUSER.EXE) for MS Windows Clients
Articles and Tips: article
Research Engineer
Systems Research Department
BEN HENDRICK
Product Support Engineer
Novell Technical Services
01 Jun 1995
The NetWare DOS Requester includes special support features for workstations running Microsoft Windows 3.1, 3.11, and Windows for Workgroups 3.11. Part of that support is a client utility called the NetWare User Tools (NWUSER.EXE). This Application Note gives an overview of the DOS Requester's Windows support and covers the features and functionality of the NetWare User Tools utility. It also provides some tips and tricks for using the NetWare User Tools, along with some general troubleshooting information.
Related AppNotes Apr 95 "Integrating the NetWare DOS Requester (VLMs) with Windows for Workgroups" Mar 95 "Support Issues for the NetWare DOS Requester (VLM) 1.2" Mar 95 "Black Screen of Death Explained" Jun 94 "NET.CFG Parameters for the NetWare DOS Requester 1.1" May 94 "The Functions and Operations of the NetWare DOS Requester v1.1" Jul 91 "Integrating NetWare and Windows 3.1" Research Report
- Introduction
- Overview of the DOS Requester's Windows Support
- Installing the DOS Requester with MS Windows Support
- A Guided Tour of the NetWare User Tools
- Tips and Tricks
- Troubleshooting the NetWare User Tools Utility
- Conclusion
- Appendix: What the DOS Requester Installation Program Modifies for Windows Support
Introduction
The NetWare DOS Requester, Novell's client software for DOS/MS Windows machines, is designed to give users access to NetWare services and resources on the network. With the increasing popularity of Windows as a desktop operating system, Novell has continued to enhance the Windows support features within the DOS Requester. A significant part of this enhanced support is a client utility called the NetWare User Tools (NWUSER.EXE). This utility is included in the NETWARE.DRV driver that comes with the DOS Requester software.
This Application Note covers briefly how to install the DOS Requester with Windows support so you can access the NetWare User Tools utility. The AppNote then covers the features and functionality of the NetWare User Tools so users can work more effectively in the NetWare environment from within Windows. It gives some tips and tricks for using the NetWare User Tools, and ends with a discussion of general troubleshooting issues. Network administrators, support providers, and training organizations can use this information to train users on the proper installation and use of the NetWare User Tools in Windows environments.
The NetWare User Tools utility works the same for Windows 3.1, 3.11, and Windows for Workgroups 3.11. This AppNote assumes you have a NetWare workstation (80386-based PC or better) running DOS 3.x or higher and MS Windows 3.1(1) or Windows for Workgroups 3.11 in 386 Enhanced mode. To get the most from this AppNote, you should have a good understanding of Windows and its terminology.
Overview of the DOS Requester's Windows Support
To support the Windows environment, Novell's DOS/Windows Client software includes a number of support drivers (DRVs), dynamic link libraries (DLLs), virtual device drivers (VxDs), and other files. These files are copied to their proper locations during the installation of the NetWare DOS Requester.
|
For more background information on the NetWare DOS Requester and related issues, refer to therelated AppNotes listed on the first page of this AppNote. |
NWUSER.EXE is an executable that has hooks into NETWARE.DRV, the Novell driver that provides the interface into NetWare for Windows users. This driver is loaded in the SYSTEM.INI file as follows:
SYSTEM.INI [boot] network.drv=netware.drv
The NETWARE.DRV file itself typically resides in the WINDOWS/SYSTEM directory if Windows is configured locally.
Note that the information in this AppNote is specific to the NetWare DOS Requester version 1.20. Details of usage may change and new features may be added in future versions. To obtain the latest update of NETWARE.DRV, download the most recent release of WINDRX.EXE (where x is the current revision number). This self-extracting file can be found in the following locations online:
|
CompuServe: |
GO NOVFILES |
WINDRx.EXE |
|
Internet: |
anonymous ftp to ftp.novell.compub/netwire/novfiles |
WINDRx.EXE |
Installing the DOS Requester with MS Windows Support
Running the INSTALL program for the NetWare DOS Requester sets up drivers, DLLs, and utilities (including NetWare User Tools) that make Windows a more useful NetWare client. INSTALL takes you through a six-step installation process. In this AppNote we'll concentrate on Step 3, which is where the program sets up support for running Windows on the client (see Figure 1).
Figure 1: The main screen of the DOS Requester INSTALL program.
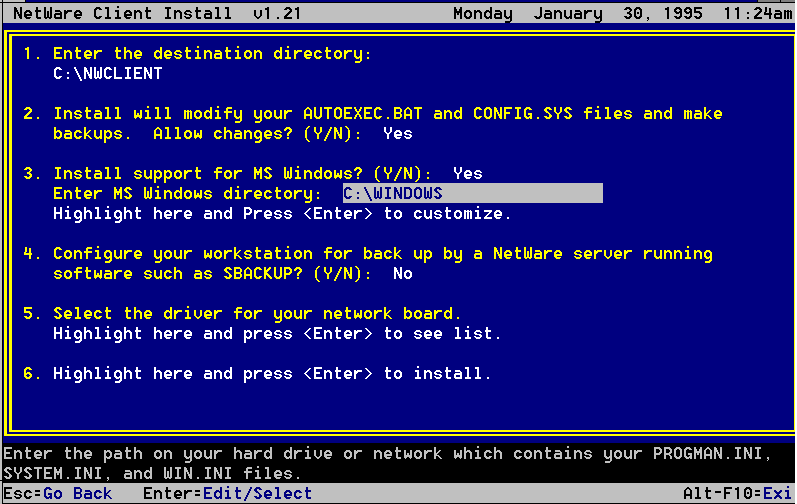
Each question or prompt that relates to Windows support is explained below.
Install support for MS Windows? (Y/N)
After completing Steps 1 and 2, highlight the field next to the "Install support for MS Windows? (Y/N)" prompt in Step 3. To have INSTALL set up Windows support on the workstation, make sure it says "Yes" by typing "Y".
Enter MS Windows directory:
INSTALL looks for a copy of Windows in the workstation's current directory, then in the directories specified in the DOS PATH variable. If it finds a copy, it will display the path in the "Enter MS Windows directory" field. If you are running Windows locally and INSTALL doesn't find your copy, type the correct path in the field.
If you are running Windows from a shared copy on the network, this prompt refers to your personal Windows directory. As noted in the Help at the bottom of the screen, this is the directory which holds your Windows *.INI files. These files are usually stored either in a local directory (such as C:\WINDOWS) or in a personal network directory, such as F:\USERS\ED\WINDOWS.
Note: Novell Technical Services has discovered a problem during installation when (1) you have a personal Windows directory on the network and (2) the workstation is booted running the NetWare Shell (NETX). When you enter the path to the personal Windows directory, you receive the error message "An invalid drive was given in PATH," even if the directory path you enter is valid.
As a workaround, first install the DOS Requester without adding Windows support (type "N" at the "Install MS Windows support" prompt). Then reboot the workstation, which will now be running the DOS Requester, and run INSTALL again. This time, answer "Yes" in Step 3 to install Windows support.
Highlight here and Press <Enter< to customize
If you are a system administrator setting up DOS Requester/Windows support for a number of users who are accessing Windows from a network installation, highlight the line that says "Highlight here and Press <Enter< to customize." When you press <Enter<, you will see the "Customize Support for MS Windows" screen, asking you about country codes and a shared MS Windows path (see Figure 2).
Figure 2: The Customize Support for MS Windows screen.
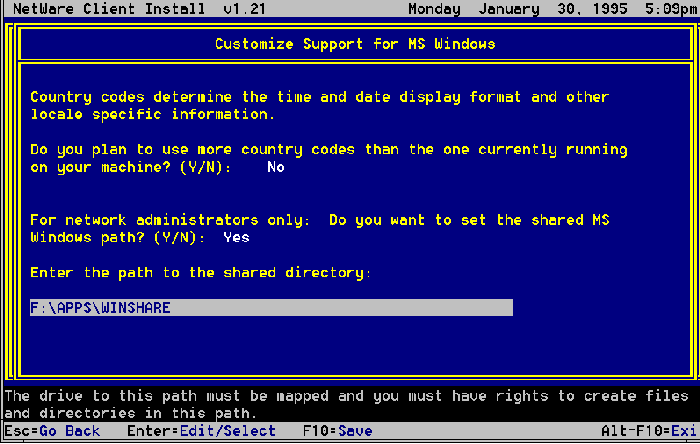
Country Codes. The first question asks if you plan to use more than one set of country codes. We'll skip over that for now, since we're just looking at the Windows-related parts of INSTALL. (For more information about country codes and the rest of the DOS Requester installation process, see "Support Issues for the NetWare DOS Requester (VLM) 1.20" in the March 1995 Novell Application Notes.)
Shared MS Windows Path. The second question under the "Customize Support for MS Windows" screen is for network administrators who have set up a shared WINDOWSdirectory using the SETUP /A option when they installed Windows on a network drive. Users then run SETUP /N to set up individual files (about 300KB for the users) either locally or in a personal Windows directory on the network (such as G:\USERS\ED\WINDOWS). They access the shared Windows directory on the network for the rest of Windows (about 8 - 11MB for Windows 3.1 and about 22MB for Windows for Workgroups 3.11).
The question that you see is "Do you want to set the shared MS Windows path? (Y/N)" with the default of No. If you choose "Yes," you will be asked to enter the path to the shared directory. This is typically a directory on the network, such as F:\APPS\WINSHARE.
Note: You should have a drive mapped to the specified path, and you must have sufficient rights to create files and directories in hat path.
Press <F10<to save your changes and return to the main INSTALL window.
With the required information for Windows support in place, continue through the remaining steps of the DOS Requester INSTALL program. INSTALL will copy the necessary files that are shared into the specified directory. Then INSTALL modifies only the .INI files that are stored locally or in the personal Windows directory of those users who have run the SETUP /N program for Windows and have typed the directory path to their individual files in the "Enter MS Windows Directory" field earlier in this step. (See Appendix A for a detailed list of changes INSTALL makes.)
|
For more information on how to install the DOS Requester with Windows 3.1x, see "Support Issues for the NetWare DOS Requester (VLMs) 1.2"in the March 1995Novell Application Notes. For more informationon how to install the DOS Requester with Windows for Workgroups,see "Integrating the NetWare DOS Requester (VLMs) with Windows for Workgroups"in the April 1995 Novell Application Notes. |
A Guided Tour of NetWare User Tools

Once you have installed the DOS Requester with Windows support and go into Windows, you will see a new program group called NetWare with a "toolbox" icon in it representing the NetWare User Tools (NWUSER) utility. To see what NWUSER has to offer, double-click on the icon. You will see a screen similar to the one shown in Figure 3.
Figure 3: The initial screen of the NetWare User Tools utility.
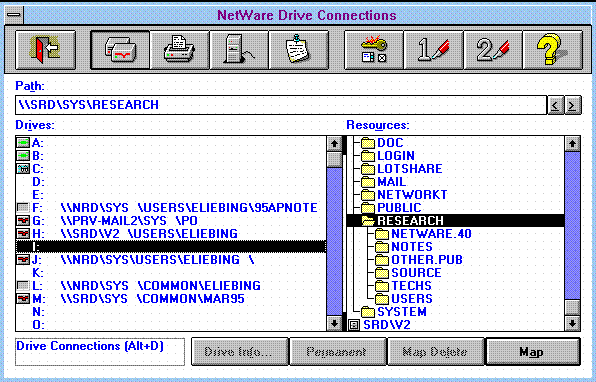
Across the top of the screen are buttons depicting the different functions you can perform in the utility. For example, you can map drives, set up printing, attach to and logout of servers, and send messages to other users.

Clicking on the open door button in the upper left-hand corner of the window exits you from the NetWare User Tools. (You can also exit by pressing Alt+X or the <Esc< key.)
The NetWare Drive Connections Window

The first time you start NWUSER, you'll see the NetWare Drive Connections window as shown in Figure 3. From this window, you can map network drives to the servers you are presently attached to. (If you are currently in another NWUSER window, access the drive connections window by clicking on the drives button, or by pressing Alt+D.)
At the bottom of the NetWare Drive Connections window are four buttons: Drive Info, Permanent, Map Delete, and Map. We'll explain the use of each button in the sections that follow.
Mapping a Drive. There are two ways to map a drive in the Drive Connections window: by using the Map button at the bottom of the window, or by using the Windows "drag-and-drop" technique. We'll explain the button method first.
To add a drive mapping, first go to the Drives list and click on the drive letter you want to use for the mapping. In the Resources list to the right, double-click on the desired volume. You will see the directories that are immediately beneath the volume (provided you have sufficient rights to see them). Double-click on a directory to see the subdirectories beneath it. Keep clicking on subdirectories until you arrive at the directory you are looking for. As you click down the directory structure, the full directory path is displayed in the Path box above.
Note: In the NetWare User Tools, paths are displayed according to the Universal Naming Convention (UNC). The syntax for UNC is \\Servername\Volume\Path. This is different from NetWare's traditional path syntax of Servername\ Volume:Path.
Before you map the drive, you need to decide where you want the "root" of the path to be. In DOS the root of a drive defaults to the volume level because you can't go any higher than that with the CD (Change Directory) command. NetWare provides a MAP ROOT text command that lets you set a "fake root" further down in the directory path. When a drive is mapped as a fake root, you can't move up a directory level from that point in the path when that drive is your current drive.

In the NetWare User Tools, the fake root defaults to the end of the path you've entered in the Path box. However, you can use the less-than (<) and greater-than (>) buttons at the right-hand side of the Path box to adjust the directory level you want to designate as "root. Clicking on the less-than (<) button moves the "root" designation one directory level up toward the volume. Clicking on the greater-than (>) button moves the "root" designation one level down, away from the volume. The current position of the "root" designation is indicated by a space.
Once you've specified where you want the "root" designation, simply click on the Map button at the bottom of the window to map the directory shown in the Path box to the selected drive letter.
To use the Windows "drag-and-drop" technique, you don't need to select a drive letter first. Just click down the directory structure in the Resources list until you arrive at the desired directory. Now click the left mouse button and hold it down. A drive icon will appear to represent the directory. Drag the directory icon over to the drive letter you want to map it to and release the mouse button. The directory is now mapped to that drive letter.
Note: When you drag a directory, you can't change the default "fake root" designation of the end of the path. If you want to change the root positioning after the fact, click on the mapping in the Drives list. The full path will be displayed in the Path box above. You can now use < and < to position the root, and then click on Map to remap the drive.
Displaying Information About a Drive Mapping . Highlighting a mapping in the Drives list and clicking on the Drive Info button shows you which server the directory is on, the full directory path, your user name, your effective rights, and your inherited rights mask to this directory (see Figure 4).
Figure 4: The Drive Info... window shows details about the selected drive mapping.
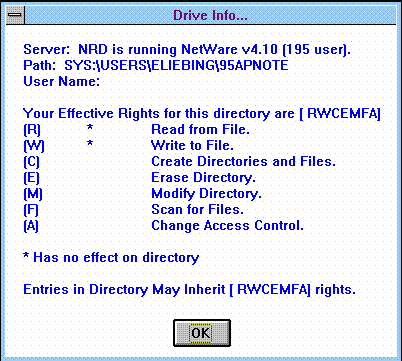
In Figure 4, user ELIEBING is running on a NetWare 4.10 server called NRD. He has all rights but Supervisor (RWCEMFA) in the highlighted directory (SYS:\USERS\ELIEBING\95APNOTE).
Clicking on OK returns you to the NetWare Drive Connections window.
Making Drive Mappings Permanent. If you want to have a drive mapping set up every time you enter Windows, highlight the drive and click on the Permanent button. The small icon to the left of the drive letter will change from a plain box to a drive icon. From now on, every time you enter Windows you will see a NetWare Restore Connections window in which the permanent drive mapping is established (see Figure 5).

Figure 5: The NetWare Restore Connections window is displayed when you start Windows and have made permanent settings.
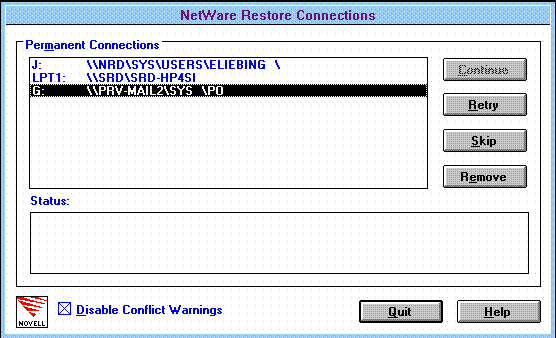
If you are currently logged in to the corresponding server, the drive mapping is performed automatically and the window disappears on its own. If you are not currently logged in, you will be prompted from the NetWare Restore Connections window to either log in or skip the drive mapping.
In Figure 5, notice that the Disabled Conflict Warnings box is checked. This means any pre-existing, duplicate drive mappings (and Capture statements) are simply overwritten by the drive mappings (and Capture statements) made permanent in NetWare User Tools. If you want to choose whether permanent settings overwrite previous settings, do not check the Disabled Conflict Warnings box.
Note: You can also check or uncheck the Disable Conflict Warnings setting under the Permanent Connections portion of the NetWare Settings (as we'll discuss later).
If you have set up a permanent drive mapping and you decide you don't want it to be permanent any more, highlight the mapping in the NetWare Drive Connections window and press the Permanent button again to unmark the drive letter. You will see the drive icon to the left of the drive letter revert to an empty box.
Deleting a Drive Mapping. To delete a drive mapping, highlight the drive you want deleted and click on the Map Delete button at the bottom the NetWare Drive Connections window.
NetWare Printer Connections

Clicking on the Printer button (Alt+P) in the NetWare User Tools brings up the NetWare Printer Connections window (see Figure 6). From here you can connect logical LPT port designations on the workstation to NetWare print queues on the network. This is analogous to setting up printer port redirection through the CAPTURE text utility in DOS.
Figure 6: You set up Capture statements in the NetWare Printer Connections window.
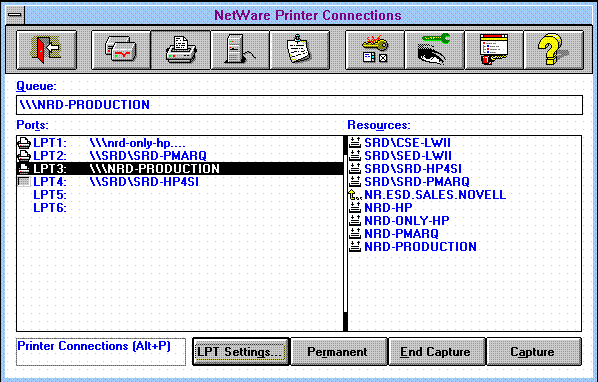
The bottom part of the screen has four buttons: LPT Settings, Permanent, End Capture, and Capture. We'll discuss the use of these buttons a bit later.
Adding a Printer Driver in Windows. Before you can access NetWare print queues through the Printer Connections window, you need to have printer drivers for Windows printing in place. You can access the place in Windows where you connect printer drivers to NetWare print queues through a couple of methods:
You can set up printing and attach printer drivers to print queues from the Printers button that is under the Control Panel Icon in the Main group.
You can also do this from the Printer Setup option under the Options pull-down screen in Print Manager (if activated).
The process of connecting printer drivers to print queues is done through the NETWARE.DRV driver that is installed when you install the DOS Requester. This driver contains the NetWare connectivity that is necessary to print to NetWare print queues from within Windows. The screen you see through the Printers icon in Control Panel or through Print Manager is the same screen you see when you select the Printer Connections button in the NetWare User Tools.
Let's go through the procedure for adding a printer driver through the Printers icon in the Control Panel. When you click on this icon, you'll see the printer drivers you have selected (if any) for the printers installed on a printer port, such as LPT1 or COM1. To add a new Windows printer driver, click on the Add button, select the printer driver from the List of Printers, and insert the proper Windows diskette as prompted. (You may need a supplemental diskette from your printer vendor that contains the driver you want to add.) Once the driver is added, you will be returned to the Printers window.
Note: These are printer drivers that Windows and Windows applications will use. DOS-based applications must use their own printer drivers in order to print. For more information on many of these printer configuration aspects, see "Printing to Network Printers in Windows 3.1" in the December 1994 Novell Application Notes.
From the Printers window, you next select the Connect button. In the Connect window, click on the Network button to bring up the NetWare Printer Connections screen. (This is the same screen that you see in the NetWare User Tools utility, shown in Figure 6.)
In the NetWare Printer Connections window, you can capture a port by highlighting the desired LPT port and then selecting a print queue from the Resources list. Click on the Capture button (Alt+A) to establish the capture.
We'll give more details about the buttons in the NetWare Printer Connections window under the next heading. For now, close the window by clicking on the Exit button (Alt+X). You will be returned to the Connect window, where you will see that the LPT connection now has a server and print queue designation (see Figure 7).
Figure 7: Sequence of windows when setting up a printer driver from the Control Panel.

Above the Ports list, Windows displays the name of the printer driver you have selected for the printer that is servicing the print queue. Be sure that this is the correct printer driver for the print queue/printer you have selected; otherwise, printed output may be unintelligible or it may not print at all.
Click on the OK button to return to the Printers window where you can set your default printer, add and remove printer drivers, and (via the Setup button) set up the printer driver to better match the printing you plan to do. The setup options typically include paper orientation (portrait or landscape), printer font cartridges, and so forth.
Setting Up a Capture in the Printer Connections Screen . A connection you make in the NetWare Printer Connections window between a logical LPT port and a NetWare print queue acts as a CAPTURE statement does in DOS. In fact, typing CAPTURE SH <Enter< at a DOS prompt displays the CAPTURE settings that you have set up in the NetWare User Tools. Likewise, any CAPTURE statements you set up in DOS before entering Windows will be reflected in the Printer Connections window (unless overwritten by a permanent Capture setting, as explained later).
Note: NetWare 3.1x utilities support only three LPT settings, while NetWare 4 utilities can handle up to nine logical LPT settings. See the "Tips and Tricks" section of this AppNote to find out how to extend the number of logical ports you can see in NetWare User Tools to nine. You can do this even on a NetWare 3.1x network; however, you must use the NetWare User Tools to manage these changes.
In the NetWare Printer Connections screen, you can click and drag a print queue from the Resources list over to the Ports list. Drop the selection on the LPT connection that matches the printer that is servicing the selected print queue. The printer driver should already be set up, as explained in the previous heading. Print queues listed on the Resources side above the NDS container name are NetWare 3.1x printer services. Those print queues listed below the NDS container name are NetWare 4 print queues.(See the "Tips and Tricks" section of this AppNote for a way to change the current context in a NetWare 4 environment to access other printer and print queue resources.)
Click on the Capture button to establish the Capture statement. Once you have done so, you can click on the LPT Settings button (Alt+G) to set all parameters that you would normally include as part of the Capture statement, such as Notify, Form Feed, Auto Endcap, Banner, and so forth (see Figure 8).
Figure 8: You specify LPT Settings for your Capture statement In the NetWare Settings window.
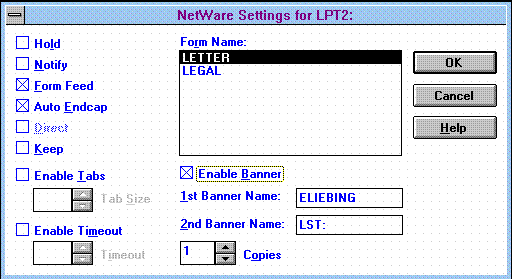
The Capture statement works for both DOS and Windows sessions, and remains in effect when you leave Windows and access applications through DOS.
To disable a Capture statement from the Printer Connections window, click on the End Capture button (Alt-E). This has the same effect as running the ENDCAP text utility in NetWare 3.1x.
Making a Capture Permanent. You can make your Capture statements permanent so that every time you go into Windows, the NWUSER utility takes care of your Capture statements for you. You do this through the Permanent button at the bottom of the Printer Connections window. A small printer icon will appear to the left of the LPT designation. The next time you go into Windows, you will see the Capture statements added through the NetWare Restore Connections window as Windows comes up.

If you are overwriting a CAPTURE command that is either in the system login script or in your own personal login script, the Restore Connections window will notify you of the conflict. If you want the Windows settings to always overwrite earlier CAPTURE commands, check the Disable Conflict Warnings box at the bottom of the Restore Connections window. Previous CAPTURE commands will be automatically overwritten.
Note: You can also check or uncheck the Disable Conflict Warnings setting under the Permanent Connections portion of the NetWare Settings (as we'll discuss later).
Attaching to Servers

The NetWare Connections button is to the right of the Printer Connections button. By clicking on this button (or by pressing Alt+C), you access the NetWare Connections window from which you can log in (attach) to and log out from NetWare servers. The window is divided into three parts: a Context box, a Connections list, and a Resources list (see Figure 9).
In NetWare 4 environments, the Context box displays your current context within the NDS tree. NetWare User Tools uses the short form, leaving out the OU= and O= designations, to display the context. (See the "Tips and Tricks" section of this AppNote for a way to change the current context and see other servers.)
Figure 9: The NetWare Connections window.
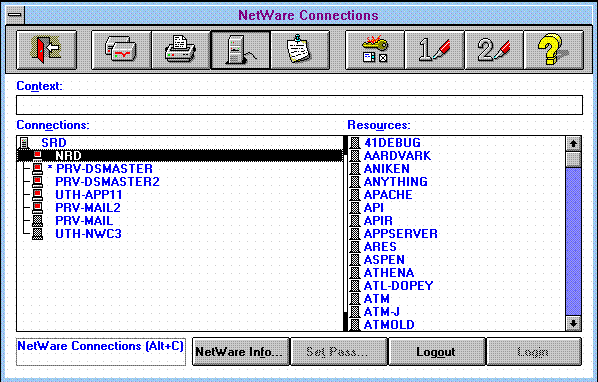

By default, items in the Connections list are sorted by resource type. The default order is bindery-based servers first, followed by tree names and servers in that tree, followed by container objects. In Figure 10, the list includes a NetWare 3.1x server (SRD), an NDS tree (NOVELL.INC), and several NetWare 4 servers directly below the tree. Note that the NDS tree is identified by a tree icon.
The Resources part of the screen lists the available NetWare 4.x, 3.x, 2.x, and Personal NetWare servers you can access.
At the bottom of the window are buttons that let you see NetWare information about a server you have selected, set your password, and log out or in.
To attach to a new server, click on the server you want in the Resources list and press the Login button (Alt+I). This brings up the Login To NetWare window (see Figure 10).
This window displays the server you have selected and allows you to log in as Guest or as a Registered User. You can only log in as Guest if there is a GUEST account defined for that server. If you are a "registered" user (one with a valid user account set up on the network), verify that the name presented in the User Name box is correct. If it is, press <Tab< to move to the Password box and type your password. Now press <Enter<. The server you are logged in to appears in the Connections list.
Figure 10: The Login To NetWare window.
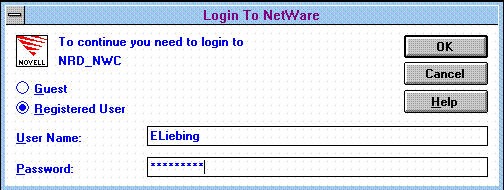
Note: The login box only attaches you to the server and does not execute any login scripts. It is the same as logging in with a LOGIN /NS (No Script) command. The "Login" option under NetWare User Tools does authenticate you to NDS in NetWare 4. However, if you want to run a login script, your initial login should be done at the DOS command line with the LOGIN text utility before you load MS Windows.
Viewing NetWare Information. Once you are logged in, you can see information about the server by either double-clicking on the server name in the Connections list, or by highlighting the server and clicking on the NetWare Info button (Alt+F). This displays information such as the server name and version, who you are logged in as, your connection ID, and your connection type (see Figure 11).
Figure 11: The NetWare Info... window displays details about your server connection.
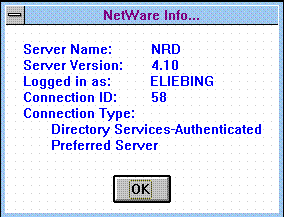
This information is similar to that displayed by the WHOAMI text utility in DOS.
Changing Your Password. If you want to change your password while in Windows, highlight the server on which you wish to change the password and click on the Set Pass button (Alt+T). You will see a NetWare Set Password window similar to the one shown in Figure 12.
Figure 12: You can change your password in the NetWare Set Password window.
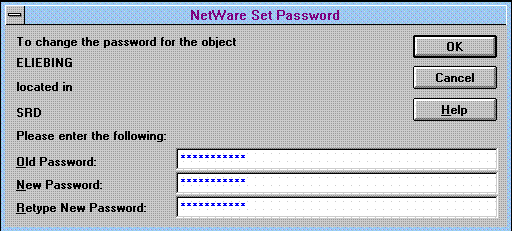
From this window, you can change the password for you as an user object on the server you highlighted. Type in the old password once and the new password twice. If successful, you'll see a message that says "The password was successfully changed."
Note: The Set Pass button changes the password only on the server you have highlighted. You can't select more than one server in order to synchronize the password on all the servers you are currently logged in to.
Currently, the best way to synchronize passwords is to use the SETPASS command at the network prompt. Type SETPASS <Enter< and, when prompted, elect to synchronize it on all attached servers. Be sure that you are attached to all the servers you normally do before typing SETPASS so they will be included in the synchronization process. (You can do this from a DOS session in Windows if you'd like.)
Sending Messages
Sending brief messages has been a part of NetWare since its inception. You can send two one-line messages (one for the screen and one for the message buffer) to anyone who is logged in to the servers you are.
Note: While you can send more than two messages, the message buffer will only hold one message and discards any other messages sent after the buffer is full.

The NetWare User Tools also has messaging capabilities that allow you to send up to two one-line messages to users or groups. To use the NetWare User Tools for sending messages, click on the button that looks like a wrinkled note tacked to a bulletin board, or press Alt+M.
At the top of the NWUSER window, you see a Message box in which to type in your message. The two sides of the main window are divided into a Connections side and a Resources side (see Figure 13).
Figure 13: The NetWare Send Messages window.
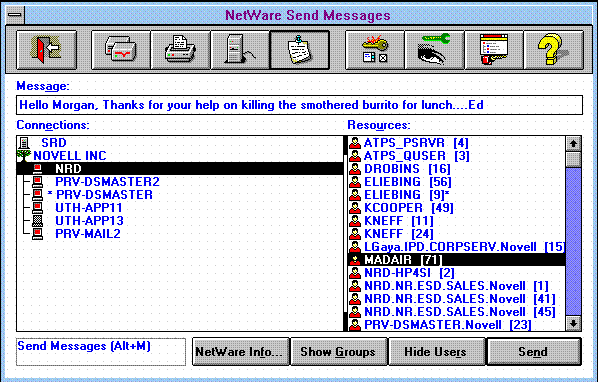
As you click on a server on the Connections side, the users and groups on the Resources side change to reflect the new selection. (See the "Tips and Tricks" section of this AppNote for a way to change the current context for access to other resources.)
To send a message, type the text of the message in the Message box. Then highlight a user or group in the Resources list and press <Enter< or click on the Send button at the bottom (Alt+N).
You can type in up to 256 characters, including spaces, and the text will scroll horizontally within the Message box. In my testing, I was able to type in and send 256 characters. However, on the receiving end, only 237 characters were displayed. The space for the other 19 or so characters was taken up with the message format syntax of:
From <username< [<connection number<]:
However, there is no indication from NWUSER that the message was truncated. So be careful if you want to send a 256-character message. Take the header space into account so you don't lose part of your message.
You also have a buffer so you can send two messages to a person or group. Once the message is received and appears on the recipient's screen, the second message goes into the buffer. If you try to send a third message before the recipient has cleared the first one, you will see "Message NOT Sent To: Username[ConnectionNumber]" because the message buffer is full.
The NetWare Info button shows general information about the server you have highlighted. This is the same information you see from the similar button in the NetWare Connections window.
You can send messages to groups or users or both. If you want to see just users in the Resources list, click on the Hide Groups button (Alt+G) on the bottom of the window. Now no groups will be displayed, and the Hide Groups button changes into a Show Groups button.
Conversely, if you don't want to see any users in the Resources list, click on the Hide Users button (Alt+R). No users will be displayed in the list and the button changes into a Show Users button.
Checking NetWare Settings for Windows

The NetWare Settings button is to the right of the Message button and is shown as a key, a menu, and a checkbox. When you click on this button, you will see the NetWare Settings window divided into six parts: Message Reception, NetWare Hotkey, Print Manager Display Options, 386 Enhanced DOS Sessions, Permanent Connections, and Resource Display Options (see Figure 14).
Figure 14: The NetWare Settings window is where you set various options for the NetWare User Tools utility.
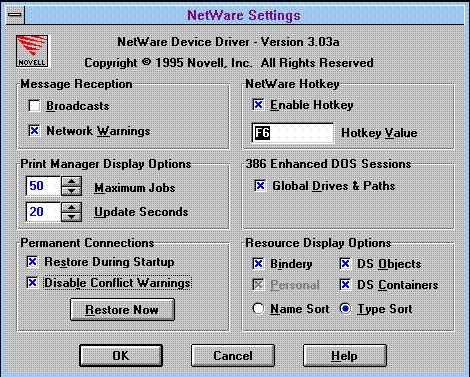
The Message Reception part of the window contains two entries: Broadcasts and Network Warnings. Broadcasts are server broadcasts, such as the server volume is almost out of disk space, etc. The Network Warnings entry displays any problems that might be happening when Windows loads the NETWARE.DRV driver and tries to set up the NetWare environment.
If you want to receive either (or both) of these messages while you are in the Windows environment, click on their corresponding boxes to check them. If you don't want messages, uncheck the appropriate box.
Note: If you are having problems with the NetWare User Tools, it is a good diagnostic step to check the Network Warnings entry so you can track any problems you might be having as Windows loads.
The NetWare Hotkey box has two entries that correspond to each other: Enable Hotkey and Hotkey Value. Check the box to enable the Hotkey function. You can then press that function key value (F6 is the default) to bring up the NWUSER utility any time you are in Windows. (This doesn't apply when you are in a DOS session in Windows.)
With the Hotkey enabled, the NWUSER utility makes the following changes to the NETWARE.INI file:
NETWARE.INI [options] HotKeyEnabled=1
You can change which function key you use clicking on Hotkey Value entry box and pressing another key to take its place. For example, if you press a Shift key or the Spacebar, it is placed in the Hotkey Value entry box. If the key is already being used by NETWARE.DRV in some way, you'll hear a beep and won't be able to select it. For example, NETWARE.DRV uses the F1 key to display Help, so you can't select that key. Neither can you select F2, F5, or F10. (F10 activates the dialog box menu, just like when you click on the bar icon in upper left-hand corner of the window).
Other applications may use certain key combinations which NETWARE.DRV can potentially interfere with. In this case, you will need to select a different key combination to activate the NWUSER utility. This can get rather tricky given the number of different Windows applications available.
If you change your mind and want to go back to the F6 default, press Cancel at the bottom of the screen before you press the OK button. Or if you try another hotkey sequence and don't like it, you can highlight the Hotkey Value box later and change it back to F6 or to a different value.
Note: You can run NWUSER as a minimized icon rather than having to type F6 every time you want to bring up the utility. See the "Tips and Tricks"section of this AppNote for details.
The Print Manager Display Options box has two options: Maximum Jobs and Update Seconds. The Maximum Jobs entry allows you to display up to 250 jobs in the NetWare print queue through a Print Manager's view of the print queue. You can also set the number to display only one print job (the default is 50). You can have more jobs than this in the queue, but you just can't see them.
If you want the information on the screen updated more than every 30 seconds (the default), you can use the Update Seconds entry to change the update rate on jobs in the print queue. If you lower this number, Windows will have to update the screen more often and printing will slow down a bit because more time is being spent on screen updates. When many jobs are queued up for printing, this can also consume some network bandwidth as the data is periodically retrieved from the server. (The update interval has little or no effect on the print job once it is being serviced by the print server.) You can set the option down to 1 second or up to 65 seconds.
The 386 Enhanced DOS Sessions option has just one entry, Global Drives and Paths, which can be checked (enabled) or unchecked. When checked, this option allows you to share the changes you make through the Drive Connections, Printing, and Server Connections options to affect all DOS sessions and Windows applications you go into. For example, I can change my drive mappings through the Drive Connections button, go into a DOS session, and see that the drive mappings are there, even after I exit Windows and go to DOS.
With the Global Drive unchecked, you will use NetWare drive mappings that you had when you went into Windows. Drive mappings made in two different DOS sessions will work independently of one another. The same drive letters in two DOS sessions can be mapped to two different paths.
The Permanent Connections box option also has two entries: Restore During Startup and Disable Conflict Warnings. You need to have the Restore During Startup entry enabled if you want to use the Permanent buttons under the NetWare Drive Connections and the NetWare Printer Connections windows. This way, the next time you go into Windows, your drive mappings, printers, and server connections will be restored.
The Disable Conflict Warnings entry prevents NWUSER from showing you messages that a network drive mapping set up in Windows is going to overwrite a NetWare drive mapping that you have in place before going into Windows.
For example, if you map drive M as a permanent drive mapping in Windows, but it's already mapped to a different directory, you will see a Status message in the NetWare Restore Connections that says something like this:
Network device M: is already connected to
\\SRD\V2\USERS\ELIEBING
Continuing will reset the network device to
\\SRD\SYS\COMMON\ELIEBING
When you press the Continue button, the drive mapping is overwritten.
You also can check the Disable Conflict Warnings box that you see at the bottom of the Status Message in the NetWare Restore Connection screen. Then you won't see messages when other drive mappings that overwrite current drive mappings.
The last box in the NetWare Settings window is the Resource Display Options. This box contains four settings for the different NetWare platforms you may be attached to. For example, if you are logged in to Personal NetWare, NetWare 2.x, NetWare 3.1x, and NetWare 4 servers, you can use this option to display the resources of these servers with their own particular picture descriptions.
The default is to have all resources selected; however, only those resources whose functions are enabled appear in black. Those resources whose functions are not enabled (as is Personal NetWare in Figure 14) appear "grayed out." You can use this color distinction to help troubleshoot resources problems (see "Losing Directory Services Functions" below.)
Depending on your rights, you can enable or disable the Bindery, Personal, DS (Directory Services) Objects, and DS Containers entries. For example, if you didn't want Directory Services containers to appear as a resource in the screens of NetWare User Tools, you would click on the DS Containers entry and remove the X from its box. Then you would not be able to browse up or down the Directory Tree to view resources in other containers.
You can also have these resources sorted by their names or by their resource type. If you choose the Type Sort, all servers, trees, and containers are lumped together as their type appears when you select the NetWare Connections button or the NetWare Printer Connections button. Otherwise, container names will appear as their names come up in the list.
Once you have made your selections, click on OK to put those changes in place and return to the NetWare User Tools main window. If you don't want to keep your selections, click on Cancel.
Making Buttons for Yourself

You can add functionality to the NetWare User Tools utility by adding utilities and applications to the user-definable buttons marked as 1 and 2. To do this, click on the button that looks like a 1 followed by a pen. You will see a screen similar to Figure 15, labeled as the User Defined Path window. In the Command Line entry, you can type in the path to the application or utility you wish to execute, including the executable name of the program. You can also add parameters to the Command Line entry you type in, just like you do when you add parameters at a DOS command line.
Figure 15: Type the path to the executable file you want to run in the User Defined Path window.

For example, if you wanted to add the NWADMIN utility to the 1 button, type Z:NWADMIN.EXE in the Command Line box and click OK. (If you have Z:\SYS\PUBLIC as a search drive before going into Windows, you can simply type NWADMIN.) From now on, you can click on the 1 button to bring up NWADMIN from within the NetWare User Tools.
If you type something wrong in the Command Line box, click on the Cancel button instead of OK.
Note: If you have already clicked on OK but change your mind about what you have added, press the Alt key as you click on the 1 button to again bring up the User Defined Path window. You can now change the 1 button to something else.
You can choose anything you want for the user-definable button in NWUSER. Popular additions include E-mail programs, Print Manager, RCONSOLE, NWAdmin, and the PCONSOLE utility.
Using NetWare User Tools' HELP Screens

The NetWare User Tools come with online help, which is accessible via the Help button (the question mark icon at the far right of the NWUSER window). The NetWare User Tools Help has been enhanced substantially from its earlier incarnations.
Clicking on the Help button brings up a help window that matches whichever button option is selected at the top of the screen. For example, if you are in the Printer Connections window, you will automatically go to the Printer Connections Help window. If you have trouble understanding the meaning of the different icons you see in the various screens, highlight the button at the top and press the Help button.
You can jump to any part of Help by selecting one of the topics under the How To... section. Or you can press the Search button and type the word you want to look for. If the word is a topic, you will see the list of topics that match the word you typed. You can also click on the Contents button to see a list of tools that are available to you, followed by a How To... section that brings you right to a topic. Once you have selected a few actions, you can click on the History button to instantly bring you back to a particular Help screen you have already accessed.
Tips and Tricks
This section presents a number of tips for getting the most out of the NetWare DOS Requester in the Windows environment. It also presents some tricks for doing things you may not know how to do.
Disabling the Novell Startup Bitmap
By default, a Novell NetWare bitmap image is displayed on the screen when NETWARE.DRV initializes. You can disable this as follows:
Go to the Windows Notepad and open the NETWARE.INI file.
Add the bolded line shown below under the [Options]section of the NETWARE.INI file:
[Options]
HotKeyEnabled=1
Messages=1
DisableLogo=0
Save the file and exit Windows. When you restartWindows, the Novell bitmap will no longer be displayed.
Minimizing NWUSER to a Desktop Icon
You may have noticed that the NetWare User Tools window has no minimize button associated with it. If you want to run the utility as a minimized icon, open the NetWare Tools folder and click once on the NetWare Tools icon to highlight it. Press Alt+Enter to bring up the Program Item Properties window. Click on Run Minimized (Alt-R) and then OK. Double-click on the NetWare Tools icon to bring up the utility, which will appear as a minimized icon on the desktop. You can hereafter bring up the utility any time by double-clicking on its desktop icon.
Note: As a driver-based application (part of NETWARE.DRV), NWUSER.EXE is treated like a screen saver and its icon always appears in the foreground on the Windows desktop. Also, its icon remains on the desktop even after you exit the utility.
Bringing up NWUSER by pressing the Hotkey (F6 by default) continues to work even when the utility is minimized as an icon. However, starting NWUSER by clicking on the icon might save initial startup time. For instance, if you had the NetWare Connections button selected when you last exited NWUSER, the utility must rebuild the list of all the servers you can access as it initially comes up. If you are running the minimized option and you double-click on the NWUSER icon, the server information doesn't have to be rebuilt. It's a small gain and you will have to weigh which method works best for you - the hotkey method or running in minimized mode.
Note: Clicking once on the minimized NWUSER icon displays a menu that includes the following options: Drive Connections, Printer Connections, Server Connections, and Send Message. If you select one of these, the utility will come up with the corresponding window active.
Using Windows as a Login Front-end
You can use Windows as a front-end to logging in and setting up NetWare drive mappings. The Restore Connections capability does allow you to log in from Windows and set up your NetWare drive mappings before Windows sets up its Windows icons and their corresponding drive mappings.
For example, you can mark as Permanent every drive mapping that you normally use when you log in to NetWare. The empty box icon to the left of the drive letter changes to a small drive icon when you do this. Next, leave Windows and log out. Type WIN <Enter< to execute Windows. As Windows loads, you will see a NetWare Restore Connections window followed by a Login To NetWare screen that allows you to log in to the server that contains the first directory maked as a permanent drive mapping. You then type in your login name, give your password, and the NWUSER utility sets up your network drive mappings before setting up the rest of your Windows icons.
There are some stipulations to using Windows as a login front-end. The main stipulation is that you must have Windows installed on the workstation's local hard disk and not on the network drive. Otherwise, you'll need to be logged in and mapped to the network directory containing Windows in order to bring up Windows. Another consideration is how Windows 3.1x and Windows for Workgroups handle search drive mappings, which is described in the next tip.
Search Drive Mappings
Windows looks at all drive mappings as directories attached to drive letters, so drive mappings added through Windows are not search drive mappings (they are not added to the PATH variable as they are with the NetWare MAP Sn command). This could cause problems when you go to the DOS prompt in a DOS session and try to run an executable that exists in a directory that is usually mapped as a search drive, such as SYS:PUBLIC.
For example, if you type MAP <Enter<, you'll receive the "Bad command or file name" message. As a workaround, you'll need to type Z:MAP <Enter< in order to run the MAP command. (This assumes that drive Z is mapped to the SYS:PUBLIC directory.) Or you can set up a new icon by selecting File, New, and then selecting OK for a new Program Item. In the Program Item Properties window, you can give the icon the name SYS:PUBLIC, give C:\COMMAND.COM for the Command Line entry and Z:\PUBLIC for the Working Directory entry. This sets up a special SYS:PUBLIC icon that you can use to run a NetWare utility in a DOS session. You can do this for SYS:SYSTEM as well.
Another trick that you can perform with the DOS Requester is to set up a batch file that places the drive letters, followed by a colon, period and semi-colon (Z:.;Y:.;X:.) for each of the permanent drive mappings that you want to access as search drive mappings in a DOS session.
For this example, you would mark Z:\PUBLIC, Y:\SYSTEM, and X:\APPS\UTILS drive mappings as permanent in the NetWare Drive Connections window, then create a batch file to call up Windows, similar to the following:
WINPATH.BAT PATH=Z:.;Y:.;X:.;%PATH% WIN
The new PATH will completely overwrite whatever was in the previous PATH variable. If you want to retain your local drive mappings, be sure to add the %PATH% variable at the end of the new PATH= command. When you are in Windows and your permanent drive mappings are in place, you can go to a DOS session and bring up the NetWare and other utilities found in these drive mappings without having to designate the drive letter along with the utility name.
You can do this because the DOS Requester uses DOS's PATH variable for its network drive mapping designations. This same procedure won't work with NETX because the NetWare Shell has its own internal network drive mappings and doesn't rely on the PATH variable for anything.
Extending the Number of Ports Available for Capture
The creation of this version of the NetWare User Tools coincided with the initial release of the DOS Requester (which was first introduced with NetWare 4.0). As a result, the NetWare User Tools have greater capabilities than the NetWare utilities that come with NetWare 3.1x or those that support NETX.
For example, the DOS Requester/NetWare User Tools can support more than eight server connections and up to nine LPT connections for CAPTURE statements. To enable printing above three LPT ports to six or nine ports, place the following lines in the NET.CFG file and in the WIN.INI file:
NET.CFG NetWare DOS Requester Network Printers = 6(default is 3, but can be set up to 9)
WIN.INI [Ports](match the number you set for Network Printers; LPT1:=3 is the default) LPT1:= LPT2:= LPT3:= LPT4:= LPT5:= LPT6:=
By placing the port numbers in the WIN.INI file, you tell Windows that it can access more than its default of three LPT printers. You can then use these LPT designations for designating print drivers to print queues on NetWare servers.
Note: The NetWare 3.1x version of the CAPTURE text utility does not support ports greater than LPT3, but CAPTURE.EXE from NetWare 4.x does. However, you can use the NetWare User Tools to manage printing in a NetWare 3.1x environment and can therefore have more than three LPT printer connections.
Changing Your NetWare 4 Context

When running NetWare User Tools in a NetWare 4 environment, notice the small icon next to the full context path entry in the Resources list. This entry displays the distinguished name of the container you are currently in (such as NR.ESD.SALES.NOVELL). To the left is a small icon of an arrow pointing up and two dots. Clicking on this entry moves you up one level in the NDS tree, displaying the Organizational Units and associated objects that you have rights to beneath the new location (including the OU that you just left).
Using this method, you can find server, printer, user, and group objects in containers other than the one where you normally work. If you have sufficient NDS rights, you can select the desired object as a service. For example, you can access print queue objects that you want to print to. You can do the same for servers you want to access, as well as users and groups for sending messages.
Navigating a Large Network
In large networks, climbing up and down the Directory tree as described in the previous tip can be a laborious process. If you need to connect to a server that is in a different Organizational Unit than the one you are in, switch to Program Manager, open a DOS box, and attach to the server by typing
LOGIN ServerName/NS <Enter<
Now switch back to the NetWare User Tools and you will see the server appear in the Connection side. With the proper rights, you can then map a drive to needed directory.
If you need to map a drive to a NetWare 4 server that is not in your Directory tree, type:
LOGIN ServerName/NS /B <Enter<
This will give you a bindery connection to that server (if that server allows for bindery connections) and you can then map your drive.
If you receive the message that the server can't be found but you know it's out there, try the following trick. The servers you see listed in the Resources side of the NetWare Connections window are the servers that your default server (the one with the asterisk by it) knows about through its routing tables. Depending on how large your network is, how many network segments it has, and the kinds of routing filtering that is in place, you may be able to see a different Resources list from another server.
To do this, highlight another server in the Connections list, then hold down the Ctrl key while you double-click on that server. This action changes that server to your default server (note that the asterisk moves to the new server). You can now see the servers that this server knows about on the network. For large networks using RIP and SAP filtering, you may see an entirely different set of servers that you can now access. If one of these is the server you are trying to attach to, switch to the DOS box and try logging in again. (This method will work if you enabled the Global Drives and Paths entry under the 386 Enhanced DOS Sessions box in the NetWare Settings window.)

The servers in the Resources list with empty icons next to them are NetWare 2.x/3.x or 4.x servers that you are not attached to. When you log in to a NetWare 2.x/3.1x server or a 4.x server that is not in your Directory tree, that server moves to the Connections list with a bindery connection and is placed above the Directory tree icon. If the NetWare 4 server you log in to on the Resources side is in your Directory tree, that server is moved to the Connections side (no password is needed) and it is listed underneath the Directory tree icon. The icon changes to a small server icon when you are attached to a server.

Note: If your name does not appear in the Logged In As entry but you see that you are Directory Services-Authenticated in the Connection Type entry, chances are you are having problems with Directory Services functions in the NetWare User Tools. See the heading "Losing Directory Services Functions" in the troubleshooting section of this AppNote.
You can span trees and attach directly to NetWare 4 servers in other trees through the NetWare Connections screen. However, when you span to different trees, the connection is bindery-based on those servers, not Directory Services-based. You must therefore have bindery services enabled by having a master or read/write replica on the server and by using the SET Bindery Context = ContainerName command at the designated server console. (The replica the server needs is a replica from the tree that the server resides in; it does not have to be a replica from the tree that you are coming from.)
Bindery-based connections offer you the same functionality as a 3.1x server: file and directory security without Directory Services. But if you are accessing such servers through Windows, you usually want to access applications or data in a particular directory. Be sure you have proper rights to access the files and directories that you need.
Troubleshooting the NetWare User Tools Utility
Users and administrators face several common problems when running the DOS Requester with Windows support. Numerous problems can occur if you try to set up Windows support manually without using the DOS Requester installation program. Other problems involve the loss of Directory Services functions when in the NetWare User Tools. Another problem occurs when you use a different shell other than Windows Program Manager shell.
Improper Installation
The procedure for setting up Windows support as a NetWare client is covered in the earlier parts of this Application Note, as well as in the March 1995 Application Note entitled "Support Issues for the DOS Requester (VLM) 1.2." If you don't run the DOS Requester's installation program, you may not get all of the network settings in Windows .INI files. Failure to do so can lead to an unstable Windows environment, such as having Windows hang when you try to exit a DOS session.
Loss of Directory Services Functions
The loss of Directory Services functions in the NetWare User Tools can affect printing as well as access to Directory Services through the utility. The main reason for these problems is the loss of Unicode support. The following sections describe a troubleshooting and repair technique for this problem.
Troubleshooting Print Queue Connections. In the NetWare Printer Connections window, you may have noticed that some of the print queue names are preceded by three backslashes (\\\nrd-only-hp) while others have two (\\srd\srd-pmarq). When a print queue has three backslashes, it means that you have attached to the server containing the print queue as a Directory Services user and that you are accessing the print queue object. When a print queue has two backslashes, it means that you have attached to the server containing the print queue as a bindery user. Bindery connections show both the server name and the print queue name, while Directory Services connections show the print queue object name without the server name.
While the two-slash versus three-slash syntax was done for convention only, you can use this convention as a means to troubleshoot your printer connections if you work in a mixed NetWare 3.1x and 4.1 environment, or if Directory Services isn't functioning properly in the NetWare User Tools.
For example, suppose you see that you have a bindery connection to a Directory Services print queue (you see two slashes and the server name instead of three slashes and the print queue object name). One reason this might be a bindery connection is that you are accessing print queues in a different Directory Services tree than the one you presently log in to. Since you cannot be in DS mode in two separate trees concurrently, your connection to the second tree will be a bindery connection.
Note: Be sure that bindery services is enabled on the container that holds the print services you are accessing, or you won't be able to access the services. You set bindery service through the SET Bindery Context = ContainerName console command on the server where the print queue physically resides. (For more information on setting bindery context, see the NetNote entitled "Changes in the NetWare 4.1 Bindery Context Parameter" in this issue.)
If you should have a DS connection in Windows, you may need to check and see if you are running with Directory Services enabled in Windows. The easiest way to see if Directory Services is enabled is to click on the NetWare Settings button and look at the DS Objects and DS Container entries under the Resource Display Options window. If the objects are grayed out (they should be black), you do not have a proper Directory Services connection. If your Directory Services connection failed and the container that you are accessing resources through does not have Bindery services enabled through the SET Bindery Context = ContainerName console command, you will not have access to any of its services, including printing.
To fix the loss of Directory Services, see the following heading, "Restoring Directory Services Functions."
Restoring Directory Services Functions. Most users lose their Directory Services functions in Windows because the NetWare Windows driver could not find the Unicode tables. Directory Services uses the NWInitUnicodeTables call to enable DS functions. As Windows loads, the NetWare Windows driver looks for the Unicode tables in four places:
The current directory (WINDOWS\SYSTEM)
The directory where the Windows shell loads (such as PROGMAN.EXE in the WINDOWSdirectory)
The NLSdirectory directly beneath the current directory
A directory in the workstation's PATH variable.
You usually lose Unicode support if you didn't use the DOS Requester's INSTALL program to install the DOS Requester with Windows support.
Another reason for seeing this problem is if you are using a Windows shell other than Windows Program Manager (this might include shell's such as Xerox's TabWorks, Norton's DeskTop, or PC Tools). Often these third-party shells are not found in the WINDOWS directory (for example, TabWorks creates it own C:\TABWORKS directory) and the shell program points to that directory in the SYSTEM.INI file. Because the \NLS directory containing the Unicode tables is not found directly under the new shell program directory, the Unicode tables are not found and Unicode support fails.
Again, to check if Directory Services is enabled, click on the NetWare Settings button and look at the DS Objects and DS Container entries under the Resource Display Options window. If the objects are grayed out (they should be black), you do not have proper Directory Services support in the NetWare User Tools. This doesn't mean you are not logged in and authenticated to Directory Services. It simply means that Directory Services functionality through the NetWare User Tools is not enabled.
If you have somehow missed the network warnings that Directory Services functions have failed, go to the NetWare Settings screen and click on the Network Warnings entry. If you exit Windows and then go back in, you will see a message that tells you Directory Services could not find the Unicode tables to function properly and you are without Directory Services functions. The message should look similar to the following:
NWDRV-3.00-30--There was a problem loading the
Unicode tables. All NetWare directory services
functions are disabled.
You can fix this problem a couple of ways. You can create an NLS directory under directory where the shell program is located (in my example C:\TABWORKS\NLS), then go to the\WINDOWS\NLS directory and perform an XCOPY *.* C:\TABWORKS\NLS /S/V command to copy all of the Unicode tables into the NLS directory and the help files into the language directory located under the NLSdirectory (such as \NLS\ENGLISH).
You can also add the directory containing the Unicode files to the PATH variable in the AUTOEXEC.BAT file. For example, the PATH=C:\DOS; C:\WINDOWS;C:\UTILS variable would include PATH=C:\DOS; C:\WINDOWS;C:\UTILS;C:\WINDOWS\NLS in the variable statement.
Conclusion
With the increasing popularity of Windows as a desktop operating system, system administrators can expect to spend more time configuring and maintaining Windows clients. When properly installed, the NetWare DOS Requester and its NetWare User Tools utility can assist you in supporting Windows clients in a NetWare environment.
This Application Note covered Windows support through the DOS Requester installation process. It looked at the features and functionality of the NetWare User Tools. The AppNote provided some tips and tricks for getting more out of the NetWare User Tools. It covered some general troubleshooting techniques and provided solutions to common problems managers and users face when running the NetWare User Tools.
Appendix: What the DOS Requester Installation Program Modifies
Appendix: What the DOS Requester Installation Program
Modifies for Windows Support
For reference, this appendix lists the changes that the DOS Requester INSTALL program makes to the various Windows .INI files and other files for each client.
Windows .INI File Changes
If you allow the INSTALL program to include Windows support, the program modifies the PROGMAN.INI, WIN.INI and SYSTEM.INI files, but keeps copies of the originals with a *.BNW (Before NetWare) extension. The changes you see here depend on how much NetWare support you are already using.
PROGMAN.INI. Changes to PROGMAN.INI are the addition of a NWUTILS.GRPline to the [Groups] heading and placing that group first in the Order line.
WIN.INI. The only change to WIN.INI is the addition of a LOAD NWPOPUP.EXEline under the [Windows] heading.
NETWARE.INI. Once you enable the HotKey aspect, the only change to NETWARE.INI is the addition of a HotKeyEnabled=1 line under the [options] heading. This file is empty until you enable HotKey.
SYSTEM.INI. Changes to the SYSTEM.INI file are as follows:
[boot]
network.drv=netware.drv

[boot.description]
network.drv=Novell NetWare (v4.0)

[386Enh]
network=*VNETBIOS,VNETWARE.386,VIPX.386
UniqueDOSPSP=TRUE
PSPIncrement=5
TimerCriticalSection=10000  (1000 for DOS Requester v1.2*)
ReflectDOSInt2A=TRUE
OverlappedIO=OFF

[vipx]

VirtualizeIrqn=TRUE   (n=the interrupt the network card uses)
For network support the DOS Requester adds three drivers for sustaining NetWare connections in Windows. These include the VNETBIOS, VNETWARE.386, and VIPX.386.
The UniqueDOSPSP=TRUE line tells Windows to start every application at a unique address (PSP). Then each time Windows creates a new virtual machine to start a new application, Windows reserves a unique amount of memory (I bytes with the "I" equaling the number of bytes specified in the PSPIncrement entry) below the application. For example, the first application would be loaded at address M, the second at M+I, the third at M+2i, and so forth.
The PSPIncrement=5 entry setting determines how many bytes are between the different memory addresses. These two entry settings help assure that applications in different virtual machines all start at different addresses. Some networks use the applications' load addresses to identify the different processes using the network. On such networks, failing to enable this setting might cause one application to fail when you exit another application.
The TimerCriticalSection increases the amount of time (in milliseconds) before the critical section is timed out. If you are running a version of the DOS Requester earlier than version 1.20, or if you are running a version of VNETWARE.386 dated earlier than 8-17-94, you will need to set TimerCriticalSection to 10000. The VNETWARE.386 driver for the DOS Requester 1.20 defaults to 1000, which better support mobile products.
The ReflectDOSInt2A=TRUE entry determines whether Windows should consume or reflect DOS Int 2Ah signals. Windows runs more efficiently when it consumes these signals (the default) rather than reflect the signals.
The OverlappedIO=OFF entry is used to allow several virtual machines to make read and write requests to disk before the first request is completed. Setting this entry to OFF means that DOS-based applications cannot request disk reads or writes until previous read/write requests are completed. Standalone systems should have this entry set to ON or they may see their overall system performance reduced. But for network use, the setting is OFF.
The VirtualizeIrqn= parameter only appears if you have a LANSUP configuration. When using the IBM LAN Support Program with SLANSUP.OBJ or LANSUP.COM, the LAN IRQ is not readable from the driver. The only way to get this information is to read the network board hardware itself. The problem with doing this is that, since the hardware can be Token Ring, PCN2 or Ethernet, VIPX would have to be aware of many different hardware configurations. Instead, VIPX requires the IBM LAN Support user to specify the network board's IRQ in the [VIPX] section of the SYSTEM.INI file. IRQs range from 0 to F (hex). An example is listed below:
[VIPX]
VirtualizeIrq2=TRUE
VirtualizeIrq3=TRUE
In this example, VIPX will virtualize both IRQ 2 and IRQ 3. VIPX can virtualize up to four different LAN IRQs. The reason for virtualizing multiple IRQs is to allow other LAN boards and protocols to be installed on the same PC and prevent them from deadlocking the machine. For example, you may have IPX running through an NE2000 board on IRQ 3 and TCP/IP running through to an IBM Token-Ring board on IRQ 2.
Files Copied to Windows Directories
The Windows client installation process copies a number of files into the WINDOWS and WINDOWS\SYSTEM directory. For NetWare 4.1 (DOS Requester 1.20), these include:
C:\WINDOWS NETWARE.INI(created when you run NWUSER) NWADMIN.INI NWUTIL.GRP NWRCON.PIF Two Novell BMPs
C:\WINDOWS\SYSTEM NWCALLS.DLL NWIPXSPX.DLL NWLOCALE.DLL NWNET.DLL NWUSER.EXE NWPSRV.DLL TBMI2.COM TASKID.COM NWGDI.DLL NETWARE.DRV NETWARE.HLP NWPOPUP.EXE VNETWARE.386 VIPX.386
The installation process also creates a C:\WINDOWS\NLS directory for storing the UNICODE tables used for language international-ization. Beneath the NLS directory is a directory that matches the language you chosen to use, such as C:\WINDOWS\NLS\ENGLISH. This directory contains the message files for the NetWare utilities.
C:\WINDOWS\NLS UNICODE Tables
C:\WINDOWS\NLS\ENGLISH NETWARER.DRV NETWARE.HLP TASKID.MSG TBMI2.MSG
* Originally published in Novell AppNotes
Disclaimer
The origin of this information may be internal or external to Novell. While Novell makes all reasonable efforts to verify this information, Novell does not make explicit or implied claims to its validity.