Upgrading to NetWare 4.1 Across a LAN/WAN Using RCONSOLE
Articles and Tips: article
Product Support Readiness Engineer
Novell Technical Services
01 May 1995
This AppNote presents a method for administrators of LAN and WAN networks to upgrade NetWare 3.1x and 4.0x servers to NetWare 4.1 from a central location using RCONSOLE. This AppNote was developed in response to the many requests from customers wanting a simple solution for upgrading to NetWare 4.1.
- Introduction
- Hardware Configuration Requirements
- Prerequisite Tasks
- Necessary Resources
- Copy Files for the Target Server
- Configure the Target Server
- Configure the DOS Client and Install the Server
- Upgrading a 4.x Server
- Upgrading a 3.x Server
- Installing NetWare Directory Services
Introduction
The purpose of this AppNote is to present a method for administrators of LAN and WAN networks to upgrade NetWare 3.1x and 4.0x servers to NetWare 4.1 from a central location using RCONSOLE.EXE. This AppNote guides you step-by-step through the process; however, we suggest that you use a lab environment until you are familiar with the overall concept, the general layout of the instructions, the steps involved, and the possible problems you might encounter.
By creating this document, Novell Services hopes to be more proactive in fulfilling our customers' needs for the overall upgrade process. It was developed in response to the many requests from customers wanting a simple solution for upgrading to NetWare 4.1.
Hardware Configuration Requirements
You must have the following hardware configuration before installing NetWare 4.1 using RCONSOLE:
An existing DOS client with an installed CD-ROM drive or an attachment to a NetWare Server with the 4.1 CD mounted as a volume.
One or more computers (which will be referred to as "target servers") meeting all of the hardware requirements listed under "Hardware Requirements" on page 2 of the NetWare 4.1 Installation manual. These computers must have either NetWare 4.x or 3.x installed and running.
Each computer connected to the DOS client via a LAN or WAN.
Prerequisite Tasks
You must complete the following tasks before installing NetWare 4.1 using RCONSOLE:
Plan your Directory Tree. See the Introduction to NetWare Directory Services for guidelines and suggestions.
If the new server has never been a server before, complete the tasks explained in Chapter 1, "Prepare Your Site and Equipment, "on page 1 of the NetWare 4.1 Installation manual. Then refer to "Install Using RCONSOLE" on page 295 of the NetWare 4.1 Installation manual.
Run the new server's Setup program and set its time to the exact local time. (The time synchronization feature in NetWare Directory Servers uses the computer's time setting.)
If necessary, partition and format your hard disk. Boot from the NetWare License diskette; type FDISK and follow the screen prompts to partition the hard disk. Reboot the machine and type FORMAT to format the DOS partition.
We suggest you create a 15MB DOS partition. This will be large enough to store the NetWare 4.1 server boot files.
Note: Reformatting your hard disk erases all stored files. Be sure to back up your hard disk prior to partitioning and formatting.
Necessary Resources
You will need the following resources in order to install NetWare 4.1 using RCONSOLE:
The NetWare 4.1 License Diskette
The NetWare 4.1 Operating System CD-ROM
Two high-density floppy diskettes or a C: partition on the DOS workstation large enough to hold approximately 2MB worth of files.
The NetWare 4.1 Installation and Introduction to NetWare Directory Services manuals.
Copy Files for the Target Server
Complete the following steps to copy the files for the target server.
Make sure that the STARTUP.NCF file that is in the server's boot directory contains the correct disk driver name that exists in 4.1. This can be checked by loading INSTALL.NLM on the server to be upgraded and looking at the file.
Create an NCF file (named REST.NCF, for example) that contains the commands listed below.
Use the following commands if you are upgrading a 4.x server:
DOWNRESTART SERVER
Use the following commands if you are upgrading a 3.1x server:
REMOVE DOSDOWNEXIT
This file will be copied to the server boot file directory.
Make a directory on the workstation that will run RCONSOLE (for example, a directory called UPDATES). The files can also be copied to two floppy diskettes.
Type "MD C:\UPDATES" and press <Enter<
Copy the following files into the directory that was just created or onto the two floppy diskettes:
|
File
|
Locationon NetWare 4.10 CD
|
|
\NRSPX.NLM |
\NW410\BOOT |
|
REMOTE.NLM |
\NW410\BOOT |
|
NWSNUT.NLM |
\NW410\BOOT |
|
INSTALL.NLM |
\NW410\BOOT |
|
CLIB.NLM |
\NW410\BOOT |
|
STREAMS.NLM |
\NW410\BOOT |
|
ISSLIB.NLM |
\NW410\BOOT |
|
DSAPI.NLM |
\NW410\BOOT |
|
SERVER.EXE |
\NW410\BOOT\NATIVE |
|
SERVER.MSG |
\NW410\BOOT\NLS\4 |
|
ICMD.NLM |
\NW410\SYSTEM\PREINST |
|
LAN Driver |
\NW410\LANDRV |
|
MSM.NLM |
\NW410\LANDRV |
|
ETHERTSM.NLM,TOKENTSM.NLM,RXNETTSM.NLM orFDDITSM.NLM |
\NW410\LANDRV |
|
Disk Driver |
\NW410\DISKDRV |
|
REST.NCF (filecreated above for rebooting the server) |
File created manually |
If the NetWare 4.10 CD is mounted as a volume, attach and map a drive to the server that contains the CD as a mounted volume.
If you will be using a CD-ROM drive attached to the workstation, make sure that the DOS drivers for the CD-ROM are loaded and functioning properly.
Make a directory on the workstation that will run RCONSOLE (for example, a directory called RCONSOLE). The files can also be copied to a floppy diskette.
Type MD C:\RCONSOLEand press <Enter<
Copy the following files into the directory that was just created or onto a floppy diskette:
|
File
|
Locationon NetWare 4.10 CD
|
|
RCONSOLE.EXE |
\NW410\SYSTEM |
|
TEXTUTIL.MSG |
\NW410\INSTALL\ENGLISH |
|
TEXTUTIL.IDX |
\NW410\INSTALL\ENGLISH |
|
RCONSOLE.MSG |
\NW410\INSTALL\ENGLISH |
|
RCONSOLE.HEP |
\NW410\INSTALL\ENGLISH |
Configure the Target Server
Follow the procedures below to install the files on the target server, and to prepare the target server for remote installation from the DOS client.
Make sure that the LAN driver for the target server is loaded and bound. Load RSPX.NLM on the target server by typing:
LOAD RSPX
Type a remote console password and press <Enter<
This password will be used by the DOS client to establish a remote connection.
Configure the DOS Client and Install the Server
Follow the procedures below to configure your DOS client to communicate with the target server and then install the NetWare 4.1 server.
Run RCONSOLE.EXEfrom the workstation.
The "Connection Type" menu appears.
From the "Connection Type" menu, select the applicable connection type and press <Enter<
For example, if you were connect to the new server via a LAN, you would select "SPX."
The "Available Server" menu appears.
Highlight the name of the target server and press <Enter<.
You are prompted for a password.
Enter the remote console password you entered in step 2 of "Configure the Target Server" and press <ENTER<.
When a remote connection is made, press <Alt<-<F1<.
The "Available Options" menu appears.
Highlight "Transfer files to Server" and press <Enter<.
The "Source Path on Workstation" screen appears.
Type the path to the subdirectory that was created in step 4 (for example, C:\UPGRADE).
The "Target Path on Server" screen appears.
Type the path on the server where the 4.1 upgrade files (the files from step 5 of "Copy Files for the Target Server") are to be copied and press <Enter<. This step copies the necessary server boot files to the target server's C: partition.
In order for the "reboot" procedure to work, the subdirectory name used:
Must be the same name that was used for the 4.x server that is being upgraded (that is, C:\SERVER.40).
Must be the same subdirectory name that will be used in step 10(see step 10 of "Configure the DOS Client and Install the Server") if a 3.1x server is being upgraded
Must exist on the target server's DOS partition regardless of the OS version being upgraded.
The "Copying Files from Workstation to Server" screen appears.
If you are not sure of the directory names on the server's C: partition select "Directory Scan", type C:\and press <Enter<.
A directory of the server's C: partition appears.
When the file copy is finished, the "Available Options" screen appears. Press <Esc< to return to the system console screen.
If the target server is a 3.1x server, an AUTOEXEC.BAT file that loads SERVER.EXE will need to be created (if one does not already exist).
From the Console Prompt, type "LOAD EDIT C:\AUTOEXEC.BAT" and press <Enter<.
Create/edit the AUTOEXEC.BAT file so that it contains the following lines:
CD\SERVER.312SERVER
Note: The directory that is changed to via the CD command must be the same as the directory that is already being used for the 3.1x server files. The current version of REMOTE.NLM cannot create subdirectories on the server's C partition.
Press <Esc<, select <YES< to exit and press <ENTER<.
Load INSTALL
The "Installation Options" screen appears.
Edit the AUTOEXEC.NCF file so that the LAN driver load line looks similar to the following, and add two new lines after the LAN driver is loaded:
LOAD C:\<directory<\<LAN DRIVER< LOAD C:\<directory<\REMOTE <password< LOAD C:\<directory<\RSPX
where LAN DRIVER is the name of the appropriate LAN driver, directory is the directory on the DOS partition where the 4.1 server files are located, and password is the password of your choice.
Note: It is strongly suggested that lines in both the STARTUP.NCF and AUTOEXEC.NCF that reference 4.x/3.1x NLMs be replaced with the 4.1 versions. References to 4.x/3.1x patches should be removed completely. References to third-party NLMs should be REMarked out until the upgrade process is completed.
Press <Esc< to exit install.
An "Exit Install?" Yes/No prompt appears.
Select "YES" and press <Enter<.
The system console prompt appears.
Type the path and name of the NCF file created in step 3 of "Copy Files for the Target Server" (that is, C:\SERVER.40\ REST).
This will cause the server to down itself and restart. The RCONSOLE connection will be lost and the screen will return to the RCONSOLE "Available Servers" menu.
Give the server a few minutes to come back up and then press <Esc<.
This will bring up the "Exit Remote Console" prompt.
Highlight "No" and press <Enter<. This will refresh the "Available Servers" menu. Repeat this process until the server name appears.
Highlight the name of the target server and press <Enter<.
You are prompted for a password.
Enter the remote console password you entered in step 2 of "Configure the Target Server" and press <Enter<.
After a Remote Console connection is made, change to the server's console prompt by pressing <Alt<-<F4<.
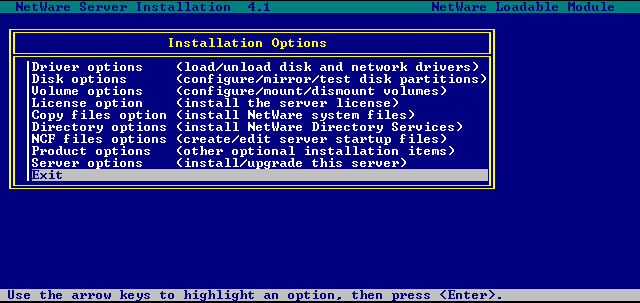
Load INSTALL.NLMby typing
LOAD C:\<v4.10 subdirectory<\INSTALL
where v4.10 subdirectory is the directory used in step 8 of "Configure the DOS Client and Install the Server."
Note: Load INSTALL.NLM from the C partition subdirectory that the 4.1 files were copied to in step 9, not from the mounted volume (for example, LOAD C:\SERVER.40\ INSTALL).
The menu shown in Figure 1 appears.
Figure 1: INSTALL's Installation Options menu.
Upgrading a 4.x Server
Complete the following steps to upgrade a NetWare 4.x server.
If the target server is a NetWare 4.x server, select "Copy files option" and press <Enter<. If the target server is a NetWare 3.x server, continue with step 1 under "Upgrading a v3.x Server."
A screen appears indicating the default path from which NetWare 4.1 files will be installed.
If the source copy of the 4.1 CD is located on another server, a server-to-server connection can be used. To do this press <F3<. When the "Specify a directory path" screen appears, enter the entire path to the CD.
For example:
<Server Name</NW410:NW410/INSTALL/<LANGUAGE<
Enter the user name and password as prompted.
If the 4.1 CD is located on the remote workstation press <F4<.
The "Specify a directory path" screen appears.
Enter the path to the CD-ROM drive of the DOS client.
For example, if the CD-ROM were drive D, the path would be:
D:\NW410\INSTALL\LANGUAGE<Enter<
where LANGUAGE denotes the language being installed (English, Francais, Espanol, and so on).
The "Specify a server boot path" screen appears.
Enter the path used in step 5 of "Copy Files for the Target Server."
The "Indicate which file groups you want installed" screen appears.
Select the file groups to be copied and press <F10<.
The "File Copy Status (Preliminary Copy)" screen appears. After a while, the "File Copy Status (Main Copy)" screen appears.
When the copy is complete, you will be returned to the "Installation Options" screen. At this point the upgrade is complete. For further instructions refer to "Where to Go From Here" on page 178 of the NetWare 4.1 Installation manual.
Upgrading a 3.x Server
Complete the following steps to upgrade a NetWare 3.x server.
Select "Server Options" and press <Enter<.
The "Server Installation Options" screen appears.
Select "Upgrade a 3.1x or 4.x Server to 4.1" and press <Enter<.
An information screen appears which, in this case, is not applicable.
Press <Enter< to continue.
A screen appears indicating the default path from which NetWare 4.1 files will be installed.
If the source copy of the 4.1 CD is located on another server, a server-to-server connection can be used. To do this, press <F3<. When the "Specify a directory path" screen appears, enter the entire path to the CD.
For example:
<Server Name</NW410:NW410/INSTALL/<LANGUAGE<
Enter the user name and password as prompted.
If the 4.1 CD is located on the remote workstation press <F4<.
The "Specify a directory path" screen appears.
Enter the path to the CD-ROM drive of the DOS client.
For example, if the CD-ROM were drive D:, the path would be:
D:\NW410\INSTALL\LANGUAGE<Enter<
where LANGUAGE denotes the language being installed (English, Francais, Espanol, and so on).
The "Additional Driver Actions - Disk Driver" screen appears.
Since the disk driver is already loaded select "Continue Installation" and press <Enter<.
A screen may appear listing LAN drivers that were not updated. These drivers are ones that install found existing on the target server, but they are not on the 4.1 CD. Contact the LAN card vendor for a 4.1 version of the LAN driver. Press <Enter< to continue.
The "Select Optional NetWare Files" menu appears.
Select the file groups to be copied and press <F10<.
The "Specify a Server Boot Path (where SERVER.EXE will be)" screen appears.
Enter the path used in step 5 of "Copy Files for the Target Server" and press <Enter<.
The "File Copy Status (Preliminary Copy)" screen appears. After a while, the "Choose the Server Drivers - Network Driver" screen appears.
Since the LAN driver is already loaded, select "Continue Installation" and press <Enter<.
The "License File Installation" screen appears.
Press <F4< to select a remote workstation as the source.
The "Specify a remote workstation directory path" screen appears.
Insert the NetWare 4.1 license diskette into drive A on the remote workstation. Type "A:\" and press <Enter<.
A message appears stating the server license was successfully installed.
Press <Enter< to continue.
A Directory Services installation screen appears.
Installing NetWare Directory Services
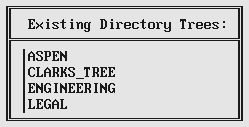
Once the preliminary files have been copied to the server, the network is scanned for Directory trees. Unless you are installing the first NetWare 4 server in the network, you will most likely want to install the server into an existing Directory tree.
Based on your network configuration, one of the following screens appears.
|
If
|
Go to
|
|
This menu appears:
a NetWare 4 server (and accompanying Directorytree) cannot be located. |
"A NonlocatableDirectory Tree, or the First Server" on page132 of the NetWare 4.1 Installation manual. |

|
If
|
Go to
|
|
This menu appears:
a single Directory tree is located and theDirectory tree name is displayed. |
"A SingleDirectory Tree Is Found" on page 144 of the NetWare 4.1 Installation manual. |
|
If
|
Go to
|
|
This menu appears:
multiple trees are located. |
"MultipleDirectory Trees are Found" on page 147 ofthe NetWare 4.1 Installation manual. |
For more information about NetWare Directory Services, see the Introduction to NetWare Directory Services manual or on-line documentation.
An AUTOEXEC.NCF information screen appears.
Press <Enter< to continue.
The "File Copy Status (Main Copy)" screen appears.
The "Other Installation Options" menu appears.
The upgrade is now complete. For more information concerning the options listed, refer to "Perform Other Installation Options" on page 164 of the NetWare 4.1 Installation manual.
* Originally published in Novell AppNotes
Disclaimer
The origin of this information may be internal or external to Novell. While Novell makes all reasonable efforts to verify this information, Novell does not make explicit or implied claims to its validity.