Integrating the NetWare DOS Requester (VLMs) with Windows for Workgroups
Articles and Tips: article
Product Support Engineer
Novell Technical Services
BRAD ANDERSON
Product Support Engineer
Novell Technical Services
01 Apr 1995
This Application Note describes how to integrate Novell's NetWare DOS Requester (VLMs) 1.2 with Microsoft's Windows for Workgroups 3.11. It covers how to install a network copy of Windows for Workgroups (WFWG) on a Novell network, how to configure the VLM client software for use with WFWG, and troubleshooting common problems encountered in this environment.
Related AppNotes Mar 95 "Support Issues for the NetWare DOS Requester (VLM) 1.20" Mar 95 "Black Screen of Death Explained" Jun 94 "NET.CFG Parameters for the NetWare DOS Requester 1.1" May 94 "The Functions and Operations of the NetWare DOS Requester v1.1"
- Introduction
- Installing a Network Copy of WFWG
- Install the NetWare Client Software
- Configuring VLMs with WFWG 3.11
- Troubleshooting Problems with WFWG and VLMs
- Appendix A: Additional Information on NetWare Client Installation
Introduction
Windows for Workgroups 3.11, the latest update from Microsoft, now supports ODI drivers using Virtual Loadable Modules (VLMs). The earlier version of WFWG (3.1) only supported monolithic IPX with the NETX.EXE shell using ODINSUP.COM. In addition, WFWG 3.1 required manual modifications to the configuration files to have both NDIS and IPX support.
Note: VLMs were not supported in the WFWG 3.1 environment because of several incompatibilities between the two redirectors.
The current release of WFWG (3.11) no longer requires manual modifications to the user's configuration files or the use of ODINSUP.COM when using the ODI drivers with NDIS 3 32-bit virtual device drivers (VxDs). This extra module is eliminated when using Microsoft's Network Setup option and their VxDs (NWLINK.386, NDIS.386, and MSODISUP.386), which perform the same function as ODINSUP did in its terminate-and-stay-resident form. Whereas NDIS 2 drivers operated in 16-bit Real Mode, NDIS 3 drivers operate in 32-bit Protected Mode.
This Application Note describes how to install a networked copy of MS Windows for Workgroups 3.11 on a NetWare server. It also details how clients running the NetWare DOS Requester (VLMs) 1.2 can access this shared copy of WFWG on a NetWare server.
Installing a Network Copy of WFWG
This first section describes how to install Windows for Workgroups into a shared directory (using SETUP /A), and then create a personal configuration for one user (using SETUP /N). Once that is done, it will explain how to install the NetWare Client for DOS/MS Windows and give the client installation program the necessary information for it to install the drivers correctly.
Note: Versions of the NetWare client installation program prior to v1.21 did not work correctly when Microsoft's peer-to-peer network was enabled.
Installing WFWG into a Common Directory
The initial procedure is to perform a network installation of Windows for Workgroups 3.11 onto a NetWare server. To do this, you'll need either an original set of WFWG diskettes or an image of these diskettes copied onto a server. The steps given below assume you are installing from diskettes.
Login to the NetWare server on which you want to install the shared copy of WFWG. Create a directory in which you will install this shared copy; for example, we will use SYS:\APPS\ WINSHARE. Remember this path or write it down for future reference.
Insert the WFWG installation diskette and run SETUP /A.
Running the Windows SETUP program with the /A option automatically copies and expands files from the Windows setup diskettes (or from an image of the diskettes on a network server) to the NetWare server. As part of this process, the files are expanded and marked as read-only. This requires about 22 MB of free disk space on the NetWare server.
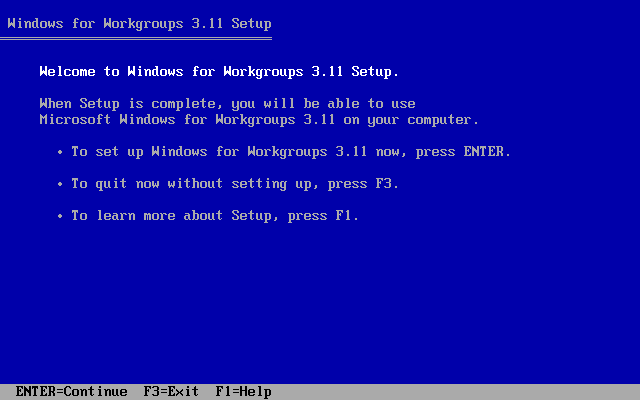
The SETUP/A program initially displays the following screen:
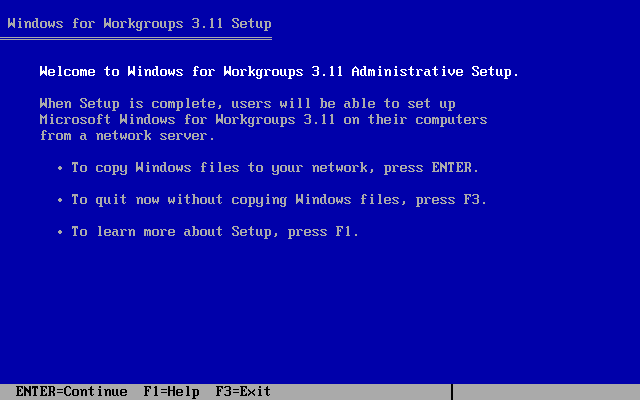
Press <ENTER< to continue. The following screen is displayed:
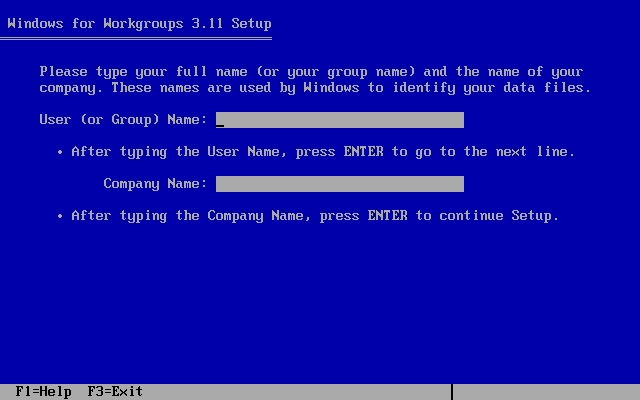
Enter a user or group name and company name, then press <ENTER<. The next screen asks you to verify that the names are correct, because once you move to the next screen, the names cannot be changed.
If the name information is correct, press <ENTER< to continue. The following screen is displayed:
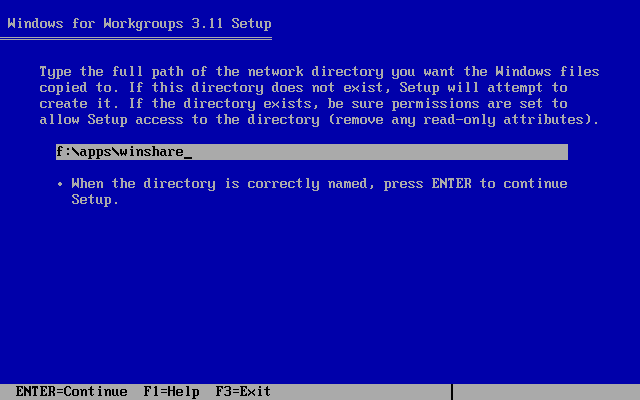
Enter the path to the directory where you will install the shared copy of Windows. This is the directory you created on the NetWare server in Step 1 (we're using F:\APPS\WINSHARE as an example). Press <ENTER<. SETUP then displays the progress of the files being copied to the server.
When the installation is complete, the following screen is displayed:
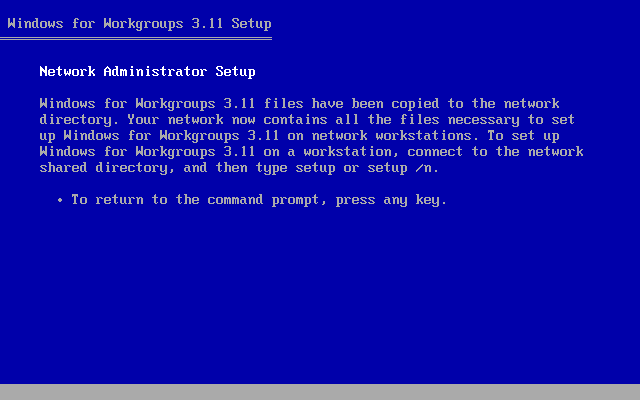
Press any key to return to DOS.
Create User Configuration Directories
After installing a shared copy of WFWG on the file server, you need to set up a personal directory for each Windows user that will use the shared copy of WFWG. This personal Windows directory can be on a local or network drive, and contains the files that specify the user's hardware configuration and desktop preferences (*.GRP, *.INI, WIN.COM and others).
Create a directory in which you will install the personalized Windows files. This can be a local or network drive. For this example, we'll use SYS:USERS\USERNAME\WINDOWS. This Setup option requires about 1 MB of free disk space on the server.
From the shared Windows directory (SYS:APPS\WINSHARE), run SETUP /N. The following screen is displayed:
Press <ENTER< to continue. The following screen is displayed:
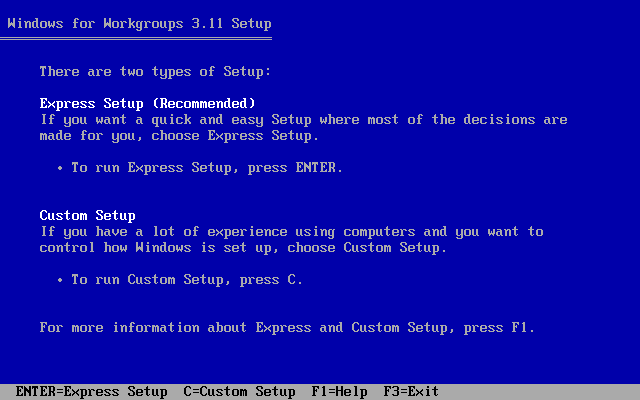
Press C to run Custom Setup. If you are upgrading from Windows 3.1 or a previous version of WFWG, the following screen is displayed:
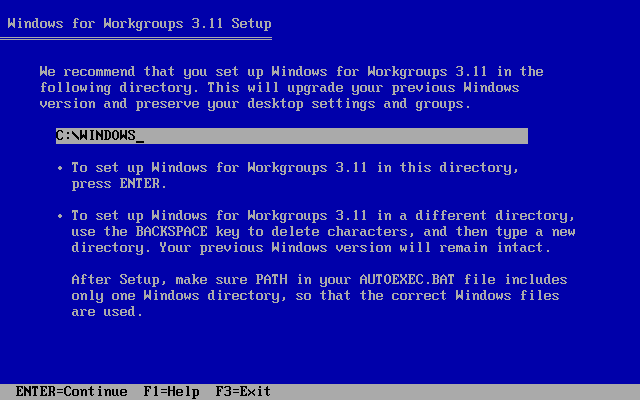
Enter the path to the personal Windows directory: in this example, it's F:\USERS\USERNAME\WINDOWS. After you press <ENTER<, the following screen is displayed (this happens only if your personal directory is on the network):
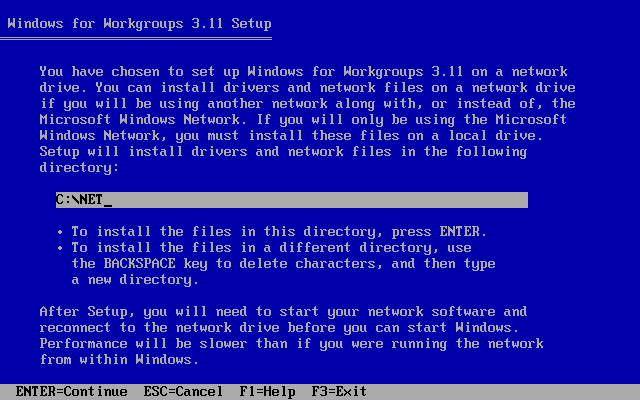
Press <ENTER< to accept the default path. SETUP will install drivers such as SMARTDRV.EXE, IFSHLP.SYS, ODIHLP.EXE, and HIMEM.SYS in that directory. The following screen is displayed, reflecting the hardware and software SETUP has detected on the workstation:
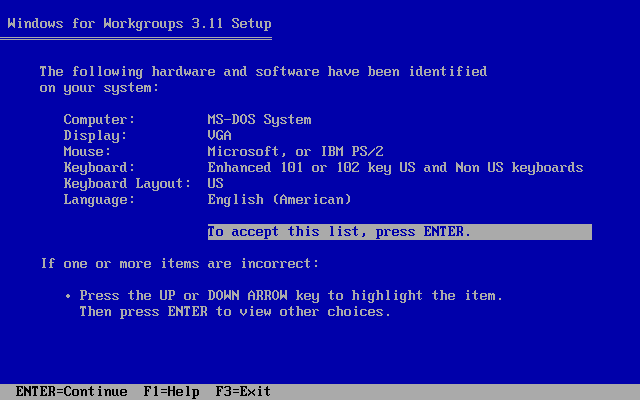
Note: The "Network:" parameter is not displayed on this screen as it is with Windows 3.1 and 3.11.
Press <ENTER< to continue. At this point, Windows for Workgroups will attempt to switch from Text/Real Mode into Img/Protected Mode. If the attempt is successful, you will see a note stating that WFWG is attempting to identify your network interface card.
You will next be prompted for your name. Enter your name, leave the product number blank, and press <ENTER< to continue.
A screen will appear, asking you to verify the information you just entered. If the information is correct, press <ENTER< to continue.
The next screen allows you to select optional tasks SETUP will perform if desired. Remove the X from all boxes and click on CONTINUE. The following screen is displayed:
Click on the Networks button (or press Alt-N). The following screen is displayed:
Click on the radial button next to No Windows support for networks. (Network configuration in WFWG will be addressed later in this AppNote. The NetWare Client must be run before configuring the networks portion of WFWG.) Click on OK. A screen similar to the following is displayed:

Your screen will show CONTINUE instead of OK. Click on the CONTINUE button. A prompt appears asking if you want SETUP to modify the CONFIG.SYS and AUTOEXEC.BAT files. Depending on your configuration, you can choose to allow or not allow the changes to these files. If Windows has already been installed locally, the necessary changes will have already been made. Make your choice and then click on CONTINUE.
SETUP builds your desktop and displays a prompt asking if you want to run the tutorial. Click on the Exit Setup button and then on OK. The Windows for Workgroups setup is now complete.
MAP a search drive to the shared Windows directory. From a different drive, change to the SYS:USERS\USERNAME\WINDOWS directory and type WIN. Windows for Workgroups should initialize. If a copy of Windows is already installed on the local hard drive and that directory is referenced in your PATH statement, make sure the search drive you create here is listed before the reference to the local copy of Windows.
Exit Windows for Workgroups.
Install the NetWare Client Software
Now we will install the Windows components of the NetWare Client for DOS/Windows. These steps assume you have the necessary client installation files copied to your NetWare server in the SYS:PUBLIC\CLIENT\DOSWIN directory. (NetWare 4.10 creates this directory by default and copies the necessary files into it. The process described in this section is the same when using diskettes, only in Step 1 you insert Diskette 1 and enter INSTALL.)
Change to the SYS:PUBLIC\CLIENT\DOSWIN directory and run INSTALL. The following screen is displayed:

Leave option 1 at the default of C:\NWCLIENT.
Unless a previous version of the DOS Requester has been installed on this machine, leave option 2 at the default of Yes. The INSTALL program will add "LASTDRIVE=Z" to the CONFIG.SYS and make sure FILES is set to at least 40. INSTALL will also add STARTNET.BAT (which loads the NetWare client files) to the AUTOEXEC.BAT file. (See Appendix A at the end of this AppNote for more information on what the client INSTALL program modifies.)
For option 3, leave the default answer of Yes in the Install support for MS Windows? (Y/N): field. When you highlight C:\WINDOWS next to Enter MS Windows directory:, INSTALL will search your path and attempt to find where Windows is located. Notice that the help at the bottom of the screen instructs you to enter the path on your hard disk or network to the personal user directory containing the PROGMAN.INI, SYSTEM.INI and WIN.INI files.
Note: You should always refer to the context-sensitive help displayed at the bottom of the screen for guidance throughout the INSTALL program.
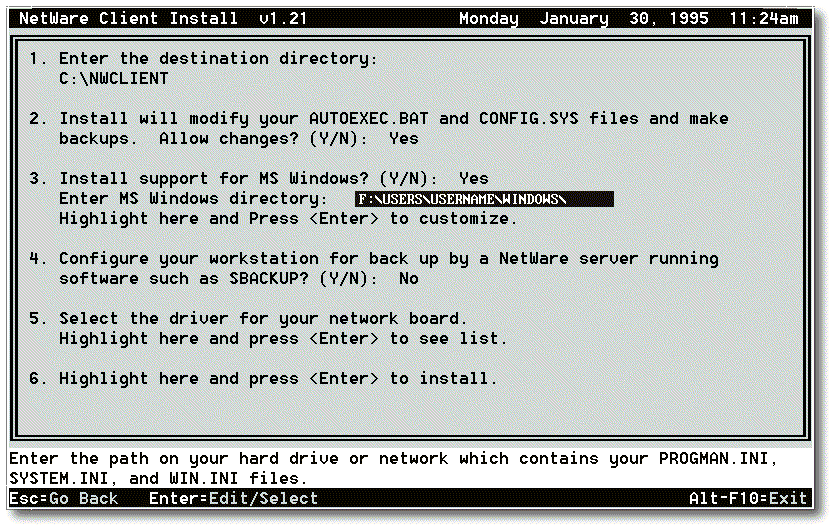
This is the directory in which you installed the personalized Windows files when you ran SETUP /N. In our example, this is F:\USERS\USERNAME\WINDOWS.
Note: Version 1.21 of the client INSTALL supports Windows from a shared directory, whereas previous versions did not. (See Appendix A for information on ordering updated NetWare Client for DOS/ Windows kits.)
After you press <ENTER<, INSTALL will check that path for the files listed above. If the files cannot be found, an error will be returned.
A common mistake at this point is to input the shared directory path instead of the path to the personal directory. If this occurs, you'll see the error "The MS Windows path given does not point to a valid MS Windows directory. Please enter a valid MS Windows directory. Press ENTER to continue."
Note: There is an issue in the client INSTALL that is seen only when the workstation is booted with NETX and the personal Windows directory is on a NetWare server. In this configuration, the error "An invalid path was given in path" is returned when you enter the path to the personal directory. To work around this, install the NetWare client initially without support for Windows. Reboot the machine, loading the VLMs. Then install the NetWare client once again, this time including support for Windows.
Select the line that says Highlight here and Press <Enter< to customize. The help tells you to press <ENTER< to set a shared MS Windows path or to set a file copy option.
When you press <ENTER<, the following screen is displayed. Using the arrow keys, leave the answer to the first question ("Do you plan to use more country codes than the one currently running on your machine?") at the default of No.
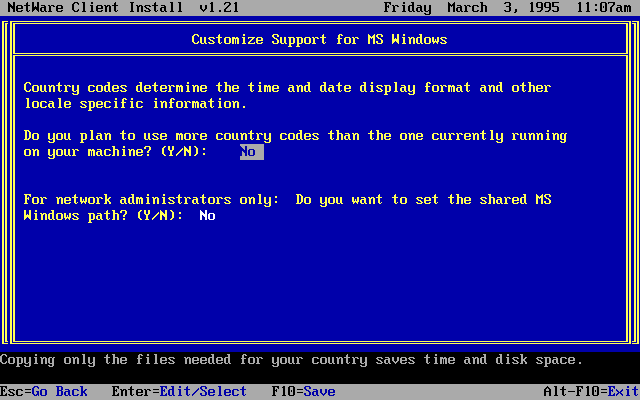
Note: In previous versions of the client INSTALL, all Unicode files were copied to the Windows directory. To minimize the amount of disk space required, version 1.21 of the client INSTALL program checks for the "COUNTRY=" parameter setting in the CONFIG.SYS file. If the parameter is set, INSTALL by default will copy only the files to support that language. For example, if COUNTRY=001, the program will copy only the files to support US English (*.001). If the COUNTRY parameter is not set, US English is used as the default.
Move down to the second question, labeled "for network administrators only." Note the help at the bottom of the screen with this option highlighted. This step only has to be done once to copy the NetWare drivers into the shared directory (refer to Appendix A for information on which files are copied to which directories). Change the No to Yes and press <Enter<. INSTALL will read the *.INI files in the directory you entered for your personal Windows directory. It will attempt to determine the path to the shared Windows directory. The following screen is displayed, prompting you to enter the path to the shared directory:
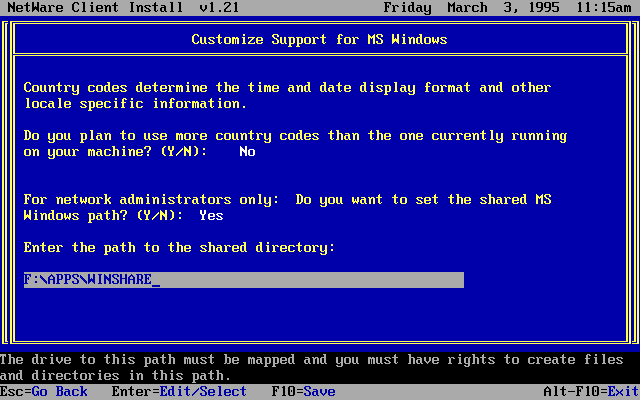
Enter the path to the directory that contains the shared Windows files (F:\APPS\WINSHARE in this example). INSTALL checks for the WIN386.EXE file to see if this is a valid shared directory. If it doesn't find this file, an error is returned.
Press <F10< to save and continue. You will be returned to the main screen, which should now look like this:
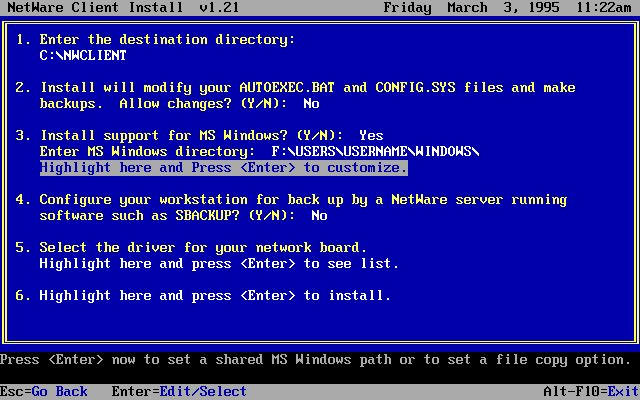
Leave option 4 at the default of No. Highlight option 5 and press <Enter<. INSTALL will recognize the ODI driver that is loaded and its configuration.
Note: INSTALL uses the information found in *.INS files as instructions to install and configure the ODI driver. For example, there is an NE2000.INS file that contains information on how to configure the NET.CFG file for that driver. The *.INS file for other drivers can be obtained through the manufacturer of the network board.
With an NE2000 network board, for example, a screen similar to the following is displayed:
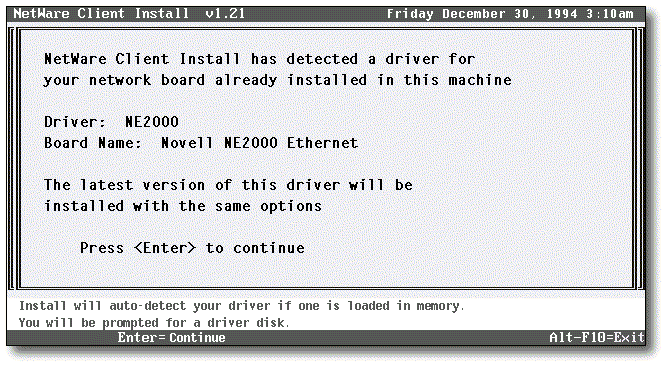
Press <Enter< to continue. You will be returned to the main menu with option 6 now highlighted. Press <Enter< once again to continue. INSTALL will copy all of the files in the correct locations. For just the DOS support files, the NetWare client requires 1 MB of disk space. For both DOS and Windows support, the client requires 3 MB of disk space. The client INSTALL program tests for free disk space and warns you if the available disk space is insufficient.
After this process is completed, a final screen is displayed informing you that the NetWare client installation is finished.
Configuring VLMs with WFWG 3.11
In this next section, we will run the Microsoft Network Setup program from within Windows for Workgroups and select two network types. We will then add the network drivers to connect to both Windows for Workgroups peer-to-peer servers and NetWare file servers.
Running the Network Setup Program
Here are the steps to load the MS Network Setup Program and configure it both for WFWG Network Support and NetWare Support. These steps assume that you have WFWG installed with no Network Support and that you have installed the DOS/Windows Client, as instructed previously in this AppNote.
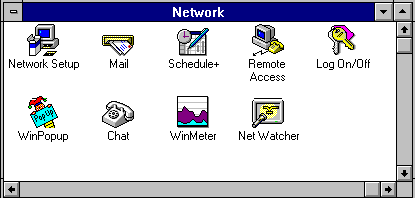
Start up Windows for Workgroups and find the network program group within Program Manager. When you open this group, you should see the following icons:
Double-click on the NetWork Setup icon. It will bring up the following dialog box:
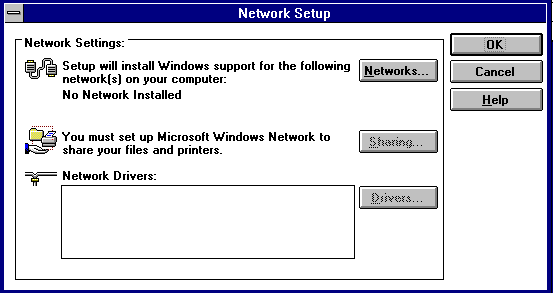
Underneath NetWork Settings, you should see "No NetWork Installed." From here we will configure WFWG to work both with Microsoft Peer Services and with NetWare using the VLMs.
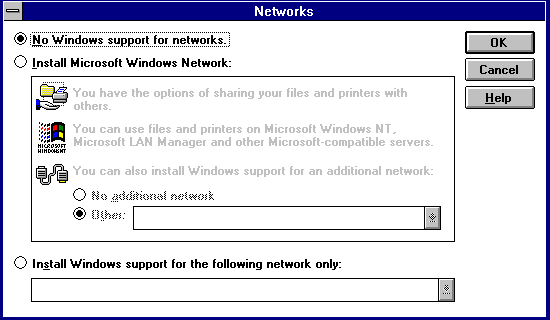
Click on Networks (or press Alt-N) and select Install Microsoft Windows Network. Use the dialog shown below to provide additional help.

Now drop down to the line that says: "You can also install Windows support for an additional network". At this line, choose Other and select "Novell NetWare (Workstation Shell 4.0 and above)."
Note: If you are using NETX, you would choose "Novell NetWare (Workstation Shell 3.x and above)." However, for this AppNote, we will focus on VLMs.
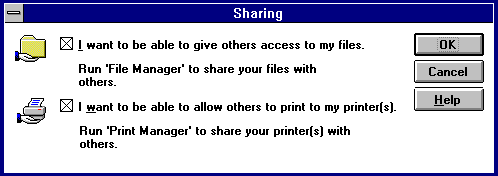
Click on OK to go back to the main screen. From here, click on Sharing (Alt-S). Now select AI want to be able to give others access to my files (Alt-I) and "I want to be able to allow others to print to my printer(s)" (Alt-W). This will enable the peer-to-peer file and print services. You should find your dialog box marked similar to the one shown below:
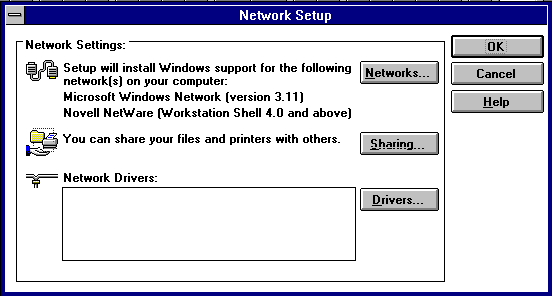
From here, click on OK to go back to the main screen. At this point, your main screen should appear as shown below:
Now select the Drivers button (Alt-D). At this point nothing should be selected, as seen in the following dialog:
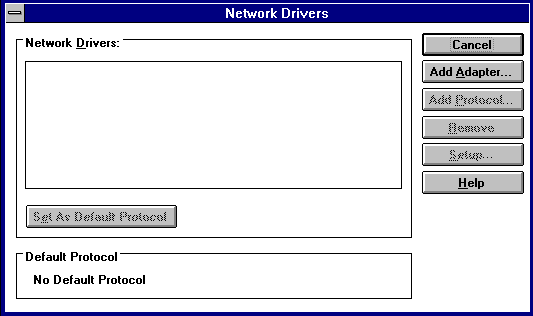
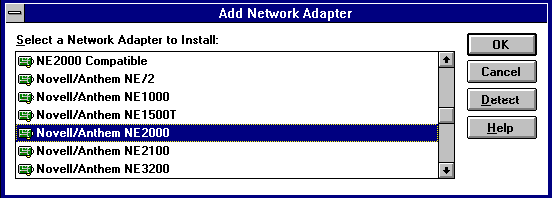
Next, click on the Add Adapter button (Alt-A). The following list is displayed:
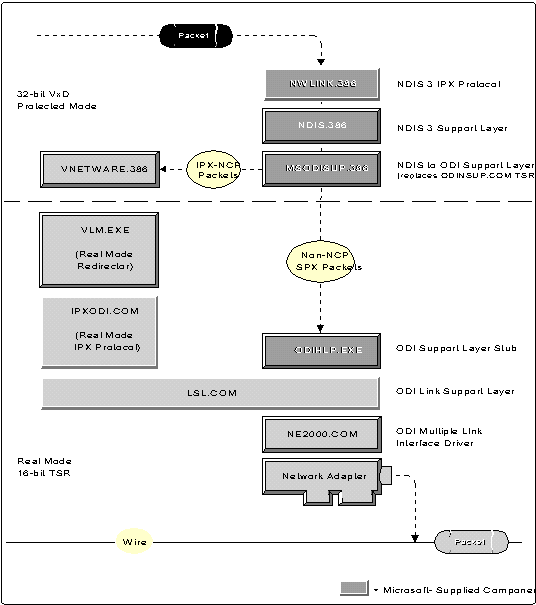
Observe the NDIS 3 drivers provided in this list. When using ODI in conjunction with NDIS 3 drivers, an MS shim called ODIHLP.EXE is added to the AUTOEXEC.BAT file. This shim allows 32-bit MS VxDs to get packets on the wire via LSL.COM and the NE2000.COM ODI driver. Therefore, LSL and the MLID should be loaded in order for the shim to bind with these modules. The resulting protocol stack is illustrated in Figure 1.
Figure 1: Components of the IPX ODI stack.
Scroll down to the Novell/Anthem NE2000 driver. Double-click on the driver name (or click on OK with the driver highlighted).
At this point, WFWG will set up ODI/NDIS3 drivers for the NE2000 card.
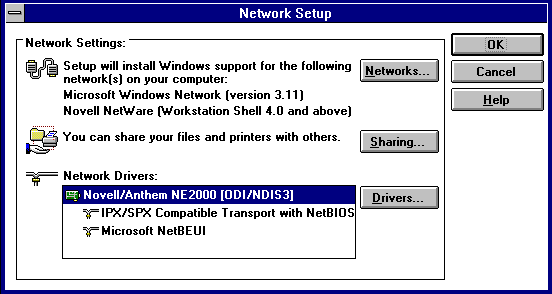
Note: The protocol will automatically default to Microsoft NetBEUI. (This is the protocol that the WFWG peer services use to communicate to other peers in the workgroup. Note that NetBEUI is a non-routable protocol, which means it cannot be routed across any routers, including NetWare servers.) Refer to the dialog box below:

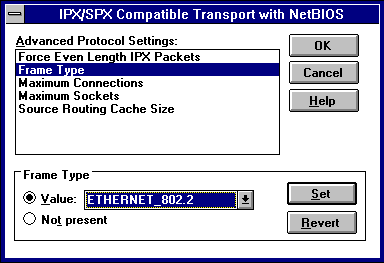
Click on the "IPX/SPX Compatible Transport with NetBIOS" protocol. From here, either double-click on the protocol or click on the Setup button (Alt-S).
Note the options associated with IPX that are found in this dialog box, as provided below. Feel free to browse around here and examine the different options.
Note: On non-NCP IPX/SPX traffic, the MS VxD will control the attributes of those packets. We will discuss these in more detail in the troubleshooting section of this AppNote.
To finish up, click on the OK button to continue. At the next screen click on the Close button (Alt-L). Next click on OK. At this point, WFWG 3.11 will prompt you for the Novell files that you have already installed from the DOS/Windows client kit. If WFWG cannot find them, enter C:\WINDOWS\SYSTEM and it will find the NETWARE.DRV file and other Windows files needed to complete the setup.
The next step is to provide the Setup program with the MS Windows Network Names. These include the User Name, Workgroup name, and Computer Name. These names will be known and broadcasted on the network via the protocol selected. See the dialog box below for more details.

If these previous steps have been followed correctly, WFWG 3.11 will build or modify the Windows SYSTEM.INI, WIN.INI, and PROTOCOL.INI files based on the configuration selected. (Old *.INI files are saved with the .CLN extension.) It will also modify the AUTOEXEC.BAT, CONFIG.SYS, and NET.CFG files. Click on OK when you see the prompt informing you of these modifications.
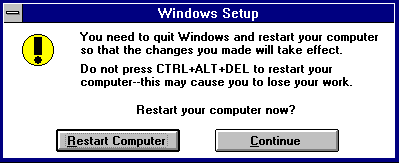
From here, SETUP will prompt you to restart the workstation to make the changes effective. Click on Restart Computer in the dialog box shown below.
At this point the machine should reboot and load the ODI drivers. However, the new shim mentioned earlier, ODIHLP.EXE, will bind itself to LSL and NE2000. This is the path WFWG will use to get packets on the wire (as shown previously in Figure 1).
Restart Windows for Workgroups. This time you will notice a new dialog box on startup. The WFWNET.DRV driver is providing this new interface.
The dialog will request that you provide the logon name specified in the setup process. At this time you will also be prompted to enter a password. Refer to the example shown below.
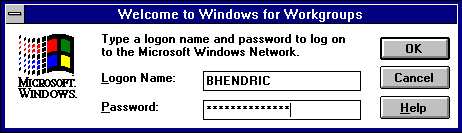
Note: NETWARE.DRV now becomes the SecondNet instead of the Primary network driver. Refer to SYSTEM.INI to verify this information.
With this setup in place, you can log in to both the Novell network and Microsoft's peer-to-peer network using the VLMs and Microsoft's Redirector.
Troubleshooting Problems with WFWG and VLMs
This section contains troubleshooting information about two common issues that arise in the dual NetWare VLM-WFWG 3.11 configuration described above.
Note: For more in-depth coverage of issues, refer to the WINVLM.TXT file found in WINDR2.EXE in NOVFILES on NetWire or on Novell's ftp server on the Internet.
Issue 1
When trying to connect to another peer in the workgroup that is across another a NetWare router, users on the other segment cannot see any other workstation in the workgroup. This scenario occurs because the default protocol for WFWG is MS NetBIEU. Refer to the Technical Information Documents (TIDs) on Novell's NSEPro CD-ROM for more information on why NetBEUI is not a routable protocol.
The solution is to change the default protocol from Microsoft's NetBEIU to the IPX/SPX Compatible Transport, which is a routable protocol through routers, including NetWare servers.
Issue 2
When trying to run RCONSOLE in a DOS box under Windows for Workgroups, no servers show up in the list. If you exit from Windows and run RCONSOLE, all servers appear in the list.
TID 021979 on the NSEPro describes this symptom and gives a solution for the problem. The TID states that WFWG's IPX/SPX compatible transport (NWLINK.386) defaults to the Ethernet_802.3 frame type, and the problem occurs when your network is using Ethernet_802.2. When RCONSOLE does a raw SPX send, it is the Microsoft drivers that actually put the packet on the wire.
The solution is to change the frame type setting for Microsoft's NWLINK.386 IPX/SPX module to Ethernet_802.2 rather than the default of 802.3.
Issue 3
ODIHLP.EXE (the Real Mode stub for ODI support that binds NWLINK to the ODI driver) must be loaded after LSL.COM and the MLID driver (such as NE2000.COM). If you are using the STARTNET.BAT file created by the client INSTALL program (which also adds the "CALL STARTNET.BAT" command to the AUTOEXEC.BAT file), it is recommended that you modify the STARTNET.BAT file so that the ODIHLP.EXE file loads after LSL.COM and NE2000.COM.
Issue 4
When using the 32-bit file access parameter in Windows for Workgroups 3.11, users running NETX noticed that performance was slow when starting Windows applications. When they turned off 32-bit file access in WFWG, the problem went away. The problem was that they were using a NETWARE.DRV for the VLMs instead of the one for NETX. By changing to the NETWARE.DRV for NETX (dated 11-22-94, found in NET33X.EXE), the problem was resolved.
Issue 5
Users of Novell's DOSNP.EXE (DOS Named Pipes) should be aware that WFWG 3.11 does not work with Novell's DOSNP.EXE. WFWG does not allow the INT 21 (Interrupt) requests related to named pipes to be passed down to the Novell DOSNP.EXE TSR. Currently, there is no patch or workaround for this scenario.
Issue 6
A problem exists for users of Microsoft's NWLINK.386 who are using SPX-based applications such as terminal emulators. Additional SPX issues have been discovered where NWLINK.386 does not provide full SPX API compatibility. Currently, there is no patch available for this Microsoft VxD (NWLINK). If you encounter problems, here is a four-step workaround:
Remove WFWG's support for networks.
Double-click on the NetWork Setup icon inside WFWG 3.11.
Click on the Networks button and select No Windows Support for Networks.
Click on OK. Network Setup will notify you at this point that it has modified your AUTOEXEC.BAT, SYSTEM.INI, WIN.INI and PROTOCOL.INI files.
Click on the Restart Computer button.
Restart WFWG and install Novell workstation shell 4.0 support.
After restarting WFWG, double-click on Network Setup icon and click on the Networks button again.
Choose Install Microsoft Network and then Other.
For Other, choose "Novell NetWare workstation shell 4.0 and above."
Select OK.
While still in WFWG, install support for the IPX-NetBIOS transport.
Click on the Drivers button and the Add Adapter button.
Choose IPX Support driver [Monolithic] with NetBIOS transport.
Now click on Close and OK.
You will receive two conflicting error dialogs. The first one states: "You do not have an ODI network driver installed and will not be able to connect to a NetWare server with Microsoft Windows Network until you install the driver. Do you want to continue? Y/N." Answer Yes.
The next dialog says: "You are running an ODI driver and have chosen to install an NDIS driver. The NDIS driver must be set up on a separate network adapter card other than the ODI driver. Do you want to continue? Y/N."Answer Yes here as well.
Setup will modify the configuration files automatically.When it is finished, click on Restart Computer.
At this point, you will be able to utilize VIPX.386 (from Novell) and eliminate NWLINK.386 (from Microsoft). This allows full SPX API compatibility for terminal emulators or other SPX-based applications within a WFWG 3.11 machine, and still provides peer-to-peer support through IPX encapsulated NetBIOS packets.
Appendix A: Additional Information on NetWare Client Installation
This appendix provides additional information about the NetWare DOS/Windows client INSTALL program.
Updates to the Client Software
Updated NetWare DOS/Windows client software and Windows support drivers can be found in NOVFILES on CompuServe or on Novell's ftp server on the Internet. As of this writing, the current files are the following:
File Name     Size     Date     Version   Location    Owner
================================================================
  VIPX.386    23855   05-23-94    1.19    WINDR2.EXE   Novell
IPXODI.COM    39353   10-31-94    3.01    VLMUP2.EXE   Novell
   LSL.COM    18313   10-11-94    2.14    VLMUP2.EXE   Novell
  NETX.EXE    78749   11-22-94    3.32PTF NET33X.EXE   Novell
  New DLLs   444222   12-19-94     ---    NWDLL2.EXE   Novell
What Files Does the DOS Client INSTALL Modify?
Below is a list of files modified by the NetWare client INSTALL program, along with the specific changes made in each file.
AUTOEXEC.BAT
@CALL C:\NWCLIENT\STARTNET
CONFIG.SYS
LASTDRIVE =Z FILES=40*
* If FILES is already set to a value greater that 40, it is left unchanged.
WIN.INI
[windows] load=nwpopup.exe
PROGMAN.INI
[Groups] Group7=C:\WINDOWS\NOVELLGR.GRP
SYSTEM.INI
Windows or WFWG with support for NetWare only
[boot]
network.drv=netware.drv

[boot.description]
network.drv=Novell NetWare (v4.0)


[386Enh]
network=*vnetbios, vipx.386, vnetware.386
TimerCriticalSection=1000
ReflectDOSInt2A=TRUE
UniqueDOSPSP=TRUE
PSPIncrement=5
OverlappedIO=off
WFWG with support for MS Windows Network
secondnet.drv=netware.drv


secondnet.drv=Novell NetWare
(Workstation Shell 4.0 and above)


secondnet=vnetware.396
NET.CFG
Link Driver NE2000
    INT 3
    PORT 300
    FRAME Ethernet_802.2

NetWare DOS Requester
    FIRST NETWORK DRIVE=F
    NETWARE PROTOCOL=NDS BIND
STARTNET.BAT
SET NWLANGUAGE=English
C:\NWCLIENT\LSL.COM
C:\NWCLIENT\NE2000.COM
C:\NWCLIENT\IPXODI.COM
C:\NWCLIENT\VLM.EXE
Windows Settings Defined by INSTALL
Following is a brief description of the Windows settings in SYSTEM.INI that are listed above.
TimerCriticalSection. This parameter increases the amount of time (specified in milliseconds) before the Windows critical section is timed out. For more information on this setting, refer to "Black Screen of Death Explained" in the March 1995 Novell Application Notes.
ReflectDOSInt2A. This parameter indicates whether Windows should consume or reflect DOS INT 2A signals. The default (false) means Windows will consume these signals. However, you need to enable this setting if you are running memory-resident software that relies on detecting INT2A messages, such as Novell's NetWare Client drivers.
UniqueDOSPSP. If enabled, this parameter tells Windows to start every application at a unique address (PSP). Each time Windows creates a new virtual machine to start a new application, Windows reserves a unique amount of memory (I bytes) below the application. For example, the first application would be loaded at address M, the second at M+I, the third at M+2I, and so forth. The amount of memory I is determined by the PSPIncrement setting. These settings should help assure that applications in different virtual machines (VMs) all start at different addresses. Some networks use applications' load addresses to identify the different processes using the network. On such networks, failing to enable this setting might cause one application to fail when you exit another.
If enabled, this setting tells Windows in 386 enhanced mode to reserve some paragraphs of memory in each VM prior to starting an application in the VM. This will usually ensure that each application has a unique PSP (loading address). Novell's DOS/Windows client uses the PSP to identify a process to make sure that two processes do not try to modify a file at the same time. If the workstation has this setting disabled, it may result in corrupted files.
PSPIncrement. This parameter specifies the amount of additional memory, in 16-byte increments, that Windows should reserve in each successive virtual machine when the UniqueDOSPSP setting is enabled. The setting that will work best for your machine might vary depending on your memory configuration and the applications you are running. Valid characters are 2 through 64.
OverlappedIO. Having this setting active when you are not running on a Novell network may reduce system performance. If enabled, this switch allows several virtual machines to make read and write requests to a disk before the first request has been completed. If it is disabled, then MS-DOS-based applications cannot issue a request to read or write to a disk until any previous read and write requests have been completed.
Where Does the DOS Client INSTALL Copy Files?
The following list tells where the NetWare client INSTALL program copies the DOS and Windows support drivers for NetWare.
DOS Drivers
FILES COPIED TO C:\NWCLIENT
AUTO.VLM       4,527   11-08-94  1:29p
AUTOEXEC.NEW   61      2-05-95   10:11p
BIND.VLM       4,680   11-08-94  1:28p
CONFIG.NEW     23      2-05-95   10:11p
CONN.VLM       10,833  11-08-94  1:28p
DOSNP.EXE      10,757  9-01-94   10:49a
FIO.VLM        18,234  11-08-94  1:29p
GENERAL.VLM    4,525   11-08-94  1:30p
HRMIB.EXE      14,965  12-02-93  3:19p
HRMIB.INI      371     11-22-93  5:51p
IPXNCP.VLM     10,083  11-08-94  1:28p
IPXODI.COM     39,353  10-31-94  4:35p
LSL.COM        18,313  10-11-94  10:03a
MIB2IF.VLM     9,643   8-30-94   1:20p
MIB2PROT.VLM   17,951  8-02-94   11:42a
NDS.VLM        8,500   11-08-94  1:28p
NE2000.COM     23,023  10-14-94  10:02p
NE2000.INS     961     10-06-94  8:47a
NESL.COM       9,379   8-10-94   1:43p
NET.CFG        212     2-05-95   10:11p
NETBIOS.EXE    24,418  8-15-94   5:06p
NETX.VLM       16,921  11-08-94  1:29p
NMR.VLM        9,842   11-08-94  1:29p
NWP.VLM        6,628   11-08-94  1:28p
ODINSUP.COM    34,298  8-01-94   5:18p
PNW.VLM        10,091  11-08-94  1:29p
PRINT.VLM      7,973   11-08-94  1:29p
README.TXT     16,198  10-31-94  1:52p
REDIR.VLM      14,777  11-08-94  1:29p
ROUTE.COM      4,897   3-15-94   9:02a
RSA.VLM        19,552  11-08-94  1:30p
RXMONSTK.COM   11,419  10-12-94  8:34a
SECURITY.VLM   7,978   11-08-94  1:29p
STARTNET.BAT   172     2-05-95   10:11p
STPIPX.COM     11,539  8-30-94   1:20p
STPUDP.COM     13,073  8-30-94   1:20p
TRAN.VLM       1,545   11-08-94  1:28p
TSASMS.COM     19,533  10-06-94  7:52p
VLM.EXE        37,611  11-08-94  1:28p
WSASN1.VLM     16,819  8-30-94   1:20p
WSDRVPRN.MIB   5,086   5-13-94   1:20p
WSDRVPRN.VLM   8,792   8-30-94   1:20p
WSREG.VLM      12,947  8-30-94   1:20p
WSSNMP.VLM     25,608  8-30-94   1:20p
WSTRAP.VLM     13,427  8-30-94   1:20p
FILES COPIED TO C:\NWCLIENT\NLS NONE FILES COPIED TO C:\NWCLIENT\NLS\ENLGISH
DOSRQSTR.MSG   9,600   10-21-94  5:32p
IPXODI.MSG     4,089   9-15-94   4:02p
LSL.MSG        3,571   8-16-94   9:21a
MIB2IF.MSG     361     5-13-94   1:20p
MIB2PROT.MSG   717     8-02-94   11:42a
NESL.MSG       947     6-14-94   10:42a
NMR.MSG        620     3-17-94   3:59p
RXMONSTK.MSG   2,542   9-21-94   8:14a
STPIPX.MSG     1,095   5-13-94   1:20p
STPUDP.MSG     1,299   5-13-94   1:20p
WSASN1.MSG     257     5-13-94   1:20p
WSDRVPRN.MSG   262     5-13-94   1:20p
WSREG.MSG      257     5-13-94   1:20p
WSSNMP.MSG     390     5-13-94   1:20p
WSTRAP.MSG     257     5-13-94   1:20p
Windows Drivers - Local Installation
FILES COPIED TO C:\WINDOWS
NOVELL.BMP     153,718 4-17-92   10:53a
NOVLOGO1.BMP   38,518  1-28-92   4:58p
NW.GRP         161     2-06-95   10:20a
NWADMIN.INI    141     3-23-94   10:46a
NWRCON.PIF     545     1-03-92   1:25p
PROGMAN.BNW    765     2-06-95   10:05a
SYSTEM.BNW     3,176   1-19-95   1:46p
WIN.BNW        15,041  2-06-95   10:05a
FILES COPIED TO C:\WINDOWS\SYSTEM
NETWARE.DRV    165,632 10-24-94  2:29p
NETWARE.HLP    419,701 8-29-94   1:15p
NWCALLS.DLL    147,616 10-20-94  11:56a
NWGDI.DLL      82,064  5-17-94   10:25a
NWIPXSPX.DLL   41,456  10-18-94  2:55p
NWLOCALE.DLL   43,088  9-20-94   12:16p
NWNET.DLL      225,264 10-18-94  4:35p
NWPOPUP.EXE    4,592   9-30-94   10:58a
NWPSRV.DLL     277,532 10-06-94  1:35p
NWUSER.EXE     5,072   10-28-93  8:12a
PNW.DLL        106,752 12-08-93  10:43a
TASKID.COM     7,648   6-03-93   4:37p
TBMI2.COM      24,973  8-04-94   8:02a
TLI_SPX.DLL    52,437  9-15-94   2:26p
TLI_TCP.DLL    17,673  7-14-93   4:54p
TLI_WIN.DLL    15,713  6-08-94   5:28p
VIPX.386       23,855  5-23-94   9:51a
VNETWARE.386   15,645  8-17-94   3:38p
FILES COPIED TO C:\WINDOWS\NLS
1252_UNI.001   727     5-31-94   12:39p
UNI_1252.001   2,264   5-31-94   12:39p
UNI_COL.001    1,752   4-04-94   12:22p
UNI_MON.001    4,312   4-04-94   12:22p
FILES COPIED TO C:\WINDOWS\NLS\ENGLISH
NETWARE.HLP    419,701 8-29-94   1:15p
NETWARER.DRV   165,632 10-24-94  2:29p
TASKID.MSG     1,603   6-03-93   4:37p
TBMI2.MSG      3,315   11-10-93  8:42a
Windows Drivers - Network Installation
FILES COPIED TO SYS:APPS\WINSHARE
NETWARE.DRV    165,632 10-24-94  2:29p
NETWARE.HLP    419,701 8-29-94   1:15p
NWCALLS.DLL    147,616 10-20-94  11:56a
NWGDI.DLL      82,064  5-17-94   10:25a
NWIPXSPX.DLL   41,456  10-18-94  2:55p
NWLOCALE.DLL   43,088  9-20-94   12:16p
NWNET.DLL      225,264 10-18-94  4:35p
NWPOPUP.EXE    4,592   9-30-94   10:58a
NWPSRV.DLL     277,532 10-06-94  1:35p
NWUSER.EXE     5,072   10-28-93  8:12a
PNW.DLL        106,752 12-08-93  10:43a
TASKID.COM     7,648   6-03-93   4:37p
TBMI2.COM      24,973  8-04-94   8:02a
TLI_SPX.DLL    52,437  9-15-94   2:26p
TLI_TCP.DLL    17,673  7-14-93   4:54p
TLI_WIN.DLL    15,713  6-08-94   5:28p
VIPX.386       23,855  5-23-94   9:51a
VNETWARE.386   15,645  8-17-94   3:38p
FILES COPIED TO SYS:APPS\WINSHARE\NLS
1252_UNI.001   727     5-31-94   12:39p
UNI_1252.001   2,264   5-31-94   12:39p
UNI_COL.001    1,752   4-04-94   12:22p
UNI_MON.001    4,312   4-04-94   12:22p
FILES COPIED TO SYS:APPS\WINSHARE\NLS\ENGLISH
NETWARE.HLP    419,701 8-29-94   1:15p
NETWARER.DRV   165,632 10-24-94  2:29p
TASKID.MSG     1,603   6-03-93   4:37p
TBMI2.MSG      3,315   11-10-93  8:42a
FILES COPIED TO SYS:USERS\USERNAME\WINDOWS
NOVELL.BMP     153,718 4-17-92   10:53a
NOVLOGO1.BMP   38,518  1-28-92   4:58p
NW.GRP         153     2-06-95   1:00a
NWADMIN.INI    141     3-23-94   10:46a
NWRCON.PIF     545     1-03-92   1:25p
PROGMAN.BNW    761     2-06-95   12:31a
SYSTEM.BNW     3,168   2-06-95   12:31a
WIN.BNW        15,020  2-06-95   12:31a
Language Support with the DOS/Windows Client
The Unicode files give the NetWare DOS Requester the capability of displaying Windows utilities (such as NWADMIN), errors, and messages in different languages. As mentioned in this AppNote, the 1.20 client INSTALL only copies the Unicode files for the language you have defined with the COUNTRY= parameter in the CONFIG.SYS. Customers who installed using an older client INSTALL program can save hard disk space by deleting all the Unicode files that do not correspond to the language you are using. Each Unicode file has a three-digit numerical extension; each country is assigned a specific extension. The following is a list of some extensions and their assigned countries:
|
001= US English and |
044= United Kingdom |
|
Canadian English |
045= Denmark |
|
002= Canadian French |
046= Sweden |
|
003= Latin America |
047= Norway |
|
031= Netherlands |
049= Germany |
|
032= Belgium |
061= Australia |
|
033= France |
081= Japan |
|
034= Spain |
351= Portugal |
|
039= Italy |
358= Finland |
|
041= Switzerland |
For example, if you want to have everything displayed in US and Canadian English, you could delete all the files in the WINDOWS\NLS directory except for the files with the *.001 extension.
Language support for DOS is not handled by the Unicode files. The "NWLanguage" DOS variable defines the language in which DOS utilities, errors, and so on are displayed. The following is a list of the current languages available:
ENGLISH FRANCAIS DEUTSCH ITALIANO ESPANOL
* Originally published in Novell AppNotes
Disclaimer
The origin of this information may be internal or external to Novell. While Novell makes all reasonable efforts to verify this information, Novell does not make explicit or implied claims to its validity.