Support Issues for the NetWare DOS Requester (VLM) 1.20
Articles and Tips: article
Research Engineer
Systems Research Department
BRAD ANDERSON
Product Support Engineer
Novell Technical Services
01 Mar 1995
A number of users are a little confused as to how to best use the NetWare DOS Requester (VLM), which has led to some problems with installation and operation of Novell's client software. This Application Note provides information that may save you some time when implementing the latest version of the DOS Requester on your networks. The issues discussed are grouped into five common problem areas: the installation process of the DOS Requester version 1.20; the DOS Requester's automatic reconnect capability; SMODE and the CAPTURE utility; connections in a NetWare 3 environment; and network board driver problems.
PREVIOUS APPNOTES IN THIS SERIES Jun 94 "NET.CFG Parameters for the NetWare DOS Requester 1.1" May 94 "The Functions and Operations of the NetWare DOS Requester v1.1"
- Introduction
- Properly Installing the DOS Requester
- Auto Reconnect for NetWare 3.11 and 3.12
- Read Only Compatibility and SMODE
- The DOS Requester and NetWare 3.x Connections
- Don't Forget to Upgrade the MLID
- Conclusion
Introduction
Since its introduction with NetWare 3.12 and 4.0, Novell's NetWare DOS Requester client software (or VLMs, for short) has been a hot item for many customer sites. The benefits of the DOS Requester are attractive. It can take advantage of memory managers that are loaded to reduce the amount of conventional memory that it requires. In addition to providing a more stable environment for workstations running MS Windows, the DOS Requester can also provide improved network performance through its support for the Packet Burst and Large Internet Packet (LIP) technologies.
As with most software packages, if the DOS Requester is not installed and configured properly, users can experience problems. Some of these problems stem from manually installing the DOS Requester files without using its own INSTALL program. Other problems occur because of changes to the DOS Requester=s default NET.CFG settings (such as the Read Only Compatibility default change made in version 1.20). Still other issues that may present problems include auto-reconnect, server connections, and network board drivers. These are the issues covered in this Application Note.
Several previous AppNotes have covered the architecture, installation, and configuration of earlier versions of the DOS Requester (see the list on the first page of this AppNote). The information in this AppNote is up-to-date for the DOS Requester version 1.20 and supersedes that found in the previous articles. Future AppNotes will address some of the other issues encountered with this and future versions of the DOS Requester.
Properly Installing the DOS Requester
Installing the DOS Requester properly can solve numerous problems that might otherwise crop up later when users access Windows and other applications. The DOS Requester's INSTALL program has a simple user interface and it should always be used to install and to upgrade the NetWare DOS/Windows client software. It installs not only DOS/Windows support files, but also sets up important parameters in a number of .INI files for Windows.
You can install the DOS Requester from the diskettes that come in the NetWare Client for DOS/Windows kit (be sure to use the 1.20 version, part number 662644024943), or from the CD-ROM that comes with NetWare 4.10.
Note: The DOS Requester version currently shipping with NetWare 3.12 is version 1.02. This version lacks some support aspects for properly running Windows and Windows for Workgroups on the network. If you are running these products on your NetWare 3.12 network, you'll need to obtain version 1.20 of the DOS Requester. (We'll cover some of the integration issues for Windows for Workgroups on NetWare in a future AppNote.)
Be aware that there are currently two updated versions of the DOS Requester on CompuServe and on Novell's FTP server. The files that you need are VLMUP2.EXE, WINDR2.EXE, and NWDLL2.EXE, not their *1.EXE counterparts. The *2.EXE files are the actual released version of the DOS Requester 1.20 that comes with NetWare 4.1. They can be found on CompuServe in the NOVFILES forum. On the ftp.novell.com server, the files are found in the Pub/Netwire/Novfiles directory. The files are dated 11/08/94.
To significantly speed up the installation process, you can also copy the DOS Requester client files onto a NetWare server and run the INSTALL program from the server.
DOS/Windows Client Installation Procedure
This discussion of the DOS Requester installation procedure assumes you are installing from the client kit diskettes. However, once you start the program, the steps are essentially the same regardless of whether you are running from diskettes, from CD-ROM, or from a server.
The NetWare client software for DOS/Windows comes on five diskettes. When you insert the diskette labelled Disk 1 into a local drive and type INSTALL <Enter<, you'll see the main menu screen with six steps, as shown in Figure 1.
Figure 1: Main menu of the DOS/Windows client installation program.

Step 1. The first step is to indicate where you want the DOS Requester files, as well as the latest ODI LAN drivers, to be installed. The default directory path is C:\NWCLIENT. You can change this default if you like by highlighting the directory path field and typing a new directory path name or the name of an existing directory. If you are migrating numerous users to the DOS Requester, network maintenance will be easier if you use the same directory on all the workstations.
Step 2. The second step discusses the changes that the installation process will make to the workstation's CONFIG.SYS and AUTOEXEC.BAT files.
For the CONFIG.SYS file, the "LASTDRIVE=" entry is changed to LASTDRIVE=Z.The INSTALL process also checks to see if the "FILES=" entry is set to 40 or above.
For the AUTOEXEC.BAT file, the Install program adds a "CALL STARTNET.BAT" entry.
The reasons for these changes are explained later in this AppNote (see the heading "CONFIG.SYS File Changes"). The changes are required for proper functioning of the DOS Requester, so you can choose to have INSTALL make these changes for you by accepting the default of "YES," or you can elect to make these changes yourself later by highlighting the field, typing "N" and pressing <Enter<. Since the changes are few, some people prefer to make them themselves so they can double-check other settings at the same time.
Step 3. The third step sets up support for running Windows on the client. If you want Windows support, highlight the field next to the "Install support for MS Windows Y/N" prompt and make sure it says "Yes" by typing "Y." INSTALL looks in the workstation's current directory, then in the directories specified in the DOS PATH variable to find the Windows directory.
If you are running Windows from a shared copy on the network, this prompt refers to your personal Windows directory which holds your *.INI files. These files are usually stored in a local directory (C:\WINDOWS) or in a personal network directory, such as F:\USERS\ED\WINDOWS. (Notice the Help at the bottom of the menu screen.)
Note: Novell Technical Services has discovered a problem during installation when (1) you have a personal Windows directory on the network and (2) the workstation is booted running the NetWare Shell (NETX). When you enter the path to the personal Windows directory, you receive the error message "An invalid drive was given in PATH," even if the directory path you enter is valid.
As a workaround, first install the DOS Requester without adding Windows support (type "N" at the "Install MS Windows support" prompt). Then reboot the workstation running the DOS Requester and run INSTALL again. This time, answer "YES" to install MS Windows support.
If you press <Enter< on the "Customize Support" field of the third step, you will see the "Customize Support for MS Windows" screen, as shown in Figure 2. This screen asks you to make choices concerning country codes and shared MS Windows.
Figure 2: Screen for customizing support for MS Windows.
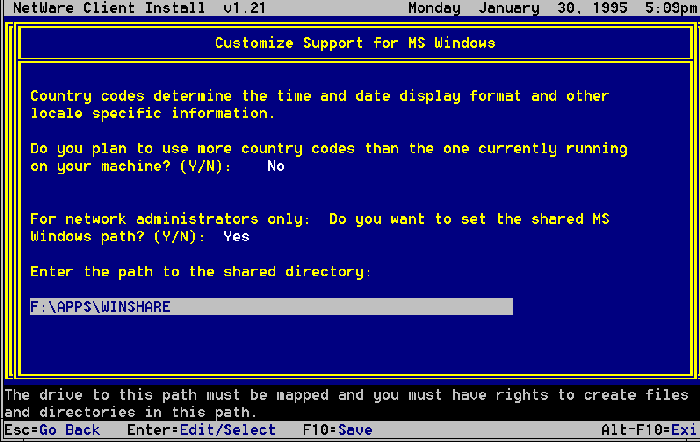
Country Codes. The first question asks if you plan to use more than one set of country codes. If you answer No, INSTALL copies only one set of Unicode files into the \NLS subdirectory under the \NWCLIENTand \WINDOWS directories. This saves installation time and disk space. Otherwise, INSTALL will copy all of the Unicode tables to the \NLS subdirectories.
The DOS Requester v1.20 uses the COUNTRY=CountryName parameter in the CONFIG.SYS file to decide which set of Unicode files to copy. If there is no COUNTRY parameter specified, the DOS Requester defaults to ENGLISH as its primary table selection and places only the *.001 Unicode files in the \NWCLIENT and \WINDOWSdirectories (unless specified otherwise).
If you have installed earlier versions of the DOS Requester, you may wish to get rid of unused Unicode files. For example, English-speaking users can delete all of the Unicode files in the \NLS subdirectories except those with the .001 extension. They can also delete the NETWARER.DRV file from the WINDOWS\NLS\ENGLISH directory, as it only pertains to languages other than English.
Below is a list of the three-digit numerical extensions for Unicode files (each country is assigned a specific extension):
001 = US English and Canadian English
002 = Canadian French
031 = Netherlands
032 = Belgium
033 = France
034 = Spain
039 = Italy
041 = Switzerland
044 = United Kingdom
045 = Denmark
046 = Sweden
047 = Norway
049 = Germany
061 = Australia
081 = Japan
351 = Portugal
358 = Finland
Language support for DOS is not handled by the Unicode files. The NWLanguage DOS variable placed in the STARTNET.BAT file defines the language in which you see the DOS utilities, errors, and other messages displayed. The following is a list of the languages that are currently available:
ENGLISH FRANCAIS DEUTSCHE ITALIANO ESPANOL
Shared Windows Directory. The second question under the "Customize Support for MS Windows" screen is for network administrators who have set up a shared WINDOWS directory using the SETUP /A option when they install Windows on a network drive. Users then run SETUP /N to set up individual files (about 300 KB) either locally or in a personal Windows directory on the network (such as G:\USERS\ED\WINDOWS), while they access the shared Windows directory on the network for the rest of Windows.
The question that you see is "Do you want to set the shared MS Windows path?" with the default of NO. If you choose "Yes," you will be asked to enter the path to the shared directory, such as W:\APPS\WINSHARE.
With the proper directory path in place, the DOS Requester INSTALL program copies the necessary files that are shared into the selected directory. Then INSTALL modifies only the .INI files that are copied locally or in the personal Windows directory of those users who have run the SETUP /N installation command and have typed the directory path to their individual files in answer to the "Enter MS Windows Directory" question earlier in this step.
To set up the shared MS Windows path, you must have rights to create files and directories in the path specified. When you are finished, press <F10< to save your changes and return to the INSTALL window.
Step 4. The fourth step allows you to configure your workstation so it can be backed up by a NetWare server that is running Storage Management Services (SMS). The default is NO. If you choose "Yes," you will see a screen similar to the one shown in Figure 3.
Figure 3: Screen for configuring Storage Management Services (SMS) support.
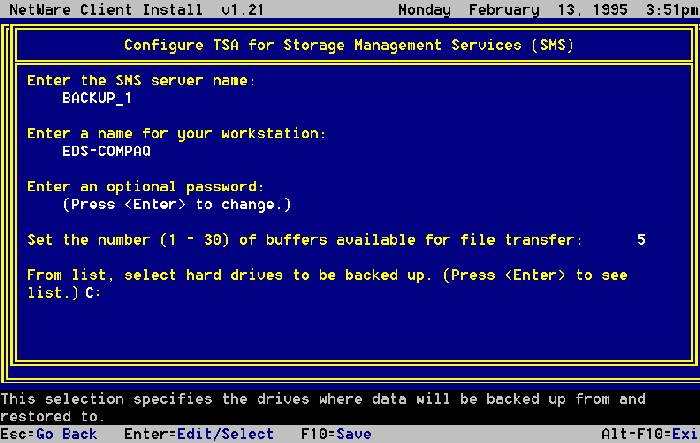
In this screen, you first select the backup server that is running the TSA_SMS.NLM for the SBACKUP software. Once you enter the server name, you enter the name of your workstation. This name can be any name that uniquely identifies your workstation from all other workstations in your office or on the network. It's best to keep these names simple, yet unique.
The third entry allows you to (optionally) set up a password for SBACKUP access. Be sure to coordinate any passwords you set here with the network administrator so that he or she will know which password to use to access the workstation when running the SBACKUP procedure.
The Set number of Buffers entry defaults to 1 buffer. If you wish to speed up file transfers, set this number between 5 and 10. This adds a corresponding "Cache Buffers = n" entry in the NET.CFG file to reflect the change.
Note: Each buffer adds to the size of the DOS Requester's Global memory block. How much depends on which network protocol you are running. If you are using Ethernet, each buffer adds about 1.5KB; if you are using Token Ring, it is 4KB per buffer. Keep this in mind if the Global block size is a factor when loading the DOS Requester.
The last entry lets you select the local hard disk drives you want to back up. When you press <Enter<, you will see a list of local disk drives that you can select (at least drive C:). Highlight each drive you want backed up and press <Enter<. When you are finished, press <F10<and <Enter< so INSTALL can save the configuration in the NET.CFG file.
Step 5. The fifth step in INSTALL's main screen allows you to update your network drivers to support ODI. ODI stands for Open Data-link Interface, a LAN driver specification which allows a single network board to support multiple protocols. For example, with ODI you can have both IPX and TCP/IP protocols actively using an Ethernet network board, thus giving you access to NetWare through IPX and to UNIX through TCP/IP.
The DOS Requester software comes with two driver diskettes. When you choose Step 5 and insert one of the driver diskettes, you'll see a list of the different ODI drivers available on that diskette. To upgrade to ODI drivers, select the driver that matches the workstation's network interface board and press <Enter<. If none of the drivers on this diskette matches your board, put in the second driver diskette and see if the driver is on that diskette.
Note: If you are installing from the network, INSTALL will detect which driver you are using and update it automatically.
You can also use ODI drivers that come from the network board manufacturer. Simply press <Esc<, highlight the field in Step 5 and press <Enter<. Insert the manufacturer's diskette when Install asks for the Drivers diskette. This diskette must contain a *.INS file along with the driver from the board manufacturer.
Note: If you don't have a diskette with the *.INS file but you do have the ODI driver, there is a workaround. Run INSTALL without any ODI driver installed, choose a driver that is similar, select the proper interrupt and port settings, and finish the installation. Then manually go into the STARTNET.BAT file and change the driver name. Go into the NET.CFG file and change the driver title and settings (if necessary).
If you need the ODI driver installed in order to run INSTALL, let it select the driver, press <Enter<, move to step 6, then move back to step 5 and press <Enter< again. Select the Another Driver option, then choose a driver that is similar and follow the rest of the instructions above.
Once you select the correct network board driver, you need to match the Interrupt, Base I/O Port, and Memory I/O Address settings to the network board settings. This screen is shown in Figure 4.
Figure 4: Screen for specifying the hardware settings for the network board.
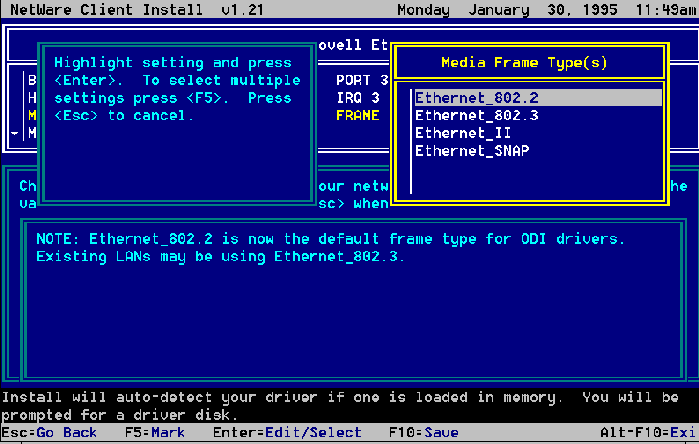
Frame Types. The third entry in the board setting window shows the Media Frame Type(s) that a protocol can use. The INSTALL procedure senses which frame type you are using and sets it accordingly.
Prior to NetWare versions 3.12 and 4.0, NetWare drivers defaulted to the Ethernet 802.3 frame type specification. This frame type deviates slightly in its frame specification from the more widely-used 802.2 specification in that it lacks the 802.2 subheader. (For Novell networks, the Ethernet 802.2 frame type is actually 802.3 with the 802.2 subheader information).
You can select the frame type if the INSTALL's auto-sensing capabilities aren't working correctly. By selecting the Media Frame Type(s) entry, you'll see which frame types are available to you. Ethernet presents the following choices:
Ethernet_802.2 Ethernet_802.3 Ethernet_II Ethernet_SNAP
For Token Ring, you have the following choices:
Token-Ring MSB Token-Ring LSB Token-Ring_SNAP MSB Token-Ring_SNAP LSB
Arcnet doesn't require any frame type selections.
Choose the frame type you are presently running; otherwise, workstations won't be able to communicate with the NetWare servers. If you are upgrading from NetWare 3.x, you can easily find out the frame type by typing CONFIG at the server console. CONFIG shows how each server network board is configured as well as the frame type if there is one specified. But again, frame type auto-sensing should do this for you.
Note: With NetWare 2.2 and earlier, you could only specify the Ethernet II frame type for Ethernet by using the ECONFIG utility.
Once you have selected the proper frame type, you can also specify an optional node address, according to 802.2 specification. NetWare-compatible drivers default to the network board's firmware node address, so you can leave this option alone.
Step 6. When you are finished selecting the driver information, press <Esc<to move to Step 6. Press <Enter< to have INSTALL carry out your selections.
What the INSTALL Program Modifies
The INSTALL program copies the appropriate files into the C:\NWCLIENT directory. If you also choose to install Windows support, INSTALL adds files to the Windows directory and makes changes to the WIN.INI, PROGMAN.INI and SYSTEM.INI files.
As you leave the INSTALL program, it tells you to remove any lines loading IPX or NETX or VLMs from the AUTOEXEC.BAT file. If you were running a previous version of the NWUSER utility in Windows, you will be prompted to delete the old NWUSER.EXE file and the old NetWare Tools icons in favor of the newly installed NWUSER utility.
CONFIG.SYS File Changes. The changes to the CONFIG.SYS file are as follows:
The "LASTDRIVE=" entry now uses Z as its drive letter.
The "FILES=" parameter is set to at least 40.
These changes are necessary because the DOS Requester uses DOS's internal drive table. If you don't set the LASTDRIVE entry to Z, you won't have any logical drives available past the default of E, which is where network drive mappings usually begin.
If you have more than 40 in the "FILES=" parameter, the entry won't be changed; if you have less than 40, the parameter will reflect "FILES=40".
While you are in the CONFIG.SYS file, check the DOS environment space variable (/E:nnn) on the "SHELL=" line to make sure it is adequate to accommodate network drive mappings. The environment space can be set anywhere between 256 bytes and 32KB, but defaults to 256 bytes. The default is usually not enough to accommodate a lot of regular and search drive mappings because the DOS Requester uses DOS's internal tables and environment space. If environment space is set too low, you will lose search drive mappings. We recommend you set the environment space variable between 512 and 1024, depending on how many drive mappings you use and whether you use color for your command line prompt. For example, your modified "SHELL=" line might look like this:
SHELL=C:\COMMAND.COM /C:\DOS /P /E:768
AUTOEXEC.BAT File Changes. The only change to the AUTOEXEC.BAT file is the insertion of the following line as the very first entry in the file:
@CALL C:\NWCLIENT\STARTNET
The reasoning behind this insertion was to ensure that the network is loaded before any menu program. However, loading the network first means you won't be able to unload the DOS Requester or any of its components at any time if you also load other TSRs after it.
STARTNET.BAT File Changes. Below is a sample STARTNET.BAT file created by the INSTALL program for the DOS Requester version 1.02:
STARTNET.BAT
@ECHO OFF
C:
CD \NWCLIENT
SET NWLANGUAGE=ENGLISH
LSL
NE2000.COM
IPXODI
VLM
CD \
For the DOS Requester version 1.10 and 1.20, the STARTNET.BAT file changes to the following:
STARTNET.BAT
SET NWLANGUAGE=ENGLISH
C:\NWCLIENT\LSL
:DRIVER1
C:\NWCLIENT\NE2000.COM
C:\NWCLIENT\IPXODI
C:\NWCLIENT\VLM
You can modify the STARTNET.BAT file to take advantage of any memory manager that the workstation has loaded. For example, if you are using MS-DOS's HIMEM.SYS and EMM386.EXE memory managers and you have the ADOS=UMB@ command in the CONFIG.SYS file, you can place LOADHIGHor LH at the beginning of the commands to load LSL, the network board driver, and IPXODI to place these files into Upper Memory Blocks (UMBs).
Note: Some memory management programs, such as MS-DOS's MemMaker, won't optimize a batch file that is called from AUTOEXEC.BAT. To have the network drivers optimized by such a memory manager, you may need to move the lines from the STARTNET.BAT file into the AUTOEXEC.BAT.
The DOS Requester's VLM.EXE module will recognize that you have a memory manager loaded and will use that memory manager to place transient portions of the *.VLM files into extended or expanded memory. VLM.EXE will also try to place the Global block and Transient Swap block into UMBs. If it successful, the DOS Requester VLM.EXE footprint in conventional memory will be only 5KB in size.
NET.CFG File Changes. As the ODI drivers load, the NET.CFG file is accessed to provide information such as the network board settings. The NET.CFG file can contain many other parameters used by VLM.EXE and its modules. Below are the settings created by the INSTALL program that came with NetWare 3.12 for an NE2000 board:
NET.CFG
LINK DRIVER NE2000
   PORT 300
   INT 3
   FRAME Ethernet_802.2
   MEM D0000

NetWare DOS Requester
   FIRST NETWORK DRIVE = F
   USE DEFAULTS=OFF
   VLM=CONN.VLM
   VLM=IPXNCP.VLM
   VLM=TRAN.VLM
   VLM=SECURITY.VLM
   VLM=NDS.VLM
   VLM=BIND.VLM
   VLM=NWP.VLM
   VLM=FIO.VLM
   VLM=GENERAL.VLM
   VLM=REDIR.VLM
   VLM=PRINT.VLM
   VLM=NETX.VLM
For NetWare 4.02 and the DOS Requester 1.2, the settings are as follows:
NET.CFG
LINK DRIVER NE2000
   PORT 300
   INT 3
   FRAME Ethernet_802.2
   MEM D0000

NetWare DOS Requester
   FIRST NETWORK DRIVE = F
For NetWare 4.1 and DOS Requester 1.2, the settings are as follows:
NET.CFG
LINK DRIVER NE2000
   PORT 300
   INT 3
   FRAME Ethernet_802.2
   MEM D0000

NetWare DOS Requester
   FIRST NETWORK DRIVE = F
   NETWARE PROTOCOL=NDS BIND
The ODI drivers use indented entries under the Link Driver heading in the NET.CFG file. In the above example, the NE2000 board is set to its default of Interrupt 3 and I/O port 300h. You will also notice that the frame type is set to Ethernet_802.2. This is the default even if a network board driver is not loaded when you install the client software. If you need to use Ethernet_802.3 instead, be sure this line reflects that frame type.
The next heading in the NET.CFG file is NetWare DOS Requester. Beneath this heading INSTALL places various entries, depending on the version of INSTALL you are running. Entries that are specific to the NetWare DOS Requester are indented under this heading, while the more generic NET.CFG parameters are not indented.
The INSTALL.CFG File. If you have some particular default entries that you want in everybody's NET.CFG files, you can modify a file called INSTALL.CFG located on the Installation diskette or in the \DOSWIN directory (for network installations). This file can be manipulated with any text editor. For example, suppose you want to add the following lines in all NET.CFG files globally:
SHOW DOTS=ON
CACHE BUFFERS = 10
Bring up the INSTALL.CFG file with a text editor, go to the [REQUESTER] heading and type in those commands as in the example below. The example also shows some of the other kinds of settings you might add to the INSTALL.CFG file:
[REQUESTER]
FIRST NETWORK DRIVE = F
NETWARE PROTOCOL = NDS BIND
SHOW DOTS = ON
CACHE BUFFERS = 10
NAME CONTEXT = "NRD.NOVELL"
Now, wherever you install the DOS Requester using the Install diskette or from the \DOSWIN directory, these global parameters will be added to newly created NET.CFG files. (Be sure to flag the INSTALL.CFG file Read-Write or unwrite-protect the diskette in order to make the modifications.)
Windows .INI File Changes. If you allow the INSTALL program to include Windows support, the program modifies the PROGMAN.INI, WIN.INI and SYSTEM.INI files, but keeps copies of the originals with a *.BNW (Before NetWare) extension. The changes you see here depend on how much NetWare support you are already using.
PROGMAN.INI. Changes to PROGMAN.INI are the addition of a NWUTILS.GRP line to the [Groups] heading and placing that group first in the Order line.
WIN.INI. The only change to WIN.INI is the addition of a LOADNWPOPUP.EXE line under the [Windows]heading.
SYSTEM.INI. Changes to the SYSTEM.INI file are as follows:
[boot]network.drv=netware.drv
[boot.description]network.drv=Novell NetWare (v4.0)
[386Enh] network=*VNETBIOS,VNETWARE.386,VIPX.386 UniqueDOSPSP=TRUE PSPIncrement=5 TimerCriticalSection=10000 (1000 for DOS Requester v1.2*) ReflectDOSInt2A=TRUE OverlappedIO=OFF
[vipx] VirtualizeIrqn=TRUE (n=the interrupt the network card uses)
Note: If you are running a version of the DOS Requester earlier than version 1.20, or if you are running a version of VNETWARE.386 dated earlier than 8-17-94 , you will need to set TimerCriticalSection to 10000. The VNETWARE.386 driver for the DOS Requester 1.20 defaults to 1000, which better support mobile products.
The VirtualizeIrqn= parameter only appears if you have a LANSUP configuration. When using the IBM LAN Support Program with SLANSUP.OBJ or LANSUP.COM, the LAN IRQ is not readable from the driver. The only way to get this information is to read the network board hardware itself. The problem with doing this is that, since the hardware can be Token Ring, PCN2 or Ethernet, VIPX would have to be aware of many different hardware configurations. Instead, VIPX requires the IBM LAN Support user to specify the network board's IRQ in the [VIPX] section of the SYSTEM.INI file. IRQs range from 0 to F (hex). An example is listed below:
[VIPX] VirtualizeIrq2=TRUE VirtualizeIrq3=TRUE
In this example, VIPX will virtualize both IRQ 2 and IRQ 3. VIPX can virtualize up to four different LAN IRQs. The reason for virtualizing multiple IRQs is to allow other LAN boards and protocols to be installed on the same PC and prevent them from deadlocking the machine. For example, you may have IPX running through an NE2000 board on IRQ 3 and TCP/IP running through to an IBM Token-Ring board on IRQ 2.
Problems When Skipping INSTALL
Many users skip the prescribed DOS Requester installation method and, consequently, end up with problems regarding DOS and Windows applications. Skipping the INSTALL program is tempting, especially for those who are upgrading from an earlier version of the DOS Requester by downloading files from the VLMUP2.EXE, WINDR2.EXE, and NWDLL2.EXE files that are out on CompuServe or the ftp server.
After you download these files, you should manually copy the new files to the proper location on the network. Or you can place the newer files on the client diskettes by deleting the older and compressed files and by copying in the newer files. (The install-ation algorithm first looks to copy compressed files, then non-compressed files.) This is a rather arduous process that you can handle much more easily when you run the installation process from a NetWare server.
The main point to remember is that if you are running Windows, be sure the changes described above are placed in their proper files in order for the DOS Requester to work properly. While you can perform these changes by hand, Novell does not recommend it. It's too easy to misspell a parameter or overlook a line.
The most common problem that many users experience when they skip the installation process is Windows hanging when they exit from a DOS box. This problem is indicative of not having the proper network settings in the SYSTEM.INI file.
For example, suppose you don't have the line UniqueDOSPSP= TRUE in the SYSTEM.INI file, and you open two DOS boxes running the same application. If you close one of the applications, the other application will close as well, because they were sharing the same PSP. If you are experiencing such a problem, ensure that the DOS Requester installation settings described above are in their proper place in the SYSTEM.INI file, as they will be if you run the INSTALL program.
Note: For more information about troubleshooting problems with Windows hanging, read the "Black Screen of Death Explained" Application Note that appears in this issue.
Auto Reconnect for NetWare 3.11 and 3.12
There's been some confusion surrounding the automatic reconnect capabilities of the DOS Requester in NetWare 3.11 and 3.12 environments. For auto-reconnect to work with NetWare 3.11 and 3.12, you need the following software components:
DOS Requester v1.20 or greater
NETWARE.DRV v3.03 or higher (comes in WINDR2.EXE and NetWare 4.1 INSTALL)
NetWare 4 LOGIN.EXE (found in LG4084.EXE in Novlib 14 on CompuServe)
Make sure you install the updated client software through the proper installation method. Then edit the NET.CFG file to include the following lines:
VLM=AUTO.VLM VLM=RSA.VLM Bind Reconnect=ON(default is OFF) Auto Reconnection=ON(optional; ON is the default) Auto Large Table=ON (optional; default is OFF) Auto Retry=nn (nn must be a non-zero number from 1 to 3640)
The AUTO.VLM module does not load by default. You need the RSA.VLM module if you are logging into NetWare 4 servers as well.
The auto-reconnect capabilities allow for the restoration of "passive" resources such as server connections and drive mappings. The AUTO.VLM does not restore "active" resources such as open files and pending print jobs.
CAPTURE statements are a little different than either passive or active resources. CAPTURE statements are set in the client and are not removed when the resource (print queue) is no longer available. If the print queue is on a server and the server is running, the CAPTURE statement to that connection will work. Otherwise, you will need to rerun CAPTURE and CAPTURE to a different server.
If your workstation is using auto-reconnect and you are attaching to a NetWare 4 server, you can't enable both auto-reconnect and packet signing together. Auto-reconnect will not work if you have packet signing enabled. You can have one or the other, but not both.
Read Only Compatibility and SMODE
Read Only Compatibility determines whether a file marked as Read Only can be opened with a read/write access call. In the past, when the NetWare Shell was loaded, a program could open a Read Only file with write access without getting an error. However, any attempt to write to the file would produce an error. Certain applications written for older versions of NetWare require that this parameter be turned ON to prevent this error.
With the DOS Requester 1.20, the Read Only Compatibility defaults to OFF. The default was set to ON in DOS Requester 1.1; however, it was discovered that a number of applications would not install with this default. For example, if you install Microsoft Office and use the SETUP /A option, the installation fails on the last diskette if this parameter is set to ON.
If you want Read Only Compatibility set to ON with the DOS Requester 1.20, you must include the following line in the NET.CFG file under the NetWare DOS Requesterheading:
Read Only Compatibility = ON
This setting has ramifications for print job configurations as well. Administrators often want to create a global print job configuration (PRINTCON.DAT) instead of creating one for every user. You can do this by copying the PRINTCON.DAT file from one user into the SYS:PUBLIC directory, and then using the SMODE utility to change the way CAPTURE.EXE searches for the print job configuration. The catch is that with the DOS Requester 1.20, the global print job configuration won't work unless you set Read Only Compatibility to ON.
The SMODE (Search Mode) utility helps determine how an application can use the search drives when searching for auxiliary files. Many applications, when started, also open a number of other files (such as overlay files and data files) that are used as a resource to the application. The Search Mode setting determines when applications can look in your NetWare search drives to find these auxiliary files.
Note: DOS will always look in a specific path (if specified in the application), and then in the default directory, regardless of which search mode you specify for NetWare.
SMODE has five possible settings: Mode 1, Mode 2, Mode 3, Mode 5, and Mode 7. (Modes 4 and 6 are not presently used.) Each mode specifies a different way of using search drives. A brief explanation of each mode appears below. You may need to read your application's documentation to determine if the application just reads its auxiliary files, or reads and writes to them.
Mode 1. This is the "default search mode" for the NET.CFG file. When you use this setting, the DOS Requester will look in the search drives only when no path is specified in the application (and after DOS has searched the default directory).
Mode 2. When you use this search mode, the DOS Requester won't look in any search drives to find auxiliary files. The application will behave as if you were running it on a standalone machine with DOS only. If the application has a defined directory path that allows it to search and open files, the application will search for the files in that defined path. NetWare refers to this mode as "Do not search."
Mode 3. This search mode is exactly like Mode 1, except that if the application has no defined directory path to search and open files, the DOS Requester will look in the search drives only if the open request is a read-only request. NetWare calls this "Search on Read-Only opens with no path."
Mode 5. When you use this search mode, the DOS Requester will always be able to look in the search drives, even if the application specifies a path. NetWare refers to this mode as "Search on all opens."
Mode 7. This search mode is exactly like Mode 5, except that the DOS Requester will look in the search drives only if the open request is a Read-Only request. NetWare calls this mode "Search on all Read-Only opens."
The search mode set in the NET.CFG file will apply to all applications, so users should choose the mode that works for the majority of their programs.
The table below summarizes when the "Search Mode" option allows the DOS Requester to use the search drives, according to whether a path is specified in the application and whether the open request is a Read-Only request or a Read-Write request.
|
NOPATH
|
PATH
|
|||
|
Mode |
Read-Only |
Read-Write |
Read-Only |
Read-Write |
|
1 |
Yes |
Yes |
No |
No |
|
2 |
No |
No |
No |
No |
|
3 |
Yes |
No |
No |
No |
|
5 |
Yes |
Yes |
Yes |
Yes |
|
7 |
Yes |
No |
Yes |
No |
The DOS Requester and NetWare 3.x Connections
The DOS Requester offers the ability for workstations to have up to 50 connections to different servers. This number principally reflects the need for additional connections that came about as a result of NetWare 4 Directory Services. The default number of connections for the DOS Requester is 8, which is also the maximum for the NetWare Shell (NETX).
NetWare 3.x programs and utilities can only handle up to 8 connections. The 8-connection limit was integrated into the NetWare Shell, and most NetWare 3.x utilities used the shell's connection table for maintaining the connections possible through the utility itself. Some of these utilities include LOGIN, CAPTURE, MAP, SYSCON, SESSION, FILER, and PCONSOLE.
We tested setting the effect of the Connections' parameter in NET.CFG by logging in to more than eight NetWare 3.x servers. While you can have more than eight connections to NetWare 3.x servers, you will only see eight server attachments through the different utilities. Some utilities, such as MAP and LOGIN, won't allow more than eight server attachments. With other utilities, connections were dropped arbitrarily. In one instance, SESSION would not recognize one server connection, while SYSCON would show the dropped server connection but drop a different connection.
In the end, this confusion to the utilities can be too much for your connections to function properly. For a strictly NetWare 3.x and below environment, it's best to stay with the default of 8.
A similar situation occurs when you want to capture to more than three logical ports while attached to NetWare 3.11 and 3.12 servers. The DOS Requester can be configured to allow up to nine CAPTUREs. However, the NetWare 3.x utilities will only allow up to three, and the CAPTURE utility itself won't allow you to capture to more than three ports.
To gain the added capabilities in the areas of server connections and CAPTUREs, you'll need to upgrade to NetWare 4. However, there is a workaround for capturing to more than three ports or having more than eight server connections with NetWare 3. That is to use the NWUSER utility in Windows. NWUSER uses the DOS Requester's capabilities, even in a NetWare 3.1x environment.
Don't Forget to Upgrade the MLID
When you move from the NetWare Shell to the DOS Requester, the network communications drivers are also updated. These include LSL, the network board driver (MLID), and IPXODI. If the LAN driver for you network board is not on the list that ships with the DOS Requester, you must obatin the network board driver yourself from third-party sources.
A number of problems that users have are caused by using older network board drivers with the DOS Requester. These network drivers can freeze up on you when you try to boot up or log in, or when you try to access applications and utilities.
If you are experiencing such problems, and before you call Novell or your network maintenance expert, try the following test. Disable Packet Burst and LIP support by going into the NET.CFG file and adding these two lines (indented) under the NetWare DOS Requesterheading:
NetWare DOS Requester
   PB Buffers = 0
   Large Internet Packets = OFF
   Signature Level = 0
If this procedure clears up your problems, you will need to update the network board driver at the workstation and, if necessary, at the server as well. Contact the board manufacturer for the latest updates to the network board drivers. Updated drivers might also be available on a Bulletin Board System such as CompuServe or on an ftp server on the Internet.
Conclusion
This AppNote has covered some of the issues that may be encountered when upgrading the NetWare DOS Requester. Be sure to run the installation procedure to reduce the number of problems you will have to deal with. Also, keep an eye on the other issues brought up in this AppNote. By following these recommendations, you should have a more stable client environment for you and your users.
* Originally published in Novell AppNotes
Disclaimer
The origin of this information may be internal or external to Novell. While Novell makes all reasonable efforts to verify this information, Novell does not make explicit or implied claims to its validity.