Using NetAdmin to Create and Administer NDS Objects
Articles and Tips: article
Software Engineer
NetWare Text Utilities
01 Jul 1993
This Application Note provides information for using the new NetAdmin text-based utility. Users that are familiar with the 3.11 SYSCON utility will recognize similarities between SYSCON and NetAdmin. Since many of our existing customers are familiar with the C- Worthy interface, it has been maintained for the 4.0 release of NetWare. We will go through an exercise of setting up a NetWare 4.0 Directory tree, adding objects, and maintaining some of the basic user information.
Introduction
With the release of NetWare 4.0, there is a lot of excitement about its new features. Along with this excitement comes concern about the required learning curve. True, there is an initial learning curve, but the benefits are great. To reduce the learning curve, we kept the C-Worthy utilities around for the 4.0 release. Therefore, if you liked the C-Worthy interface for maintaining your network, it is still available with several enhancements. The purpose of this AppNote is to acquaint you with the new NetAdmin utility and to help former SYSCON users become familiar with the new features of Directory Services using a familiar interface.
However, once you learn them, the new NetWare Graphical User Interface (GUI) utilities will probably make maintaining the network easier. For example, the NetWare GUI utilities have the capacity to display the Directory Services tree graphically, while NetAdmin only shows you one branch of the tree at a time. You can use the C-Worthy tools until you are familiar with the new Directory Services structure. After that, I encourage you to learn the GUI utilities.
The new NetAdmin utility replaces the functions of the old SYSCON. This AppNote takes you through the process of setting up a multiple server network for a small (fictitious) software company. I'll start by setting up some objects in the Directory tree. If you have a couple of servers and want to follow along by setting up the tree on a real network, feel free to do so.
If you don't have the resources to go through the tutorial on a real network, I include many of the screens that you would see. We will create some of the new objects such as Organizational Units, Organizational Roles, and Directory Maps. We will also make some file system trustee assignments and add Directory Service object trustee assignments.
Setting Up the Directory Tree
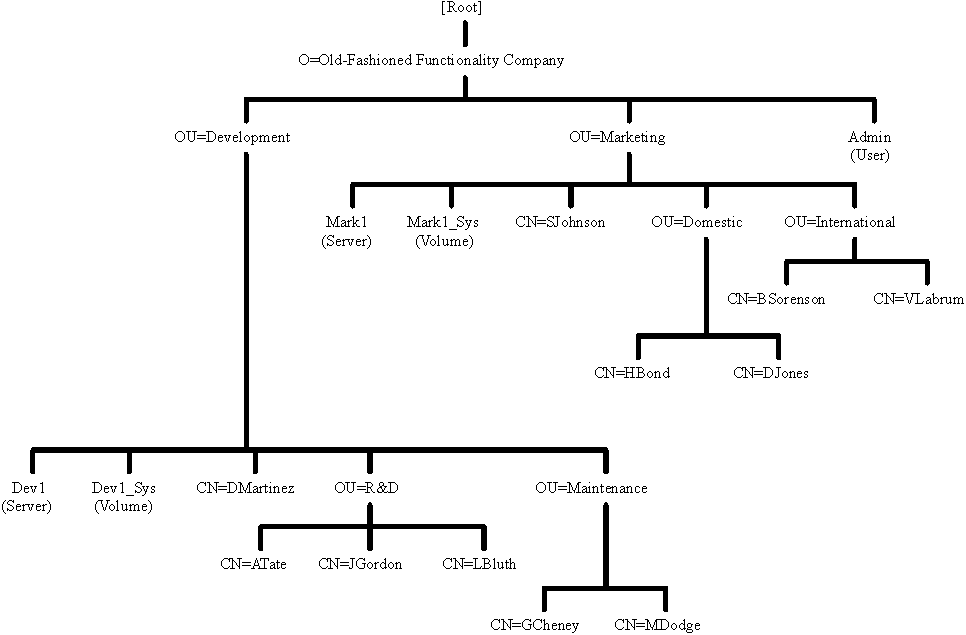
The name of our company is the Old- Fashioned Functionality Company, or OFF Company for short. There are two divisions in this company: Development and Marketing.
The Development department is divided into R&D and Maintenance. The Marketing department is divided into Domestic and International. Since the company is divided into such neat entities, we will create our network Directory tree structure to look the same. Our Directory structure is shown in Figure 1.
Figure 1: Full NDS Directory tree structure for OFF Company.
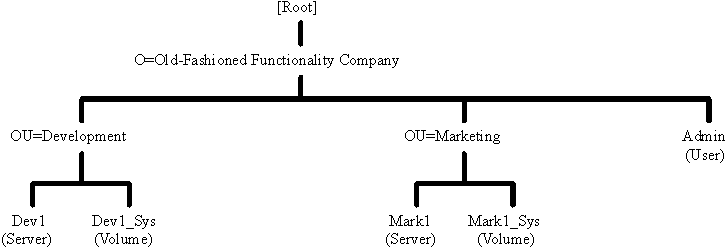
When we install NetWare 4.0 on the server, the installation program asks us for our company name and whether or not we want to create the Organization object. I answered "Yes" to this. The main organization, called OFFCompany, was created in the root container of the tree. Also, at installation time, I created the server and volume objects. I have a server for each division: one for Development and one for Marketing. I created two Organizational Units (OUs) during the installation process called Development and Marketing.
I put the development server called DEV1 in the Development OU and the Marketing server called MARK1 in the Marketing OU. I also put the volume object that represents the SYS volume on each server in their appropriate OUs:
volume MARK1/SYS, named MARK1_SYS into Marketing OU
volume DEV1/SYS, named DEV1_SYS into Development OU
After the Install NLM utility finished, we have the tree structure shown in Figure 2. The base of the tree is [Root] which is an object of type Top.
Figure 2: Base Directory tree following the installation process.
The Admin user was set up in the OFFCompany container. The Admin user is used to administer the network. Admin is like the SUPERVISOR user on 3.11 networks, with one big difference: Admin's rights can be removed and the user Admin can be deleted. This allows you to make your network more secure. By deleting Admin, no one knows which user has all rights to the network. You may not even want to have an Admin user. You may want to have administrators of individual branches of the tree, none of which has all rights to the entire network. Remember, Admin is not a special user like SUPERVISOR was on NetWare 3.11. Whether you assign someone full rights to the network or remove Admin is completely up to you.
Initial NetAdmin Screens and the Browser
All of the objects listed previously were created during installation. We can now create the other objects in the tree, such as users, groups, organizational roles, and Directory Map objects.
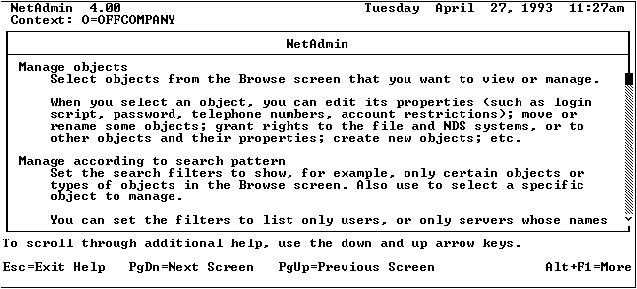
You may want to bring up the NetAdmin utility and follow along. Do this by typing "netadmin" at the DOS command line. The first screen you will see is similar to that shown in Figure 3.
Figure 3: NetAdmin options screen.

For those familiar with the SYSCON utility, you will recognize the basic C-Worthy layout. We have added several things to this screen. Notice the top three lines of the screen.
The top line is the name of the utility, the version number, and the current date and time.
The second line is the current Directory context. This context tells you the name of the container holding the objects you are viewing and changing (similar to a directory path in the file system). This screen shows the context as O=OFF Company. The context line changes as you browse the tree. We'll talk about browsing a little later.
The third line tells you your Login Name. In this case I have logged in as CN=Admin.O=OFFCompany. This line remains the same and is handy when setting up object trustee rights.
Now look at the bottom three lines of the screen. These lines provide available options at every screen throughout the utility.
The bottom line lists the active function keys. The new C- Worthy utilities show the names and functions of the active keys on the bottom line. If there are more keys available than can be shown on this line, the <Alt<+<F1< key appears in the lower right corner. Press <Alt<+<F1< to see additional key information. In this case we have three function keys for this screen: Enter=Accept, Esc=Exit, and F1=Help.
The two lines above the key help line contain a summary of the actions you can perform at this point. This is the Quick Help.You can "Press <Enter< to select an object to manage by navigating the Directory structure." Each screen in the new C-Worthy utilities shows you available options. Press the F1 key to get more help for the screen.
Now let's look at the new context sensitive help screens. To access the help screens, press the <F1< key.
Figure 4: NetAdmin Help screen.
Pressing the <F1< key provides you with help based on what is on the screen. (This is referred to as "context sensitive help." Don't confuse this context with the Directory Services context. Context sensitive help simply means help related to what is currently displayed on the screen.) SYSCON users will notice a new layout for this screen.
Notice the Quick Help and Key Line areas (the bottom three lines on the screen) of this help screen. You have more function keys that are available to you:
You can use the Up <8< and Down <9< arrow keys to scroll through the help.
You can use the <PgUp< and <PgDn< keys to page through the help.
The scroll bar on the right side of the screen tells you how much more help is available for this screen. With SYSCON you had to page through the help - you couldn't scroll line by line. Scrolling allows you to see more help for each screen and makes it easier to read the help screens. You can scroll through the information one line at a time. If you press the <Alt<+<F1< screen you see that you can also press <Ctrl<+<PgDn< to get to the end of this help screen. <Ctrl<+<PgUp< takes you to the beginning.
Now press <Escape< to return to the main menu. Let's look at the options on the main menu screen.
The first option on the screen is the selection you will make 90% of the time. It accesses the Browser. The Browser allows you to display the objects in the tree one container at a time.
The second option on this screen allows you to select objects to manage using classes or search patterns. You can also edit the properties of alias objects.
The third option on this screen allows you to change the context for this utility.
Let's explore the second and third options. Then we will return to the first option, and proceed to enter objects.
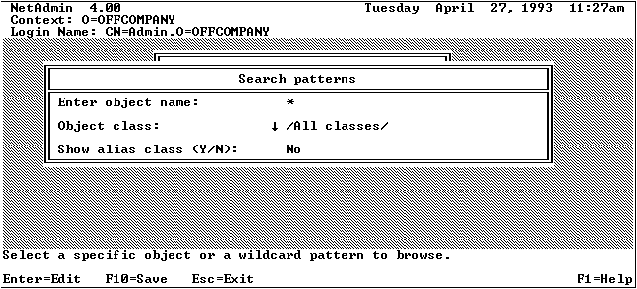
Select Manage according to search pattern. To view specific objects when browsing the tree, use this option.
If you want to view only objects that begin with A, you would type "A*" for the Enter object name field (see Figure 5 for the "Search patterns" screen).
Since Directory Service object name searches are case insensitive, typing "a*" would do the same thing. If you want to see all objects that begin with SERV you would type "SERV*". The only wildcard permitted is the asterisk (*). If you type in the object nameof an existing object and press <F10<, you are taken tothe View/Edit screen for the object. This skips calling the Browser.
Figure 5: Search patterns screen.
The next option allows you to select certain types of objects to view. For example, if you want to view only Volume objects, you would select the Object class option from this screen.
Select Object classand press <Enter<
Press the <Insert< key. The screen in Figure 6 appears.
Figure 6: Object class inclusion list.
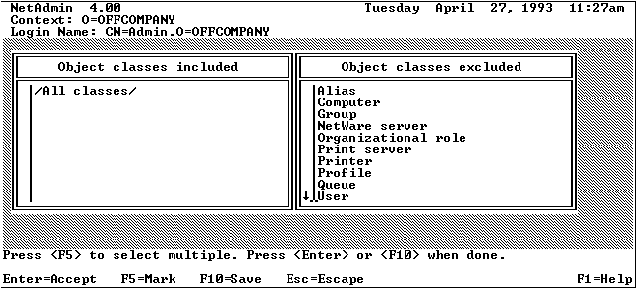
Scroll down to Volume (which is off the screen at the bottom), and press <Enter<.
The /All Classes/ option has been removed and replaced with Volume. With these two selections made (A* for the object name and Volume for the object class), the Browser displays only volume objects that begin with the letter A, and all container objects.
Press <Esc<.
You should be at the search patterns menu. The third option on the search patterns menu lets you determine how Alias objects appear in the browser. Normally this option is set to "No". If you need to edit the properties of an alias object instead of the properties of the object pointed to by the alias, set this option to "Yes". Alias objects are Directory Service objects whose sole purpose is to point to another object in the tree. Alias objects have some unique attributes that aren't discussed in this AppNote.
Press <Escape<.
Don't save the changes.
At the NetAdmin options screen, select Manage objects and press <Enter<.
This brings you to the Browser screen.
Learn the Browser
The Browser is the name we gave to the screens that allow you to locate objects in the DS tree. From the Browser screens you can add, delete, or edit Directory Service objects. You can also move up and down the tree by selecting parent and container objects. The GUI version of NetAdmin, NWAdmin, shows the tree in a graphical form. NetAdmin shows the contents of the tree one context at a time.
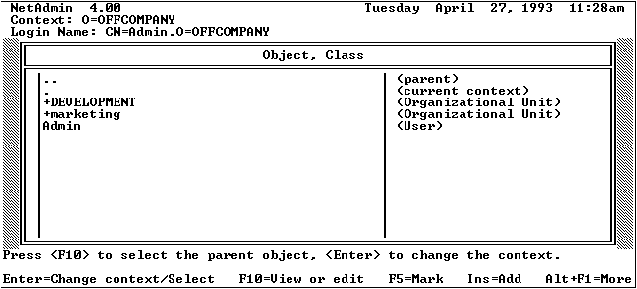
Figure 7: Browser screen.

As you can see, we have four objects that we can select from. The .. (parent) object, the . (current context) object, the DEV1, (Server) object, and the DEV1 Sys (Volume) object.
The ..(parent) object represents the parent container. Since our current context is OU=Development.O=OFFCompany, the parent container would be O=OFFCompany.
The . (current context) object represents the current container.In our example, the current container is OU=Development.
The other objects are the server and volume objects that reside in this department. These were created by the installation program.
To familiarize you with the browser, we are going to browse around the tree and make sure that objects that were supposed to be created by Install are actually there. We will come back to this screen and add users in the Development Department.
Look at the Quick help and Key lines. Whenever in doubt as to what actions can be performed, look at these three lines. Of course, you can always press the F1 key for more help.
The Quick help line tells us to "Press <F10< to select the parent object, <Enter< to change the context." Whenever the cursor is on a container object, (container objects are Countries, Organizations, Organizational Units), pressing <Enter< will change the context to that container and display the objects in the container. Pressing <F10< while the cursor is on a container object selects that container object for editing.
Move the cursor to the . (current context).
The quick help changes to "Press <F10< to select the current context. The phrase "press <Enter< to change to context" has disappeared. Why? Because we are already looking at the contents of this container. Pressing <Enter< does nothing.
Move the cursor to the server object.
The quick help changes again to "Press <Enter< to select this object." Pressing Enter on a leaf object (leaf objects are all the non-container objects such as users, volumes, servers, groups etc.), allows you to edit the properties of the selected object. Notice the '+' in front of the Organizational Units. The plus sign signifies that this is a container. Pressing <Enter< on these objects displays the contents of these objects. Let's go browsing.
Move the cursor to the .. (parent) object.
Press <Enter<. The context changes to O=OFFCompany and produces the screen shown in Figure 8.
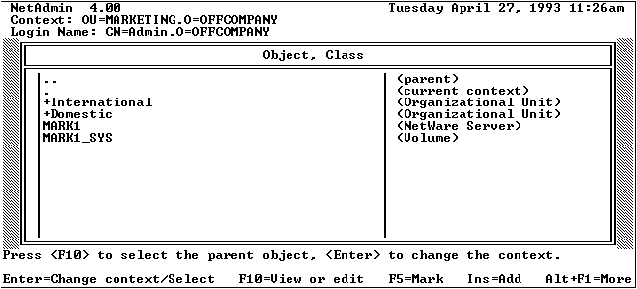
Figure 8: Browser screen.
Select the Marketing object by putting the cursor on +Marketing and pressing <Enter<. We now see the Mark1Sys (volume) and Marketing (NetWare Server) objects displayed.
Select the .. (parent) object.
Select the Accounting (Organizational Unit) object. We now see the Accounting and Acct1Sys volume objects in the Accounting container.
We have verified that the organization OFFCompany, and the departments Development and Marketing have been created by Install. We also see that the Admin user was created in the O=OFFCompany container and that the servers and volumes have associated objects in the Directory Services tree.
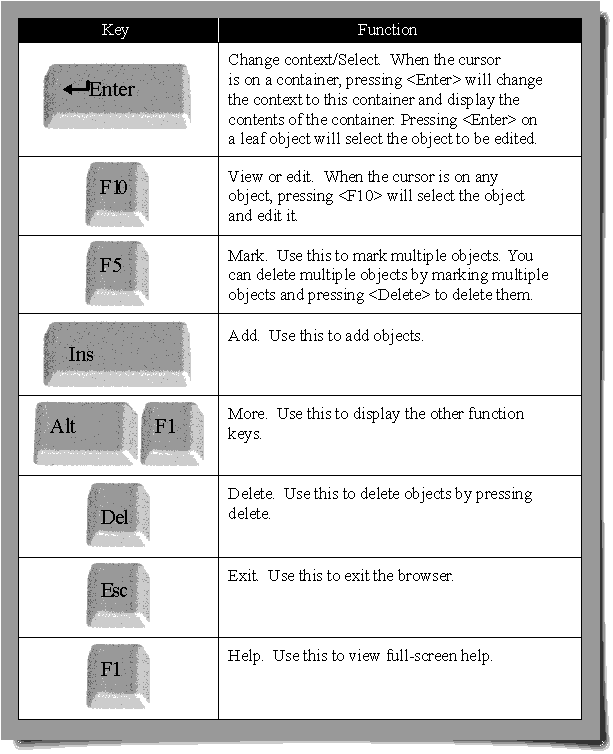
Figure 9 lists the function keys and associated actions that are available in the Browser.
Figure 9: Browser function keys.
Setting Up Containers
Before we add our users, we need to create the lower level OUs. We are also going to set up a User Template object in each OU so we don't have to type all of the information for each new user.
From the Browser, besure your current context is set to OU=Development.O=OFF Company.
Press <Insert<. The screen in Figure 10 appears.
Figure 10: Object class screen.
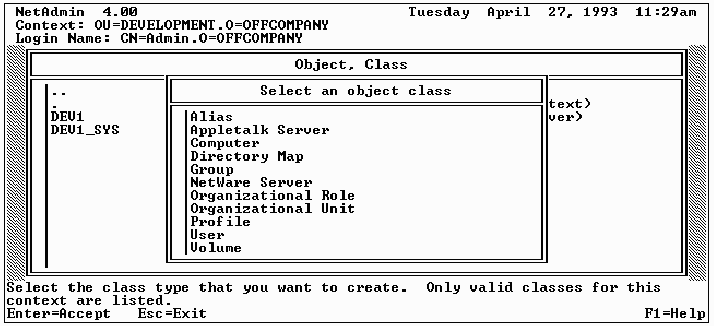
Select Organizational Unit and press <Enter<. The screen in Figure 11 appears.
Figure 11: Create OU screen.
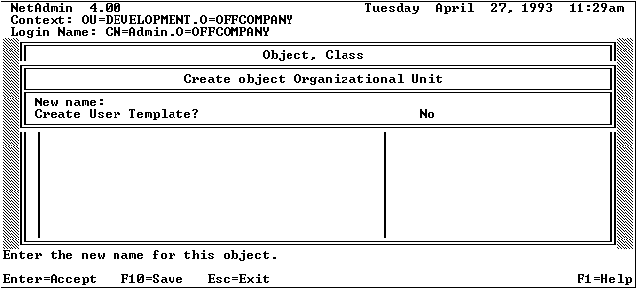
Type "R&D" for New name.
Answer "Yes" to create user template.
Press <F10< to create the R<D Organizational Unit (OU).
Answer "Yes" to Create another?
Type "Maintenance" for the New name.
Answer "Yes" to create user template.
Press <F10< to create the Maintenance OU.
Answer "No" to create another OU in this context.
Change to the Marketing container to create the other OUs.
Move to the Marketing container by selecting the .. (parent)container.
Always look at the second line of the screen to determine what your current context is. Since we are in the OU=Development. O=OFFCompany context, selecting.. (Parent) will move us to the O=OFF Company container context.
Select +Marketing (OU). This displays the items in the Marketing container.
Press <Insert< to add an object.
Select Organizational Unit.
Type "International" for the name of the OU.
Select Yesto create User Template.
Press <F10< to create the OU.
Select Yesto create another OU.
Type "Domestic" for the name of the OU.
Say "Yes" to create the User Template
Press <F10< to create the OU.
Say "No" to create another OU. Your screen should look similar to Figure 12.
Figure 12: Browser screen.
We have now created all the container objects we are going to need. Next we'll set up the user template object.
Setting Up User Templates
Before setting up our users, we want to add some common properties that all of the users in this department need. We are going to use the user template object to set up these default values. When you created the OUs you said "Yes" to create a user template. (When the Install NLM creates the Organization or Organizational Unit, you will have to manually create the user template object.) By selecting to create a user template, a user with the name of "USER_TEMPLATE" is created in the OU.
When user objects are created, NetAdmin can be told to copy a portion of the properties from the nearest User Template object. NetAdmin searches the current context for the User_Template object. If it is not found in the current context, each parent context is searched until it is, or until the top of the tree is found.
So that there will be something in the User Template object to copy, we are going to modify the properties of the User Template object in the R&D container.
Browse up the tree to Development and then back down again to set your context to OU=R&D.OU=Development.O=OFFCompany.
Select the User_Template object and press <Enter<. The screen in Figure 13 appears.
Figure 13: Actions for User screen.
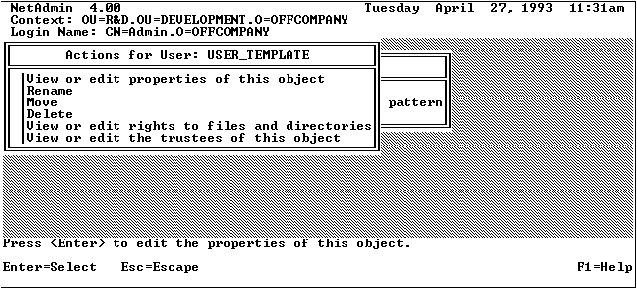
To View or edit the properties of this object, press <Enter<.
Press <Enter< to edit the Identification information for this object. You will see a screen similar to the one in Figure 14.
Some of the screens and options available for users are not needed for user templates. Because some properties aren't used for user templates we have removed them to avoid confusion.
On this screen you see the fixed information pertaining to user objects. These fields were not available on 3.11 servers and are currently used for information only. None of them, other than the Login Name, are currently being used by 4.0 processing.
Figure 14: User identification screen.

Notice that many of the entries display "(Empty List)." This means the field can contain multiple items but currently contain no entries. Fields that contain multiple values also display the down arrow (9)to indicate that the field may have multiple values. If there is at least one value, the first value in the list will be displayed in the field. The down arrow is used to notify you that even though a value is displayed, it may not be the only value for this list. Select the field to view the entire list.
In our sample, OFF Company, the telephone number is the same for the entire company. Let's enter the telephone number.
Select Telephone and press <Enter<. The screen in Figure 15 appears.
Figure 15: Telephone numbers screen.
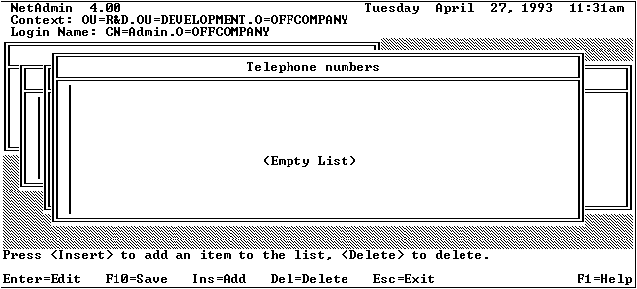
To add an item to a list, press <Insert<.
Enter the telephone number and press <Enter<.
At this point you can:
Add another telephone number by pressing <Insert<.
Delete a number by pressing <Delete<.
Change a number by pressing <Enter<.
Exit by pressing <Escape<.
Save the list by pressing <F10<.
This same procedure is used for all lists.
Save the list by pressing <F10<.
Notice that <F10< is used to save information. SYSCON used to have you press <Esc< and then you had to select <Save< to save the information. This has been combined into the <F10< key. You can still use the <Esc< key, but <F10< will save you keystrokes.
The telephone number has now been added.
Press <F10< again to save this screen's information.
Select Environment from the View or edit user screen and press <Enter<. The screen in Figure 16 appears.
Figure 16: Environment information screen.
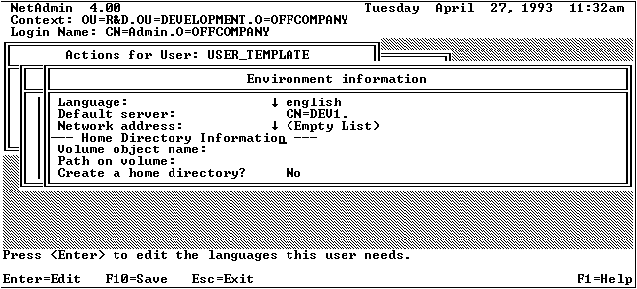
Environment Information Fields
The following fields are used by the 4.0 system.
Language. The Language property is used to specify which language the screens should appear in when running NetWare 4.0 Utilities. When you log in, the Login program gets the value of this property and sets the DOS environment variable NWLANGUAGE equal to this value. In this example, the NWLANGUAGE variable is set to english.
Default server. The Default server property is used by the Send utility. When sending a message to another user on the network, the Send utility needs to know which server to send the message to. The Send utility reads this property and sends the message to the user on this server. Therefore, whenever you are logged in, you should have an attachment to your Default Server so that you can receive messages. If you are not logged in to your Default Server, you will not get messages sent with Send or Broadcast.
Network address. The Network address property lists the physical address of the workstation from which the user logged in. If the user has logged in from multiple workstations, each workstation's address will be displayed here. Again, since this is a list, only the first address in the list will be automatically displayed. You can't change this property. It is maintained by the server.
Home Directory Information. The Home Directory Information contains data that is used when creating new users. SYSCON had the capability to create a user's home directory. NetAdmin has the same capability. Since we are no longer server-centric, the utility needs to know where to place the home directory. This property is used to determine the location of the home directory. The Volume object name is the Directory Services' name of the volume on which the directory will be created. The Path on volume is the path, beginning at the root of the specified volume, where the directory is to be created.
Create a home directory. The final prompt, Create a home directory?, allows you to create the directory immediately from this screen, assuming you have sufficient rights to do so.
Let's set the Default Server and Home Directory information of this User_Template so that when we create users in the development department, they will be created properly. Leave the Language and default server fields as they are.
Select Volume objectname by pressing <Enter<.
Since we can't remember what the name of the volume is, press <Insert<. The Browser screen appears.
Now let's use the browser to look up the name of the volume object.
Figure 17: Browse for Volume screen.
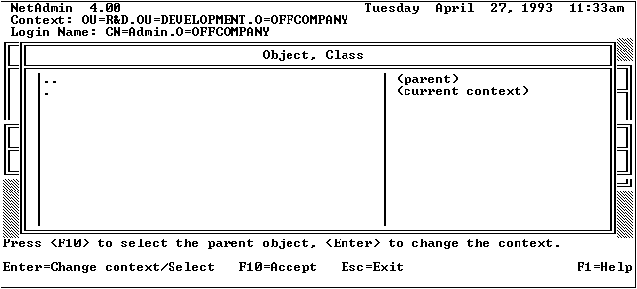
Notice that this screen only lists containers and volume objects. Since we are looking for a volume object, NetAdmin tells the browser to only list containers and Volumes.
Since there are no volumes in this context, move up to OU=Development by pressing <Enter< on the .. (Parent) line.
In our case, the DEV1_SYS volume is the one we want. If it were not the one we wanted, we could continue browsing until we found the one we wanted.
Press <Enter< on Dev1_sys (volume).
Press <Enter< to accept Dev1_sys.
Now we need to set the path on the volume where the home directories will be created. Do not include the login name; it will be added when the user object is created. Do not include the Server/Volume: portion. The volume object name specifies this information for us. We will put our users' home directories in the USERS subdirectory. You could browse for the directory, but in this case we simply type it in.
Press <Enter< on the path on volume.
Notice that the server/volume: prompt has been entered for us. The directory must already exist. (I cheated and set up the USERS directory before beginning NetAdmin.)
Type "No" for create a home directory since we don't want to create a home directory for the User_Template.
Press <F10< to save this information.
Before proceeding to create our users, we need to set some other bits of information. We want the password to be a minimum of 5 characters and to expire every 45 days. We put this information into the User Template so that it can also be copied to all users that are created in this container.
From the View or Edit user screen, select Account Restrictions and press <Enter<.
Select Password restrictions from the Account Restrictions screen, and press <Enter<. A screen similar to that shown in Figure 18 will appear. For those that have run SYSCON before, this screen should look familiar. If you need more information, press the <F1< key.
Figure 18: Password restrictions screen.
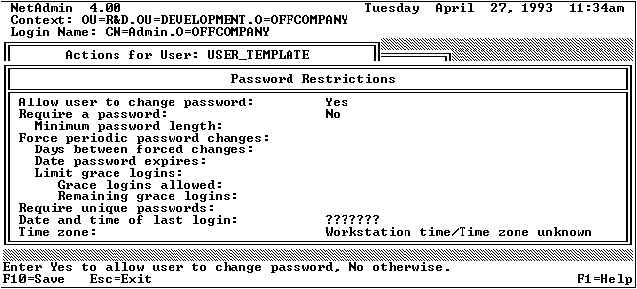
Change Require a password to "Yes".
Change Force periodic password changes to "Yes".
Change Days between forced changes to "45".
Press <F10< to save this information.
Now the User Template object has information that can be copied to all users created in this context. Let's create some users.
Creating Users
Now that we have the User Template object set up the way we want it, it's time to create other objects such as users, groups, organizational roles, and a Directory Map object. Be sure that the users have appropriate rights to the file system and that the Development Manager has all rights to administer his team.
Return to the Browser screen by pressing <Esc< repeatedly.
We are going to add our users using the User Template object as a pattern.
Be sure your context is: OU=R&D.OU=Development.O=OFFCompany,
Press <Insert< to add the first user object.
From the "Select an object class" screen, select User.
Enter the following information at this screen:
Login Name: DMartinez
Last Name: Martinez
Create Home Directory: Yes
Copy    the user template: Yes
Notice that the Home Directory Information is already set for you. The path name is read from the Directory information we saved in the User Template object.
You may have observed that the Login Name can be more than 8 characters in length. It can also include characters that are not valid for DOS file names. There is a special routine that modifies the Login Name when creating home directories. You can remove any invalid characters and shorten it the Login Name, if needed.
Press <F10< to create the user.
The wait screen is displayed while the public and private keys are generated. You may want to exit NetAdmin and verify that the directory Users\Danny was actually created for this user on the DEV1 volume.
Now create the other users in this context, remember to copy the user template and to create the home directories for:
ATateJGordonLBluth
We have now created all of the users in the Development/R&D department. Next let's create an Organizational Role object.
Organizational Role
The development manager is DMartinez. Since each manager receives certain privileges, we are going to create an Organizational Role (OR) for DMartinez. The Organizational Role will be given rights to administer the network. These will be given to the OR rather than giving them directly to Danny. That way when he is promoted we can just move someone else into the role's occupant (membership) list. The new manager will automatically be assigned the same privileges DMartinez had. By the way, more than one individual may be a role occupant, so if you want to have all managers be occupants of an OR, you may do so.
Set your context to OU=R&D.OU=Development.O=OFFCompany.
Press <Insert<.
Select Organizational Role.
Name this OR "Development Manager".
When this object has been created, select the OR from the browser. We are going to add DMartinez to this object's Role Membership property.
Select View or edit properties of this object.
Select Identification Information.
Select Occupant.
Press <Insert< to add an occupant to this organizational role.
An occupant of an Organizational Role is similar to being a member of a Group. Whenever a user is added as an occupant of an Organizational Role, that user becomes security equivalent to the group or Organizational Role.
Browse for DMartinez' object by pressing <Insert< and add DMartinez to the list.
Verification
Now let's verify that the user DMartinez has been set up properly.
Return to the browser.
Select DMartinez.
Select View or Edit user.
Make sure that
Require a password is set to Yes.
Force periodic password is set to Yes.
Days between forced changes is set to 45.
The telephone number is set properly.
Security equal to is set to Development Manager.
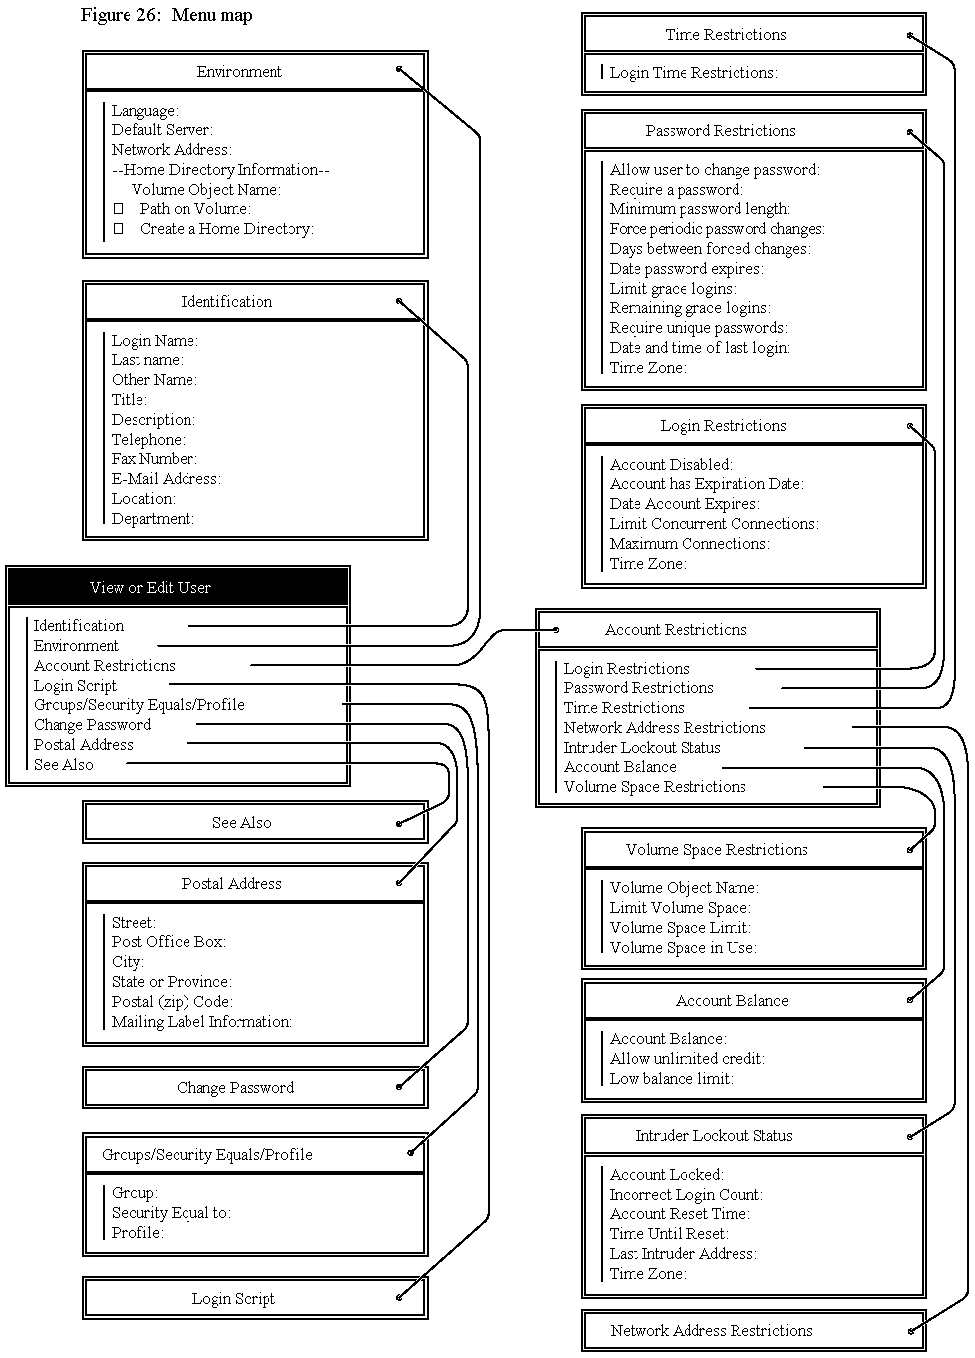
Use the menu map (Figure 26) at the end of this AppNote if you can't remember where this information is located.
Creating Other Users
Now it's your turn. Create the following users in their appropriate containers. Again, remember to copy the user template and to create the home directories.
GCheney.Maintenance.Development.OFFCompany
MDodge.Maintenance.Development.OFFCompany
SJohnson.Marketing.OFFCompany (We put him in the
 Marketing container since he is the manager of
 the department)
BSorenson.International.Marketing.OFFCompany
VLabrum.International.Marketing.OFFCompany
HBond.Domestic.Marketing.OFFCompany
DJones.Domestic.Marketing.OFFCompany
Creating a Group
Now let's create a group for sending out messages to all Development personnel. Let's put this group in the OFFCompany organization.
Set your context to O=OFFCompany.
Create a group called Development Messages.
Select the group object to edit.
Go to the Group Members option on the View or Edit Group screen.
The screen will initially be set to (Empty List).
Press <Insert< twice.
You are now at the browser screen for O=OFFCompany. This screen displays containers and users.
Browse to the OU=R&D.OU=Development.O=OFFCompany container.
Press <F5< to mark each user (ATate, DMartinez, JGordon, LBluth), except the User_Template object.
Press <Enter<.
Notice that the users have been added to the list.
Now add the other employees to the list by pressing <Insert< twice and browsing for the other users to be added to the list.
When you've added all of the users, press <F10< to save the list.
All of these users have now been made security equivalent to the group. Therefore, if you want to give specific rights to this group, all of the members of the group will have the same rights.
Directory Map
The Directory Map object can be a very useful feature. You can create a Directory Map object that points to a path of a widely used application, such as your WordPerfect files. Then when you upgrade versions, you can simply point the Directory Map to another path and everyone that used the Directory Map object in their login script will automatically access the new files. Let's create a Directory Map object.
Set your context to OU=Development.
Press <Insert<.
Select Directory Map object and press <Enter<. The screen in Figure 19 appears.
Figure 19: Creating a Directory Map.

Give it the name of WordPerfect.
Set the volume name to the volume where the WordPerfect files reside: DEV1.
Set the path to path of the WordPerfect files: WP51.
In order for a user to access this directory, just include the following line in the login script of the user, container or profile of any users which need access to this program (the user will need to have Read rights on the WordPerfect object):
Map <drive letter<:=".CN=wordperfect.OU=Development.O=OFFCompany"
This will map you to the WP51 directory. When you upgrade to WordPerfect 5.2, you can simply change the path of the WordPerfect Directory Map object to WP52.
Object Privileges (ACL's)
The final thing we want to cover in this AppNote is how to assign File/Directory and Object rights with the NetAdmin utility. Let's give the Development Manager all rights to the Development container. To do this, complete the following steps.
Use the browser to select the Development Organizational Unit. You may do this in one of three different ways.
If your context is:
OU=R&D.OU=Development.O=OFFCompany select .. (parent)object
If your context is:
OU=Development.O=OFFCompany select . (current context)object
If your context is:
O=OFFCompany select the OU=Developmentobject
Use one of these methods and press the <F10< key. (Not the <Enter< key.)
Now select View or edit the trustees of this object.
At the Trustees of this Object screen, select Trustees. The screen in Figure 20 appears.
Figure 20: Trustee listing screen.
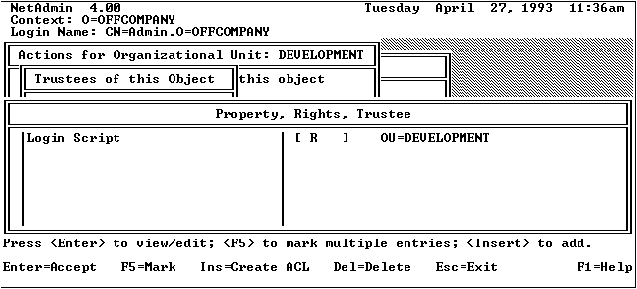
The only trustee assignment for the Development object so far is for the Login Script, the [R]- read, right and it is given to the OU=Development object. Let me explain why this trustee is here. The system login script is stored in the user's parent container. In order for the users to read the system login script, they must have rights to read it. Child objects are considered security equivalent to all of their parents. Therefore, by assigning Read rights to the container object itself, all children objects in this container, will also have the same rights. So by definition, all users in the Development container will be able to read the System login script stored in the Development container's login script. We want to add an additional trustee of this object.
Press the <Insert< key to create an ACL.
Select the property to which we want to assign rights. In this case we want the Development Manager to be a manager of this container. We give the Development Manager Organizational Role all rights to the Access Control List (ACL) itself.
Select the Access Control List (ACL) property and press <Enter<. You are now prompted for the trustee name.
Select the object which will become the trustee of this property by pressing <Insert<. The browser screen appears.
Browse until you findthe Development Manager organizational role and press <Enter< with Development Manager highlighted.
Press <Enter< again to accept Development Manager as the trustee.
By default, the [R]-Read right is given to this trustee.
To grant the trustee all rights, press the <Enter< key on the Access Control List (ACL) line.
Press the <Insert< key again to see the list of Rights disallowed, not yet given. The screen in Figure 21 appears.
Figure 21: Property rights allowed/disallowed.
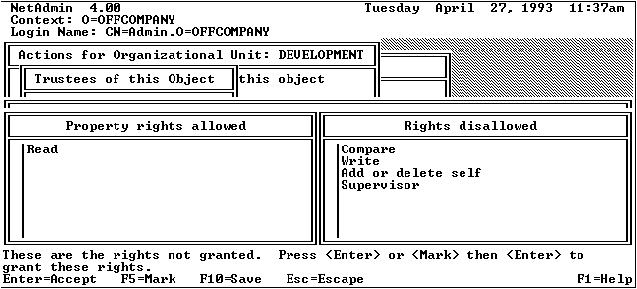
On the left of the screen are the rights that have been assigned to this trustee. On the right are the rights that are not yet allowed. We want to grant all rights to Development Manager.
Use the F5=Mark key to mark all rights on the right and press <Enter<. This operates in the same way that SYSCON operated when assigning file trustee assignments.
Press <F10< to save these rights. You should now see the Rights list of [CRWAS] to the left of Development Manager's name.
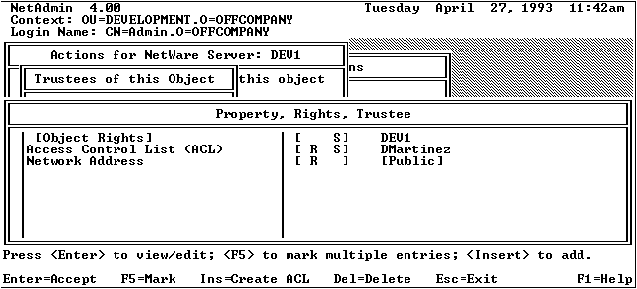
We also want to make the Development Manager "supervisor equivalent" on the development server. This will give him access to the server object and to the physical server. For this we assign the rights directly to DMartinez rather than to his Organizational Role object. Any user that has the Supervisor privilege on the ACL property of a server object is considered a Supervisor on that server. Again, in order to assign someone access privileges to the server object, we select the server object from the browser.
Select the DEV1 (Server)object from the browser.
Select View or edit the trustees of this object.
Select Trusteeand press <Enter<.
Press <Insert< at the next screen.
Notice that the server DEV1 already has two trustee assignments: [Object Rights] [S]for DEV1 and Network Address [R] for [Public]. This means that the server itself has all rights to its own object. The [Public], which is everyone, can read the network address of this server.
Press <Insert< to add a new trustee.
Select the ACLproperty.
Select DMartinez.
Add the Supervisor right. DMartinez is now a supervisor equivalent on server DEV1. The screen in Figure 22 appears.
Figure 22: Trustee listing screen.
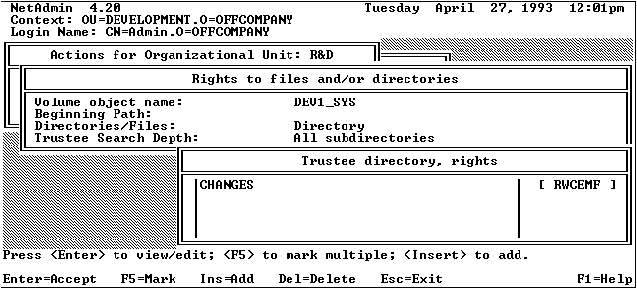
File System Rights
Now we want to give the development personnel rights to their common Changes directory in the root of the DEV1_SYS volume. We will assign all users in the Development R&D department [RF]- Read and File Scan rights to the Changes directory in the root of the DEV1_SYS volume. In order to do so we will select the R&D.Development.OFFCompany object to be the trustee. Since objects in a container are security equivalent to their container, we can give all users in R&D rights to a directory by giving rights to the container object.
Set your context to OU=Development.
Select Organizational Unit: R&D.
Select View or edit rights to files and directories and press <Enter<. The screen in Figure 23 appears.
Figure 23: Setup screen for file rights.
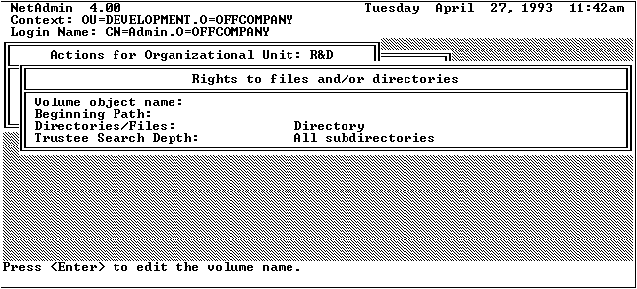
As we proceed, I will explain the fields on the "Rights to files and/or directories" form.
Volume Object Name
This is Directory Services name of the volume to manage. To set this option, press the <Insert< key. The browser will be displayed and you may select which volume to view or edit trustee assignments on.
Select DEV1_SYS.
Beginning Path
This is the where the utility should begin its search for trustees. A blank in this field meansto start the search at the volume root. If you want to change this option, you may press the <Insert< key which will bring up the file system browser. We want to see all trustee assignments for the Development Department beginning at the root of the volume.
Leave this field blank.
Directories/Fill
This option tells the utility to include directories, files, or both in the search for trustees. We want to view trustees of Directories only.
Leave this option set at Directories.
Trustee Search Depth
This option allows you to limit the depth of the search on the volume. You can select to search for trustees in the current directory only or to search all subdirectories beginning at the directory specified in the Beginning path field. We will want to search all subdirectories, therefore, we will not need to change this option.
Leave this option set at Subdirectories.
After all fields on the "Rights to files and/or directories" form are set, Press the <F10< key to bring up the list of trustee assignments for this user on this volume. The screen in Figure 24 appears.
Figure 24: File trustee listing screen.
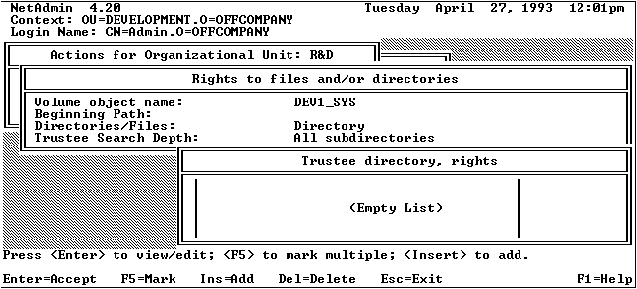
A list of trustee assignments will be displayed. This list will include the trustee assignment list for the selected object on:
The selected volume
Starting at the beginning path
For all directories only, files only, or both
If there are no trustee assignments for this object, (Empty List) will display. In our case, R&D has not been assigned as a trustee to any directories on the volume yet.
Press the <Insert< key to select the directory where we want R&D to be assigned as a trustee.
Since the Beginning Path entered previously was only used for the initial search, we need to specify the exact directory where we want the trustee assignment to be made. In our case let's select the Changes directory. We can use the browser to locate the Changes directory or we can type the path \Changes here.
Type "\Changes" and press <F10<.
R&D has now been assigned the default rights of [RF]-Read and File Scan to the Changes directory.
To assign all rights, press the <Enter< key to select this directory. You can add the other rights in the same manner as you added object trustees.
Press <Insert< to add a new right.
Press <F5< to mark the rights you want to add.
Press <Enter< to move them from the Not Granted screen to the Granted screen.
Press <F10< to save the changes.
Figure 25: File trustee listing screen.
Multiple directory or file trustee assignments may be modified by marking them and pressing <Enter<. Whatever the rights were for those trustee assignments will be overwritten with the new rights. The default for setting rights to multiple files or directories is All rights. If you do not want to assign All rights to a group of files or directories, remove some of the rights from the default list, then go back to the directories/files list with <F10<, and then confirm the changes.
Summary
The new NetAdmin utility should make network setup and management considerably easier. Now that you know more about the NetAdmin utility and how it works, you can complete the following administrative tasks on a NetWare 4.0 network.
Setting up a Directory tree
Creating Organizational Units
Setting up user templates
Creating Users
Creating an Organizational Role
Creating a Group
Creating a Directory Map
Granting File System rights
Granting Directory Service object rights
If you were previously acquainted with SYSCON, many of the procedures we used should have been familiar. We have tried to maintain many of the same keystrokes that were used with SYSCON. I hope that this tutorial, whether or not you were able to actually follow the keystrokes, has been useful in acquainting you with the new features. This information should help you as you begin installing 4.0 Directory Services.
Figure 26: Menu map.
* Originally published in Novell AppNotes
Disclaimer
The origin of this information may be internal or external to Novell. While Novell makes all reasonable efforts to verify this information, Novell does not make explicit or implied claims to its validity.