Planning a NetWare 4.0 Directory Tree
Articles and Tips: article
Senior Technical Editor
Systems Research
01 Apr 1993
This AppNote provides information on how to plan and implement a NetWare 4.0 Directory tree. It provides a set of guidelines for setting up a Directory tree as well as detailed sections on setting up a small, medium, and large Directory tree.
- Introduction
- Guidelines for Planning a Directory Tree
- Planning a Directory Tree for a Small Network
- Planning a Directory Tree for a Medium-Sized Network
- Planning a Directory Tree for a Large Network
- Example of an NDS Naming Standards Document
Introduction
One of the most critical parts of preparing for a NetWare 4.0 installation or upgrade is the planning and setup of the Directory tree. The structure of the Directory tree can affect your network's security, auditing, and access to shared resources. Careful planning of your Directory tree is crucial if you want to take full advantage of NetWare 4.0's features and performance.
Planning and implementing the Directory tree is much more involved than simply adding users and other objects to the bindery in prior versions of NetWare. The actual process of setting up the tree is not difficult, but again, planning is critical. When the Directory is planned properly, you are rewarded with greatly enhanced network management capabilities.
This AppNote provides guidelines to use in planning your Directory tree. To cover the differing needs of small, medium-sized, and large networks, we present separate sections for each. Before implementing your Directory tree, you should consider all the information provided here, as well as any specific network needs or problems that are not covered here.
Guidelines for Planning a Directory Tree
You need to plan your Directory tree to:
Make it easy for users to access information (such as network resources).
Provide Directory fault tolerance for the network.
Decrease unnecessary network traffic.
Simplify network administration and maintenance.
This section presents some guidelines you can use to help you plan your own NDS Directory tree.
Important: There is no one "right" way to design a Directory tree. There are ways that are less efficient than others, and there are ways that are extremely efficient. Each network has different requirements. You might want to consider designing your Directory tree several ways, and then analyzing the various designs to decide on the one that best suits your network's needs.
Each of the following items is cross-referenced to different sections in this AppNote and others. Read the specified sections for more detailed information.
If you are upgrading from a previous version of NetWare, you must first prepare the binderies.
For help in developing an upgrade strategy, see the "Planning for NetWare 4.0 Installation, Server Migration, and Coexistence" AppNote in this issue.
Create a NetWare Directory Services "Naming Standards" document.
This document should detail the conventions you will use for naming Directory objects (Users, Printers, Servers, and so on). It should also specify what property values (telephone numbers, addresses, and so on) you will use for the objects. It is important that object and property naming be consistent throughout the network. We recommend that you distributethis document to all network supervisors responsible for adding, modifying, or moving objects in any part of the tree.
See "Examples of an NDS Naming Standards Document" at the end of this AppNote.
Develop the Directory tree based on the logical structure of your company.
The Directory structure can be based on your company's organization chart, its physical locations, or on functions within the company. A tree designed to follow the functions within the company is often the most useful. For some companies, planning the Directory structure may be as easy as setting it up according to organizational charts. However,larger companies need to consider the corporate structure at the division (or subsidiary) level, at the department level, or even at the workgroup level.
While the corporate organizational structure is an important consideration, so are such things as physical location of users and resources, and the way people work. To gather the information necessary to design the most efficient Directory structure for your company, you should consult with division managers, department heads, workgroup supervisors, and your Information Systems department (or their equivalents). With their input, you should be able to design a Directory tree that best fits the needs of your company and users.
Whichever structure you choose for your Directory tree, require all network supervisors to use the same physical and logical maps of the company. This will ensure uniformity throughout the Directory tree and will make management much easier.
See "Planning the Top Levels of the Directory Tree" in the section of this AppNote which corresponds to your network size.
Determine how to best use specific NDS objects and properties to organize your Directory tree.
The easiest way to plan and design a Directory tree is from the top level down. Once this is done, proceed down the tree one level at a time. You can have numerous levels in the Directory structure. For ease of network management and to keep performance high, we recommend that you use no more than four levels in your Directory tree. More levels can be used, but this leads to more complex management and possibly a decrease in network performance.
See "Planning the Structure of the Directory Tree" in the section of this AppNote which corresponds to your network size.
Plan for adequate and well distributed replication of the partitions.
Divide the Directory database into partitions based on logical boundaries and then replicate the partitions where you want to reduce traffic going over a WAN link. Also, carefully consider placement of replicas to provide fault tolerance for the Directory database.
See "Distributing Partitions" in the section of this AppNote which corresponds to your network size.
Plan NDS time synchronization.
This step includes coordinating which servers to designate as time source servers and deciding which type of time servers the specified servers will be (Secondary, Primary, Reference, or Single Reference).
See "Network Time Synchronization" in the "Introduction to NetWare Directory Services" AppNote in this issue.
Decide how to set up security for the tree.
You have several options for providing security for different parts of the tree. You can even use the design of the tree to implement security for containers and the objects in those containers.
See the "Understanding NetWare Directory Services Rights" AppNote in this issue.
While there are some tools provided with NetWare 4.0 to modify your Directory tree, the best thing to do is to plan properly and set it up right the first time. Planning the Directory tree may not be totally painless, but it can pay big dividends in network management capabilities. Using these guidelines should make this task easier.
Refer to this material often as you design your tree. You may have to read it several times to become familiar enough with the new concepts. Also, refer to the NetWare 4.0 Documentation when installing or configuring your system. This simple step can avoid a lot of frustration and unnecessary support calls.
Good luck planning your tree!
Planning a Directory Tree for a Small Network
If your network meets the following criteria, read this section for ideas and hints on planning a Directory tree for a small network:
Up to 5 servers
No more than 100 users
All servers and users are on the same local area network
The Directory defaults in the installation program will help you set up a small Directory tree with very little planning. The default setup will probably suffice for small installations with only a few servers and under 100 users and resources.
When you choose the Directory defaults in the NetWare installation program, NetWare provides some default leaf objects (such as User object Admin), as well as Directory partitions, network time synchronization, and bindery emulation. You can probably get by with such an installation. However, to take full advantage of all the Directory features, we recommend that you still fully plan and implement a Directory tree that will meet all your needs.
We recommend that you create only one Directory tree for your company rather than creating several separate trees. Having a single tree lets you take advantage of the global features of NetWare 4.0 and NDS. You can then use the NetWare 4.0 security features to control access to any part of the Directory tree. This is easier than having separate trees for resources you want to deny or limit access to.
Important: You cannot share Directory data across trees. Each Directory tree has its own database of objects that is not visible from any other tree. Consider this carefully if you are thinking of creating more than one Directory tree. We recommend you use only one Directory tree for your entire company (or network, if spanning more than one company).
Planning the Top Levels of a Small Tree
The top level is the most important level of the Directory tree, as all other levels branch off from it. Carefully consider what the best top level should be for your entire network. Regardless of your company size, we recommend that you make the top level of the Directory tree consistent network-wide, and then allow network supervisors to create their own parts of the tree at the lower levels.
If you plan to have centralized management of the Directory, we recommend that you use no more than four levels in your tree. With four levels, the longest a user's complete name would ever be is USERNAME.OU.OU.OU.O. This is the management scheme recommended for small Directory trees.
NDS will support arbitrary tree depths, but it is important to remember that each level you add to the tree can increase the length of the user's context. The shorter you keep users' contexts, the less problems users will have remembering them.
Note: [Root] does not add a level to the Directory tree because it is not a part of an object's context.
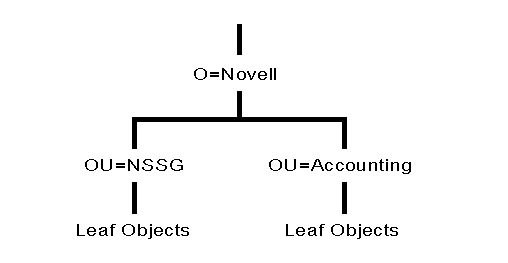
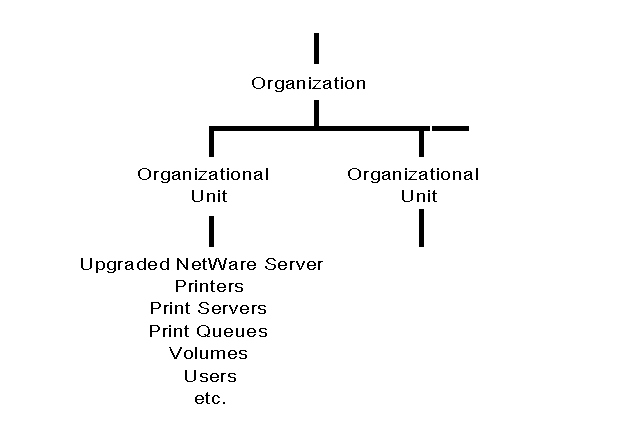
Figure 1 shows an example of a small tree with two levels. This tree uses Organization as the top level. Two Organizational Units branching off from that contain all the leaf objects in the database.
Figure 1: Example of a small Directory tree with two levels.
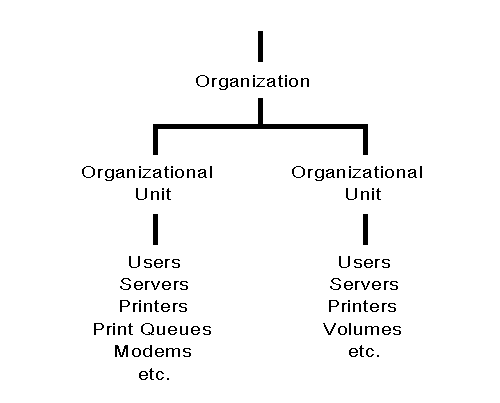
You can keep a Directory tree simple by using one Organization object and just a few Organizational Unit objects to contain all your Directory objects (such as resources and users). By starting out simple like this, you can easily expand the tree as the need arises without having to redesign a completely new Directory tree.
Important: You must use at least one Organization container in your Directory tree. Organizational Units are optional.
As your network grows, you can install new NetWare 4.0 servers and add more Organization and Organizational Unit objects to your Directory tree as needed.
Planning the Structure of a Small Tree
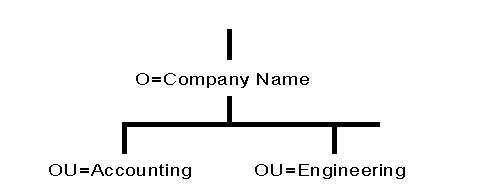
One way to set up your Directory tree is to follow the organization chart for your company. For example, you can designate your company as the Organization (O) object, and then designate the departments or groups within the company as Organizational Unit (OU) objects.
This scheme works well for small Directory trees and may be the method you prefer. An advantage of using the organization chart structure for a small Directory tree is that most people in your company are probably familiar with the organization of the company and thus will remember their context easier. They will also be able to move around the Directory tree more easily.
Figure 2 shows an example of a small Directory tree which uses the company's organization chart as the model for the Directory tree structure.
Figure 2: Example of a small Directory tree using a company organizational chart for structure.
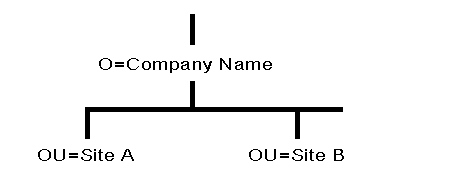
You can also designate geographic locations as Organizational Units. Using a geographic structure can be an advantage in that it allows the users to "see" where objects are physically located. However, if users or other resources are moved between locations frequently, their contexts can change dramatically even though the organization does not. We recommend this option not be used for small Directory trees unless there is a special need that mandates that this be used.
However, if users and resources remain static in the geographic structure, this option provides a stable structure for your Directory tree. Consider the pros and cons carefully before using a geographic structure for a small Directory tree.
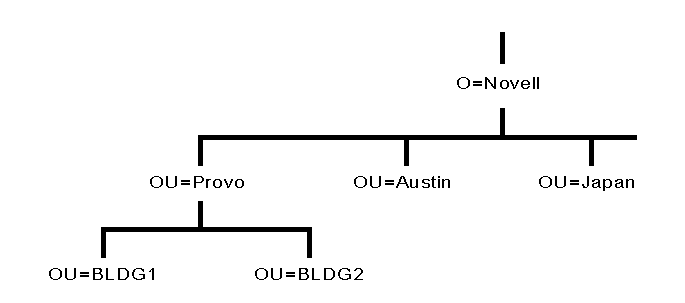
Figure 3 shows an example of a small Directory tree using the geographic structure with different locations designated as Organizational Units (OU).
Figure 3: Example of a small Directory tree using geographic structure as Organizational Units.
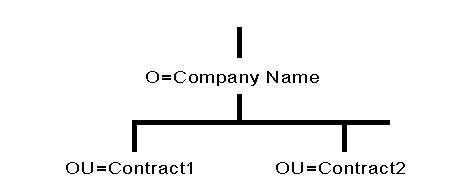
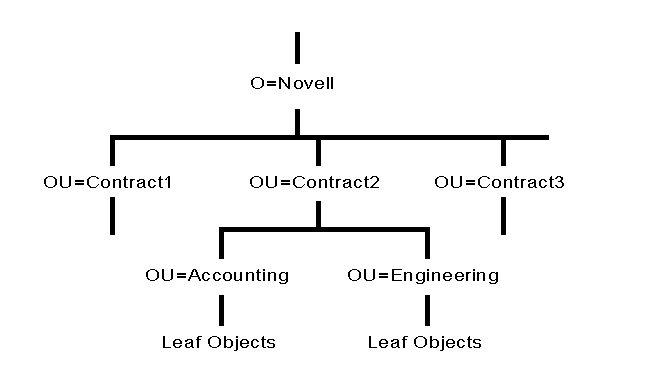
If users or groups of users perform the same functions in your company, another option you might want to consider is organizing your Directory tree by function. For example, if you have several development teams and each development team works on a different contract, you could set up the contract teams as Organizational Units (see Figure 4).
Figure 4: Example of a small Directory tree using different contract units as Organizational Units.
Organizational Units do not all have to be the same type. You can designate a workgroup as one Organizational Unit, a project as another Organizational Unit, and a department as a third type of Organizational Unit. Having different kinds of Organizational Units can help network supervisors customize the Directory tree for their particular needs. This flexibility is available so that departments or groups can customize the Directory tree to their advantage.
Remember to choose the type of Directory organization that is not going to change frequently. This reduces necessary administrative tasks on your Directory tree. Also remember to keep the number of levels in the Directory tree to a minimum.
Keep your Directory tree as simple as is workable for you. Unnecessary complexity can cause future administrative headaches.
Placing Objects in the Tree
Container objects and their contents should be defined by workgroups, shared resources, and information usage and exchange. This means that leaf objects representing resources used by a single group should be placed in the same container (preferably the same container as the group members are in).
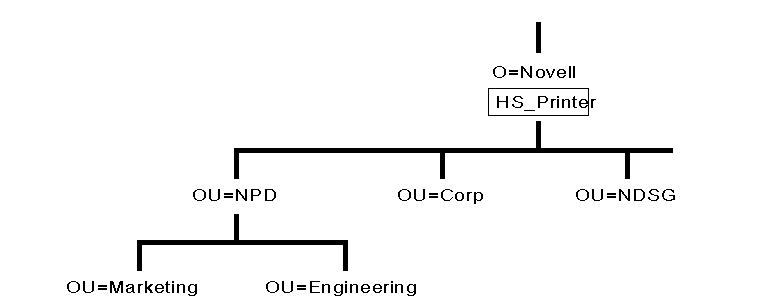
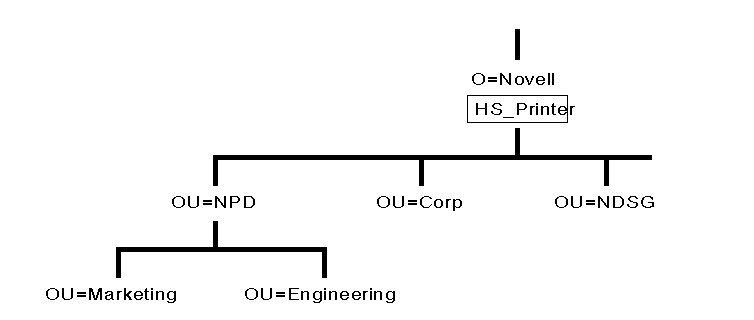
Design your Directory tree so that the company has shared access to resources. For example, if your company has one high- speed printer that everyone needs access to, place the Printer object for that printer in a container that is above the containers where the User objects are placed. This allows you to easily assign rights to the lower containers that allow everyone in those lower containers to access the Printer object. It is easier to grant rights at the container level than to grant everyone individual access rights to a particular object (see Figure 5).
Figure 5: Example of placing a shared-resource to grant easy access to everyone.
Important: You can always add, delete, or move leaf objects after you have installed your Directory tree. This allows you a degree of flexibility if something doesn't work out right at first. The best implementation is still to plan ahead and avoid having to make changes later.
Placing Objects in Container Objects
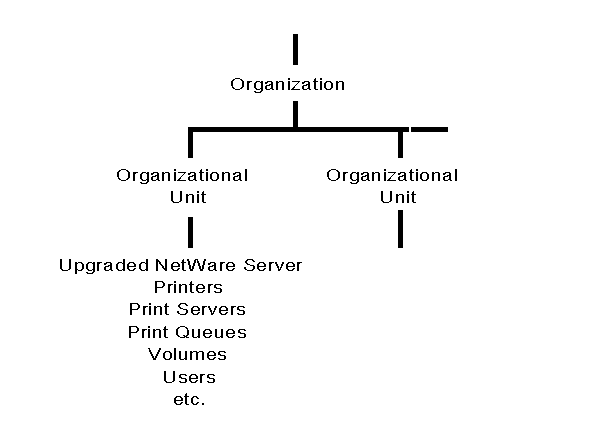
In Organization (O) or Organizational Unit (OU) objects, you can create the following container and leaf objects:
Container Objects
Organizational Unit
Leaf Objects
|
AFP Server |
Printer |
|
Alias |
Print Queue |
|
Computer |
Print Server |
|
Directory Map |
Profile |
|
Group |
User |
|
NetWare Server |
Volume |
|
Organizational Role |
For definitions and explanations of these container and leaf objects, see the "Container Object" and "Leaf Object" sections of the "Introduction to NetWare 4.0 Directory Services" AppNote in this issue.
Carefully consider how you place User objects into containers. In most cases, you should create User objects only in the container where they will typically log in.
Important: Having duplicate User objects for the same person will cause problems with network administration, rights, and contexts. In a strictly NDS-based NetWare 4.0 network, it is neither necessary nor in any way advantageous. If you are using bindery emulation and have users that must access servers in different contexts, plan carefully to avoid as much User object duplication as possible.
An example of using a leaf object to manage your tree would be the leaf object Alias. Alias can be used to represent a resource (such as a high-speed modem) that most users in the tree need to access. By placing an Alias for the object at the top of the tree, the Alias can provide a short name that is easy for all the users to remember. Perhaps the name the Alias provides would be HSMODEM.NOVELL. Without the Alias, the full name of the modem could be HSMODEM.SALES.CONTRACT1.NOVELL.
Standardizing Object Names. Use standardized naming of objects and object properties in order to exploit the Directory to its fullest. If you name objects and their properties in a consistent manner, browsing and searching in the Directory will be easier and more precise.
Default Leaf Objects. If you are installing NetWare 4.0 on a new server, the following leaf objects are automatically created for you and placed in the same Organization or Organizational Unit where you have placed the server:
NetWare Server object
Volume object SYS
Volume objects for other volumes (besides SYS) on the server
User object Admin. This object is created on the first server installed in a new tree (and always under the first Organization object) so you can log in for the first time and begin creating objects.
User object SUPERVISOR (used for bindery emulation purposes only). This object is recognized only by pre-NetWare 4.0 utilities. User SUPERVISOR initially has the same password as User Admin.
Leaf Objects from an Upgraded Server. When you upgrade a server to NetWare 4.0 (from a previous version of NetWare), you automatically place the Server object in a container object.
In addition to the default leaf objects listed previously, all the objects that were in that server's bindery are also placed in the same container object with the Server object. Figure 6 shows an upgraded server and its upgraded bindery objects placed in a Directory tree in an Organizational Unit object.
Figure 6: Example of a NetWare bindery server upgraded to NetWare 4.0.
Installing a Server into an Existing Directory Tree
When you install NetWare 4.0 on a server, you can add that server to an existing Directory tree by specifying the tree name. Then you can choose to do one of the following:
Place the Server object in an existing context (in an existing container object in the tree). This would be logical if you were adding a new server to a pre-existing workgroup, department, etc., that is adding a resource rather than a whole new part to the tree.
or
Create the new Server and Volume objects in a new context by creating a new container object. This is the process to use if you are adding a new branch to the tree such as a new division, department, workgroup, etc., that will add a new container to the tree (no matter at what level).
Using Default Directory Partitions
The NetWare 4.0 installation program creates default Directory partitions of the Directory tree for you. Each new container object where you install a NetWare 4.0 Server object is designated as a default partition by the installation program. The [Root] object is included in the partition that is created with the very first container object where you install a NetWare 4.0 server.
Figure 7 shows the default partitions (indicated by shading) in a sample small Directory tree. Each default partition has a Server object installed in a new context.
Figure 7: Example of default partitions created for new container objects.
The NetWare 4.0 installation program also places a Master replica of the Directory partition on the first server installed in a container object. All subsequent servers installed in a container object receive a Read/Write replica of the Directory partition.
The installation program automatically sets the server's bindery context at the container object level where the server is installed. The Read/Write replicas placed on the server by the installation program are necessary for bindery emulation to be enabled.
You can use the default Directory partitions and replicas created by the installation program (defaults), or you can use the Partition Manager Tool (GUI utility) or the PARTMGR (text utility) to change the partitions and replicas after the tree is created.
During the installation process, be aware of how default partitioning, replication, and bindery emulation occur. If you are using an Organization object without any Organizational Units, the Organization is designated as the default partition.
Important: We recommend that until you understand the impact of partitioning, replication, and bindery emulation, you use the defaults provided by the installation program. Remember, you can change these at a later date.
Distributing Partitions
NDS partition replicas serve two purposes:
To minimize the risk of any single point of failure for the Directory.
To provide faster access to information for servers that are physically distant from the Master replica (usually this is across a WAN link).
On most small networks, you probably do not need to provide users access to information across a WAN link. Thus your main concern is to provide fault tolerance for the Directory database so there is no single point of failure on the network. This can be accomplished by storing replicas of Directory partitions on different servers.
Remember, a Master replica is automatically placed on the first server installed in a container object with all subsequent servers added to that container receiving a Read/Write replica.
Any time you install more than one server in a container object, you have Directory fault tolerance (provided by default). However, you should consider storing one copy of each Directory partition on an off-site server for disaster-recovery purposes.
Be sure that after you complete the server installation that your partition is replicated as you expected. If this does not happen, make sure your partition is replicated and placed manually.
Important: You must have at least two replicas of every Directory partition on the network. If for some reason you lose a partition and do not have a replica of that partition, you may permanently lose access to a part of your Directory tree. We recommend that you have three copies of each Directory partition on your network (in addition to any off-site replicas). We also recommend that you place no more than five replicas on any one server in a small network.
If a replica becomes very large, you can use utilities (included in NetWare 4.0) to split the partition. For more information on these utilities and the necessary process, see the NetWare 4.0 Documentation set.
Important: Replication of the Directory only provides fault tolerance for the Directory database, not for the file system. To provide file system fault tolerance, you must mirror or duplex your server's hard disks and enable the Transaction Tracking System (note that TTS must be enabled for NDS to work as well). For more information on file system fault tolerance, refer to the NetWare 4.0 Documentation.
Planning Network Time Synchronization
As explained previously, time synchronization is an important consideration in setting up a network that will use NDS. NetWare 4.0 offers four types of time servers:
A Secondary Time Server (STS) obtains the time from a Single Reference, Reference, or Primary time server and provides time to clients.
A Primary Time Server (PTS) synchronizes network time with at least one other Primary or Reference time server, and provides time to Secondary time servers and clients.
A Reference Time Server (RTS) provides a time to which all other servers and clients synchronize.
A Single Reference Time Server (SRTS) provides time to Secondary time servers and clients.
Primary, Reference, and Single Reference time servers are all time source servers because they provide time to the network. Secondary time servers do not provide time to the network; they only receive the time from a time source server and pass the received time along to clients.
Recommended Configuration. For easier management and better performance on a small network, we recommend that you use a Single Reference time server with Secondary time servers (unless circumstances dictate otherwise). This is the default when you install NetWare 4.0.
By default, Secondary time servers use the Service Advertising Protocol (SAP) to contact a time source server. You should not place Secondary time servers more than one hop away from the time source server (Single Reference time server). We recommend direct connections (no intervening routers or slow LAN segments), if possible.
Secondary time servers can contact other Secondary time servers to get the time, but this adds one more level of potential synchronization error.
Figure 8 shows an example of the recommended time synchronization setup for a small network, using Single Reference and Secondary time servers.
Figure 8: Example of a small network using Single Reference and Secondary time servers (default configuration). network using Single Reference and Secondary
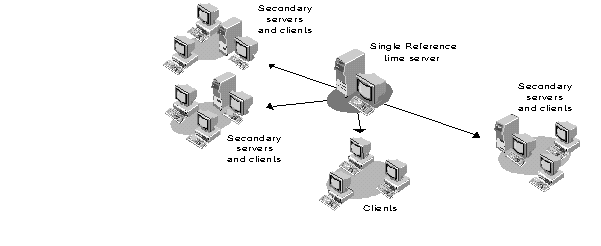
Important: Because the Single Reference Time Server is the sole source of time on the network it is installed on, all other servers on the network must be able to contact it.
When a Single Reference Time Server is used, you cannot have any Reference or Primary time servers on the network.
Alternate Configurations. Your network circumstances may dictate the need for a time synchronization setup other than the default described above. If you decide not to use a Single Reference time server, use Reference and Primary time servers.
We recommend only one Reference time server on a small network. However, because the Reference time server must poll at least one other time server, you must also install one of the following on the same network:
A Primary time server (recommended)
Another Reference time server
If you have more than one Reference server on the network, each must be synchronized through an external time source. To use an external time source, you must turn the hardware clock option off on the Reference server during the installation process. Server synchronization from external sources can be accomplished through the use of various third-party products.
There is usually no need for Primary time servers on small networks. If you do use Primary time servers on a small network, you must have at least one other Primary time server or a Reference time server that the Primary time server can contact for synchronization.
Also, be aware that when Reference and Primary servers are used, they must all be able to see each other. Secondary servers must always be able to see at least one time source (Primary, Reference, or Single Reference time server).
Once you decide on a specific plan for your network time synchronization, provide the plan to all the local network supervisors who will install NetWare 4.0 on servers within the network. They can then assign the correct time synchronization function to each server they install.
When to Use the Custom Configuration Method. By default, time servers use the SAP method to find and choose a time server to synchronize network time. This allows for quick installation without regard to the network layout. It also allows quick reconfiguration if operating modes are changed or if new time servers are added to the network.
The SAP method does generate additional network traffic, but this usually isn't a problem in small networks as the traffic generated should be minimal.
In an environment where time source servers may come and go (such as in a test lab), use of the SAP method may cause the time to be disrupted.
Important: Bringing up a time source server in this environment can cause problems if you do not carefully set the server time. Never set a time source server's time to a future time. If anything, set the server's clock a minute or two behind the network synchronized time. If you do set a new time source server to a time in the future, no updates made on your network will be accepted. This can cause major problems. Using the Custom Configuration method provides some protection against this situation accidentally taking place.
The custom configuration method for time synchronization allows you to assign specific time source servers that a particular server should contact. It also allows you to specify that a server should not listen for SAP information from other time source servers, nor should it advertise its presence using SAP. This eliminates nonessential network SAP traffic, as well as errors associated with accidental reconfiguration.
Using custom configuration allows the network administrator to maintain complete control of the network time synchronization environment. However, it requires more time for planning and installation. It is also more difficult to install or remove Primary, Reference, or Single Reference time servers from the network. Using this method, you must manually change the approved server list maintained on each server each time a new time source server is added to the network. (This does give you a measure of protection against accidental synchronization with a new server that has an incorrect future time set.)
We recommend you use the custom configuration on small networks subject to frequent reconfiguration during which servers are added or removed. If you anticipate steady or rapid network growth, consider using the custom configuration method for your time synchronization to avoid growth pains in the future. This will allow you better control of network time synchronization in the future, as well as a better handle on future network performance.
Remember that whenever you add or remove a time source that uses the custom configuration (Primary, Reference, or Single Reference time server) the configuration list on that server and all other time source servers must be updated. Time sources must always know about all other time sources.
You can use both the SAP and custom configuration methods on the same network. Be aware that the custom configuration information stored on a server always takes precedence over any SAP information received by the server.
Controlling Access to the Directory Tree
When you plan your Directory tree, carefully decide how you want to control access to objects in the tree. You can control access by using the hierarchy of the tree itself because of the way rights flow down through the tree.
You can also control access to any part of the tree by creating an Inherited Rights Filter (IRF) to limit rights to the object at that level.
For example, if a user has rights to change information about the container object at the Organization level, those rights can be filtered (using the IRF) at the Organizational Unit level so that the user has no rights to the Organizational Unit or any object contained in it.
Default Security on a New Directory Tree. The User object Admin, created during installation, receives a trustee assignment that grants it the Supervisor object right to the [Root] object of the Directory tree. As a result, the User object Admin has the following rights:
All rights to all objects and properties in the Directory tree.
The Supervisor object right to the NetWare Server object; this also gives Admin the Supervisor right to the root directory of all volumes attached to the server.
In addition, the following rights are granted by default:
[Public] has the Browse object right to the [Root] object. This means that all users can browse the entire Directory tree. [Public] is the bindery equivalent of attached but not logged in.
The SYS Volume object's container object is granted Read and File Scan rights to the volume's SYS:PUBLIC file system directory. This means that when users are created in that container they can access all utilities located in the SYS:PUBLIC directory.
Users are granted Read rights to all attributes and Write rights to their login scripts.
The [Root] object can also be a trustee. If you make the [Root] object a trustee of another object, then every object in the tree has the same rights as the [Root] object by ancestor inheritance. This means all users are security equivalent to [Root]. Give careful consideration before making the [Root] object a trustee of another object.
Important: The [Root] object of a Directory tree should not be confused with the root directory in the file system. The root directory in the file system is the first directory on a volume, and has no relation to the [Root] object of a Directory tree.
Additional Security. Adding additional security to the Directory is a very critical concern. You can further control access to objects within the tree and add additional security using the methods listed below:
Grant trustee assignments to any object for any other object.
Create Group objects to give groups of users limited or unlimited access to particular objects in the Directory tree.
Create an Inherited Rights Filter (IRF) for an object to limit access to that object.
Make a User object the security equivalent to any other object(s) to allow access.
For more detailed information on Directory rights, see the "Understanding NetWare Directory Services Rights" AppNote in this issue.
Planning a Directory Tree for a Medium-Sized Network
A medium-sized network (10-100 servers) requires more planning for your Directory tree than a small network does. If your network meets the following criteria, read this section for ideas and hints on planning a medium-sized Directory tree:
From 6 up to 100 servers
No more than 2000 users
When you choose the Directory defaults in the NetWare installation program, NetWare provides some leaf objects (such as User object Admin), as well as Directory partitions, network time synchronization, and bindery emulation. While you could get by with these defaults for a medium-sized network, you will probably want to plan and customize your Directory tree for better performance, fault tolerance, and ease of use.
We recommend that you create only one Directory tree in your company rather than creating several separate trees. Having a single tree lets you take advantage of the global features of NetWare 4.0 and NDS. You can then use the NetWare 4.0 security features to control access to any part of the Directory tree. This is easier than having separate trees for resources you want to deny or limit access to.
Important: You cannot share Directory data across trees. Each Directory tree has its own database of objects that is not visible from any other tree. Consider this carefully if you are thinking of creating more than one Directory tree. We recommend you use only one Directory tree for your entire company (or network, if spanning more than one company).
Planning the Top Levels of a Medium-Sized Tree
The top level is the most important level of the Directory tree, as all other levels branch off from it. Carefully consider what the best top level would be for your entire network. Each site in your organization that installs NetWare Directory Services (NDS) may have special needs that must be accommodated. For this reason, you may want to plan only the top levels of your Directory tree and than assign individual sites the responsibility for creating and administering their parts of the tree. If this is your situation, we recommend that you write up specific guidelines for each of the individual sites to follow to maintain consistency across your entire network.
If you plan to have centralized management of the Directory, we recommend that you use no more than four levels in your tree. With four levels, the longest a user's context would ever be is USERNAME.OU.OU.OU.O. This is the management scheme recommended for medium-sized Directory trees.
NDS will support arbitrary tree depths, but it is important to remember that each level you add to the tree increases the length of the user's context. The shorter you keep users' contexts, the less problems users will have remembering them.
Note: [Root] does not add a level to the Directory tree because it is not a part of an object's context.
Figure 9 shows an example of a medium-sized tree with two levels. This tree uses Organization as the top level. Two Organizational Units branching off from that object contain all the leaf objects in the database.
Figure 9: Example of a medium-sized Directory tree with two levels.
You can keep a Directory tree simple by keeping the number of Organization objects to a minimum. Each Organization object can contain one or two Organizational Unit objects to hold all of your Directory objects (such as resources and users). By starting out simple like this, you can easily expand the tree as the need arises without having to redesign a completely new Directory tree.
Important: You must use at least one Organization container in your Directory tree. Organizational Units are optional.
As your network grows, you can install new NetWare 4.0 servers and add more Organization and Organizational Unit objects to your Directory tree.
Planning the Structure of a Medium-Sized Tree
One way to set up your Directory tree is to follow the organization chart for your company. For example, you can designate your company's divisions as Organization objects (O), and then designate the departments or groups within the divisions as Organizational Unit objects (OU).
This scheme can work well for medium-sized Directory trees and may be the method you prefer. An advantage of using the organization chart structure is that most people in the divisions of your company are probably familiar with the organization within their division and thus will remember their context easier. They will also be able to move around the Directory tree more easily.
Figure 10 shows an example of a medium-sized Directory tree which uses the company's organization chart as the model for the Directory structure.
Figure 10: Example of a medium-sized Directory tree based on a company's organization chart.

You can also designate geographic locations as Organizational Units. Using a geographic structure can be an advantage in that it allows the users to "see" where objects are physically located. However, if users or other resources are moved between locations frequently, their contexts can change dramatically even though the organization did not. We recommend this option not be used for medium-sized Directory trees unless there is a special need that mandates that this be used.
However, if users and resources remain static in the geographic structure, this option provides a stable structure for your Directory tree. Consider the pros and cons carefully before using a geographic structure for a medium-sized Directory tree.
Figure 11 shows an example of a medium-sized Directory tree using the geographic structure with different locations designated as Organizational Units (OU).
Figure 11: Example of a medium-sized Directory tree using geographic structure as Organizational Units.
If users or groups of users perform the same functions in your company, another option you might want to consider is organizing your Directory tree by function. For example, if you have several development teams and each development team is working on a different contract, you could set up the contract teams as Organizational Units (see Figure 12).
Figure 12: Example of a medium-sized Directory tree using different contract units as Organizational Units.
Organizational Units do not all have to be of the same type. You can designate a workgroup as one Organizational Unit, a project as another Organizational Unit, and a department as a third type of Organizational Unit. Having different kinds of Organizational Units can help network supervisors customize the Directory tree for their particular needs. This flexibility is available so that departments or groups can customize the Directory tree to their advantage.
Remember to choose the type of organization that is not going to change frequently. This reduces necessary administrative tasks on your Directory tree. Also remember to keep the number of levels in the Directory tree to a minimum.
Keep your Directory tree as simple as is workable for you. Unnecessary complexity can cause future administrative headaches.
Placing Objects in the Tree
Container objects and their contents should be defined by workgroups, shared resources, and information usage and exchange. This means that leaf objects representing resources used by a single group should be placed in the same container (preferably the same container as the group members are in).
Design your Directory tree so that the company has shared access to resources. For example, if your company has one high- speed printer that everyone needs access to, place the Printer object for that printer in a container that is above the containers where the User objects are placed. This allows you to easily assign rights to the lower containers that allow everyone in those lower containers to access the Printer object. It is easier to grant rights at the container level than to grant everyone individual access rights to a particular object (see Figure 13).
Figure 13: Example of placing a shared-resource to grant easy access to everyone.
Important: You can always add, delete, or move leaf objects after you have installed your Directory tree. This allows you a degree of flexibility if something doesn't work out right at first. The best implementation is still to plan ahead and avoid having to make changes later.
Placing Objects in Container Objects
In Organization (O) or Organizational Unit (OU) objects, you can create the following container and leaf objects:
Container Objects
Organizational Unit
Leaf Objects
|
AFP Server |
Printer |
|
Alias |
Print Queue |
|
Computer |
Print Server |
|
Directory Map |
Profile |
|
Group |
User |
|
NetWare Server |
Volume |
|
Organizational Role |
For more information on these container and leaf objects, see the "Container Object" and "Leaf Object" sections of the "Introduction to NetWare 4.0 Directory Services" AppNote in this issue.
Carefully consider how you place User objects into containers. In most cases, you should create User objects only in the container where they will typically log in.
Important: Having duplicate User objects for the same person can cause problems with network administration, rights, and contexts. In a strictly NDS-based NetWare 4.0 network, it is neither necessary nor in any way advantageous. If you are using bindery emulation and have users that must access servers in different contexts, plan carefully to avoid as much User object duplication as possible.
An example of using a leaf object to manage your tree would be the leaf object Alias. Alias can be used to represent a resource, such as a modem, that most users in the tree need to access. By placing an Alias for the object at the top of the tree, the Alias can provide a short name that is easy for all the users to remember. Perhaps the name the Alias provides would be HSMODEM.NOVELL. Without the Alias, the full name of the modem could be HSMODEM.SALES.CONTRACT1.NOVELL.
Standardizing Object Names. Use standardized naming of objects and object properties in order to exploit the Directory to its fullest. If you name objects and their properties in a consistent manner, browsing and searching in the Directory will be easier and more precise.
Default Leaf Objects. If you are installing NetWare 4.0 on a new server, the following leaf objects are automatically created for you and placed in the same Organization or Organizational Unit where you have placed the server:
NetWare Server object
Volume object SYS
Volume objects for other volumes (besides SYS) on the server
User object Admin. This object is created so you can log in for the first time and begin creating objects.
User object SUPERVISOR (used for bindery emulation purposes only). This object is recognized only by pre-NetWare 4.0 utilities. User SUPERVISOR uses the same password as User Admin.
Leaf Objects from an Upgraded Server. When you upgrade a server to NetWare 4.0 (from a previous version of NetWare), you automatically place the Server object in a container object.
In addition to the default leaf objects listed previously, all the objects that were in that server's bindery are also placed in the same container object with the Server object. Figure 14 shows an upgraded server and its upgraded bindery objects placed in a Directory tree in an Organizational Unit object.
Figure 14: Example of a NetWare bindery server upgraded to NetWare 4.0.
Installing a Server into an Existing Directory Tree
When you install NetWare 4.0 on a server, you can add that server to an existing Directory tree by specifying the tree name. Then you can choose to do one of the following:
Place the Server object in an existing context (in an existing container object in the tree). This would be logical if you were adding a new server to a pre-existing workgroup, department, etc., that is adding a resource rather than a whole new part to the tree.
or
Create the new Server and Volume objects in a new context by creating a new container object. This is the process to use if you are adding a new branch to the tree such as a new division, department, workgroup, etc., that will add a new container to the tree (no matter at what level).
Using Default Directory Partitions
The NetWare 4.0 installation program creates default Directory partitions of the Directory tree for you. Each new container object where you install a NetWare 4.0 Server object is designated as a default partition by the installation program. The [Root] object is included in the partition that is created with the very first container object where you install a NetWare 4.0 server.
Figure 15 shows the default partitions (indicated by shading) in a sample medium-sized Directory tree. Each default partition has a Server object installed in a new context.
Figure 15: Example of default partitions created for new container objects.

The NetWare 4.0 installation program also places a Master replica of the Directory partition on the first server installed in a container object. All subsequent servers installed in a container object receive a Read/Write replica of the Directory partition.
The installation program automatically sets the server's bindery context at the container object level where the server is installed. The Read/Write replicas placed on the server by the installation program are necessary for bindery emulation to be enabled.
You can use the default Directory partitions and replicas created by the installation program (defaults), or you can use the Partition Manager Tool (GUI utility) or the PARTMGR (text utility) to change the partitions and replicas after the tree is created.
During the installation process, be aware of how default partitioning, replication, and bindery emulation occur. If you are using an Organization object without any Organizational Units, the Organization is designated as the default partition.
Important: We recommend that until you understand the impact of partitioning, replication, and bindery emulation, you use the defaults provided by the installation program. Remember, you can change these at a later date.
Distributing Partitions
NDS partition replicas serve two purposes:
To minimize the risk of any single point of failure for the Directory.
To provide faster access to information for servers that are physically distant from the Master replica (usually this is across a WAN link).
On medium-sized networks, you might need to provide users access to information across a WAN link. Thus you must be concerned with both fault tolerance for the Directory database (so there is no single point of failure on the network) and with performance in the form of fast Directory access.
Fault tolerance for the Directory can be accomplished merely by storing replicas of Directory partitions on different servers. The performance issue involves deciding where to place replicas that need to be accessed from servers that might be in a different physical location. This takes some serious thought on how your users access resources in different parts of the Directory tree.
Remember, a Master replica is automatically placed on the first server installed in a container object with all subsequent servers added to that container receiving a Read/Write replica.
Any time you install more than one server in a container object, you have Directory fault tolerance (provided by default). However, you should consider storing one copy of each Directory partition on an off-site server for disaster-recovery purposes.
Important: You must have at least two replicas of every Directory partition on the network. If for some reason you lose a partition and do not have a replica of that partition, you may permanently lose access to a part of your Directory tree. We recommend that you have three copies of each partition on your network (in addition to any off-site replicas). We also recommend that you place no more than 10-15 replicas on any one server.
If a replica becomes very large, you can use utilities (included in NetWare 4.0) to split the partition. For more information on these utilities and the necessary process, see the NetWare 4.0 Documentation set.
Important: Replication of the Directory only provides fault tolerance for the Directory database, not for the file system. To provide file system fault tolerance, you must mirror or duplex your server's hard disks and enable the Transaction Tracking System (note that TTS must be enabled for NDS to work as well). For more information on file system fault tolerance, refer to the NetWare 4.0 Documentation.
Planning Network Time Synchronization
As explained previously, time synchronization is an important consideration in setting up a network that will use NDS. NetWare 4.0 offers four types of time servers:
A Secondary Time Server (STS) obtains the time from a Single Reference, Reference, or Primary time server and provides time to clients.
A Primary Time Server (PTS) synchronizes network time withat least one other Primary or Reference time server, and provides time to Secondary time servers and clients.
A Reference Time Server (RTS) provides a time to which all other servers and clients synchronize.
A Single Reference Time Server (SRTS) provides time to Secondary time servers and clients.
Primary, Reference, and Single Reference time servers are all time source servers because they provide time to the network. Secondary time servers do not provide time to the network; they only receive the time from a time source server and pass the received time along to clients.
Note: Reference and Single Reference Time Servers are two distinctly different types of time servers. Do not confuse the two.
Recommended Configuration. For better Directory performance on a medium-sized network, we recommend that you use a Reference time server with Primary time servers, unless circumstances dictate otherwise. This is different from the NetWare 4.0 default configuration (a Single Reference Time Server with Secondary time servers).
When you use Primary time servers on a medium-sized network, you must have at least one other Primary time server or a Reference time server that the Primary time server can contact for synchronization.
We recommend you use only one Reference time server on a medium-sized network. However, because the Reference time server must poll at least one other time server, you must also install one of the following on the same network:
A Primary time server (recommended)
Another Reference time server
If there is more than one Reference server on the network, each Reference server must be synchronized through an external time source. To use an external time source, you must turn off the hardware clock option on the Reference server during the installation process. Server synchronization from external sources can be accomplished through the use of various third- party products.
Also, be aware that when Reference and Primary servers are used, they must all be able to see each other.
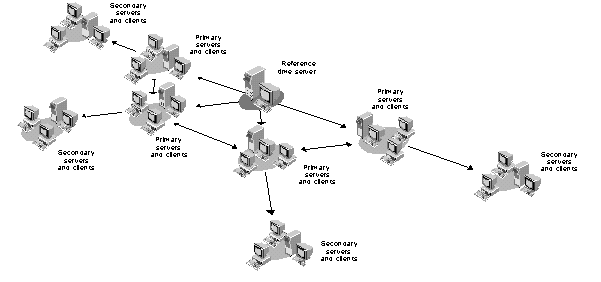
Figure 16 shows an example of the recommended time synchronization setup for a medium-sized network, using Reference and Primary time servers.
Figure 16: Example of a medium-sized network using Reference and Primary time servers.
After you have designated the necessary Primary and Reference time servers on your network, designate all other servers on the network as Secondary time servers (the default for all but the first server installed on the network). Remember that Secondary servers must always be able to see at least one time source (Primary, Reference, or Single Reference time server). You should not place Secondary time servers more than one hop away from a time source server (Primary, Reference, or Single Reference time server). We recommend direct connections (no intervening routers or slow LAN segments), if possible.
Secondary time servers can contact other Secondary time servers to get the time, but this adds one more level of potential synchronization error.
Alternate Configurations. Your network circumstances may dictate the need for a time synchronization setup other than the recommendation described above. For example, another possibility is to use the default configuration of a Single Reference Time Server (SRTS) with Secondary time servers (see "Recommended Configuration" in the section on planning a Directory tree for a small network). The SRTS can be used for all networks, regardless of size, but is primarily recommended for small networks.
Once you decide on a specific plan for your network time synchronization, provide the plan to all the local network supervisors who will install NetWare 4.0 on servers within the network. They can then assign the correct time synchronization function to each server they install.
When to Use the Custom Configuration Method. By default, time servers use the SAP method to find and choose a time server to synchronize network time. This allows for quick installation without regard to the network layout. It also allows quick reconfiguration if operating modes are changed or if new time servers are added to the network.
The SAP method does generate additional network traffic, but this usually isn't a problem in medium-sized networks as the traffic generated should be minimal.
In an environment where time source servers may come and go (such as in a test lab), use of the SAP method may cause time to be disrupted.
Important: Bringing up a time source server in this environment can cause problems if you do not carefully set the server time. Never set a time source server's time to a future time. If anything, set the server's clock a minute or two behind the network synchronized time. If you do set a new time source server to a time in the future, no updates made on your network will be accepted. This can cause major problems. Using the Custom Configuration method provides some protection against this situation accidentally taking place.
The custom configuration method for time synchronization allows you to assign specific time source servers that a particular server should contact. It also allows you to specify that a server should not listen for SAP information from other time source servers, nor should it advertise its presence using SAP. This eliminates nonessential network SAP traffic, as well as errors associated with accidental reconfiguration.
Using custom configuration allows the network administrator to maintain complete control of the network time synchronization environment. However, it requires more time for planning and installation. It is also more difficult to install or remove Primary, Reference, or Single Reference time servers from the network. Using this method, you must manually change the approved server list maintained on each server each time a new time source server is added to the network. (This does give you a measure of protection against accidental synchronization with a new server that has an incorrect future time set.)
On medium-sized networks where it is unlikely that servers will be added or reconfigured after initial installation, you can use the SAP method (which is the installation default). On networks subject to frequent reconfiguration where servers are added or removed, or if you anticipate steady or rapid network growth, we recommend you use the custom configuration. This will allow you better control of network time synchronization in the future, and give you a better handle on future network performance.
Remember that whenever you add or remove a time source that uses the custom configuration (Primary, Reference, or Single Reference time server) the configuration list on that server and all other time source servers must be updated. Time sources must always know about all other time sources.
You can use both the SAP and custom configuration methods on the same network. Be aware that the custom configuration information stored on a server always takes precedence over any SAP information received by the server.
Controlling Access to the Directory Tree
When you plan your Directory tree, carefully decide how you want to control access to objects in the tree. You can control access by using the hierarchy of the tree itself because of the way rights flow down through the tree.
You can also control access to any part of the tree by creating an Inherited Rights Filter (IRF) to limit rights to the object at that level. For example, if a user has rights to change information about the container object at the Organization level, those rights can be filtered (using the IRF) at the Organizational Unit level so that the user has no rights to the Organizational Unit or any object contained in it.
Default Security on a New Directory Tree. The User object Admin, created during installation, receives a trustee assignment that grants it the Supervisor object right to the [Root] object of the Directory tree. As a result, the User object Admin has the following rights:
All rights to all objects in the Directory tree.
The Supervisor object right to the NetWare Server object. Therefore, User Admin also has the Supervisor right to the root directories of the file system of all volumes attached to the server.
In addition, the following rights are granted by default:
[Public] has the Browse object right at the [Root]. This means that all users, even before logging in, can browse the entire Directory structure.
The SYS Volume's container object is granted Read and File Scan rights to the volume's SYS:PUBLIC file system directory. This means that when users are created they can access utilities located in the SYS:PUBLIC file system directory.
Users are granted all rights to their home directories, which can be created when you create a User object.
Additional Security. Adding additional security to the Directory is a very critical concern. You can further control access to objects within the tree and add additional security using the methods listed below:
Grant trustee assignments to any object for any other object.
Create Group objects to give groups of users limited or unlimited access to particular objects in the Directory tree.
Create an Inherited Rights Filter (IRF) for an object to limit access to that object.
Make a User object the security equivalent to any other object(s) to allow access.
For more detailed information on Directory rights, see the "Understanding NetWare Directory Services Rights" AppNote in this issue.
Planning a Directory Tree for a Large Network
If your network meets either of the following criteria, read this section for ideas and hints on planning a Directory tree for a large network:
More than 100 Servers
More than 2,000 users
While you can set up a simple Directory tree by using the installation defaults, this is not appropriate for a large network. We recommend that you carefully plan and customize your Directory tree to gain maximum efficiency from the features of the Directory.
Each site in your organization that installs NetWare Directory Services (NDS) probably has special needs that you must accommodate (which cannot be handled by the installation defaults). For this reason, you may want to plan only the top levels of your Directory tree and then assign individual sites the responsibility for creating and administering their parts of the tree. If this is your situation, we recommend that you write up specific guidelines for each of the individual sites to follow to maintain consistency across your entire network.
We recommend that you create only one Directory tree for your company rather than creating several separate trees. Having a single tree lets you take advantage of the global features of NetWare 4.0 and NDS. You can then use the NetWare 4.0 security features to control access to any part of the Directory tree. This is easier than having separate trees for resources you want to deny or limit access to.
Important: You cannot share Directory data across trees. Each Directory tree has its own database of objects that is not visible from any other tree. Consider this carefully if you are thinking of creating more than one Directory tree. We recommend you use only one Directory tree for your entire company (or network, if spanning more than one company).
Planning the Top Levels of a Large Tree
The top level is the most important level of the Directory tree, as all other levels branch off from it. Carefully consider what the best top level would be for your entire network. Regardless of your company size, we recommend that you make the top level of the Directory tree consistent network-wide, and then allow the network supervisors to create their own parts of the tree at the lower levels.
If you plan to have centralized management of the Directory, we recommend that you use no more than four levels in your tree. With four levels, the longest a user's context would ever be is USERNAME.OU.OU.OU.O.
NDS will support arbitrary tree depths, but it is important to remember that each level you add to the tree increases the length of the user's context. The shorter you keep users' contexts, the fewer problems users will have remembering them.
Note: [Root] does not add a level to the Directory tree because it is not a part of an object's context.
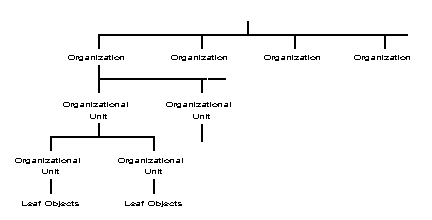
Figure 17 shows an example of a large tree with several levels. This tree uses several peer Organizations as the top level. with multiple Organizational Units below which contain all the leaf objects in the database.
Figure 17: Example of a large Directory tree with several levels.
Container objects form the top level of the Directory tree. These container objects help you manage and organize your network by relating groups of objects (both container and leaf objects).
You can create as many peer Organization objects as you need, and each can contain as many Organizational Units as you need.
Important: You must use at least one Organization container in your Directory tree. Organizational Unit container objects are optional.
As your network grows, you can install new NetWare 4.0 servers and add more Organization and Organizational Unit objects to your Directory tree as needed.
Planning the Structure of a Large Tree
One way to use multiple Organization objects is to have one Organization object for each of your company's sites. You can also use the Organization object to designate a part of your company that is a separate business unit, such as a subsidiary.
Another way to set up your Directory tree is to follow the organization chart for your company. For example, you can designate your company's divisions as the Organization (O) objects, and then designate the departments or groups within the divisions as Organizational Unit (OU) objects.
This scheme can work well for large Directory trees and may be the method you prefer. An advantage of using the organizational chart structure for a large Directory tree is that most people are probably familiar with the organization of their particular divisions and departments and thus will remember their context more easily. They will also be able to move around the Directory tree more easily.
Figure 18 shows an example of a large Directory tree which uses the company's organization chart as the model for the Directory tree structure.
You can also designate geographic locations as Organizational Units. Using a geographic structure can be an advantage in that it allows the users to "see" where objects are physically located. However, if users or other resources are moved between locations frequently, their contexts can change dramatically even though the organization does not. This is often a necessity for large Directory trees and might work well for you. Before using this structure, plan carefully.
However, if users and resources remain static in the geographic structure, this option provides a stable structure for a Directory tree for a large network.
Figure 18: Example of a large Directory tree based on a company's organization chart.
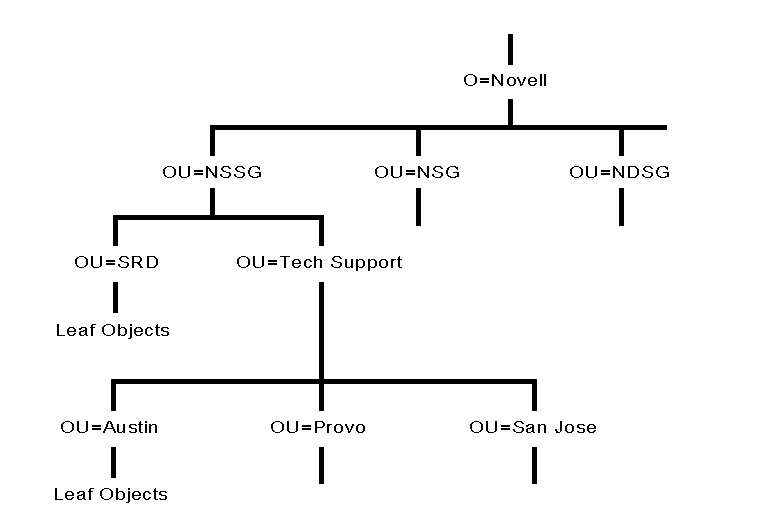
Figure 19 shows an example of a large Directory tree using the following geographic structure:
The Organization (O) object is Novell.
The Organizational Unit (OU) objects on the second level are divisions of the company.
The Organizational Unit (OU) objects at the third level are geographic locations of units within those divisions.
Figure 19: Example of a large Directory tree using geographic structure as Organizational Units.

Organizational Units do not all have to be of the same type. You can designate workgroups, departments, geographical locations, projects, or product teams as peer Organizational Units. This flexibility allows you to organize your Directory tree by function if groups of users perform the same functions within your company.
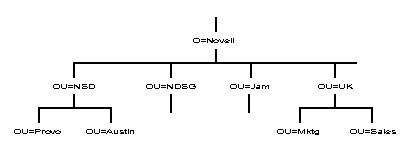
Figure 20 shows an example Directory tree that includes both company divisions and geographical locations as peer Organizational Unit (OU) objects. NSD (NetWare Services Division) and NDSG (Novell Desktop Systems Group) represent divisions, while JAM (Jamaica) and UK (United Kingdom) represent geographical locations, all under the Organization Novell.
Figure 20: Example of a large Directory tree using different divisions and geographical locations as Organizational Units. using different divisions and geographical locations as Organizational
Another possible way to set up a large Directory tree is to use the Organization (O) object as a geographic designation.
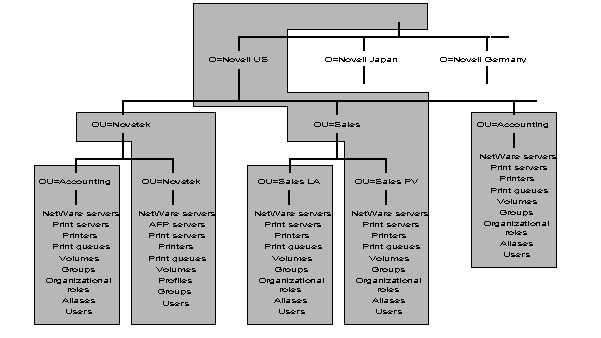
An example of using Organization to designate multinational sites is shown in Figure 21. In this figure, NOVELL US, NOVELL GERMANY, and NOVELL JAMAICA are all Organization objects. This example only shows the part of the Directory tree that branches from under the NOVELL US object.
Figure 21: Example of a multinational Directory tree using Organization objects to designate international sites.
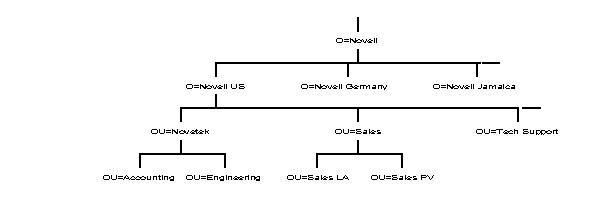
In Figure 21, NOVELL US contains the Organizational Units for divisions that exist in the United States. Only a few example Organizational Units are shown. CPD (Communication Products Division) with its Administration and Engineering Organizational Units, NDSG (Novell Desktop Systems Group) with its Documentation and Sales Organizational Units, and the CORPORATE ADMIN Organizational Unit.
Some areas of a large Directory tree may need more than one organizational unit. This is an easy thing to plan for. However, remember to limit the number of levels in your Directory to as few as possible. We recommend that you avoid more than six levels.
Having different kinds of Organizational Units can help network supervisors customize the Directory tree for their particular needs. This flexibility is available so that departments or groups can customize the Directory tree to their advantage.
Remember to make the Directory tree as consistent as possible to reduce possible difficulties during administration and troubleshooting.
Important: If you allow local network supervisors to create the tree for their groups below the Organization level, we strongly recommend that you provide them written guidelines and naming standards to follow. This will reduce the number of necessary administrative tasks on your Directory tree. Also remind your supervisors to keep the number of levels in the Directory tree to a minimum.
Another way to reduce administrative tasks on your Directory tree is to choose the type of organization that is not likely to change frequently.
For example, in an Engineering department, an engineer may be assigned to work on several projects. The engineer typically works on each project for a short period of time, and then moves on to the next one. If the projects are set up as Organizational Units, the network supervisor may need to move this engineer's User object between Organizational Units every time the engineer changes projects. This can create administration headaches as well as confusion because the engineer's context changes as he or she is moved from project to project.
However, if one Organizational Unit is set up to encompass all of the Engineering department, then Directory administration, as well as the User's context is not affected as he is transferred between projects.
Keep your Directory tree as simple as is workable for you. Unnecessary complexity can cause future administrative headaches.
Placing Objects in the Tree
Container objects and their contents should be defined by workgroups, shared resources, and information usage and exchange. This means that leaf objects representing resources used by a single group should be placed in the same container (preferably the same container as the group members are in).
Design your Directory tree so that the company has shared access to resources. For example, if your company has one high- speed printer that everyone needs access to, place the Printer object for that printer in a container that is above the containers where the User objects are placed. This allows you to easily assign rights to the lower containers that allow everyone in those lower containers to access the Printer object. It is easier to grant rights at the container level than to grant everyone individual access rights to a particular object (see Figure 22).
Figure 22: Example of placing a shared resource to grant easy access to everyone.
Important: You can always add, delete, or move leaf objects after you have installed your Directory tree. This allows you a degree of flexibility if something doesn't work out right at first. The best implementation is still to plan ahead and avoid having to make changes later.
Placing Objects in Container Objects
In Organization (O) or Organizational Unit (OU) objects, you can create the following container and leaf objects:
Container Objects
Organizational Unit>
Leaf Objects
|
AFP Server |
Printer |
|
Alias |
Print Queue |
|
Computer |
Print Server |
|
Directory Map |
Profile |
|
Group |
User |
|
NetWare Server |
Volume |
|
Organizational Role |
Important: You should avoid placing more than 1,000 objects in any container. Current NetWare 4.0 utilities do not efficiently handle more than 1,000 objects at a time.
For more information on these container and leaf objects, see the "Container Object" and "Leaf Object" sections of the "Introduction to NetWare 4.0 Directory Services" AppNote in this issue.
Carefully consider how you place User objects into containers. In most cases, you should create User objects only in the container where they will typically log in.
Important: Creating duplicate User objects for the same person can cause problems with network administration, rights, and contexts. In a strictly NDS-based NetWare 4.0 network, it is neither necessary nor in any way advantageous. If you are using bindery emulation and have users that must access servers in different contexts, plan carefully to avoid as much User object duplication as possible.
An example of using a leaf object to manage your tree would be the leaf object Alias. Alias can be used to represent a resource, such as a modem, that most users in the tree need to access. By placing an Alias for the object at the top of the tree, the Alias can provide a short name that is easy for all the users to remember. Perhaps the name the Alias provides would be HSMODEM.NOVELL. Without the Alias, the full name of the modem could be HSMODEM.SALES.CONTRACT1.NOVELL.
Standardizing Object Names. Use standardized naming of objects and object properties to exploit the Directory to its fullest. The example naming standards document at the end of this AppNote gives some example leaf names for objects in the Directory tree. If you name objects and their properties in a consistent manner, browsing and searching in the Directory will be easier and more precise.
Default Leaf Objects. If you are installing NetWare 4.0 on a new server, the following leaf objects are automatically created for you and placed in the same Organization or Organizational Unit where you have placed the server:
NetWare Server object
Volume object SYS
Volume objects for any other volumes (besides SYS) on the server
User object Admin. This object is created so you can log in for the first time and begin creating objects.
User object SUPERVISOR (used for bindery emulation purposes only). This object is recognized only by pre-NetWare 4.0 utilities. User SUPERVISOR uses the same password as User Admin.
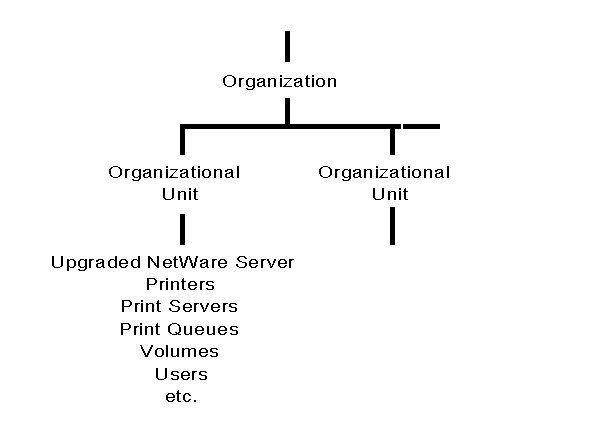
Leaf Objects from an Upgraded Server. When you upgrade a server to NetWare 4.0 from a previous version of NetWare, you automatically place the Server object in a container object. In addition to the default leaf objects listed previously, all the objects that were in that server's bindery are placed in the same container object with the Server object. Figure 23 shows an upgraded server and its upgraded bindery objects placed in a Directory tree in an Organizational Unit object.
Figure 23: Example of a NetWare bindery server upgraded to NetWare 4.0.
Installing a Server into an Existing Directory Tree
When you install NetWare 4.0 on a server, you can add that server to an existing Directory tree by specifying the tree name. Then you can choose to do one of the following:
Place the Server object in an existing context (in an existing container object in the tree). This would be logical if you were adding a new server to a pre-existing workgroup, department, etc., that is adding a resource rather than a whole new part to the tree.
or
Create the new Server and Volume objects in a new context by creating a new container object. This is the process to use if you are adding a new branch to the tree such as a new division, department, workgroup, etc., that will add a new container to the tree (no matter at what level).
Large Tree Planning Example
As an example of a large Directory tree, Figure 24 illustrates a fictional version of Novell. This example uses the part of the tree located in the United States, involving offices at three sites:
Novetek, a wholly owned subsidiary located in New York City. Novetekis a self-contained business unit, with its own Accounting department, Engineering department, Sales department, etc.
Sales and Accounting offices located at corporate headquarters in Provo, Utah.
A sales office located in Dallas, Texas.
Figure 24: Physical layout of planning example used for a large network.
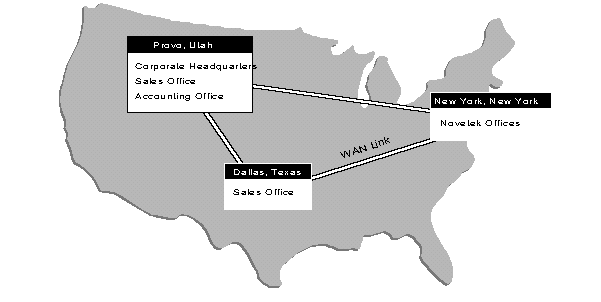
Figure 25 shows the logical layout for the example Directory tree for Novell.
Figure 25: Example names of NDS leaf objects used in the Directory tree example for Novell.
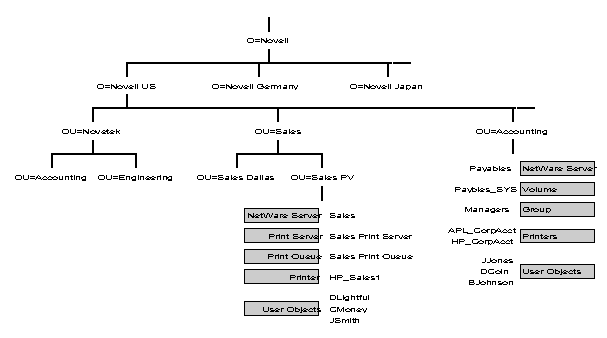
Notice that the names of the leaf objects in Figure 25 follow standardized naming conventions. For example, all the User objects are named by taking the initial of the user's first name. followed by the user's last name. Also notice that the printers have an HP or APL followed by an underscore ( _ ) followed by a descriptor. For example under ACCOUNTING.NOVELL US there are two printers HP_CorpAcct and APL_CorpAcct. The name HP_CorpAcct identifies the first printer as an HP Laserjet printer in the Corporate Accounting department, while the APL_CorpAcct identifies that printer as an Apple LaserWriter located in the Corporate Accounting department.
These are just a few examples of how naming standards can be implemented in the Directory tree. You should use standardized naming conventions to exploit the Directory to its fullest.
When NDS objects and their properties are named in a consistent manner, browsing and searching in the Directory is much quicker and easier for both users and network administrators.
For more information on naming convention standards, see the "Example of an NDS Naming Standards Document" section at the end of this AppNote.
Using Default Directory Partitions
The NetWare 4.0 installation program creates default Directory partitions of the Directory tree for you. Each new container object where you install a NetWare 4.0 Server object is designated as a default partition by the installation program. The [Root] object is included in the partition that is created with the very first container object where you install a NetWare 4.0 server.
Figure 26 shows the default partitions (indicated by shading) in a sample large Directory tree. Each default partition has a Server object installed in a new context. In the , the first server was installed in SALES PV.SALES.NOVELL US. Therefore the [Root] object is included in that first Directory partition.
Figure 26: Example of default partitions created for new container objects.

The NetWare 4.0 installation program also places a Master replica of the Directory partition on the first server installed in a container object. All subsequent servers installed in a container object receive a Read/Write replica of the Directory partition.
The installation program automatically sets the bindery context at the container object level where the server is installed. The Read/Write replicas placed on the server by the installation program are necessary for bindery emulation to be enabled.
You can use the default Directory partitions and replicas created by the installation program (defaults), or you can use the Partition Manager Tool (GUI utility) or the PARTMGR (text utility) to change the partitions and replicas after the tree is created.
During the installation process, be aware of how default partitioning, replication, and bindery emulation occur. If you are using an Organization object without any Organizational Units, the Organization is designated as the default partition.
Important: We recommend that until you understand the impact of partitioning, replication, and bindery emulation, you use the defaults provided by the installation program. Remember, you can change these at a later date.
Distributing NDS Partitions
NDS partition replicas serve two purposes:
To minimize the risk of any single point of failure for the Directory.
To provide faster access to information for servers that are physically distant from the Master replica (usually this is across a WAN link).
On most large networks, you probably need to provide users access to information across a WAN link. Thus you must be concerned with both fault tolerance for the Directory database (so there is no single point of failure on the network) and with performance in the form of fast Directory access.
Fault tolerance for the Directory can be accomplished merely by storing replicas of Directory partitions on different servers. The performance issue involves deciding where to place replicas that need to be accessed from servers that might be in a different physical location. This takes some serious thought on how your users access resources in different parts of the Directory tree.
Remember, a Master replica is automatically placed on the first server installed in a container object with all subsequent servers added to that container receiving a Read/Write replica.
Any time you install more than one server in a container object, you have Directory fault tolerance (provided by default). However, you should consider storing one copy of each Directory partition on an off-site server for disaster-recovery purposes.
Important: You must have at least two replicas of every Directory partition on the network. If for some reason you lose a partition and do not have a replica of that partition, you may permanently lose access to a part of your Directory tree. We recommend that you have three copies of each partition on your network (in addition to any off-site replicas). We also recommend that you place no more than 10-15 replicas on any one server.
If a replica becomes very large, you can use utilities (included in NetWare 4.0) to split the partition. For more information on these utilities and the necessary process, see the NetWare 4.0 Documentation set.
Important: Replication of the Directory only provides fault tolerance for the Directory database, not for the file system. To provide file system fault tolerance, you must mirror or duplex your server's hard disks and enable the Transaction Tracking System (note that TTS must be enabled for NDS to work as well). For more information on file system fault tolerance, refer to the NetWare 4.0 Documentation.
Providing Faster Access to Information
If any users must access Directory information through a WAN, consider placing a replica of the necessary partition on one of their local servers. Because the Directory information is more likely to be read than modified, placing a replica on the local server may actually decrease network traffic. However, when replicas synchronize (to update the database), network traffic is generated.
Carefully consider whether or not it is better for your users to create traffic by accessing information across a link, or if users access the specified information enough to place a copy of the replica on their local server (taking up disk space and generating network traffic during updates).
Before you distribute replicas of partitions, decide how much information you want (or need) in each partition. Because replicas are stored on servers, unnecessary information stored in a replica can be a waste of disk space. If a partition becomes overly large, and you need to replicate only part of it, you can use utilities in the Partition Manager Tool (GUI utility) or the PARTMGR text utility to split the partition.
In most cases, you shouldn't need more than 8 to 10 replicas of any partition. Remember, the more replicas you have, the more network traffic that will be generated during updates.
Figure 27 shows an example of how you might distribute replicas on our example tree.
Figure 27: Example of replica distribution.
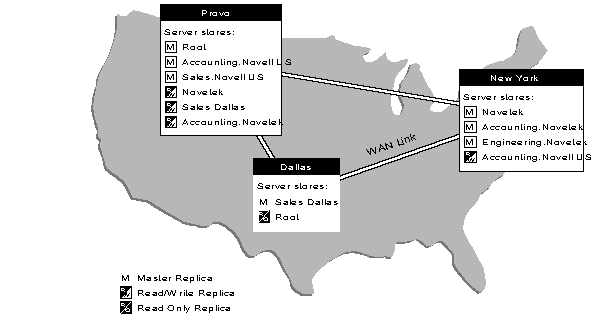
Note the following about this example:
Master replicas are stored at each site. Thus a server at the New York location stores the Master replica of Novetek; a server at the Provo location stores a Master of replica of ACCOUNTING, etc.
Servers at the Provo location store replicas of Novetek and SALESDAL so that information is locally accessible to users at corporate headquarters.
A server in the Dallas sales office stores a replica of SALESPV so that sales people in Dallas do not have to use a WAN link to access information from their counterpart in Provo.
A server in the Novetek offices in New York stores a replica of ACCOUNTING.NOVL US to allow local access.
The example shown in Figure 28 is only one example of how to place partition replicas to best suit your needs. You must decide the best way (for your specific situation) to minimize the risk of any potential single points of failure and provide your users with easy access to information according to your physical network layout and access needs.
Planning Network Time Synchronization
As explained previously, time synchronization is an important consideration in setting up a network that will use NDS. NetWare 4.0 offers four types of time servers:
A Secondary Time Server (STS) obtains the time from a Single Reference, Reference, or Primary time server and provides timeto clients.
A Primary Time Server (PTS) synchronizes network time withat least one other Primary or Reference time server, and provides time to Secondary time servers and clients.
A Reference Time Server (RTS) provides a time to which all other servers and clients synchronize.
A Single Reference Time Server (SRTS) provides time to Secondary time servers and clients.
Primary, Reference, and Single Reference time servers are all time source servers because they provide time to the network. Secondary time servers do not provide time to the network; they only receive the time from a time source server and pass the received time along to clients.
Note: Reference and Single Reference Time Servers are two distinctly different types of time servers. Do not confuse the two.
Recommended Configuration. For better Directory performance on a large network, we recommend that you use a Reference time server with Primary time servers, unless circumstances dictate otherwise. This is different from the NetWare 4.0 default configuration (a Single Reference Time Server with Secondary time servers).
When you use Primary time servers, you must have at least one other Primary time server or a Reference time server that the Primary time server can contact for synchronization.
We recommend you use only one Reference time server on a large network. However, you may decide to use an additional Reference time server in a distant location if you deem it necessary. (For example, you might do this if you have more than one physical location with numerous servers that are an extreme distance apart, such as New York and Japan.)
Because a Reference time server must poll at least one other time server, you must also install one of the following on the same network:
A Primary time server (recommended)
Another Reference time server
If there is more than one Reference server on the network, each Reference server must be synchronized through an external time source. To use an external time source, you must turn off the hardware clock option on the Reference server during the installation process. Server synchronization from external sources can be accomplished through the use of various third-party products.
Also, be aware that when Reference and Primary servers are used, they must all be able to see each other.
Figure 28 shows an example of the recommended time synchronization setup for a large network, using Reference and Primary time servers.
Figure 28: Example of a large network using Reference and Primary time servers.
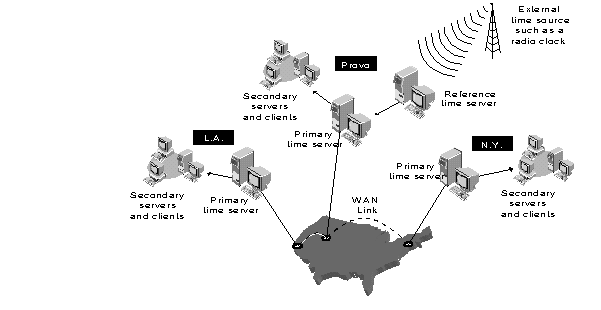
After you have designated the necessary Primary and Reference time servers on your network, designate all other servers on the network as Secondary time servers (the default for all but the first server installed on the network). Remember that Secondary servers must always be able to see at least one time source (Primary, Reference, or Single Reference time server). You should not place Secondary time servers more than one hop away from a time source server (Primary, Reference, or Single Reference time server). We recommend direct connections (no intervening routers or slow LAN segments), if possible.
Secondary time servers can contact other Secondary time server to get the time, but this adds one more level of potential synchronization error.
Alternate Configurations. Your network circumstances may dictate the need for a time synchronization setup other than the recommendation described above. For example, another possibility is to use the default configuration of a Single Reference Time Server (SRTS) with Secondary time servers (see "Recommended Configuration" in the section on planning a Directory tree for a small network). The SRTS can be used for all networks, regardless of size, but is primarily recommended for small networks.
Once you decide on a specific plan for your network time synchronization, provide the plan to all the local network supervisors who will install NetWare 4.0 on servers within the network. They can then assign the correct time synchronization function to each server they install.
When to Use the Custom Configuration Method. By default, time servers use the SAP method to find and choose a time server to synchronize network time. This allows for quick installation without regard to the network layout. It also allows quick reconfiguration if operating modes are changed or if new time servers are added to the network.
The SAP method does generate additional network traffic. This can be a problem in large networks as the traffic generated could be significant.
In an environment where time source servers may come and go (such as in a test lab), use of the SAP method may cause time to be disrupted.
Important: Bringing up a time source server in this environment can cause problems if you do not carefully set the server time. Never set a time source server's time to a future time. If anything, set the server's clock a minute or two behind the network synchronized time. If you do set a new time source server to a time in the future, no updates made on your network will be accepted. This can cause major problems. Using the Custom Configuration method provides some protection against this situation accidentally taking place.
The custom configuration method for time synchronization allows you to assign specific time source servers that a particular server should contact. It also allows you to specify that a server should not listen for SAP information from other time source servers, nor should it advertise its presence using SAP. This eliminates nonessential network SAP traffic, as well as errors associated with accidental reconfiguration.
Using custom configuration allows the network administrator to maintain complete control of the network time synchronization environment. However, it requires more time for planning and installation. It is also more difficult to install or remove Primary, Reference, or Single Reference time servers from the network. Using this method, you must manually change the approved server list maintained on each server each time a new time source server is added to the network. (This does give you a measure of protection against accidental synchronization with a new server that has an incorrect future time set.)
On large networks where it is unlikely that servers will be added or reconfigured after initial installation, you can use the SAP method (which is the installation default). On networks subject to frequent reconfiguration where servers are added or removed, or if you anticipate steady or rapid network growth, we recommend you use the custom configuration. This will allow you better control of network time synchronization in the future, and give you a better handle on future network performance.
Remember that whenever you add or remove a time source that uses the custom configuration (Primary, Reference, or Single Reference time server) the configuration list on that server and all other time source servers must be updated. Time sources must always know about all other time sources.
You can use both the SAP and custom configuration methods on the same network. Be aware that the custom configuration information stored on a server always takes precedence over any SAP information received by the server.
Controlling Access to the Directory Tree
When you plan your Directory tree, carefully decide how you want to control access to objects in the tree. You can control access by using the hierarchy of the tree itself because of the way rights flow down through the tree.
You can also control access to any part of the tree by creating an Inherited Rights Filter (IRF) to limit rights to the object at that level.
For example, if a user has rights to change information about the container object at the Organization level, those rights can be filtered (using the IRF) at the Organizational Unit level so that the user has no rights to the Organizational Unit or any object contained in it.
Default Security on a New Directory Tree. The User object Admin, created during installation, receives a trustee assignment that grants it the Supervisor object right to the [Root] object of the Directory tree. As a result, the User object Admin has the following rights:
All rights to all objects in the Directory tree.
The Supervisor object right to the NetWare Server object. Therefore, User Admin also has the Supervisor right to the root directories of the file system of all volumes attached to the server.
In addition, the following rights are granted by default:
[Public] has the Browse object right at the [Root]. This means that all users, even before logging in, can browse the entire Directory structure.
The SYS Volume's container object is granted Read and File Scan rights to the volume's SYS:PUBLIC file system directory. This means that when users are created they can access utilities located in the SYS:PUBLIC file system directory.
Users are granted all rights to their home directories, which can be created when you create a User object.
Additional Security
Adding additional security to the Directory is a very critical concern. You can further control access to objects within the tree and add additional security using the methods listed below:
Grant trustee assignments to any object for any other object.
Create Group objects to give groups of users limited or unlimited access to particular objects in the Directory tree.
Create an Inherited Rights Filter (IRF) for an object to limit access to that object.
Make a User object the security equivalent to any other object(s) to allow access.
For more detailed information on Directory rights, see the "Understanding NetWare Directory Services Rights" AppNote in this issue.
Example of an NDS Naming Standards Document
This section provides some examples that can be used for creating naming standards for NetWare Directory Services. These samples will assist the network supervisor in entering object names and property values in a consistent manner.
The examples shown in Tables 1 through 5 describe standards that can be used for objects and organization objects. The last part of this section provides suggestions for naming network resources to make them easier for users to find and access.
Table 1: Examples of User object's properties.
|
PROPERTY |
SUGGESTEDFORMAT |
EXAMPLE |
|
Login Name |
First initialand last name of user. Capitalize all lettersin the login name. Be sure this name is unique. |
GHERBON |
|
Full Name |
User's surname,followed by a comma, followed by the firstname and middle initial. Capitalize onlythe first letter in each name. |
Herbon, GamalB. |
|
Other Names |
No standard. |
|
|
Title |
User's current job title. |
Senior Editor |
|
Description |
No standard. |
|
|
Telephone |
Full telephone number format. |
800-555-1212 (US) |
|
FAX number |
Full fax number format. |
800-555-1313 (US) |
|
EMAIL Address |
E-mail address format. |
GHERBON@... |
|
Location |
Name or codefor building where user is located. |
BLDG E |
|
Department |
Department code. |
42-76543 |
Table 2: Examples of User objects' environment properties.
|
PROPERTY |
SUGGESTED FORMAT |
EXAMPLE |
|
Language |
User's primary language. |
ENGLISH (US) |
|
Default Server |
Server theuser gets messages on when sent with the SEND utility. |
PRV-SRD |
|
Network Address |
No standard. |
|
|
Home Directory |
Include boththe volume object name and the path name. |
SRD_SYS:\HOME\GHERBON |
Table 3: Examples of User objects' account restrictionproperties.
|
PROPERTY |
SUGGESTEDFORMAT |
|
Login Restrictions |
Leave all thefields in this property at the default ("No"). |
|
Password Restrictions |
Discussed inthe security section of the NetWare 4.0 documentation. |
|
Time Restrictions |
No standard. |
|
Net AddressRestrictions |
No standard. |
|
Intruder LockoutStatus |
No standard. |
|
Account Balance |
No standard. |
|
Volume |
No standard. |
Table 4: Example of User objects' postal address properties.
|
PROPERTY |
SUGGESTEDFORMAT |
|
Postal Address |
User's defaultcorporate postal address. Place the mailstop information in the "Post Office Box" field. |
|
Example: |
123 ANY STREETEVERYWHERE,USA12345 |
Use "Copy the address to the mailing label" to set the mailing address.
Use the full name on the mailing label.
Table 5: Example of Organization objects' properties.
|
PROPERTY |
SUGGESTEDFORMAT |
EXAMPLE |
|
Name |
Full name ofthe organization that is associated with this container. |
Systems ResearchDepartment |
|
Other Name |
No standard. |
|
|
Description |
Brief descriptionof the organization's job functions. |
PublicationofNetWareApplication Notes,Research Reports,and PerformanceTest data. |
|
Telephone |
Full telephonenumber format used in the company's telephone directory. |
800-555-4567 |
|
FAX number |
Full fax numberformat used in the company's telephone directory. |
800-555-7654 |
|
Location |
Current locationnames found in the company's telephone directory.If the organization is located in differentgeographical areas, put all locations in the field. |
Provo, Boulder,Austin |
Other Object Naming Guidelines
For general naming of Directory objects, we recommend you devise a method that is easy to remember and that will help your users easily identify resources (different types of printers, modems, workstations, and so on). This will make Directory searches easier for average users who do not necessarily know all the specifics of a resource they need to use.
For example, suppose a writer needs to access a printer near his desk but doesn't know the specifics of the printer (such as the fact that the printer has a loaded cartridge with 63 different fonts). As long as the writer knows that the printer is an Apple LaserWriter, he can do a search for all Apple LaserWriters and determine which printer he wants to use. This works best if you use simple naming conventions as we are suggesting.
For example, you might want to name all your Apple LaserWriters with an APL_ prefix. Thus you might have the following printers:
APL_By Ken's Office APL_Sales1 APL_LA Accounting
This allow users to do a search for all Apple LaserWriter printers on the network (that they have rights to). From this list, users can determine which specific printer they want to use.
While these are just suggestions, you may want to set up similar naming conventions for all resources on your network. Keep the naming conventions consistent across the network so they are easy for everyone to decipher and use. Below is a list of possible naming conventions for common network resources:
|
APL_ |
Apple LaserWriter printer |
|
HPL_ |
Hewlett-Packard LaserJet printer |
|
CPMQ_ |
Compaq PageMarq printer |
|
PLOT_ |
Plotter |
|
HM_ |
Hayes modem |
|
HCM_ |
Hayes-compatible modem |
|
CPQ_ |
Compaq workstation |
|
NPS_ |
NetWare print server |
|
PS2_ |
IBM PS/2 workstation |
|
NPQ_ |
NetWare print queue |
The prefixes above are only prefixes. You must still put a specific name, location, or identifier after the underscore ( _ ) in the prefix. For example, you might use
APL_Jason's Desk
to denote the Apple LaserWriter printer that is physically located near Jason's desk. This list is simply an example of ways you might want to name your network resources to make resource searches and access easier for your users.
Be sure to document all of the naming conventions you will use on your network and provide a copy of these standards to all administrators of your network (or sections of your network) to provide consistency and ease of use across your entire network.
* Originally published in Novell AppNotes
Disclaimer
The origin of this information may be internal or external to Novell. While Novell makes all reasonable efforts to verify this information, Novell does not make explicit or implied claims to its validity.