Understanding and Troubleshooting Novell's Print Services
Articles and Tips: article
Senior Editor
Systems Research Department
Virgil Telford
Product Support Engineer
Novell Services Group
01 May 1992
This AppNote looks at the internals of Novell's printing services by explaining how the printing services are created, configured, and stored. It then gives two examples of how print jobs get to the printer. One example follows a print job traveling from the application to a printer connected to the file server. The other example shows a print job journey from the application to a printer connected to a workstation running RPRINTER. The AppNote also presents some common NetWare printing problems and solutions.
- Introduction to NetWare Printing
- Print Server and Print Queue Directories
- PSERVER's Working Dynamics with Printers
- Selected Printing Problems and Solutions
- Conclusion
Introduction to NetWare Printing
When Novell's print server was introduced with the release of NetWare v3.0, NetWare printing services changed internally. Whereas in earlier versions the printing services were part of the operating system, printing services can now run separately from the OS as a VAP, NLM, or on a dedicated DOS or OS/2 workstation running print server software (PSERVER.EXE).
Understanding how NetWare print services work will not only help you to set up and configure your network printing services to better meet your needs, it will also help you decide where to begin the troubleshooting process if a problem occurs. When troubleshooting and maintaining Novell's printing services, it's sometimes difficult to know where to begin looking for problems. Network managers often troubleshoot a printing problem as an isolated instance, without considering its network implications. But network problems are hard to pin down. When you don't know where to look, you might miss the actual problem entirely, turning a half-hour maintenance project into a full-day affair.
This AppNote looks at the internals of how PSERVER works by first looking at the structure and contents of the print server and print queue directories. It next looks at two examples of how print jobs move from the application to the print queue to the printer. This section describes how PSERVER interacts with printers, as well as how PSERVER interacts with RPRINTER, the remote printer driver. Finally, the AppNote lists some of the more common problems users have when using PSERVER and explains how to solve them.
Print Server and Print Queue Directories
This first section describes how PSERVER saves its printer and print queue configurations. As the network supervisor, you create these configurations through the PCONSOLE utility when you create print servers and print queues. The discussion includes print server and queue directory location and files.
The PSERVER program uses the Service Advertising Protocol (SAP) to advertise when it's open for business, ready to provide print services. PSERVER pulls its working information from files located in print server directories under the SYS:SYSTEM directory. It also services files from print queue directories under SYS:SYSTEM.
Print Queue Directories
When a print queue is created through the PCONSOLE utility, a corresponding subdirectory is created under SYS:SYSTEM on the file server where the print queue resides. The NetWare operating system uses this directory to hold the print job files that are waiting to be printed.
When you type "LISTDIR <Enter<" in the SYS:SYSTEM directory, you'll see print queue directory names such as 040015 or 0C004F if you have NetWare v2.x and you upgraded from a previous version; for NetWare v3.x, print queue directory names have an extension such as AC010015.QDR or 0400000B.QDR. The first part of the directory name corresponds to the Object ID number you can see when you select the "Print Queue ID" option for a print queue in the PCONSOLE utility.
Here's an example of what you might see when you look into a print queue directory and there are print jobs waiting to be printed. In this example, the directory name is 0400000B.QDR. You'll see a listing similar to the following:
00040001.Q  17853 4-30-92    9:59p
00040002.Q   9823 4-30-92   10:00p
00040003.Q  87972 4-30-92   10:00p
Q_0004.SRV      0 5-07-92    1:42p
Q_0004.SYS   1120 4-16-92    9:41a
The print job names are numbered in the order they are received; using PCONSOLE to change the print sequence doesn't change the print job file names. When the print services finish sending a print job to the printer, the print job is deleted from the queue and the file is immediately deleted from the queue directory.
As a job is removed from the queue, that print job number is freed up and is reused by the next print job submitted to the queue. So when job 00040001.Q is finished printing, the next print job placed in the queue will be named 00040001.Q.
The last two files have .SRV and .SYS extensions and are flagged as hidden. The .SRV file contains information about the print servers that are attached to the directory's queue. If no print server is currently attached to the queue, the file is zero bytes large.
The .SYS file is specifically for Novell's Queue Management Services (QMS). It contains information the server needs to maintain queues. All queues have this information, which includes the station that sent the job, the user's ID number, the print job file names, when the jobs were entered in the queue, when they are to print, and a record area for information contained in CAPTURE. This type of information is stored in all files in the directory, and updated as new print jobs are added.
Print Server Directories
When you create print servers through the PCONSOLE utility, NetWare also creates corresponding directories under the SYS:SYSTEM directory. Like print queue directories, print server directory names are also a combination of numbers and letters, such as D7000011. The directory name corresponds to the Object ID number you see when you select the "Print Server ID" option from PCONSOLE's "Print Server Information" menu.
The files you see in print server directories are very different from those you see in print queue directories. Understanding these files will help you better understand how PSERVER works. To see what they are, go to the SYS:SYSTEM directory and change directories to a print server directory. If you need to, go into PCONSOLE and look at print server's ID number to see what the directory's name will be.
The following example uses print server NEARSIDE whose ID number (and thus directory name) is D7000011. As you select a print server directory on your system and type "DIR <Enter<," you'll see a screen similar to the following:
FILESERV            48    3-18-92   4:16p
PRINT      000      70    3-18-92   4:17p
PRINT      001      70    3-18-92   4:19p
PRINT      002      70    3-18-92   4:19p
QUEUE      000      49    3-18-92   4:20p
QUEUE      001      98    3-18-92   4:20p
QUEUE      002      98    3-18-92   4:20p
NOTIFY     000      54    3-18-92   4:21p
NOTIFY     001      54    3-18-92   4:22p
NOTIFY     002     162    3-18-92   4:22p
The print server directory contains four types of files:
The FILESERV file contains information about the file servers that are serviced
The PRINT files contain information for each printer defined
The QUEUE files contain information for the print queues serviced by the printers
The NOTIFY files contain lists of users who need to be notified when the printer requires attention
Files with the same extension, such as PRINT.000, QUEUE.000, and NOTIFY.000, are all related in that they contain configuration information for the same defined printer. Since Novell's print server can support up to 16 printers per PSERVER definition, you can see up to 16 sets of PRINT, QUEUE, and NOTIFY files in a print server directory.
Print services reads the FILESERV and PRINT files from the file server on which you run the PSERVER NLM or VAP. When you run PSERVER.EXE, print services reads the FILESERV and PRINT files from the file server the workstation is logged in to. Print services then reads the QUEUE and NOTIFY files on the file servers it finds in the FILESERV file.
The FILESERV File. The FILESERV file contains the list of all file servers that this print server will service. If you use the command "TYPE FILESERV <Enter<," you'll see a binary listing of the file server names. If the print server is only servicing the default file server, you won't see a FILESERV file. But if at one time you added other file servers and have since deleted them to leave only the default server, this file becomes 0 bytes large.
When you choose the "Print Server Configuration" option from the "Print Server Information" menu in PCONSOLE, you'll see the "File Servers To Be Serviced" option. Selecting this option displays those file servers that PSERVER attaches to when it initially comes up. You can add other file servers by pressing <Ins< and selecting the server you wish to add from the "Available File Servers" list. Be aware that PSERVER takes a user connection slot to make this service attachment, so make sure that you specify only those servers whose queues the print server will actually service.
PRINT.0nnFiles. The PRINT.0nn files contain pertinent information about each printer you defined through PCONSOLE's "Printer Configuration" option. This option is accessed from the "Print Server Information Menu." When you select this option and select a printer number from 0 to 15 (we'll use Printer 1 as an example), you'll come to the "Printer 1 Configuration" window shown in Figure 1.
Figure 1: PCONSOLE displays the configuration options for Printer 1 in the "Printer 1 Configuration" window.
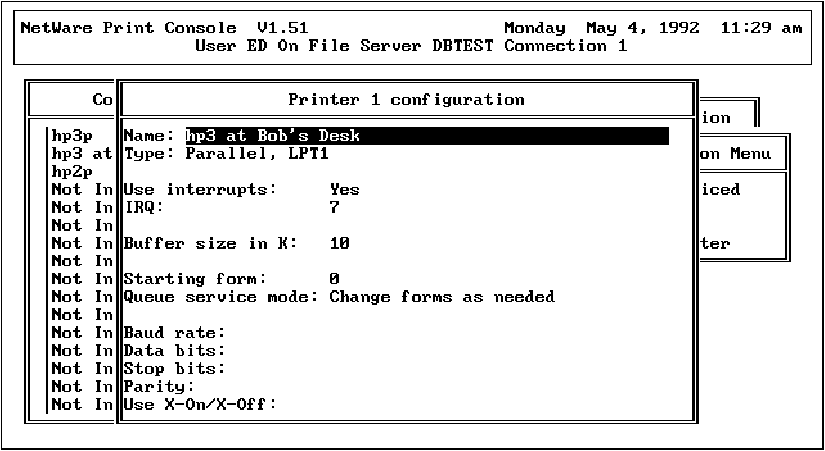
The information you fill out in this window for Printer 1 is stored in the PRINT.001 file. This information includes printer name, type, interrupts, buffer size, starting form, queue service mode, and serial communication parameters for serial printers. Each printer definition you define is saved to a PRINT.0nn file, with the file extension matching the number of the printer created. PRINT.000 is the configuration file for Printer 0, PRINT.001 is for Printer 1, and so forth.
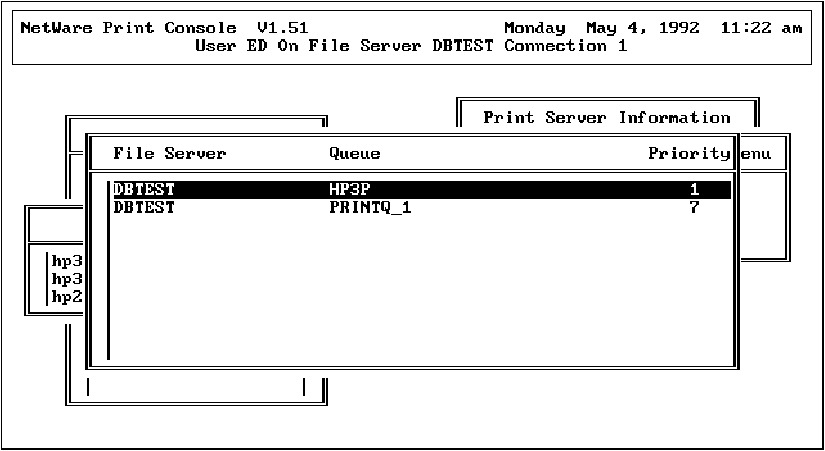
QUEUE.0nnFiles. The QUEUE.0nn files contain information about the print queues that the corresponding printer will service. For example, Printer 1 services the print queues listed in the QUEUE.001 file. The QUEUE.0nn file contains the queue name and the priority at which the queue will be serviced.
You set up print queues under the "Queues Serviced By Printer" option in PCONSOLE's "Print Server Configuration Menu." When you select a printer number and press <Enter<, you see the screen shown in Figure 2, which lists the queues the selected printer is configured to service. At this point, you can add other print queues that are available on the current file server by pressing <Ins<.
Figure 2: PCONSOLE lists the queues that a particular printer is configured to service.
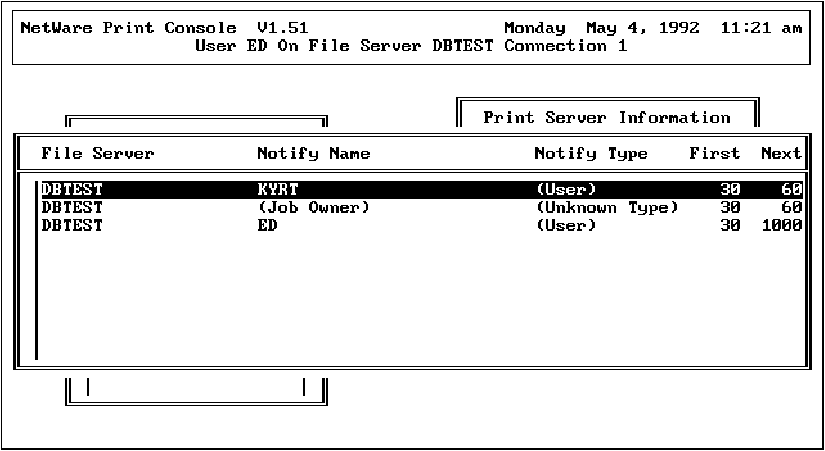
NOTIFY.0nnFiles. The NOTIFY.0nn files contain information on who should be notified when the corresponding printer needs attention. You set up the notify list under PCONSOLE's "Notify List for Printer" option in the "Print Server Configuration Menu." When you select a printer number and press <Enter<, you'll see the Notify window shown in Figure 3. This window contains the file server and user who'll be notified, the bindery type of that user, and how often to notify the user (in seconds).
Figure 3: PCONSOLE's Notify window lists who is to be notified when the printer needs attention.
Changing the Print Server Configuration
Any changes you make to the print server from the "Print Server Configuration Menu" window in PCONSOLE are saved to the FILESERV, PRINT, QUEUE, and NOTIFY files. These changes don't become effective, however, until you bring down the PSERVER and bring it back up again. PSERVER then takes the information found in the files and re-establishes its connections to the serviced file servers, printers, and print queues.
You can also enact temporary changes on print servers that are currently running. In PCONSOLE, select a print server that is running, then select the "Print Server Status/Control" option and make your temporary changes. Because these changes don't affect the print server files, all changes made through this option last only as long as this print server session is running. If you want the changes to be permanent, you must make them through the "Print Server Configuration" option, as described above, so the changes will be written to the configuration files.
PSERVER's Working Dynamics with Printers
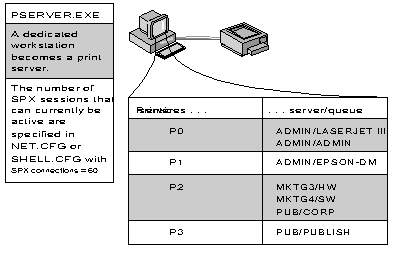
When you load the PSERVER VAP on a NetWare v2.x server, the PSERVER NLM on a NetWare v3.x server, or PSERVER.EXE on a workstation, the PSERVER software goes to its ID directory on the server it is run from (or logged in to, in the case of PSERVER.EXE). PSERVER next reads all the files within that directory and attaches to the file servers found in the FILESERV file. PSERVER then creates a table out of the data in the PRINT, QUEUE, and NOTIFY files, and logically attaches print queues to their designated printers. This process is illustrated in Figure 4.
Figure 4: When PSERVER loads, it uses the data in its ID directory files to configure itself.
When you load PSERVER as a VAP or NLM on a server that has printers attached, PSERVER uses the printer definitions found in its printer table to set up printer communication. PSERVER then begins polling the print queues that each printer services, sending print jobs that are ready to the attached printers.
The print server has a 3-20KB buffer it uses to transfer data to a locally attached printer. The buffer size matches the "Buffer Size In K" setting you set in the "Printer Configuration" option in PCONSOLE. When that buffer is full, the print server enables the printer port by generating an interrupt sequence to see if the printer is ready to receive data.
The print server then sends one byte of data to the printer; if the printer signals that it needs more data, the print server sends the next byte. This process continues until the print job completes. If a parallel printer sends no signal for ten seconds, the print server interprets this to mean the printer is off-line or out of paper.
When the print job completes, the print server disables the interrupt to the printer port. When another print job is ready to print, the print server again enables the interrupt to the printer port and sends a byte of data. This process works the same for printers attached to a dedicated station running PSERVER.EXE.
As a rule of thumb, use PSERVER as an NLM or VAP if you have moderate server workload and only a couple of network printers. Otherwise, move PSERVER to a dedicated workstation running PSERVER.EXE (the print server can be an 8086-, 286-, 386-, or 486-based computer). This frees up the file server from having to deal with the overhead involved in polling printers.
Using RPRINTER
RPRINTER is a terminate-and-stay-resident (TSR) program that allows printers attached to workstations to become network resources. To load the RPRINTER software, go to the workstation with the printer attached and type:
RPRINTER PrintServerName PrinterNumber<Enter<
For example, to load RPRINTER so that the attached printer (defined as Printer 0) can be serviced by print server NEARSIDE, you would type "RPRINTER NEARSIDE 0 <Enter<." To avoid mistyping, it's a good idea to load RPRINTER from the workstation's AUTOEXEC.BAT file.
If the print server servicing the printer is running, it activates the printer definition in its print table, matching the printer number which RPRINTER has registered. PSERVER then sends the information it finds in the corresponding PRINT.0nn file to the RPRINTER station. This information includes LPT or COM port number, buffer size (which both RPRINTER and PSERVER use as their "pass-along" buffer size), printer type, interrupts used, and so forth. Figure 5 illustrates this process.
Figure 5: When RPRINTER loads, PSERVER sends its configuration information from the PRINT file.
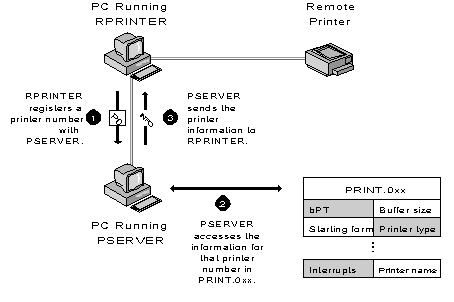
Once this initial dialogue takes place, the exchange depicted in Figure 6 takes place.
Figure 6: PSERVER passes print job data to RPRINTER, which sends it to the remote printer.
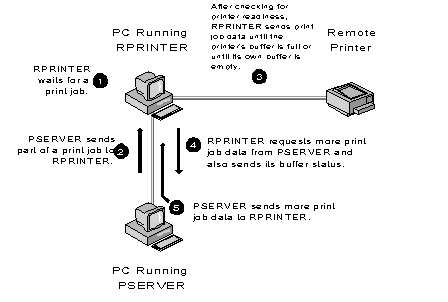
As shown in Figure 6, RPRINTER waits for PSERVER to send a print job from any of the print queues the printer services. When the printer is ready to receive a print job and a job in a polled queue is ready to print, PSERVER fills its "pass-along" buffer with part of the print job. It sends this data to RPRINTER's buffer, which enables the interrupt on the printer port and sends a byte of data to discover if the printer is ready. The printer receives data until its print buffer is full, then it tells RPRINTER to stop sending.
RPRINTER then waits until the printer is ready to receive again. When the printer is ready, it signals RPRINTER and RPRINTER sends its buffered data. When RPRINTER's buffers are empty, it requests more data from PSERVER. Likewise, PSERVER requests more data from the print queue when its buffers are empty. When the print job finishes, RPRINTER disables the interrupt on interrupt to the printer port.
Example 1: From Application to a Server-Attached Printer
To get a clearer understanding of how the whole NetWare printing process works, let's follow a print job on its journey from its creation in an application to its appearance as a final printout at the network printer. This example uses parallel printing.
When you print from within some applications, the application creates a file out of the print job. This file is temporarily stored at the workstation, either in memory or on a local disk. Other applications bypass this step and send the data directly to the printing services. Some applications issue an interrupt 17h to ROM BIOS to request printing services, while others send an interrupt 21h function 05h to DOS, which, in turn, uses interrupt 17h. At this point, the NetWare shell intercepts the Int 17h calls and replaces DOS or ROM BIOS printing services with NetWare's printing services. The print data is thus redirected to a network print queue.
Figure 7: The NetWare shell intercepts DOS Int 17h calls and redirects print jobs over the network to a queue.
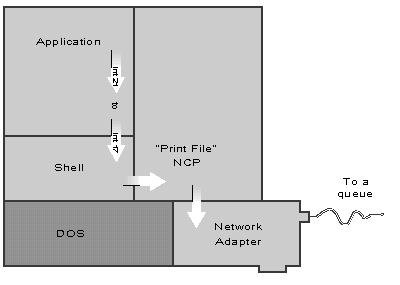
Network-aware applications (such as WordPerfect 5.1 and Quattro Pro 4.0) can direct print jobs directly to a print queue. Since such network-aware applications are still the exception, this example will describe how the NetWare shell redirects print jobs using the NetWare CAPTURE command.
The NetWare shell uses LPT1, LPT2, and LPT3 as logical device names to redirect print jobs from the workstation to the proper print queue, and therefore to the printer servicing the queue. The shell converts the application request for DOS or ROM BIOS printing services to a NetWare print service call. This NCP "create queue job and file" call opens a queue job and gives the job a file handle in the queue directory that stores the file. The shell then dumps the print job to that file handle. Figure 8 illustrates this process.
Figure 8: With CAPTURE in effect, the shell uses the LPT device names to redirect print jobs to the right queue.
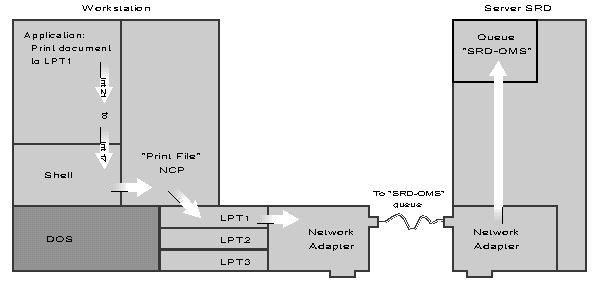
A workstation doesn't need to have physical LPT ports installed for the shell to redirect its print jobs; however, your application must be directed to send print jobs to the port where CAPTURE is active. Otherwise, the shell won't be looking on the right LPT port for print jobs to redirect. The CAPTURE command designates which print queue will collect the print jobs sent to the LPT designation. For example, to redirect print jobs sent to LPT1 to queue SRD-QMS on file server SRD, the command would be
CAPTURE LPT1 S=SRD Q=SRD-QMS <Enter<
You can monitor how print jobs are progressing through print queues in PCONSOLE. Select "Print Queue Information" and choose the queue you want to watch. When the print job data first starts arriving at the queue, its status is shown as "Adding" to the queue. The job is not ready to be printed yet.
When the application finishes sending the print job data, the NetWare shell sends the "close file and start queue job" signal. QMS interprets the signal to mean "this print job is ready to be printed," and the print job is flagged as "Ready." As the print server begins servicing the job, its status changes to "Active." As far as the workstation is concerned, the job is now printed and it can move on to other tasks.
Along with the data, your application supplies information about the print job, such as how it will fit on a page, the fonts it uses, bolds, headers, footers, and so on. On the NetWare side, print services adds other specifications as to how the file should be printed, such as the connection ID of the sender, formatting information, job number, banner page information, form number, and so on. The NetWare information is called the "print job configuration." You can see this configuration information when you highlight a queue entry in PCONSOLE and press <Enter<. The CAPTURE command can also supply this kind of information.
For print queues that have been empty, the print server polls print queues about every 15 seconds to see if there is a job flagged "Ready" for printing. If the print queue has been busy and the print server just finished one of its printing jobs, the print server immediately checks the queue for another job that is ready to print. When the print server picks up the next queued job, it gets the file handle of the file that has the actual data and checks the printer to see if it is ready to receive data by enabling the printer port and sending a byte of data.
For NetWare servers running the core printing services internally for printers attached to the server, the services contain a polling mechanism to check print queues for print jobs, and, when the print job is ready, enabling the printer port and sending a byte of data. When the printer is ready to receive another byte of data, core services sends it.
As the print job finishes, the application usually sends a Top Of Form command through a form feed, in preparation for starting the next print job at the top of the next page. The printer sends a "ready" signal for the next bit of information, and the whole process starts over again.
Example 2: From Application to Workstation Printer
This second example looks at the journey a print job takes from a workstation running a network-aware application to a printer attached to another workstation running RPRINTER.
As described earlier, when RPRINTER becomes active, it requests information about the printer number you specify in the RPRINTER command. PSERVER activates the printer definition for that printer number in its print table and sends the printer information it finds in the corresponding PRINT.0nn file to the RPRINTER station. Once this dialogue takes place, RPRINTER waits for PSERVER to send a print job from any of the print queues that the printer services.
If you define the printer port as "Remote Other/Unknown" in PCONSOLE, you will see a screen that allows you to configure the printer ports at the time you load RPRINTER. Once you configure the printer port, RPRINTER then waits for PSERVER to send a print job.
The journey from application to print queue occurs in much the same way as described in Example 1. However, in this case, CAPTURE is not required since the application is designed to make the "create queue job and file" request directly to NetWare print services. The shell simply sends the print job data over the network to the specified queue.
When the remote printer is ready to receive a print job, PSERVER fills its "pass-along" buffer with a portion of the queued print job's data. PSERVER then sends this data to RPRINTER's similar buffer, from which the data is fed to the printer. The printer receives data until its print buffer is full, then it signals RPRINTER to wait until the printer's buffer is ready to receive again.
When the printer is ready to receive more data, RPRINTER sends its next round of buffered data. As RPRINTER's buffers are depleted, RPRINTER sends a status message to the PSERVER. The status message indicates whether it has free buffers, or whether the printer is on-line or off-line. In the case of free buffers, RPRINTER requests more data from the PSERVER. PSERVER does the same from the print queue when its buffers are empty.
As the print job finishes, the application sends a Top Of Form command through a form feed, thereby preparing to start the next print job at the top of the next page. The printer stands ready for the next delivery of information. RPRINTER conveys this information to the print server and waits for a print job.
Selected Printing Problems and Solutions
You may encounter a few problems when using Novell print services. This section is a list of the more common problems you might see.
Many printing problems can be resolved by updating to the latest print services files. These files are available to the public on NetWire in NOVLIB Library 01 or 06. These files are called PSERVx.ZIP, PUTILx.ZIP, and PRINTx.ZIP. The x in the file names represents a number that increments each time the files are updated. There may be even more recent print service files in the private (NSD) area of NetWire, but these files have not been through software testing and are offered "at your own risk."
Undeleted Print Server Subdirectories
Corrupted print queues or a corrupted print server definition cause many common printing problems, including the print server asking for a password when none are assigned, slow or erratic printing, and RPRINTER errors when sending to or receiving data from the network. You can get rid of these problems by deleting the existing print queues and print server definitions and then recreating the definitions from scratch.
As discussed earlier, NetWare creates a subdirectory for each print server defined in PCONSOLE. The directory name matches the ID number displayed in the "Print Server ID" option under PCONSOLE.
If you are having any unusual problems with your printing services and you have deleted and recreated print server definitions, check for any print server subdirectories under SYS:SYSTEM that don't have corresponding Print Server IDs in PCONSOLE. If you find such a print server subdirectory, delete the files within it, then delete the subdirectory with the DOS RD command. Or you can use the FILER menu utility to delete the files and subdirectories at the same time.
PCONSOLE version 1.51 contains a bug that when you delete a print server, the associated subdirectory is not deleted. To practice good housekeeping, be sure to delete the print server subdirectory if you delete a print server name with this version. You can check your version of PCONSOLE by going to SYS:PUBLIC and typing "VERSION PCONSOLE.EXE <Enter<." You can also bring up PCONSOLE and look at the top-left corner of the initial screen for version information.
RPRINTER Losing Connection
RPRINTER makes an SPX connection to the print server, and this connection is susceptible to variations from network specifications. For example, you can have RPRINTER connection problems from faulty cabling, concentrators, terminators, or network interface boards, defective board drivers, older IPX and NetWare shell versions, and so forth.
Sometimes the presence of a router between the RPRINTER station and the print server can cause problems for RPRINTER. PCONSOLE uses an SPX connection when you run the status/control features under the "Print Server Status/Control" option, which can also have problems when crossing routers.
You can sometimes alleviate these problems by placing certain settings in the SHELL.CFG or NET.CFG file. If the problem stems from RPRINTER timing out of its SPX connection before it receives a response, try the following. Include the following lines in the SHELL.CFG or NET.CFG file:
IPX RETRY COUNT=35 <Enter<
SPX ABORT TIMEOUT=700 <Enter<
The default for IPX Retry is 20 seconds, so the above increase almost doubles the retry count before dropping the connection. For SPX Abort Timeout, the default is 540 ticks, which is roughly 30 seconds. Changing the timeout value to 700 makes it roughly 40 seconds. The benefit of the increased times is that they may keep your connection; the downside is it will take longer to discover connection problems when the connection really is lost.
When you reboot the workstation to re-establish a lost connection, you sometimes get a message telling you RPRINTER's printer is still in use. You see this message when the previous SPX connection hasn't timed out and torn down the session information, which usually takes 20-30 seconds. With the increased SPX Abort and IPX Retry counts, the timeout-before-tear-down sequence is even longer, sometimes up to 45 seconds.
You can build a small batch file routine to accommodate the timeout process of SPX. For example, in a REMOTE.BAT file, type in the following:
@ECHO "RPRINTER is establishing its connection--"
@ECHO "Please wait"
DELAY 45
RPRINTER SRD 5^Z
In this example, RPRINTER waits 45 seconds to ensure that the last SPX connection has timed out. If it hasn't, you'll see a message that another Printer 5 is in use. In this case, try setting the DELAY value to 50. (The DELAY batch file command is not available in some versions of DOS.)
RPRINTER Hanging
Sometimes RPRINTER conflicts with the network interface board settings and hangs the workstation when RPRINTER loads. This kind of problem often stems from the network board drivers. You can often get around this problem by changing the settings on the network interface board, then running WSGEN to match IPX to the new board settings. For workstations using ODI drivers, set the network board and change the NET.CFG file to reflect the new settings.
There is also a problem with RPRINTER and DOS v5.0 hanging the workstation when RPRINTER loads. You can avoid this problem by using RPRINTER v1.22R (PTF 920218), which you can find on NetWire.
Another area to check when RPRINTER hangs is a conflict with another TSR the station is running. When this happens, unload all other non-NetWare TSRs, then load RPRINTER and see if the workstation runs. If it does, start loading the other TSRs one by one until you find the culprit. Then either don't use that TSR anymore or try loading the TSRs in a different order and see if the problem goes away.
PSERVER.EXE Hanging
Sometimes PSERVER.EXE will hang the workstation to the point that you need to turn the computer off and on again to reboot. This particular problem is generally caused by network board driver conflicts or by using older versions of IPX or the NetWare shell. As with RPRINTER, you can also see this problem when there are variations in network specifications or bad hardware. Follow those remedies outlined above.
When PSERVER hangs, you may also see one printer is having problems while the other printers are still functioning properly. Unloading and reloading the print server will usually reset the print server so it can service the printer. If the problem persists, try resetting the network interface board, checking cabling, and using newer versions of IPX drivers.
Running PSERVER.VAP
The current version of the PSERVER.VAP has been stable, but some sites have reported the print server will stop SAPing (advertising its presence on the network) if you use network interface boards drivers that are not certified to run with NetWare v2.2.
The print server will also not SAP if you have an Arcnet topology installed as LAN A and you have no workstations powered on. In this case, turn on one workstation before bringing up the server and loading the PSERVER.VAP, and the problem will go away.
Servers using shadow RAM have caused problems with the print server VAP. If your PSERVER.VAP is having sporadic problems and the file server is using shadow RAM, remove the shadow RAM and try running the VAP.
Another soft spot can be third-party VAPs that conflict with the print server VAP. You usually notice this problem when loading the VAPs and PSERVER won't load or hangs when loading. You may be using a configuration (such as a nondedicated file server running PSERVER) that has not been fully tested by the third-party manufacturer. In these cases, write down the order in which PSERVER and other VAPs are loading and the problems it is causing, then call the vendor as well as Novell about the problem.
Conclusion
When printing works well, it's easy to forget the network aspects of the printing process. But when printing goes awry, it's often hard to pinpoint which part of network printing is the culprit. By understanding the internals of how PSERVER works, you should be better armed to troubleshoot printing problems.
When troubleshooting or maintaining your NetWare printing environment, keep in mind how PCONSOLE creates and stores PSERVER's configuration files, and how PSERVER uses the files to create the network printing environment in the first place. Also keep in mind how PSERVER works in relation to RPRINTER and remote network printers.
* Originally published in Novell AppNotes
Disclaimer
The origin of this information may be internal or external to Novell. While Novell makes all reasonable efforts to verify this information, Novell does not make explicit or implied claims to its validity.