Getting Started in NLM Development
Articles and Tips: article
Technical Consultant
Systems Engineering Division
01 Oct 1991
For those who have decided to make the leap into NetWare Loadable Module (NLM) development, this AppNote tells how to get started. It helps you determine what hardware and software you need and how to configure your NLM development environment. It introduces various NLM development tools and gives an example of how to compile your first NLM.
- You, Too, Can Write NLMs
- What Hardware Will I Need?
- Configuring Your Test File Server
- NLM Development Tools
- Hello Universe NLM
You, Too, Can Write NLMs
Maybe your company has a software product that is pushing the processing limits of a single PC, and you would like to see if distributing your application across a network will eliminate the processor bottleneck. Perhaps you are an in-house software developer for an established NetWare network, and have an idea for an application that will make your network easier to administer. Or maybe you have a couple PCs in your basement, and dream of riding the client-server wave to fame and fortune.
Whatever your situation, the fact that you have read past the first paragraph of this AppNote says that you are thinking about writing an NLM. This AppNote will help you get from that initial thought to your first compiled NLM.
What Hardware Will I Need?
Your exact hardware needs depend upon the nature of the NLM you are developing. At some points in the development cycle, you will want to test your NLM in network configurations that approximate conditions your NLM will be used in after release. You should, however, be able to do most development with just one or two PCs. Three development network configurations are described below.
Configuration 1: One Workstation/Server on a Network
Although this is typically not an ideal development environment, you can develop most NLMs on a single 386/486-based PC attached to a network, using the machine as both a workstation and a NetWare v3.x file server. To set up a development workstation/server using this configuration you will need:
A 386 or 486-based PC
At least 4MB RAM
A NetWare disk partition of at least 20MB
A floppy drive or DOS hard disk partition
Enough disk space, either on a network server or on the development workstation's DOS partition, for all development tools, source code, and object code
A network interface card and cables to connect the workstation to the network
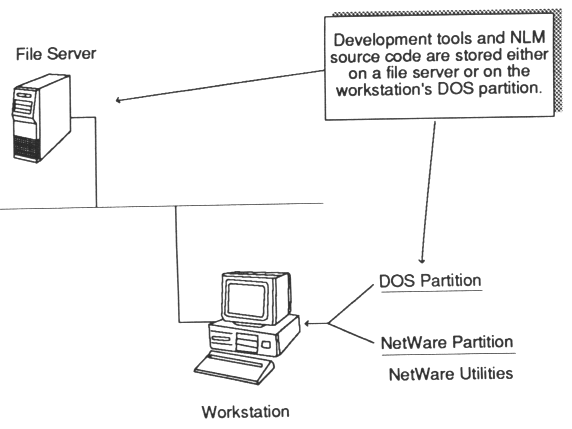
A one workstation/server development environment is diagrammed in Figure 1.
Figure 1: A one workstation/server NLM development environment.

Using this configuration, you edit and compile your NLM on the development workstation, then (if your development tools are on a network file server) copy the compiled NLM code to a disk from which it can be loaded after you bring up NetWare -either a floppy disk or the workstation's DOS partition. Then load NetWare on the development workstation, and load and test your NLM.
The disadvantage to a one-PC configuration is that once you bring up NetWare, you do not have a workstation. You cannot log into your development file server to test client-oriented features of your NLM, or to debug your NLM remotely (using Watcom's WVIDEO debugger). Still, for many NLMs, this configuration is adequate. And even for NLMs that require a client workstation for complete testing, a one-PC development environment can be used while developing the NLM's console interface.
Configuration 2: A Two-PC Mini-network
Two 386/486-based PCs should be considered the minimum for most NLM development. To set up a development network using this configuration you will need:
Two 386 or 486-based PCs
At least 4MB RAM for each computer
A "large" hard disk in one computer (large enough to hold all your development tools and code)
Two network interface cards and cables to connect the two computers
There are two ways to operate a two-PC network: the two-workstation approach, and the server-workstation approach.
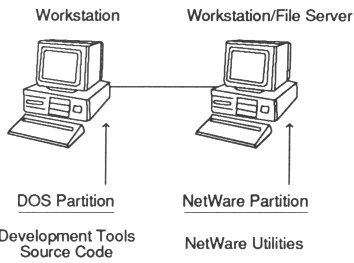
A two workstation development environment is diagrammed in Figure 2.
Figure 2: A two workstation NLM development environment.

Under the two-workstation approach, one machine (usually the one with the larger hard disk) holds all development tools and code, and is the main development workstation. The other machine, which must have enough hard disk space for a NetWare partition (at least 20MB), is a workstation/server. You can use it as a second workstation while you are editing, compiling, and linking your NLM on the main development workstation. When the NLM is ready to test, load NetWare on the workstation/ server machine, log into the server from your main development workstation, copy the NLM to the server's SYS:SYSTEM directory, then load and test the NLM.
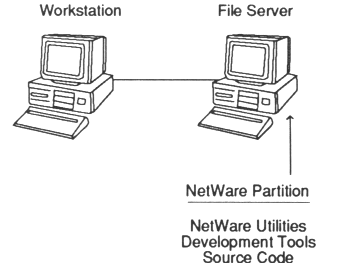
A server-workstation development environment is diagrammed in Figure 3.
Figure 3: A server-workstation NLM development environment.

Under the server-workstation approach, the machine with the larger hard disk is a dedicated NetWare server. The other machine, which might not have a hard disk at all, is the development workstation. When your NLM is ready to test, copy the NLM to SYS:SYSTEM, then load and test it on the file server.
Each of these two approaches has its own advantages. With the two-workstation approach, all your development tools are on the workstation. When your NLM crashes your file server, you can continue working on the workstation while the file server is coming back up. Hardware requirements are more modest with the server-workstation approach, since the workstation does not have to have a hard disk.
A third variant of the two-PC development network is available for those with very limited hardware resources. You still need a 386-based machine with at least 4MB RAM and a large hard disk. Part of the hard disk on this machine is set aside as a NetWare partition. You edit, compile, and link your NLM on this machine, then load NetWare and load the NLM from the machine's DOS partition. The second computer acts simply as a workstation that can log into the file server when testing client-oriented features of the NLM (such as adding jobs to a queue serviced by the NLM). The advantage to this approach is that the second workstation can be a 8086- or 80286-based computer with or without a hard disk.
All three variants of the two-PC development network have the advantage of being isolated. If you are developing an NLM for your company's NetWare network, a separate development network allows you to work without adding to the traffic or otherwise affecting your company's production network.
Configuration 3: A Test Server and Workstation on a Network
Perhaps the best NLM development environment, overall, uses a workstation and dedicated NetWare file server, attached to a larger network. This configuration is the two-workstation variant of the two-PC development network, attached to another network. In addition to the existing network, hardware requirements for this configuration are the basically same as for the two-PC configuration:
Two 386 or 486-based PCs
At least 4MB RAM for each computer
Two network interface cards and cables to connect the two computers
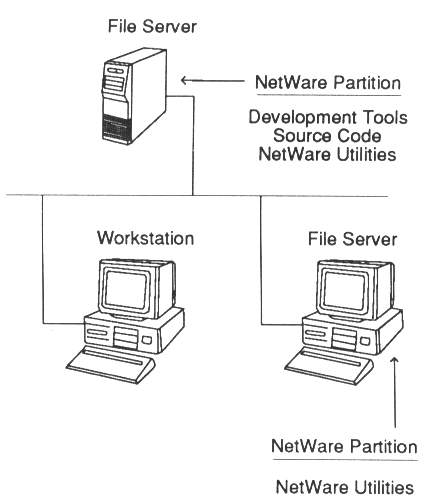
The difference is that the workstation/server machine is not required to have a large hard disk, since all development tools are kept on a separate file server. The workstation/server machine need only have enough hard disk space for a small NetWare partition. A test server and workstation development environment is diagrammed in Figure 4.
Figure 4: A test server and workstation NLM development environment.

Two development workstations are available during editing, compiling, and linking, both with access to all resources on the network. When you have compiled your NLM, load NetWare on the workstation/server machine, map a search drive from the development workstation to the test server's SYS:SYSTEM directory, copy the NLM to the test server, then load and test the NLM.
If (or when) your NLM crashes the test server, the development workstation retains its connection to the file server where your development tools and source code are stored. You can therefore continue working uninterrupted while you reboot the test server.
This configuration is best when one or more NLMs are being developed by a group of software engineers. Source code and development tools are stored on a main file server where all developers have access. Each developer can compile and link the shared version of the NLM source code, then load and test the compiled NLM on a test file server without affecting developers on other parts of the network.
Configuring Your Test File Server
A default NetWare v3.x installation is configured for a "typical" network environment. When you are developing NLMs, you might need to make some adjustments to the default installation. These adjustments include disabling the Transaction Tracking System (TTS) and changing file server parameters from their default settings.
Disabling Transaction Tracking
If your NLM maintains a database on the file server, you should disable TTS during testing. This forces your NLM to handle locking and unlocking of all records, and enables you to see if your NLM correctly handles calls to TTS even when it is disabled. The only disadvantage is that if the file server goes down during a transaction, the file server will not be able to "back out" the incomplete transaction when the file server is brought up again. Disable TTS by running FCONSOLE and selecting the "Status" option in the main menu.
Setting File Server Parameters
NetWare v3.x has a number of parameters that can be set to configure the operating system for various environments. On your test file server, you may want to change the settings of some of these parameters, particularly those that send additional warning messages to the file server console.
To change a file server parameter from its default value, you can execute the SET command at the file server console, or enter a SET command in the file server's AUTOEXEC.NCF file. Some parameters can also be set in the file server's STARTUP.NCF file. Documentation for the SET command and all the file server parameters is given in the NetWare System Administration manual.
Some of the parameters you should be aware of are given below, along with default settings, recommended settings on NLM test file servers, and brief explanations of each parameter.
Display Relinquish Control Alerts When ON, causes the operating system to display a message on the file server console when an NLM does not relinquish control of the CPU within 0.4 seconds. This parameter can also be set in the STARTUP.NCF file.
Default Setting: OFF Recommended Setting: ON
Pseudo Preemption Time. This parameter is available on NetWare v3.11, and indicates the amount of time (in 0.84 microsecond increments) to allow an NLM process to run before forcing it to relinquish control. It is called pseudo preemption because the preemption occurs only at the next file read or write call, and only if the NLM was linked with WLINK's PSEUDOPREEMPTION linker option. The range of values supported by this parameter is 1,000 to 10,000. If the release version of your NLM relies on pseudo preemption, a recommended setting for this parameter should be given in the NLM's documentation.
Default Setting: 2000 Recommended Setting: 2000
Display Old API Names. When ON, causes the operating system to display a message on the file server console when an NLM is loaded that calls APIs for a previous version of NetWare. This parameter should be set ON if you are upgrading an NLM to a newer version of NetWare. This parameter can also be set in the STARTUP.NCF file.
Default Setting: OFF Recommended Setting: ON
Console Display Watchdog Logouts. NetWare's watchdog verifies which workstation connections are active. If a workstation does not send a file server request within a specified period of time, the watchdog sends a packet to the workstation shell, asking it to send a reply if it is still active. If the file server does not receive a reply, the watchdog sends a number of retries at specified intervals. If the workstation still does not reply, the file server disables the connection to the workstation. The delay before the first watchdog packet is sent, the delay between watchdog packets, and the number of watchdog packets sent can all be specified by setting file server parameters.
If your NLM communicates with a client program, you should set this parameter to ON and allow the client program to sit idle for more than 20 minutes (assuming the default watchdog parameter settings). This verifies that the client program does not interfere with the workstation shell in replying to watchdog packets.
Default Setting: OFF Recommended Setting: ON
Auto Register Memory Above 16 Megabytes. When ON, this parameter causes the file server to automatically register memory above 16MB in EISA computers. This parameter must be set OFF if the file server has a network or disk board that uses on-line DMA or AT bus mastering. These boards use 24-bit addressing, and can only address 16MB. They will address low memory, instead of the assigned high memory, and will corrupt low memory in use by the operating system.
You should test your NLM on machines with less that 16MB RAM, and on machines with more than 16MB RAM and this parameter set ON, to ensure that the NLM runs correctly regardless of the amount of available memory. This parameter must be set in the STARTUP.NCF file.
Default Setting: ON Recommended Setting: Test with both ON and OFF
NLM Development Tools
Currently, there are two ways to develop NLMs:
Write the NLM in assembly language and assemble it with an assembler (such as Phar Lap Software's 386ASM assembler) that produces 32-bit protected-mode object code. This method is typically used for LAN and disk driver NLMs.
Write the NLM in C (or a combination of C and assembly language), and compile and link it using the tools in the NLM software development kit (SDK) from Novell.
Novell and Watcom have worked together to produce software development toolkits for NLMs. The original SDK was called the C Network Compiler/386. The latest version is the NetWork C for NLMs Software Developer's Kit. Both kits contain compilers, linkers, function libraries, and other tools for creating NLMs. Most of the components of the SDKs are much like tools you have worked with in other C language development systems, with three major differences:
The compiler produces 32-bit protected-mode object code that uses a flat memory model.
The linker produces NLM format executable files (rather than DOS EXE format files).
The function library, in addition to the standard malloc and printf you are familiar with, includes several hundred functions that allow you to access network resources.
The compiler's code generation is transparent. The function library is too huge to discuss here, but is documented in two large volumes in the SDK. That leaves the linkers, which are discussed below.
NLM Linkers
The C Network Compiler/386 shipped with a linker developed by Novell called NLMLINK. For the Network C for NLMs SDK, Watcom modified its linker, WLINK, to produce NLM format executable files. NLMLINK also ships with NetWork C for NLMs, for backward compatibility. The two linkers have many command-line options, summarized in the table below.
Figure 5: Linker options.
|
NLMLINKOption
|
WLINKOption
|
Description
|
|
DEBUG |
DEBUG |
Specifies thetypes of debugging information to put inthe executable file |
|
EXPORT |
EXPORT |
Indicates whichsymbols are made available for import byother NLMs |
|
INPUT |
FILE |
Specifies objectfiles and library modules the linker is touse as input |
|
TYPE and DESCRIPTION |
FORMAT |
Specifies theformat of the executable file (NLM, LAN,DSK, or NAM) |
|
IMPORT |
IMPORT |
Specifies symbol(s)that are defined externally in other NLMs |
|
LIBRARY |
Gives the nameof a function library to be linked |
|
|
MODULE |
MODULE |
Specifies anNLM that is required to be loaded beforethe NLM being linked |
|
OUTPUT |
NAME |
Indicates thename of the executable file the linker isto create |
|
OPTION CASEEXACT |
Sets case sensitivemode for resolving references to global symbols |
|
|
CHECK |
OPTION CHECK |
Specifies thename of a procedure to execute before theNLM is unloaded |
|
OPTION COPYRIGHT |
Specify copyrightstring to be displayed when the NLM is loaded |
|
|
CUSTOM |
OPTION CUSTOM |
Specifies thename of a data file that is to be linkedwith the executable, then passed to the NLMas arguments |
|
OPTION DOSSEG |
Specifies theorder in which segments are to be linked |
|
|
EXIT |
OPTION EXIT |
Specifies thename of the function to be executed whenthe NLM terminates |
|
FULLMAP |
OPTION MAP |
Tells the linkerto generate a map file and optionally specifiesthe name of the map file |
|
MULTIPLE |
OPTION MULTILOAD |
Indicates thatthe NLM can be loaded more than once |
|
OPTION NAMELEN |
Specifies thenumber of characters that must uniquely identifya symbol (default is 39) |
|
|
OPTION NODEFAULTLIBS |
Instructs thelinker to ignore default libraries |
|
|
OPTION PSEUDOPREEMPTION |
Indicates thatthe NetWare operating system is to forcethe NLM to relinquish control of the CPUif it does not do so after the time specifiedby the operating system's Pseudo PreemptionTime parameter |
|
|
OPTION QUIET |
Suppressesinformational messages |
|
|
REENTRANT |
OPTION REENTRANT |
Indicates thatthe NLM is written to be reentrant, so ifthe module is loaded more than once, thecode in the server's memory is reexecuted |
|
SCREENNAME |
OPTION SCREENNAME |
Specifies thename of the NLM's first screen |
|
STACK and STACKSIZE |
OPTION STACK |
Specifies thesize of the stack to be allocated for theNLM (default is 8192 bytes) |
|
START |
OPTION START |
Specifies thename of the procedure to execute first (defaultis _Prelude) |
|
SYNCHRONIZE |
OPTION SYNCHRONIZE |
Causes theload process, when the NLM is loaded, tosleep until the NLM calls SynchronizeStart(prevents other console commands from beingexecuted while the NLM is loading) |
|
THREADNAME |
OPTION THREADNAME |
Specifies thebase name to be used for the NLM's thread(s) |
|
OPTION UNDEFSOK |
Tells the linkerto generate an executable file, even if thereare undefined symbols |
|
|
VERBOSE |
OPTION VERBOSE |
Causes thelinker to include in the map file all segmentsit defines and their sizes |
|
OPTION VERSION |
Specifies theversion number of the NLM, which is displayedwhen the NLM is loaded |
|
|
PATH |
Specifies directoriesto be searched for object files in subsequentFILE directives |
Fortunately, linker options can be kept in a file, so they do not have to be typed on the command line every time an NLM is linked. Probably the most convenient way to handle linker options is to have a make file create the linker option file.
Make Files
Watcom's make utility, WMAKE, is both powerful and complex. Until you become familiar with all the make file syntax rules, you should use a make file that works in your development environment, and is easily modified for each NLM you write. A sample make file is provided with the Hello Universe NLM below. You can modify the make file for any NLM with one source code file, just by changing the macro definitions at the beginning of the file. For NLMs with more than one source code file, add lines at the end of the file that define the dependence of each object file on the corresponding source file.
Hello Universe NLM
A heretofore unwritten law of software development says that the first program written in a new development environment is Hello World. While it is possible to write an NLM that just printfs "Hello, world" to the NLM's screen, you might want to consider using Hello Universe as your gentle introduction to NLM programming. Hello Universe sends a greeting to every workstation connected to the file server on which it is loaded.
The HELLOU.C source code follows:
#include <stdio.h>

#include <nwconn.h>

#include <nwbindry.h>

#include <nwmsg.h>

#define MAX_BINDERY_OBJ_NAME_LEN    48

main()

{

int maxStations;

char    message[] = "Hello, universe";

WORD    i;

int ccode;

char    objectName[MAX_BINDERY_OBJ_NAME_LEN];

WORD    objectType;

maxStations = GetMaximumNumberOfStations();

for (i=1; i<=maxStations; i++) {<
    ccode = GetConnectionInformation(i, objectName, &objectType,&
                                        (long *)NULL, (BYTE)NULL);

    if (ccode)

        printf("Unable to get user name for connection %u\n", i);

    else if (objectType == OT_USER) {

        printf("Sending howdy to %s at connection %d\n", objectName, i);

        SendBroadcastMessage(message, &i, (BYTE *)NULL, 1);&
    }

}

}
The make file for Hello Universe is given below. Notice that the make file creates the linker option file for you. The OPTION lines of the linker option file are not required, but are included to show how these options are used.
# Commands to execute before making any target

# Set environment variables for compiler

.BEFORE

@set inc386=f:\nwcnlms\h

@set wcg386=f:\nwcnlms\bin\386wcgl.exe

#################################################################

# Macro definitions

NLMNAME = hellou

DESCRIPTION = Hello Universe (network hello)

VERSION = 0.10

COPYRIGHT = (c) Copyright 1991, Novell, Inc.

SCREENNAME = Hello Universe

CLIBIMP = f:\nwcnlms\imp\clib.imp

OBJFILE = $NLMNAME.obj

PRELUDE = f:\nwcnlms\imp\oprelude.obj

COMPILE = wcc386p /zq /d2 /3s

LINK = wlink

DESTDIR = f:\system

#################################################################

# All .obj files implicitly depend on .c files

.c.obj:

@echo Compiling $[*.c

@$COMPILE $[*.c

# If .obj or .lnk files are modified, link new .nlm and copy to dest dir

$NLMNAME.nlm : $OBJFILE $NLMNAME.lnk

@$LINK @$NLMNAME

@echo Copying $[*.nlm to $DESTDIR

@copy $NLMNAME.nlm $DESTDIR

# If makefile is modified, create new linker option file

$NLMNAME.lnk : makefile

@echo FORMAT NOVELL NLM '$DESCRIPTION'     >$NLMNAME.lnk>
@echo OPTION THREADNAME '$NLMNAME'        >>$NLMNAME.lnk>
@echo DEBUG ALL                          >>$NLMNAME.lnk>
@echo FILE $OBJFILE                     >>$NLMNAME.lnk>
@echo FILE $PRELUDE                     >>$NLMNAME.lnk>
@echo OPTION MAP                          >>$NLMNAME.lnk>
@echo OPTION VERSION=$VERSION             >>$NLMNAME.lnk>
@echo OPTION COPYRIGHT '$COPYRIGHT'       >>$NLMNAME.lnk>
@echo NAME $NLMNAME                     >>$NLMNAME.lnk>
@echo MODULE clib                         >>$NLMNAME.lnk>
@echo OPTION SCREENNAME '$SCREENNAME'     >>$NLMNAME.lnk>
@echo IMPORT @$CLIBIMP                    >>$NLMNAME.lnk>
# If .c file is modified, compile new .obj

$NLMNAME.obj : $NLMNAME.c
* Originally published in Novell AppNotes
Disclaimer
The origin of this information may be internal or external to Novell. While Novell makes all reasonable efforts to verify this information, Novell does not make explicit or implied claims to its validity.