On a Roll
Articles and Tips: article
Michael Wilkinson
01 Mar 2005
Novell Open Enterprise Server is a significant change agent to bring about IT utopia: complete and comprehensive management of all network resources. With a common directory (eDirectory), common administration interface (iManager), common network services, and common management agents (ZENworks), all network resources--whether they are running on NetWare or Linux--are part of a centrally and holistically managed network. Now that's cool, and no one with any IT savvy will argue the fact that simplified and streamlined is better. Novell Open Enterprise Server is the first major product to enable consolidation and normalization of network services across multiple platforms. It's network nirvana.
But for seekers of simplification, the major question is, "How do I get there from here?" "Here" being most likely a state of heterogeneity--several operating systems or network platforms, mixed file systems, multiple directories and printers scattered throughout. It's a good question and one with a not-so-simple answer if your network services are extensive.
This article will help you plot a path for planning, configuring and deploying Novell Open Enterprise Server, and in the process, migrate, consolidate and simplify your network for easier management and big cost savings. It's not a simple process, especially if your network has evolved organically with changes in technology or organizational mergers and acquisitions. But the tools are available and processes are in place for bringing disparate systems and outdated versions to the point where you have a state-of-the-art network with management and administration tools that are comprehensive and powerful, yet simple.
Topics covered here include new deployment, in-place upgrades, migration and consolidation with tools and services such as Open Enterprise Server Install, YaST, Migration Wizard, Server Consolidation Utility, and Server Consolidation and Migration Utility. Each of these methods and utilities have application, depending on your existing and proposed environments. Of particular interest to many managers is the ability to migrate/consolidate from a Windows environment to Novell Open Enterprise Server with the advantages of easier management, better scalability and higher reliability and security.
Strategy Overview
Let's start with an overview of the different possible options for deploying or migrating to Novell Open Enterprise Server. Table 1 summarizes the standard options that are available. As you can see, solutions are available to accommodate getting from previous versions of NetWare as well as old or even current versions of Windows to Open Enterprise Server running on NetWare or Linux.
Table 1
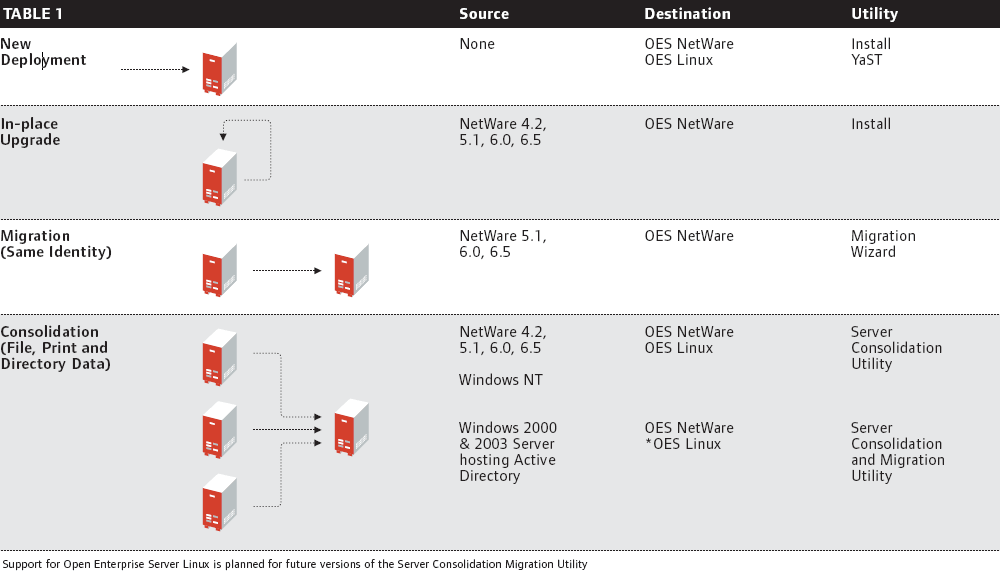
As Table 2 shows, if you're starting from scratch with a new machine or an old machine with a purged hard drive, you'll do a new deployment. If you're working with an existing machine and need to retain the data and the machine identity, you'll perform an in-place upgrade. If you're moving from an old machine to a new one with newer version software, you'll be migrating. And if you're combining file, print and directory data from multiple machines to a single machine, you'll be consolidating.
Table 2
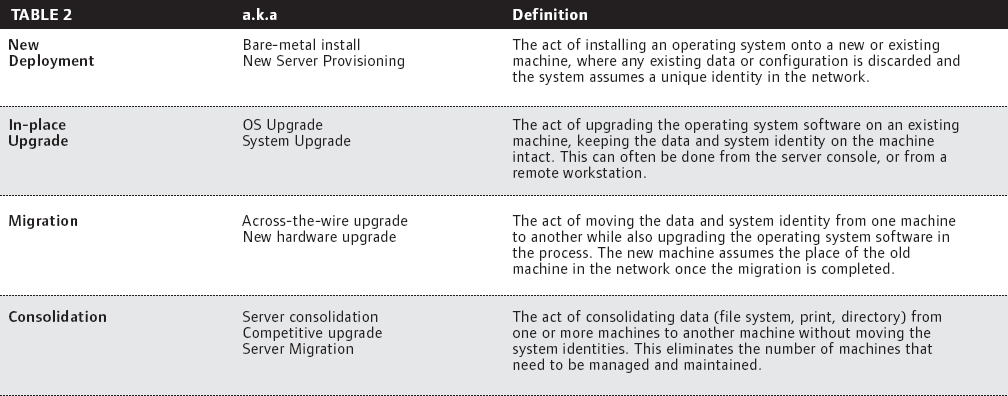
The collection of utilities available for deployment and migration can be more simply categorized by looking at the functions of each and determining under what circumstances each would be used. For new deployments of Novell Open Enterprise Server NetWare or in-place upgrades of NetWare, the Open Enterprise Server Install utility is best. For new deployments or upgrades of Novell Open Enterprise Server Linux, YaST (Yet another Setup Tool) is appropriate. If migrating earlier versions of NetWare to a different machine running Open Enterprise Server NetWare while keeping all data and the machine identity intact, use the Migration Wizard. If you're consolidating earlier versions of NetWare and/or Windows NT from multiple machines to a single machine, the Server Consolidation Utility is best. And if consolidating Windows 2000/2003 with Active Directory, the Server Consolidation and Migration Utility is appropriate. Note the commonality in these last two utility names and be sure to use to the correct one for the task at hand. (For more information on version compatibility of the Migration Wizard versions 6.5 and 8.0, and the availability of these utilities see Open Enterprise Server NetWare Migration.)
The benefits of deployment, migration and consolidation can be significant. As mentioned, management can be streamlined and simplified and administration costs lowered. Novell Open Enterprise Server enables administrators to consolidate storage with larger volumes, storage area networks (SANS) and greater numbers of files so that file management is simplified and made more reliable. Managing user access and identity is simplified through eDirectory, even if multiple operating system platforms are used. And the entire network becomes more secure, flexible and scalable with the ability to create failover solutions, clusters and physically separate mirrored services.
To understand the methods and benefits of deployment, migration and consolidation alternatives, let's take a detailed look at each option, noting the steps involved and the prerequisites.
New Deployments of Novell Open Enterprise Server NetWare
If you're familiar, comfortable and satisfied with NetWare and want to continue without OS changes, the best option is to deploy Open Enterprise Server NetWare to new, bare-metal machines. To do this, use the Open Enterprise Server NetWare Install utility. This utility makes the installation simple, intuitive and fast. It includes the following pre-configured install patterns for quick, function-specific installs:
Customized Novell NetWare Server
Basic Novell NetWare File Server
Pre-Migration Server
DNS/DHCP Server
Novell eXtend J2EE Web Application Server
LDAP Server
Novell NetWare AMP (Apache, MySQL, PHP and Perl) Server
Novell NetWare Backup Server
QuickFinder Server
Network Attached Storage (NAS) Server
Novell iPrint Server
Novell Nterprise Branch Office -- Central Office Server
Apache/Tomcat Server
Novell Nsure Audit Starter Pack Server
iSCSI SAN Storage Server
Management Server
Novell iFolder Storage Services
Novell Virtual Office Server
You can install any combination of the available patterns in the previous list. When you run the install, a summary page will appear which shows your selections and the disk space required for each. After installing the core files, specific pattern pages will appear requesting configuration information for those patterns that require further input.
Novell Open Enterprise Server NetWare allows you to install a new server from CD or from the network. The Open Enterprise Server NetWare install process starts from a DOS partition. To install Open Enterprise Server NetWare from a CD, make sure that the DOS config.sys file contains the FILE=50 and BUFFERS=30 commands. Also make sure that the config.sys and autoexec.bat files load the CD-ROM drivers. The logical name in the driver configuration for your CD-ROM cannot be CDDVD.
If installing Novell Open Enterprise Server NetWare from the network, you must first install a DOS network client such as the Novell Client for DOS and Windows 3.1 or the IP Server Connection Utility software. These are on the Novell Clients Software CD.
Complete the Open Enterprise Server NetWare install by following the prompts and providing the requested information. Drivers for LAN, disk, keyboard and mouse are auto-discovered and loaded. For complete details on installation, refer to the online documentation.
Installing to a New or Existing Directory Tree
Installation of Novell Open Enterprise Server NetWare will require different steps depending on whether the server will be the first server in an eDirectory tree or will be inserted into an existing tree. For a new tree, answer the questions asked on the install screen, providing identification and IP address information as requested.
If the newly deployed server is to be inserted into an existing tree, the following conditions must be met:
Novell eDirectory must be at version 8 or later.
All servers in the tree must be running
Novell NetWare 4.11 or later.
All of the latest support packs for existing
NetWare 4 and 5 servers must be applied.
Running PKIdiag and SDIdiag is recommended to ensure that security keys and certificates for eDirectory and for servers being upgraded are valid and working.
Before installing Novell Open Enterprise Server, it is necessary to prepare the network by running the NetWare Deployment Manager utility. This utility can be found on the root of the Open Enterprise Server NetWare CD labeled NetWare 6.5 SP3 CD 1 (Operating System) and is called nwdeploy.exe. This utility performs required steps including extending the schema for eDirectory, updating the certificate authority objects, preparing for Universal Password, preparing your Open Enterprise Server to handle Microsoft and Apple networking protocols (CIFS/AFP) and verification of NICI keys.
Other optional, but highly recommended, preparation steps include backing up server and directory data, and GUID (globally unique identifier) generation for NetWare 4.11 and 4.2 servers.
If the Open Enterprise NetWare server is not the first in the eDirectory tree, it is possible for subcontainer administrators to perform the installation as long as they have appropriate rights including the following:
Supervisor rights to the container where the server will be installed
Read rights to the Security container object for the eDirectory tree
Read rights to the NDSPKI:Private Key Attribute on the Organizational CA object, which is located in the Security container
Supervisor rights to the W0 object located inside the KAP object in the Security container
If you plan on deploying multiple servers, you may want to consider using a response file. A response file includes all the input information required to set up a new server and can be used to automate the process in conjunction with NetWare Deployment Manager. Response files can be used over and over (with minor changes), and can help to minimize user input error and speed up deployment.
New Deployments of Novell Open Enterprise Server Linux
Deploying Open Enterprise Server Linux is a two-stage process. The SUSE LINUX Enterprise Server kernel and operating services (the OS for Novell Open Enterprise Server Linux) are installed first and then the Open Enterprise Server networking services are added. Complete installation steps for SUSE LINUX can be found at online or in the 2004 May/June issue of Novell Connection magazine.
Next, we'll highlight important things to know about Novell Open Enterprise Server Linux deployment.
First, Open Enterprise Server is only available on SUSE LINUX Enterprise Server 9 or later. SUSE LINUX Enterprise Server 9 is the only platform that can receive patches and updates through the Novell Red Carpet/ZENworks update channel. The update channel, if connected to the Internet, enables the ability to get live updates for new packages and patches, keeping the server current with the latest developments.
To install SUSE LINUX Enterprise Server 9, start the install script (from the network or CD) and follow the prompts for information, noting the following issues.
When asked to select an authentication method (local or LDAP), select "local." Selecting LDAP will install OpenLDAP which is incompatible with Open Enterprise Server Linux.
Open Enterprise Server Linux requires that a static IP address is used rather than one obtained through DHCP; the default is to use DHCP and must be manually changed.
When asked for the hostname, do not enter a full DNS name. Open Enterprise Server will not install correctly with domain information in the name.
Plan your partitions in advance. The /boot, /swap and / partitions will be identified by default. If you want to create the /var, /opt, and /usr partitions (which are normally a part of the / partition, if not created) make sure that you create them with a minimum of 350 MB, 250 MB and 310 MB respectively. Create the / partition last, allocating the rest of the unused disk space to it.
When installing Novell Open Enterprise Server network services, you will be presented with two installation options: express and custom. The express option requires minimal input. Use it to create a brand new directory tree with a new server object. To install Open Enterprise Server Linux into an existing directory tree, select the custom installation option.
You can also perform an unattended installation which uses a response file rather than manual input. You can download a response file template for either the express or custom install options online. All parameters must be properly specified, including passwords, or the unattended installation will fail.
Server Patterns
During the Novell Open Enterprise Server Linux installation, you can choose from several pre-configured server patterns. Choosing a specific pattern only installs the components required to enable features for that pattern's functionality. The six Open Enterprise Server Linux pattern options are listed below. The Custom pattern option allows you to select from a list of all of the Open Enterprise Server Linux network services components.
Custom
Novell iFolder2
Novell iFolder3
Quick Finder Server
Novell Virtual Office
Novell iPrint
Depending on the service components installed, there may be additional post-installation tasks required before services are completely configured. Details for each component are found in the Novell Open Enterprise Server Planning and Implementation Guide.
Once SUSE LINUX Enterprise Server 9 has been installed, the network services included with Open Enterprise Server are installed. This process is similar to installing other Linux packages and can be initiated manually or using the Open Enterprise Server Linux Install CD. Services installed at this point include identity management, file, print, messaging and management.
In-place Upgrade
If you have an existing server and just want to bring it current with the latest version, an in-place upgrade is your best option. It's kind of like remodeling your house while living in it. There may be some inconvenience and the changes may be anywhere from minor to major but everything remains intact through the process.
Open Enterprise Server NetWare In-Place Upgrade
The Open Enterprise Server NetWare upgrade process is similar to installing a new server. Deployment Manager must be run to prepare the network. Each of the earlier versions of NetWare must be updated to the following support packs before beginning the upgrade:
NetWare 4.2 Support Pack 9 (Down Server Upgrade)
NetWare 5.1 Support Pack 6
NetWare 6.0 Support Pack 3
NetWare 6.5 Support Packs 1, 2 and 3
As with NetWare 4.2, a Down Server Upgrade means that the upgrade process is started from DOS. Normally, the upgrade process is initiated from the server console, or run remotely from iManager or Deployment Manager. This is necessary for NetWare 4.2 with Support Pack 9 and for any other server that may fail the Health Check. A Health Check is performed after starting the installation utility to determine if a server can be upgraded. There are three possible outcomes of the Health Check: Success, Warning and Failure. A summary page will display if there is a warning or failure during the process.
Again, before the upgrade process is started, it is highly recommended that all of the server files be backed up, including the files that reside on the DOS partition. After backing up the files, log off any users that may be connected to the server and unload any unnecessary applications or services on the server (e.g., virus scanning software, backup software). It may also be necessary to update some applications to work in a Novell Open Enterprise Server environment. For example, ZENworks for Servers 2 needs to be upgraded to ZENworks for Servers 3 prior to upgrading to Open Enterprise Server. Finally, verify that the DOS partition is valid. If the DOS partition is not large enough (200 MB), the server cannot be upgraded.
During the Open Enterprise Server NetWare upgrade, the following activities occur:
The operating system files are updated.
The eDirectory files are updated.
Any NetWare products or components that were installed are upgraded.
Additional products such as GroupWise and ZENworks are not upgraded.
If the server was running the Netscape Enterprise Web Server, it will be migrated to the Apache 2 Web Server (along with its configuration) and the Netscape server will then be removed.
As part of the install process, you have the option of adding new Novell products and services. During the upgrade, the Install Pattern page is displayed and new selections can be made at this point. Following the prompts and inputting requested information guides you through the process which is similar to a new deployment.
Open Enterprise Server NetWare Migration
A basic migration consists of moving the contents and identity of one server to another while upgrading the operating system in the process. It may be a good time to upgrade the hardware as well. To further the house analogy, instead of remodeling, you're moving to a new house and keeping your old stuff.
Migration requires a combination of the standard installation utility for Open Enterprise Server NetWare and the Novell NetWare Migration Wizard 8.0. The Novell NetWare Migration Wizard lets you copy file system data and the NDS/eDirectory database from the old NetWare server to a new one. The NetWare Migration Wizard is a Windows-based program that runs on a workstation and helps transfer the data and identity of one server to another. The NetWare Migration Wizard allows you to model your migration project using simple drag-and-drop procedures before you actually perform the migration. Modeling helps to eliminate problems before they occur and fix errors during the migration.
If you are migrating a NetWare 4.x server, you must use the Migration Wizard v6.5 which will migrate to any version of NetWare after 5.x. If you are migrating a NetWare 5.x or greater server, you should use the Migration Wizard v8.0 that ships with Open Enterprise Server. Note that the Migration Wizard only migrates NetWare servers to NetWare servers. (For more information about migrating NetWare servers to Open Enterprise Server Linux, see Server Consolidation and Migration Utility.)
There are five basic steps in migrating an existing NetWare server to Open Enterprise Server NetWare:
Prepare the Source Server
To prepare the source server for migration, shut down any applications, products or services before running the Migration Wizard. Verify the health of eDirectory by loading DSRepair on the source server and running the following three options: Unattended Full Repair, Time Synchronization and Report Synchronization Status. If any errors are found while running DSRepair, resolve them before attempting the migration. Finally, back up eDirectory and all data on the server, and remove any unwanted applications or data from the server.
Install a New Pre-migration Server
Once the source server has been prepared for the migration, create the destination server by installing Open Enterprise Server NetWare using the standard install procedure and selecting the Pre-Migration Server pattern option. The Pre-Migration Server pattern only installs the minimal files necessary to accomplish the migration. This pattern will install the server into a temporary eDirectory tree. After the installation is complete, modify the sys:\etc\hosts file on the Pre-Migration Server by adding the IP Address and server name of the source server. This is necessary so the migration software can communicate correctly during the migration process.
Model the Migration
Before you can model the migration you will need to install the NetWare Migration Wizard software on a Windows workstation. You must be logged into the network with supervisor rights to the source and destination servers. Turn off all screen savers and power management software to avoid interruptions during the migration. The NetWare Migration Wizard and Server Consolidation Utility software is on the Products CD in the Migration_Utilities directory. You can also download it online.
From the Migration Wizard interface, choose Create a New Project to browse and locate the source and destination servers. Create a Project File allows you to model different migration scenarios. You can drag and drop existing volumes and directory structures from one window to the other (which preserves your data layout), or you can move and organize data any way you want. (See Figure 1.) The software will prompt you if there are duplicate directory conflicts and provide options on how to resolve the conflicts. At any time, you can save your project file, leave the NetWare Migration Wizard and return to it later.
Figure 1
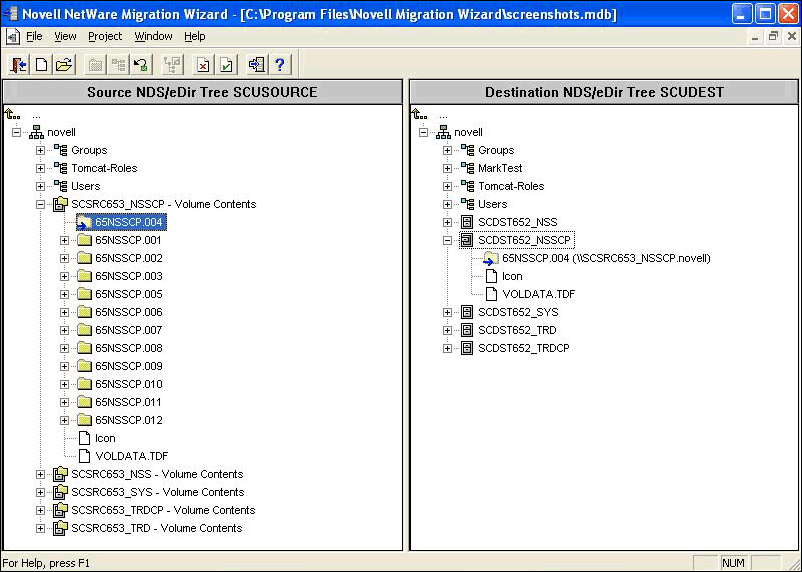
Once you have modeled your migration project, perform a virtual migration to verify it. A virtual migration detects issues such as insufficient rights, disk space limitations and name spaces that are not loaded. Resolve any issues that come up during this verification process before beginning the real migration.
Perform the Migration
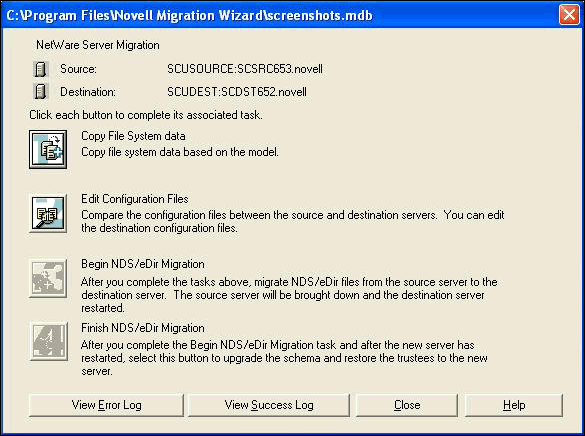
Once all issues have been resolved, click the Copy File System Data button to begin the migration. (See Figure 2.) During the migration you will see several verification screens, disable login options and file filter selections. If you have reorganized your data into new directories or onto new volumes, you will be asked to verify the source and destination directories. You will also have the option to disable user login to prevent new user access during migration. If users are still connected, broadcast a logout message, and then manually disconnect any that remain.
Figure 2
As the migration proceeds, you are given two options for file synchronization and file comparison. File synchronization allows you to remove files on the destination server that don't exist on the source server. For example, if you have copied the major portion of the data during the week and you are now refreshing the file copy on the weekend, select this option so the files that the users have deleted in their home directories (or elsewhere), won't reappear when they log back in on Monday. You can also compare the files based on file attributes (e.g., name, date, size) or do a full binary comparison (byte-by-byte) of each file. The binary comparison provides the greatest assurance that the source and destination files are exactly the same, but it requires more time.
The Migration Wizard allows you to set up criteria for copying files. For example, if a file hasn't been accessed for a specified period of time, the criteria can direct Migration Wizard to not copy it. Files can also be filtered based on extensions, for example, .MP3.
The last two steps to complete the migration are to edit the configuration files and to migrate NDS/eDirectory. Editing the configuration files consists of using a side-by-side editor in the Migration Wizard to modify the .ncf or .cfg files that need to be synchronized between servers. Cut and paste from the source window to the destination window to move the appropriate load statements and parameters. In particular, change the IP address of the new server to match that of the old server. Once you have edited all of the applicable .ncf and .cfg files, click the Begin the NDS/eDirectory Migration button.
Once the data is migrated, the source will be brought down and the destination server rebooted. When the destination server comes back up, it will have the identity of the source server. At this point, reboot the Migration Wizard workstation to clear any network connections and log in to the new destination server. Start the NetWare Migration Wizard and click on Open Last Project. This will verify that the destination server has assumed the new identity and will allow you to complete the migration.
The Finish NDS/eDirectory Migration step of the eDirectory migration upgrades the schema and restores the trustees to the server. Select this option and complete the last couple of dialog screens to conclude the migration. Run DSRepair to verify that the new server's time is synchronized with the others on the network and that there are no further errors.
Install Server Applications
The Migration Wizard does not migrate applications that were installed on the source server. These applications will need to be reinstalled on the new Open Enterprise Server, either as part of the NetWare Install Pattern process or manually, once the data and eDirectory migration is complete.
Consolidation
Consolidation is where Novell Open Enterprise Server hits a deployment/migration home run. Open Enterprise Server helps IT organizations simplify their networks by reducing the number of servers and systems that need to be managed. Standardizing on Open Enterprise Server Linux for example, will enable an organization to have a consistent operating system for all application and network services. Open Enterprise Server Linux or Open Enterprise Server NetWare will allow consolidation of network file and print services, accommodating more users per server, larger volumes of data, more files and providing better backup, storage management and identity management capabilities. Consolidation allows you to merge data and services from multiple machines to a single machine.
Consolidation can be from multiple versions of NetWare and Windows to either flavor of Open Enterprise Server: NetWare and/or Linux. So there are two different utilities that can help you make the move: The Server Consolidation Utility 4.0, which ships with Open Enterprise Server, facilitates migration from NetWare and Windows NT to Open Enterprise Server NetWare and Open Enterprise Server Linux. (See Figure 3.) The Server Consolidation and Migration Utility 1.0 will facilitate moving Windows 2000/2003 and Active Directory content to Open Enterprise Server Linux or Open Enterprise Server NetWare.
Figure 3
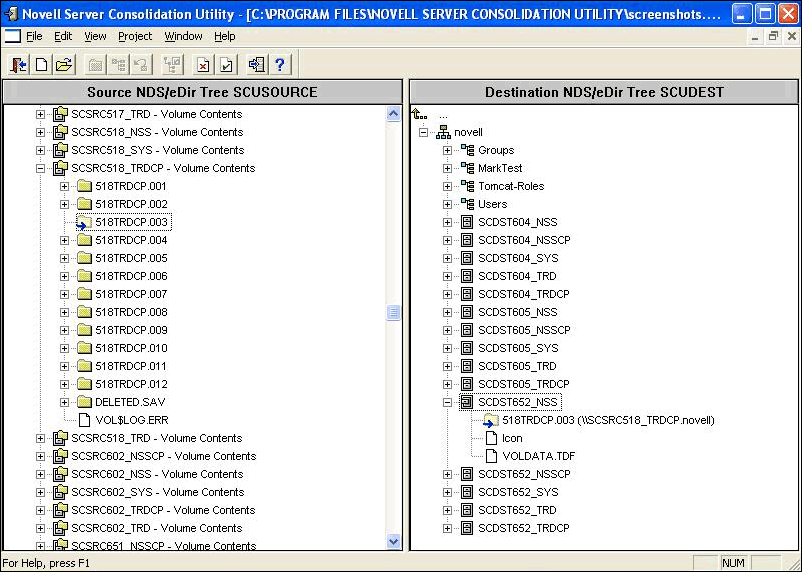
This latter utility will be available for download at a later date after the initial shipment of Open Enterprise Server. Clicking the "Check for updates" button in the Server Consolidation Utility will launch your browser and automatically take you to the Web site where you will be able to download the new utility when it becomes available. (For more information on this utility, see Server Consolidation and Migration Utility.)
Server Consolidation Utility
The Novell NetWare Server Consolidation Utility is a file- and print- consolidation utility for moving data from any number of NetWare volumes (or directories on volumes), or from Windows NT 4 domains, to Novell Open Enterprise Server. Data consolidation types include file system data (both NetWare and NT), NT 4 Domain users and NetWare printers. The Server Consolidation Utility has many similar features to the Migration Wizard. The major difference is that a migrated server (using the Migration Wizard) assumes the name and function of the existing server, while a consolidated server (using the Server Consolidation Utility) aggregates file and print data from multiple sources to a new machine with a new unique network name and function. Using the Server Consolidation Utility, you can:
Copy Data from NT 4.0 Domains to Open Enterprise Server
Schedule projects and run them completely unattended (See Figure 4.)
Filter and exclude options for the files being consolidated
Add users to eDirectory if they don't already exist
Perform a post-copy compare of file data to check the integrity of the copy
Check for sufficient disk space on the destination server before performing the copy
Disable login during copy
Specify default server and home directory for newly created users
Copy an expanded list of user rights and trustees when creating new users
Figure 4
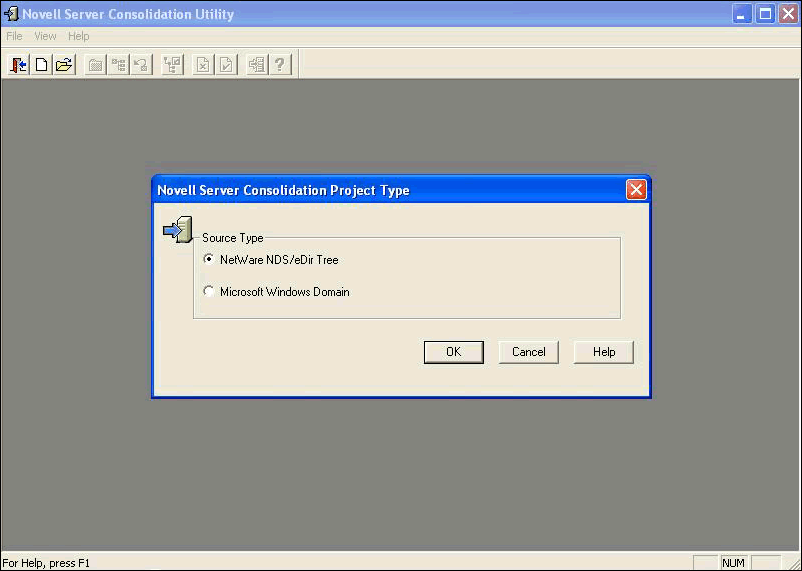
The specific set of data sources that can be consolidated to Open Enterprise Server are:
Windows NT 4
NetWare 4.2
NetWare 5.1
NetWare 6.X
Data can be consolidated from these sources to either Open Enterprise Server NetWare or Open Enterprise Server Linux because eDirectory, Novell Storage Services and Novell iPrint run seamlessly on both platforms.
The Server Consolidation Utility also provides the capability to consolidate NDPS printer agents from one NDPS Manager to another NDPS manager in the same eDirectory tree on NetWare. When using the Server Consolidation Utility to consolidate printer information, be aware of the following configuration issues: While file data can be consolidated from servers in one directory tree to another, printer agents cannot.
Print Queues are not moved when the printer agents are moved. If the print queues existed on the source server, and that server is being retired or redeployed as something else, the printer agent configuration will have to be modified to point to new print queues.
The printer agents will continue to use the same Print Broker. If the Print Broker was running on the source server, and that server is being retired or redeployed, the print agent configuration will have to be modified to use a different Print Broker.
Server Consolidation and Migration Utility
If you need to migrate data from Windows 2000 or Windows 2003, including Active Directory information, then you'll need to use the new Server Consolidation and Migration Utility that will be available online after Open Enterprise Server ships. The new Server Consolidation and Migration Utility will replace the Server Consolidation Utility and the Migration Wizard. It will facilitate the otherwise complex process of planning and executing cross-platform migrations and provide a competitive migration solution for Win2000/2003 systems and Active directory. The initial release of the Server Consolidation and Migration Utility will only support consolidating from NetWare to Open Enterprise Server, but a future version will eventually contain all consolidation services for NetWare and Windows (NT, 2000, 2003) plus more, included in one package. The Server Consolidation and Migration Utility will let you copy Active Directory users and groups, along with NTFS files and folders to Novell eDirectory and to Novell Storage Services files and folders.
The Server Consolidation and Migration Utility will function similar to the Server Consolidation Utility letting you model your consolidation project using simple drag-and-drop procedures before you actually perform the consolidation. This helps to minimize errors and disruption during the actual migration. The major difference between the Server Consolidation Utility and the Server Consolidation and Migration Utility is that the latter is being written in C#/.net which will facilitate moving the utility to Mono and Linux in the future, making it fully functional across Windows, NetWare and Linux platforms.
To consolidate servers, follow the same steps outlined above to prepare the new server, model and verify the migration, transfer users and data and then install any additional applications.
Summary
So there you have it--all the tools necessary to bring your network services and applications together for centralized management on Linux, NetWare or both platforms. The deployment and migration options available with Novell Open Enterprise Server allow you to update older versions of NetWare and/or Windows and consolidate them to fewer machines running either Linux or NetWare.
Moving to Novell Open Enterprise Server lets you comprehensively manage all your network resources. Novell eDirectory becomes the only identity management solution you'll need to use. Novell iManager lets you manage servers, applications, services, users, devices and more from a single interface. Novell ZENworks lets you manage all servers, Linux or NetWare, providing software distribution, inventorying and patch management. All of this, combined with the fact that Open Enterprise Server lets you do more with less due to performance and scalability features, provides IT organizations major motivations for upgrading.
Novell install, migration and consolidation utilities get you to Novell Open Enterprise Server quickly and easily moving volumes, directories, files, printers and users with all the associated information intact. Migration and consolidation is safe and intuitive with intuitive graphical interfaces and the ability to model and verify moves before they physically occur.
Windows NT 4 Consolidation Considerations
There are many reasons to consolidate data from Windows NT 4 to Open Enterprise Server, including aging hardware or the stability and security of NT. Whatever the reason, here are several questions that you will need to consider as part of the transition.
What do I do with the applications running on the NT Server? Server Consolidation Utility 3.0 does not migrate applications. After migrating the data, you will have to install comparable applications that run on Linux or NetWare if available. If Linux applications are not available, you may need to retain the application server with user access and file storage being handled by Novell Open Enterprise Server. Which NT users and groups will I migrate, and where will I put them? NT domains are usually machine-specific. With Novell Open Enterprise Server, you have the option of organizing users by function, physical location, group membership or other classifications. Thinking through how and where users/groups will be organized is necessary to avoid duplicate directory entries and simplify management. Which users and groups have access to what files and directories? In order to maintain file access and security, you should group users and file data migrations into the same projects. That way, users have immediate access to the files they need to get their jobs done.
* Originally published in Novell Connection Magazine
Disclaimer
The origin of this information may be internal or external to Novell. While Novell makes all reasonable efforts to verify this information, Novell does not make explicit or implied claims to its validity.