Forms and files auto-responder in GroupWise
Articles and Tips: tip
01 Dec 2003
Many organizations have forms or files that need to be dispersed to employees, clients or the public upon request. This is often done manually. In other words, someone receives a request e-mail and manually replies and attaches the requested form or file. You would save time if you let GroupWise complete this task automatically.
You want GroupWise to automatically send forms or files to anyone that requests them via e-mail.
Once again, the Rules feature comes to the rescue. In Part 1, we'll look at the requesting side of the solution; in Part 2, you will create the rule that does the work for you in GroupWise.
Part 1
To request the form, someone sends you an e-mail with a subject that GroupWise can easily recognize so the rule can do its job--reply with an attached form or file. An easy way to do this is to create a link on a Web page (Internet or Intranet, depending on who needs to receive the form or file) that an individual can click to initiate the request. The following link opens the user's default e-mail client (which means the request will be coming from their e-mail address) and embeds the subject of the message whenever someone clicks the link.
mailto:forms@yourdomain.com?Subject=Requesting Form 1
Let's break it down for further explanation:
instructs the Web browser to open a new message using the default e-mail client software.
is the address where the message will be sent. Replace this address with the one you want to use in your organization. This is the account for which you will be setting up the rule in Part 2.
embeds the subject in the email.
is what GroupWise will recognize and use to trigger the rule to reply with the form or file.
Part 2
Use the same GroupWise account that was used in Part 1 to take the following steps:
From the menu bar click Tools then choose Rules and then click the New... button.
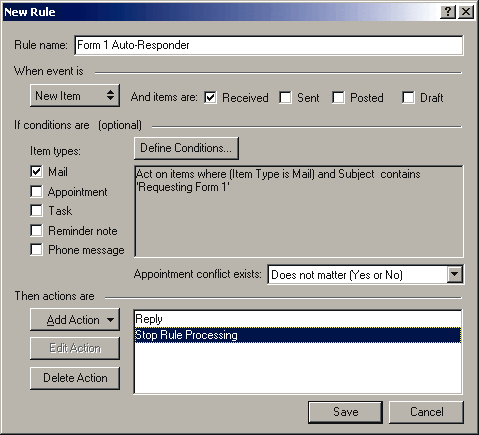
Name your rule (e.g., Form 1 Auto-Responder).
Under When event is, choose New Item and make sure that there is a checkmark in Received.
Under If conditions are place a checkmark in Mail and click on Define Conditions.
Now choose Subject in the first drop box and = Matches in the delimiter box.
Type in the following text box exactly what is in the mailto link after ?Subject= (in the example, it was Requesting Form 1 and click OK.
Click on Add Action then Reply... and then click OK.
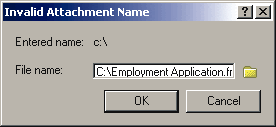
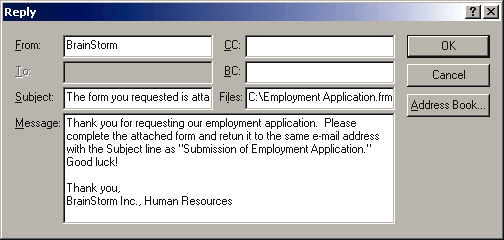
In the Files: field, type the path to where the form or file is saved. (Hint: If you don't trust yourself to get the path correct, just type any letter in the field click OK and GroupWise will prompt you to Browse to select the file. See Figure 2.)
In the Message: field, type any message that you would like the recipient to receive along with the attached form or file and click OK. (See Figure 3.)
10. If in Step 8, you typed the complete path to the form or file correctly, skip to Step 12, otherwise, click the folder icon at the right of the File name: field.
11. Browse to the form or file and click Open and then click OK.
12. Optional -- You can tell GroupWise to stop processing rules by clicking Add Action and then Stop Rule Processing. (See Figure 4.) This stops it from running through the rest of the rules in the account.
13. Click Save and then Close.
Figure 2

Figure 3

To test your new rule and link, from a different GroupWise account, go to the Web page where the link is embedded and click it. Your default e-mail client should open a blank e-mail that is already properly addressed and with the subject line already populated. Now send the message. When GroupWise receives the email, it recognizes the subject and automatically responds with the proper form or file attached.
Figure 4

Typically, if you have one form or file to send, you probably have many more. It's very useful to list each of the forms or files that you have available to the same group of people on a single Web page, making this the one place where all forms or files are easily accessible to all users. Yes, you can make all the forms and files available directly on the Web site, but the advantage of using this method is you can track who has requested and received each form or file by viewing the sent items in the GroupWise account that is handling the auto-response.
Following is a perfect example of how to incorporate this functionality in your own helpdesk organization. The majority of your time is spent resolving common issues amongst your end users. You and your staff manually field most of these common problems, but many could be resolved by the end users if they had the proper information. Consider setting up some GroupWise rules to autorespond to your end users' common queries and automatically attaching appropriate diagrams or information. In addition, you can type text in the message box that can explain steps to resolve their problem.
* Originally published in Novell Connection Magazine
Disclaimer
The origin of this information may be internal or external to Novell. While Novell makes all reasonable efforts to verify this information, Novell does not make explicit or implied claims to its validity.